You are in our US store • Switch to Europe store

Backpack Name Tags

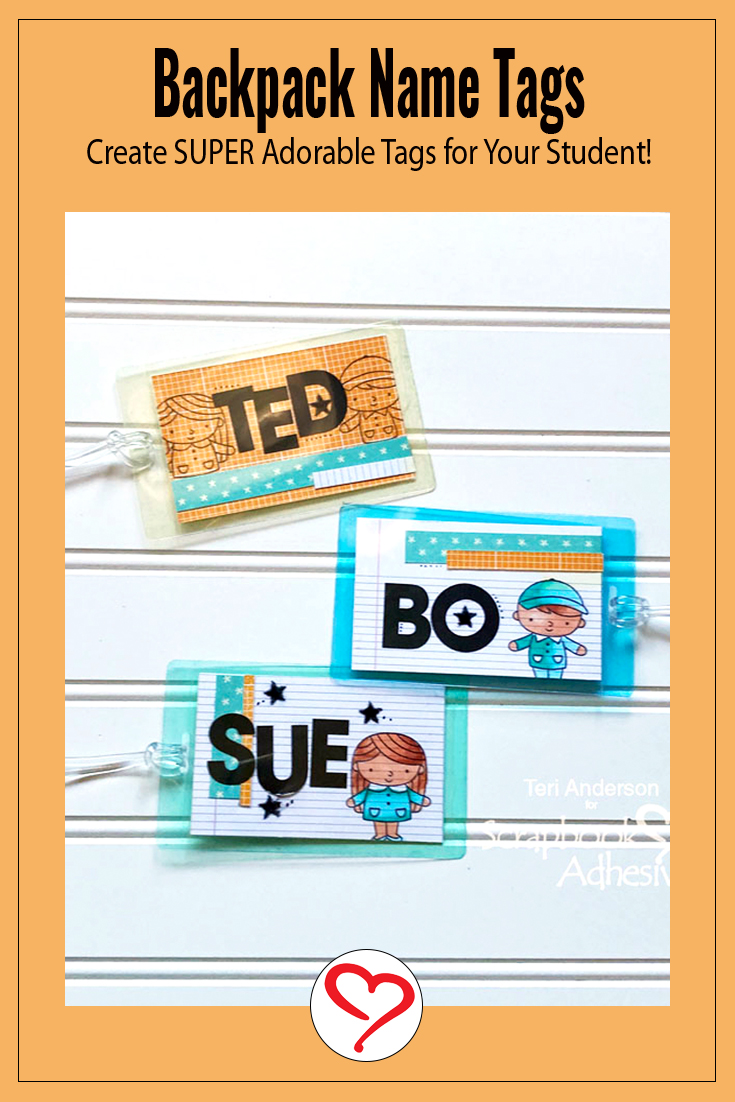
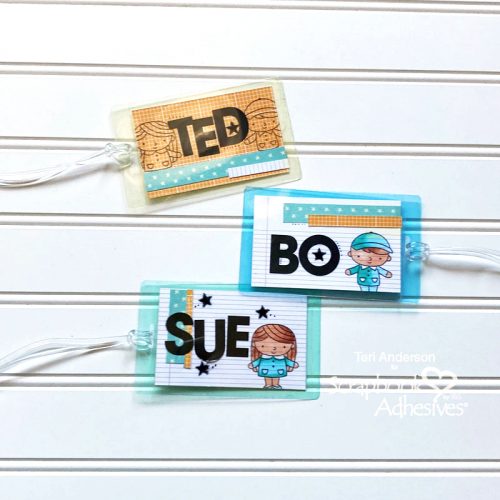
Hi, everyone! Got kiddos heading back to school? Teri here, and here’s a fun idea for you! I created some backpack name tags for an adorable way to personalized and accent their backpacks!

Backpack Name Tags by Teri Anderson for Scrapbook Adhesives by 3L

They are so easy and so fun to create! And the best part is you can customize the tags, just for them!

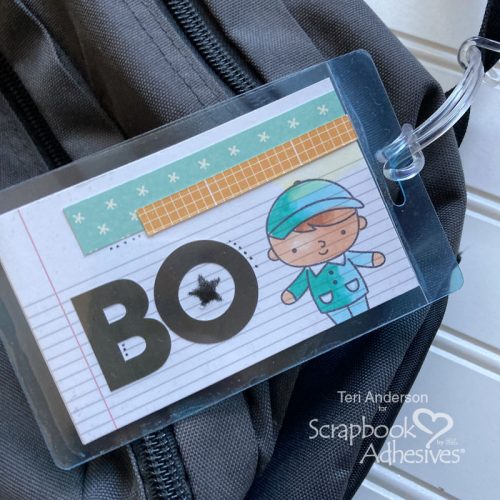
Backpack Name Tag for Bo

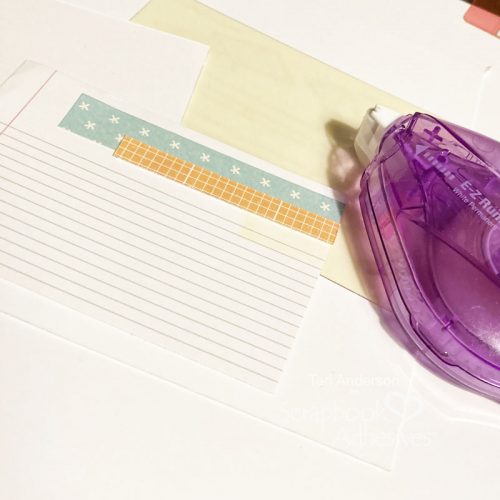
Start by cutting a panel of cardstock to fit inside a self-laminating tag’s pouch. Decorate the panel with patterned paper.

Backpack Name Tags by Teri Anderson for Scrapbook Adhesives by 3L

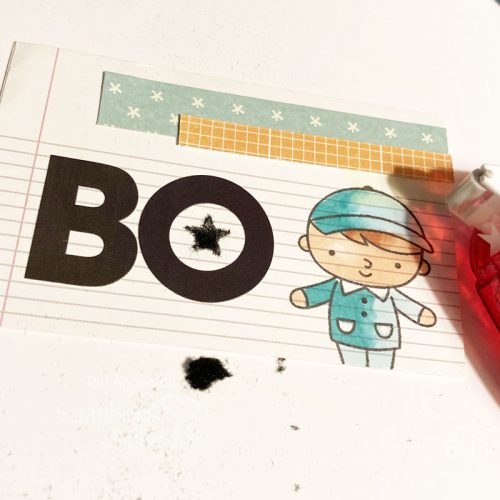
Stamp an image on the panel. Color it in with markers. Use letter stickers (or letter stamps…. or your own handwriting) to spell out your student’s name! Add an adhesive star and cover it with flock or glitter. Complete the panel by drawing a few lines or dots on it with a pen.

Backpack Name Tags by Teri Anderson for Scrapbook Adhesives by 3L

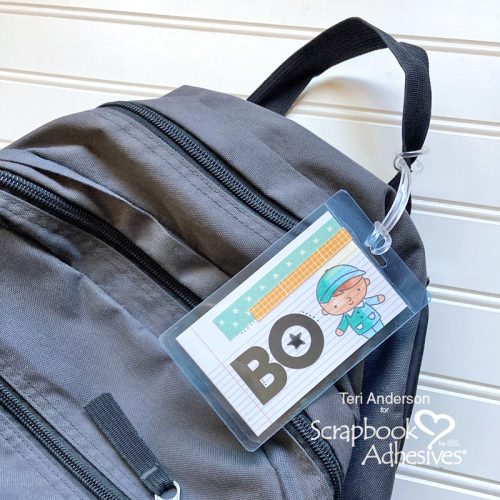
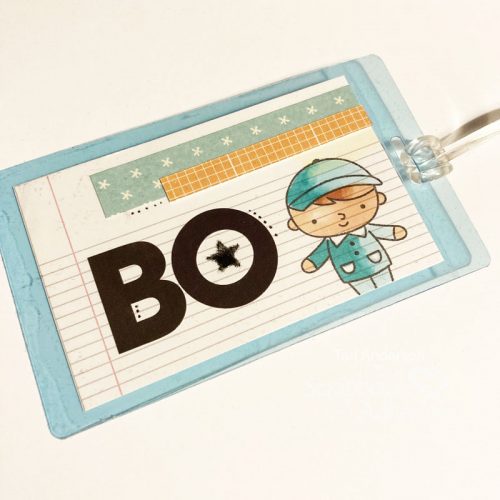
Place the panel in the tag’s pouch and seal it up! Add the loop to the panel and hang it on your student’s backpack.

Backpack Name Tags by Teri Anderson for Scrapbook Adhesives by 3L

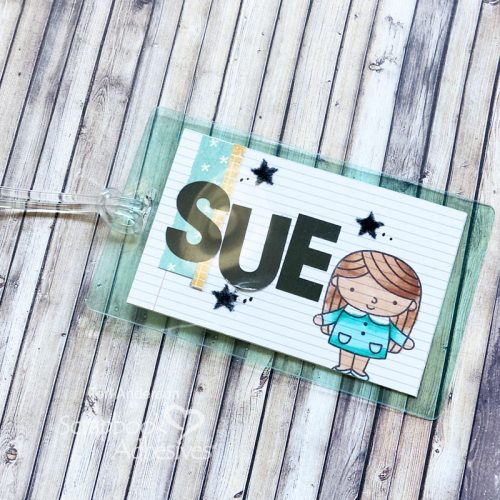
Backpack Name Tag for Sue

While this tag was made for a boy, it’s easy to switch up your design and make a backpack name tag for girl. Change your color scheme or use different stamped images. In this case, I just stamped a girl rather than a boy for it.

Backpack Name Tags by Teri Anderson for Scrapbook Adhesives by 3L

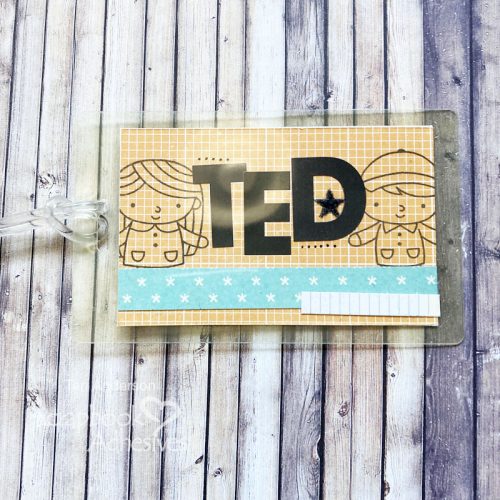
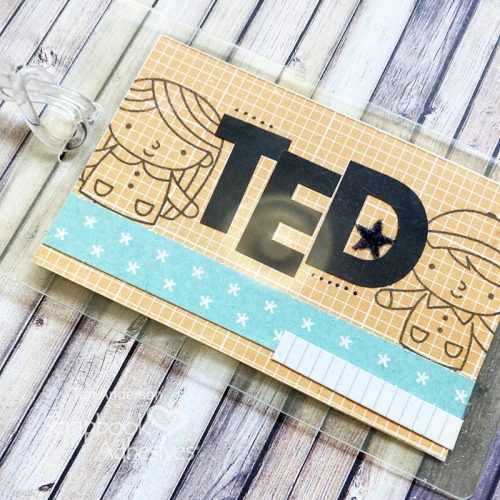
One for Ted with a Simple Design

When making your name tags, don’t feel you have to color in your stamped images! Coloring can be stressful and time-consuming! Instead you can also change up your design by simply stamping images on bright patterned papers, just like I did here.

Backpack Name Tags by Teri Anderson for Scrapbook Adhesives by 3L

So easy and so fun! The colorful background papers make the images pop!

I hope you are inspired to make a few backpack name tags for the students in your life! Thanks for stopping by today!

Happy creating!
Teri Anderson

Creative Time: 45 Minutes
Skill Level: Beginner

Materials Needed
Scrapbook Adhesives by 3L®

HomeHobby™ by 3L

  • Self-Laminating Tags with Loops

Other
White Cardstock: Neenah Paper; Patterned Papers: American Crafts and Elle’s Studio; Stamps: Pretty Pink Posh (Friends Forever Stamp Set); Letters Stickers: Fancy Pants Designs; Black Ink Pad: Ranger Ink; Markers: Copic; Flock: Stampendous!; Black Pen: American Crafts

Save it to Pinterest!

Backpack Name Tags by Teri Anderson for Scrapbook Adhesives by 3L Pinterest

Visit our Website and Blog!
Sign up for our Newsletter so you never miss a contest or giveaway!

instagram purple icon facebook icon purple pinterest purple icon twitter purple icon YouTube icon blog subscription purple icon

Six Feet Away Dimensional Card

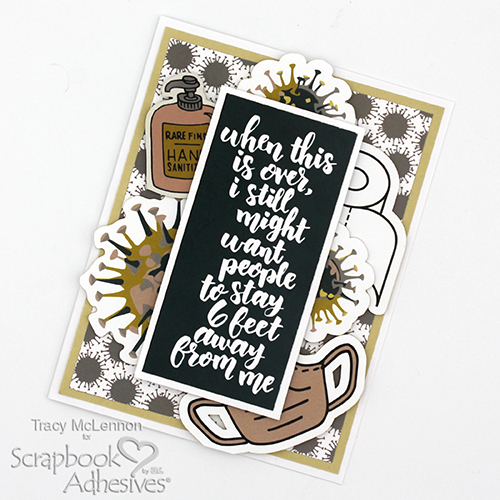
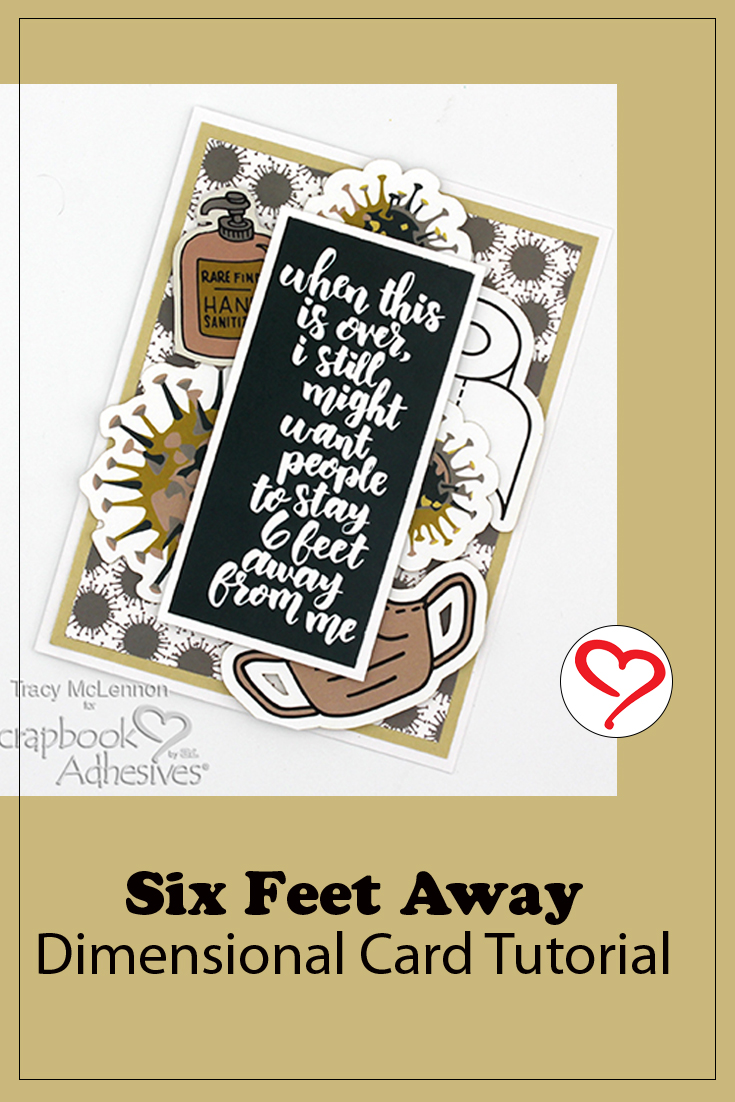
Hello crafty friends! Tracy here and today I am sharing a unique and simple dimensional card, Six Feet Away. We’ve been through a lot this past year and a half ALL over the world. Why not share a little giggle with someone you love. LOL! See all of the details below.

Six Feet Away Dimensional Card by Tracy McLennon for Scrapbook Adhesives by 3L

Dimension to Your Six Feet

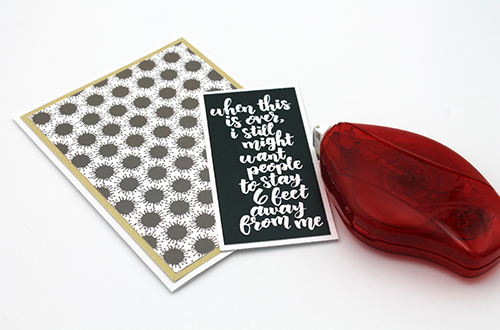
Start by creating a simple layered card base using patterned paper and cardstock. I also matted the sentiment piece with white cardstock all using the E-Z Runner® Permanent Strips Refillable Dispenser.

Six Feet Away Dimensional Card by Tracy McLennon for Scrapbook Adhesives by 3L

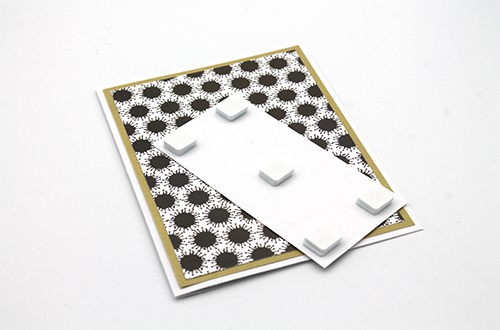
Add the matted sentiment piece to the card using two layers of 3D Foam Squares White Mix. This will give lots of room to add different layers of dimension to this card.

Six Feet Away Dimensional Card by Tracy McLennon for Scrapbook Adhesives by 3L

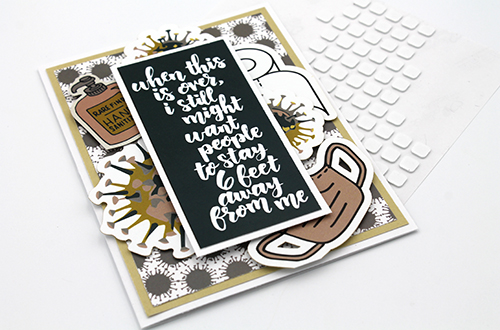
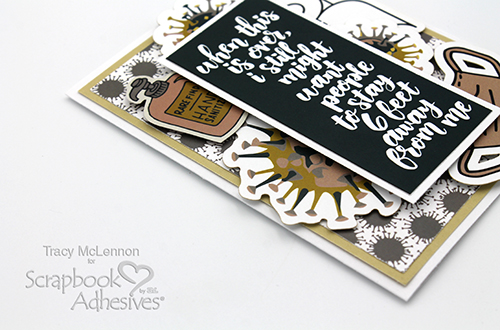
To add the ephemera pieces around the matted sentiment of this simple dimensional card, I used a combination of 3D Foam Squares White Mix and Thin 3D Foam Squares White Mix to give space and dimension between the layers. Start by adding the lower layers and work your way up.

Six Feet Away Dimensional Card by Tracy McLennon for Scrapbook Adhesives by 3L

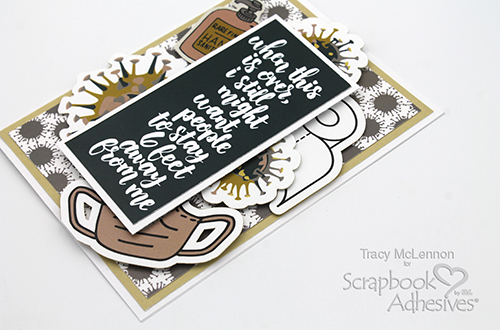
The finished project is a snarky little dimensional card that is sure to bring a smile to someone you care about.

Six Feet Away Dimensional Card by Tracy McLennon for Scrapbook Adhesives by 3L

Thanks so much for stopping by!
Tracy McLennon

Creative Time: 30 Minutes
Skill Level: Beginner

Materials Needed
Scrapbook Adhesives by 3L®

Thin 3D Foam Squares White Mix
3D Foam Squares White Mix
E-Z Runner® Permanent Strips Refillable Dispenser

Other:
Wild Whisper- 6 Feet Apart Collection (Patterned Paper, Ephemera); Cardstock (White, Taupe)

Save to Pinterest!

Six Feet Away Dimensional Card by Tracy McLennon for Scrapbook Adhesives by 3L Pinterest

Visit our Website and Blog!
Sign up for our Newsletter so you never miss a contest or giveaway!

instagram purple icon facebook icon purple pinterest purple icon twitter purple icon YouTube icon blog subscription purple icon

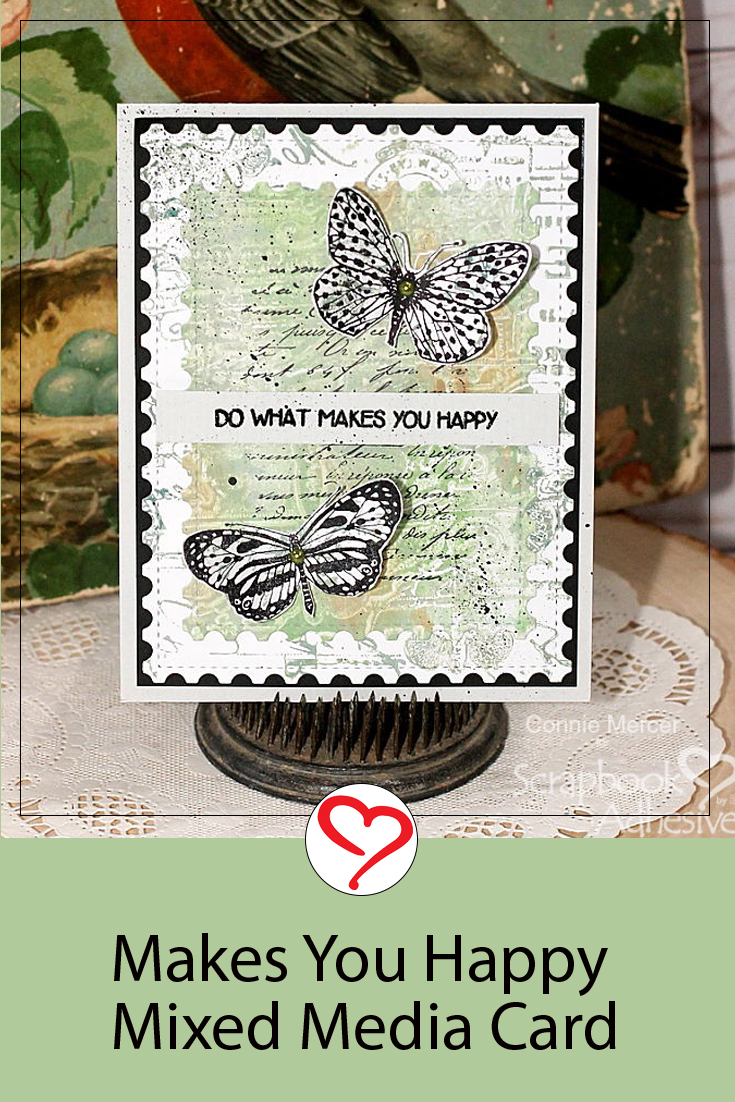
Makes You Happy Mixed Media Card

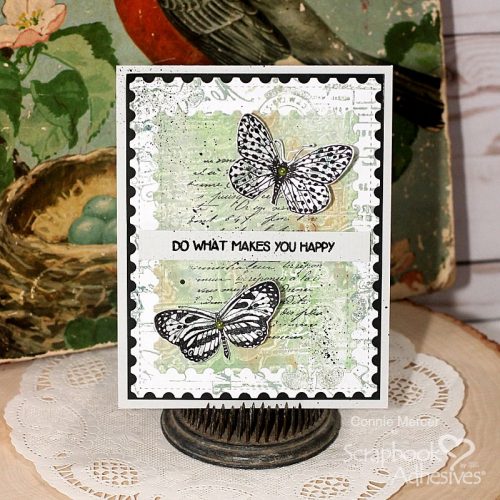
Hi, Connie here with a fun project, Makes You Happy Mixed Media Card, using scraps from my stash and the wonderful Adhesive Sheets. They really make things easy when using a cutting die. Let me show you.

Makes You Happy Mixed Media Card by Connie Mercer for Scrapbook Adhesives  by 3L

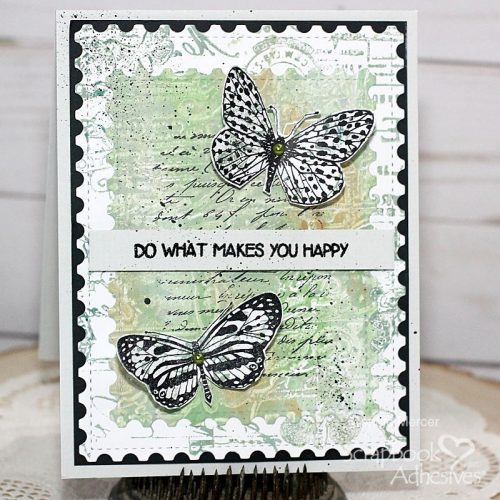
The mixed media prints, used on this card, were created using a Gel Press and Fresco Chalk paint. They were hanging out in my stash, just waiting to be created with.

Happy Mixed Media Card Background

Makes You Happy Mixed Media Card by Connie Mercer for Scrapbook Adhesives  by 3L
  • 1. Decide on the area you wish to cut. I’m using a Postage Stamp cutting die. I’m only using the Adhesive Sheets on the medium die cut as shown in the photo.
    2. Run the mixed media paper (with the adhesive sheet attached to the back of the paper) through the die cutting machine.
    3. Remove the cutting die from the paper, peel off the liner and adhere to the larger die cut, as shown in focal photo.

Assembling the card

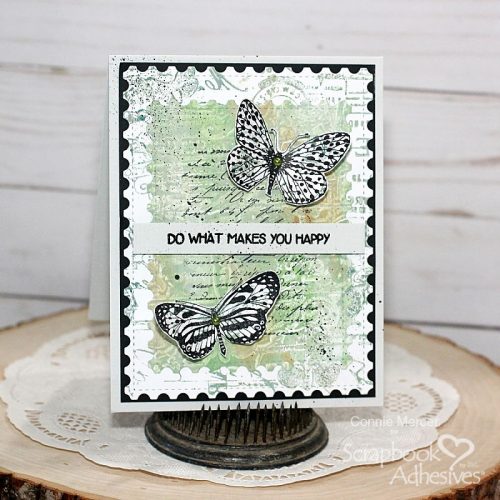
Makes You Happy Mixed Media Card by Connie Mercer for Scrapbook Adhesives  by 3L

I love how my Happy Mixed Media card came together using these prints from my stash! Give it a try!
Thanks for stopping by.
Connie Mercer

Creative Time: 40 Minutes
Skill Level: Beginner

Materials Needed
Scrapbook Adhesives by 3L®

Adhesive Sheets 4″ X 6″
3D Circles White Mix
3D Foam Strips Black
Crafty Foam Tape 108′
E-Z Runner Grand Refillable Dispenser

Other:
Darkroom Door Stamps, Hobby Art Stamps, Whimsy Stamps, Postage Stamp Die by Kat Scrappiness and Wow Embossing Powder

Save to Pinterest!

Makes You Happy Mixed Media Card by Connie Mercer for Scrapbook Adhesives  by 3L Pinterest

Visit our Website and Blog!
Sign up for our Newsletter so you never miss a contest or giveaway!

instagram purple icon facebook icon purple pinterest purple icon twitter purple icon YouTube icon blog subscription purple icon

TV Frame Card Tutorial

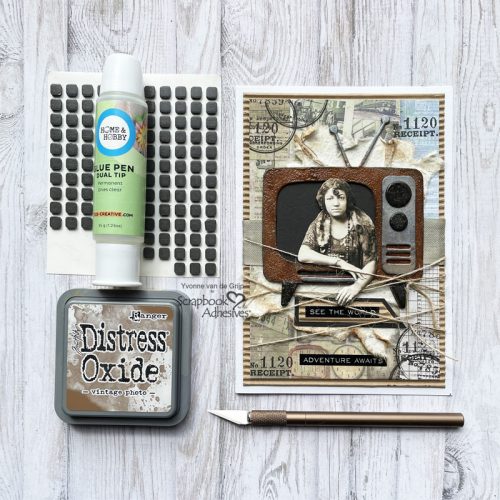
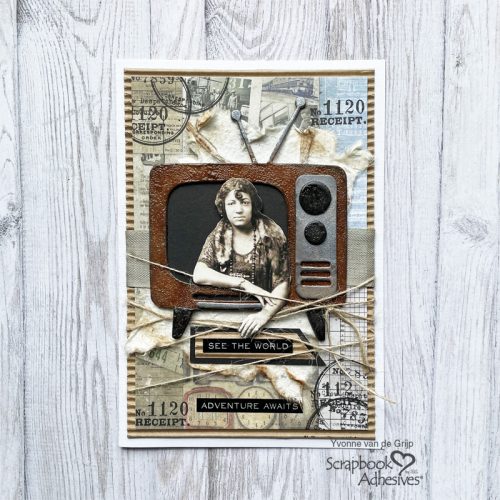
Hi everyone, Yvonne here with a unique dimensional TV Frame Card. I had so much fun making this TV frame card!

TV Frame Card Tutorial by Yvonne van de Grijp for Scrapbook Adhesives by 3L

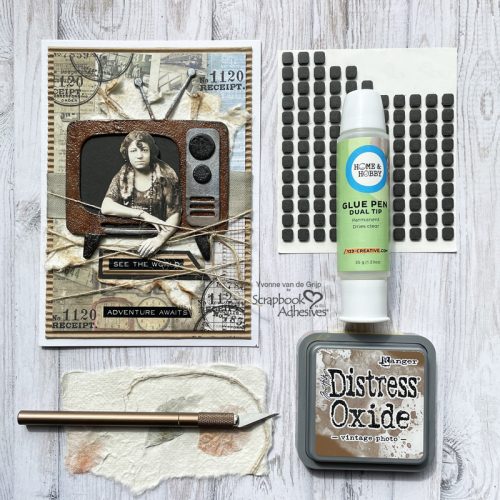
With the help of the Dual Tip Glue Pen, I was able to not only glue but also help accent the card. Are you curious how I made the card? Come on and join me and let me show you how to create the card!

Making the TV Frame

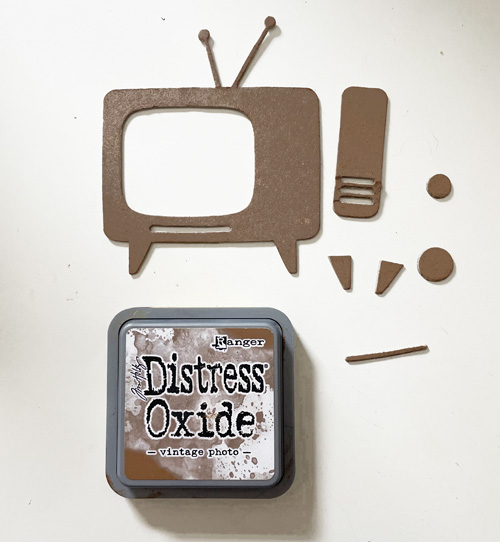
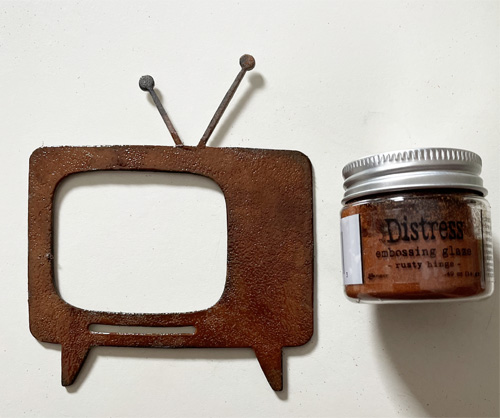
For the TV frame, I used a steel rule die and die-cut the TV from chipboard. Cover the TV by rubbing a brown chalk ink pad over it.

TV Frame Card Tutorial by Yvonne van de Grijp for Scrapbook Adhesives by 3L

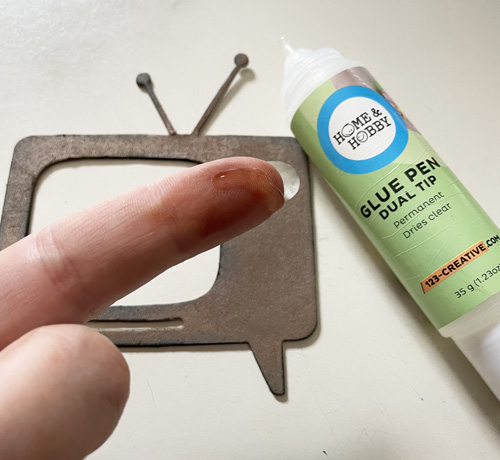
Next I used a black inkpad to accent the edges of the shape and to color the smaller parts. Because I want to use embossing powder, I used the Dual Tip Glue Pen to secure the embossing powder to the die cut.

TV Frame Card Tutorial by Yvonne van de Grijp for Scrapbook Adhesives by 3L

Simply rub some glue over the shape and sprinkle the brown transparent embossing powder over it. Use a heating tool to melt the powder.

TV Frame Card Tutorial by Yvonne van de Grijp for Scrapbook Adhesives by 3L

Now, I applied metallic wax over the TV antennas and the panels. Adhere the parts onto the TV frame using the Dual Tip Glue Pen. For the TV screen background, I adhered a piece of black cardstock (which I hand cut using scissors) to the back of the TV frame using the Dual Tip Glue Pen. Lastly, adhere the woman figure into the TV screen with 3D Foam Squares Black Mix.

Making the Card Panel

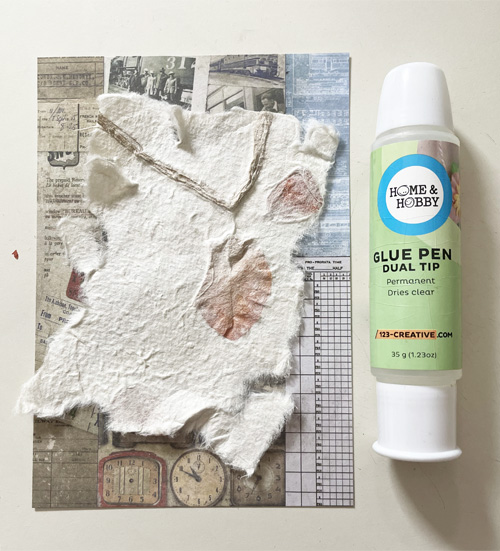
First I cut out a piece of patterned cardstock to a rectangular shape. Then tear a piece of cotton flower paper and adhere it onto the card panel with the Dual Tip Glue Pen.

TV Frame Card Tutorial by Yvonne van de Grijp for Scrapbook Adhesives by 3L

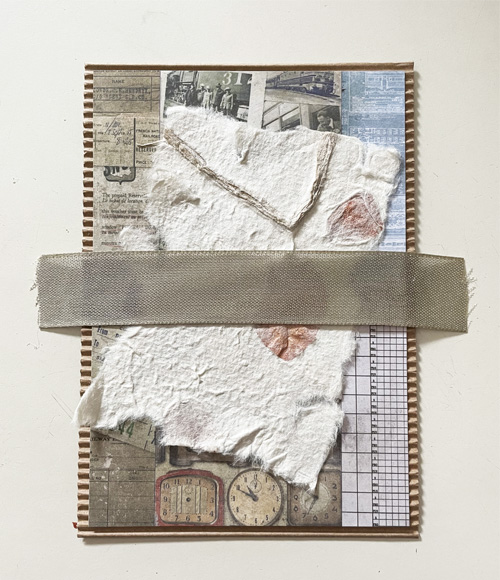
Next, alter the edges of the cotton paper with brown ink. Then adhere the panel onto a piece of corrugated cardstock with the EZ Runner® Permanent Strips Refillable Dispenser for affixing. Wrap a piece of beige ribbon around the card panel and adhere to the back of the panel using the EZ Runner® Permanent Strips Refillable Dispenser.

TV Frame Card Tutorial by Yvonne van de Grijp for Scrapbook Adhesives by 3L

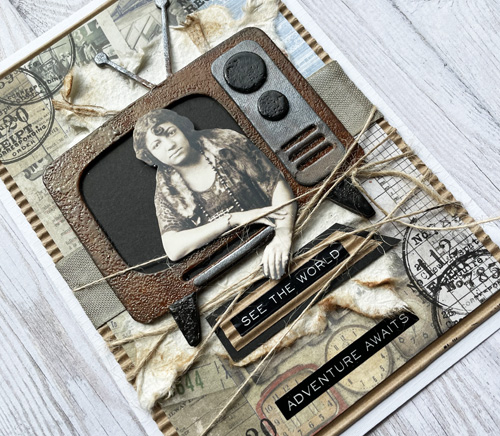
Now adhere the TV Frame embellishment onto the panel with the EZ Runner® Permanent Strips Refillable Dispenser.

Finishing the Card

To embellish the card panel, I wrapped some twine around the card panel. Place a sentiment sticker onto a piece of corrugated cardstock and mat with a piece of black cardstock using the EZ Runner® Permanent Strips Refillable Dispenser before adhering it to the card panel.

Adhere the card panel onto a white card base with the EZ Runner® Permanent Strips Refillable Dispenser. Then accent the card by stamping some accents onto the card using a black ink pad.

TV Frame Card Tutorial by Yvonne van de Grijp for Scrapbook Adhesives by 3L

And voila your TV frame card is ready. I hope you enjoyed this tutorial and wish you happy crafting!
Yvonne van de Grijp

TV Frame Card Tutorial by Yvonne van de Grijp for Scrapbook Adhesives by 3L

Creative Time: 60 minutes
Skill Level: Advanced

Materials needed:
Scrapbook Adhesives by 3L®
EZ Runner® Permanent Strips Refillable Dispenser
3D Foam Squares Black Mix

HomeHobby™ by 3L
Dual Tip Glue Pen

Other
Cardstock (White, Corrugated, Black, Chipboard); Die-Cutting and Embossing Machine (Spellbinders® Paper Arts: Platinum 6 Machine); Steel Rule Die-template (Sizzix: Tim Hol6tz: Retro TV); Inkpads (Distress Oxide inkpad: Vintage Photo; Distress inkpad: Black Soot; Archival Inkpad: Jet Black); Patterned Paper (Tim Holtz Destination); Embossing powder (Tim Holtz Glaze: Vintage Photo, Hickory Smoke); Stamp (Stampers Anonymous: Field Notes); Images (Tim Holtz: Metallic Stickers Quotations; Paper Dolls); Twine; Cotton Flower Paper; Scissors; Ink Blending Tool; Heat tool

Save to Pinterest!

TV Frame Card Tutorial by Yvonne van de Grijp for Scrapbook Adhesives by 3L

Visit our Website and Blog!
Sign up for our Newsletter so you never miss a contest or giveaway!

instagram purple icon facebook icon purple pinterest purple icon twitter purple icon YouTube icon blog subscription purple icon

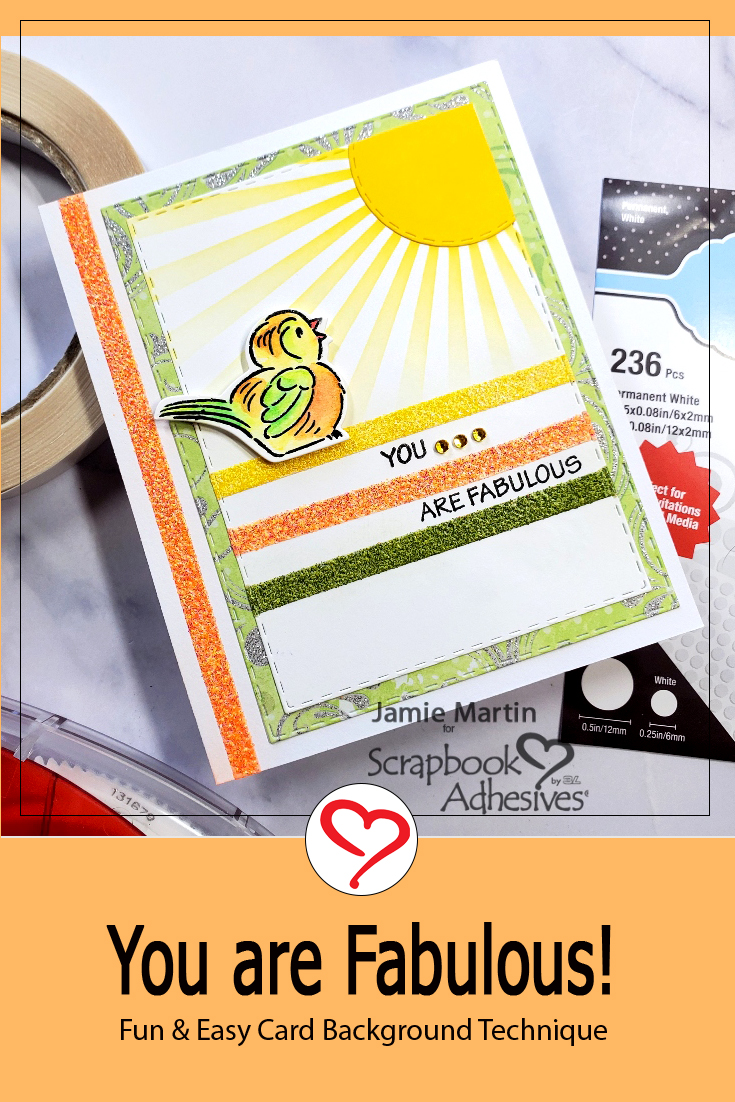
You are Fabulous Background Tutorial

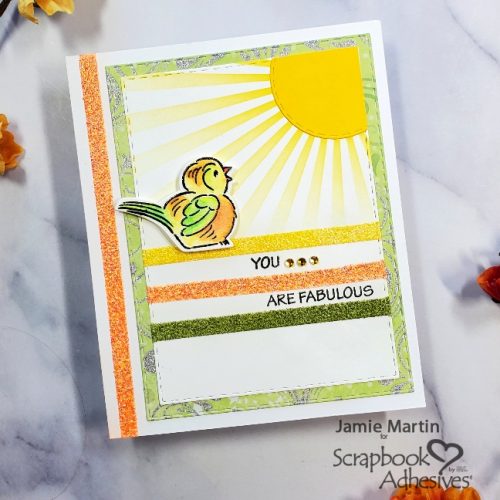
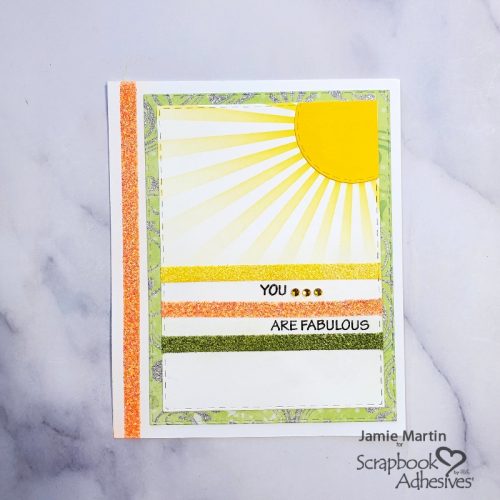
Hi there, Jamie here with you today with a bright and cheerful You are Fabulous background card tutorial. Send out it to friends on these warm summer days! One thing that I love doing is to make my own backgrounds, that way no matter what I’m making, I don’t have to worry about having the right colors or styles of decorative papers.

You are Fabulous Background Tutorial by Jamie Martin for Scrapbook Adhesives by 3L

Creating My Fabulous Background

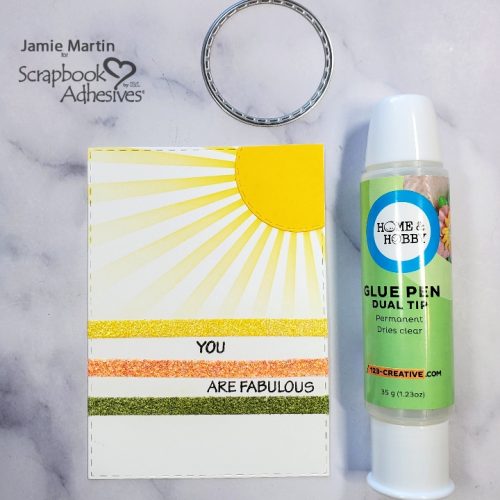
The product I find myself reaching for the most to make my background is the Crafty Power Tape Polybag 81ft. because it is heat resistant – you can sprinkle it with embossing powder and heat it with your heat gun without losing its shape.

You are Fabulous Background Tutorial by Jamie Martin for Scrapbook Adhesives by 3L

The Dual Tip Glue Pen was used to attach the sun since I needed to make sure that the circle was in the right position, I needed to slide it around a bit.  

You are Fabulous Background Tutorial by Jamie Martin for Scrapbook Adhesives by 3L

Adding Dimension

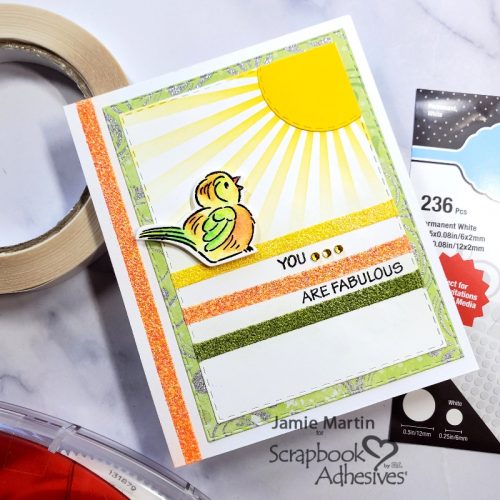
Cards are always a little more fun with a bit of dimension, so I added 3D Foam Circles to the back of the watercolored bird.  Even though this adds dimension, it can still be mailed without a problem.

You are Fabulous Background Tutorial by Jamie Martin for Scrapbook Adhesives by 3L

The E-Z Runner® Grand Refillable Dispenser was used to attach the panel to a larger decorative paper panel then onto a white card.

You are Fabulous Background Tutorial by Jamie Martin for Scrapbook Adhesives by 3L

I hope you enjoyed this You are Fabulous Background card and give some of these techniques a try!
Jamie Martin

Skill Level: Intermediate
Creative Time: 60 minutes

Materials Needed:
Scrapbook Adhesives by 3L®
E-Z Runner® Grand Refillable Dispenser
3D Foam Circles White Mix
Crafty Power Tape Polybag 81ft.

HomeHobby™ by 3L
Dual Tip Glue Pen

Other: Stampendous- Stamps, Embossing powders Floral Garden Set, Rubbernecker Stamps- Dies, Stencil, Cardstock- PrintWorks Specialty Paper 

Save it to Pinterest!

You are Fabulous Background Tutorial by Jamie Martin for Scrapbook Adhesives by 3L Pinterest

Visit our Website and Blog!
Sign up for our Newsletter so you never miss a contest or giveaway!

instagram purple icon facebook icon purple pinterest purple icon twitter purple icon YouTube icon blog subscription purple icon

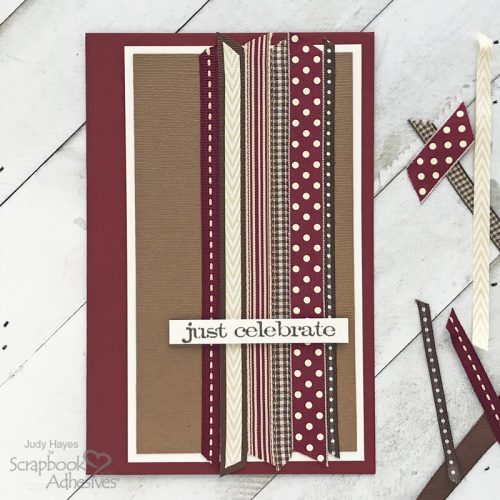
Just Celebrate Ribbon Card

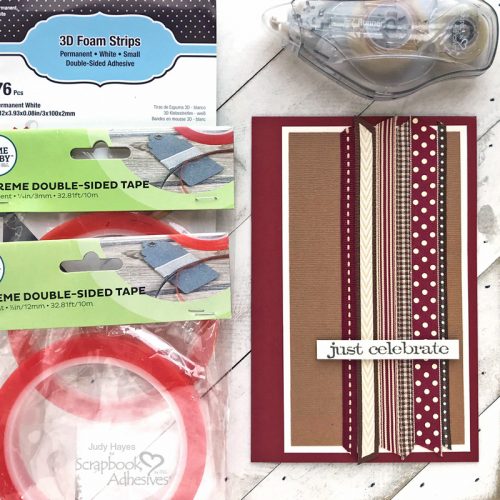
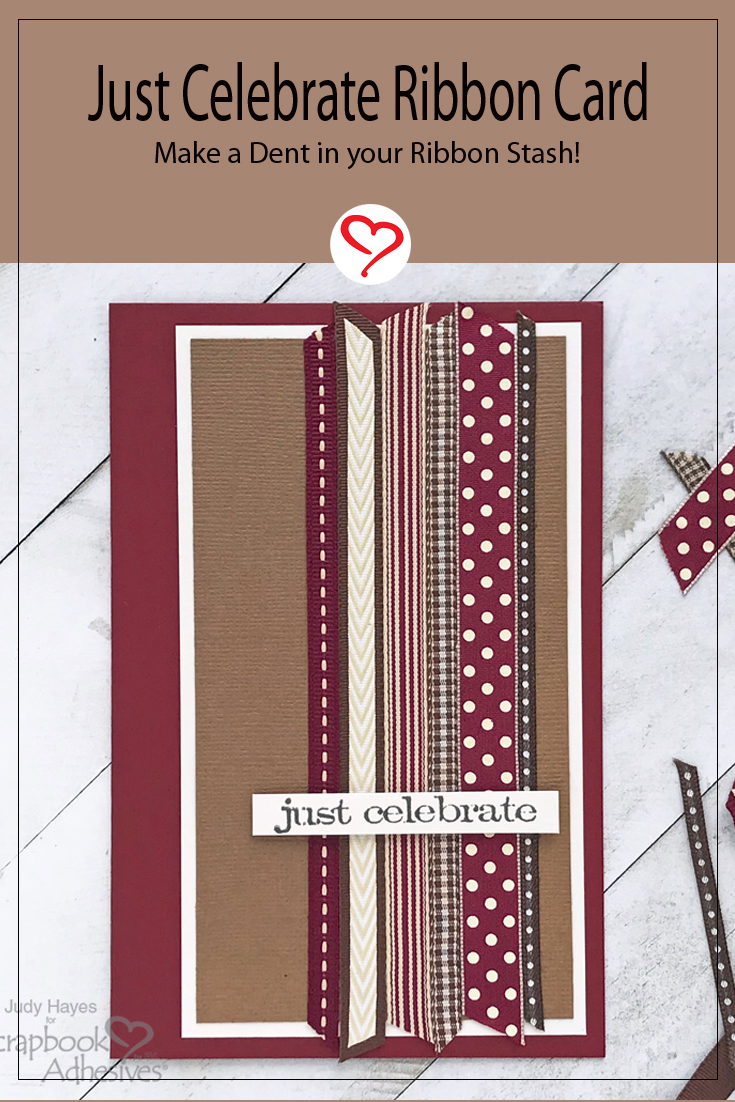
Hello friends! Today, I raided my stash of ribbons to make this card. I’m on a mission to reduce some of my stash….ultimately this didn’t make a dent in it but it’s a fun way to use ribbons! So easy with Extreme Double-Sided Tape!

Just Celebrate Ribbon Card by Judy Hayes for Scrapbook Adhesives by 3L

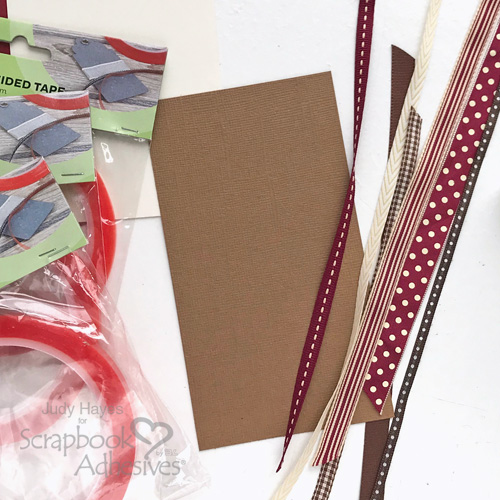
Ribbon Card Background Prep

Just Celebrate Ribbon Card by Judy Hayes for Scrapbook Adhesives by 3L

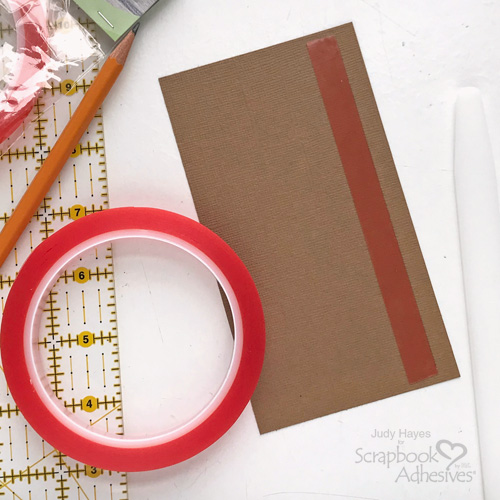
Choose an assortment of red, brown, and cream ribbons in a variety of patterns and sizes, I used seven types on this card. Cut a piece of Walnut cardstock to 3.25 x 5.75 inches.

Just Celebrate Ribbon Card by Judy Hayes for Scrapbook Adhesives by 3L

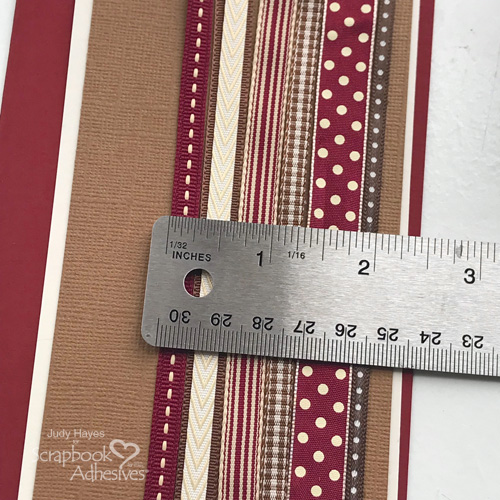
Layout the ribbon pattern as desired. This will help determine the width of the ribbon border. Use measurement to choose what size Extreme Double-Sided Tape to best use for the project. For this card, four pieces of Extreme Double-Sided Tape 1/2in will hold all the ribbon.

Designer Tip: Take a photo to help remember the ribbon pattern.

Assemble the Ribbon Background

Just Celebrate Ribbon Card by Judy Hayes for Scrapbook Adhesives by 3L

Draw a pencil line along the cardstock edge to mark the placement of the Extreme Double-Sided Tape 1/2in.

Apply the Extreme Double-Sided Tape 1/2in along pencil line. Firmly press in place. Continue to add three more pieces of the Extreme Double-Sided Tape 1/2in next to each other and press firmly in place.

Just Celebrate Ribbon Card by Judy Hayes for Scrapbook Adhesives by 3L

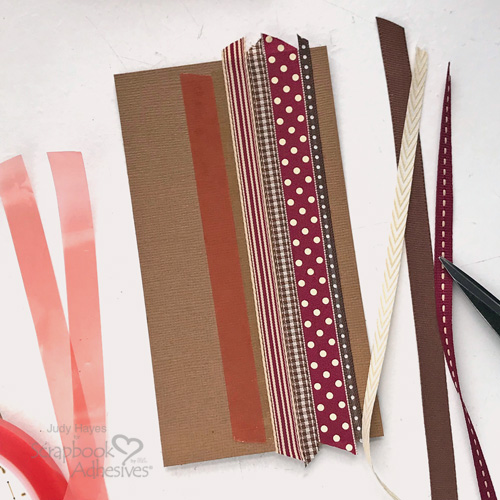
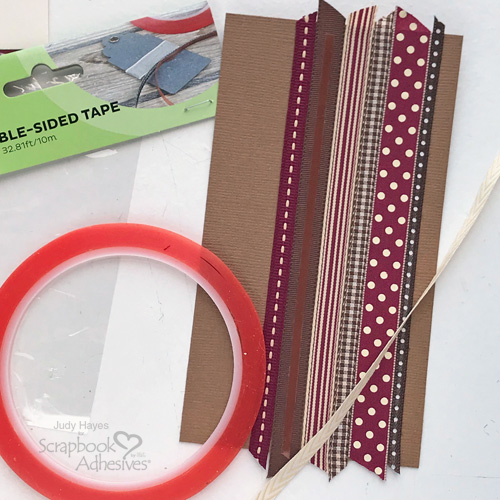
Remove the liner on tape near the edge. Hold the first ribbon at each end to pull it straight but not stretched, align with the tape edge, and press in place. Trim ribbon ends to extend slightly beyond cardstock. Continue to remove the tape liner and add ribbons aligning each against the edge of the previous ribbon. Press in place.

Just Celebrate Ribbon Card by Judy Hayes for Scrapbook Adhesives by 3L

Add Extreme Double-Sided Tape 1/8in centered over the wider brown ribbon. Place a narrow cream ribbon over it and press in place.

Make the Card

Just Celebrate Ribbon Card by Judy Hayes for Scrapbook Adhesives by 3L

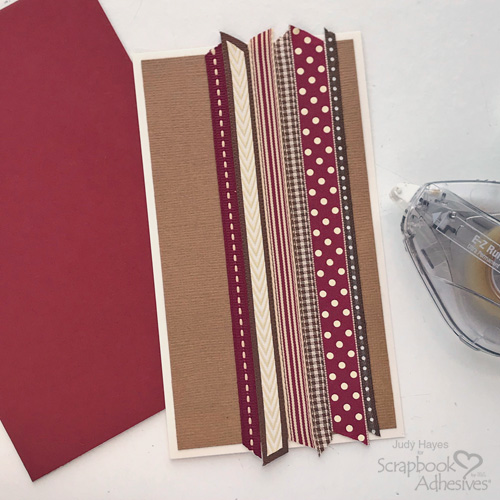
Cut a piece of 8.5 x 6.5-inch deep red cardstock and fold it in half to form a 4.25 x 6.5-inch card. Next, cut a piece of Walnut Cream cardstock to 3.75 x 6.125-inch.

Apply adhesive with E-Z Runner® Ultra Strong Refillable Dispenser to the back of the ribbon piece and adhere it to the Walnut Cream mat. Use E-Z Runner® Ultra Strong Refillable Dispenser to apply adhesive to the back and fasten it on the card front.

Stamp Greeting

Just Celebrate Ribbon Card by Judy Hayes for Scrapbook Adhesives by 3L

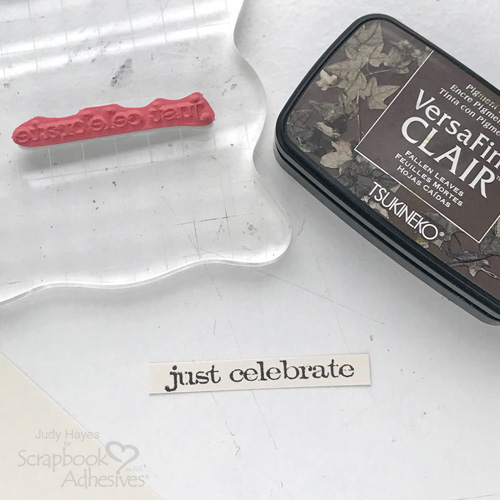
Stamp the greeting on Walnut Cream cardstock with Fallen Leaves ink. Trim to narrow strip.

Complete Card

Just Celebrate Ribbon Card by Judy Hayes for Scrapbook Adhesives by 3L

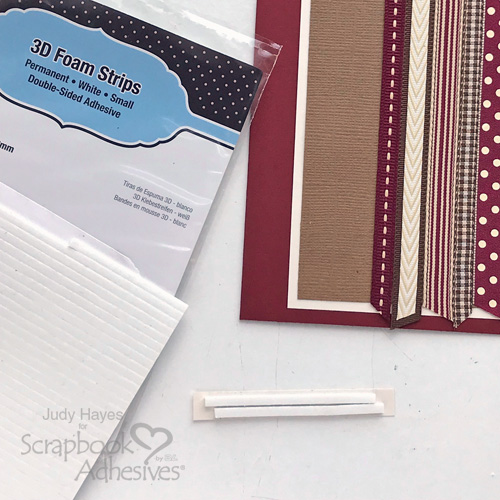
Secure 3D Foam Strips to back of greeting strip. Remove liners and attach the greeting across ribbons on the card front.

Just Celebrate Ribbon Card by Judy Hayes for Scrapbook Adhesives by 3L

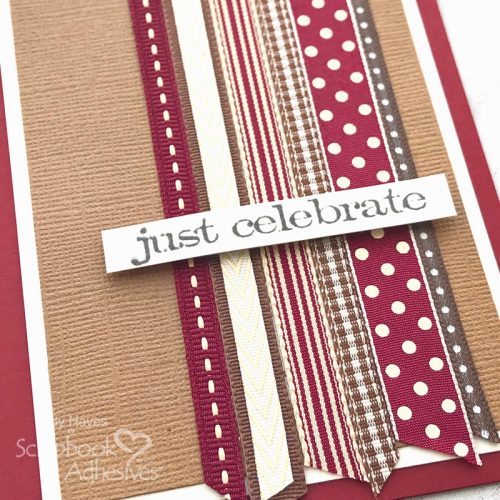
Why not make up a few ribbon cards without a greeting to have on hand? So quick to add a greeting and send it off!

Just Celebrate Ribbon Card by Judy Hayes for Scrapbook Adhesives by 3L

Thanks for Visiting!
Judy Hayes

Creative Time: 30 Minutes
Skill Level: Easy

Materials Needed
Scrapbook Adhesives by 3L®

HomeHobby™ by 3L

Other Supplies: Bazzill® Basics Cardstock (Walnut Cream, Walnut); Stampers Anonymous Tim Holtz Stamp Set (Simple Sayings); Tsukineko® Versafine Clair™ Ink (Fallen Leaves); Cardstock (Deep Red); Assorted Red, Cream and Brown Ribbons

Save it to Pinterest!

Just Celebrate Ribbon Card by Judy Hayes for Scrapbook Adhesives by 3L Pinterest

Visit our Website and Blog!
Sign up for our Newsletter so you never miss a contest or giveaway!

instagram purple icon facebook icon purple pinterest purple icon twitter purple icon YouTube icon blog subscription purple icon

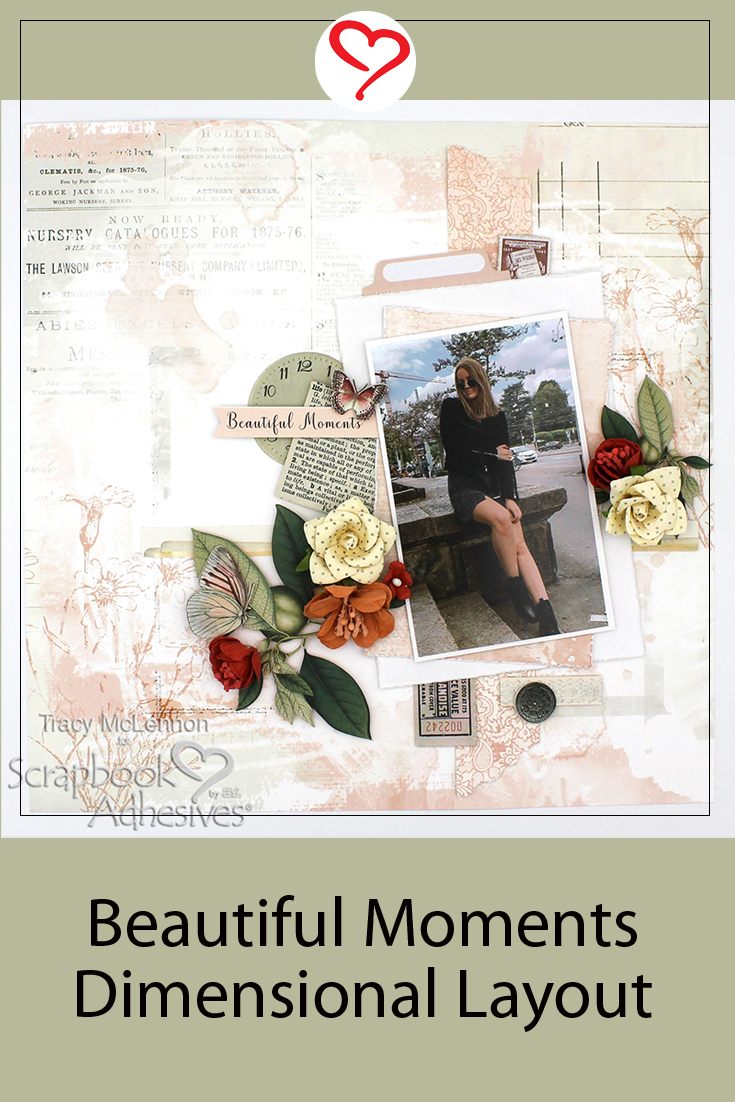
Beautiful Moments Dimensional Layout

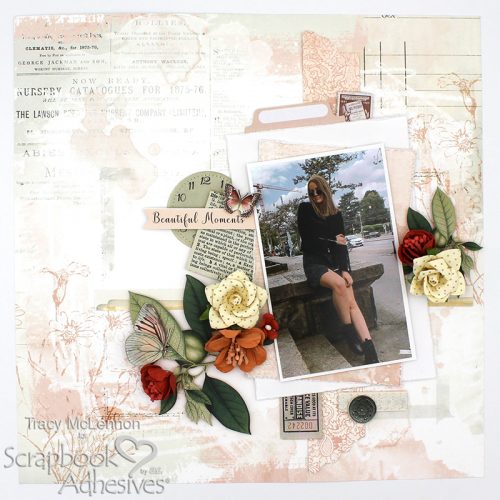
Hello crafty friends! Tracy here and today I’m back with another Dimensional Layout step-by-step tutorial to share. I love adding dimension and texture to my creations, and thought today I would take you through my process when I create.

Beautiful Moments Dimensional Layout by Tracy McLennon for Scrapbook Adhesives by 3L

Dimensional Layout How To’s

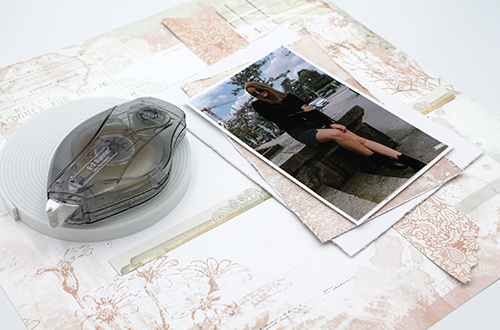
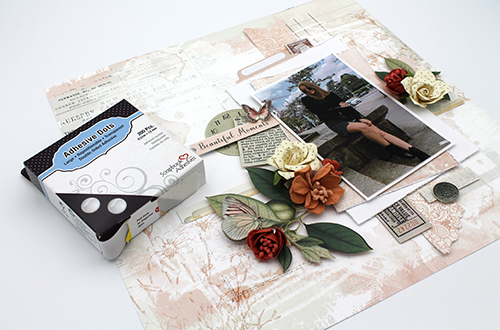
Once I picked out my patterned background, I matted my photo in white cardstock and cut the patterned paper pieces that I wanted to frame my matted photo. I used a combination of the E-Z Runner® Ultra Strong Refillable Dispenser and Crafty Foam Tape White to adhere these pieces to the background starting my dimensional layout. I will always use my E-Z Runner® Ultra Strong Refillable Dispenser when creating dimensional layouts. This ensures I create a good solid base to adhere many layers and embellishments that could be weighty.

Beautiful Moments Dimensional Layout by Tracy McLennon for Scrapbook Adhesives by 3L

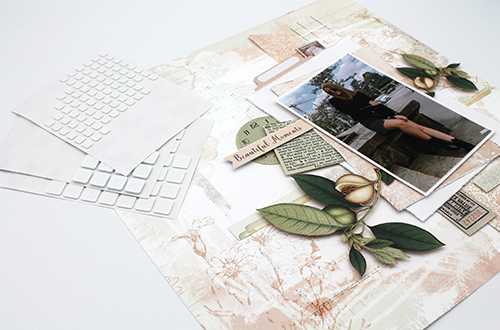
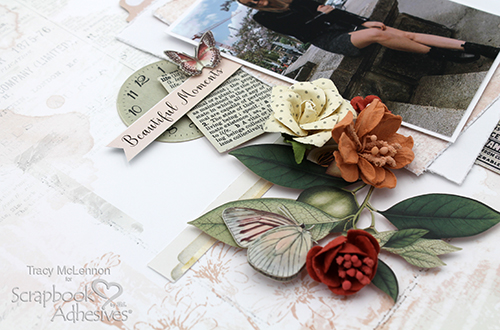
The second step is to start adding the paper die cut embellishments around the matted photo. This is also key for creating a dimensional layout. By using a combination of 3D Foam Squares White Mix and Thin 3D Foam Squares White Mix, I added these pieces. Even the difference of using Thin 3D Foam Squares White Mix gives enough space between layers to add dimension without adding too much dimension.

Beautiful Moments Dimensional Layout by Tracy McLennon for Scrapbook Adhesives by 3L

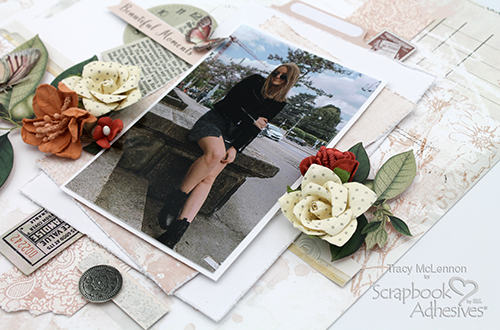
My final step is to add the very dimensional flowers to the layout. I love to use Adhesive Dots Large to add these securely. Depending on the texture and weight of the flower, sometimes I will double up the Adhesive Dots Large to really make sure it’s down.

Beautiful Moments Dimensional Layout by Tracy McLennon for Scrapbook Adhesives by 3L

These few little tricks will hopefully help with your next dimensional layout.

Beautiful Moments Dimensional Layout by Tracy McLennon for Scrapbook Adhesives by 3L

Thanks so much for stopping by!
Tracy

Skill Level: Intermediate
Creative Time: 45 minutes

Materials Needed:
Scrapbook Adhesives by 3L®

Crafty Foam Tape White
E-Z Runner® Ultra Strong Refillable Dispenser
Adhesive Dots Large
Thin 3D Foam Squares White Mix
3D Foam Squares White Mix

Other: 49 & Market Vintage Artistry Collection (patterned papers, die cuts, flowers); Cardstock- White; Paper Distresser

Save to Pinterest!

Beautiful Moments Dimensional Layout by Tracy McLennon for Scrapbook Adhesives by 3L Pinterest

Visit our Website and Blog!
Sign up for our Newsletter so you never miss a contest or giveaway!
instagram purple icon facebook icon purple pinterest purple icon twitter purple icon YouTube icon blog subscription purple icon

Sunshine Wishes 3D Slimline Card

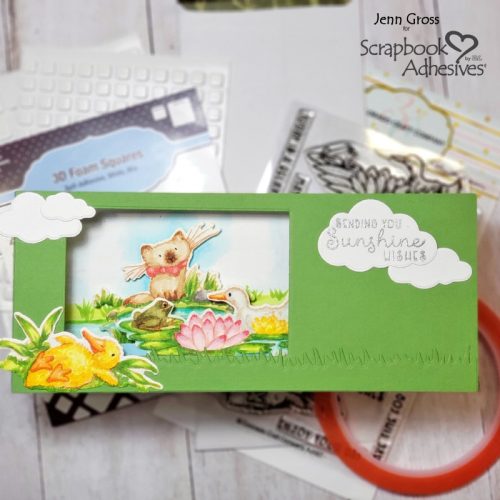
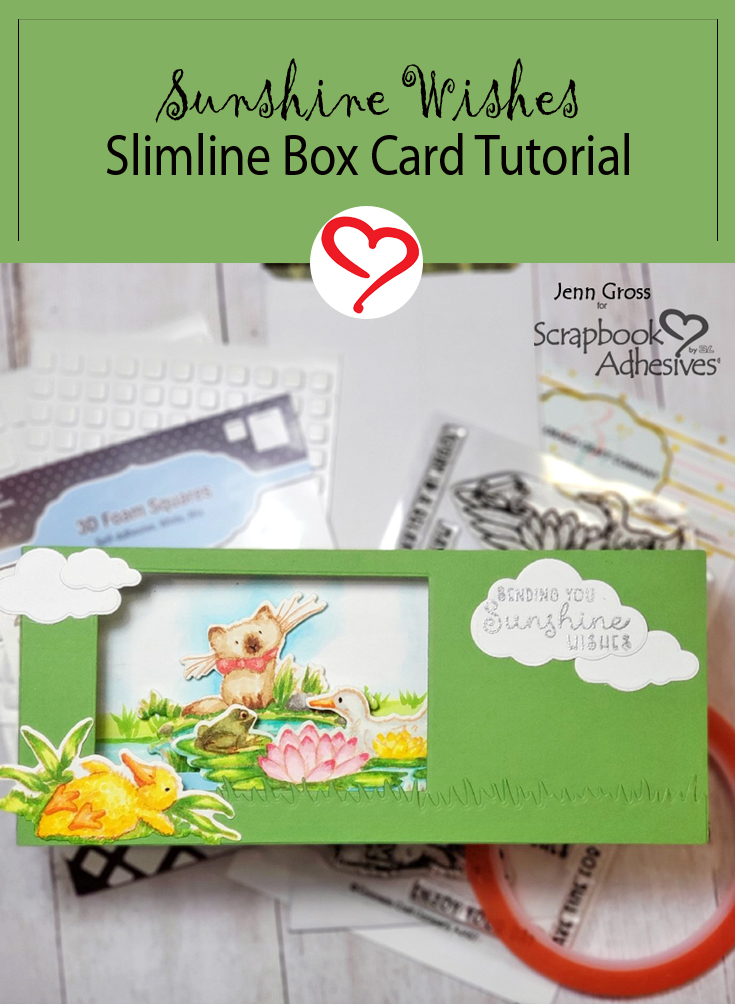
Hello, my crafty friends, Jenn Gross here! I’ve designed a fun Sunshine Wishes 3D slimline box card It folds flat to measure at 3 1/4″ x 8 1/4″.  It includes a 3D relaxing pond scene.  Using the Extreme Double-Sided Tape 1/8″ to adhere this card together, I am confident that this super-strong tape holds the folds with no problem!  Let’s get started. Enjoy!

Sunshine Wishes 3D Slimline Card by Jenn Gross for Scrapbook Adhesives by 3L

Sunshine Wishes Stamp Art

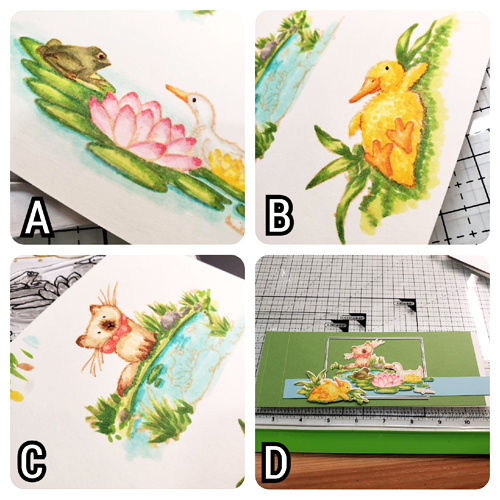
Stamp three image from the Pond Pampering stamp set in light peach ink onto premium marker-friendly paper.  I colored each image with alcohol markers creating a no line coloring. Steps A – C images are what I colored from the stamps, and then die-cut each piece afterward.

Sunshine Wishes 3D Slimline Card by Jenn Gross for Scrapbook Adhesives by 3L

Step D shows how the card front (8 1/2″ x 3 1/4″ green cardstock) is scored at 1/4″ and 1″ mark on the short side (3 1/4″) of the cardstock. Next, mountain fold the score lines on the left side towards the card back to crease the lines. Position the following stamped die cuts on the card front: kitten in the back, Frog and duck in middle, and fuzzy duck on top.  Using these die cuts as guides, you are determining the rectangular window opening for this slimline box card.

Placement of Stamp Images

Sunshine Wishes 3D Slimline Card by Jenn Gross for Scrapbook Adhesives by 3L

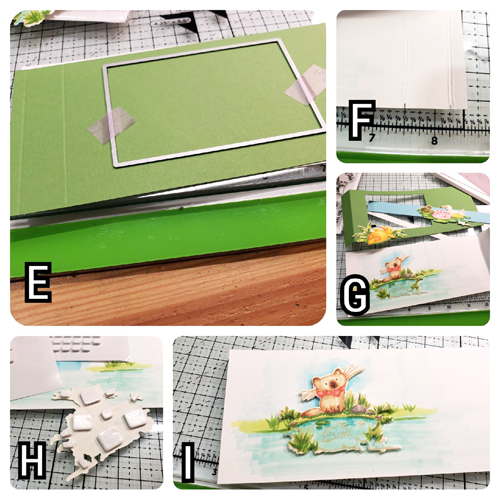
In Step E, the rectangle die opening is 3 5/8″ x 2 3/8″.  After determining placement, make sure to leave 5/8″ of green framing the bottom of the card front, and secure the die with washi tape.  Die cut the window opening

Use a piece of 8 1/2″ x 3 1/4″ white cardstock as the card back in Step F.  On the short side, scored at the 7 1/2″ and 8 1/4″ marks. Valley fold the score lines on the right side of the card back forward towards the card front.

The Step G Image shows using both the green card front with the window and the white card back together as a guide, see where the window opening will fall when the card is popped open.  Set the kitten die cut down in the opening and gently pencil sketch an extension of the image (grass and pond) on the white cardstock back and color the extension. Also, add a light blue sky shading on the page where the kitten will be placed  

Add 3D Foam Squares to the back of the kitten die cut and attach the image over the colored extension as shown in Steps H and I.

Assemblying the Sunshine Wishes Box Card Part 1

Sunshine Wishes 3D Slimline Card by Jenn Gross for Scrapbook Adhesives by 3L

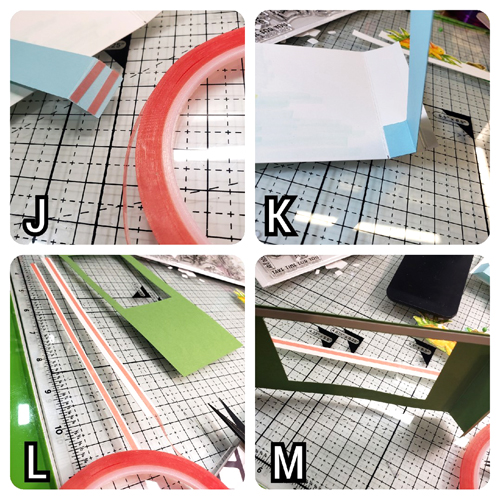
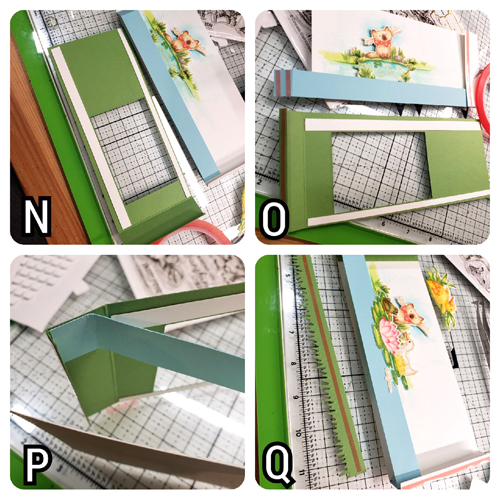
With a piece of 8 1/2″ x 1″ light blue cardstock, score on the short side at 1/2″ and 8″.  Fold the 1/2″ tabs inward to each other and attach Extreme Double-Sided Tape 1/8″ to the 1/2″ tab as shown in Step J.

Then remove the liner and attach the right side of the blue strip to the bottom right of the white card back. Make sure to line up the edge of the blue strip with the 7 1/2″ fold (see Image K) and set aside.

In Step L, cut 2 1/4″ x 7 3/4″ strips of heavy white cardstock to use a stabilizer and attach a strip of Extreme Double-Sided Tape 1/8″ to one side of each strip.

Next, in Step M, remove the liner and attach one strip to the inside area (above the window opening) of the green card front. Do not cover any of the score lines.  Attach the other white strip to the inside bottom 5/8″ area below the window frame. 

Assemblying the Box Card Part 2

Sunshine Wishes 3D Slimline Card by Jenn Gross for Scrapbook Adhesives by 3L

Gather the green card front and the white card back pieces and align the 5/8″ bottom of the green front to the bottom of the white card back’s blue strip.  Add Extreme Double-Sided tape to the top of the 1/4″ folded edge of the right side of the card back and the 1/2″ fold of the left side of the blue strip as shown in Images N and O.  Add Extreme Double-Sided Tape 1/8″ to the 1/4″ fold on the left card front as pictured.

In Step P, remove the liner from the blue strip and attach it to the 3/4″ side, lining up the edge of the 1/4″ score line of the green card front.

Image Q shows a piece of 7 1/2″ x 1″ green cardstock strip die-cut with a grass edge die at the top of the green strip. Add Extreme Double-Sided Tape 1/8″ and attach it to the green card front, from the right lower edge to the first score line fold on the left side.  Position the frog and duck images and adhere it to the blue strip, lining up the frog’s eye just between the cat paw and the rock when folded flat.

The Final Steps

Sunshine Wishes 3D Slimline Card by Jenn Gross for Scrapbook Adhesives by 3L

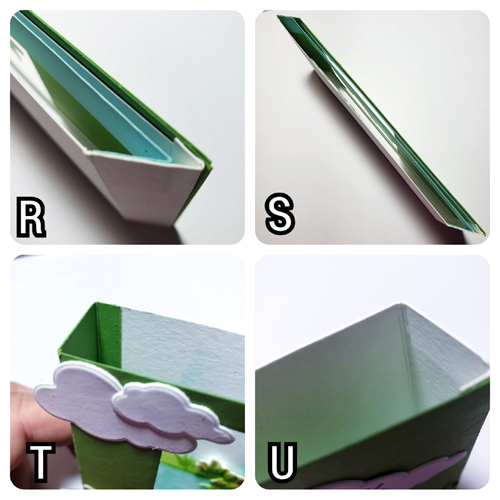
Remove the liner from the 1/4″ folded edge of the white card back and attach it to the inside edge of the green card front. Next take the liner off from the 1/4″  folded edge of the green cardstock (the opposite side previously connected) fold the card flat and attach this last edge together (Image R).  

As shown in Step S, the card will now fold to a flat 3 1/4″ x 8 1/4″ slimline card. These photos share how the left side (T) and the right side (U) of the card look when unfolded.

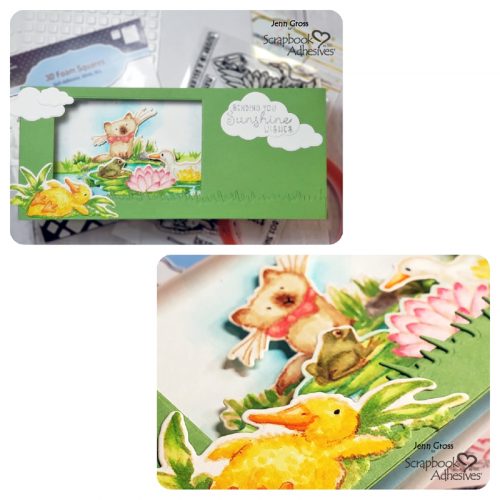
Complete the card front by attaching the fuzzy duck image to the left side of the card, overhanging the edge 3/4″ and on top of the grass edge.  Next, die-cut four clouds ranging in length from 3/4″ to 2″ wide. Stamp and heat emboss the sentiment “Sending you Sunshine Wishes” on the large cloud in Silver embossing powder and attach all with Extreme Double-Sided Tape 1/8″ to complete the Sunshine Wishes 3D box slimline card.

Sunshine Wishes 3D Slimline Card by Jenn Gross for Scrapbook Adhesives by 3L

Thank you for stopping by the blog.  I hope you enjoyed this fun Sunshine Wishes slimline box card. Give box cards a try and share your link in the comments below!

Be Creative ~ Stay Inspired
Jenn Gross

Creative Time: 70 minutes (includes coloring time)
Skill Level: Advanced

Materials Needed:
Scrapbook Adhesives by 3L®

3D Foam Squares White Mix

HomeHobby™ by 3L
Extreme Double-Sided Tape 1/8″

Other:
Stamp and Die: Colorado Craft Company (Pond Pampering) and Mama Elephant (Slimline Window Dressing Die); Coloring Medium: Copic Alcohol Markers; Inks: Spellbinders® Paper Arts/FSJ (Peaches and Cream Hybrid ink) and Tsukineko (VersaMark Watermark ink); Embossing Powder: Brutus Monroe (Sterling Silver); Mini Cloud Craft Die; Heat Gun; Paper Trimmer; Bone Folder

Save to Pinterest!

Sunshine Wishes 3D Slimline Card by Jenn Gross for Scrapbook Adhesives by 3L Pinterest

Visit our Website and Blog!
Sign up for our Newsletter so you never miss a contest or giveaway!
instagram purple icon facebook icon purple pinterest purple icon twitter purple icon YouTube icon blog subscription purple icon

2 for 1 Birthday Tag Cards

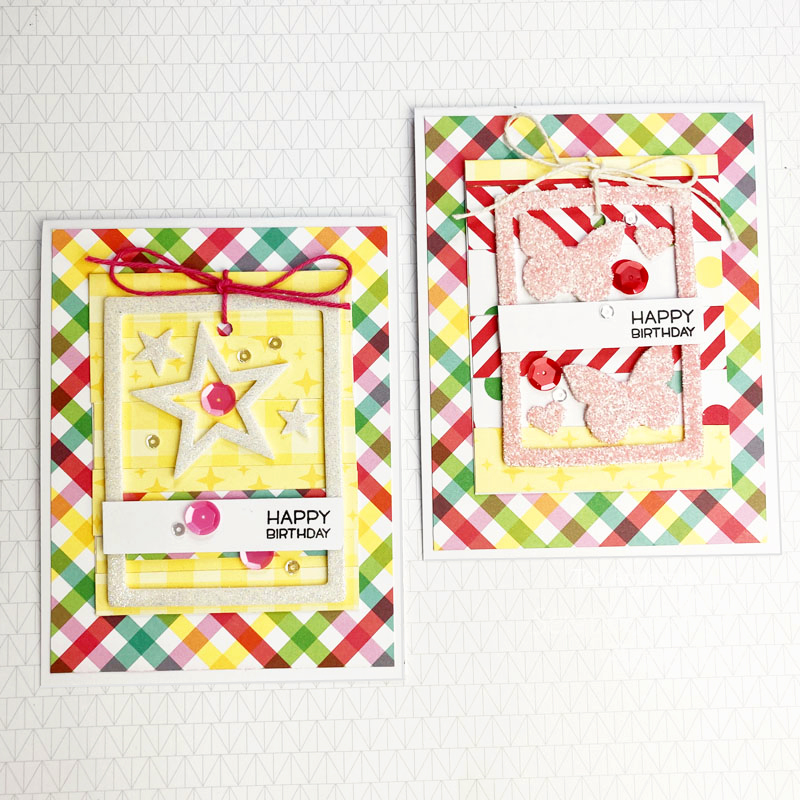
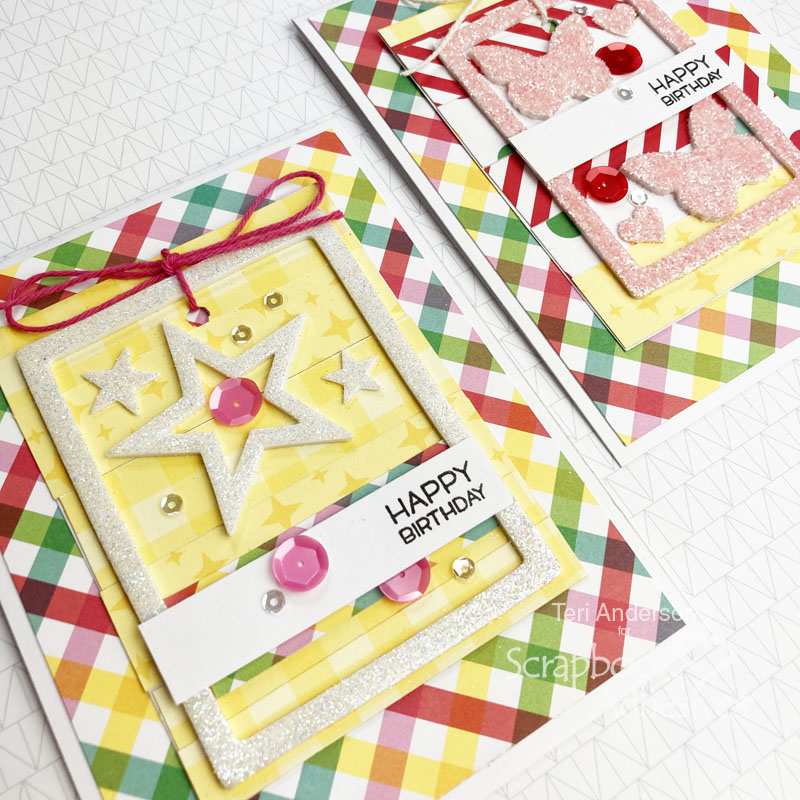
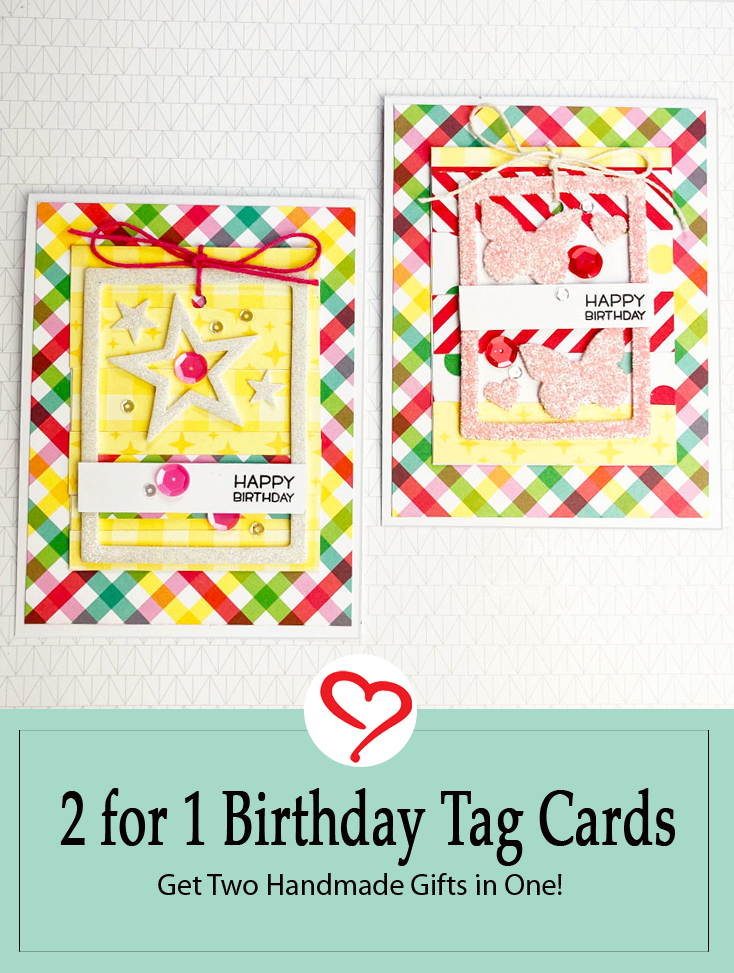
Hi, friends! Teri here with a fun idea for your next handmade birthday card. Instead of making a traditional card, make one with a tag on it that the recipient can reuse! A set of 2 for 1 Birthday Tag Cards!

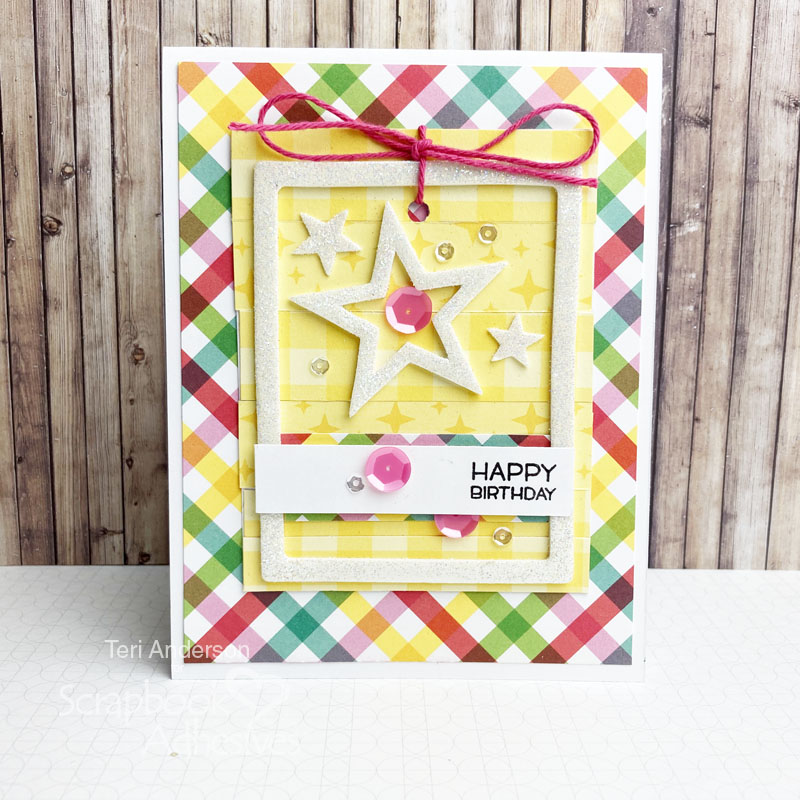
2 for 1 Birthday Tag Cards by Teri Anderson for Scrapbook Adhesives by 3L

Create the Tags for the Birthday Tag Cards

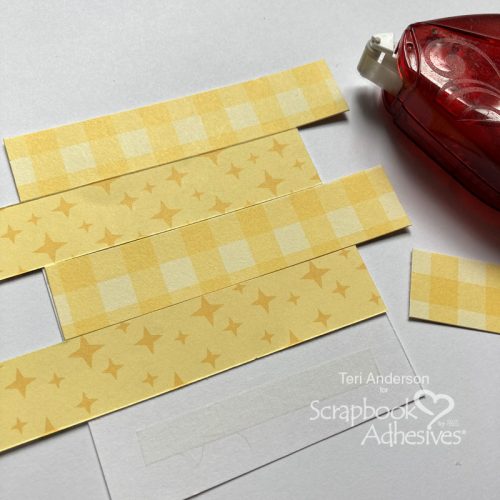
Start by making your tag. Cut a piece of cardstock that is big enough for a 3D Foam Frame. Cover the tag base with patterned paper.

2 for 1 Birthday Tag Cards by Teri Anderson for Scrapbook Adhesives by 3L

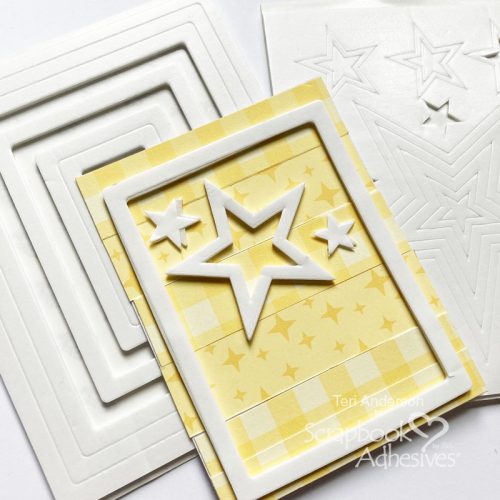
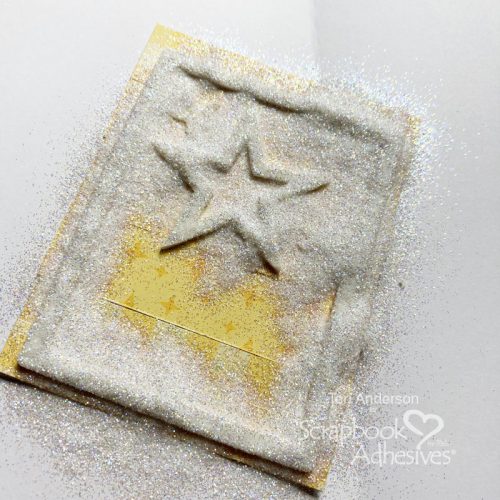
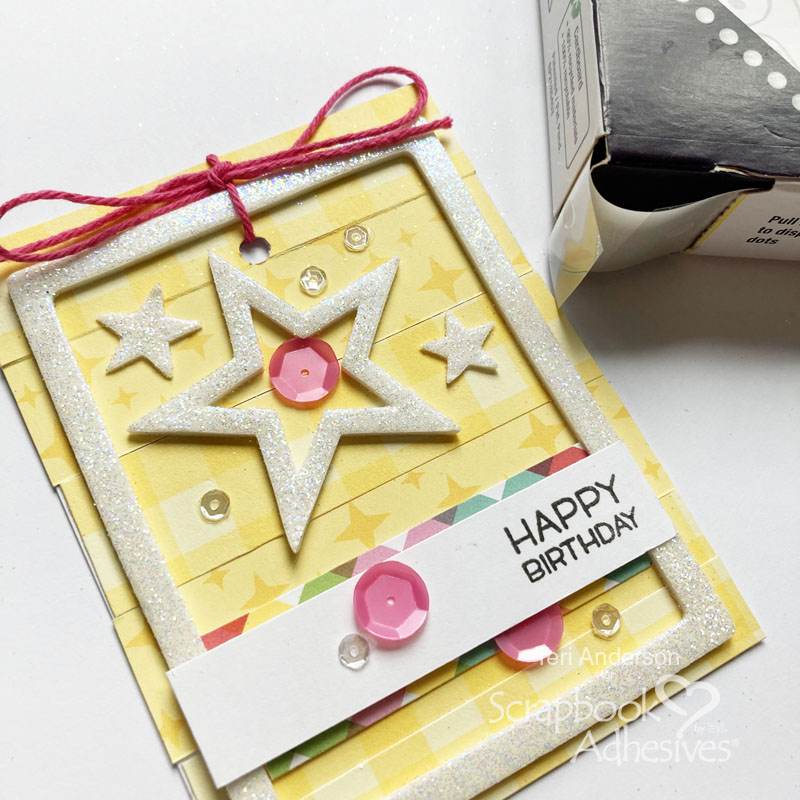
Mount your frame and a few foam stars to the tag. Then add glitter to the foam!

2 for 1 Birthday Tag Cards by Teri Anderson for Scrapbook Adhesives by 3L

Add any additional patterned paper strips to the tag, as well as a sentiment. I wanted my sentiment to pop so I affixed with 3D Foam Circles. Apply a few sequins as well to really make the tag sparkle!

2 for 1 Birthday Tag Cards by Teri Anderson for Scrapbook Adhesives by 3L

Poke a hole through the top of the tag and tie on some ribbon or twine. You’ll end up with one awesome birthday tag!

2 for 1 Birthday Tag Cards by Teri Anderson for Scrapbook Adhesives by 3L

Turn in your tag into a two-for-one card by adhering some patterned paper onto a card. Mount the tag onto it with repositionable adhesive!

Change Your Design by Using Different Foam Shapes and More Patterned Papers

This design is easy to recreate and change up!

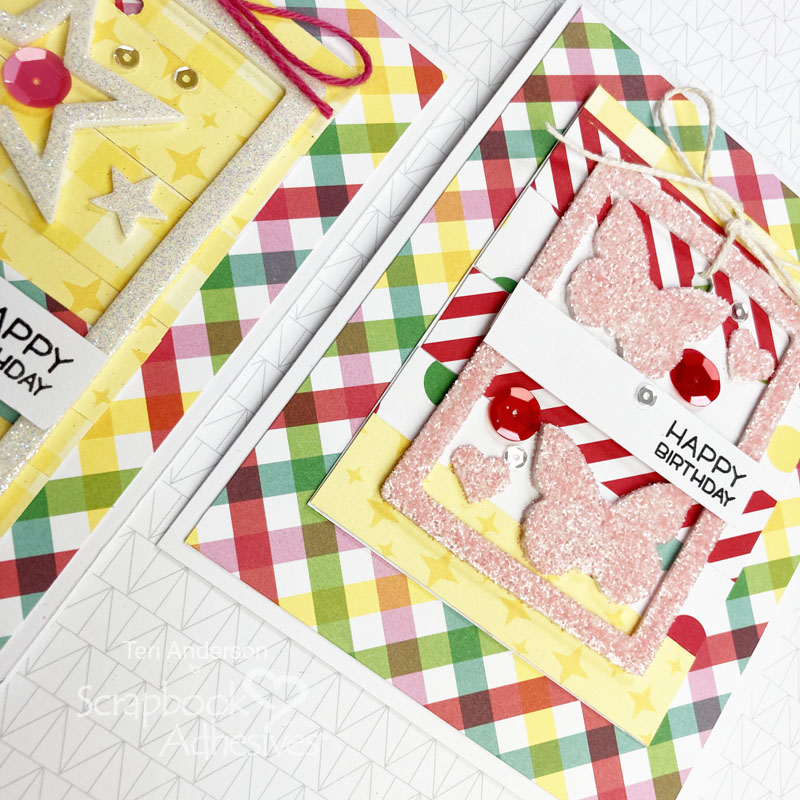
2 for 1 Birthday Tag Cards by Teri Anderson for Scrapbook Adhesives by 3L

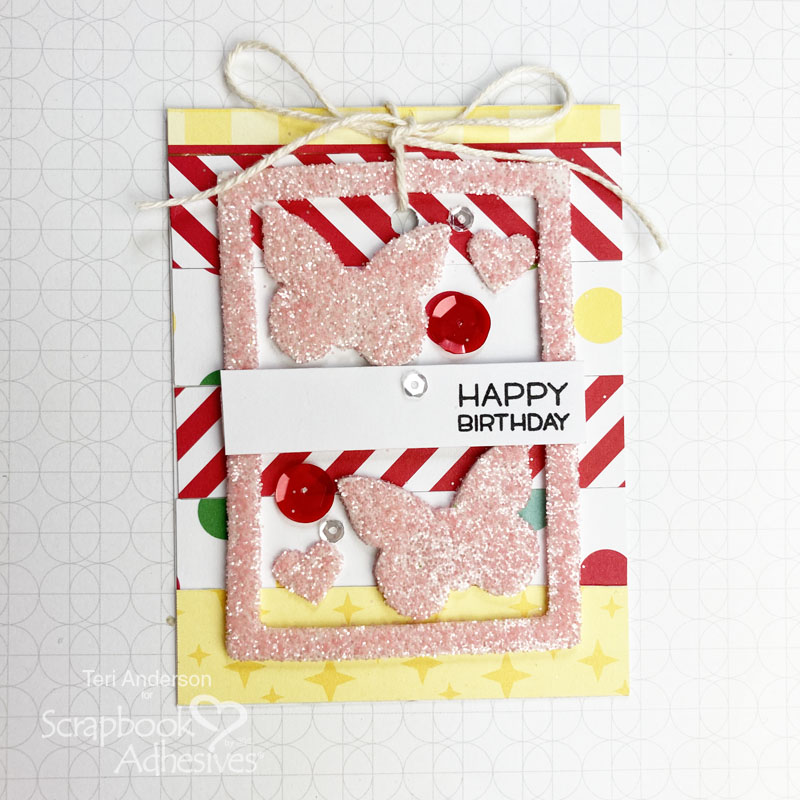
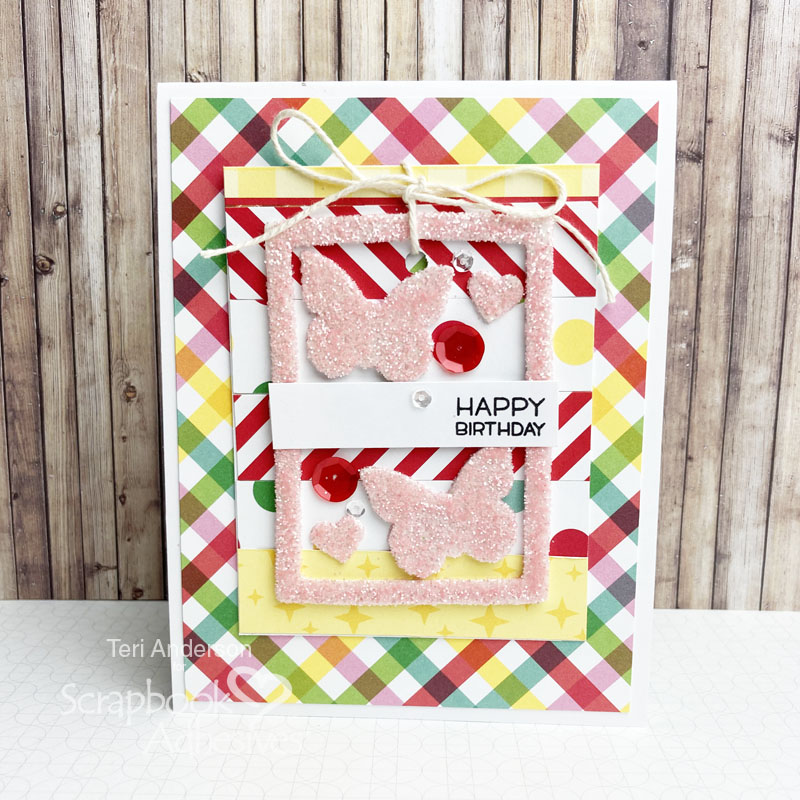
Rather than using just yellow patterned papers to decorate the tag for a second card, I used a variety of different colored paper strips

Also instead of stars, I decorated the tag with foam butterflies and hearts. I also used a pink glitter, which I think is really fun!

2 for 1 Birthday Tag Cards by Teri Anderson for Scrapbook Adhesives by 3L

I hope you are inspired by this tutorial to make your two-for-one birthday cards! Thanks so much for stopping by today!

2 for 1 Birthday Tag Cards by Teri Anderson for Scrapbook Adhesives by 3L

Happy creating,
Teri Anderson

Creative Time: 50 Minutes
Skill Level: Intermediate

Materials Needed
Scrapbook Adhesives by 3L®

Other
White Cardstock: Neenah Paper; Patterned Paper: Doodlebug Design (Christmas Magic Collection); Stamps: Lawn Fawn (Reveal Wheel Sentiments Stamp Set); Ink Pads: Ranger Ink; Sequins: Pretty Pink Posh; Glitter: Ranger Ink; Twine: The Twinery; Hole Punch

Save it to Pinterest!

2 for 1 Birthday Tag Cards by Teri Anderson for Scrapbook Adhesives by 3L Pinterest

Visit our Website and Blog!
Sign up for our Newsletter so you never miss a contest or giveaway!
instagram purple icon facebook icon purple pinterest purple icon twitter purple icon YouTube icon blog subscription purple icon

Mixed Media Dragonfly Tag

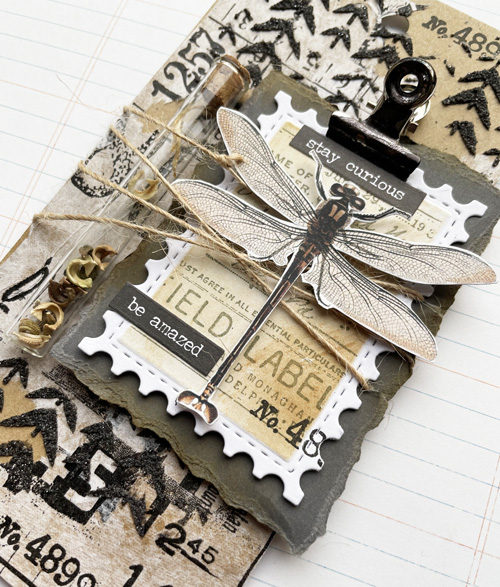
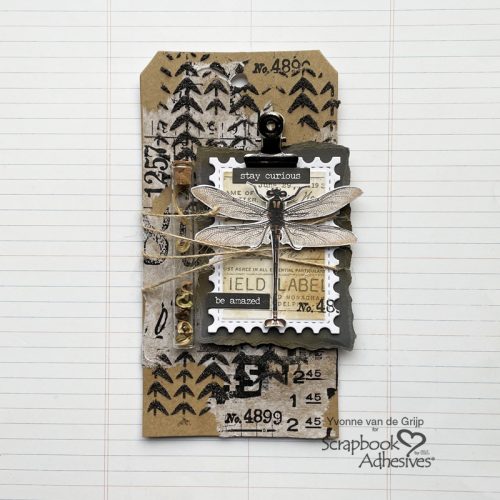
Hi everyone, Yvonne here. Last year I collected all kinds of flower seeds from our garden and I like to gift them to friends in an original way. What came to mind was this mixed media Dragonfly Tag with a small glass bottle on it filled with flower seeds. I hope my friend enjoys receiving it as much as I loved creating it! The tag is all about layers and I would love to share with you all how I made it. Wanna join me in making this 3D Dragonfly Tag using lots of 3D Foam Products.

Mixed Media Dragonfly Tag by Yvonne van de Grijp for Scrapbook Adhesives by 3L

Making the Dragonfly Tag Base

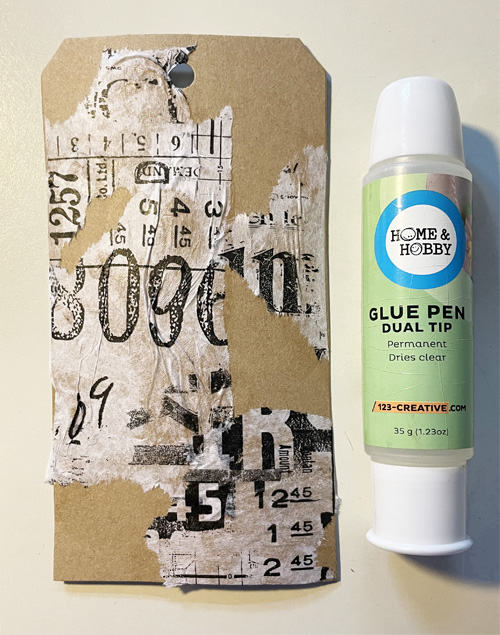
For my Dragonfly Tag, I used a kraft tag as its base and adhered some torn tissue paper onto the tag using the Dual Tip Glue Pen. Simply rub some glue over the back of the tissue paper with your fingers and then adhere to the tag.

Mixed Media Dragonfly Tag by Yvonne van de Grijp for Scrapbook Adhesives by 3L

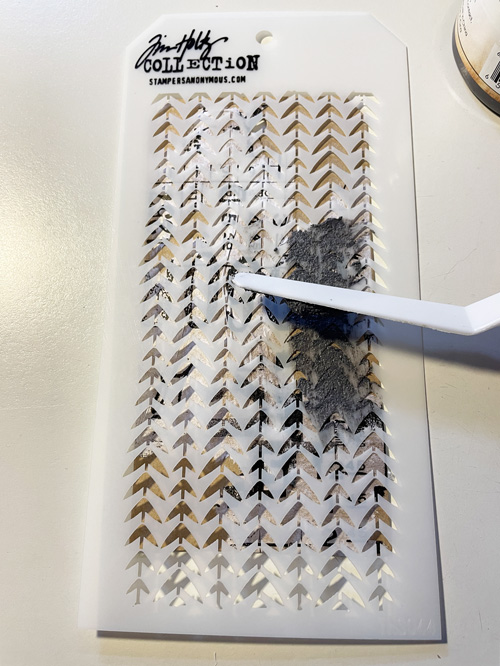
Grab a stencil and a spatula to make a pattern with dark texture paste on the tag.

Mixed Media Dragonfly Tag by Yvonne van de Grijp for Scrapbook Adhesives by 3L

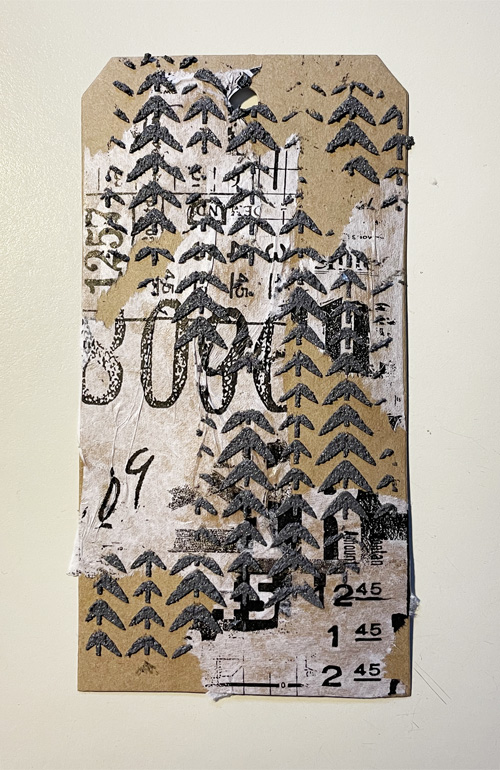
Then let dry. It gives interest and grounds the background. Love it!

Mixed Media Dragonfly Tag by Yvonne van de Grijp for Scrapbook Adhesives by 3L

Create the Postage Stamp Panel

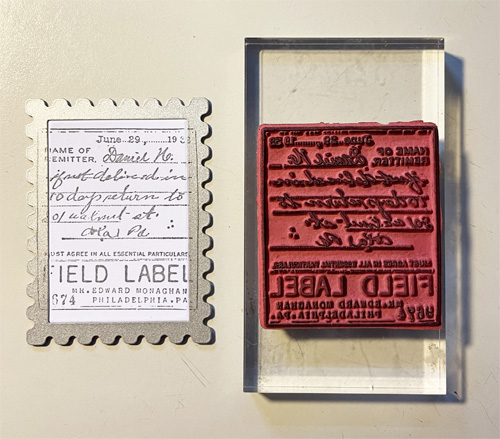
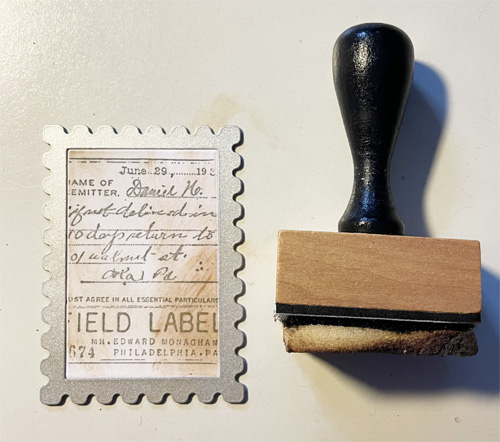
Die-cut and emboss a stamp shape from white cardstock. Leaving the die cut shape in the metal die, stamp text onto it using a grey inkpad.

Mixed Media Dragonfly Tag by Yvonne van de Grijp for Scrapbook Adhesives by 3L

Still leaving the die cut shape in the metal die, distress it with brown ink and an ink blending tool. Now take out the die cut shape out from the metal die.

Mixed Media Dragonfly Tag by Yvonne van de Grijp for Scrapbook Adhesives by 3L

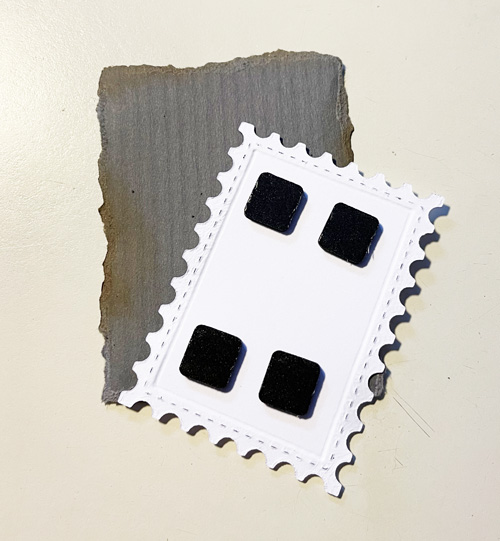
To mat the die cut shape, tear a piece of dark grey cardstock and ink its edges with brown ink.

Mixed Media Dragonfly Tag by Yvonne van de Grijp for Scrapbook Adhesives by 3L

Adhere the stamp shape onto the grey teared panel using 3D Foam Squares Black Mix.

Mixed Media Dragonfly Tag by Yvonne van de Grijp for Scrapbook Adhesives by 3L

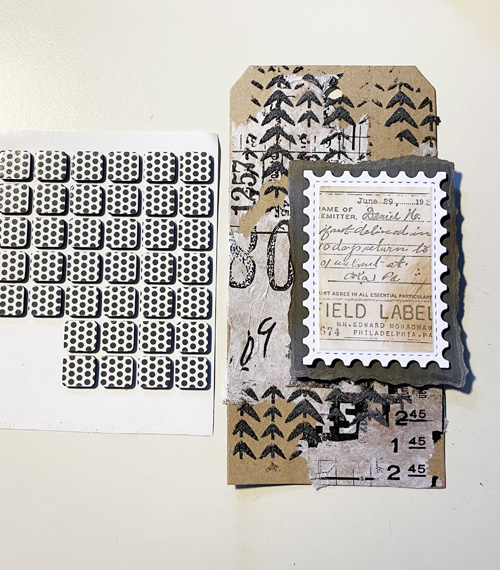
Make sure to wind some twine around the panel before adhering it onto the tag using 3D Foam Squares Black Mix.

Finishing the Dragonfly Tag

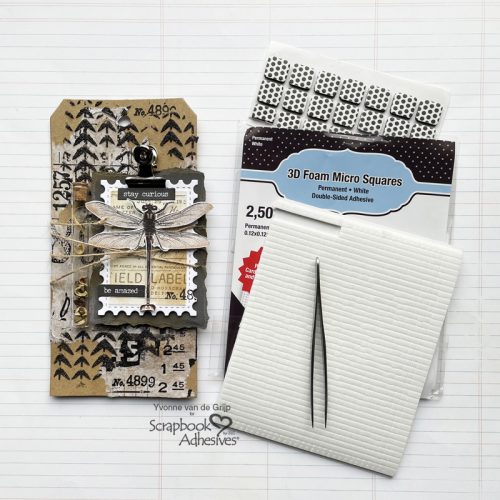
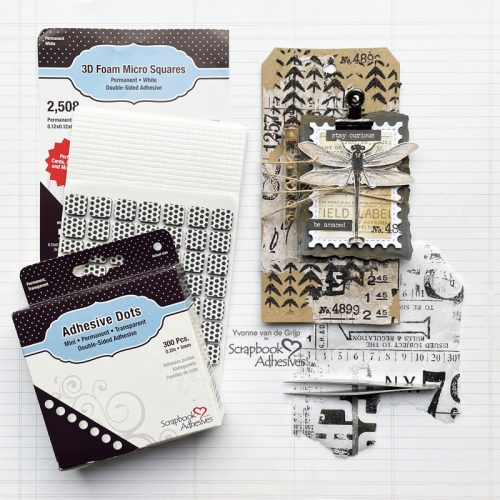
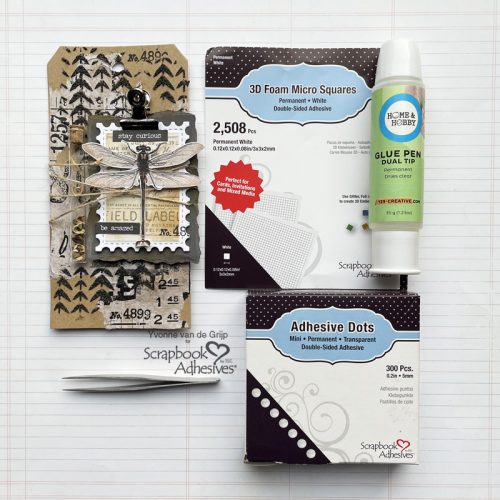
To embellish the tag, I cut a dragonfly image from patterned paper using scissors and adhere it onto the tag using 3D Foam Squares Micro White. These tiny foam squares are really the best for invisible adhere detailed items! I like to use tweezers to pick up the tiny 3D Foam Squares Micro White.

Fill a small glass bottle with flower seeds and adhered it to the tag using Adhesive Dots Mini. Then alter a clip with some alcohol ink and attach it to the tag. Finally, I added some small stamped details using a black ink pad.

Mixed Media Dragonfly Tag by Yvonne van de Grijp for Scrapbook Adhesives by 3L

Well, my Dragonfly Tag is ready to be sent to a dear friend. How about yours?

Thanks for stopping by and wishing you happy crafting!
Yvonne van de Grijp

Mixed Media Dragonfly Tag by Yvonne van de Grijp for Scrapbook Adhesives by 3L

Creative Time: 40 minutes
Skill Level: Advanced

Materials needed:
Scrapbook Adhesives by 3L®
3D Foam Squares Black Mix
3D Foam Squares Micro White
Adhesive Dots Mini

HomeHobby™ by 3L
Dual Tip Glue Pen

Other:
Die-Cutting and Embossing Machine (Spellbinders® Paper Arts: Platinum 6 Machine); Cardstock (White, Kraft, Dark Grey); Patterned Paper (Mintay Papers: Wing Book); Tim Holtz (stencil: Tracks;  stampset:  Fieldnotes; Tissue/Collage Paper: Typeset/Composer), Alcohol ink (Brown, Black, Copper); Inkpads (Grey, Black, Brown); Ink blending Tool; Acrylic Stamp Block; Dark Structure paste; Spatula; Glass bottle; Flower Seeds; Twine; Metal Clip; Scissors; Tweezers

Save it to Pinterest!

Mixed Media Dragonfly Tag by Yvonne van de Grijp for Scrapbook Adhesives by 3L Pinterest

Visit our Website and Blog!
Sign up for our Newsletter so you never miss a contest or giveaway!
instagram purple icon facebook icon purple pinterest purple icon twitter purple icon YouTube icon blog subscription purple icon