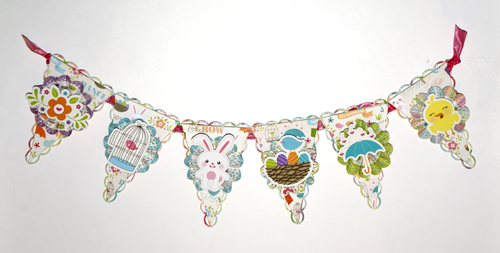
I have an Easter Banner tutorial today!
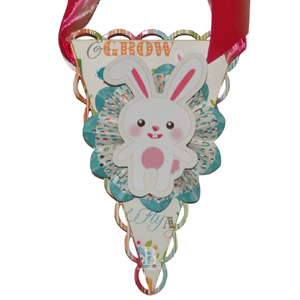
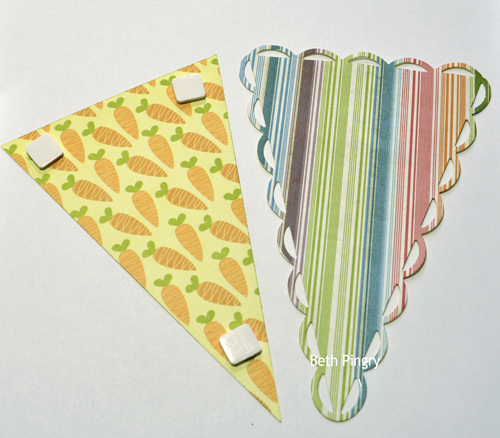
 And it’s sooooo easy to make! First I die cut the pieces, six of each.
 Next I made the florets, which look tricky, but really they’re pretty simple. I die cut the edges for a fun design.
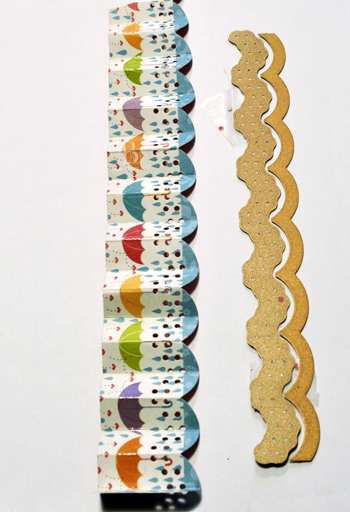 Fold at 1/2 inch intervals. Do mountain/valley folds the whole length, then adhere the ends to form a circle. MyStik™ Permanent Strips work perfectly for this.
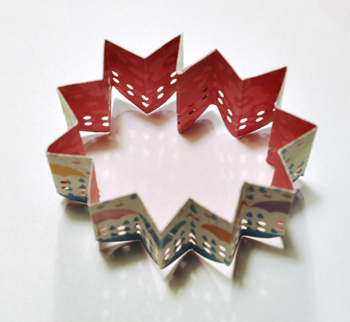 Push the straight edges toward the center, with the decorative cut edges to the outside. Place a Dodz 3D Adhesive Dot at the center of the top, then flip it over and add a Dodz 3D to the bottom. Dodz come out of the dispenser with a clear plastic transfer sheet so you don’t have to touch the adhesive.
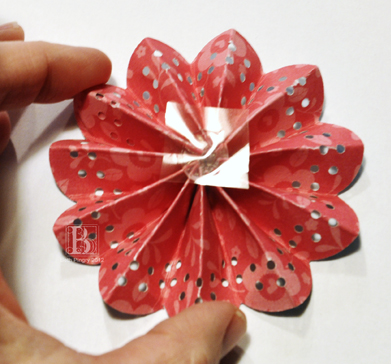 The clear transfer sheet stays on, and this allowed me to make several florets at once, and have them on my work space without sticking to everything!
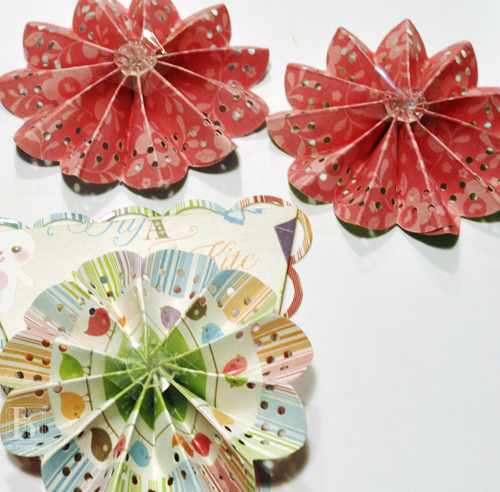 I assembled the banner parts with the Nested Lacey Pennants, then the Nested Pennants using 3D Foam Squares, then the florets with Dodz 3D, and then the Imaginisce colored die cuts. The top Dodz piece not only holds the floret together, it holds the next layer!
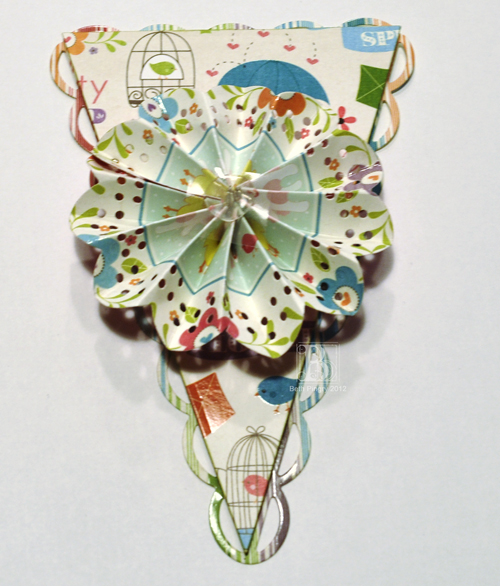 Now just string ribbon through the back side and hang it up!
Thank you for stopping by today!
I used these supplies today:
- SCRAPBOOK ADHESIVES BY 3L™: 3D Foam Squares, MyStik Permanent Strips, Dodz 3D
- Imaginisce®: Hippity Hop Collection
- Spellbinders™: Grand Calibur® machine S5-028 Nested Pennants, S5-029 Nested Lacey Pennants, E8-007 Classic Edges One, E8-014 Classic Decorative Inserts Six,
- May Arts: Ribbon

By rush February 13, 2012 - 5:12 am
really cute banner! thank you for sharing.
By Shana aka Drayia February 13, 2012 - 7:11 am
I LOVE Spellbinders and have this set you used. What a great banner for Easter and love the idea of Dodz, I have never seen those here in Canada. Thanks for sharing and the chance to win!
By MargieH February 13, 2012 - 7:13 am
Lovin’ those Dodz – makes it so easy to create those flowers 🙂 Such a cute project – perfect for the upcoming Easter holiday!
By Nathalie Jakubik February 13, 2012 - 7:31 am
Very cute banner. Thanks for the idea! There would be great for all kinds of different occassions. 🙂
By Rexene Lockyer February 13, 2012 - 7:41 am
This is a wonderful idea. Can be used on all kids of cards and layouts. Thanks!!!
By liz aka javagirl February 13, 2012 - 8:32 am
This is so great I love that it doesn’t have words great idea awesome that adheasive can hold the accordian will be on the look out thanks for fun blog post
By debbie gardia February 13, 2012 - 8:34 am
This is perfect for my grandsons love it all
Great adhesive fairly new to all this
Thanks for sharing
By sandra m February 13, 2012 - 8:40 am
Cute banner! Love all those sweet little birdies on the pattern papers.
By Chelle K February 13, 2012 - 8:58 am
Beautiful banner.
By Ann May February 13, 2012 - 9:22 am
Very crafty, loved all those flowers &bunnies ,could easily adapt for a new baby ,thanks for the inspiration and the chance to win ,
By Miriam Prantner February 13, 2012 - 9:34 am
That banner is so cute! Thanks!
By Guiseppa Gubler February 13, 2012 - 9:52 am
Love this banner!
By Barbara Greenberg February 13, 2012 - 10:21 am
Wow Wow Wow, what great inspiration for beautiful banners and also such great flowers on them too.
Will have to try this soon.
By Maryann February 13, 2012 - 10:21 am
What a nice and cute banner here, it really looks awesome. And these Dodz sounds pretty cool too, but must admit, I´ve never heard or seen about them before??? Must have a look around and see, if I can find them here anywhere, but just not sure about that. But it sure ease the work quite a lot, I can see, if they can be found.
I really love, how you made the banner look soo great Beth, awesome work again here.
By Kerys February 13, 2012 - 11:00 am
WOW! What a super cute banner – thank you for the tutorial! Thank you so much for the inspiration – I can’t wait to see what is in store for us for the rest of the week! 🙂 x
By Amanda Coleman February 13, 2012 - 11:01 am
Darling banner! I {heart} Scrapbook Adhesives!
By amanda February 13, 2012 - 11:07 am
soo cute … thanks for the inspiration !
By Gail February 13, 2012 - 11:20 am
Thanks for the tips. Love, love, love the banner.
By Me-Ma Kim February 13, 2012 - 11:41 am
OH MY! LOVE the Banner!! Thanks for the info on HOW-TO!! Have a GREAT Day,
Me-Ma Kim
By Rebecca W February 13, 2012 - 12:02 pm
Adorable banner!
By Danielle February 13, 2012 - 12:51 pm
Oh my goodness, that banner is so cute!! Love the layers.
By Vicki Chrisman February 13, 2012 - 12:59 pm
Very Cute Beth!!
By Mandy Szeto February 13, 2012 - 1:41 pm
awesome banner! I love the colors and theme. 🙂
By linda trzos February 13, 2012 - 2:07 pm
LOVE the Banner….Imaginisce has such CUTE critters. Very cool trick with the Dodz…have to get some of those!
By alwayscharlie February 13, 2012 - 2:30 pm
That is one fabulously cute banner.
smilesmoore2 atverizon dotnet
By Sue D February 13, 2012 - 3:30 pm
Very cute banner with the rosettes and die cuts.
By Shellye McDaniel February 13, 2012 - 3:53 pm
Love this banner! You’ve given me a great idea for my Spring decor 🙂
By Sharon Jaeger February 13, 2012 - 4:05 pm
Wow your adhesives make accordion flowers so easy!!
Thanks for the tip!
By Trisha February 13, 2012 - 4:11 pm
Great and fun banner. Love the papers and thanks for the explanation of the adhesives you used. Can’t wait to see what is up for tomorrow. patnbobcuddy at gmail dot com
By Micah G. February 13, 2012 - 4:25 pm
Boy oh boy could I use those awesome supplies!
By B. Poteraj February 13, 2012 - 4:25 pm
Oh how cute the banner is. Thanks for showing us up close so we can really see how to make them.
By Sharon Gullikson February 13, 2012 - 4:26 pm
So darned cute. I need to make one for each holiday.
By Natasha G.P. February 13, 2012 - 4:26 pm
I’m going to try to make the rosettes with my score board.
By conniemelancon February 13, 2012 - 4:35 pm
cute banner! I just ordered those Pennants! Thanks for sharing.
By Micah G. February 13, 2012 - 4:48 pm
The bunny things and flowers look really good together. Thanks for showing us how to make nice decorations.
By Randi February 13, 2012 - 4:55 pm
I like that I can experiment with different colors and textures with this project.
By Bernie February 13, 2012 - 5:09 pm
How cute it this! Love it! Thanks for the chance to win.
Blessings Bernie
By Jeanette February 13, 2012 - 6:10 pm
Great banner and looks easy to make! Thanks for the chance to win!
By Dawnll February 13, 2012 - 7:59 pm
This is cute as can be-love all the layers-the Easter theme is adorable
Thanks for a chance to win
By Angel B Burton February 13, 2012 - 8:11 pm
What fun. Love the banner project. Angel
By Sandi Marson February 13, 2012 - 11:21 pm
Love the banner! I wish my rosettes turned out like these ones!
Thanks for sharing!
By Cathy February 14, 2012 - 2:17 am
So quick and easy… wow!
By Michele Smith February 14, 2012 - 6:07 am
What a great idea! Thanks for sharing your wonderful banner!
By Melissa Kaye February 14, 2012 - 8:45 am
Love your take on the banner! Super cute!
By Lynda February 14, 2012 - 11:25 am
Love those florets!
By Silvia Mendoza February 14, 2012 - 12:10 pm
Awesome blog hop. I love the new easter line from Imaginise. That banner is beautiful and thanks for the glue dot idea. I had never thought of doing it that way.I really hope to win.
By Sandi Pressley February 14, 2012 - 12:15 pm
Wow…great banner! I am going to pin this to my Pinterest board for future reference!
By Larissa Heskett =) February 14, 2012 - 1:23 pm
This is so great I love that it doesn’t have words great idea awesome that adheasive can hold the accordian will be on the look out thanks for fun blog post
By Michelle McClure February 14, 2012 - 1:34 pm
What an adorable banner! One can never have enough adhesive!
By Ange February 14, 2012 - 3:01 pm
That banner is seriously adorable!! Love it!
By Lisa L. February 14, 2012 - 5:41 pm
OHHH I love the use of the 3D Dodz, this really would make doing rosettes a lot easier! Thanks so much for this idea! And this banner is just the cutest!
Lisa
By Sheri February 15, 2012 - 8:41 am
I love this idea, so fun to create home decor.
By DebbieC. February 15, 2012 - 9:20 am
Great rosettes for the banner and it is nice to have great adhesive when making rosettes.
By Tanya Wilson February 15, 2012 - 5:12 pm
CUTE CUTE CUTE!!!! I would love this collection to make a banner!!! LOVE IT!!
By KellyG February 15, 2012 - 9:10 pm
So cute, awesome banner!!
By Michele Duffy February 15, 2012 - 11:04 pm
I enjoyed the banner tutorial! Thanks for the chance to win.
By Luanne P. February 16, 2012 - 1:42 am
oh my gosh! so pretty banner. love love the individual designs
By Sabina February 16, 2012 - 1:50 am
Adorable!!!! Really love it!!!
By Brenda aka centralNYscrapper February 16, 2012 - 2:02 pm
This is so stinkin’ cute that even though I don’t have little ones I want to make it! Thanks for sharing!
By Lisa Watson February 17, 2012 - 8:50 am
oh, I love love love this banner!! SO adorable!!
By Christine Dring February 17, 2012 - 7:57 pm
Fantastic banner! So stinkin’ cute!