
Hi! It’s Lisa here with you today to share a cool card using some of the new products AND some of the the faves along with a bit of watercoloring. I hope that you enjoy it!
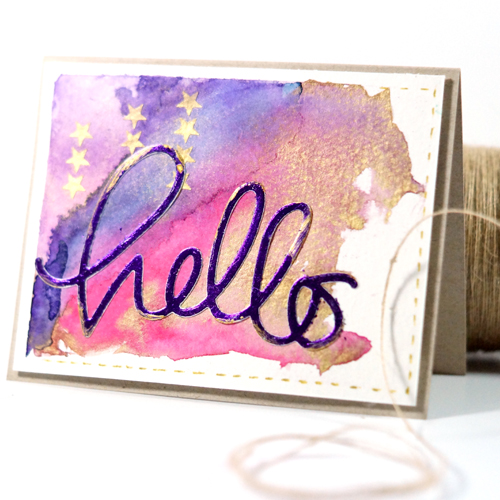
First I created the watercolor background. Just lots of really loose, lovely colors here. But, I wanted to be sure to interject some gold and leave some white space. Then I added a few rows of stars. And, using a soft brush, I added a light dusting of gold pigment powder directly on top of the stars by swirling the pigment on top of the stars in a circular motion.

On the opposite end of the watercolor piece I used a metallic gold pen and drew dotted lines to finish the edge. Little touches like this are what make a card so personal and unique.
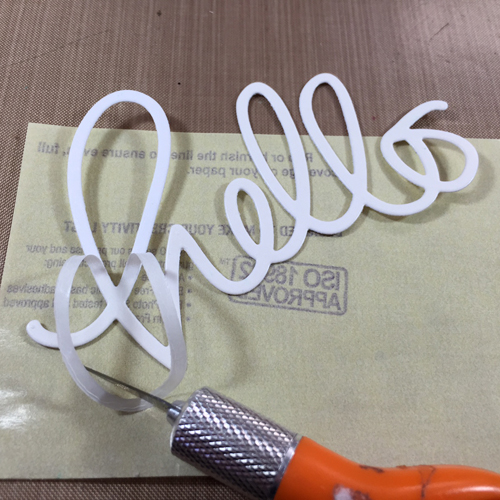
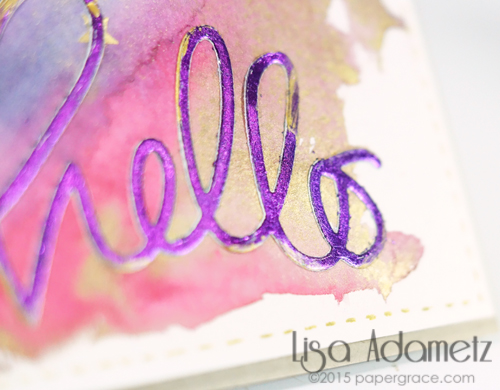
Onto the “hello”! Using the 6 x 12″ pack of Adhesive Sheets, I cut a 3 x 4″ piece out (to the size of my cardstock and the Hello die). Following the directions on the yellow release paper I removed the adhesive and burnished it onto the cardstock. (Keep the yellow release paper! It comes in handy.) Die-cut the “Hello” following the directions and remove the release paper from the adhesive side.

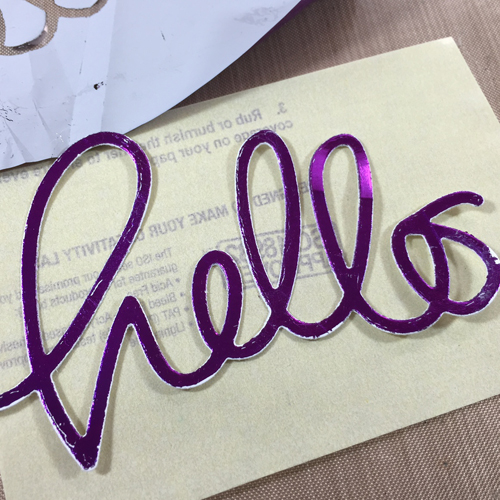
Once the release paper is off, place your foil shiny side up onto your die (which will now be VERY sticky) and burnish (rub) using a bone folder or something similar. As long as the surface is sticky enough and has been burnished in well, the foil will adhere.
After the foil was adhered I HAD to get a little mixed media-esque. 😉 So, I added a little Gold Texture Luxe™ around the edges of the die cut. It brings all of the gold from the background together with the front of the card.
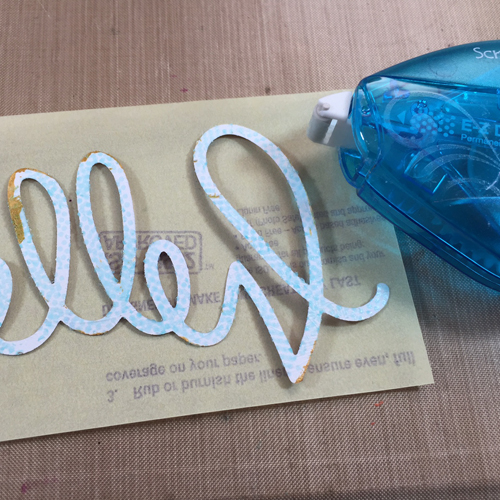
After adding the Texture Luxe™ I added E-Z Dots® Permanent Refillable to the back of the die-cut. Using the release paper made it really easy to do this and not get adhesive everywhere. Just another tip! Then adhere to the front of the watercolor piece.
Place 3D Foam Squares Regular White on the back of the watercolor piece and adhere to card base. All done!

Thank you so much for stopping by today and I hope you have an amazing and creative weekend!
Supplies from Scrapbook Adhesives by 3L®:
E-Z Dots® Permanent Refillable Adhesive
3D Foam Squares White Regular
Adhesive Sheets 6” x 12”
Other Supplies:
Paper: Neenah, Strathmore
Watercolors: Kuretake Gansai Tambi
Faber-Castell Design Memory Craft®: Texture Luxe™ Gold
Die: Simon Says Stamp

By AJ Otto February 27, 2015 - 2:52 pm
swoon. this is so fabulous Lisa!!!
By Margie Higuchi February 27, 2015 - 4:05 pm
Oh so FABULOUS! Love EVERYTHING about this card <3
By Kimberly E. February 28, 2015 - 11:30 am
Love this card so much!! The gold detail on the die cut word was brilliant Lisa!!!
By Kimberly March 1, 2015 - 5:12 pm
Very pretty card!