
Hi everyone! It’s Lisa here with you to share how I created my shaker card today. And I will admit…this was my very first shaker card. But, having the right adhesives makes it so much easier!
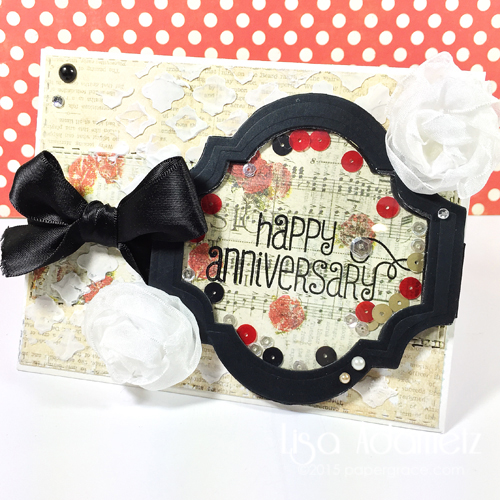
Not bad for my first shaker card, huh? 😀 I’ll be sending this to my parents. Their anniversary is this weekend. ♥
I’ll be honest. I looked up a LOT of tutorials before making this. But the only one that was any help was one that I found on YouTube by Kimberly Crawford and she actually USES the 3D Foam Creative Sheets, too! (The girl was in my brain, I tell ya.) Between her video and my tutorial I hope that this will get the job done. 🙂
1. Create card base (mine is A2 sized and scored on the horizontal edge). Add patterned paper 1/8″ smaller and adhere with E-Z Dots Permanent Refillable.
2. With dies that nest (fit within each other to create a frame) die-cut the following: 1 frame out of black cardstock and 2- frames out of 3D Foam Creative Sheets, black. Then using only the large piece of the two dies used to make the frame, die-cut the following: 1 piece out of patterned paper and 1 piece out of acetate.
That will create 3 frames (one cardstock and 2 out of 3D Foam Creative Sheets) and 2 solid pieces (one patterned paper and one acetate).
3. & 4. To build the shaker I found it easiest to build from front to back. So, I started with the black cardstock frame, then the 1st 3D Foam Creative Sheet Frame, then the acetate, the 2nd 3D Foam Creative Sheet Frame, NOW the embellishments (being careful not to add to many – less is more…and FLAT is best), and then finally the back of the frame (which is the patterned paper).
Be sure to stamp the patterned paper prior to building the shaker if you have a sentiment within your shaker.
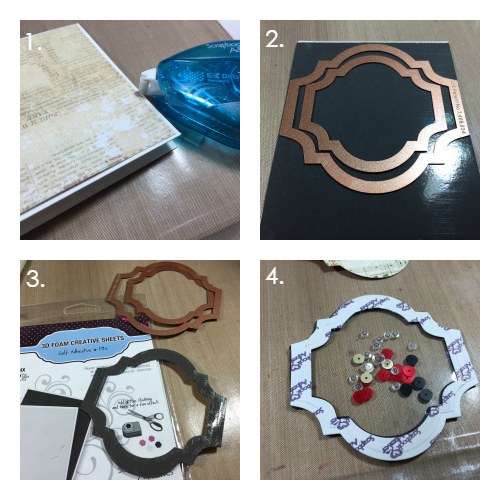
I placed a TON of 3D Foam Squares in black on the back of the shaker piece and will adhere towards the end.
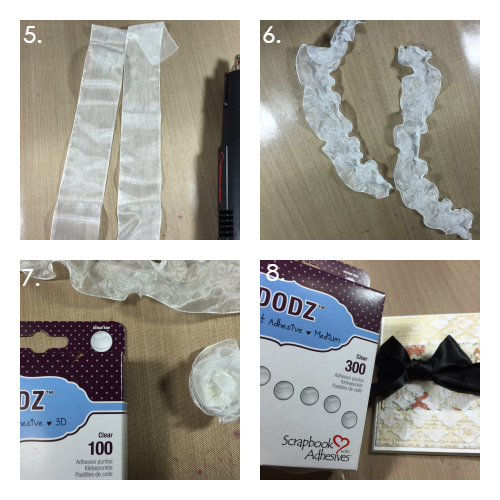
5. Cut two lengths of organza – approximately 12 – 14″ in length.
6. Using an embossing gun, melt the ribbon. Be extremely careful as the ribbon gets VERY hot! (This trick doesn’t work with all ribbon types.)
7. Holding the end of the ribbon in a pair of tweezers, wrap into a rose shape. Secure with Dodz Adhesive Dots 3D.
8. Apply Whipped Spackle over card front through a stencil. Once dry, wrap black satin ribbon around card and tie in bow. Secure bow with Dodz Adhesive Dots Medium. Once the bow is secure then the shaker piece can be added by removing the backer pieces off of the 3D Foam Squares, Black, and any additional embellishments can be added.
I hope that you enjoyed my first foray into shaker-card-land. And that my tutorial made some sense. The key is knowing how many pieces to cut and of what! I think that if you were using a simple shape like a circle it would be way easier. Also be aware that using a die-cutting machine WILL flatten your 3-D Foam Creative Sheets. So, if you have enough on hand you may want to cut a few extra. 🙂
Supplies:
From Scrapbook Adhesives by 3L®:
3D Foam Creative Sheets, Black
E-Z Dots® Permanent Refillable Adhesive
3D Foam Squares Black – Regular
Dodz Medium
Dodz 3D
Other Supplies:
Spellbinders Nesting Dies
Prima Patterned Paper
Faber-Castell Design Memory Craft® Whipped Spackle
Mama Elephant Stamp
Satin Ribbon
Sequins
Adhesive backed gems
Cardstock
Organza ribbon
Stencil

By Barb Thompson March 11, 2015 - 4:20 pm
Yes, really great shaker card!
By Kimberly March 20, 2015 - 8:29 am
Great card, LOVE that bow!