
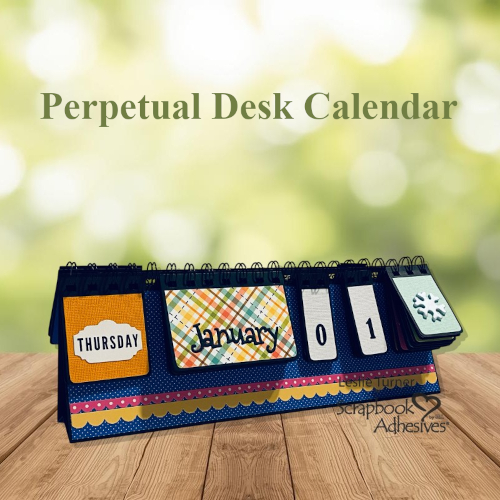
Hey everybody, happy Saturday – I hope you have something fun planned this weekend! As we head into a new year, I keep asking myself where did THIS year go?! Leslie here, sharing a perpetual calendar with you today. I’m so stinkin’ excited to create a calendar full of bright Doodlebug Design patterned papers and fun embellishments. It’s exactly what we need for the new year, right?! Let me show you how I made this one!
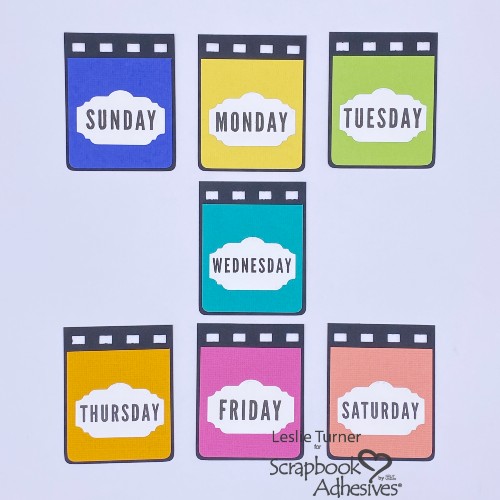
Days of the Week
Firstly, I stamped the week days in black ink on white cardstock and cut them with a label die in my stash. Had to improvise a bit with three of them that were too long for the label die. Stamped and then copied them at a reduced percentage which worked like a charm.
Next, I cut seven panels of heavyweight black cardstock from my stash at 2″ x 2-1/2″, and rounded the bottom corners of all the pieces. Also cut seven slightly smaller panels from different colors of Doodlebug Design textured cardstock. Also Used the E-Z Runner® Grand Permanent Strips Refillable Dispenser to adhere the panels and the week day labels. The final step was punching holes at the top with a binding machine.
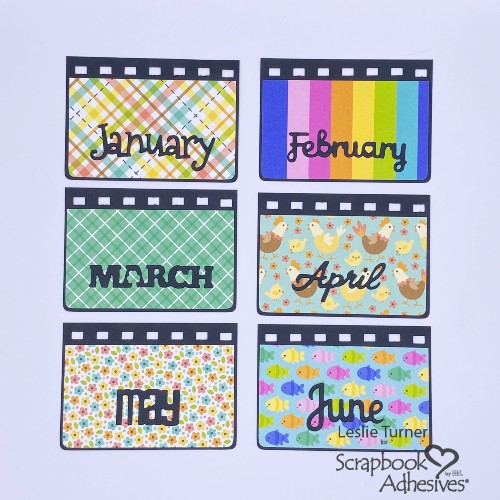
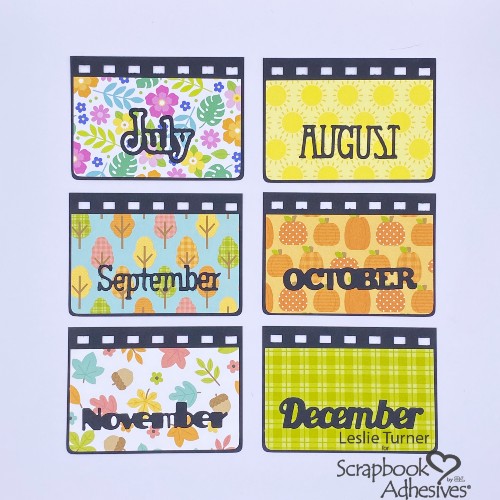
Months of the Year
Secondly, I used dies in my stash to cut the months of the year from black cardstock. Similar to the previous step, I adhered 12 Doodlebug Design patterned paper panels to 12 black cardstock panels cut at 2-1/2″ x 3-1/2″ using the E-Z Runner® Grand Permanent Strips Refillable Dispenser. Then I punched the binding holes at the top.
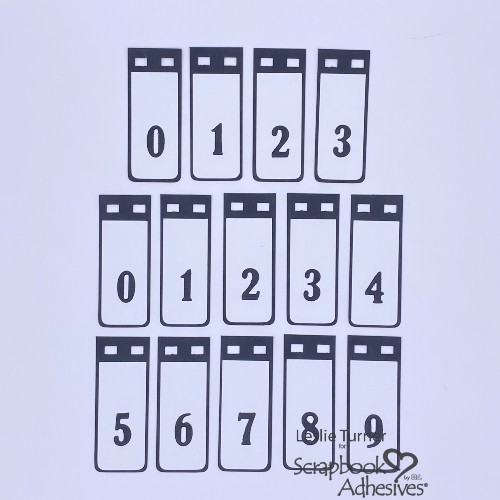
Dates in the Month
Thirdly, using dies in my stash, I cut numbers from black cardstock to represent the dates in the month. As before, I adhered 14 white Doodlebug Design panels to black cardstock panels cut at 1″ x 2-1/2″ using the the E-Z Runner® Grand Permanent Strips Refillable Dispenser. The Dual Tip Glue Pen was used to adhere the numbers to the panels.
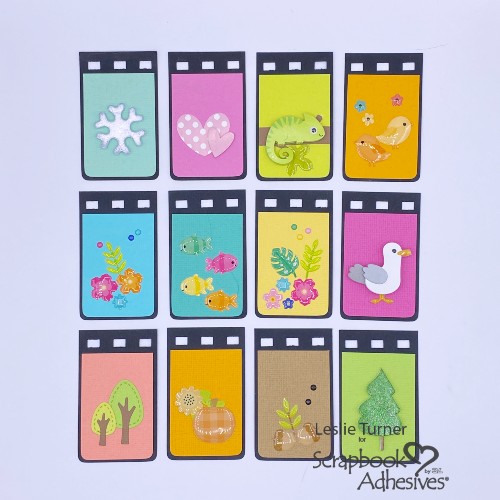
Seasonal Icons
Fourthly, I cut more Doodlebug Design textured cardstock panels in various colors for the seasonal icons. Once again, using the E-Z Runner® Grand Permanent Strips Refillable Dispenser, I adhered these panels to black cardstock panels cut at 1-1/2″ x 2-1/2″. Quite a few Doodlebug Design Doodle-Pops and Shape Sprinkles were chosen for these tabs.
Additionally, I employed the ‘Wear Your Adhesive on the Outside’ technique using 3D Foam Snowflakes with Metallic Transfer Foil Sheets Nature Colors. Besides that one, I also used 3D Foam Christmas Shapes with Metallic Transfer Foil Sheets Celebrate Colors for another tab. Thin 3D Foam Squares White Mix were used under layered elements on two of the tabs.
Perpetual Calendar Base
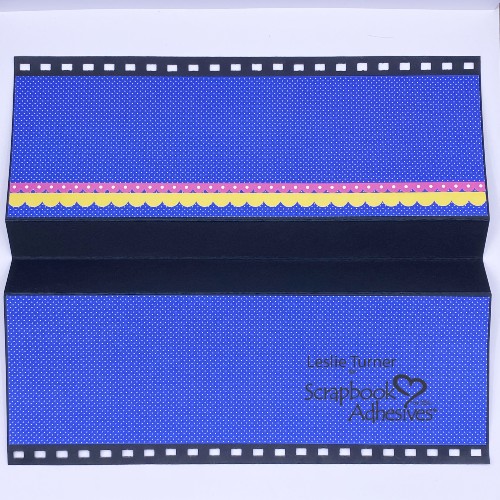
Finally, I cut the perpetual calendar base from the heavyweight black cardstock. Simply adhere a 7″ x 11″ piece to a 4″ x 11″ piece which yields an 11″ square base. Score the larger piece at 4″, 5″ and 6″ on the long side prior to adhering the two pieces. Valley-Mountain-Valley fold the score lines and burnish with a bone folder. This creates the bottom of the base. Designer tip: If you have 12″ x 12″ heavyweight cardstock 130# or higher, you only need one piece trimmed to 11″ square. Added Doodlebug Design patterned paper panels and scalloped border elements, and then punched the binding holes.
Finishing It Up
After placing all the tabs in the correct order on the wire, I closed the binding wire and the calendar was complete. This was definitely a fun project and such a joy watching it come to life!

Thanks for visiting!
Leslie
Creative Time: 180 mins
Skill Level: Intermediate
Materials Needed:
Scrapbook Adhesives by 3L®
E-Z Runner® Grand Permanent Strips Refillable Dispenser
3D Foam Snowflakes
3D Foam Christmas Shapes
Metallic Transfer Foil Sheets Nature Colors
Metallic Transfer Foil Sheets Celebrate Colors
Thin 3D Foam Squares White Mix
HomeHobby™ by 3L
Dual Tip Glue Pen
Cardstock: Neenah Classic Crest 130# Epic Black and 80# Solar White cardstock
Paper: Doodlebug Design Summer Fun and Farmhouse 12×12 Textured Cardstock; Summer Fun and Farmhouse 12×12 Paper Packs; Horn A Plenty and Tropical Trio Doodle-Pops; Fall Flurry, Island Tropics, Summer School and Feathered Friends Shape Sprinkles
Stamps: Stampin’ Up Day To Day Stamps
Ink: Versafine Onyx Black
Dies/Punches: Inspired By Stamping Fancy Label Dies 1, Sizzix Calendar Months Thinlits, Lawn Fawn Center Picture Window Card Add-On Dies, Kadomaru Pro Corner Rounder
Accessories: MISTI Stamp Tool, Big Shot, Zutter Bind-It-All with 1/2″ Black Wire
Click Preferred Retailers List
Save to Pinterest!

Visit our Website and Blog!
Sign up for our Newsletter so you never miss a contest or giveaway!


