
Creative Photo Corners are a versatile and fun product. Read on to see how Kristen uses them on the roof of her haunted house!
It’s never too early to start planning your fall home décor projects – especially when it comes to Halloween, my favorite! Halloween has become another holiday, like Christmas, where people go all out as far as decorations. But a quick walk down the aisle at your local store reveals that the latest and greatest decorations are not cheap! What better way to save money and still show your Halloween spirit than by making your own?
Here is a super simple and super “spooky” Haunted House I made using Crafty Power Tape & Photo Corners
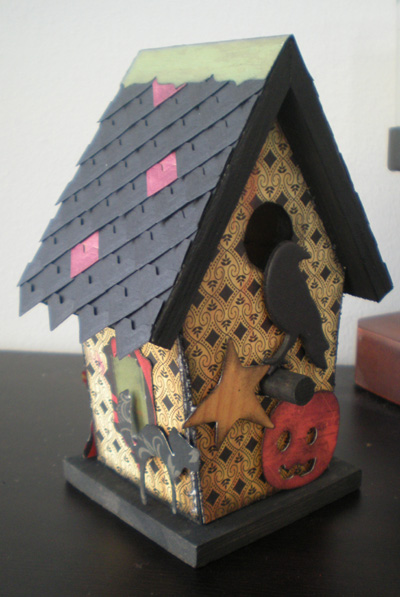
First, I took an ordinary wooden birdhouse that you can find at your local craft store. I painted it with black just in case any part showed through. Then I measured my paper, and adhered it the birdhouse using Adhesive Sheets.

The next step is to start placing the photo corners on the roof to look like shingles. I lucked out with the first row – no trimming needed!

For the next row, I staggered the corners and then simply trimmed a corner in half and finished the row. I continued on with this stagger pattern as I moved my way up the roof.

Now, everyone knows Haunted Houses are supposed to eerie and creepy, so to add interest, I thought I would add some colored shingles – here and there. To do this, I used my ink to change the color of the Kraft colored photo corners (this also works with the white or ivory corners).

Then I added the purple photo corners sporadically in the shingle pattern. The great part about being able to ink the corners is that I can make them the perfect shade for my project. Once I got to the top the issue became how can I top this off and still have it look clean?

The answer was Crafty Power Tape! I placed a strip of Crafty Power Tape on the top of each side of the roof, and then added a “cap” of paper which coordinated with the project, and with Crafty Power Tape, I know that it was a great choice for sticking to wood.

In order to decorate the perimeter of the house, I wanted to use some shapes I cut with my electronic die cutter. The perfect solution for adhering the paper temporarily to the glass mat for cutting is my E-Z Dots®. The dots hold strong while the cutter is working – yet rub off easily once its done!

Once I had all the die cuts, I adhered them to the birdhouse using Black 3D Foam Squares, the perfect choice for this creepy house!

Supply list:
- Creative Photo Corners Black & Kraft
- Crafty Power Tape
- Adhesive Sheets
- 3D Foam Squares
Paper –Cosmo Cricket, Ink – Color Box & Ranger, Die cuts – Making Memories..
Kristen Cohen
Visit our Website and Blog!
Sign up for our Newsletter so you never miss a contest or giveaway!


By Holly September 8, 2010 - 10:38 am
Genius use of photo corners!