
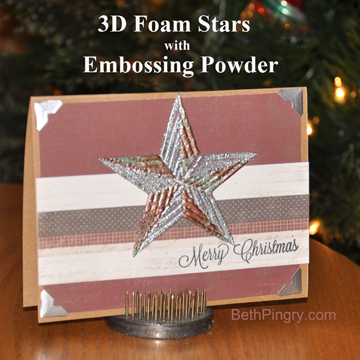
It’s December and time to get those Christmas cards finished! Here is a fun idea for 3D Foam Stars and embossing powder!
 To create the effect where I used 2 colors of embossing powder on the same star I used a ruler and a craft knife.
First I cut around the star to remove it from the sheet of stars. Leave it stuck to the liner papers. I carefully sliced through the top liner to cut it, without cutting all the way through the foam (I did in one spot…a light hand and more practice required!)
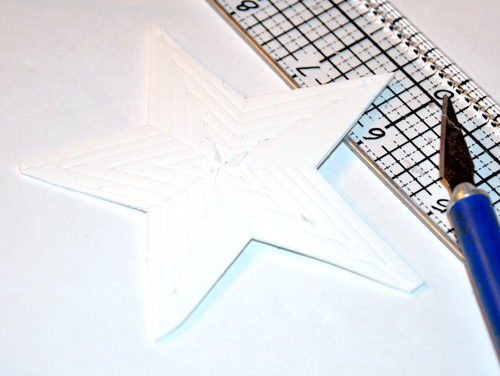
This created 10 sections on the 5 point star. Carefully peel off the liner on half of the sections, then apply the first color of embossing powder. Heat just until each section is melted. Wipe off excess from the star.
Tip: I like to pour embossing powder into round coffee filters. There’s no static, and it’s easy to pour the excess back into the container!
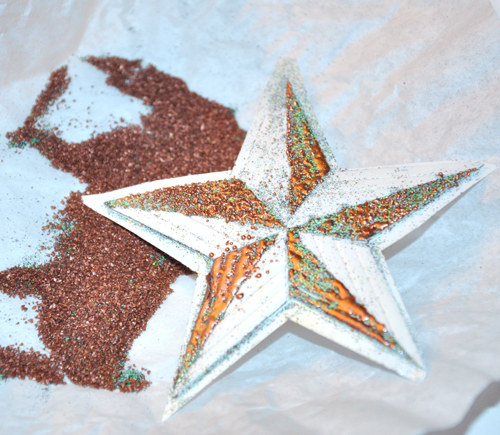 Now carefully remove the rest of the liners, add the second color of embossing powder and heat those sections. Tweezers or the tip of the craft knife work great on the tiny pieces!
Create the project to use this on, and then apply the star. Peel the backing off the star and place it on the project. Don’t stretch or pull apart the nested shapes, this takes a gentle hand, but is very doable. Just don’t rush it!
Thanks for coming by and have a great day!
Beth Pingry
Supplies:
- Scrapbook Adhesives by 3L®: 3D Foam Stars, E-Z Squares® Refillable, Creative Photo Corners Silver
- Stampendous: Sterling Silver & Aged Copper embossing powders
- A Jillian Vance Design: The Holiday Zipper Stamp Set
- Carta Bella: Christmas Day 6×6 Paper Pad
- Black ink, kraft cardstock, craft knife, ruler
By Stampendous Graphics December 4, 2013 - 7:18 pm
Wow! This is just gorgeous! What a terrific idea, and so simple and dynamic! Thanks so much for sharing with our products!