
Happy May Day! It’s Beth here with a textured tag tutorial that’s perfect for Spring!
 Here’s a quick tutorial – it’s so easy!
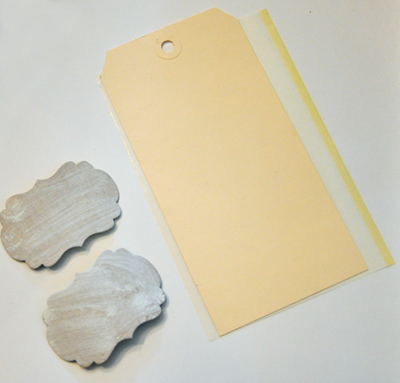 First die cut desired shapes from cardstock or chipboard. I used chipboard then added some paint on top to neutralize the darker color. (This isn’t the order I did it, so follow the written instructions – I always figure out an easier way while I’m doing it the hard way!)
Trim the die cuts and adhere them to the tag, I used E-Z Squares®. Cover the tag with an Adhesive Sheet and burnish it down with your fingers. Remove the liner to reveal the adhesive covered tag, then crumple up a sheet of tissue paper and lay it onto the tag. The more wrinkles, the more texture!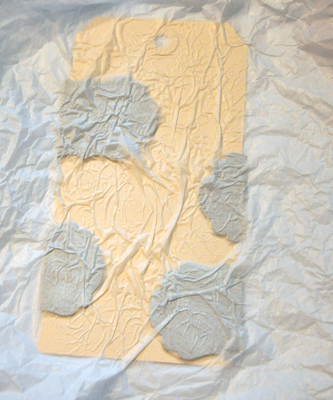 Next, burnish the tissue into the adhesive, so that the entire tag is covered, then trim or tear the excess. I placed the die cuts slightly off the edges and used scissors to trim.
Now for the messy, I mean fun part – color! I spritzed 4 different colors onto the tag, making sure that I covered the tag. Impatient like me? Go ahead and use a heat gun to dry it quickly. 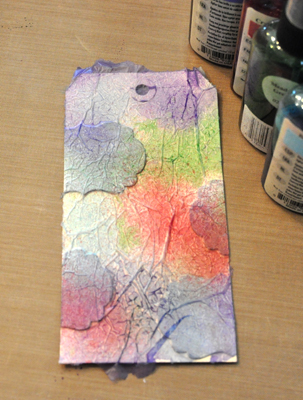 Tip: I keep the yellow liners from Adhesive Sheets for other projects!
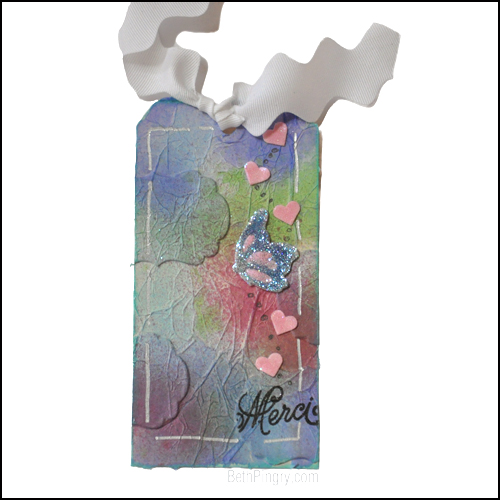
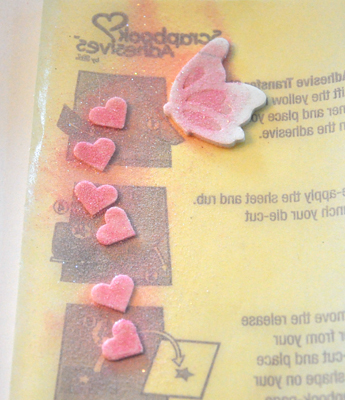
Here I moved some 3D Foam Hearts and a 3D Foam Butterfly to an extra liner, removed the top sheets and the centers of the butterfly, then added pink glitter.
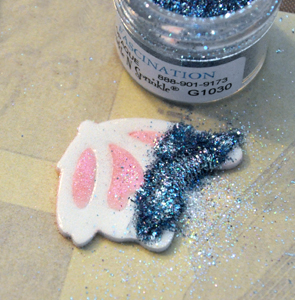
 I removed the rest of the butterfly and added blue glitter.
 Next stamp a sentiment, add the 3D Foam Hearts and 3D Foam Butterfly, a ribbon and some hand drawn lines and bubbles. I inked the edges with green chalk ink. The sky’s the limit here on embellishing.
Thanks for coming by! Stay tuned for Saturday, National Scrapbook Day, for giveaways you don’t want to miss! Coming up next week we have some extra special announcements too!
I used these supplies:
- Scrapbook Adhesives by 3L®: Adhesive Sheets 4 x 6“, E-Z Squares®, 3D Foam Hearts, 3D Foam Butterflies
- A Jillian Vance Design: {Die}namic Duo die, Many Thanks Stamp Set
- May Arts Ribbon: Large Ric-Rac
- Sparkle N’ Sprinkle: Fascination and Princess Rose Glitters
- ClearSnap: ColorBox Mixed Media Inx Black, Mint Green Fluid Chalk Ink
- Tattered Angels: Glimmer Mists -Blue Skies, Meadow Green, Lavender Fields, Cranberry Zing
- Silver Sharpie Pen, Black Pen, Tag, die cut machine
By Deborah S April 28, 2014 - 8:00 pm
Great tag love all the texture and your wonderful step by step tutorial thanks!
By Asia King April 30, 2014 - 2:53 am
Fabulous tag Beth! I love the textures and the sparkly foam shapes!