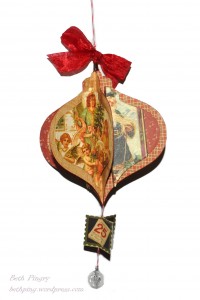
Today’s SCRAPBOOK ADHESIVES BY 3L™ and Graphic 45® Blog Hop item is an ornament I made using the 8 x 8″ pack of Christmas Past paper and images.
 The ornament starts with five die cut shapes.
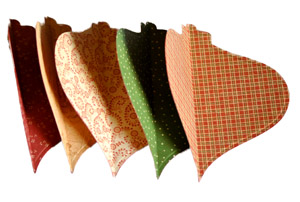 Ink the edges, score each down the center vertically. Then apply adhesive to one half of the back side. I used Crafty Power Tape down the score line, and then a few Click ‘n Stick™ Mounting Squares around the edges.
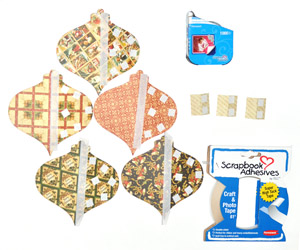 The simply match up the shapes and adhere back to back to make a dimensional ornament. I added a piece of bakers twine to use as a hanger. I dangled a plastic bead at the bottom of the ornament and added three of the same shaped images back to back below the main ornament.
I added a cone bead to the top, and then tied a bow to it. I will loop the top of the twine so I can hang it from the tree at Christmas time.
I took the ornament one step further, buy die cutting another set of images in a smaller size, then adhering them inside the folds, giving the ornament an additional layer.
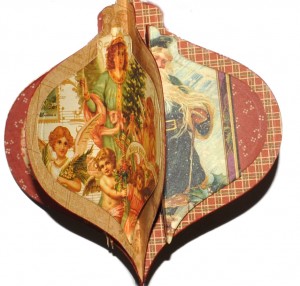 The possibilities are endless for this type of ornament, any shape, pattern or image will work, and you can embellish with any beads or bows or baubles.
Thanks for stopping by, and don’t forget to leave a comment for a chance to win our Prize Package! And then stop by the Graphic 45 Blog to leave a comment for their prize package!
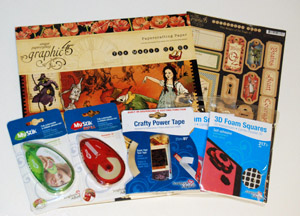 Like us both on Facebook, SCRAPBOOK ADHESIVES BY 3L and Graphic 45, to stay up to date with us.
Supplies:
- SCRAPBOOK ADHESIVES BY 3L: Crafty Power Tape, Click ‘n Stick™ Mounting Squares
- Graphic 45: Christmas Past 8×8″ Paper Pad, Tag Sheet
- Spellbinders: Grand Calibur machine, 2011 Heirloom Ornament die set
- Jillibean Soup: Bakers Twine
- Creative Impressions: Red silk ribbon
- Crafts Etc: 15mm Cone Bead Cap
- Other: Clear Bead
Thanks,

By Dara Lynn Hale October 11, 2011 - 6:07 am
These ornaments would be precious and elegant all over a Christmas tree….Wouldn’t it be fantastic will all the lines from Graphic 45??? or load up on the new Christmas Emporium? Looooove it…giving me visions of new decorations for my tree!
By Michelle Reaves October 11, 2011 - 6:49 am
Oh my, I love those ornaments!! I’m going to make some for my tree this year with my G45 Christmas Past papers. Gorgeous!!
By Rosemary Sharon Woodruff October 11, 2011 - 7:11 am
thank you …thank you…wanted the “directions” for this type ornament for a while……and love it with Graphic 45!
By Keesha Cooper October 11, 2011 - 7:19 am
Wow! These projects have really been amazing! Kudos on such a fantastic blog hop!
By Connie Hopkins October 11, 2011 - 8:02 am
Gorgeous! I am going to be making a few of these!
By Christine Dring October 11, 2011 - 8:20 am
Oooh! I love this! Thanks for sharing!
By barbara johnson October 11, 2011 - 8:28 am
What a great idea!! I’m still waiting for my Tim Holtz ornament die and was hoping to fill a tree with handmade ornaments this year. This one is beautiful!! Thanks for the tutorial!! I love adding the beads!!
By MargieH October 11, 2011 - 8:38 am
LOVE this technique! Great way to frame the images too 🙂 Beautiful!!
By Regina Keyser October 11, 2011 - 8:40 am
very pretty
By Renee VanEpps October 11, 2011 - 8:45 am
This is gorgeous, love how you added the smaller images for the matting. Great tutorial too 🙂
By Pam October 11, 2011 - 9:45 am
I love this idea! You could create sooo many things. TFS
By Lagene Sands October 11, 2011 - 10:15 am
WOW Love your vintage ornaments, thanks for the tutorial!
By Carol E Brooker October 11, 2011 - 11:03 am
Love the ornament, thanks for sharing it and the chance to win.
By Elena Pana October 11, 2011 - 11:09 am
Beautiful project! Thank you for this daily marathon of creativity with Graphic45!
By Sharka Leigh October 11, 2011 - 11:25 am
Just got the ornament punch by EK Success and these would be a wonderful project to make using both the punch and the newest Christmas Emporium collection… which i love!!!!
By Rhea Skomorowski October 11, 2011 - 11:51 am
great ornament!
By Stacy Caddy October 11, 2011 - 12:24 pm
Love these, I am going to have to make a bunch for this year since I lost all of my Christmas decor when I moved….
By sharon gullikson October 11, 2011 - 1:26 pm
Without great adhesive power, the adorable Graphic 45 papers wouldn’t work. So even though they get all the glory, your adhesives need to grab a little, too!
By b. poteraj October 11, 2011 - 1:26 pm
This reminds me of the ornaments that my parents used to make with last year’s Christmas cards. They were so cute! I LOVE homemade ones.
By natasha g.p. October 11, 2011 - 1:27 pm
I really want to make some of the ornaments. They are old fashioned, which I love!
By Tanya Phillips October 11, 2011 - 5:59 pm
Wow, this is beautiful! And looks pretty easy. I could definitely see these on my tree.
By Kim H October 11, 2011 - 8:05 pm
Beautiful ornament. can use so many different pattern papers for lots of styles. Thank you for sharing, and the chance to win.
By ava October 11, 2011 - 8:47 pm
great ornament!! that will keep fresh looking from year to year, cuz 3L is holding everything in place!
ava
By Gayla October 12, 2011 - 1:11 am
I’ve been wanting to make this ornament but it looked difficult. Thanks to you being willing to share your talent I know I can make it. Taping it instead of gluing it will be so easy. I have a new cuttlebug I’m dying to use so I’m ordering that die or one like it and going into the ornament business. Like the chips, it will take more than one!
By kathyc/northcarolina October 12, 2011 - 5:10 am
I am LOVING my Crafty Power Tape…it’s always on my desktop, and it works so well. This ornament ROCKS! Thanks for the great idea!
By Lisa Watson October 12, 2011 - 8:03 am
That ornament is fantastic!!
By Charmaine October 12, 2011 - 10:47 am
Totally loving this idea – and I have some new die cuts from Spellbinders that would work perfectly!!! Am excited to try this out.
By Beverly Jordan October 12, 2011 - 11:54 am
Really great project!! Perfect for this time of year!
By Kristina M. Anderson October 12, 2011 - 1:52 pm
What a great idea! Love the ornament. I cannot wait to try it out. Thank you so much for sharing your idea and ornament.
By f lynn rush October 12, 2011 - 4:35 pm
love the ornament idea!
By Jackie October 12, 2011 - 10:19 pm
This ornament is very cool!!
By Sherry October 13, 2011 - 10:10 am
Very cool, this is one I am going to try! Thank you for posting it.
By Maggy Tronche (@MaggyTronche) October 14, 2011 - 3:41 pm
Very creative project for christmas!!: Love it! Thanks for sharing!! You are so talented girls! ugs.. Maggy 🙂