
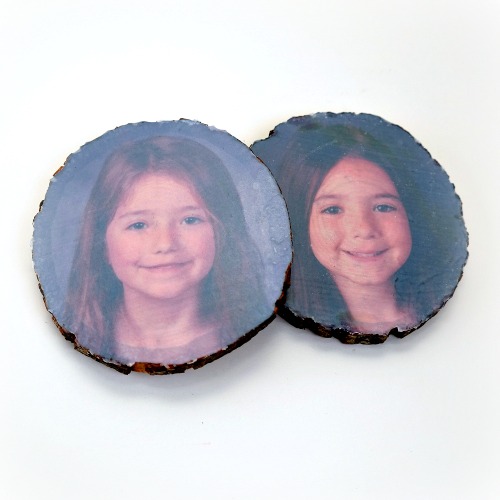
Hi friends! Dana Tatar here with you today sharing my tutorial for how to transfer photos onto a wood slice. I’m always looking for creative ways to display photos in my home. These wood slice photo plaques are such a fun way to add a rustic accent, with a bit of a modern twist, to any decor. I used 4 x 6″ Adhesive Sheets and a Dual Tip Glue Pen for this project.
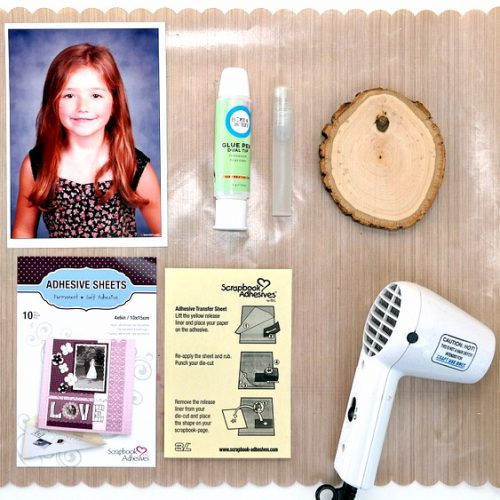
Here are my supplies to achieve this fun project…
To view Wood Slice Photo Plaques by Dana Tatar Video, see below.
Step 1: Gather supplies.
Step 2: Remove the yellow liner from the Adhesive Sheet. Place the Adhesive Sheet onto the wood slice, adhesive side down, and press to seal.
Step 3 (Optional): Warm the Adhesive Sheet with a heat tool. Note: I found that a little heat helps transfer the adhesive more completely onto the uneven and rough surface of the wood.
Step 4: Rub and lift the Adhesive Sheet backing liner to transfer the adhesive to the wood slice.
Step 5: Press the wood slice onto the 5 x 7″ Ink Jet Photo. Press down to seal.
Step 6: Flip the wood slice over so that the photo paper is facing up. Distress the photo paper with sand paper. Note: This distressing technique helps the water soak into the photo paper which is necessary for removal. Scoring the photo paper with scissors also works, but may damage the photo.
Step 7: Spray the photo with water and let soak. Carefully peel off the top layer of photo paper.
Step 8: Again, spray the photo with water and let soak. Carefully rub the wet paper from the photo. Repeat this process until the photo is visible.
Step 9: Tear away the excess photo paper from the wood slice. Note: The wet photo paper is easy to remove with the edge of a fingernail and downward pressure.
Step 10: Apply Dual Tip Glue Pen to the photo and smooth with a finger. Let dry.
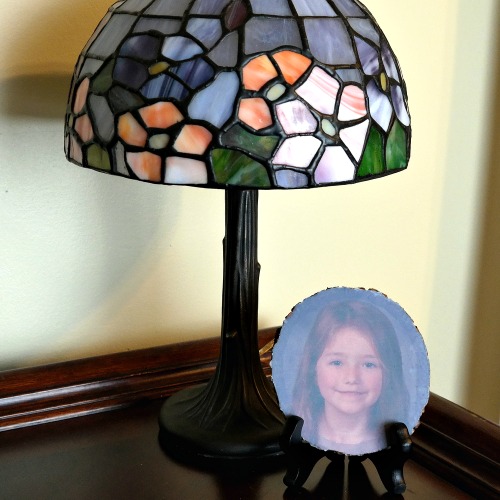
I’m displaying my photo plaques on small stands. Try attaching mounting hardware to the back of the wood slice to create a wall hanging or glue on a magnet and stick it to the fridge.
These adhesives, are easy to use, non-toxic, acid free, and wash from hands and clothes with warm water, which makes this a safe project for school-aged children with adult supervision. Photo plaques make a great gift for family, friends, or a special teacher or coach.
Scrapbook Adhesives by 3L Supplies:
Adhesive Sheets – 4 x 6″
HomeHobby Dual Tip Glue Pen
Other Supplies:
Walnut Hollow Basswood Country Round Coaster; Heat Tool; Craft Mat; Mister; Sandpaper; Photo
By Julie Tucker May 16, 2017 - 7:11 am
These are absolutely AMAZING!! I loveeeeeeeeeeee them!!!!!!!!!!!!!!!!!!!!!!!!!!