Welcome to Day 1 of our Blog Hop with Graphic 45!
Our first project is from AJ Otto
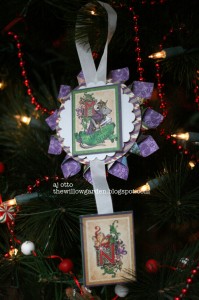
I LOVE patterned paper- there is SO much you can do with it! I decided to create an ornament using Graphic 45’s Nutcracker Sweet line. I made one like this several years back and thought it was time for a new one.
Cut your desired 12 X 12 paper into 4 X 4 squares. (This is the Nutcracker Sweet paper) There are 12 of those little rolled pieces, which came from 6 squares total, not even using a whole sheet of paper. Roll into a cone shape, tapering the ends. Adhere ends of cones together with Crafty Power Tape.
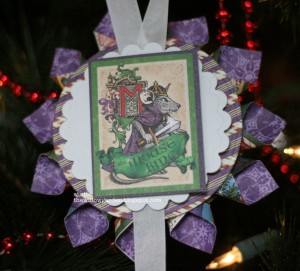
Using Spellbinders dies, cut/emboss two of your circle shapes from a complimentary patterned paper, (Gingerbread Delights here) piece. I cover the back just like the front so it’s pretty on both sides. One by one, adhere your cones to the center of the circle die cut with Crafty Power Tape. When complete, cover the flip side with the other circle.
I die cut a scalloped circle from white card stock, and adhered to the striped circle with 3D Foam Squares.
I chose the cute mouse king image for the focal point from the Holiday Magic page, and adhered it to the white scalloped circle with more 3D Foam Squares. (Can’t use enough of these when adding dimension!! 😉
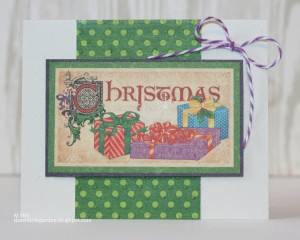
I had quite a bit of paper left over, (the green is the backside of the Holiday magic piece, and the Christmas is the front) so I whipped up a quick card to have on hand for last minute needs. I embossed the green layer with the EG-002 Dainty Dots M-Bossabilities folder, then adhered to the card with E-Z Runner tape. I attached the Christmas piece using 3D Foam Squares, and finished it off with a twine bow.
Our next project comes from Karin Strandby.
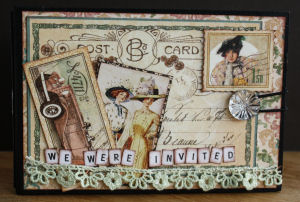
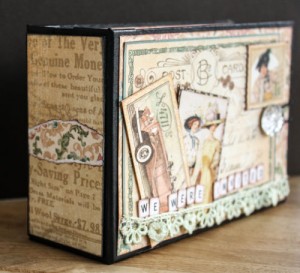
Its Karin here, and I’ve made a fat mini album with the awesome paper collection “A Ladies Diary” from Graphic 45. I have a bunch of pictures from a party with my friends and I decided to make this mini.
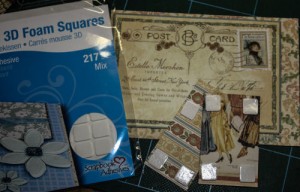
To give the dimension I always use 3D Foam Squares, which are available in different sizes and thicknesses. SO COOL!!
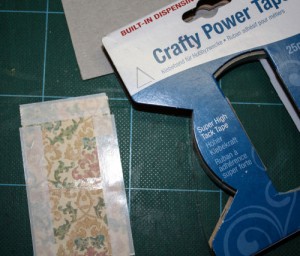
To adhere it all together, chipboard, design paper, pictures and ornaments I use Crafty Power Tape, MyStik® Permanent Strips and E-Z Runner®, all permanent adhesives.
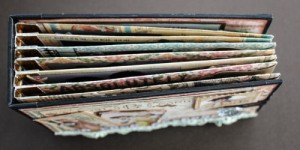
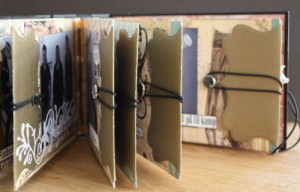
A glimpse to the inside of the Fat Mini. The pages are pockets and tags with text about the party.
To get it more stable, I’ve sewn the pages to the back, through some eyelets.
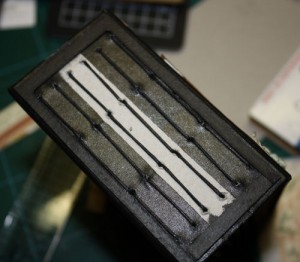
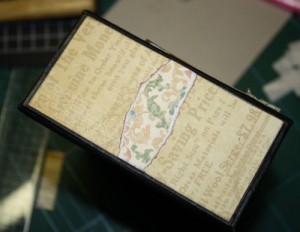
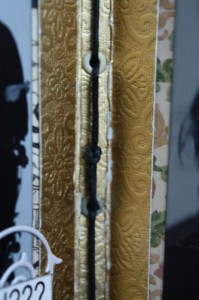 Before decorating with design paper I’ve made a frame to get a little distance, so the design paper lies nice over the cord. Maybe a little difficult to see because I’ve painted it black as all the other chipboard.

By LeeAnne Fusco December 17, 2012 - 7:09 am
I love the mini album. Chunky vintage just my style. The paper line is gorgeous and Pop it up!!! That’s my motto! Thanks for sharing this beautiful project.
By Cheryl Hutcherson December 17, 2012 - 7:12 am
Love Karin’s project!!
By Boo December 17, 2012 - 7:24 am
Wonderful projects. The use of foam squares always adds to much to a project.
By Brenda B. December 17, 2012 - 7:31 am
Incredibly beautiful projects. The mini album has so much wonderful detail.
By Donna W December 17, 2012 - 7:39 am
Love the mini album. Never tried making one but it sure makes me think about trying to do one myself. TFS
By Cathy Ross December 17, 2012 - 7:52 am
I love the mini fat book. All the pockets are a great idea!
By Sharon Y December 17, 2012 - 7:54 am
Great idea to useG45 paper to make ornaments. Loving the fat mini.
By {vicki} December 17, 2012 - 7:55 am
G45 sent me over
By Margie Visnick December 17, 2012 - 8:01 am
I love Nutcracker Sweet, great projects!
By Alice W December 17, 2012 - 8:03 am
Wow, that fat mini album is gorgeous!
Thanks for the chance to win.
By kathy/NorthCarolina December 17, 2012 - 8:08 am
I love that fat album! The design is terrific, and it is embellished so beautifully. AJ’s ornament is so festive, and I bet it looks great on the tree, too!
By Brooke John December 17, 2012 - 8:25 am
I love that gorgeous mini album!!! And making your own ornaments would be so beautiful on my Christmas tree! I’ll have to get scrappin’!!!
By Tammy December 17, 2012 - 8:36 am
I LOVE the mini album. I really like the binding of the pages and all the pockets and detail<3
By Mandy W December 17, 2012 - 8:48 am
really lovely projects!
By Jeniff Sthory December 17, 2012 - 8:59 am
Love the mini album, is beautiful.
By Miriam Prantner December 17, 2012 - 9:10 am
Great projects! I love those Nutcracker Suite images and the mini is so pretty!
By Nikki Brown December 17, 2012 - 9:18 am
Great stuff!
By Misty W. December 17, 2012 - 9:22 am
Love albums! Such a great gift for the someone who has everything!
By Paula December 17, 2012 - 9:30 am
What a great week! Awesome projects the inspiration is fantastic.
Paula
By Kayla December 17, 2012 - 9:57 am
I LOVE the mini album, and the paper used is gorgeous
By Mary Thompson December 17, 2012 - 10:31 am
I’m just about to start my first mini album, so this is really useful. Thank you!!
By Susan Foulkes December 17, 2012 - 11:29 am
Wonderful projects! I love the fat album especially. xx
By Lauren December 17, 2012 - 11:30 am
Gorgeous projects! I love the Ladies Diary mini. Thank you!
By Laura December 17, 2012 - 11:30 am
Great projects! They are getting me into that holiday spirit.
By Kerry December 17, 2012 - 11:33 am
The binding on the fat mini is a great idea!! Love it so much!
I’ll see if I can replicate it – That’s how much I love it! Thanks so much for sharing!!
By Rita Barakat December 17, 2012 - 11:34 am
Great projects! I am a big fan of everything that has dimension!
By mar powell December 17, 2012 - 11:39 am
great designs! scrapbook adhesives make my favourite tape runner!
By Stacy Smith December 17, 2012 - 11:40 am
This is awesome
By Kathy Bumb December 17, 2012 - 11:40 am
Love your blog and the great tutorials, especially the mini album – beautiful. Have a great holiday season!!
By Dallas Diston December 17, 2012 - 11:43 am
Love these beautiful projects with gorgeous G45 !!! Would love to win a prize here !!
By Mary December 17, 2012 - 11:46 am
Beautiful! I love it!
By Stacy Caddy December 17, 2012 - 11:50 am
Beautiful projects…. Thanks for sharing..
By barbara f December 17, 2012 - 12:19 pm
This is a great project! Beautiful design and great explanation of how to make it. THANKS!
By Susan Foulkes December 17, 2012 - 12:23 pm
Great projects..I especially like the fat album.
By Barbara Diane December 17, 2012 - 1:02 pm
Hello!
What wonderful projects! I am so happy to have found your blog and I am coming back each day for the blog hop! Wishing you a happy one!
Hugs,
Barbara Diane
By S. Arleen Jellinek December 17, 2012 - 1:07 pm
Loved seeing all the great items made from Graphic 45. A Ladies’ Diary mini album is really attractive. I have also been making mini albums out of lots of Graphic 45 papers. . . love it all!
By Mary Wilkins December 17, 2012 - 1:10 pm
Oh, the projects are SO neat. I love the book and the box the best. Mary
By Cindy December 17, 2012 - 1:36 pm
G45papers are the best. So hard to get out of stock so many online places. But I’m not discouraged I’ll find them. :). These projects are great
By Debbie Eslinger December 17, 2012 - 1:43 pm
I love the mini tutorial great tips, I made one last Christmas for my husband and I sure could have use this thanks
By JOYCE December 17, 2012 - 2:03 pm
gREAT PROJECTS AND GREAT GIVE AWAY.
By Drifty Wright/aka Judy Wright December 17, 2012 - 2:09 pm
Sweet Ornament!! I Love Chunky mini albums!! They can hold so many surprises!! Great projects!! Thank You for Sharing!! Happy Christmas!
By Tucker De Ratt December 17, 2012 - 2:15 pm
These are breathtaking designs. I make an ornament for each family member each year, you have provided the perfect inspiration. Thank you for sharing them.
By Susanne December 17, 2012 - 2:23 pm
Great Projects!
By Cindi December 17, 2012 - 2:24 pm
“Happy Holidays!” Projects like these really captivate and motivate me…The vintage look is a favorite of mine!
Many thanks, Cindi
By Lavonna Vanden Berg December 17, 2012 - 2:25 pm
Love the projects hope I have chance at winning as the prizes are nic3e
By shelley December 17, 2012 - 2:37 pm
Great Ideas, I’ll keep watching.
By Kim Sottung December 17, 2012 - 2:49 pm
Love the projects! So creative!
By Wendy Wakefield December 17, 2012 - 3:07 pm
What great inspiration on such a cold winter’s day. Thank you Scrapbook Adhesives and your design team members.
By Larissa Heskett =) December 17, 2012 - 3:09 pm
LOVE all of the projects shared today!! THANKS for the INSPIRATION and have a FABULOUS WEEK!! =)
By Terry December 17, 2012 - 3:12 pm
What great projects and inspiration!! Thanks for sharing 🙂
By Donna Conrad December 17, 2012 - 3:17 pm
Very Cute Mini Album!!
By Lori Danieski-Bellotti December 17, 2012 - 3:27 pm
I think the ornament is so cute…The paper is fabulous and the Mini Album is fabulous..nice and chunky and a beautiful paper line…To Die For!!!
By Jackie Schachter December 17, 2012 - 3:31 pm
What lovely projects – such useful gifts.
Shows what can be made using the right
glues, tape runners and foam squares,
which, by the way, I would love to win.
By Marilyn Cline December 17, 2012 - 3:31 pm
I LOVE, LOVE, LOVE you adhesives. They are the only ones I will use. I especially love you square dimensionals. Nutcracker Suite is totally awesome, too!
By Linda December 17, 2012 - 3:31 pm
how great are these ideas! I should start on next years Christmas cards, etc.
By sarina coffin December 17, 2012 - 3:39 pm
I am crazy for Minis!! Love anything handmade and to hang some gorgeous ornaments on my tree would be awesome!
By Cindi December 17, 2012 - 3:41 pm
Would love to win this. Would be real helpful! Great giveaway!
By ava g December 17, 2012 - 3:42 pm
3L how great to have outstanding designers show case your product so well… they sure do demonstrate the need for reliable 3L…
ava g
By Carol Reiff December 17, 2012 - 4:22 pm
Love the mini albums
By Lisa Fox December 17, 2012 - 4:26 pm
Just finished a Tropical Travelogue book – would love to take on this one!
By Christine Dring December 17, 2012 - 4:31 pm
Wow! These are incredible projects! TFS!
By Donna H December 17, 2012 - 4:32 pm
Fantastic and gorgeous projects. So inspiring. Keep up the great work.
By Kat Filby December 17, 2012 - 4:57 pm
Hi,
I am so excited to find a company with adhesives. I trust the folks at Graphic 45 and if they recommend you, then I am in. The projects you have today are beautiful.
Thanks
By Vail December 17, 2012 - 5:12 pm
Both projects are wonderful, love the ornament and the mini album,
By Stella December 17, 2012 - 5:28 pm
Love both projects! The album will be GREAT for my new DIL.Thank you!
By Jean Marmo December 17, 2012 - 5:39 pm
That album is just gorgeous!!
By Dorothy McCarthy December 17, 2012 - 5:42 pm
Excellent Ideas!!
By Gisy Angel December 17, 2012 - 5:48 pm
Wonderful projects! Thank you so much for sharing.
By Sharka Leigh December 17, 2012 - 5:51 pm
Both wonderful projects, but LOVE the fat mini, both with gorgeous papers from G45 and you gotta LOVE 3L Adhesives too, I sure do! 🙂
By NWFlamingo December 17, 2012 - 5:58 pm
Two great companies with awesome products!
By Carol B December 17, 2012 - 6:01 pm
Lovely projects!
Carol B
ciaoitalia2007(at)gmail(dot)com
By SuZeQ December 17, 2012 - 6:17 pm
Oh, what great projects. Thank you for the inspiration.
By Lucy December 17, 2012 - 6:22 pm
You can’t go wrong with the team of Scrapbook Adhesives and G45! The mini-album is wonderful, as are the cute ornament and card from the Nutcracker Suite paper. I’m looking forward to a week of “blow me away” projects.
By Dorina D December 17, 2012 - 6:28 pm
Great projects. THe ornament is adorable, but the album is fabulous and so clever. Thanks fro the chance to win.
By Randi December 17, 2012 - 6:37 pm
Especially love those fat mini books.
By Carole December 17, 2012 - 6:54 pm
Love all the projects! Wonderful inspiration and both companies are two of my favorites. Merry Christmas!
By Merrilee W. December 17, 2012 - 7:05 pm
Wonderful projects! TFS
By Bernadette Gibson December 17, 2012 - 7:23 pm
What great projects! I just love Graphic 45, however, I have to buy products on line. There is no place in Asheville that sells it. Thank goodness for ebay!
By Wendy Hill December 17, 2012 - 7:29 pm
Love your adhesives especially the tape runners. Great project, great companies.
By Georgia Clough December 17, 2012 - 7:30 pm
Oh my gosh. Scrapbook Adhesives and Graphic 45. What a team. Two of my favorite scrapbooking companies. Yea!!!
By Sue D December 17, 2012 - 7:40 pm
Wonderful ornament and card and fabulous album!
By Ramona Walter December 17, 2012 - 8:12 pm
I love the projects today from Graphic 45 and Scrapbook Adhesives. They are stunning!
By Pam December 17, 2012 - 8:48 pm
Great creations. That mini album is fabulous! I am in love with it!
By Teresa December 17, 2012 - 9:02 pm
great projects! love the album!
By Cathy Osborne December 17, 2012 - 9:03 pm
What wonderful projects. Great ideas and so beautifully executed.
By Liz Lumsden December 17, 2012 - 9:22 pm
Great projects! I love that the foam adhesives come in different thicknesses…
By Marge R. (mer) December 17, 2012 - 9:32 pm
Both are fabulous projects that accurately showcase how beautifully your adhesives work and their holding power — TFS!!!
By Karen Buchanan December 17, 2012 - 9:57 pm
Love the projects!
By Carolyn T. December 17, 2012 - 9:58 pm
That is the most amazing mini album I have ever seen!
By Linda E December 17, 2012 - 10:02 pm
Love all the amazing projects!! Thanks so much for sharing.
By Erin K December 17, 2012 - 10:06 pm
I’m loving the fat mini album. Drool-worthy!
By MaryLouH December 17, 2012 - 10:46 pm
I love the mouse. She looks like she has a destination in mind and nothing is going to stop here.
By Teena Schaefer December 17, 2012 - 11:25 pm
Beautiful mini! Teena
By Becky D December 17, 2012 - 11:39 pm
Wow! What great projects today! Thanks for the mini tutorial AJ – love that ornament! And that sweet mini album is so gorgeous Karin! I just love the Ladies Diary collection 🙂 Thanks for sharing!
By Nancy Walker December 17, 2012 - 11:58 pm
I just love both of these projects! So clever. I do want to comment on your 3D foam squares–I just discovered them this past year, and I am crazy about them! They are a fantastic product.
By Diane H December 18, 2012 - 12:25 am
I loved the “fat mini”…and the name just made me laugh…fun and creative ornament, too!!
By Vanessa Hayden December 18, 2012 - 12:34 am
Great ideas and wonderful adhesives!
By Carole H December 18, 2012 - 1:55 am
Fabulous projects!! Great details on the “fat mini”!!
By butterfly December 18, 2012 - 2:27 am
Fabulous projects – that album looks so amazing!
Alison x
By Suzanne December 18, 2012 - 2:47 am
Can never have enough Scrapbook adhesives and Graphic 45 products. Love em’ gotta have em’!
By Linda Williams December 18, 2012 - 3:00 am
Love the Christmas ornament and the mini is great….nice and big!
By Debbie P. December 18, 2012 - 3:40 am
Love all the examples on how to use the different types of adhesive. Fun projects and ideas.
By Debbie Fagnant December 18, 2012 - 5:36 am
Two of my “favorite” products together in one spot! Love it!
By Karen Conner December 18, 2012 - 5:49 am
I need to buy stock-I use TONS of adhesive! If it weren’t for adhesives-I couldn’t create!
thanks for the inspiration & products!
By Christina P. December 18, 2012 - 5:51 am
Love the projeckt, and the papers are so nice.
By Kim December 18, 2012 - 7:23 am
Awesome projects! Love the mini!!
By Amanda Parham-Hall December 18, 2012 - 8:01 am
Beautiful projects 2day~I especially luv the “Fat Mini” LOL! Thanx 4 sharing & inspiring:) And thanx 4 the amazing giveaway! ~prhmangel(at)gmail(dot)com
By Molly December 18, 2012 - 8:07 am
WOW! I love the book!! Beautiful projects all around.
By Leanne Bourassa December 18, 2012 - 8:11 am
Fantastic projects ladies!!!! Thanks so much for the inspiration. 🙂
By Carol b December 18, 2012 - 8:30 am
Adhesives are certainly the backbone of papercrafting .
Carol b
By Maria Mendoza December 18, 2012 - 8:44 am
it turned out beautiful
By Lee Dreyer December 18, 2012 - 9:08 am
Awsome work!!
By Phyllis Howard December 18, 2012 - 9:21 am
Wonderful projects. Love the crafty power tape, it is great.
By Karen Wedding December 18, 2012 - 9:49 am
Wow! What great projects. The ornament is so cute. I love the mini album. Love the bulky pages. The pockets are very handy. Great job!
By fusiafscrapping December 18, 2012 - 12:22 pm
Those projects are fantastic! Love them both especially Ladies Dairy minialbum.
By Debra Vineyard December 18, 2012 - 12:39 pm
Wow! The fat album is wonderful! Would love to see a more detailed video on how to do it! hint hint!!! Cute Christmas ornaments with Graphic 45 paper! Great inspiration! Thank you so much!
By kath White December 18, 2012 - 1:10 pm
Two great products in one spot. Awesome!!
By Pau December 18, 2012 - 2:51 pm
WOW the album it’s wonderful, I’ll like a toturial of it!! The ornaments are great
By Jackie H December 18, 2012 - 5:34 pm
I like the ornament and the album!!
By Sandra December 18, 2012 - 5:52 pm
WOW! I love Karin’s chunky mini album. I would love to make this in Graphic 45 Nutcracker Sweet papers. What a wonderful present this would be! Using the foam squares and tape really gives the pages that extra POP (pun intended).
By Terry December 18, 2012 - 8:58 pm
Love the mini album! Your adhesives are great with Graphic 45 papers.
By Krista's Paper Cafe December 18, 2012 - 10:06 pm
beautiful snowflake and stunning box!
By Ginger McGraw December 18, 2012 - 10:51 pm
I just love these products so much I don’t know what else to say. The projects here are incredible and the designers so talented. I wish I were. Love this hobby.
By Beatrice Lawson December 18, 2012 - 10:57 pm
I love the colors in the Nutcracker collection and the ornament is so beautiful!
By Maureen Hayes December 18, 2012 - 11:38 pm
Oh my, what beautiful projects your designers have created. You have such a wide variety of adhesives it makes it easy to use them for all sorts of crafts. Thanks for the inspiration!
By Amanda Christensen December 18, 2012 - 11:45 pm
Love that thick mini album!
By Wendy Whalen December 19, 2012 - 12:09 am
I love the mini book. It’s a great idea!!
By Kirsty Vittetoe December 19, 2012 - 2:37 am
Beautiful projects! Thanks for the inspiration!
By Teresa Igo December 19, 2012 - 8:31 am
Awesome projects! Can’t wait to see more!
By Gloria Stengel December 19, 2012 - 6:48 pm
Love the Ladies’ Diary project!
By leslile M December 19, 2012 - 8:04 pm
lovely projects. thanks for sharing
By Lynn B December 19, 2012 - 8:14 pm
Fabulous projects!
By Jeanette December 19, 2012 - 8:47 pm
thank you for sharing your very creative projects!
By Boo December 20, 2012 - 6:52 am
Love the book you made!
By Patricia Molnar December 20, 2012 - 12:03 pm
Beautiful album!!!
By Diana December 20, 2012 - 1:38 pm
The mini is beyond fabulous.
By Kimmie Hogan December 20, 2012 - 4:58 pm
I really love the album. You wouldn’t have a step by step tutorial would you ? All of you over at Graphic 45 are very talented, and you truly inspire others with your beautiful projects. You all invoke the true meaning of creative. Happy Holidays!!! P.S. I hope you all pick me to win the giveaway prize package…. 🙂
By NancyR December 20, 2012 - 9:12 pm
That ornament is so cute and the mini album is fantastic!
By Blog Hop with Graphic 45 Day 5 | The Crafty Power Blog December 21, 2012 - 6:02 am
[…] Blog Hop with Graphic 45 Day 1 Get inspired! […]
By babygirl97240 December 21, 2012 - 6:17 am
magnifique réa! bravo! bises
By babygirl97240 December 21, 2012 - 6:25 am
l’album est splendide! quel beau travail! bises
By Kathleen Scott December 21, 2012 - 7:30 am
Wonderful….thank you!
By zulma December 21, 2012 - 8:41 am
Me encantó, gracias!!!
By Lisa Leavitt December 21, 2012 - 9:02 am
I started scrapbooking and altering paper projects over 16 years ago and as soon as I saw Scrapbook Adhesives you have been a staple in my supplies. All my books, pages, and projects have held together fabulously throughout the years thanks to your products!!! My local scrap shop has not carried the Power Tape (and thus I was unaware it existed) — Thanks to this blog hop I’ve seen several of Scrapbook Adhesives’ products that I have never used and am definitely going to try. Love the artistry that has gone into all the projects for the hop, definitely some amazing paper masters contributed! Hopefully you’ll do it again for another holiday … or … don’t even wait for a holiday!!
By DebbieK December 21, 2012 - 9:31 am
Terrific projects. Absolutely LOVE the book!
– DebbieK
By Debbie Lamboo December 21, 2012 - 9:50 am
What awesome projects! Beautiful book!
By Flo December 21, 2012 - 10:00 am
The ornament is beautiful and I love the mini album.
By Nataly December 21, 2012 - 10:38 am
Beautiful Graphic 45 paper collection combined with your talant, skills and love for crafts gives you the opportunity to create masterpieces like this mini album, and for us it’s the chance to admire your works and get some inspiration. It’s adorable. I absolutely love it!
By Ruth M. December 21, 2012 - 11:03 am
Lovely ornament for the tree. TFS
By Monica Baker December 21, 2012 - 11:03 am
Great mini and ornament! Best of both G45 & SA!!
By Helen December 21, 2012 - 12:37 pm
love the ornament
By Rosann December 21, 2012 - 1:30 pm
Such creative ideas, love the Mouse King ornament… so cute and the mini album awesome !!
By Jan December 21, 2012 - 3:09 pm
make my christmas wish come true
By karen sallows December 21, 2012 - 5:52 pm
The colors are so beautiful!
By Carla Hundley December 21, 2012 - 8:11 pm
Quite the work on this album. All are
pretty.
Carla from Utah
By Laura Karaba December 21, 2012 - 8:19 pm
LOVE AJ’s ornament and card! LOVE Karin’s mini-album! Very creative!
By Marsha D December 21, 2012 - 8:53 pm
What a lot of artistic talent in these projects.
By Boo December 22, 2012 - 1:37 am
love the box.
By Katina December 22, 2012 - 1:55 am
Love to see what other companies are doing with some of my favorite paper collections. Love the projects, especially the fat little mini!
By Kat December 22, 2012 - 8:40 am
I love the mini album!
By Judi December 22, 2012 - 3:57 pm
I like the vintage look.
By Julia December 22, 2012 - 8:18 pm
Love it all!! There is just so much talent on your blog. What inspiration. Thank you so much. Merry Christmas.