
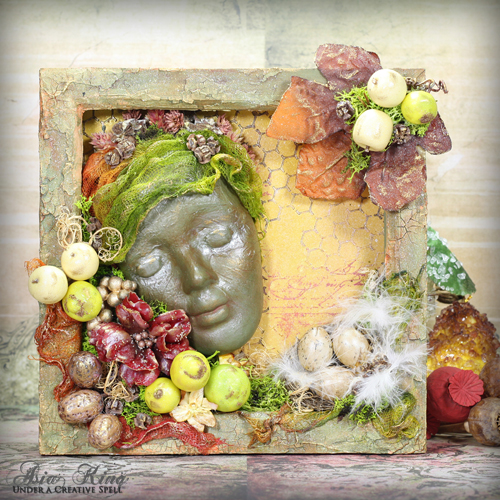
Hello everyone! Asia King here. I’m back today with a mixed media wall art. This is one of those (many) projects that evolved into something completely different to what it was meant to be at the outset :). But I am really happy with the end result and I hope you will like my Sleeping Woodland Fairy, too.
At first, I was hoping to create a hanging with a mask decorated in a fancy Venetian style. I knew I wanted to focus on autumnal colours so I started off by painting the backing board with acrylic paints and stenciling some lovely texture with a mix of translucent embossing paste and Gold, Pink and Brown Pigment Powders. To ‘fancify’ my mask I stenciled a butterfly onto tissue paper and decoupaged it onto the mask using the Dual Tip Glue Pen. As I thought my mask looked more tribal than Venetian I decided to take a completely different take on the project. At least you can see what my Fairy looked like before the make-over :).
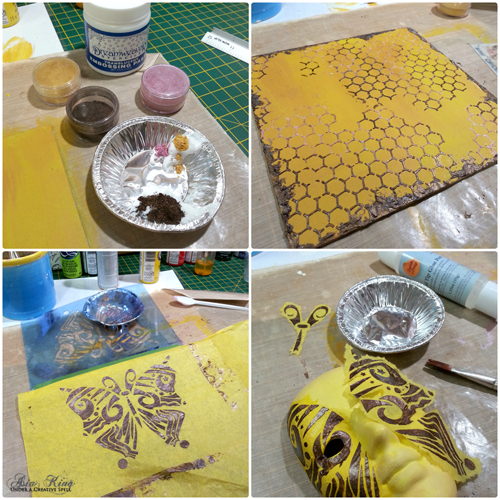
My frame was heavily treated with layers of Texture Crackle and paints, as well as White Linen spray and a DIY Gold Pigment Powder mist. My backing board got mist-treated as well and I added some background stamping.
You might have noticed that originally my plaster mask had hollow eye sockets. To add the (closed) eyes I used no other than my trusty DODZ Adhesive Dots 3D! Cool, huh? 🙂
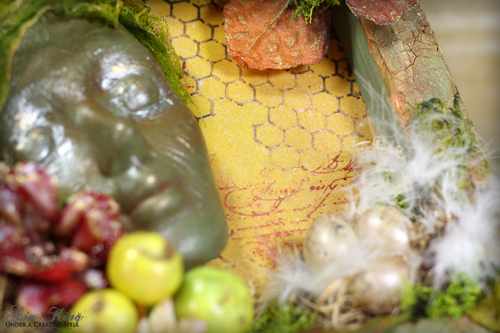
After painting over the previous stenciling, the texture on the Fairy’s skin looked a bit like tree bark wrinkles, which I thought was quite fitting for my forest lady.
The head scarf was first inked with Color Wash sprays and when it dried, I soak it in a Fabric Stiffener. As I was arranging it around the face I started building up layers of faux moss, embellishments, fruits and flowers secured in place with lots of DODZ 3D, and the Dual Tip Glue Pen.

I also soaked a fabric flower in the Fabric Stiffener and added some highlights with paints. When it was all dry I brushed it with glue from the Dual Tip Pen and sprinkled some micro beads over.
Supplies:
DODZ Adhesive Dots 3D; Adhesive Dots Large, Dual Tip Glue Pen
Media:
Color Wash ink sprays (Ranger) – Red Pepper, Butterscotch, Lettuce; Dylusions White Linen Ink Spray; Vermillion Archival Ink (Ranger)
DecoArt: Silver Sage, Oyster Pearl, Country Red, Muted Gold, Coffee Bean, Enchanted, Quinacridone Gold paints; DuraClear Ultra Matte Varnish, Texture Crackle, Fabric Stiffener
Dreamweaver Translucent Embossing Paste; wooden frame, resin-plaster mask
Stampendous – Cling Vintage Letter; The Crafters Workshop Mini Chickenwire Reversed stencil
I hope you enjoyed this little walk in the autumnal forest – I would LOVE to know what you think :). Please feel free to also visit my blog for additional close up photos.
Have a fabulous week!
Big crafty hugs
