
Welcome to the second day of the Spring Fever Blog Hop sponsored by Spellbinders™!
Today we feature 2 tutorials from our Design Team Members Asia King and Angela Ploegman. We’re sure you’ll love them!
Dress Form Tutorial from Asia King!
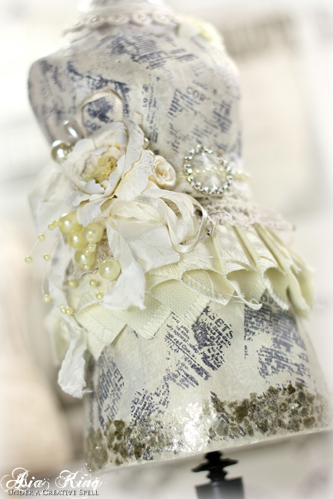
I have a tutorial showing how to turn an old tired paper mache dress form into a shabby chic number.
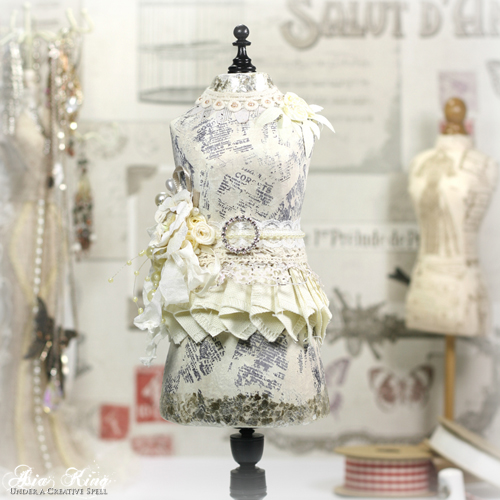
I bought this old dress form at a charity jumble sale and it was crying for a make-over :). So let’s get started.
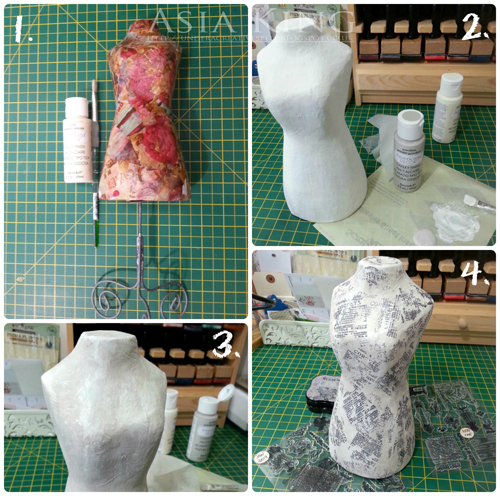
1. Prepare your dress form and paints. Give it a gentle wipe to make sure it is clean and free of grease.
2. Cover the dress form with a couple of generous coats of paint. Allow to dry.
3. Add a layer of Primitive paint, wiping it off gently in parts with a wet baby wipe. For ease of distressing work in sections to avoid paint drying out too quickly. Allow to dry fully.
4. Randomly stamp the text stamps all around the dress form. I stamped freehand without a stamping block. Alternate the direction of text, overlap the prints and stamp parts of the images – this will help create a decoupaged look.
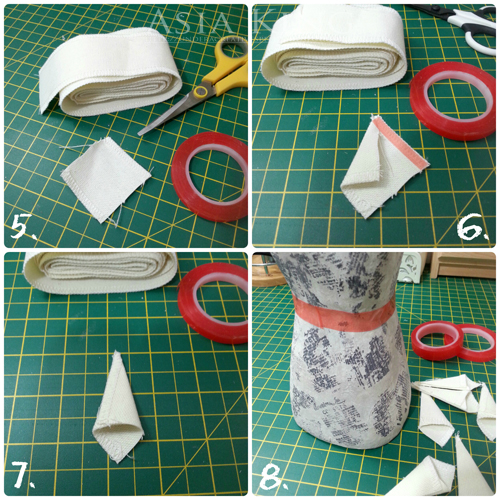
5. To create a pleated skirt cut several square-ish pieces of canvas ribbon. Turn each piece round with a corner pointing up (it will resemble a diamond shape).
6. Pull the left edge towards the centre and press with your finger to make a small fold – use the photo as a guide. Add a strip of Extreme Double-Sided Tape 1/8″ along the right edge.
7. Pull the right side of the fabric and align it with the edge of the fold as shown.
8. Wrap Extreme Double-Sided Tape 1/4″ around the waste of your dress form.
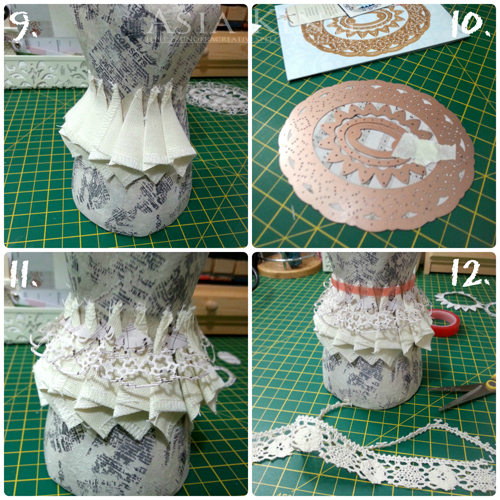
9. Arrange your fabric pleats as shown. Press the fabric into the Extreme Double-Sided Tape to ensure good contact with the adhesive.
10. Die cut vintage music sheet using the Oval Regalia die set- arrange the dies as show (at this point I wasn’t sure if I was going to use all the die cuts). Use the largest oval to create a frilly ‘ribbon’ for the skirt.
11. Adhere the die cut ‘ribbon’ by pressing the paper into the tape in the gaps between the pleats.
12. Continue adding layers with lace ribbons and Extreme Double-Sided Tape 1/4″ until you are happy with the result. I also added a small diamante buckle.
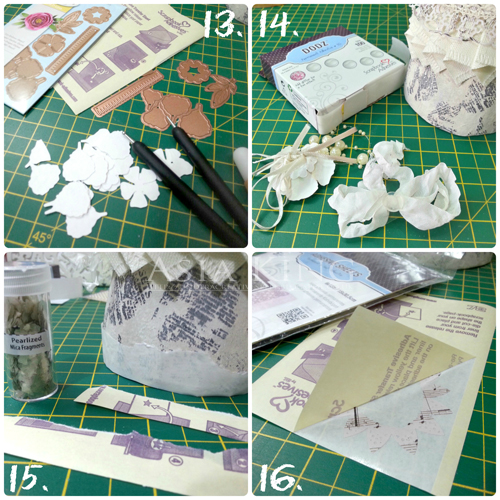
13. Die cut several petals and blooms from the Peony set and create a 3D flower.
14. Add ribbons and pearl strings to the back of the flower with Adhesive Dots Small and Adhesive Dots 3D. Adhere to the dress form. Secure with decorative pins, if necessary.
15. Tear narrow strips from Adhesive Sheets 6×12″ and adhere around the bottom and the neck of the dress form. Sprinkle generously with Pearlized Mica and rub any excess flakes off.
16. Cover your second largest die cut shape with adhesive using Adhesive Sheets and adhere around the neck to create a necklace.
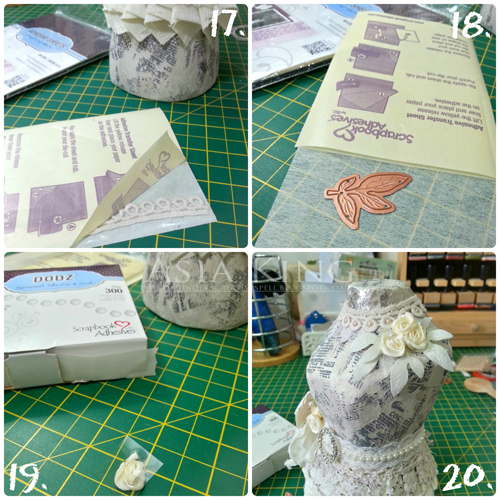
17. Cut a length of the narrow lace ribbon and cover with adhesive. Adhere around the neck line and embellish with small flat back pearls.
18. Cover some mulberry paper with Adhesive Sheets and die cut some leaves using the die from the Peony set.
19. Add Adhesive Dots Small to three small ribbon roses.
20. Arrange the leaves and the roses over the shoulder as shown above.
I have recently fallen madly in love with the crushed glass mosaic finishes that are currently trending in the home decor department stores across the UK. You can see them used on lamp bases, vases, mirrors, frames and even small table tops. For me the most exciting thing was to discover that you can easily recreate this sophisticated look with Adhesive Sheets and Mica Fragments.
You don’t have to be limited to the straight lines of your Adhesive Sheets either. And that’s because you can die cut your Mica covered sheets with a guaranteed full coverage and no gummed up dies 🙂 – just as I have done to create a rose lattice trellis in my recent Roses of Friendship card.
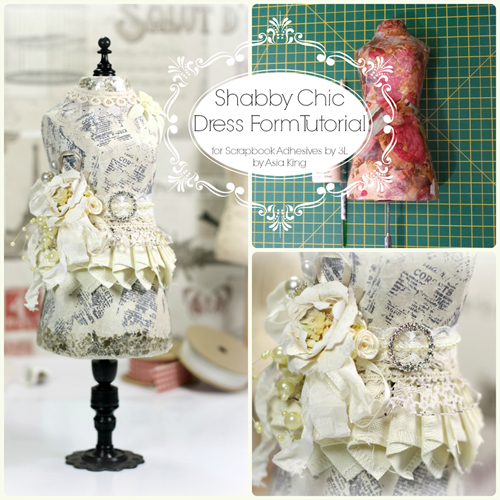
I hope you enjoyed my tutorial – I would love to know what you think! Feel free to share and pin the graphic above for future reference :).
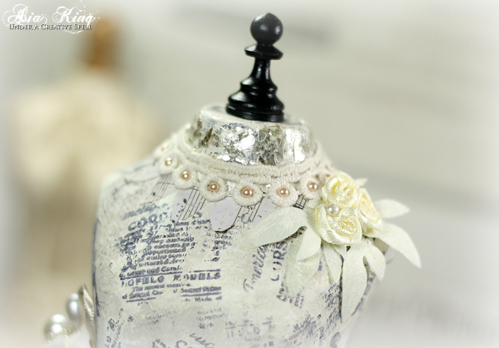
To finish my dress form I replaced the original ugly metal stand with a new one I made myself from old wooden chess pieces :). To find out more and to check out additional close-up pictures of my project, be sure to also visit my blog Under A Creative Spell!
Supplies:
- Scrapbook Adhesives by 3L®: Adhesive Sheets 6×12″, Adhesive Dots Small, Adhesive Dots 3D, Extreme Double-Sided Tape 1/8″, Extreme Double-Sided Tape 1/4″
- canvas ribbons and lace ribbons
- Spellbinders: Peony and Oval Regalia die sets; Ephemera Papers
- Stampendous: Pearlized Mica Fragments, Vintage Ladies and Charmed Art Perfectly Clear Stamps
- DecoArt Americiana Decor Chalky Finish in Lace and Primitive, StazOn Mini Cloudy Sky ink by, seam binding, ribbon roses, decorative pins, pearls.
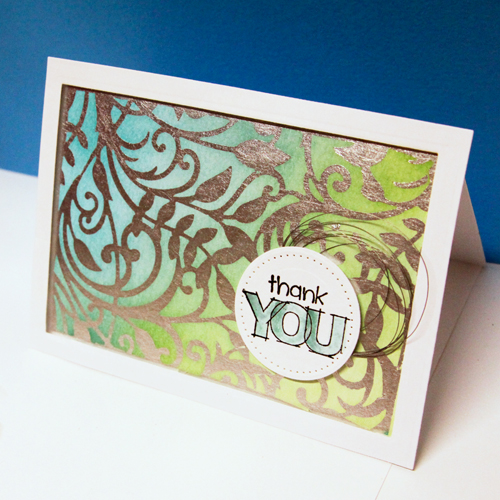
Foiled Ombre Card Tutorial by Angela Ploegman
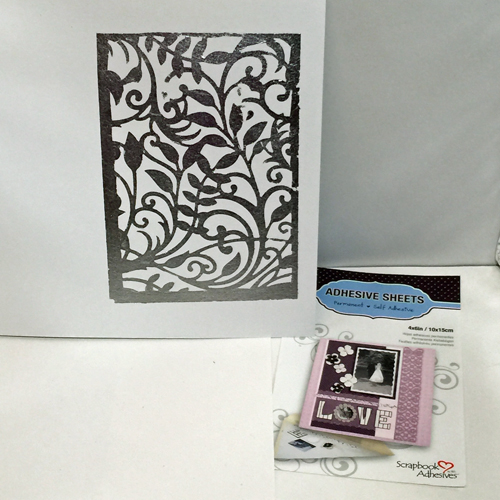
Spellbinders Dies and Scrapbook Adhesives by 3L® Adhesive Sheets are a perfect match! The super thin and super sticky Adhesive Sheets cut cleanly, leaving no residue…a MUST in order to be successful with this technique. Here’s the card I created using the technique to produce the custom foiled and inked background:
Tutorial
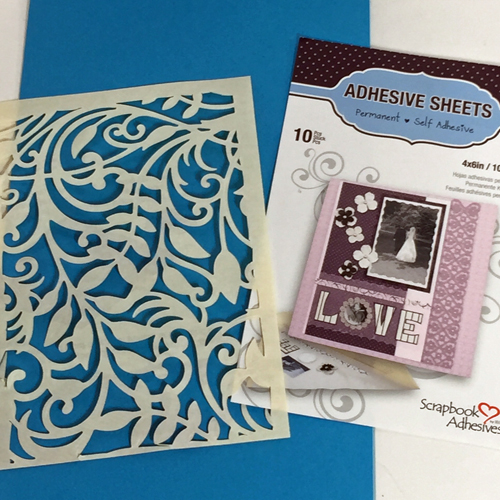
1. Die cut the Adhesive Sheet 4×6″ with a background die.
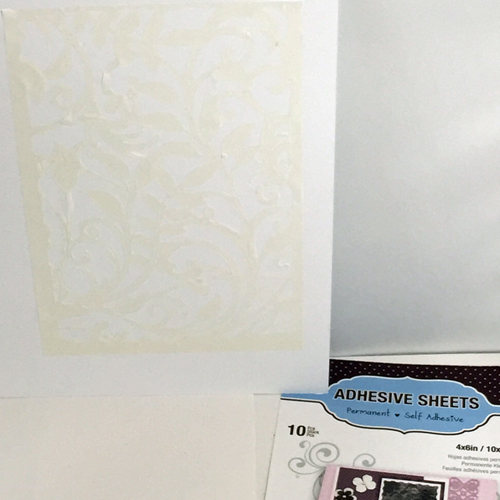
2. Peel the protective backing and apply the die cut Adhesive Sheet to the card base. It’s difficult to see in the photo, but it’s there!
3. Burnish the adhesive and then remove the top protective backing and apply silver leafing.
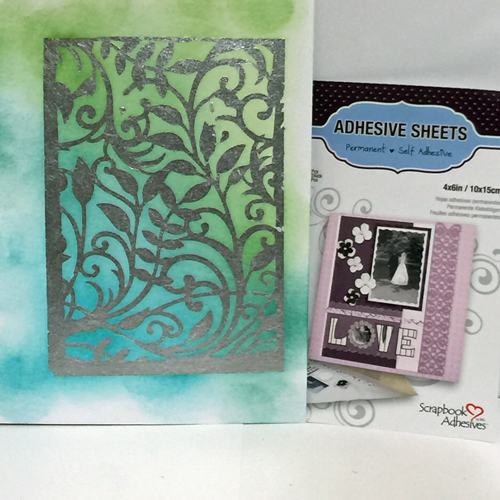
4. Apply three different colors of ink blending well between colors. The super thin Adhesive Sheets make this possible!
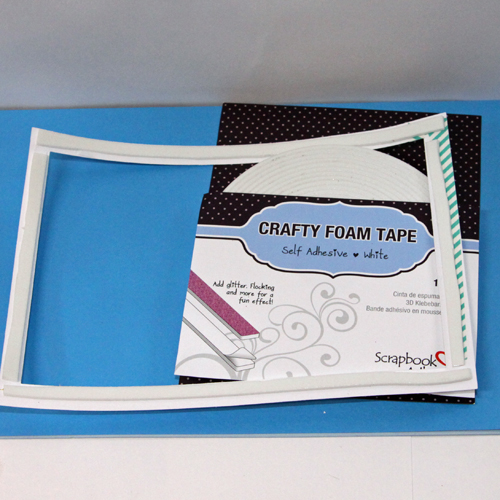
5. Die cut the card border and apply to the card base using Crafty Foam Tape White.
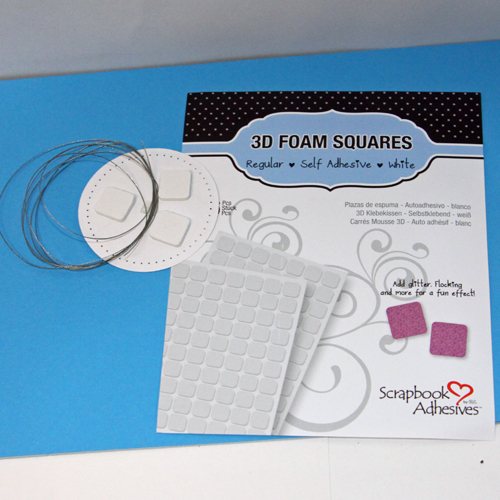
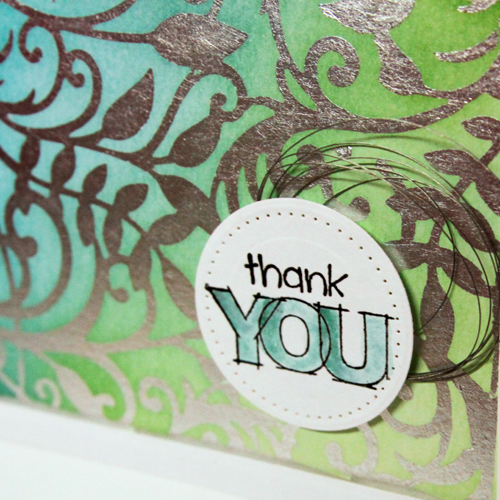
6. Stamp the sentiment, emboss with clear embossing powder and color the sentiment with the blue ink from the card base. Die cut using the perforated circle dies.
7. Adhere loops of jewelry wire the back side of the sentiment block with a Adhesive Dots Small. Adhere the sentiment block to the card front with 3D Foam Squares White Regular.
That’s it! Super trendy and super easy….it’s what the right tools bring to EVERY project! Here’s a close up of the sentiment block with the foiled background:
Scrapbook Adhesives by 3L® Supplies used: Adhesive Sheets 4x6in, Crafty Foam Tape White, Adhesive Dots Small, 3D Foam Squares White Regular
Spellbinders Botanical Swirls, 5 x 7 Matting Basics A and B, Celebra’tions Perforated Circles,
Bazzill Basics Paper Card Stock, Close to my Heart Stamp, Tsukineko Ink, Ranger Embossing Powder, EK Success Silver Foil, Ranger Distress Inks, misc. jewelry wire.
And now on to the contests:
Be sure to visit Basic Grey® and Clearsnap® today for their tutorials and chances to win!
Check back with Spellbinders tomorrow for more tutorials and prizes!
By Ruth K March 23, 2015 - 11:30 pm
I love how you redid the dress form. Thanks for the tutorials and your participation in the Spring Blog.
By Joan Meyers March 23, 2015 - 11:42 pm
I wish I could do more of your projects; unfortunately my local Michaels and JoAnns don’t carry very many of your product selection. But the projects look great.
By Patricia Molnar March 23, 2015 - 11:56 pm
Fabulous projects!! I love the dress form! So amazing how you can make something so beautiful and re purpose something old and give it new life!! The card is so beautiful, I love the colors! Thank you for the tutorials!!
By Sylvia March 23, 2015 - 11:56 pm
I love both projects. I will have to make me a dress form for my craft room. Great inspiration! I love the die used to cut the silver foil! thanks for sharing!
By Patricia Molnar March 23, 2015 - 11:59 pm
I use your products regularly when creating! I use your foam squares when I am giving dimension to my projects!
By Jacqueline T. March 24, 2015 - 12:58 am
That dress form is gorgeous! And the silver leafing on the card is stunning. I love both projects.
By Sandra F March 24, 2015 - 1:02 am
Love this hop…so nice when companies realize that their products go well with other products and there is enough room for both.
By Mariah Walker March 24, 2015 - 2:37 am
Thank you for sharing your ideas. It is nice to have new ideas to use with the products that I purchase. I too like to go to rummage sales and dressup my finds. Thanks for sharing!
By TracyM #6773 March 24, 2015 - 4:22 am
DELIGHTFUL dressform Asia – LOVE the DELICATE layers & details!!!
BEAUTIFUL card Angela- LOVE the silver leaf on the diecut panel – I’ve not tried this EXCITING technique before, even MORE BEAUTIFUL with the blended inks – WOW!!!
THANK YOU for sharing your CREATIVE INSPIRATION and TERRIFIC tutorials ladies 🙂
By TracyM #6773 March 24, 2015 - 4:38 am
OOPS – I forgot to confess that I haven’t used any of your tutorials yet, but I am subscribed to your blog & Pinterest boards, so I have plenty of inspiration on hand with lots of products & techniques I look forward to trying 🙂
By Christine Duffy March 24, 2015 - 4:31 am
Gorgeous dressform, you could ring the changes and keep re-doing this.. hmm thinking cap is on. Great technique with the card, oohh lots of inspiration here. Thanks so much.
By Heaney March 24, 2015 - 5:13 am
I have yet to create any project from your tutorial posted here.
By Beverly Perdue March 24, 2015 - 5:15 am
The dress form is awesome! It’s amazing how you can create something so beautiful! I have only tried a couple of the projects from the tutorials, but I have learned several techniques that I have used on some of my cards. Thanks for the inspiration.
By Sara Tann March 24, 2015 - 6:11 am
These projects are beautiful. I can see a lot of uses for the adhesive sheets. I think I’m going to get into a lot of trouble once I find them. LOL
By Ellen Crawley March 24, 2015 - 6:21 am
I wasn’t even aware of your sheets of adhesive which can be die cut! Can’t wait to try these.
By Heather Marley March 24, 2015 - 6:22 am
I love the use of the adhesive sheets, the metal and the ink. Gorgeous results!
By Janet Cobb March 24, 2015 - 6:39 am
I love what you did with the dress from and the card is so pretty. I don’t do many of the projects from the tutorials since I concentrate mostly on card making, not a lot of papercrafting. But I don so enjoy seeing all the lovely creations by others!
By Miriam Prantner March 24, 2015 - 6:54 am
Great projects! I don’t necessarily recreate projects, but I will use techniques I see or get ideas and then incorporate them into my projects.
By kath white March 24, 2015 - 6:56 am
Wow! These projects are so detailed and wonderful. Love the dress!
By Linda F March 24, 2015 - 7:17 am
Fantastic projects. I’m dominantly a card maker and I haven’t worked right through any tutorial but I do try out different tips and tricks from within your tutorials.
By JulianaT March 24, 2015 - 7:31 am
I have not yet created a project from your tutorials but I will certainly be checking back and trying some!
By adziamar March 24, 2015 - 7:36 am
Amaizing projects. I love that step by step tutorial
By ANN ROBBINS March 24, 2015 - 7:46 am
I am mostly into card making so I really liked your little card very much. THank you for participating in Spellbinder’s Blog Hop.
Mstgane
Ann
By Mary Karas March 24, 2015 - 7:47 am
I just picked up a dress form and I love your tutorial on the remake. I may just follow along and try it out. Thank you.
By doudou2106 March 24, 2015 - 7:58 am
So beautiful creations. Thanks for the tutorial
By Karen S March 24, 2015 - 8:05 am
Thank you for your inspiration and tutorials. Love both projects.
By jean marmo March 24, 2015 - 8:06 am
Wow – amazing projects and inspiration!! Loving this hop!
By barbara macaskill March 24, 2015 - 8:11 am
LOVE Asia’s dress form and Angela’s card is stunning! Thanks for being a part of this awesome hop!
By Amante del Papel March 24, 2015 - 8:12 am
Beautiful and awesome tutorials!!!
By barbara macaskill March 24, 2015 - 8:13 am
Forgot to answer the question. I often create something loosely based on a tutorial I have seen on your site!
By sharon l-s March 24, 2015 - 8:25 am
I try to do a project from tutorials about once a month. Some are easy to do others a little more complicated but all are fun. tfs The two projects today are adorable. Love the dress form have to look for one but could dress up a pear form (I have some quilt material with a pear person sunbathing at the beach) great idea. the card idea – love it I have the material on hand going to use a different die. thanks for the wonderful ideas
By Anita Braddock March 24, 2015 - 8:27 am
Beautiful love the colors and the layers thanks for sharing Thanks for the tutorial. I craft as I can our Granddaughter keeps me going.
By Jennifer Scull March 24, 2015 - 8:28 am
what beautiful projects! I must confess that I am great at reading tutorials, but not so great at actually making things from them. I need to get better at that! 😉
By Holly Young March 24, 2015 - 8:35 am
Such amazing projects! I love how you did the skirt on the dress form, and the card is stunning! Especially love the coiled cording behind the sentiment.
By Dana W March 24, 2015 - 8:37 am
Great projects!! Lots of great details!! My style is a bit more clean and simple so i just use tips here and there!
By Michelle S March 24, 2015 - 8:56 am
I love the dress form. It’s just wanted I wanted to do for my daughter’s french inspired bedroom. Thanks!!
By Sandra KM March 24, 2015 - 9:08 am
I do mostly cards so those are the most inspiring tutorials for me. I do enjoy learning how to use the products in creative ways that I would never have thought of on my own, so I appreciate all the tutorials.
By Judy W. March 24, 2015 - 9:17 am
Beautiful projects! This is the first time I have been to your site, and I’ve seen some techniques that will be fun to use in my own projects!
By Ruby N March 24, 2015 - 9:17 am
I’m a cardmaker too…I try to incorporate different tips. 🙂
By Pai March 24, 2015 - 9:22 am
i need to try your adhesive with foil. i have not found a good one yet!
By Scherry Sine March 24, 2015 - 9:24 am
Thanks for the projects . Love different idea s.
By Amanda Rhodes March 24, 2015 - 9:36 am
Beautiful projects! Thanks for sharing!
By Cindy S March 24, 2015 - 9:38 am
I don’t think I’ve made anything from your tutorials,yet!
By Theresa Redfern March 24, 2015 - 9:40 am
This is the first time to your site now I will be back to explore.
By Susan March 24, 2015 - 9:41 am
I’m new to your site, brought here by the Spellbinders Blog Hop, so haven’t yet made anything form your tutorials. I did find your tutorial today quite informative, and now want to get some of the adhesive paper to try the foil method shown above!
By Kathy L Goda March 24, 2015 - 9:46 am
I always enjoy seeing the projects! Have created 3 but am looking to create more!
By Gail L. March 24, 2015 - 9:52 am
Great projects! The dress form turned out stunning!
Card is wonderful!
By Peg Adams March 24, 2015 - 9:53 am
Lovely creations. Thanks for the chance to win.
By LaChelle Shown March 24, 2015 - 10:01 am
I love how the dress form turned out. I have been wanting to try and do one. Also really like the background of the thank you card. It just screams “summer”!
By adie March 24, 2015 - 10:05 am
Love the uniqueness of your projects.
hugs
By Yana March 24, 2015 - 10:10 am
Beautiful projects! Love the dress!
By Angie Hall March 24, 2015 - 10:11 am
Wonderful projects & the adhesives help make them special.Thanks for yor giveaway.
By Terralin Hirniak March 24, 2015 - 10:13 am
Thanks for the lovely ideas for you products and spellbinder dies. They are all very intriguing!
By sherrie March 24, 2015 - 10:51 am
Wow!!!! Amazing projects! I love the dress… amazing ideas, colors, papers and dies! So inspiring:)
Sherrie K
By Robin March 24, 2015 - 10:52 am
Lovely work! WOW!!!!
By Janis in ID March 24, 2015 - 10:53 am
Phenomenal projects. LOVE the dress form!!!! Gorgeous!! Thanks for the chance(s) to win!! LOVE Scrapbook-Adh products!!
<3 J
jwoolbright at gmail dot com
HerPeacefulGarden.blogspot.com
By Janis in ID March 24, 2015 - 11:35 am
Internet is sloooow today and so I just now was able to load up the rafflecopter to see I was supposed to answer the question abt tutorials. I get loads of inspiration on unique ways to use your products from your tutorials. I often use the great tips and shortcuts I learn, even if I don’t follow the tutorial exactly.
<3 J
jwoolbright at gmail dot com
HerPeacefulGarden.blogspot.com
By Mary Holshouser March 24, 2015 - 11:07 am
I use a lot of the ideas that I see on your blog. I don’t necessarily make the same project that you demonstrate.
The inspiration is the important part. thanks
By Erin D March 24, 2015 - 11:14 am
I just discovered this blog and I am looking forward to all the inspiration.
By Regina M. Hamilton March 24, 2015 - 11:17 am
Wonderful projects. I love the dress form.
By Terri Burson March 24, 2015 - 11:25 am
Oh em gee! That dress form? To die for. And I love the leafing and tutorial on the card. I get so many great ideas from your tutorials. I may not replicate a full on project, but always glean something to use in creations of my own.
By Karen Petitt March 24, 2015 - 11:34 am
Fabulous projects and great step by step on the dress form – which has given me an idea to upcycle some old items! Thanks for the tutorial and a great blog hop too Karen x
By Karen Petitt March 24, 2015 - 11:36 am
It’s my first time visiting your blog although I was lucky to win some or your wonderful adhesives a while ago which I love! I hope to back soon Karen x
By christine kaminski March 24, 2015 - 11:42 am
Awesome fun on the blog hop and thanks for the chance for additional prizes!! great ideas today!!
By Dorina D March 24, 2015 - 11:45 am
Amazing projects with fun tutorials . The dress form is so unique and the card is amazing. Great job
By Viki B March 24, 2015 - 11:55 am
These are such beautiful and inspiring projects!
By Carla Hundley March 24, 2015 - 12:14 pm
These are wonderful and thanks for the
instructions! I do make some things like
you show. Can never learn too much!
Carla from Utah
By Lisa F March 24, 2015 - 12:26 pm
Both projects are so fabulous and inspirational!! Love them both!!
By Regina Furman March 24, 2015 - 12:26 pm
I’m totally amazed by that dress form project! I would never have the patience, nor do I have the talent. I can see myself making something very similar to the card though! That is gorgeous ad well!
By Christine March 24, 2015 - 12:28 pm
I hardly ever “copy” a project, I only copy techniques and take inspiration from projects. The dress form is really pretty!
By Regina Furman March 24, 2015 - 12:29 pm
Oops, I forgot to answer your question! I have attempted to make a few things following your tutorials. My favorite things are the shaker cards!
By lorene holbrook March 24, 2015 - 12:40 pm
love this hop. the cards are gorgeous! this is my first time to your blog, so I haven’t made anything yet!
By Amy C. March 24, 2015 - 12:42 pm
Beautiful projects today! I haven’t had the chance to replicate any of your blog projects.
By Teresa Godines #6857 March 24, 2015 - 12:47 pm
I may only make one or two of the projects you show…. but I find a way to use some of the techniques and inspiration in other projects
By Anne Marie Fowler March 24, 2015 - 12:50 pm
This is my first time visiting your site, but I can tell that I will be returning. Your ideas are so fun and light–the very reason I love crafting.
By Tami B March 24, 2015 - 12:55 pm
If I see something I like I will usually incorporate some aspect of the project in something I create, or at least pin it for later use. How often? I really can’t say.
By Beth Williams March 24, 2015 - 1:05 pm
It’s been a while I must admit. But it’s been a while since I made anything. Getting back in the swing of creating-and I can say with all honesty-you are my favorite adhesives. I’ve got to give those sticky adhesive sheets a try-they look fantastic.
By April S. March 24, 2015 - 1:05 pm
I have made a few things. Love these projects!!
By Rebecca B. March 24, 2015 - 1:07 pm
I really liked the tutorials. I could see myself making the silver burnished card.
By Kristina Beagle March 24, 2015 - 1:19 pm
I often create projects from tutorials or at least inspired by some element of them 🙂
By Sharon Brand March 24, 2015 - 1:33 pm
WOW these projects are fabulous. I gather a lot of inspiration from tutorials but only occasionally do them exactly.
By D.Ann March 24, 2015 - 1:36 pm
Two FAB projects! I have several of your posts bookmarked that I want to try someday. Unfortunately I move slower than a herd of turtles and it may be a while before I actually get to them. lol!
By Marg March 24, 2015 - 1:40 pm
Great projects. I really like how the adhesive sheet was used in making the card.
By Elaine March 24, 2015 - 1:47 pm
Lovely work well done
By Suzan D March 24, 2015 - 2:00 pm
Gorgeous projects.
By Shari Czerwinski March 24, 2015 - 2:22 pm
Great tutorial! Never thought about using adhesive with die cuts. Thanks for sponsoring 🙂
By Heather Warner-Ferguson March 24, 2015 - 2:54 pm
Such wonderful projects- I have yet to do a project as in depth as the dress form, but have made many cards with ideas seen on here to assist me in design
By Lynne T. March 24, 2015 - 2:56 pm
I love your projects. They are all so cute.
By Mandy Moore March 24, 2015 - 3:00 pm
That dress form re-do is AMAZING!! I love EVERYTHING about it! Great job, Asia! And I’m obsessed with those the sheets of adhesives—-LOVE, LOVE, LOVE! Thanks, Angela, for showcasing those…..your card is just beautiful!
By Linda Duensing March 24, 2015 - 3:16 pm
Beautiful projects. I have been looking for the adhesive sheets but have not found them the stores we have in my area. The dress form is very unique and I love vintage items. Thanks for sharing.
Linda D.
By Blue Rose March 24, 2015 - 3:29 pm
Ladies, you have done an awesome job. I can see making the first project for a bride to be…so lovely. I also loved the tip on just cutting the adhesive…been using it to adhere delicate dies, but never on its own…thanks.
By Teresa March 24, 2015 - 3:47 pm
Asia, your dress form is a work of art and you would NEED GOOD adhesive to do that. ( I love a good adhesive!!) Great job.
Angela., I love, love, love your card. BEAUTIFUL! I have been paper crafting for over 15 years and I can’t stress enough how much I love GOOD Adhesive and Spellbinders dies were my first dies I bought ( and I have a ‘few’.) Great combo of companies!
By Melissa B March 24, 2015 - 4:02 pm
This is my first time on your site. I’m sure I’ll be using it often!
By MarilynY March 24, 2015 - 4:03 pm
Samples and tutorials are among the best ways to let crafters be aware of your products and I’ve always enjoyed learning from them. Double stick tapes are the most important items on my work table…..in fact, I always have at least 3 laying around for easy access. They make my life easier and work faster when working on my card projects. I have to purchase these through website stores since we don’t have easy access to them.
By Jan Castle March 24, 2015 - 4:06 pm
Had to laugh…posting my comments too fast….never saw that before! Love both projects….truly AMAZING!
Hope this is slow enough to get posted this time!!!
Jan
By Beverly Parkison aka Lateblooming Designs March 24, 2015 - 4:18 pm
Love the dress form and maybe when my grands are a little older I will make one for them. thencard is especially pretty and you make it seem so easy. thanks for sharing.
By Debbie Eslinger March 24, 2015 - 4:21 pm
I try to create as much as possible nut not as much as I like
By Carol H. March 24, 2015 - 4:30 pm
Well, I’ve just recently started reading your blog, so I can’t say that I’ve created any of the projects yet. Love the ones today. I’d love to try the card, but I need some silver leafing. I do use your products though and they are great!
By Maureen March 24, 2015 - 4:30 pm
Beautiful ideas
By Janet Mack March 24, 2015 - 4:34 pm
I love the gold foil card. I will have to try that.
By Gilda March 24, 2015 - 4:39 pm
I have just discovered your site and look forward to following, but I do use and love your products. Thanks for being a part of the hp and sharing the beautiful ideas.
By Laurie Black March 24, 2015 - 5:14 pm
I just discovered your tutorials, will be taking a closer look at these. I love the silver leaf technique.
By jpscraps March 24, 2015 - 5:29 pm
One word….STUNNING!
By Sherry Lowmaster March 24, 2015 - 5:31 pm
cute projects!!
By Jean Bullock March 24, 2015 - 5:37 pm
I love today’s projects. The altered dress form is awesome and I love the card. Those adhesive sheets are at the top of my wish list. I found some old gold leaf sheets ( from about 20 years ago) and I am dying to try out that technique.
How often do I create projects.? I have no idea. I don’t duplicate the projects exactly but I learn from the techniques I see and when I need what I learned, I apply it.
By Abbie Bryant March 24, 2015 - 5:47 pm
Both the dress form and the card are beautiful! I love that you guys offer so many different types of adhesives which help make a lot of these beautiful project possible! Thank you for sharing today and for all you do!
By Abbie Bryant March 24, 2015 - 5:50 pm
This is my 1st time visiting your blog, but it will not be my last, that is for sure!
By Michele K. Henderson March 24, 2015 - 5:54 pm
Great ideas! Beautiful projects too! I am always inspired by something in the cards or tutorials, although I do not recreate exactly as the instructions suggest.
By Lucy E. March 24, 2015 - 5:58 pm
Beautiful projects!!!
I have tried only a handful of the projects you have had tutorials on.
I just don’t have enough time between working and caregiving for my grandson
and mother in law.
By Cindy March 24, 2015 - 6:00 pm
I love the idea of using the sticky sheets and silver for the card. Maybe I will use the dress form ideas on a canvas instead. Thank you for sharing.
By Tona March 24, 2015 - 6:01 pm
Wonderful projects. I especially adore that dress form!
By Rebecca W March 24, 2015 - 6:28 pm
I don’t often copy the projects but I love seeing the new ideas and techniques and using those in my own ways. I adore the idea of using an adhesive sheet through a diecut to apply leafing or other small items that are similar- fabulous technique.
By Janet Sisk March 24, 2015 - 6:30 pm
WOW! What a fabulous dressform! Love all the details. The card is amazing with the foiling. Thanks for all the inspiration! 😀
By Patricia Foit March 24, 2015 - 6:52 pm
That dress project is adorable! I am very grateful for your tutorials! Please keep them coming! I learn so much from them! I use so many of your products too. Have always loved your adhesives! Thanks for the giveaway.
By Rebecca Yahrling March 24, 2015 - 6:54 pm
Great projects! That dress form is just phenomenal. I’m blown away.
By Natalia March 24, 2015 - 6:55 pm
What a beauty! And a beautiful card! I love the background knives! Thank you for the opportunity to win, keep for themselves cams
By Kathy Burgess March 24, 2015 - 6:58 pm
Enjoyed the tutorials and projects. Once again Asia King does stunning work!!
By Sandy K. March 24, 2015 - 7:00 pm
The dress form was simply gorgeous…so very creative and I loved the card using the foil. It’s beautiful. I can honestly say that I use Scrapbook Adhesive’s by 3L practically everyday making cards and scrapbook.ing. The foam squares and runners are both something I try never to run out of. Just recently bought the adhesive sheets and look forward to using them with my punches and Spellbinders dies.
By Amy M March 24, 2015 - 7:04 pm
Thanks for the tutorials. I found you and signed up for the blog/newsletter so I can try some of the projects.
By Michel E March 24, 2015 - 7:06 pm
Great projects.
craftymom205 at yahoo dot com
By Donna Rinckel March 24, 2015 - 7:28 pm
This is my first visit to your blog. So I’ve never used one of your tutorials. But I will be coming back to check it out and subscribe if that’s possible. Thanks for the gorgeous tutorial!
By Lois March 24, 2015 - 7:28 pm
This is my first visit to your blog, so glad to have found it. I love both projects and will definitely be trying these.
By Samantha March 24, 2015 - 8:07 pm
I love your products – cute card
By Monika/buzsy March 24, 2015 - 8:08 pm
Lovely projects. Especially love that dress form… so shabby and elegant. Very creative too!
By Sue D March 24, 2015 - 8:48 pm
I get ideas from your tutorials to make my own projects.
By Diane Johnstone March 24, 2015 - 8:49 pm
What a great project.
By Jan Westcott March 24, 2015 - 8:54 pm
Fantastic projects. thanks for sharing.
By Jeniff Sthory March 24, 2015 - 9:21 pm
Beautiful dress form!
By Vicki Sopcak March 24, 2015 - 9:34 pm
I love the projects and I have used your adhesive sheets. They are great for making quilt cards.
By Rufus March 24, 2015 - 9:47 pm
While the dress form is really pretty I’m much more likely to do something along the lines of the card with the foiling and inking. Both projects where interesting. Thanks for sharing them.
By Dru W. March 24, 2015 - 10:04 pm
Use some SA foam squares on a project tonight – they’re my favorite!
By Elizabeth Kimbel March 24, 2015 - 10:24 pm
Love the tutorials! Especially the one using the adhesive sheets! I didn’t even know there was a product out there like this. Looks like a lot of fun!
By NWFlamingo March 24, 2015 - 10:47 pm
Gotta love that foiling! And the dress form is really cute too.
By Rebecca Ednie March 24, 2015 - 11:08 pm
I’m not familiar with your blog so I’ve never made anything from your tutorials. But I hope to soon! I love the dress form.
By Jenelle Reyes March 24, 2015 - 11:18 pm
Wow! The dress form was amazing! Loved the silver leafing on the card! Very cool projects and excellent use of Scrapbook Adhesives!
By Brandi R March 24, 2015 - 11:19 pm
These are both fantastic projects! Thank you for sharing ♥
By suman March 24, 2015 - 11:33 pm
Love both the projects , the dress form is gorgeous and the foiled die-cut using the adhesive sheets is a stunner !!
By Brenda Olvera March 24, 2015 - 11:56 pm
Beautiful Projects!!
By Anne Telecky March 25, 2015 - 12:37 am
I love card and the burnish technique, can’t wait to try it.
By Cathy K. March 25, 2015 - 1:22 am
Thanks to Spellbinders, I found your site. I really liked the silver leafing on the card and I’m sure I’ll be trying it on the cards I make.
By Maxine D March 25, 2015 - 1:59 am
Wow what wonderful projects, and great techniques shown. Thanks for sharing these projects.
By Beatrice Cristina Lawson March 25, 2015 - 4:55 am
Stunning projects! I don’t keep track of how often I use tutorials mainly because I save the ones I am interested in and go back later when I gave an idea to read it again… What I can say is that the foiled background from today is definitely one I will use with my adhesive sheets, I thoughts it was just gorgeous and relatively easy!
By Joan F March 25, 2015 - 6:41 am
I love the idea of adhesive sheets that can be die-cut. Can’t wait to try out the ideas.
By Angelica Chambers March 25, 2015 - 7:05 am
I Use The Ideas On The Blog To Often Create Similar Projects. Thank U!
By Lisa Conner March 25, 2015 - 7:34 am
I have only made a project from your tutorials twice that I remember, though I love looking at all the inspiration and frequently pick up useful tips/techniques that I use on other projects.
By Jeffrey Sheats March 25, 2015 - 7:40 am
What fun projects! I don’t make the project too often but they give me ideas to try on the next thing I make.
By littlen March 25, 2015 - 10:07 am
first time visitor to your blog.
By Jessica Salinas March 25, 2015 - 11:15 am
Wonderful tutorials, I love the stepped out pictures. This is my fist time visiting but I will definitely be back. I absolutely love the dress form, it’s gorgeous.
By Cynthia Xavier March 25, 2015 - 1:46 pm
I love the dress form. What a cute idea. I’ve been looking for some to play with. Thanks for the idea on how to decorae.
By Nadine March 25, 2015 - 2:06 pm
This is the first time I visited but I get lots of ideas from blogs. Thank You!
By Liz Lumsden March 25, 2015 - 3:54 pm
The dressform is awesome!! and the card is so pretty. Thanks for sharing your projects.
By Monica Baker March 25, 2015 - 4:17 pm
I am a new subscriber – but I definitely want to try the dress form tutorial. That is amazing!
By Deb ~ Paxton Valley Folk Art March 25, 2015 - 5:06 pm
Amazing creations, what inspiration! Thanks for a fun blog hop and the great tutorials. I’ve just discovered your blog but will be back for sure to lean more from your talented DT!
By Freetany March 25, 2015 - 6:00 pm
Great products and very creative uses of the dies.
By Golda March 25, 2015 - 6:14 pm
Wow! That dress form is amazing and the card is great, too.
By Robin Buchholz March 25, 2015 - 6:23 pm
Beautiful, I love both projects! I follow a few tutorials a month.
By Heather Mills March 25, 2015 - 6:47 pm
These are both so fabulous!! That updated dress form is now a work of art!! And the foil background looks amazing!
By Heather Mills March 25, 2015 - 6:49 pm
Just saw the question posed in the rafflecoptor entry. I haven’t actually made any projects from your tutorials, but they are definitely fabulous.
By Lindi Phillips March 25, 2015 - 7:10 pm
Love Love you guys …once again you have blown me away in particular with that dress thankyou..
By Barb in AK March 25, 2015 - 7:45 pm
I LOVE, LOVE, LOVE your products, but to be honest, I’ve never used adhesive sheets before! I think that may change very soon! Thank you for the wonderful inspirations 🙂
By shea balentine March 25, 2015 - 7:49 pm
This is my first trip to your website, so, obviously I haven’t ever created anything from one of your tutorials! But, I certainly do plan on visiting more often and finding a project to make!
By Julie Shearer March 25, 2015 - 8:41 pm
I have made projects using your tutorials …. Not sure how many but love your products and projects!!
By Yolanda March 25, 2015 - 9:14 pm
Sweet dress form and the card is gorgeous!
By Jade Passmore March 28, 2015 - 12:23 pm
Thank you for sponsoring the Spring Blog hop! I love your products and the dress form and card tutorials above are amazing! Love them.