
Hi everyone, Christine here today with a decorated mini round gift box.
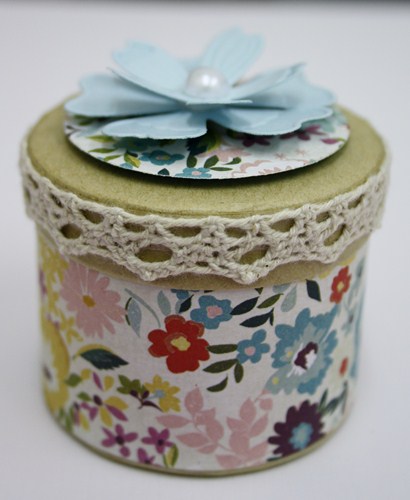
I’ve chosen pretty flowers because hopefully here in the UK Springtime is on its way! I selected a shop bought mini round gift box. It looks extremely boring and plain but not for long!
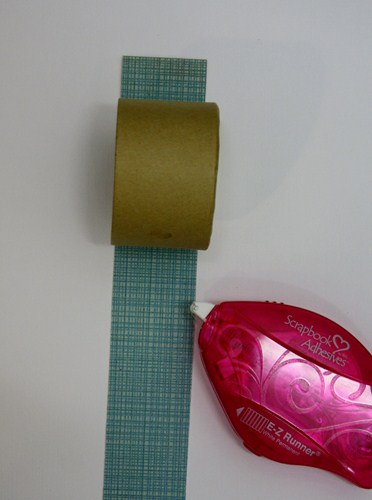
 I cut a strip of paper – Basic Grey – RSVP and wrapped this around the base section of the box. I used E-Z Runner® Permanent Strips – Refillable to make sure it was adhered securely.
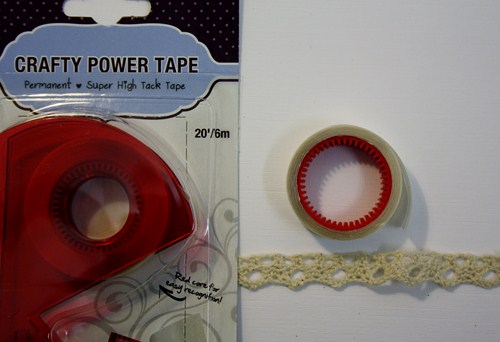
 I then decided to have lace around the edge of the box lid, Crafty Power Tape is perfect to adhere lace. The tape comes in a handy refillable dispenser.
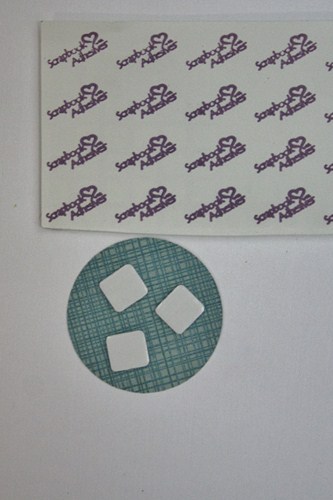
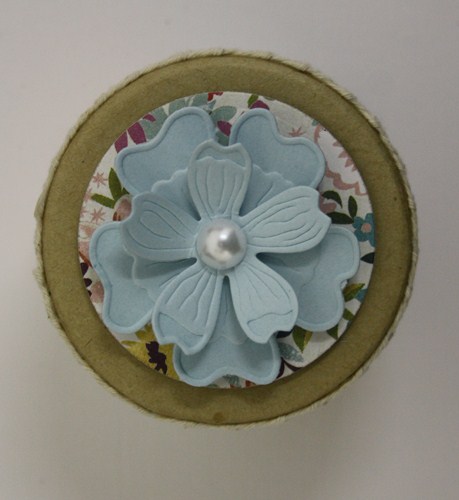
To decorate the top of my box I die cut a circle from the patterned paper – Spellbinders® Standard Circles LG
 For dimension I applied 3D Foam Squares – White Regular to the reverse of my die cut and then placed this onto the box lid.
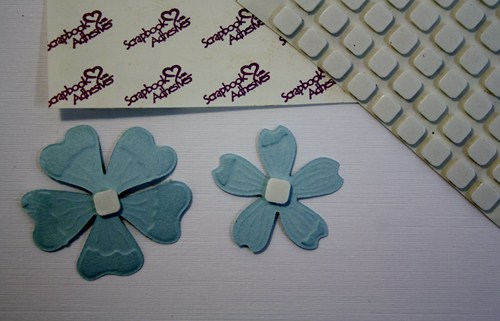
For decoration, I cut/embossed Spellbinders® Blooms Three from pale blue cardstock and attached them using 3D Foam Squares – White Small.
The finished mini round gift box.
Perfect for a gift of jewellery, gift vouchers, lottery tickets! Thank you for joining me today, have fun crafting with the brilliant Scrapbook Adhesives by 3L products.
Supplies used:
Scrapbook Adhesives by 3L: E-Z Runner® Permanent Strips – Refillable, Crafty Power Tape, 3D Foam Squares – White Regular, 3D Foam Squares – White Small
Spellbinders: Standard Circles LG, Blooms Three
Basic Grey: RSVP paper collection
Gift box, pearl, lace
By Maggie March 3, 2014 - 12:13 am
Hi Christine. What a transformation to that plain little box~ such a pretty project~ I love it!!
Hugs,
Maggie x
By Anne March 3, 2014 - 12:24 am
A really pretty box, lovely flower topper. Anne
By Janice March 3, 2014 - 12:44 am
Such a pretty box Christine, which can be used for so many things.
Great tutorial too.
Thank you! Janice x
By Carole Zorzo March 3, 2014 - 1:20 am
A really beautifully decorated box Christine and super tutorial too! Carole Z X
By Julia March 3, 2014 - 1:30 am
Looks easy to do but very pretty aswell. Thank you
By Patricia Howarth March 3, 2014 - 1:48 am
Morning Christine, Wow !! what a transformation, loving everything you have used on this project, and the colours really ‘lift the spirits’. A beautiful gift box, and a great step-by-step.
Lots of love from Patricia xx
By Susan Flynn March 3, 2014 - 2:53 am
What a pretty box Christine, love the papers and the gorgeous flower. Susan x
By Lucycat March 3, 2014 - 3:30 am
A really pretty box and a great tutorial, thank you.
By CornishEmma March 3, 2014 - 3:35 am
What a beautiful little box, so useful for keeping those little things in. Emma
By Gemma Couch March 3, 2014 - 5:24 am
Hi Christine. Love the way you have decorated this box. I have a lot of Scrapbook Adhesives from Hope & Chances and they are excellent. Love the little flower too! Gemma xx
By Denise Key March 3, 2014 - 8:19 am
Such a sweet project! Love the floral print! Thanks for sharing! 🙂
By Loraine March 3, 2014 - 8:43 am
Pretty little box I love the lace around the top thanks for sharing x
By Anne March 3, 2014 - 9:09 am
Hello Christine
What a lovely idea. Such a transformation into a really pretty box. Looks so simple to do.
Best wishes
Anne O
By Valerie Harrison March 3, 2014 - 12:47 pm
Christine, Love how you have transformed the box, I have several different boxes and will follow your lead. Valerie
By Kathy C March 3, 2014 - 12:49 pm
Hi Christine, Love your decorated little box, Scrapbook Adhesives are great products. I always have their foam pads to hand when I am crafting, purchased from Hope & Chances !!
Kathy C