
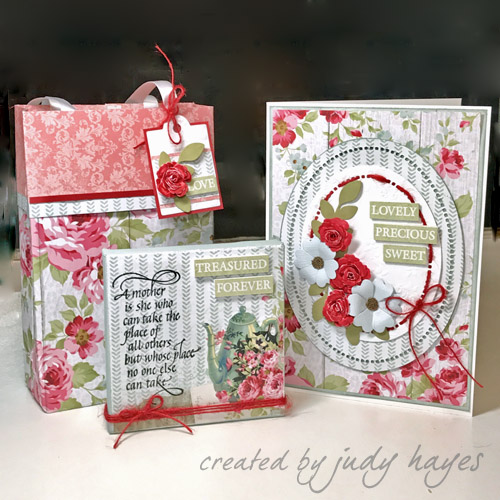
I’m thinking ahead to spring and have Mother’s Day on my mind. My gift ensemble displayed at the Creativation trade show is perfect for the occasion. Hello everyone, it’s Judy! My sweet Mother’s Gift Ensemble features a mini canvas, card and gift bag. I chose a verse about mother on the mini canvas. Another gift idea is a verse for a friend.
Creating the Canvas Gift
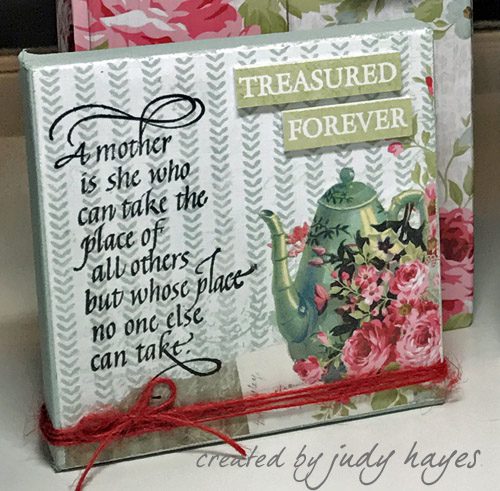
The mini 4 x 4 inch canvas painted with chalk paint to coordinate with my paper. The little teapot was fussy cut from patterned paper and placed in the corner of the canvas with Dual Tip Glue Pen. I used a brush to spread it over the canvas. Stamp the verse and heat with clear embossing on tissue paper. Remove excess paper around the verse with a wet brush by outlining the verse and then pulling the paper away. Apply Dual Tip Glue Pen to the back of tissue and spread with my finger. Place over the canvas. Finally, the words are popped up with Crafty Foam Tape White. Wrap red twine around the bottom and tie into a tiny bow.
Card Making Details
The card features two die cut oval die cuts and pretty paper flowers. In the smaller white oval, thread twine for a unique accent. In addition, the darker paper behind the large oval shows through the tiny holes would add for another dimension. Ovals are fastened together with E-Z Dots® Permanent Refillable Dispenser and popped up on the card front with Thin 3D Foam Squares Mix White.

Die cut paper flowers and leaves are fastened with Adhesive Dots Small and Adhesive Dots Medium. The blue flower centers were made with a Adhesive Dots Medium covered with tiny beads. The words are popped up with Crafty Foam Tape White.
Assembling the Gift Bag
Using a coordinating two-sided 11 x 12 inch patterned paper, I folded 2.5 inches on the 12-inch side. Also, I added borders of red and striped papers for the top. Next, score and make the folds vertical to form the sides. Premium Double-Sided Tape ¼ʺ was applied to the edge to fasten into a bag shape. The bottom was scored, folded and secured with Premium Double-Sided Tape ¼ʺ. Note: I found the basic directions online and adjusted the dimensions. At the top, I fastened two white ribbon handles inside the bag top using Premium Double-Sided Tape ¼ʺ. I fastened patterned paper over the ribbon ends. Tie a small tag to the handle with twine.
Simply slip the mini canvas into the gift bag, the card into an envelope and the gift ensemble is ready to give to someone special!
Thanks for visiting!
Judy Hayes
Scrapbook Adhesives by 3L®:
Crafty Foam Tape White
Adhesive Dots Small
Adhesive Dots Medium
E-Z Dots® Permanent Refillable Dispenser
Thin 3D Foam Squares Mix White
HomeHobby By 3L®:
Dual Tip Glue Pen
Premium Double-Sided Tape ¼ʺ
Other:
DecoArt® Chalky Finish, Imagine Crafts/Tsukineko Versafine Onyx Black, KaiserCraft High Tea Collection, Little B Tags, Penny Black Happy Wishes, Spellbinders Hemstitch Ovals, Spellbinders Cinch and Go Flowers III, Spellbinders Bitty Blossoms, White & Red Cardstock, White Tissue Paper, Red Twine, White Ribbon, Mini Canvas 4 x 4ʺ
By beverly C Parkison February 16, 2018 - 10:45 am
Is it time for Mothers day already.? I am behind.
By Beth Pingry - admin February 16, 2018 - 2:11 pm
Hi Beverly, Judy’s project was in line with our AFCI booth theme of celebrations. While she had Mother’s Day in mind, this ensemble can be created for any celebration.
By Julie Blake February 17, 2018 - 4:52 pm
Its a beautiful collection of gifts.
Could you please let us know the name of the papers you used – I cannot find that information anywhere.
Thank you