You are in our US store • Switch to Europe store

You are Amazing Treat Bag

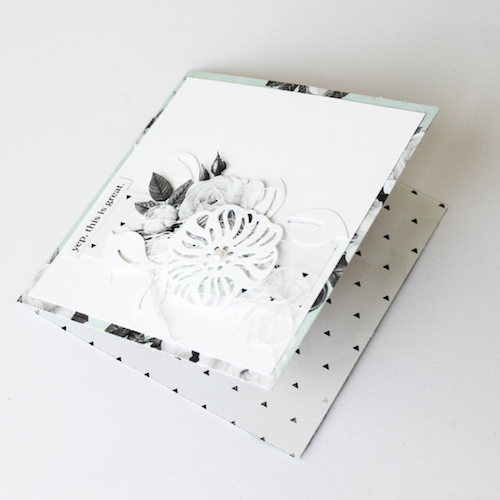
Hiya!  AJ here with a fun treat bag to share featuring the Premium Double-Sided Tape 1″ Permanent and silver mica and glitter as sparkly accent across the front!

AJOtto-YouAreAmazing-1

I love pretty little packaging, and time permitting, I try to create little customized gifts for varying people in my life. With the end of the year approaching, this seemed like a great project for a teacher gift.
AJOtto-YouAreAmazing-2

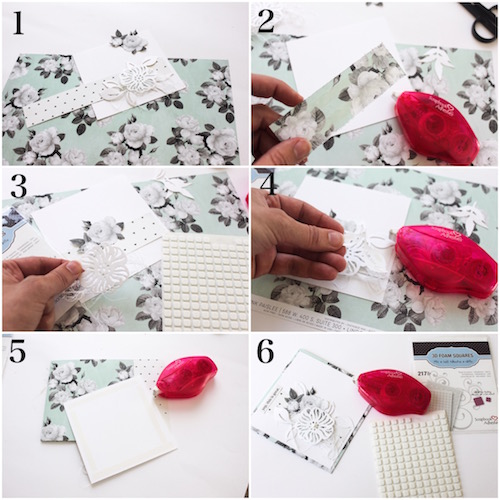
To start, I stamped the background of my bag.  I then adhered two strips of Home Hobby Premium Double-Sided Tape 1″ Permanent.  This is one of my favorite techniques for adding that pop of something different to my projects.

AJOtto-YouAreAmazing-3

Trim the ends off and remove the backing.  I used Silver Lux Mix mica and glitter on mine but think of the many beads/glitter/flock combinations you have in your craft pile!

AJOtto-YouAreAmazing-4

Once the Premium Tape is covered with the silver glitter and mica, I worked on the stamped panel. Using the Crafty Foam Tape – Black, I adhered the panel to its die cut base.
AJOtto YouAreAmazingCd Step4 May2916

To adhere the panel to the card, I used the Dodz™ Medium.  I wanted to make sure it was going to stick on that glitter 😉
AJOtto-YouAreAmazing-6

You can bake cookies and fill each bag to the top OR add a nice gift card to a certain coffee house inside.

AJOtto-YouAreAmazing-7

Enjoy!
AJ

Supplies:
Scrapbook Adhesives by 3L®: Home Hobby Premium Double-Sided Tape 1″ PermanentDodz Adhesive Dots MediumCrafty Foam Tape Black

Other: Flowers/Leaves Stamps and Dies (Spellbinders® Paper Arts); Sentiment Stamp (Simon Says Stamps); Silver Mica and Glitter (Stampendous®); Inks (Avery Elle)


Save

Save

Patriotic Thank You Card

Here’s a Thank You card to our military who keep our country safe! Remembering all those who sacrificed their lives for our freedom and those who serve to maintain that freedom on this Memorial Day weekend!

It’s Judy here today. I’ve created a patriotic “Thank you” card in honor of Memorial Day. With the classic red, white and blue, there’s a bit of sparkle on the stars!

Patriotic Thank You Card by Judy Hayes for Scrapbook Adhesives by 3L

Patriotic Thank You Card Steps

First, form a 4.25 x 5.5-inch white card base. Cut 4⅛ x 5⅜-inch piece of white cardstock panel and emboss with an embossing folder.

Cut 4.5-inch pieces of burlap, blue ribbon and red ribbon. Apply Premium Double-Sided Tape ¼ʺ to long edges on the backs of the burlap and ribbons.

Patriotic Thank You Card by Judy Hayes for Scrapbook Adhesives by 3L

Add a row of 3D Foam Stars to the blue ribbon. Remove the top liners and sprinkle with glitter on top. Press onto stars to secure and tap off the excess.

Patriotic Thank You Card by Judy Hayes for Scrapbook Adhesives by 3L

Attach the burlap to the embossed card panel. Adhere the blue ribbon on top of the red ribbon. Add both to the burlap ribbon. Trim ends even with the card panel edge.

Card Panel Details

Wrap and tie a piece of twine around the card panel and above the red ribbon. Place three short strands of twine over the knot and tie again. Trim ends. Use E-Z Runner® Dots Permanent to adhere the embossed card panel to the card base.

Patriotic Thank You Card by Judy Hayes for Scrapbook Adhesives by 3L

Thank You Sentiment

Cut a piece of blue cardstock large enough to fit thank you die. On the back, cover with Crafty Foam Tape Black.

Patriotic Thank You Card by Judy Hayes for Scrapbook Adhesives by 3L

Die-cut the sentiment through die cutting machine two to three times. Most likely the paper and foam will cut but the backing is uncut. Use tweezers to remove all the excess pieces, leaving the sentiment attached to the backing.

Patriotic Thank You Card by Judy Hayes for Scrapbook Adhesives by 3L

Lay the sentiment on the card front to guide the placement of stars. Apply stars to the top of the card. Sprinkle glitter over stars, press into stars, and remove excess.

Patriotic Thank You Card by Judy Hayes for Scrapbook Adhesives by 3L

Adhere the sentiment to the card front, overlapping the burlap ribbon.

Patriotic Thank You Card by Judy Hayes for Scrapbook Adhesives by 3L

Have a safe Memorial Day!
Judy Hayes

Materials Needed:
Scrapbook Adhesives by 3L®

E-Z Runner® Dots Permanent
Crafty Foam Tape Black
3D Foam Stars

Home Hobby by 3L®
Premium Double-Sided Tape ¼ʺ

Other
Craft Dies: Spellbinders® Paper Arts (S4-564 Simply Said Phrase Set Two and SCF-004 Rosette Wall Embossing Folder); White and Blue Cardstock; Blue and Red Ribbon; Glitter

Patritotic cards, scrapbook pages, banners & projects
Click to see more patriotic projects!

Visit our Website and Blog!
Sign up for our Newsletter so you never miss a contest or giveaway!

instagram purple icon facebook icon purple pinterest purple icon twitter purple icon YouTube icon blog subscription purple icon

Save

Save

Save

Thank You Card

Hi crafty friends! Lisa on the blog to share a fun Thank You card.  A Thank You card is always appropriate and when you make one that uses so many fun elements like this one does, it’s sure to bring a smile.

LisaAdametz-ThanksLatte-05272016-1

(sentiment reads: “Thanks a Latte” )

Most of my elements were pre-cut utilizing dies. I find that dies make card making a lot more fun and can really be unique IF you think outside the box a little.

I first stamped my coffee cup with an archival ink and water-colored it using water-color pencils. Then a die was used to cut it out. (Please note: All the other pieces were die cut in advance to make assembly easier.)

Since my paper was already die cut I’m ready to assemble:

Using the E-Z Dots® Permanent Refillable adhesive on the back of the white die-cut card stock and the patterned paper the layers are built up on the card base. I like this adhesive a lot because if I make a mistake I can move it right after adhering, but then it becomes permanent.

LisaAdametz-ThanksLatte-05272016-4

Next, I wanted to adhere this very thin die-cut ring to a paper doily. Well, Scrapbook Adhesives by 3L® has the perfect adhesive for that! The new E-Z Runner® Micro Refillable Dispenser. It’s soooooo thin! Only .08″ wide and perfect for circles.

LisaAdametz-ThanksLatte-05272016-5

On the backside of the doily (where the ring of the die-cut paper shows from underneath) I laid down a thin bead of glue using the Dual Tip Glue Pen and adhered into place.

I knew I wanted to add dimension to the coffee cup, so I added 3D Foam Squares -White,  Regular to the back of the cup.

LisaAdametz-ThanksLatte-05272016-6

Before taking off the liner paper and adhering the coffee cup, though, I wanted to add a little feminine bow.

Using the Twine in Pink I doubled up a length of twine and tied it in a bow, making sure the bows are relatively even and trimming the ends. Secure the bow to the doily using a Adhesive Dots Medium.

LisaAdametz-ThanksLatte-05272016-7

To give the bow some stability and to keep it from “flopping” my favorite trick is to dip my fingers in the Art Medium and run my fingers over the bows. It truly will help the bow stiffen up without making it look crazy. 😉 Just wash your hands as soon as possible.

Now is the PERFECT time to adhere that coffee cup, too! 🙂

Stamp the sentiment, find the placement, and add some of Tissue Tape as an embellishment.

I had a tiny cup of die-cut glitter hearts so I added one using a tiny piece of a 3D Foam Squares Black, Small.  I love the extra added touch of bling.

Here are a few close-ups:

LisaAdametz-ThanksLatte-05272016-2

One more….

LisaAdametz-ThanksLatte-05272016-3

I hope you enjoyed today’s card. I’m going add a Starbucks gift card to this and give it to a very special friend of mine. I hope she likes it!

Have a wonderful weekend.

SUPPLIES by Scrapbook Adhesives by 3L®:
E-Z Dots® Permanent Refillable Dispenser
E-Z Runner® Micro Refillable Dispenser
Adhesive Dots Medium
3D Foam Squares – White, Regular
3D Foam Squares – Small, Black
HomeHobby by 3L Dual Tip Glue Pen

Others:
Stamp, Sentiment, Die: Ellen Hutson, LLC
Dies: My Favorite Things Die-Namics, Papertrey Ink, Pretty Pink Posh
Patterned Paper: Pebbles
Cardstock: Neenah, My Favorite Things
Ink: Memento, Ranger. Watercolor Pencils: Faber-Castell
Embellishments: Wilton

LisaAdametz-sig

Save

Visit our Website and Blog!
Sign up for our Newsletter so you never miss a contest or giveaway!

instagram purple icon facebook icon purple pinterest purple icon twitter purple icon YouTube icon blog subscription purple icon

My Guy Card

0516LYmyguycard2

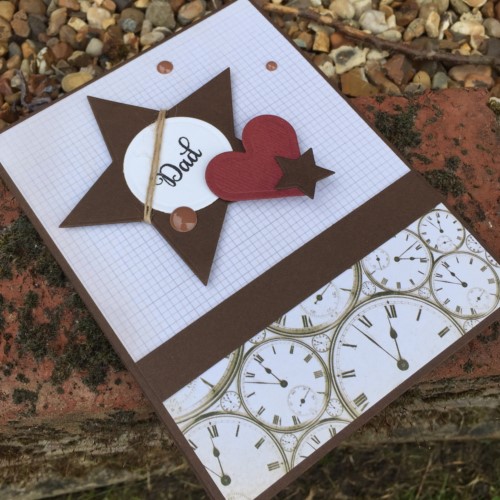
Hello there, Latisha here with you today sharing a masculine card.  This card is perfect for a birthday, fathers day, just because, etc…

Instructions:

  1. Cut/score card stock.
  2. Adhere pattern paper strip using MyStik® Permanent Strips Dispenser.IMG_2897
  3. Adhere the pattern paper panel to the card front using Crafty Foam Tape White. IMG_2898
  4. Adhere the “my guy” diecut to the “for you” tag die cut to the card using 3D Foam SquaresIMG_2896
  5. Adhere the twine and mustache embellishments using Dodz™ Mini. IMG_2899


0516LYmyguycard1

Materials Used:

Scrapbook Adhesives by 3L® MyStik® Permanent Strips Dispenser

Scrapbook Adhesives by 3L® Crafty Foam Tape White

Scrapbook Adhesives by 3L® Dodz™ Mini

Scrapbook Adhesives by 3L® 3D Foam Squares – White, Small

Fancy Pants Designs pattern paper, wood veneer & die cuts

Other: White Card Stock; Twine; Black Ink


Altered Frames with E-Z Runner Ultra

It’s Erica and today I’m sharing two frames I altered using E-Z Runner® Ultra Refillable Dispenser and Extreme Double Sided Tape 1/4″.

Altered Frame One by Erica Houghton

Altered Frame Two by Erica Houghton

I started with an inexpensive frame and removed the glass and back of the frame. I then lined the outer edges with E-Z Runner® Ultra Refillable Dispenser.

Altered Frames with E-Z Runner Ultra

I  then covered the frame with pattern paper.

Altered Frames with E-Z Runner Ultra

Next, I cut four narrow strips to place around the inner and outer edges of both frames. I adhered each strip using Extreme Double Sided Tape 1/4″.

Altered Frames with E-Z Runner Ultra

I adhered the metal accents using the Dual Tip Glue Pen and gave the flowers dimension using Crafty Foam Tape White.

Here are a few close-ups:

Altered Frames with E-Z Runner Ultra Altered Frames with E-Z Runner Ultra

Scrapbook Adhesives by 3L

Paper

  • Authentique Paper, Utopia

Embellishments

  • Prima Marketing – flowers
  • Flying Unicorn – adornments
  • Fun Stampers Journey – twine
  • Petaloo, Fancy Trims – burlap

Products

  • Tim Holtz – distress ink
  • 13 Arts – matte white paint

Thanks for joining me today!

Erica Houghton

Adhesive Ain’t Just for Adhering!

Hello, it’s Michele with three cards using adhesives for something other than adhesive! (Gasp!) Let me show you how to create a stunning dimensional background with 3D Foam Squares and glitter.

As you already know this gal loves lumpy, bumpy cards with a lot of texture.  Using the 3D Foam Squares as a background is a fun easy way to achieve that!

Adhesives Ain't Just for Adhering Background Texture Tutorial by Michele Kovack for Scrapbook Adhesives by 3L

Pink and Gold Background Celebrate Card:

Adhesives Ain't Just for Adhering Background Texture Tutorial by Michele Kovack for Scrapbook Adhesives by 3L

Pink and gold glitter on the 3D Foam Squares White Regular makes a pretty background. Just embellish with a die cut flower, sentiment, lace, sequins, and stars; adhere them with Adhesive Dots Small, Adhesive Dots Mini, and Adhesive Dots Medium.

Adhesives Ain't Just for Adhering Background Texture Tutorial by Michele Kovack for Scrapbook Adhesives by 3L

See how I also tucked a twine bow under my flower.

Adhesives Ain't Just for Adhering Background Texture Tutorial by Michele Kovack for Scrapbook Adhesives by 3L


Watercolor Background Celebrate Card

I love this technique so much I made two more cards!  This one uses gold glitter and a water colored background.  Again, I adhered my flowers, leaves, and sentiment using Adhesive Dots Small, Adhesive Dots Mini, and Adhesive Dots Medium.

Adhesives Ain't Just for Adhering Background Texture Tutorial by Michele Kovack for Scrapbook Adhesives by 3L

Blue Ombre Background Card

For the Blue Ombre card, I used a chunkier glitter in 3 different colors.  Embellishments are adhered using the Adhesive Dots Small, Adhesive Dots Mini, and Adhesive Dots Medium. The navy twine is a great accent.

Adhesives Ain't Just for Adhering Background Texture Tutorial by Michele Kovack for Scrapbook Adhesives by 3L

Tutorial for 3D Foam Square Adhesive Background

Here is what I did to create my backgrounds for each card.  First, start with a package of 3D Foam Squares White Regular.

celebrate 6 tutorial

I left the 3D Foam Squares White Regular on the original backing sheet and cut it to the size of the background panel. Carefully peel off the tops of each 3D Foam Square. Position the exposed adhesive over the background patterned or water colored paper card panel.

celebrate7tutorial

Once placed over the panel, press down to ensure that each square has adhered well.

celebrate8tutorial

Then peel off the top layer to reveal the second sticky side of the 3D Foam Squares.

celebrate11tutorial

Next, pick your glitter or embossing powder to sprinkle over the top of each 3D Foam Squares White Regular.

celebrate9tutorial

celebrate12tutoria' copy

celebrate14tutorial

Here is a quick recap of the three cards I created!

Adhesives Ain't Just for Adhering Background Texture Tutorial by Michele Kovack for Scrapbook Adhesives by 3L

Thank you so much for stopping by!

Creative Time: 60 minutes
Skill Level:  Intermediate

Material Needed
Scrapbook Adhesives by 3L®

Adhesive Dots Small
3D Foam Squares White Regular
Adhesive Dots Mini
Adhesive Dots Medium.

Other
Cardstock; Glitter; Die Cuts; Watercolors; Lace; Pearls; Sequins; Twine


Pin It!

Adhesives Ain't Just for Adhering Background Texture Tutorial by Michele Kovack for Scrapbook Adhesives by 3L Pinterest

Little Girl Birthday Card

Hi everyone, Laurel here.  It is with sadness that I write this post as my last with the team.  I have enjoyed every minute but have to step down.  Life has just gotten in the way of my crafting.  I have a 1 1/2 year old grand daughter who I see a lot of and I just never have the time to craft like I used to.  I want to thank Scrapbook Adhesives by 3L® for having me and I do hope to get back into regular crafting one day!

Today I have a simple birthday card for you.  As I have said before, I like to give hand made cards to the students in my class and am always needing more.

Birthday 7 Card by Laurel Seabrook

I used the  E-Z Runner® Grand Dispenser as always 🙂 to adhere the main panels to the card.

The main flags and number I mounted with the 3D Foam Squares because I love the dimension they add.  To adhere the die cut sentiment, I used the DODZ™ Mini in a few places.

2016 05 22_3273

Thank you for stopping by and I hope to see you around the blogging world 🙂

Scrapbook Adhesives by 3L® Products Used:
E-Z Runner® Grand Dispenser
3D Foam Squares
DODZ™ Mini


Other products used:
Patterned Papers; Twine; Dies

Blog Hop with LDRS Creative – Day 5

Welcome to Day 5 and last day of our blog hop with LDRS Creative! We hope the wonderful projects from both talented design teams inspired you to try some of these tips and techniques. If you missed Day 4, click Blog Hop with LDRS Creative – Day 4! Don’t forget about the opportunity to win a giveaway…so stick with us at the end of the post for details.

ldrsLY_justbecausecard-2

For this card I used the sentiment from the Just Because stamp set, a few images from the A Girl Can’t Have Too Many set from the All Dressed Up stamp series, and the Gilded Oval Die set from LDRS Creative.  The image was colored in with alcohol markers, and a glitter pen.  The teal card stock was adhered down using the E-Z Dots Permanent Refillable tape runner.  To give dimension to the card the die cuts were adhered to the card using Crafty Foam Tape (white) and the bow was added to the card using an Adhesive Dots Mini.

Don’t forget to hop over to our friends over at LDRS Creative by clicking Blog Hop with LDRS Creative – Day 5.

Blog Hop Prize Details

Blog Hop with Scrapbook Adhesives by 3L and Little Darlings Rubber Stamps

Enter to win by leaving a comment through the Rafflecopter App. A winner will be randomly picked. International entries are welcome.

a Rafflecopter giveaway

Blog Hop with LDRS Creative – Day 4

Welcome to Day 4 of our blog hop with LDRS Creative! We are excited to showcase fabulous inspiration created with both company’s products. Join us to see what both talented design teams have done. If you missed Day 3, click Blog Hop with LDRS Creative – Day 3! Don’t forget an opportunity to win a giveaway…details at the end of the post 🙂

Hi everyone, Christine here today and I’m delighted to be taking part in a blog hop with LDRS Creative.   Combining Scrapbook Adhesives by 3L® products, dies and LDRS Creative’s beautiful stamps I’ve made a favor box bag and mini card.

CEmberson - Favor Bag Main

I used a favor box die and assembled it with E-Z Runner® Ultra – this is an ultra strong, permanent, double-sided adhesive in a refillable dispenser.  It dispenses a clear line of adhesive and is immediately tacky and perfect for mixed media projects.

CEmberson - Favour Bag 1

The assembled favor box.

CEmberson - Favour Bag 2

I selected  LDRS Creative – Just Because stamp set, so many useful sentiments.

CEmberson - Favour Bag 3

To affix the stamped sentiment to the front of my project I used Crafty Power Tape.

CEmberson - Favour Bag 4

I created flowers for embellishments and affixed in place with 3D Foam Squares – White, Small.

CEmberson - Favour Bag 5

The finished coordinating favor box bag and mini card.

CEmberson - Favour Bag 6

CEmberson - Favour Bag 7

CEmberson - Favour Bag 8

Thanks for stopping by today and don’t forget to check out all the great products available from LDRS Creative and Scrapbook Adhesives by 3L.

Christine

Products used:
Scrapbook Adhesives by 3L®: E-Z Runner® Ultra, Crafty Power Tape and 3D Foam Squares – White, Small
LDRS Creative: LDRS Stamp Set – Just Because
Other: Ivory Pearlized Card; Black Ink; Gemstones

Don’t forget to hop over to our friends over at LDRS Creative by clicking Blog Hop with LDRS Creative – Day 4.

Blog Hop Prize Details

3L-LDRS Hop rect2 (002)

Enter to win by leaving a comment through the Rafflecopter App. A winner will be randomly picked. International entries are welcome.

a Rafflecopter giveaway

Blog Hop with LDRS Creative – Day 3

Welcome to Day 3 of our blog hop with LDRS Creative! See what products the two talented design teams have used and created for some amazing inspiration. If you missed Day 2, click Blog Hop with LDRS Creative – Day 2! There’s an opportunity to win a giveaway…so stay tuned at the end of the post for details!

Hi everyone, Laurel here.  I was fortunate to receive the Basic Stitched Flags dies and the Emmy Lou set from CandiBean Stamps to work with.  I am always in need of kids birthday cards so they were perfect!

LDRS Birthday Card by Laurel Seabrook

I used the die to add a couple of flag layers.  I adhered these to the base using the  E-Z Runner® Grand Dispenser.  I then paper pieced and colored the image before mounting her with the 3D Foam Squares White Small. Tip: for small areas such as her legs, I cut the foam squares in half 🙂

2016 05 16_3243

I hope you have been enjoying the projects this week and be sure to come back each day!

Products Used:
Scrapbook Adhesives by 3L®: E-Z Runner® Grand Refillable Dispenser (150′) and 3D Foam Squares small
LDRS Creative: Emmy Lou Stamp and Basic Stitched Flags Die
Other: Elle’s Studio (Paper);

Don’t forget to hop over for more wonderful projects from our friends over at LDRS Creative by clicking Blog Hop with LDRS Creative – Day 3.

Blog Hop Prize Details
Blog Hop with Scrapbook Adhesives by 3L and Little Darlings Rubber Stamps

Enter to win by leaving a comment through the Rafflecopter App. A winner will be randomly picked. International entries are welcome.

a Rafflecopter giveaway