You are in our US store • Switch to Europe store

Glassine Bag Gift Card Holder

Hello Latisha here with you today.  I have two teenagers, and it seems like they are always invited to a birthday.  My go-to gift these days for kids/teenagers are gift cards.  I am always trying to come up with new and easy way to package a gift card.  So today, I am using a glassine bag.

Glassine Bag Gift Card Holder by Latisha Yoast for Scrapbook Adhesives by 3L
Here are step by step instructions, as well as photos to walk you through this easy way to decorate a glassine bag.  I used this for a gift card holder, but you could easily put money in the bag or even some kind of treat.
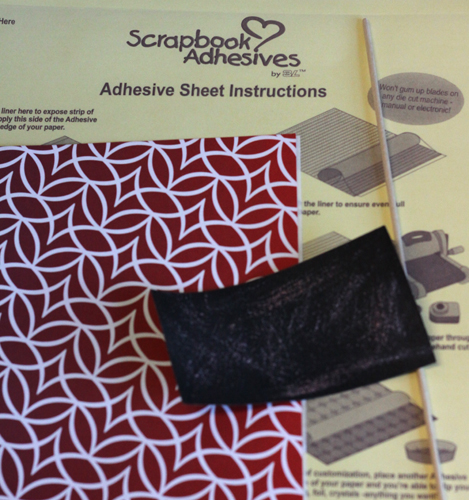
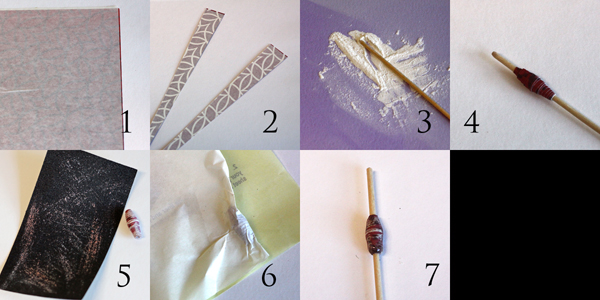
3L LY 0326 glassinetreatbag21.  Using the Scrapbook Adhesive by 3L Adhesive Sheets.  Trim down card stock, and also part of the adhesive sheet to perfectly adhere over the cardstock.  I trim down the sheet so I don’t waste any product.

3L LY 0326 glassinetreatbag32.  Peel off the backing to the adhesive sheet, and adhere it to the cardstock.

3L LY 0326 glassinetreatbag4


3.  The cardstock is now a sticker.  Place the die cuts over the card stock, to create scallop circle stickers.

3L LY 0326 glassinetreatbag5


4.  Peel off the backing of the die cut, and place it onto the glassine bag.

3L LY 0326 glassinetreatbag6


5.  Using scissors, trim off the excess card stock hanging off the side of the bag.

3L LY 0326 glassinetreatbag7


6.  Using Scrapbook Adhesive by 3L Dodz Small, adhere sequins to the bag.

3L LY 0326 glassinetreatbag8


7.  Add a larger scallop sticker to close the bag shut, tie twine around the bag to embellish.

3L LY 0326 glassinetreatbag9Quick and easy gift card holder.

Materials Used:  Scrapbook Adhesives by 3L Adhesive Sheets, Scrapbook Adhesives by 3L Dodz Small, Lawn Fawn scallop lawn cuts, Bazzill card shop pink card stock, Lawn Fawn sequins, yellow twine, glassine bag


Layered Birthday Balloon

Hello! Kimberly here with a fun, and as always, quick card for a birthday. This card will work to send to anyone on your list! Who doesn’t love a red balloon?

Kimberly Crawford hip hooray balloon 1

Kimberly Crawford hip hooray balloon 2

After layering my papers and stickers to my card base, I added the balloon shape from 3D Foam Cupcakes. I removed the top backing and then applied red foil to the entire surface. then I added a small star from 3D Foam Stars to the center of the balloon and applied gold foil to it.

For a tutorial on how to use foil with Scrapbook Adhesives by 3L® check out this tutorial here: Gold Foil on 3D Foam Shapes

Kimberly Crawford hip hooray balloon 3

Just a side view so you can see all the layers I love to create with my 3D Foam Squares Small White. The first layer of patterned paper, the die cut pennant shapes, the row of candles, the sticker at the bottom, all popped up to add fun dimension!

thanks for stopping by!

Kimberly Crawford

Supplies- Scrapbook Adhesives by 3L® (3D Foam Cupcakes, 3D Foam Stars, 3D Foam Squares Small White), Patterned paper and stickers- Carta Bella (It’s a Celebration), Die- MFT (Dienamics Blueprints 13), Foil- Clearsnap, Cardstock- MFT

Visit our Website and Blog!
Sign up for our Newsletter so you never miss a contest or giveaway!

instagram purple icon facebook icon purple pinterest purple icon twitter purple icon YouTube icon blog subscription purple icon

Hello Friend

Hi There! Shell here today with a vintage/shabby chic page.

Shell Carman Hello Friend I just love the graphic 45 Botanical Tea collection. The colours are so yummy & there are lot’s of beautiful images to fussy cut!
Shell Carman Hello Friend 1
I find the E-Z Dots® Permanent Refillable perfect for adhering chipboard pieces, especially items such as the gate which has really fine lines. I have used some 3D Foam Squares White Regular to add dimension to the fussy cut roses.
Shell Carman Hello Friend 2
To adhere the flowers I have used my trusty Dodz™ 3D

Scrapbook Adhesives by 3L products Used
Dodz™ 3D  E-Z Dots® Permanent Refillable  3D Foam Squares White Regular

Other Products Used

  • Graphic 45 Botanical Tea
  • Kaiser raft Paper Blooms
  • Kaisercraft Wooden Flourish Gate
  • Prima Stitch Stamps Lines
  • Prima Stamp Brick

Thanks for Looking!
Cheers
Shell Carman- Another Scrappy Day

Little Joys Card – Quietfire Blog Hop Day 6

Welcome to the last day of our Blog Hop with Quietfire Designs! This has been a fabulous week of inspiration! Did you have a chance to see all of the posts? You can start with Tiffany Johnson’s post and scroll through the week, enter on each blog!

Beth Pingry LIttle Joys CardI took a seemingly holiday themed stamp and used it to ‘delight in the little joys’ of Spring! Here in Chicago the snow is finally melting and the bulbs are peeping out of the ground. I’m counting those as big joys, considering the weather we’ve endured!

I stamped the image onto a pre-cut piece, then mounted it with 3D Foam Squares onto another pre-cut piece of paper (how’s that for fast and easy?) and mounted it all onto kraft and then more patterned paper with E-Z Runner® Permanent Fine adhesive. I added Creative Photo Corners in Ivory to the corners.

BethPingry-Quietfire-3L-2
The pre-made flower is adhered with a 3D Foam Square. The leaves are 3D Foam Leaves with glitter, tucked under the flower.

Join us all week for the Blog Hop with Quietfire Designs!

Quietfire - 3L Blog hop
Remember, there is a generous prize package up for grabs this week, worth approximately $60 in Scrapbook Adhesives by 3L® and Quietfire Designs products! To enter you must leave a comment here on our blog. Get additional entries, see below!  Then visit Quietfire to see their inspiring projects and enter their giveaway too!

a Rafflecopter giveaway

Good Luck, Happy Spring and thanks for stopping by! What is your little joy?

Beth Pingry

I used these supplies:

Visit our Website and Blog!
Sign up for our Newsletter so you never miss a contest or giveaway!

instagram purple icon facebook icon purple pinterest purple icon twitter purple icon YouTube icon blog subscription purple icon

Incorporating Art Paper into Projects with Adhesive Sheets

Welcome to Day 5 of our Blog Hop with Quietfire Designs!

It’s Angela hosting today and I am sharing a tutorial for how to incorporate Art Paper into your crafting projects using the Scrapbook Adhesives by 3L® Adhesive Sheets. I used the technique to create this Thank You card:

Incorporating Art Paper into Projects with Adhesive Sheets - Thank You Card by Angela Ploegman There is a small art supply store near my house and they have a frequently changing inventory of archival quality art papers….all of which are so very pretty. It got me thinking as to how I could incorporate these materials into my cards and scrapbook layouts. Since some of the papers, like the one shown in the project above are translucent, the right adhesive was key! Turns out, the right adhesive was the Adhesive Sheets – 4×6″. Let’s get started!

Step by Step Instructions

Incorporating Art Paper into Projects with Adhesive Sheets - Thank You Card by Angela Ploegman

1. Gather your supplies. Cut a card base from white card stock (5.5 x 8.5 inches folded to 5.5 x 4.25 inches).

angela ploegman thank you card_22. Apply an Adhesive Sheet – 4×6″ to white card stock by removing the yellow backing layer and applying the exposed adhesive to the card stock. Burnish the white backing to ensure complete transfer.

Incorporating Art Paper into Projects with Adhesive Sheets - Thank You Card by Angela Ploegman 3. Peel the white backing from the adhesive layer and cover the exposed adhesive with the art paper. Burnish lightly to smooth out any wrinkles.

Incorporating Art Paper into Projects with Adhesive Sheets - Thank You Card by Angela Ploegman 4. Trim to 4.00 x 5.25 inches and round the corners. Adhere to the card base with MyStik® Permanent Strips.

Incorporating Art Paper into Projects with Adhesive Sheets - Thank You Card by Angela Ploegman 5. Stamp the Quietfire Thank You, Rough Hewn sentiment onto white card stock with an ink in a matching color.

Incorporating Art Paper into Projects with Adhesive Sheets - Thank You Card by Angela Ploegman 6. Trim, leaving a thin white border and adhere 3D Foam Squares – White, Regular to the backside of the trimmed sentiment.

angela ploegman thank you card_77. Adhere to the card base and embellish with silver sequins. I used the DODZ™ – Small to adhere the sequins.

Here’s a close up view of the finished card:

Incorporating Art Paper into Projects with Adhesive Sheets - Thank You Card by Angela Ploegman And since I had my Quietfire stamp stash out, I created a clean and simple second card (no art paper on this one!) using the Flourishing Inside – Hearts and the Ten Tiny Tag Sentiments stamp sets.

Incorporating Art Paper into Projects with Adhesive Sheets - Thank You Card by Angela Ploegman

Thanks for stopping by today.

Join us all week for the Blog Hop with Quietfire Designs!

Remember, there is a generous prize package up for grabs this week, worth approximately $60 in Scrapbook Adhesives by 3L® and Quietfire Designs products! To enter you must leave a comment here on our blog. Then check out how to get additional entries, and come back all week to comment on each post! Then visit Quietfire to see their inspiring projects and enter their giveaway too!

a Rafflecopter giveaway

Angela

Scrapbook Adhesives by 3L® Supplies used: Adhesive Sheets – 4×6″, MyStik® Permanent Strips, 3D Foam Squares – White, Regular, DODZ™ – Small

Quietfire Designs Supplies used: Thank You, Rough HewnFlourishing Inside – HeartsTen Tiny Tag Sentiments

Other Supplies used: Ranger Archival ink, Bazzill Basics Paper card stock, misc. sequins, art paper, twine

Scrapbook Adhesives by 3L and Quietfire Blog Hop Day 4

Welcome to Day 4 of our Blog Hop with Quietfire Designs!

Hello, AJ here to share with you today a card using Quietfire Stamps.

AJOtto-Quietfire-1

My card today uses the Ten Tiny Tag Sentiments set.  I love the great little sentiments and the size makes them perfect for cute little cards also!
AJOtto-Quietfire-2

Start by adhering your patterned paper to the card base using E-Z Runner® Permanent Strips Refillable.

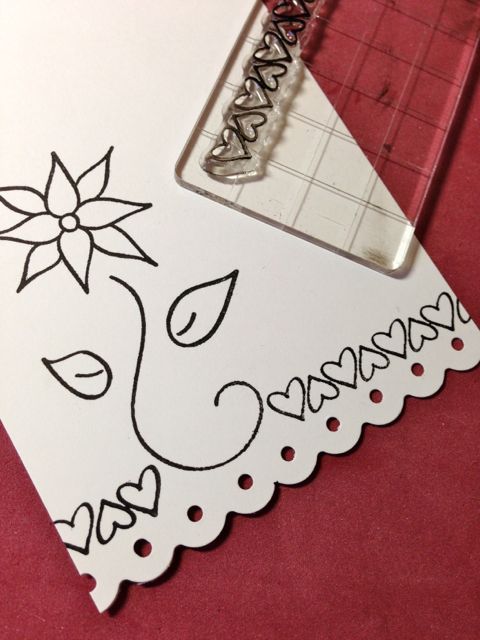
AJOtto-Quietfire-3Because Quietfires stamps come unmounted, I used E-Z Dots® Repositionable Refillable to adhere the stamp to my block.  No foam needed! 😉

AJOtto-Quietfire-4 After stamping my sentiment, I wrapped string around my card stock layer and adhered it with Crafty Foam Tape.

AJOtto-Quietfire-5

Next, to assemble the flower, I adhere the first two layers together with Dodz™ Small
AJOtto-Quietfire-6

Then adhere the the remaining layer with a 3D Foam Square, and another to adhere to my card.

We have a generous prize package worth approximately $60 in Scrapbook Adhesives by 3L® and Quietfire Designs products! To enter you must leave a comment here on our blog. Then check out how to get additional entries, and come back all week to comment on each post!  Then visit Quietfire to see their inspiring projects and enter their giveaway too!

a Rafflecopter giveaway

Stamps- Ten Tiny Tag Sentiments, Quietfire Designs

Spellbinders dies; Crate patterned paper; String; Basic Grey enamel dot

enjoy!! 🙂 AJ

Quietfire Designs Blog Hop: Day 3

Welcome to Day 3 of our blog hop with Quietfire Design!

It’s Kelly here, and I’m excited to share a card I created using some beautiful Quietfire Design stamps and Scrapbook Adhesives by 3L® products.  I would say the combination turned out beautifully!

kellyklapstein-quietfire-1

I am in LOVE with these gorgeous deeply etched rubber stamps by Quietfire Design!

kellyklapstein-quietfire-9

I used these 2 stamps sets: “Floral Thank You” (set of 4) and “Butterflies/Dragonflies” (set of 7).

kellyklapstein-quietfire-3

Whenever I make an easel card, I like to design lots of 3D elements, and so my essential adhesives are the 3D Foam Squares and Crafty Foam Tape.

kellyklapstein-quietfire-2

kellyklapstein-quietfire-5I also stamped one of the smaller Quietfire butterflies onto a 3D Foam Butterfly…. and it looks so pretty!

kellyklapstein-quietfire-8

The pearls are adhered with Dodz™ Medium.

kellyklapstein-quietfire-6

kellyklapstein-quietfire-10I used the Dodz™ for both the single larger pearls and the smaller pearls in a cluster.

kellyklapstein-quietfire=9

We have a generous prize package worth approximately $60 in Scrapbook Adhesives by 3L® and Quietfire Design products!

Quietfire - 3L Blog hop

Enter through the contest ap with a comment. Then check out how to get additional entries, and come back all week to comment on each post!  Then visit Quietfire (click HERE) to see their inspiring projects and enter their giveaway too!
a Rafflecopter giveaway

Enjoy the hop and happy crafting!

Kelly Klapstein (Visit my blog at www.kellycreates.ca)

Crafty Foam Tape White 13'3D Foam Squares Mix White 217Dodz Medium01222 3D Foam Butterflies


SUPPLIES: FabScraps paper and pearls; Clearsnap Mix’d Media Inx and Embossing Powder; Prima Chalk Ink; May Arts ribbon; Sizzix die and Big Shot; Fiskars Scalloped Scissors; ZIG (Kuretake) Wink of Stella Glitter Brush

Scrapbook Adhesives by 3L and Quietfire Blog Hop

Welcome to Day 2 of our Blog Hop with Scrapbook Adhesives by 3L® and Quietfire Design!

Kimberly Crawford Quietfire Stars 1

Kimberly here to show you how to showcase the beautiful handwritten sentiments from Quietfire Design using the fabulous 3D Designer Shapes!

Kimberly Crawford Quietfire Stars 2

Hello gorgeous sentiment, right? Suzanne Cannon writes all the sentiments with her own hand! To attach the non-backed stamp to my acrylic block, I simply used E-Z® Dots Repositionable Refillable. A couple of passes of the runner on the back of the rubber works wonderfully. Once you are finished stamping, simply use a damp cloth of some type to remove the small dots of adhesive.

I stamped the sentiment onto a white cardstock panel in watermark ink, then heat embossed it with white powder. Blue watercolor paints were applied over the top until I achieved the look I wanted. Don’t forget to wipe away any excess watercolor that may pool on the embossed surfaces of the words. It will make the sentiment pop even more.

Kimberly Crawford Quietfire Stars 3To highlight the words, I grabbed my set of 3D Foam Frames. I removed it from the backing and placed it at an angle over the wording.

Kimberly Crawford Quietfire Stars 4

The backing was removed and gold glitter was poured generously over the top. Gently burnish (or rub in) the glitter and remove the excess. Yes, glitter gets everywhere, but a gentle breath or two and a pass over with a paintbrush will remove the unwanted specks.

Kimberly Crawford Quietfire Stars 5

The sentiment needed real stars too. The smaller stars in 3D Foam Stars were just the right fit. They too were glittered.

 Join us all week for the Blog Hop with Quietfire Designs!

Enter by commenting on our blog – and then see how to earn additional entries. Be sure to comment all week! Then visit Quietfire to enter to again! We have a generous prize package worth approximately $60 in Scrapbook Adhesives by 3L® adhesives and Quietfire Design stamps!

Quietfire - 3L Blog hop

a Rafflecopter giveaway

thanks for stopping by!

Kimberly Crawford

Supplies: Scrapbook Adhesives by 3L® (E-Z® Dots Repostionable Refillable, 3D Foam Frames, 3D Foam Stars, E-Z® Runner Permanent Strips Refillable), Stamp-Quietfire Design (If I Had A Star), Cardstock-MFT, Ink- Tsukineko, Glitter and Embossing powder- Stampendous!

Save

Save

Quietfire Designs Blog Hop: Day 1

Hello Blogosphere! It’s Tiffany and I’d like to welcome you to Day 1 of our Blog Hop with Quietfire Designs!

TiffQuietfire1I’ve chosen to share a Video Tutorial showing you how to create a card from start to finish using 2 trending elements: calligraphy and gold! Enjoy!

Video Tutorial:


Closer View:

TiffQuietFire2

I used the following Scrapbook Adhesives by 3L®: E-Z Dots Mini Permanent, MyStik® Repositionable Dots, 3D Foam Hearts.

My card uses the Wheresoever You Go unmounted rubber stamp from Quietfire Designs.

Join us all week for the Blog Hop with Quietfire Designs!

Enter by commenting on our blog – and then see how to earn additional entries. Be sure to comment all week! Then visit Quietfire to enter to again! We have a generous prize package worth approximately $60 in Scrapbook Adhesives by 3L® adhesives and Quietfire Design stamps!

Quietfire - 3L Blog hop
a Rafflecopter giveaway

Layout Spring is here

Hi there,

it’s Stephanie here today. This is my Layout about the first warm days this year and I can tell you “Spring is here”. 🙂

Stephanie_Layout_spring_1For this layout I used 3D Foam Frames from Scrapbook Adhesives by 3L® and I added Glitter from Clearsnap.

Stephanie_Layout_spring_2I cut them and added the elements to decorate the layout with more spring color and bling.

Stephanie_Layout_spring_3  My Journaling is behind the little flap.

Stephanie_Layout_spring_4

Supplies I used:

E-Z Dots® Permanent – Refillable & 3D Foam Frames from Scrapbook Adhesives by 3L®

  • Paper from Pink Paislee Portfolio collection
  • Rub-on Butterflies from 7Gypsies
  • Glitter from Clearsnap
  • Stencil Branches from Joggles and Structure paste
  • Brad from Basic Grey RSVP collection
  • Stamp from my stash
  • Alphabet Sticker from Simple Stories Say Cheese
  • Watercolor Paint

Thanks for visiting! I wish you all a nice creative day!