You are in our US store • Switch to Europe store

Grateful for You Flower Card

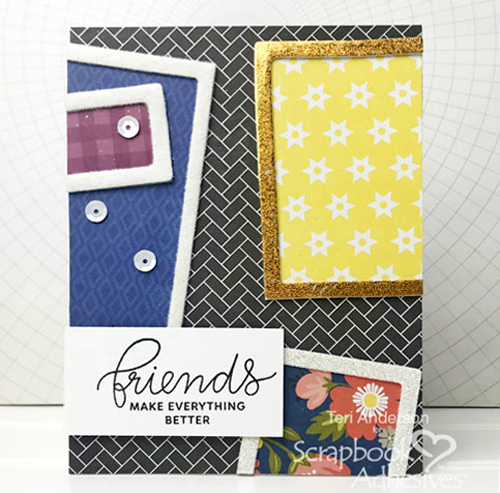
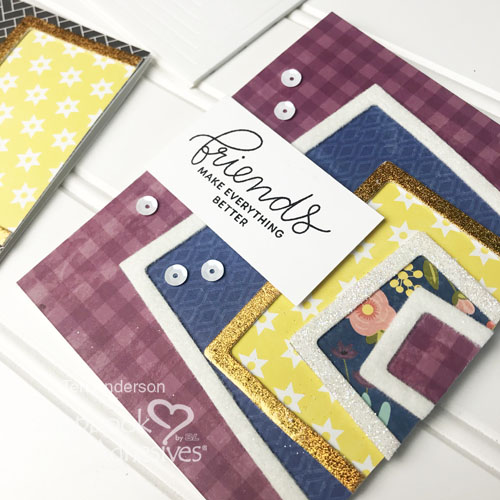
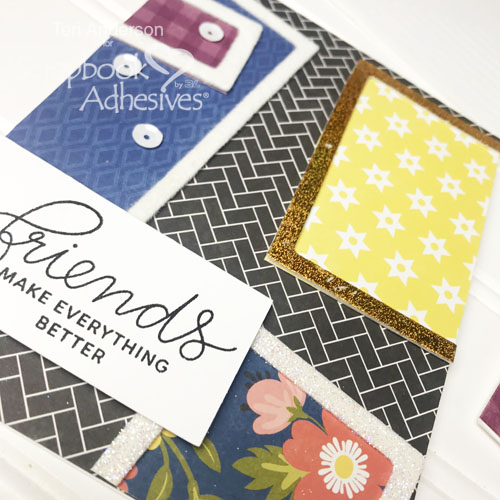
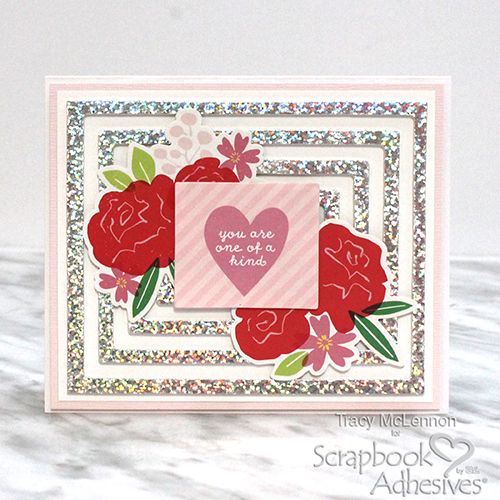
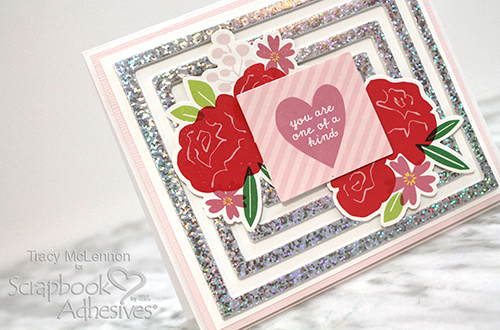
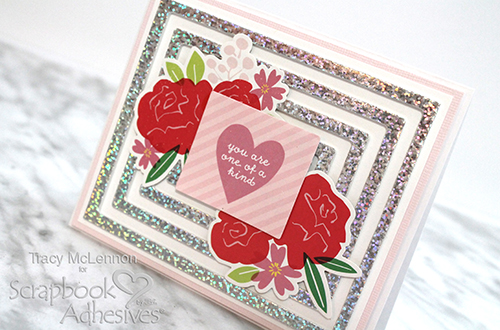
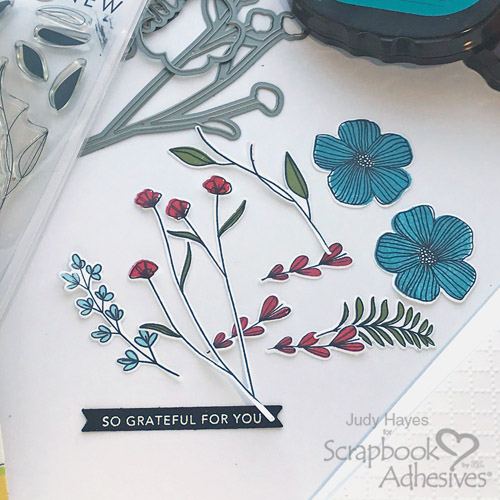
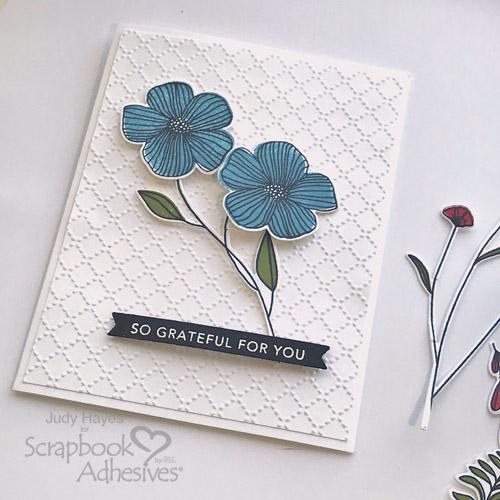
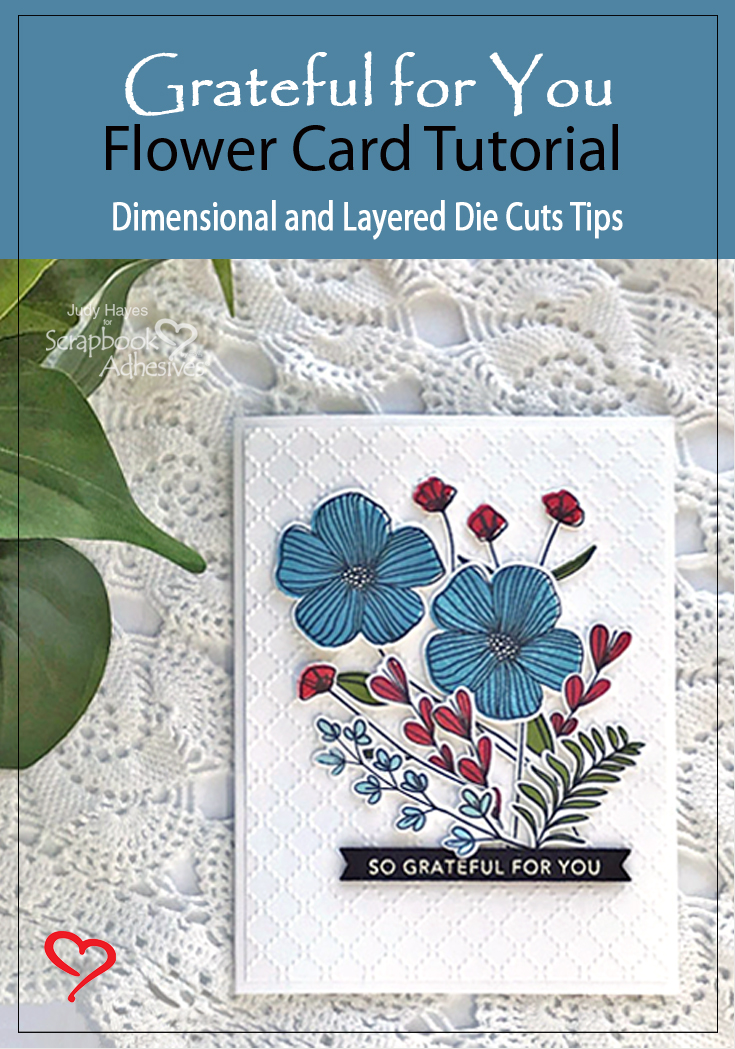
Hello everyone! Judy here today with a Grateful for You Flower Card. I’m ready for some spring colors and flowers! Where I live, it’s cold and snowy much of winter. I’m ready for warmer temps! So I chose to use some pretty turquoise and red flowers on white to make this card.

Grateful for You Flower Card by Judy Hayes for Scrapbook Adhesives by 3L

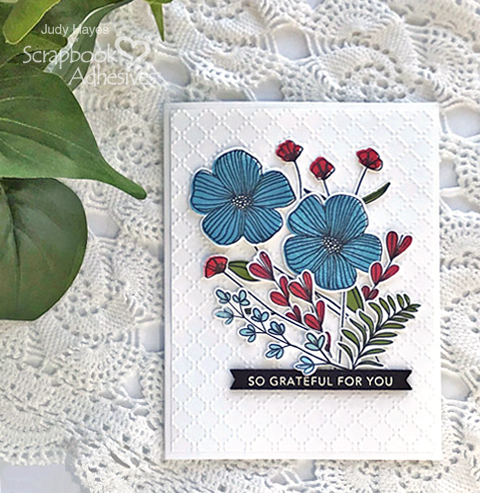
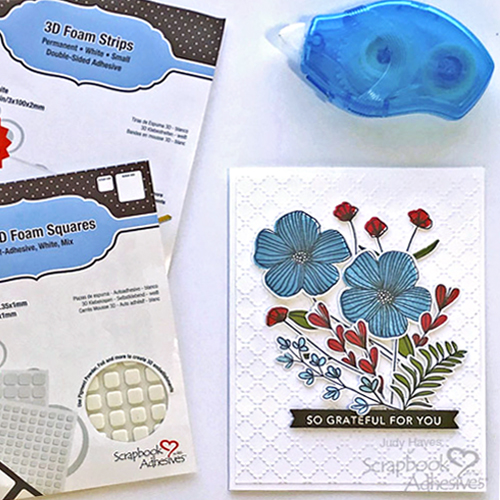
Grateful Flower Card Pieces

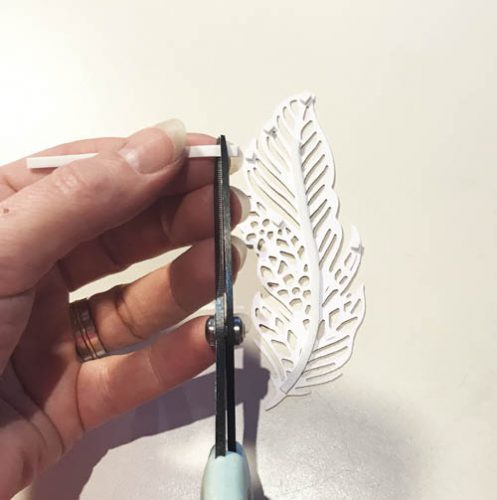
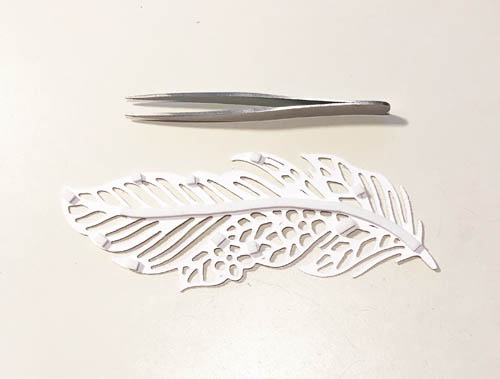
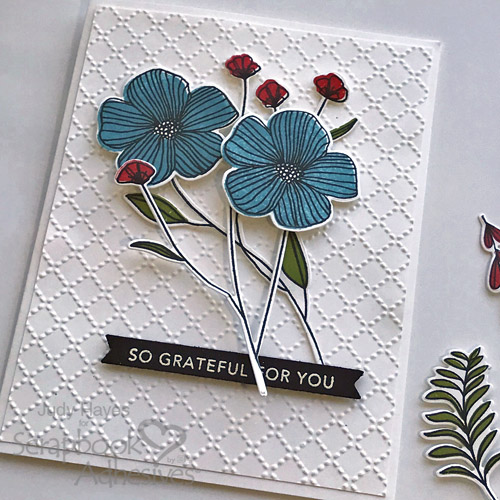
Stamp, color and die-cut several sets of flowers. Using the same card design, you can make several cards using different flower colors and varying verses. Once all the pieces are stamped and cut, this card goes together quickly!

For the verse strip, stamp with watermark ink, sprinkle with white embossing powder and melt with a heating tool. Lastly, I die-cut it with a banner die.
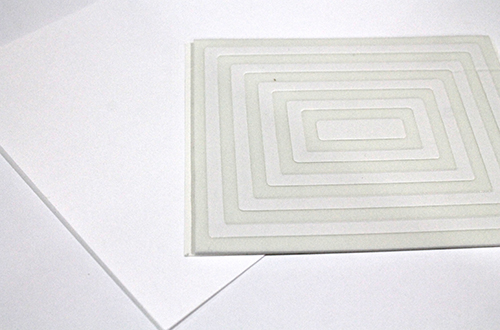
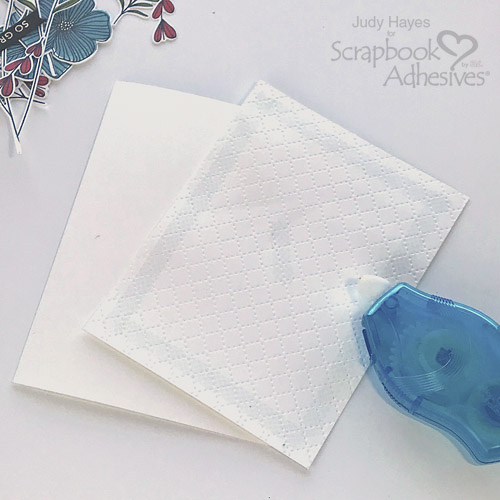
Grateful for You Flower Card by Judy Hayes for Scrapbook Adhesives by 3L

Simple Card Base

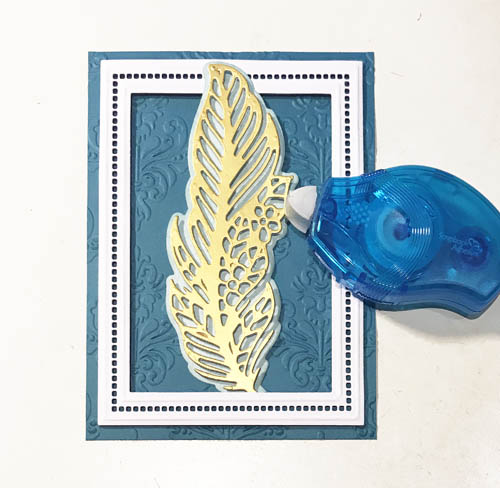
This Grateful Flower Card base measures 4.25 x 5.5 inches. An embossed piece of 4 x 5.25 inches white card stock covers the card front. It’s easily attached to the card with E-Z Runner® Petite Permanent Dots Refillable Dispenser. This little dispenser is a favorite of mine!

Grateful for You Flower Card by Judy Hayes for Scrapbook Adhesives by 3L

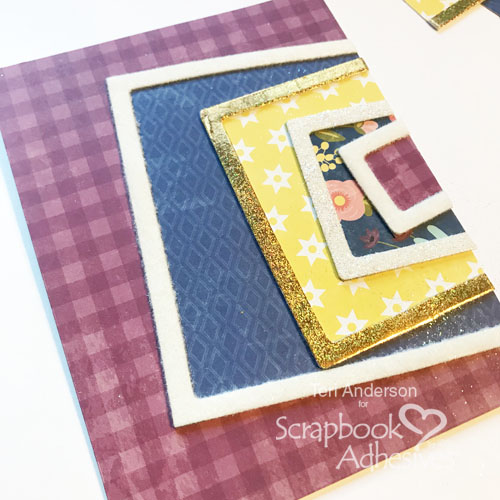
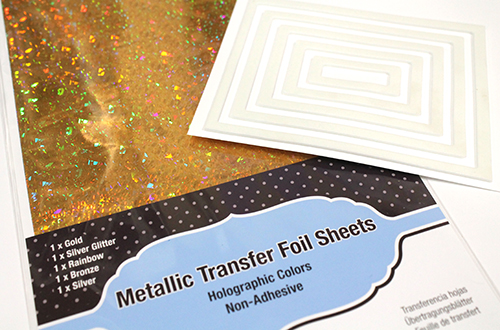
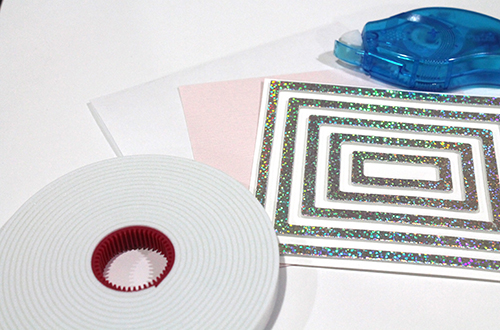
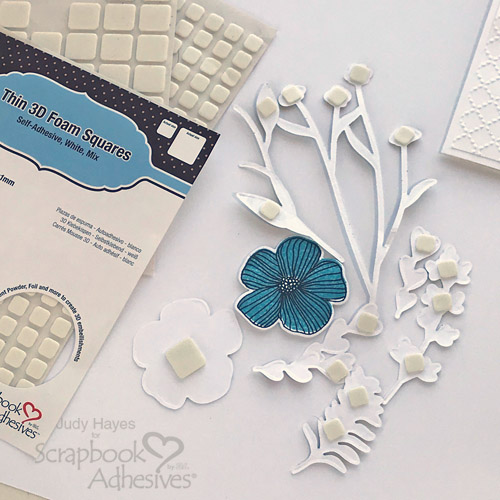
Prepping the Die Cuts

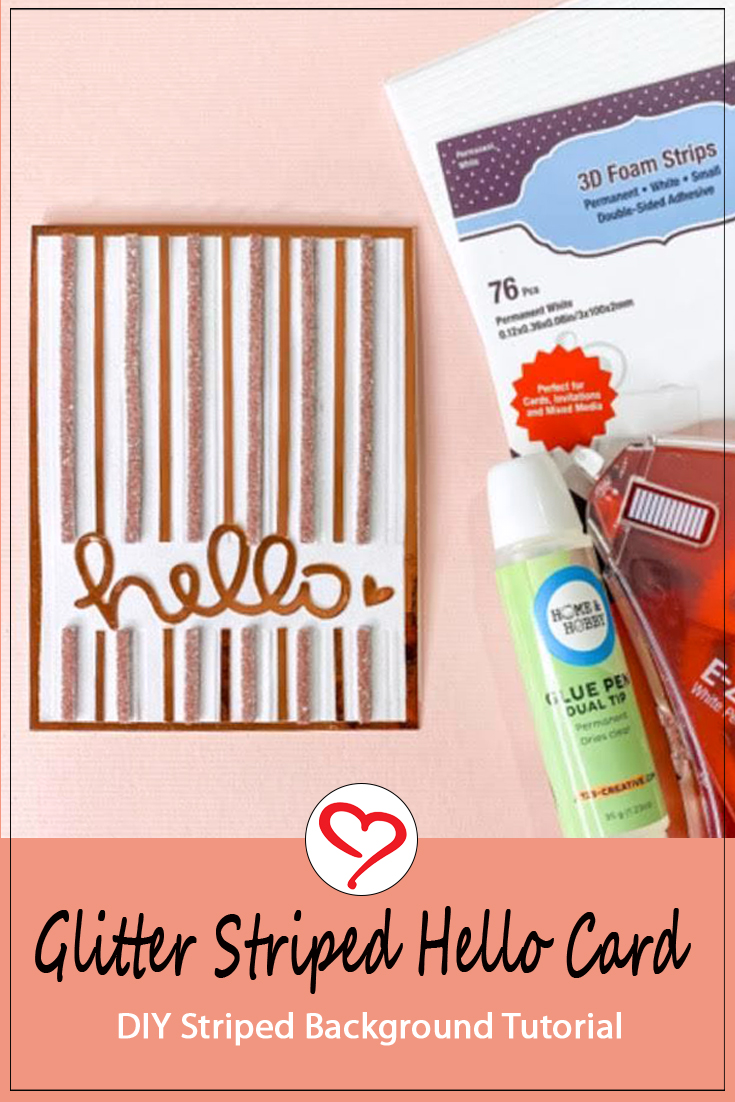
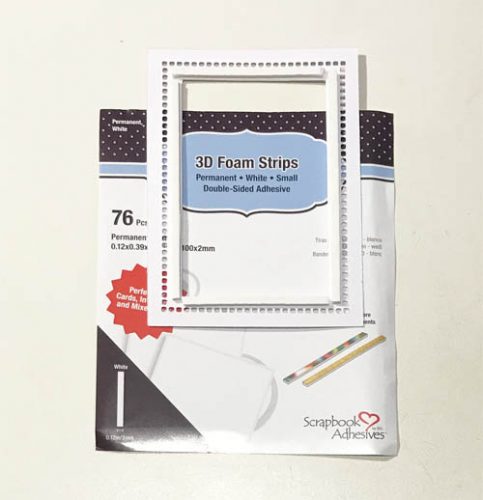
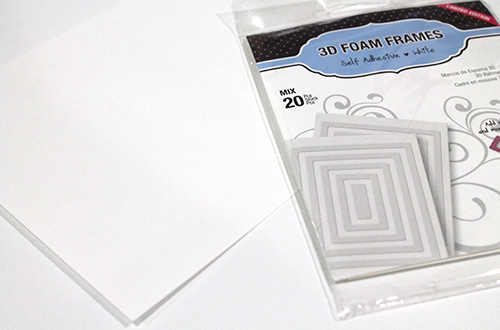
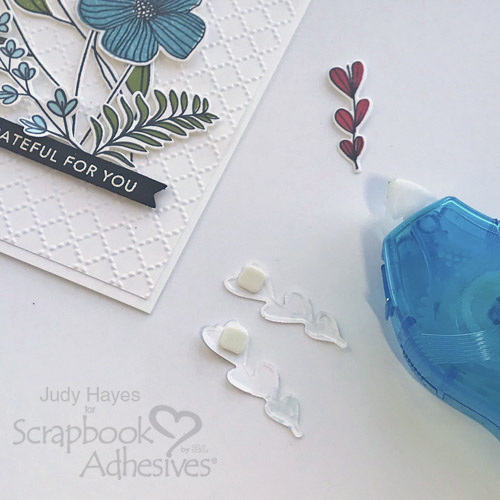
The die cuts and verse pieces will be lifted up with Thin 3D Foam Squares White Mix. I love that there are 1/4-inch and 1/2-inch sizes. You can see that I placed a combination of the two sizes toward the tops of the stems and center of the big flowers. Perfect coverage!

Grateful for You Flower Card by Judy Hayes for Scrapbook Adhesives by 3L

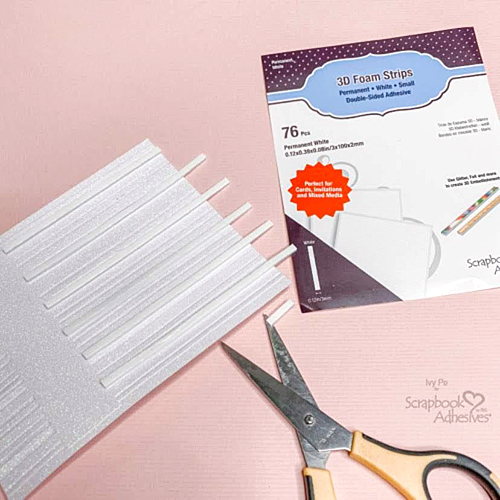
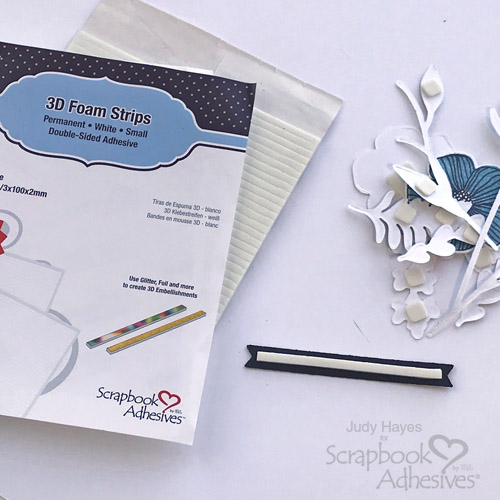
For the verse strip, I cut a piece of 3D Foam Strips to length and attached it to back. Perfect for narrow areas like this verse!

Grateful for You Flower Card by Judy Hayes for Scrapbook Adhesives by 3L

Embellishing the Card

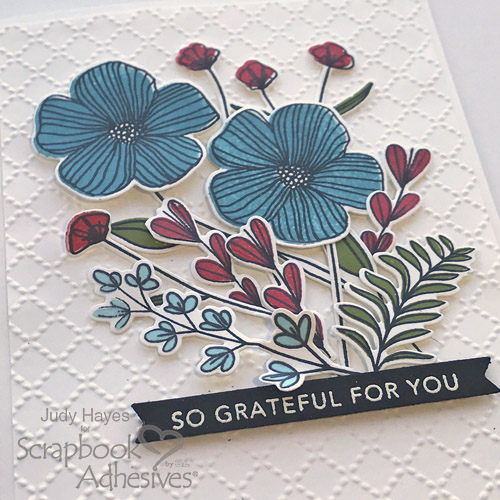
Now for the fun part, arranging the verse with flowers. Without taking the liners off, I laid the verse and main flowers on the card front to determine placement. After deciding, I first secured the verse in place.

For the main flowers, I placed the leaves first. Then the end of the stem, I applied E-Z Runner® Petite Permanent Dots Refillable Dispenser to adhere to the card front. Note that the large flowers are not attached yet.

Grateful for You Flower Card by Judy Hayes for Scrapbook Adhesives by 3L

Place the stem of red flowers behind and front of the main flowers. Remove the liners of the 3D Foam Squares on the backs of red flowers and attach them. Then I removed the liners of the foam squares and fastened the main flowers. See the image shown below as reference.

See the stem extended beyond the verse? I simply trimmed it and applied E-Z Runner® Petite Permanent Dots Refillable Dispenser on the end before tucking behind the verse.

Grateful for You Flower Card by Judy Hayes for Scrapbook Adhesives by 3L

Continue to build the flower cluster design by adding/trimming flower stems and the leaf branch using E-Z Runner® Petite Permanent Dots Refillable Dispenser to the ends of each stem.

Grateful for You Flower Card by Judy Hayes for Scrapbook Adhesives by 3L

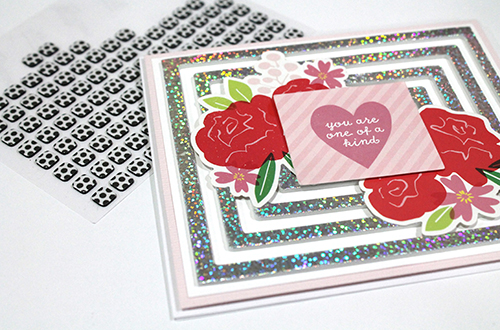
Here’s the finished arrangement on my Grateful Flower Card! 🙂

Grateful for You Flower Card by Judy Hayes for Scrapbook Adhesives by 3L

Thanks for Visiting
Judy Hayes

Grateful for You Flower Card by Judy Hayes for Scrapbook Adhesives by 3L

Creative Time: 30 minutes
Skill Level: Intermediate

Materials Needed
Scrapbook Adhesives by 3L®

Other
Stamp and Die Sets: Altenew (Charming Doodles Stamps and Charming Doodles Dies) and Taylored Expressions (Simple Strips Background Stamp and Simple Strips Die); Embossing Folder: Sizzix (Tim Holtz Texture Fades – Quilted); Ink: Imagine Crafts/Tsukineko (Versafine Onyx Black and Versafine Clair Shady Lane) and Scrapbook.com (Lagoon Blue and Cardinal Red Hybrid Inks); Embossing Powder: Ranger Ink (Detail White); White and Black Cardstock

Save It to Pinterest!

Grateful for You Flower Card by Judy Hayes for Scrapbook Adhesives by 3L Pinterest

Visit our Website and Blog!
Sign up for our Newsletter so you never miss a contest or giveaway!

instagram purple icon facebook icon purple pinterest purple icon twitter purple icon YouTube icon blog subscription purple icon

Birthday Party Favor Boxes

Hello! Shellye McDaniel here with a set of Birthday Party Favor Boxes. Aren’t they colorful and fun?! These boxes can be made ahead of time. Or have them on hand as a party craft and fill with goodies- perfect for kids!

Birthday Party Favor Boxes by Shellye McDaniel for Scrapbook Adhesives by 3L

Birthday Party Favor Boxes Steps

To begin, apply a sheet of the Adhesive Sheets 6 x 12 inch onto the cardstock. It gives the cardstock edge-to-edge coverage without any fuss. Next I die-cut the cardstock and thin chipboard using the same box die. Remove the liner from the cardstock to layer to the thin chipboard.

Birthday Party Favor Boxes by Shellye McDaniel for Scrapbook Adhesives by 3L

Assemble the box with Extreme Double-Sided Tape 1/4in and embellish the top with a strip of 3D Foam Strips on each side. Remove the top liner and apply the green foil from the Metallic Transfer Foils Variety Colors COLOR SIDE UP by burnishing with your fingertip. Pull off the sheet and you have color!

Embellishing!

For the FUN part, embellishing. Layer the scalloped circles, round circle, and party shapes togther with 3D Foam Squares. Then attach them to the boxes with Crafty Foam Tape White. To the center of the candles or gift die cut, add a sequin with Adhesive Dots Micro.

Birthday Party Favor Boxes by Shellye McDaniel for Scrapbook Adhesives by 3L

Attach the handles and bows with Extreme Double-Sided Tape 1/4in. To the center of the bow, I placed a 3D Foam Circles White that I applied gold foil from the Metallic Transfer Foils Holographic. Just follow the same step as mentioned above.

Birthday Party Favor Boxes by Shellye McDaniel for Scrapbook Adhesives by 3L

In finishing, I added some shredded paper to the insides of the boxes…now they’re ready as Birthday Party Favor Boxes! What will you put in them?

Thanks for joining me!
Shellye McDaniel

Creative Time: 1 Hour
Skill Level: Intermediate

Materials Needed:
Scrapbook Adhesives by 3L®

Adhesive Sheets 6 x 12 inch
3D Foam Circles White Mix
3D Foam Squares
Adhesive Dots Micro
3D Foam Strips
Metallic Transfer Foils Variety Colors
Metallic Transfer Foil Sheets Holographic Colors
Crafty Foam Tape White

HomeHobby™ by 3L
Extreme Double-Sided Tape 1/4in

Other
Patterned Paper and Stickers: Echo Park Paper; Ribbon: Paper Mart; Cardstock and Sequins: Doodlebug Design

Love It? Save It to Pinterest!

Birthday Party Favor Boxes by Shellye McDaniel for Scrapbook Adhesives by 3L Pinterest

Visit our Website and Blog!
Sign up for our Newsletter so you never miss a contest or giveaway!

instagram purple icon facebook icon purple pinterest purple icon twitter purple icon YouTube icon blog subscription purple icon

Framed Friends Fun Cards Tutorial

Hi, everyone! Teri here to show you how to make a couple of colorful cards with 3D Foam Frames. These framed friends fun cards are easy to create and are sure to make your friends smile. Let’s get started!

Framed Friends Fun Cards Tutorial by Teri Anderson for Scrapbook Adhesives by 3L

Create Framed Friends Fun Cards

First, you’ll want to make two card bases from cardstock. Cover each one with patterned paper using E-Z Runner® Permanent Strips Refillable Dispenser. Set the cards aside.

Framed Friends Fun Cards Tutorial by Teri Anderson for Scrapbook Adhesives by 3L

Make Frame Designs

Take several 3D Foam Frames and adhere them to various patterned papers. I recommend using a ruler to measure each frame and cut the paper pieces to size.

Framed Friends Fun Cards Tutorial by Teri Anderson for Scrapbook Adhesives by 3L

There are several ways to embellish the frames’ edges. Let’s apply flock. Simply remove the top liner from a couple of the frame and dump flock all over the frames. Press the flock into the frame to secure. Tap off the excess.

Framed Friends Fun Cards Tutorial by Teri Anderson for Scrapbook Adhesives by 3L

Another application is foil. The Metallic Transfer Foil Holographic is perfect and easy – no special tools! Remove the top liner from a frame, set a piece of transfer foil on top (color side up) and burnish the foil to the frame. You’ll end up with a nice, sparkly frame!

Framed Friends Fun Cards Tutorial by Teri Anderson for Scrapbook Adhesives by 3L

Designer’s Tip: to store your transfer foil sheets, put a piece of cardstock in a page protector. Then add the sheets. This will keep them nice and tidy!

Framed Friends Fun Cards Tutorial by Teri Anderson for Scrapbook Adhesives by 3L

For the last frame, just add glitter to it! Using the same step with the flock, take the top liner off and sparkle the glitter on the exposed adhesive. Press into the frame to secure and tap off the excess glitter. Done!

Framed Friends Fun Cards Tutorial by Teri Anderson for Scrapbook Adhesives by 3L

Adding the Frames to the Card Base

Let’s decorate the card bases! Partially place a frame on one of the card bases with E-Z Runner® Permanent Strips Refillable Dispenser. Trim off the excess frame. Be sure to keep the leftover frame for the second card.

Framed Friends Fun Cards Tutorial by Teri Anderson for Scrapbook Adhesives by 3L

Keep adding frames to the card until you get your desired look.

Framed Friends Fun Cards Tutorial by Teri Anderson for Scrapbook Adhesives by 3L

Finishing the Card

Complete the card by stamping a sentiment on white cardstock and add it with 3D Foam Squares to really pop on the card. Lastly, secure a few sequins using Adhesive Dots Micro.

Framed Friends Fun Cards Tutorial by Teri Anderson for Scrapbook Adhesives by 3L

Creating a Second Card

What’s fun about this technique is you can use all those leftover frames to make a second card. You lay the second card out the same way or you can throw caution to the wind! You can arrange the frames differently for a totally different design!

Framed Friends Fun Cards Tutorial by Teri Anderson for Scrapbook Adhesives by 3L

You’ll finish the card just like the first card by adding a sentiment and a few sequins to it!

Framed Friends Fun Cards Tutorial by Teri Anderson for Scrapbook Adhesives by 3L

I hope you are inspired to make a couple of cards with frame designs of your own!

Framed Friends Fun Cards Tutorial by Teri Anderson for Scrapbook Adhesives by 3L

Happy creating!
Teri Anderson

Creative Time: 45 Minutes
Skill Level: Intermediate

Materials Needed
Scrapbook Adhesives by 3L®

Other
White Cardstock: Neenah Paper; Patterned Papers: Jillibean Soup (You Make MISO Happy and Garden Harvest Collections); Stamp: Pretty Pink Posh (Encouraging Greetings); Ink and Glitter: Ranger Ink; White Flock: Stampendous!; Sequins: Cartwright’s Sequins

Love It? Save It to Pinterest!

Framed Friends Fun Cards Tutorial by Teri Anderson for Scrapbook Adhesives by 3L Pinterest

Visit our Website and Blog!
Sign up for our Newsletter so you never miss a contest or giveaway!

instagram purple icon facebook icon purple pinterest purple icon twitter purple icon YouTube icon blog subscription purple icon

Glitter Striped Hello Card

Hello! It’s Ivy Pe with a very sparky cheery card to share with you today. I am so excited about these 3D Foam Strips! Look how I used them on this Glitter Striped Hello Card. Let me show you how.

Glitter Striped Hello Card by Ivy Pe for Scrapbook Adhesives by 3L

Glitter Stripe Hello Card Panel

For my card panel, I used a piece of white glitter cardstock which was embossed with my favorite striped embossing folder. It pairs perfectly with the 3D Foam Strips!

Glitter Striped Hello Card by Ivy Pe for Scrapbook Adhesives by 3L

I randomly placed the 3D Foam Strips on my embossed card panel. It doesn’t have to be perfectly spaced out. Then trim the excess foam on the edges.

Glitter Striped Hello Card by Ivy Pe for Scrapbook Adhesives by 3L

Wear Your Adhesive on the Outside

This is the FUN part – apply the glitter! Simply peel off the backing and sprinkle the glitter on top. Press the glitter into the foam to secure and tap off the excess. Designer’s Tip: use a brush to get into tight places.

Glitter Striped Hello Card by Ivy Pe for Scrapbook Adhesives by 3L

Adding Mirror Cardstock

Adhere the glittered card panel to a mirror cardstock panel using the E-Z Runner Grand Dispenser.

Glitter Striped Hello Card by Ivy Pe for Scrapbook Adhesives by 3L

For your sentiment and background, die-cut the word, hello, and a small heart with a piece of mirror cardstock. Then cut thin ⅛ strips from what’s left of the mirror cardstock.

To secure the cardstock pieces onto the card panel, I used the Dual Tip Glue Pen which has a fine tip that is perfect for those narrow areas! Place the strips onto your card panel, in between the foam strips and the hello die cut.

Glitter Striped Hello Card by Ivy Pe for Scrapbook Adhesives by 3L

Adhere the glittered and layer card panel to a white card base with the E-Z Runner® Grand Refillable Dispenser. Now the Glitter Striped Hello Card is complete! It is super easy but because it’s glittery it makes a BIG impact.

Glitter Striped Hello Card by Ivy Pe for Scrapbook Adhesives by 3L

Creative Time: 30 minutes
Skill Level: Beginner

Materials Needed:
Scrapbook Adhesives by 3L®

3D Foam Strips
E-Z Runner® Grand Refillable Dispenser

HomeHobby™ by 3L
Dual Tip Glue Pen

Other
Cardstock: Cardstock Warehouse (Glitter and Mirror); Craft Dies: Simon Says Stamp; Glitter: Auntie Tay (Rose Gold Glitter); Embossing Folder: Silhouette; Tool: Sizzix (Big Shot Die-Cutting and Embossing Machine)

Save It to Pinterest!

Glitter Striped Hello Card by Ivy Pe for Scrapbook Adhesives by 3L Pinterest

Visit our Website and Blog!
Sign up for our Newsletter so you never miss a contest or giveaway!

instagram purple icon facebook icon purple pinterest purple icon twitter purple icon YouTube icon blog subscription purple icon

Make Life Sweet Dimensional Tag

Hello crafty friends! Tracy here and today I have a quick little tutorial on how to create a Make Life Sweet Dimensional Tag. Tags are a great addition to gifts, scrapbook layouts or even the front of cards. I have some quick tips on how to create an easy dimensional tag so let’s get started!

Make Life Sweet Dimensional Tag by Tracy McLennon for Scrapbook Adhesives by 3L

Make Life Sweet Dimensional Tag Step Outs

Start your dimensional tag by cutting the base layers for your project. Based on the large cream tag base I chose, I cut the ivory cardstock to 3.5 x 4.5-inch and the patterned paper layer 3.25 x 4.25-inch. Round all of the corners of these layers. Adhere these cut and rounded layers together using the E-Z Runner® Petite Permanent Dots Refillable Dispenser. Then adhere this to the tag using Crafty Foam Tape White.

Make Life Sweet Dimensional Tag by Tracy McLennon for Scrapbook Adhesives by 3L

Add the die cut frame and the cardstock sticker sentiment to the middle of the tag using Thin 3D Foam Squares Black Mix. It’s a great way to give you enough separation for dimension without the thickness when creating multiple layers.

Make Life Sweet Dimensional Tag by Tracy McLennon for Scrapbook Adhesives by 3L

Adding on Another Layer

For my next layer, I used a combination of 3D Foam Squares White Small Size and Thin 3D Foam Squares Black Mix. Occasionally I use this combination to lift a piece up that will be adhered to an uneven layer below. This sweet little owl will be added to the bottom right-hand corner of the tag where the die cut frame has already been popped up on this dimensional tag.

Make Life Sweet Dimensional Tag by Tracy McLennon for Scrapbook Adhesives by 3L

Finally, add a couple of sticker embellishments, and the die cut frame pieces to the sides of the tag using Adhesive Dots Mini.

Make Life Sweet Dimensional Tag by Tracy McLennon for Scrapbook Adhesives by 3L

The finishing touch to this dimensional tag was to add a variety to ribbon and string.

Make Life Sweet Dimensional Tag by Tracy McLennon for Scrapbook Adhesives by 3L

Thanks so much for stopping by!
Tracy McLennon

Creative Time: 30 minutes
Skill Level: Intermediate

Materials needed:
Scrapbook Adhesives by 3L®

Crafty Foam Tape White
Adhesive Dots Mini
Thin 3D Foam Squares Black Mix
3D Foam Squares White Small Size
E-Z Runner® Petite Permanent Dots Refillable Dispenser

Other
Patterned Paper, Ephemera, Cardstock Stickers, and Chipboard Stickers: American Crafts (Wildflower & Honey Collection by Vicki Boutin) Ivory Cardstock; Tag; Ribbon; String; Corner Rounder

Love It! Save It to Pinterest!

Make Life Sweet Dimensional Tag by Tracy McLennon for Scrapbook Adhesives by 3L Pinterest

Visit our Website and Blog!
Sign up for our Newsletter so you never miss a contest or giveaway!

instagram purple icon facebook icon purple pinterest purple icon twitter purple icon YouTube icon blog subscription purple icon

15th Birthday Celebration Ensemble

Hi, Connie here with a birthday celebration ensemble set created for Scrapbook Adhesives by 3L’s booth at an industry trade show, Creativation 2020. Let me show you how to incorporate many products into this project.

15th Birthday Celebration Ensemble by Connie Mercer for Scrapbook Adhesives by 3L

Birthday Celebration Ensemble Cupcake Card

15th Birthday Celebration Ensemble by Connie Mercer for Scrapbook Adhesives by 3L
  1. Die-cut all pieces of the Pop-up card set from cardstock and patterned paper. Adhere the center section inside the folded card with the E-Z Runner Grand Refillable Dispenser.
  2. Apply Extreme Double-Sided Tape 1/4in. to the bottom of the card and remove liner.
  3. Lay the blue foil from the Metallic Transfer Foil Sheets Variety Colors color side up over the tape. Gently rub with your finger tips to transfer the color. Peel away the foil. It’s that easy!
  4. For dimension, I die-cut the cupcake pieces with the 3D Foam Creative Sheets. Repeat the foiling process. Note I used the gold foil from the Metallic Transfer Foil Sheets/Holographic colors.
15th Birthday Celebration Ensemble by Connie Mercer for Scrapbook Adhesives by 3L

The Happy Birthday words were die-cut from cardstock. The words were adhered to the inside of the card using the Dual Tip Glue Pen.

15th Birthday Celebration Ensemble by Connie Mercer for Scrapbook Adhesives by 3L

Vintage Spool Stars

15th Birthday Celebration Ensemble by Connie Mercer for Scrapbook Adhesives by 3L

A star pattern was used to outline the shape onto the 3D Foam Creative Sheets Small White and a piece of patterned paper. Hand-cut both and then foiled with the Metallic Transfer Foil Sheets Variety Colors. Each star was adhered to a craft stick using Extreme Double-Sided Tape 1/4in. The patterned paper was adhered to the spool base using Extreme Double-Sided Tape 1/4in.

15th Birthday Celebration Ensemble by Connie Mercer for Scrapbook Adhesives by 3L

15th Congratulations Notepad

15th Birthday Celebration Ensemble by Connie Mercer for Scrapbook Adhesives by 3L

To create the pretty notepad, add patterned paper to the back of the notepad with Extreme Double-Sided Tape 1/4in. Fold the excess patterned paper over the top of the notepad and then, embellish it. 3D Foam Stars were foiled and added in random spots on the projects.

I hope you enjoyed reading my process in creating this special birthday celebration ensemble. Let me know which one was your favorite in the comment section below. Thanks for stopping by!!
Connie Mercer

Creative Time: 60 minutes
Skill level: Intermediate

Materials needed:
Scrapbook Adhesives by 3L®

E-Z Runner Grand Refillable Dispenser
Metallic Transfer Foil Sheets Variety Colors
Metallic Transfer Foil Sheets Holographic Colors
3D Foam Creative Sheets Small White
3D Foam Stars

HomeHobby™ by 3L
Extreme Double-Sided Tape 1/4in.
Dual Tip Glue Pen

Other
Pop-Up Die Set: Karen Burniston (Cupcake Pop-up Die Set); Patterned Paper; Small Notepad; Vintage Spools; Craft Sticks; Fabric Strips; Wooden Heart

Save It to Pinterest!

15th Birthday Celebration Ensemble by Connie Mercer for Scrapbook Adhesives by 3L Pinterest

Visit our Website and Blog!
Sign up for our Newsletter so you never miss a contest or giveaway!

instagram purple icon facebook icon purple pinterest purple icon twitter purple icon YouTube icon blog subscription purple icon

Birthday Wishes Card using 3D Foam Strips

Hi everyone, Yvonne here with a Birthday Wishes card. Have you seen the brand new 3D Foam Strips? I love, love, love this product! I’m going to show you how to use them in three ways with 3D frames and an intricate feather die-cut.

Birthday Wishes Card Tutorial by Yvonne van de Grijp for Scrapbook Adhesives by 3L Blog

Birthday Wishes Card Base

Make a white card base. Add a silver rectangle card panel and then an embossed card panel with the E-Z Runner® Petite Permanent Dots Refillable Dispenser on top of the white card base.

Die-cut and emboss a frame from white cardstock. To lift the layer, adhere the frame to the card base using 3D Foam Strips.

Intricate Feather Die Cut and 3D Foam Strips

Die-cut an intricate feather shape from gold cardstock and then die-cut its silhouette from mint cardstock.

Handcut with scissor cut some of the 3D Foam Strips into small pieces to fit behind the gold feather die cut. It cuts beautifully (as all the 3D Foam does) with scissors. See how I’m using a full 3D Foam Strip to curve along the spine of the feather?

Remove the liners from the 3D Foam Strips and adhere it onto the mint silhouette shape. Use the E-Z Runner® Petite Permanent Dots Refillable Dispenser to adhere the layered feather onto the white frame.

For more dimension and elegance, add self-adhesive pearls and a pearl strip onto the feather.

Completing the Card

Stamp Birthday Wishes sentiment on black cardstock and trim it to a thin band. Using Adhesive Dots Micro, adhere it toward the lower part of the feather die cut.

Tie and adhere a white satin bow to the card with Adhesive Dots Micro. I enjoy using the Adhesive Dots because they don’t stain and there is no glue shining through the satin bow. The best part, there’s no drying time!

Voila…your feathered Birthday Wishes card is ready. I hope you enjoyed the tutorial and wish you happy crafting!

Hugs, Yvonne

Birthday Wishes Card Tutorial by Yvonne van de Grijp for Scrapbook Adhesives by 3L Blog

Creative Time: 30 minutes
Skill Level: Intermediate

Materials needed:
Scrapbook Adhesives by 3L®

Other
Etched Dies and Die-Cutting Machine: Spellbinders® Paper Arts (Feathers in the Wind, Hemstitch Rectangles, Medallion Embossing Folder and Platinum 6 Die-Cutting and Embossing Machine); White, Gold, Silver, Sea Blue and Mint Cardstock; Self-Adhesive Pearls; Satin Bow, Sentiment; Scissors, Paper Trimmer; Bone Folder; Tweezers

Save It and Pin It!

Birthday Wishes Card Tutorial by Yvonne van de Grijp for Scrapbook Adhesives by 3L Pinterest

Visit our Website and Blog!
Sign up for our Newsletter so you never miss a contest or giveaway!

instagram purple icon facebook icon purple pinterest purple icon twitter purple icon YouTube icon blog subscription purple icon

Gnome Wiper Card Tutorial

Hi friends! Dana Tatar here today sharing an interactive card tutorial. This colorful card has a surprise inside! Pull the sides of the card to pop up a gnome. This card assembly is quick and easy with a wiper card kit and the Ultra Strong E-Z Runner.

Gnome Wiper Card Tutorial by Dana Tatar for Scrapbook Adhesives by 3L

Wiper Card Assembly

Gnome Wiper Card Tutorial by Dana Tatar for Scrapbook Adhesives by 3L

Cut pieces of patterned paper to fit inside the sections of both wiper card panels. Attach the patterned paper to the card bases using the Ultra Strong E-Z Runner.

Gnome Wiper Card Tutorial by Dana Tatar for Scrapbook Adhesives by 3L

Adhere the front piece of the card to the left side of the back piece using the Ultra Strong E-Z Runner. Be sure to align the front piece with the bottom left corner of the back card base.

Gnome Wiper Card Tutorial by Dana Tatar for Scrapbook Adhesives by 3L

Open the front piece of the card. Attach the wiper mechanism to the back of the front piece as shown. Align the mechanism with the top right corner of the folded section.

Gnome Wiper Mechanism

Gnome Wiper Card Tutorial by Dana Tatar for Scrapbook Adhesives by 3L

Cut a gnome from patterned paper. Use a Dual Tip Glue Pen to apply liquid adhesive to the heart. Sprinkle red glitter over the glue and let dry.

Gnome Wiper Card Tutorial by Dana Tatar for Scrapbook Adhesives by 3L

Attach the gnome embellishment to the wiper mechanism using the Ultra Strong E-Z Runner.

Gnome Wiper Card Tutorial by Dana Tatar for Scrapbook Adhesives by 3L

Apply Ultra Strong adhesive to the left side of the back of the front piece and fold the panel over onto the folded (yellow) panel of the back piece of the card.

Finishing Touches

Gnome Wiper Card Tutorial by Dana Tatar for Scrapbook Adhesives by 3L

Use Micro Adhesive Dots to secure small heart sequins to the front of the card.

Gnome Wiper Card Tutorial by Dana Tatar for Scrapbook Adhesives by 3L

Pull both sides of the card out to activate the wiper mechanism and pop up the gnome!

I think everyone could use a gnome in their home! This cheerful card with definitely help brighten someone’s day.

~Dana Tatar

Creative Time: 30 minutes
Skill Level: Beginner

Materials Needed
Scrapbook Adhesives by 3L®

Adhesive Dots Micro
E-Z Runner Ultra Strong Refillable Dispenser

HomeHobby™ by 3L
Dual Tip Glue Pen

Other
Wiper Card Kit and Patterned Papers: Photo Play Paper; Glitter; Heart Sequins

Love It and Save It to Pinterest!

Gnome Wiper Card Tutorial by Dana Tatar for Scrapbook Adhesives by 3L

Visit our Website and Blog!
Sign up for our Newsletter so you never miss a contest or giveaway!

instagram purple icon facebook icon purple pinterest purple icon twitter purple icon YouTube icon blog subscription purple icon

Valentine’s Day Heart Tags

Hello everyone! It’s Judy, and today, I’m sharing a tutorial for Valentine’s Day Heart Tags. You can use them for a bag of treats or on a gift. I know Valentine’s Day is tomorrow and there’s not much time to make these… but look how quickly you can put them together.

Valentine's Day Heart Tags Tutorial by Judy Hayes for Scrapbook Adhesives by 3L

Valentine’s Day Heart Tags Prep Work

You can use pre-made tags, but I decided to die-cut the tags from cream cardstock. This tag was longer than I wanted so I aligned it in the die with the tag top about 1/2 inch below the top edge and ran through die cutting machine again. By doing so, I cut the bottom edge off and made it shorter, scissors would also do the trick. Cut the music paper to the width of tag and 2 1/2 inches long.

For the sentiments, I die-cut “XOXO” and “LOVE” in black cardstock and trimmed the negative piece close to the letters. Save the letters to use later. Stamp several phrases with black ink onto cream cardstock and cut them apart.

You can make the little heart strip with paper embossed in an embossing folder and then rubbed with red ink to highlight the hearts.

Valentine's Day Heart Tags by Judy Hayes for Scrapbook Adhesives by 3L

Assembling the Heart Tags

The first step is to attach the music paper onto the tag using E-Z Runner® Petite Permanent Dots Refillable Dispenser.

Valentine's Day Heart Tags by Judy Hayes for Scrapbook Adhesives by 3L

Place one of the large heart shapes from the 3D Foam Hearts onto the tag front over the music paper.

Carefully pull back liner paper on heart and fold it.

Designer Tip: use the fold to align letters or a word strip to avoid touching the adhesive!

Place the LOVE word strip on the heart. Fold the liner back in place and press to secure word strip. Peel the liner this time from the bottom of the heart to add the Hug Me stamped strip. Again, put the liner back into place to press the strip for a strong hold.

Valentine's Day Heart Tags by Judy Hayes for Scrapbook Adhesives by 3L

Wear Your Adhesive on the Outside with Embossing Powder

Now remove the liner from the3D Foam Heart entirely and pour the red tinsel embossing powder to cover it. Press powder into the heart with your finger, making sure that it gets into the LOVE letter spaces.

Tap off the excess embossing powder from the tag. Use a small dry paint brush to remove loose bits. Now melt the powder with a heating tool.

Valentine's Day Heart Tags Tutorial by Judy Hayes for Scrapbook Adhesives by 3L

Apply a strip of Extreme Double-Sided Tape 1/4 in across the bottom of the tag and trim the ends.

Valentine's Day Heart Tags by Judy Hayes for Scrapbook Adhesives by 3L

Place the red twill over applied Extreme Double-Sided Tape 1/4 in and press firmly in place. Lastly, trim the ends.

Valentine's Day Heart Tags by Judy Hayes for Scrapbook Adhesives by 3L

The Finishing Touches

To embellish the red twill, add dots of black Enamel Accents across it. It’s a great way to coordinate all the colors. Next, thread a piece of red twill on the top and tie a simple knot.

Valentine's Day Heart Tags Tutorial by Judy Hayes for Scrapbook Adhesives by 3L

Making the XOXO Tags

The second tag is made using the same directions as above, but I’m using the die cut “XOXO” on the 3D Foam Heart, before adding the embossing powder.

Valentine's Day Heart Tags Tutorial by Judy Hayes for Scrapbook Adhesives by 3L

Here I’m using a cream music paper and a paper strip of embossed and inked hearts at the bottom adhered with the E-Z Runner® Petite Permanent Dots Refillable Dispenser.

Now I’m using the leftover letters on a third tag. See how quick and easy it is to die cut once for two tags!

Valentine's Day Heart Tags Tutorial by Judy Hayes for Scrapbook Adhesives by 3L

These tags have texture, dimension, and shine. Nobody will guess how easy they are to make! Enjoy making these fun and sweet Valentine’s Day Heart Tags! They’ll be oh so pretty attached to gifts! Happy Valentine’s Day!

Thanks for Visiting!
Judy Hayes

Creative Time: 30 minutes
Skill Level: Intermediate

Materials Needed:
Scrapbook Adhesives by 3L®

HomeHobby™ by 3L

Other
Stamp: Penny Black (Transparent Stamps Hug Me); Craft Dies: Spellbinders® Paper Arts (Tag, You’re It! Contour Steel Rule Die) and Sizzix (Alphanumeric Tiny Type Upper and Holiday Words #2 by Tim Holtz); Ink: Tsukineko (Versafine Onyx Black) and Ranger Ink (Archival Ink Vermilion); Embossing Folder: Taylored Expressions (Swiss Hearts); Red Tinsel Embossing Powder; Music Patterned Paper; Red Sparkle Twill; Black and Cream Cardstock

Save It to Pinterest!

Valentine's Day Heart Tags Tutorial by Judy Hayes for Scrapbook Adhesives by 3L

Visit our Website and Blog!
Sign up for our Newsletter so you never miss a contest or giveaway!

instagram purple icon facebook icon purple pinterest purple icon twitter purple icon YouTube icon blog subscription purple icon

One of a Kind Foiled Frame Background Card

Hello crafty friends! Tracy here, and today I have a fun little Valentine’s Day inspired 3D Foam Foiled Frame Background for my card. Here are all of the details.

One of a Kind Foiled Frame Background Card by Tracy McLennon for Scrapbook Adhesives by 3L

Foiled Frame Background Basics

Start this sweet little project with a piece of white cardstock and a pack of 3D Foam Frames. I didn’t cut the white cardstock to size, until AFTER the next step. I didn’t want to stress about perfect placement. So start larger and then cut it down to size.

One of a Kind Foiled Frame Background Card by Tracy McLennon for Scrapbook Adhesives by 3L

Peel off the backing from every other 3D Foam Frame, this is what will make the 3D Foam Foiled Frame Background. Flip the frames over onto your piece of white cardstock, press firmly and then pull back the frames you are not using from the cardstock.

One of a Kind Foiled Frame Background Card by Tracy McLennon for Scrapbook Adhesives by 3L

This is where you will cut the white cardstock down to size. You want to leave a little border of white around the largest frame. Now grab your Metallic Transfer Foil Holographic Colors. I chose to use the silver holographic foil, remove the adhesive backing from the 3D Foam Frames and firmly press the foil onto the background.

One of a Kind Foiled Frame Background Card by Tracy McLennon for Scrapbook Adhesives by 3L

Cut a simple pink cardstock mat and a white cardstock card base for the 3D Foam Foiled Frame Background. Adhere the top 2 layers together using the E-Z Runner® Petite Permanent Dots Refillable Dispenser and then that piece to the base using Crafty Foam Tape White.

One of a Kind Foiled Frame Background Card by Tracy McLennon for Scrapbook Adhesives by 3L

Add simple cardstock sticker embellishments and then the die cut the sentiment using Thin 3D Foam Squares Black Mix onto the 3D Foam Foiled Frame Background.

One of a Kind Foiled Frame Background Card by Tracy McLennon for Scrapbook Adhesives by 3L

I absolutely love how this background just shimmers and shines behind the embellishments.

One of a Kind Foiled Frame Background Card by Tracy McLennon for Scrapbook Adhesives by 3L

Thanks so much for stopping by!
Tracy McLennon

Creative Time: 30 minutes
Skill Level: Beginner

Materials needed:
Scrapbook Adhesives by 3L®

Crafty Foam Tape White
3D Foam Frames
Metallic Transfer Foil Sheets Holographic Colors
Thin 3D Foam Squares Black Mix
E-Z Runner® Petite Permanent Dots Refillable Dispenser

Other
Embellishments: Pink Paislee (Lucky Us Collection); White and Pink Cardstock

Save It to Pinterest!

One of a Kind Foiled Frame Background Card by Tracy McLennon for Scrapbook Adhesives by 3L

Visit our Website and Blog!
Sign up for our Newsletter so you never miss a contest or giveaway!

instagram purple icon facebook icon purple pinterest purple icon twitter purple icon YouTube icon blog subscription purple icon