You are in our US store • Switch to Europe store

Happy Amazing Moments Layout

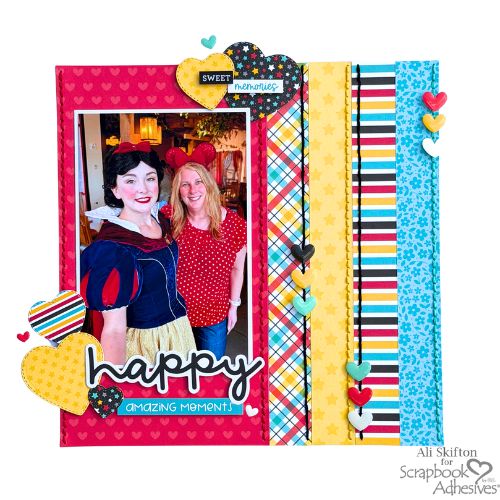
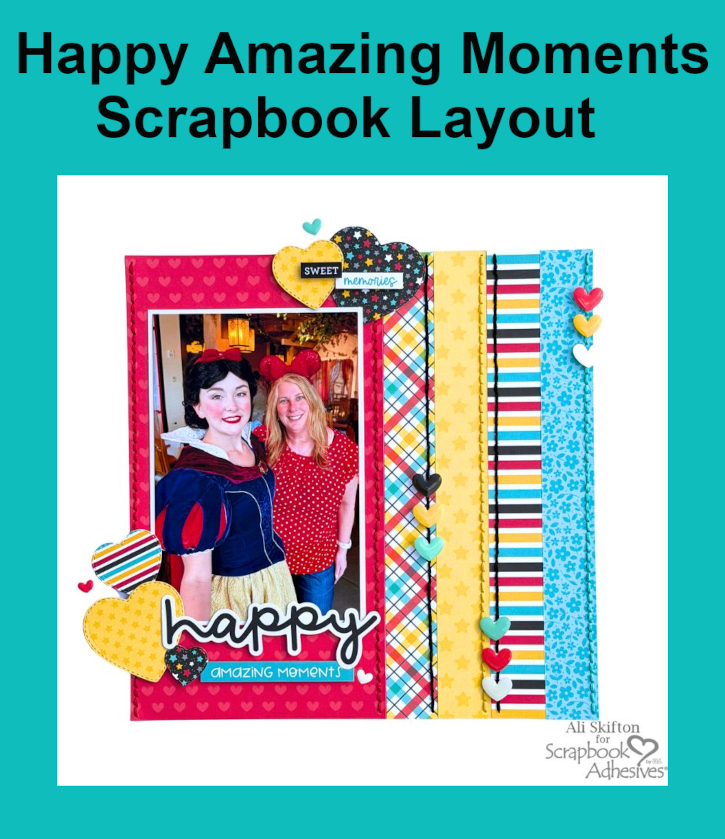
Hello my crafty friends! It’s Ali, @funadventureswithali, and I’m so excited to be sharing this magical Disney-inspired Happy Amazing Moments Layout with you today! This project combines some of my very favorite things — Disney memories, hand stitching, dimension, and of course, my favorite adhesive products that help bring everything together so easily.

Happy Amazing Moments Layout by Ali Skifton for Scrapbook Adhesives by 3L

Happy Amazing Moments Layout Design

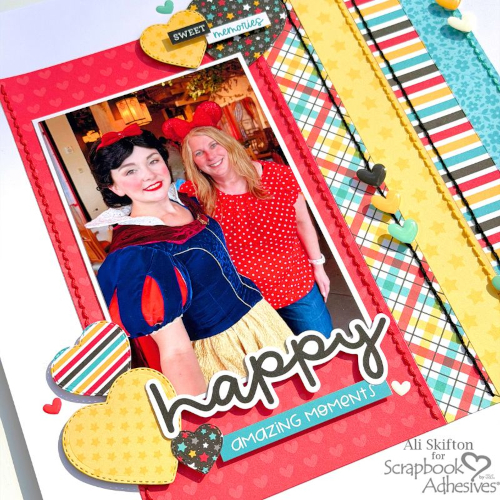
What I love most about scrapbooking is to relive special moments through photos and creative storytelling. The photo with Snow White is one of my favorites from our trip to Disney World at a character dinner. The forest-inspired atmosphere with a storybook vibe was truly beautiful, cozy and magical…the meal was absolutely delicious!

Happy Amazing Moments Layout by Ali Skifton for Scrapbook Adhesives by 3L

Happy Amazing Moments Layout by Ali Skifton for Scrapbook Adhesives by 3L

Picking out the Patterns

For this layout, I used playful and whimsical patterned papers especially the red heart patterned paper which would make the perfect background for my photo with Snow White. The bold pops of red really help the photo stand out while adding so much warmth and love to the page.

Layers of the Happy Amazing Moments Layout

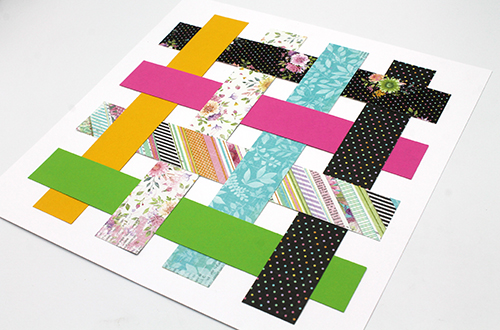
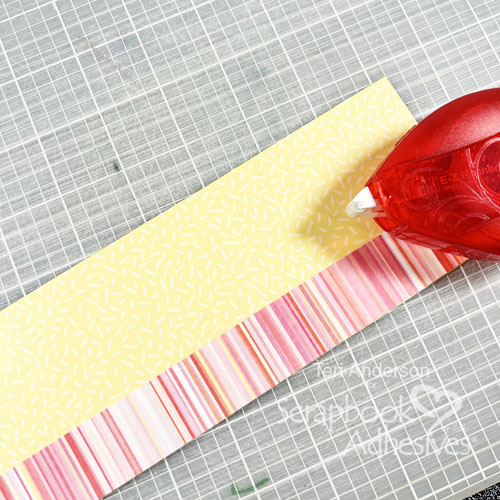
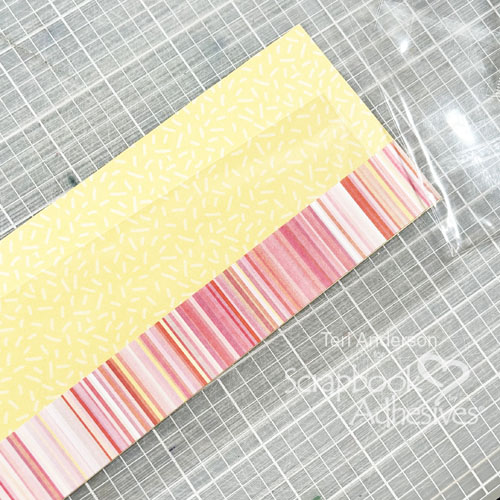
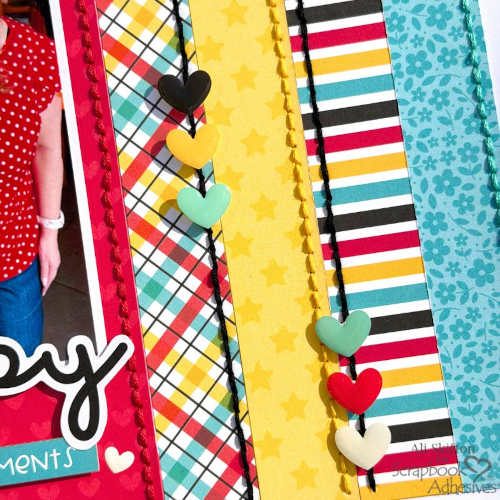
To create extra texture and interest, I selected four additional patterned papers and cut them into strips. Next, adhered each strip down the center using my E-Z Runner® Grand Permanent Strips Refillable Dispenser. By only applying adhesive in the middle, I was able to pierce my holes and stitch each strip without my needle getting stuck in adhesive — a little trick that saves so much frustration! It also helped keep all of my papers securely in place while stitching, so nothing shifted around as I worked.

Hand stitching is one of my favorite techniques because it instantly adds texture, detail, and a handmade touch to any layout. I love how the stitched lines guide your eye across the page and add softness and movement to the design.

Happy Amazing Moments Layout by Ali Skifton for Scrapbook Adhesives by 3L

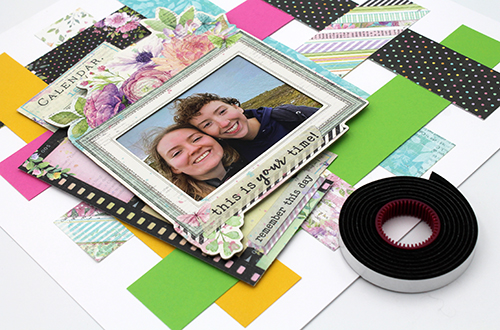
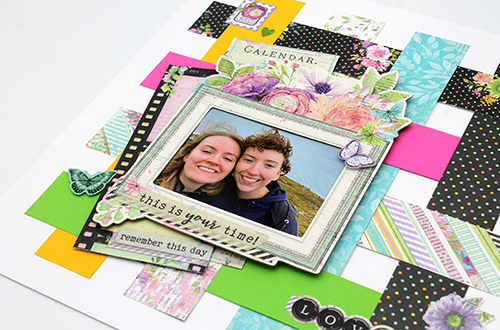
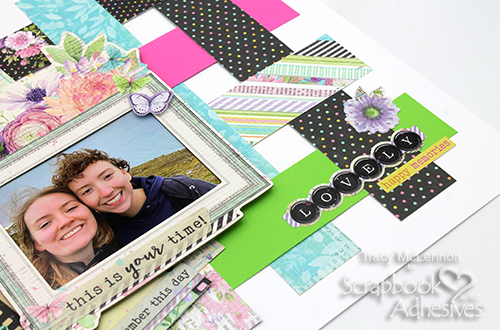
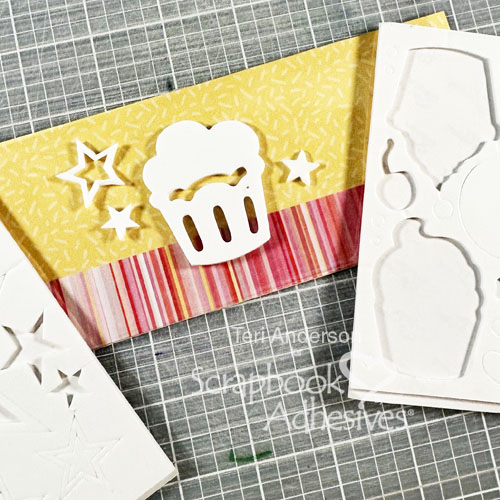
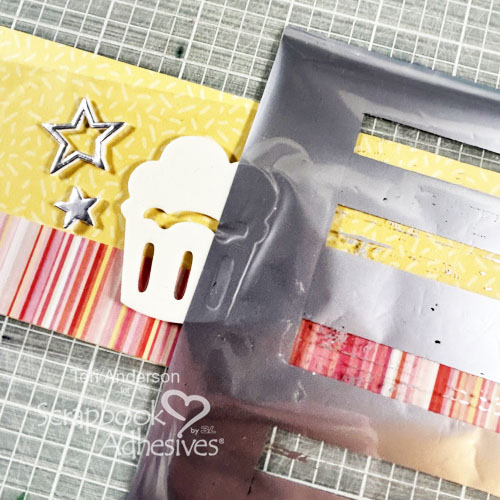
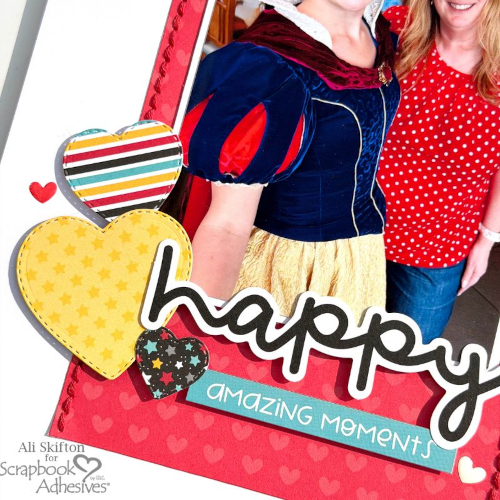
For a fun accent, I die-cut several stitched hearts and hearts from several coordinating patterned papers to layer them around the photo using 3D Foam Squares White Mix.

Adding the Title

For the title and journaling strip, I used 3D Foam Strips to give even more lift and dimension to the layout. I added the phrase “Amazing Moments” along with some sweet sentiment word strips layered over the hearts. These little details help tell the story while adding even more visual interest to the design.

Happy Amazing Moments Layout by Ali Skifton for Scrapbook Adhesives by 3L

To finish everything off, I created three clusters of tiny heart sprinkles around the stitched sections of the layout. I used 3D Foam Squares Micro White to pop up those little hearts as well because I just can’t resist adding extra dimension wherever I can! Those small details may be tiny, but they truly bring the page to life and add so much charm and movement.

Thank you so much for stopping by and letting me share this magical project with you today. I hope this layout inspires you to document your own special memories and maybe even add a little hand stitching and dimension to your next project too!

Wishing you a truly magical day and happy crafting, friends!

Thanks for visiting!
Ali Skifton (FunAdventuresWithAli)

Creative Time: 90 mins
Skill Level: Beginner

Materials Needed:
Scrapbook Adhesives by 3L®

E-Z Runner® Grand Permanent Strips Refillable Dispenser

3D Foam Squares White Mix and 3D Foam Squares Micro White

3D Foam Strips

Other: Patterned Papers + Elements: Doodlebug Design

Save to Pinterest!

Happy Amazing Moments Layout by Ali Skifton for Scrapbook Adhesives by 3L Pinterest

Visit our Website and Blog!
Sign up for our Newsletter so you never miss a contest or giveaway!

instagram purple icon facebook icon purple pinterest purple icon twitter purple icon YouTube icon blog subscription purple icon

Montana Hike Layout

Hello crafty friends! It’s Kristin here to share a layout, Montana Hike Layout. Inspired by some vintage family photos, it felt special to document these family memories through scrapbooking! Using two vacation photos from the 1940s taken during a family hiking trip in Montana. The nostalgic outdoor theme paired perfectly with the P13 Hit the Road collection.

Montana Hike Layout by Kristin Rizzo for Scrapbook Adhesives by 3L

Montana Hike Background

To set the mood, I used a map patterned paper as the base of the layout. It gives the sense of adventure and complements the vintage travel photos.

Montana Hike Layout by Kristin Rizzo for Scrapbook Adhesives by 3L

The earthy tones and travel-inspired design worked beautifully with the black-and-white photos. The photo and frame were secured with my E-Z Runner® Permanent Strips Refillable Dispenser. Layer a few simple embellishments around the main photo using 3D Foam Squares White Mix to add dimension to the page.

Add Sparkly Shaker Elements

To give the layout some movement, I created three shaker elements using patterned papers with sequins in coordinating colors from my stash. Cover the window with the acetate using the Premium Double-Sided Tape 1/8in. and build a well with 3D Foam Strips around the edges of the window. Fill each with sparkling sequins before sealing it close with clear vellum with the Premium Double-Sided Tape 1/8in. and place around the Montana Hike Layout as pictured.

The shaker elements add movement, texture, and fun to the layout while still keeping the vintage travel theme intact. Plus, the sparkle contrasts beautifully with the black-and-white photos.

Finishing the Montana Hike Layout

To complete the page by adding the Montana Hike title with some white Thickers near the center of the layout. For extra hold, I always use my Dual Tip Glue Pen. For more layers and dimension, I used Crafty Foam Tape White 54ft. behind additional embellishments. I love how this layout preserves these treasured family memories while combining vintage photos with modern scrapbook techniques.

Montana Hike Layout by Kristin Rizzo for Scrapbook Adhesives by 3L

Final Thoughts

If you love adding texture and depth to your scrapbook pages, foam adhesives are a wonderful way to make your embellishments stand out. They are also perfect for creating layered travel-themed layouts like this one.

Thanks so much for stopping by today! I hope this Montana Hike layout inspires you to document your own treasured travel memories and family photographs.

Happy scrapping! 💕✂️
Kristin Rizzo

Creative Time: 45 mins
Skill Level: Beginner

Materials Needed:
Scrapbook Adhesives by 3L®

E-Z Runner® Permanent Strips Refillable Dispenser, 3D Foam Squares White Mix, Crafty Foam Tape White 54ft., 3D Foam Strips

HomeHobby™ by 3L

Premium Double-Sided Tape 1/8in., Dual Tip Glue Pen

Other: Patterned Paper & Embellishments: P13; Alpha Letters: American Crafts (Thickers)

Click Preferred Retailers List

Save to Pinterest!

Montana Hike Layout by Kristin Rizzo for Scrapbook Adhesives by 3L Pinterest

Visit our Website and Blog!
Sign up for our Newsletter so you never miss a contest or giveaway!

instagram purple icon facebook icon purple pinterest purple icon twitter purple icon YouTube icon blog subscription purple icon

Glittered Daisy Card

Hi everyone, Yvonne here with a summer themed card. For my Glittered Daisy Card, I made some gorgeous daisies using the technique called Wear Your Adhesive on the Outside. I would love to share how I made this happy and fun card. Will you join me?

Glittered Daisy Card by Yvonne van de Grijp for Scrapbook Adhesives by 3L

Glittered Daisy Card Panel

Start by punching a grass border from green cardstock and adhere it to a blue card panel using Crafty Foam Tape 108ft for a subtle lift. The height of this foam tape is 1/32″ which is half of 1/16″.

Glittered Daisy Card by Yvonne van de Grijp for Scrapbook Adhesives by 3L

Wear Your Adhesive on the Outside with 3D Foam Circles

Create sweet daisies using a combination of small and regular size circles from the 3D Foam Circles White Mix! Flower centers are the regular size circle and the petals are the small circles surrounding the center. Let’s embellish! Peel the liner off the flower center, cover with yellow glitter and rub the glitter into the circle to secure. Tap off excess. Next, peel the liners off of the petals and repeat the glitter steps with the white glitter. This technique to make your adhesive shine is known as Wear Your Adhesive on the Outside.

Glittered Daisy Card by Yvonne van de Grijp for Scrapbook Adhesives by 3L

Mat the Glittered Daisy Card panel to a yellow panel and then on a white card base with the E-Z Runner® Permanent Strips Refillable Dispenser.

The Finishing Touch

Mat the sentiment stickers on a yellow strip which I hand cut and place them onto the card using Thin 3D Foam Squares White Mix for a subtle pop. Add a small circle from the 3D Foam Circles White Mix on both sides of the “It’s Your Day” sentiment on the grass border. Use the Wear Your Adhesive on the Outside technique by peeling off the liners and covering with yellow glitter.

Glittered Daisy Card by Yvonne van de Grijp for Scrapbook Adhesives by 3L

And voilá, your Glittered Daisy Card is ready. Hope you enjoyed this card tutorial and wish you happy crafting!

Yvonne van de Grijp

Creative Time: 30 minutes

Skill Level: Intermediate

Materials needed:

Scrapbook Adhesives by 3L®:

3D Foam Circles White Mix

E-Z Runner® Permanent Strips Refillable Dispenser

Thin 3D Foam Squares White Mix

Crafty Foam Tape 108ft

Other: Punch: Martha Stewart Crafts (Grass Border); Sentiments: Tim Holtz® (Label Sentiment Stickers); White + Yellow Glitter; Paper Trimmer; Scissors; Tweezers; White, Green, Blue + Yellow Cardstock

Save to Pinterest!

Glittered Daisy Card by Yvonne van de Grijp for Scrapbook Adhesives by 3L Pinterest

Visit our Website and Blog!
Sign up for our Newsletter so you never miss a contest or giveaway!

instagram purple icon facebook icon purple pinterest purple icon twitter purple icon YouTube icon blog subscription purple icon

Geometric Thank You Card

Hi friends, happy Friday! Can’t believe it’s already the middle of May! Do you like to work with geometric shapes on your card designs? Leslie here sharing a geometric thank you card that I think you’ll love. The nice thing about this design is that it can be made with any geometric shape and in any color combo. And it’s another one of those cards that can be mass-produced with ease to have multiples in your stash. Let me show you this card in more detail!

Geometric Thank You Card by Leslie Turner for Scrapbook Adhesives by 3L

Card Base Details

I cut the card base from white linen cardstock at 5-1/2″ x 8-1/2″ and scored it at 4-1/4″. Next, I cut the focal panel from white linen cardstock at 4″ x 5-1/4″.

Geometric Thank You Card Focal Panel

From the rounded jewels infinity dies in my stash, I chose two sizes of dies. Also chose four colors of cardstock, and cut two small and one larger shape from each color. These were arranged on the focal panel, popping one small shape up with 3D Foam Squares White Mix. Accordingly, I used 3D Foam Squares Black Mix for the dark cardstock. Then I stamped a simple sentiment.

As you undoubtedly know by now, the Wear Your Adhesive on the Outside technique is one of my favorites! Used the bronze foil in the Metallic Transfer Foil Sheets Nature Colors and 3D Foam Circles White Mix. Simply remove the liner from the foam circle and press the foil (color side up) onto it. So easy! These created some really pretty embellishments for this design.

Geometric Thank You Card by Leslie Turner for Scrapbook Adhesives by 3L

Card Assembly

Once the focal panel was complete, I adhered it to the front of the card base with Crafty Foam Tape White 54ft. Love the dimension this gives.

The E-Z Runner® Grand Permanent Strips Refillable Dispenser was used to adhere the layers on the inside panel. To carry the design to the inside, I incorporated two die cuts, adhering them with the Dual Tip Glue Pen. Of course, I added a couple more bronze embellishments created with the Wear Your Adhesive on the Outside technique. Lastly, I stamped an inside sentiment, and this completed the geometric thank you card.

Geometric Thank You Card by Leslie Turner for Scrapbook Adhesives by 3L

Thanks for visiting!
Leslie

Creative Time: 45 mins
Skill Level: Intermediate

Materials Needed:
Scrapbook Adhesives by 3L®
3D Foam Squares White Mix
3D Foam Squares Black Mix
Crafty Foam Tape White 54ft.
Metallic Transfer Foil Sheets Nature Colors
3D Foam Circles White Mix
E-Z Runner® Grand Permanent Strips Refillable Dispenser

HomeHobby™ by 3L
Dual Tip Glue Pen

Other: Cardstock/Paper: Neenah Classic Linen Solar White cardstock, CutCardStock Basis White cardstock and Lessebo Sunset Orange, Pitch Black, Brick Orange and Sunflower Yellow cardstock
Stamps: Keep It Simple Paper Crafts Thank You Sentiment Stamp Set
Ink: Versafine Onyx Black ink
Dies/Punches: Hero Arts Rounded Jewels Infinity Dies
Accessories: Fiskars 12″ ProCision Rotary Bypass Paper Trimmer, Big Shot, Mini MISTI

Click Preferred Retailers List

Save to Pinterest!

Geometric Thank You Card by Leslie Turner for Scrapbook Adhesives by 3L Pinterest

Fun and Dimensional Celebrate Card

Hi, Judy here today! I made this Fun and Dimensional Celebrate Card using 3D Foam Adhesive Shapes (squares, circles, pennants and small strips) to create a pattern. Bright colors of embossing glaze cover each foam piece to Wear Your Adhesive on the Outside technique. The affect really stands out on a black background. Best of all, it’s a fun and easy card to make!

Fun and Dimensional Celebrate Card by Judy Hayes for Scrapbook Adhesives by 3L

Dimensional Celebrate Card Pattern

Referring to the image below, on a 3.125 x 5.5 inches black cardstock panel, peel and place small triangles in the 3D Foam Pennants slightly above center at left edge to form a curved row. Next, peel small 3D Foam Circles White Mix and place between points of a triangles. Fill each space between triangle points and at triangle point with a small circle.

Fun and Dimensional Celebrate Card by Judy Hayes for Scrapbook Adhesives by 3L

Arrange a row of large 3D Foam Squares White Mix above triangles. Lastly, peel 3D Foam Strips and cut to fit vertically above row of squares.

Wear Your Adhesive on the Outside with Glaze

Let’s make the embellishment truly shine with Distress Glaze and the foam pieces through the Wear Your Adhesive on the Outside technique. Start with peeling the liners from small 3D Foam Circles White Mix, cover with Distress Spiced Marmalade Glaze, and shake off excess. Designer’s Tip: Use a small dry paint brush to remove any stray glaze. Heat with heat tool to melt the glaze.

Fun and Dimensional Celebrate Card by Judy Hayes for Scrapbook Adhesives by 3L

Remove the liners from row of triangles and repeat the Distress Glaze steps in Peacock Feathers Glaze. Then the row of 3D Foam Squares in Picked Raspberry Glaze, the 3D Foam Strips in Twisted Citron Glaze. Heat only until glaze melts otherwise, it overheating may cause the foam pieces to curl.

Stamp Greeting

Ink stamp with Versamark ink and stamp greeting. Cover with white embossing powder, remove excess and heat emboss with heat tool.

Fun and Dimensional Celebrate Card by Judy Hayes for Scrapbook Adhesives by 3L

Dimensional Celebrate Card Assembly

Cut white cardstock 8.5 x 6 inches, score and form into 4.25 x 6 inch card. Use E-Z Dots® Permanent Refillable Dispenser to apply adhesive to back of Celebrate panel and fasten on card.

Thanks for visiting!
Judy Hayes

Creative Time: 15 mins
Skill Level: Beginner

Materials Needed:
Scrapbook Adhesives by 3L®

E-Z Dots® Permanent Refillable Dispenser

3D Foam Squares White Mix and 3D Foam Circles White Mix

3D Foam Strips and 3D Foam Pennants

Other: Stamp: Pink Fresh Studio (Happy Birthday Sentiments); Ink: Tsukineko (Versamark); Embossing Glaze: Ranger Ink (Tim Holtz Distress Glaze in Spiced Marmalade, Peacock Feathers, Picked Raspberry + Twisted Citron); Embossing Powder: Ranger Ink (White); Craft Dies: Sizzix; Black + White Cardstock

Click Preferred Retailers List

Save to Pinterest!

Fun and Dimensional Celebrate Card by Judy Hayes for Scrapbook Adhesives by 3L Pinterest

Visit our Website and Blog!
Sign up for our Newsletter so you never miss a contest or giveaway!

instagram purple icon facebook icon purple pinterest purple icon twitter purple icon YouTube icon blog subscription purple icon

Bright Woven Layout

Hello scrappy friends! Tracy here, and today I have a fun and bright layout to share using a simple weaving technique. Here are all of the details on how I created this bright woven layout.

Bright Woven Layout by Tracy McLennon for Scrapbook Adhesives by 3L

Let’s Get Crafty!

White cardstock is the background of this layout, and that makes the bright patterns and cardstock just pop beautifully. Cut strips of patterned paper and coordinating cardstock that are 1.5×10.5. You will need 8 in total.

Bright Woven Layout by Tracy McLennon for Scrapbook Adhesives by 3L

Lay down the strips evenly. I started by adhering one end of the horizontal strips using E-Z Runner® Grand Refillable Dispenser. Now weave the vertical pieces in. Once all pieces are set in place. Adhere all of the ends in place.

Bright Woven Layout by Tracy McLennon for Scrapbook Adhesives by 3L

Add the chipboard frame to the chosen photo using E-Z Runner® Grand Refillable Dispenser. Next, adhere the photo and decorative pieces to the background using Crafty Foam Tape Black. I use multiple layers of Crafty Foam Tape Black to give dimension between the layers of this bright woven layout.

Bright Woven Layout by Tracy McLennon for Scrapbook Adhesives by 3L

Start adding embellishments around the matted photo. Some I adhered straight to the layout and others I attached using 3D Foam Squares White Mix.

Bright Woven Layout by Tracy McLennon for Scrapbook Adhesives by 3L

Adhere the cardstock sticker title to the bottom right hand corner of the bright woven layout.

Bright Woven Layout by Tracy McLennon for Scrapbook Adhesives by 3L

Thanks so much for stopping by!
Tracy

Creative Time: 40 mins
Skill Level: Intermediate

Materials Needed:
Scrapbook Adhesives by 3L®
E-Z Runner® Grand Refillable Dispenser
3D Foam Squares White Mix
Crafty Foam Tape Black

Other: Simple Stories- Simple Vintage Collection, Cardstock

Save to Pinterest!

Bright Woven Layout by Tracy McLennon for Scrapbook Adhesives by 3L Pinterest

Visit our Website and Blog!
Sign up for our Newsletter so you never miss a contest or giveaway!

instagram purple icon facebook icon purple pinterest purple icon twitter purple icon YouTube icon blog subscription purple icon

Happy Mother’s Day Film Strip Card

Mother’s Day is tomorrow so I am scrambling to get a card together for mom! Hi, Margie here today and I am sharing my process in creating my Happy Mother’s Day Film Strip Card so come along!

Happy Mother's Day Film Strip Card by Margie Higuchi for Scrapbook Adhesives by 3L

Assembling the Film Strip Card Front

The card base was created by folding a 8.5 x 5.5 inch white cardstock in half to make a side-fold A2 standard card size (4.25 x 5.5 inch). Then I cut a 4.25 x 5.5 inch patterned paper panel and covered the card base front with the E-Z Runner® Grand Permanent Dots Refillable Dispenser.

Happy Mother's Day Film Strip Card by Margie Higuchi for Scrapbook Adhesives by 3L

Die-cut a film strip die with light blue cardstock and secure it on the left side of the card front with the E-Z Runner® Grand Permanent Dots Refillable Dispenser. I love using this adhesive tape because the dots hit the shape and skips over the gaps. Usually I use an Adhesive Sheets 4 x 6in. but ran out – GASP! LOL! Trim off the excess film strip and set aside.

Wear Your Adhesive on the Outside with 3D Creative Foam Sheet

Die-cut a solid butterfly with 3D Foam Creative Sheets Small White and a detailed butterfly from patterned paper. Cover the glitter with the solid butterfly (after removing the top liner), press to secure and tap off the excess. Set aside to create the sentiment.

Stamp the Sentiment

Using the stamp positioner, stamp the sentiment with dark brown ink on a piece of patterned paper and cut into a strip. With the glittered butterfly as a placement guide, adhere the sentiment with the E-Z Runner® Grand Permanent Dots Refillable Dispenser on top of the film strip.

Then adhere the glittered butterfly on the side of the sentiment by removing the bottom liner and adhere the detailed butterfly with the E-Z Runner® Grand Permanent Dots Refillable Dispenser.

To finish, accent with crystal glass rhinestones using the Adhesive Dots Micro. For smaller stones, I pull the adhesive dot to smaller piece to secure.

Happy Mother's Day Film Strip Card by Margie Higuchi for Scrapbook Adhesives by 3L

Now it’s ready to be sent to mom! Hope you enjoy my Happy Mother’s Day Film Strip Card tutorial and give it a try!

Thanks for stopping by and Happy Mother’s Day!
Margie Higuchi

Creative Time: 25 mins
Skill Level: Intermediate

Materials Needed:
Scrapbook Adhesives by 3L®

E-Z Runner® Grand Permanent Dots Refillable Dispenser

3D Foam Creative Sheets Small White

Adhesive Dots Micro

Other: Papers: Creative Memories (Cherish Collection); Stamp: CraftFancy (Happy Everything Clear Stamp Set); Ink: Ranger Ink (Distress Ink in Vintage Photo); Rhinestones: CraftFancy (Crystal Glass Rhinestones); Glitter: Nuvo (Pure Sheen Glitter in Gold); Craft Dies: CraftFancy (Slimline Film Strip + Side Butterfly); Stamp Positioning Tool: My Sweet Petunia (Small MISTI); Picker + Stamp Press: PinkFresh Studio; Anit-Static Powder Tool: Taylored Expressions; Light Blue + White Cardstock

Click Preferred Retailers List

Save to Pinterest!

Happy Mother's Day Film Strip Card by Margie Higuchi for Scrapbook Adhesives by 3L Pinterest

Visit our Website and Blog!
Sign up for our Newsletter so you never miss a contest or giveaway!

instagram purple icon facebook icon purple pinterest purple icon twitter purple icon YouTube icon blog subscription purple icon

Birthday Treat Jar

Hi, friends! Got a friend with a birthday coming up? Teri here to show you to make a super cute Birthday Treat Jar! While I filled this little jar with treats, you could easily use it to place money or gift card inside instead.

Birthday Treat Jar by Teri Anderson for Scrapbook Adhesives by 3L

Create the Inner Pieces for the Jar

For this project, you’ll need a small jar with a lid. You can use a glass jar or a plastic one. Don’t feel like buying one to use for the project? Upcycle an old jar for it.

Birthday Treat Jar by Teri Anderson for Scrapbook Adhesives by 3L

Start by cutting a piece of patterned paper to fit inside the jar. You want the panel to be able to roll up so you can fit it inside it. Decorate it by adding another strip of paper to it.

Birthday Treat Jar by Teri Anderson for Scrapbook Adhesives by 3L

Cut a clear transparency to fit in the jar. Make sure you can fold the transparency in half. Don’t have a transparency? Recycle a piece of clear plastic packaging. It will work just fine.

Set your transparency on your patterned paper piece. You’ll need to do this for placement. Adhere some 3D Foam Shapes onto it. Pick ones with a birthday theme.

Birthday Treat Jar by Teri Anderson for Scrapbook Adhesives by 3L

Use Metallic Transfer Foil

Set a piece of Metallic Transfer Foil onto the shapes one at a time with the pretty side up. Burnish the foil onto it. If you are using a piece of foil that you’ve used before and have open spaces, that’s OK. Just apply a little bit of foil at a time. Start with one side of the shape and then do the other. Work toward the middle until the shape is completely covered.

Birthday Treat Jar by Teri Anderson for Scrapbook Adhesives by 3L

Apply Crafty Power Tape to the inside of your transparency. Add some sequins and seal up the panel. Roll the panel into a circle and place it in your jar. Roll your patterned paper panel and do the same.

Decorate the Jar’s Outside and Lid

Decorate the outside of your jar with stickers or additional 3D Foam Shapes.

Birthday Treat Jar by Teri Anderson for Scrapbook Adhesives by 3L

Take the lid and decorate it with stickers and additional 3D Foam Shapes. Apply Metallic Transfer Foil to any of the shapes you add.

Birthday Treat Jar by Teri Anderson for Scrapbook Adhesives by 3L

Complete the jar by tying some ribbon or twine onto it. Use an Adhesive Dot Micro to hold the twine or ribbon in place. Fill the inside of the jar up with candy or whatever you desire.

I hope you are inspired to decorate a jar to give as a gift! Let me know if you do!

Happy Creating!

Teri Anderson

Creative Time: 60 minutes

Skill Level: Beginner

Materials needed:

Scrapbook Adhesives by 3L®:

Metallic Transfer Foil Sheets Nature Colors

E-Z Runner® Permanent Strips Refillable Dispenser

3D Foam Stars

3D Foam Cupcakes

Adhesive Dots Micro

Crafty Power Tape Polybag 81ft

Other:  Patterned Paper and Stickers: Photo Play (Birthday Sparkle Collection); Twine: The Twinery; Sequins: This Calls for Confetti; Jar: Dollar Tree; Candy

Save to Pinterest!

Birthday Treat Jar by Teri Anderson for Scrapbook Adhesives by 3L

Visit our Website and Blog!
Sign up for our Newsletter so you never miss a contest or giveaway!

instagram purple icon facebook icon purple pinterest purple icon twitter purple icon YouTube icon blog subscription purple icon

Dimensional Sending Thanks Card

Hi everyone, Yvonne here with a new card. I love clustering together fussy cut elements. To level up, create layers for an interesting Dimensional Sending Thanks Card. I love the elegance and classical vibe this card brings 🙂 This card is suitable for beginner card makers too. Shall we get started?

Dimensional Sending Thanks Card by Yvonne van de Grijp for Scrapbook Adhesives by 3L

Dimensional Sending Thanks Card Panel

Start by fussy cutting elements. I always like to cut more elements than I need so I can pick the best combination for my Dimensional Sending Thanks Card. Then adhere onto a beige cardpanel. Start by adhering the back element (the arch) using the E-Z Runner® Permanent Strips Refillable Dispenser as your adhesive.

Dimensional Sending Thanks Card by Yvonne van de Grijp for Scrapbook Adhesives by 3L

Then adhere the chair using 3D Foam Squares White Mix. For the smaller parts I used 3D Foam Squares Micro White. Next tuck the other elements using Thin 3D Foam Squares White Mix as our adhesive. This way you create a depth on your Dimensional Sending Thanks Card.

Card Base

Adhere the top card panel onto a brown card panel and next onto a white card base using the E-Z Runner® Permanent Strips Refillable Dispenser as your adhesive.

Finishing Touch

For a finishing touch I adhered some sticker sentiments onto white cardstock and cut it (using scissors) to a banner. Then adhered them onto the card using Thin 3D Foam Squares White Mix.

Dimensional Sending Thanks Card by Yvonne van de Grijp for Scrapbook Adhesives by 3L

And voilá….your Dimensional Sending Thanks Card is ready. I hope you enjoyed this simple tutorial and wish you happy crafting.

Yvonne van de Grijp

Creative Time: 40 minutes

Skill Level: Intermediate

Materials needed:

Scrapbook Adhesives by 3L®:

3D Foam Squares White Mix

E-Z Runner® Permanent Strips Refillable Dispenser

3D Foam Squares Micro White

Thin 3D Foam Squares White Mix

Other: Paper Elements: Craft O’Clock (Vintage Sky Extras Set); Sentiments: Tim Holtz® (Sentiment Label Stickers); White, Beige and Brown Cardstock; Paper Trimmer; Scissors; Tweezers

Save to Pinterest!

Dimensional Sending Thanks Card by Yvonne van de Grijp for Scrapbook Adhesives by 3L Pinterest

Visit our Website and Blog!
Sign up for our Newsletter so you never miss a contest or giveaway!

instagram purple icon facebook icon purple pinterest purple icon twitter purple icon YouTube icon blog subscription purple icon

Happiness Lavender Farm Layout

Hello my crafty friends! It’s Ali, @funadventureswithali, and I’m so excited to share a new Happiness Lavender Farm Layout with you today that is full of texture, layers, and all my favorite foam adhesives! If you know me, you know I absolutely love adding dimension to my pages, and this layout is a perfect example of how mixing different foam products can really bring everything to life.

Happiness Lavender Farm Layout by Ali Skifton for Scrapbook Adhesives by 3L

Happiness Lavender Farm Layout Design

This very special 5 x 7″ photo was taken at a lavender farm in Door County WI during a summer trip with my husband, Jeff. It was our first visit there and fell in love with the endless rows of soft purples and white over a peaceful atmosphere. Of course, the incredible and truly unforgettable lavender scent! I picked colors and patterns that mirrored the tones in photo. The background paper had layered details but I added even more layers to enhance the effect.

Happiness Lavender Farm Layout by Ali Skifton for Scrapbook Adhesives by 3L

For varying heights, I used a combination of Crafty Foam Tape White 108ft., 3D Foam Squares White Mix, to create depth and interest across the entire page. It helps each element stand out while still working together beautifully. To make my 5×7″ photo the focal point, I double matted it for extra definition. I added crafty foam tape behind the photo, which allowed me to tuck in embellishments underneath for a more dynamic, layered look. In the top right corner, I used 3D Foam Squares White Mix to pop up ephemera pieces, creating a soft cluster that draws your eye across the page.

Add the Elements

Place a 3D Foam Strips behind the word “Beautiful” and add it in the upper right area. Then a 3D Foam Squares Micro White behind an adorable bee. A few enamel dots sprinkled around that cluster help tie everything together and add just the right finishing touch.

Happiness Lavender Farm Layout by Ali Skifton for Scrapbook Adhesives by 3L

Underneath the photo, tuck a torn piece of purple paper for a bit of texture and softness. On the bottom left side, I created another cluster using lavender sprigs layered over the background with 3D Foam Strips. They’re perfect for those longer, thinner pieces. I love how full and dimensional this area feels with just a few added elements. In finishing that cluster, a cute enamel brad to hold the sprigs together, another popped-up bee, and—of course—more enamel dots.

Add the Title

For my main title, “Happiness,” I used 3D Foam Strips to give it lift and placed it toward the bottom center of the page, slightly overlapping the photo. I layered in a banner that says “Life is Sweet” using 3D Foam Strips as well, adding even more dimension and interest.

Happiness Lavender Farm Layout by Ali Skifton for Scrapbook Adhesives by 3L

To balance everything out, I created a final cluster in the bottom right corner. 3D Foam Squares White Mix were added behind a floral honeycomb ephemera piece. Next, add an even thicker foam square behind a small flower vase to really make it stand out. I overlapped the elements slightly and finished it off with another sweet bumblebee and a few more enamel dots.

Happiness Lavender Farm Layout by Ali Skifton for Scrapbook Adhesives by 3L

With all these layers and textures, it truly brings me right back to that beautiful day in the lavender fields. I can almost smell the lavender and hear the soft buzzing of the bees all around. It’s amazing how a page can hold not just a memory, but a feeling.

I’m already dreaming about our next visit back!

Happy spring vibes, friends!

Thanks for visiting!
Ali Skifton (FunAdventuresWithAli)

Creative Time: 90 mins
Skill Level: Beginner

Materials Needed:
Scrapbook Adhesives by 3L®

E-Z Runner® Grand Permanent Strips Refillable Dispenser

3D Foam Squares White Mix, Thin 3D Foam Squares White Mix and 3D Foam Squares Micro White

Crafty Foam Tape White 108ft., 3D Foam Strips

Other: Patterned Papers + Elements: Simple Stories (Simple Vintage Lavender Collection)

Save to Pinterest!

Happiness Lavender Farm Layout by Ali Skifton for Scrapbook Adhesives by 3L Pinterest

Visit our Website and Blog!
Sign up for our Newsletter so you never miss a contest or giveaway!

instagram purple icon facebook icon purple pinterest purple icon twitter purple icon YouTube icon blog subscription purple icon