
Hi everyone, Christine here today with a tutorial for tags with Flowers and Hearts. Each month I meet up with some craft-loving friends and we exchange little gifts. I like to personalize my gifts with special tags and it is easily achievable with Scrapbook Adhesives by 3L®!
Making the Tag Bases
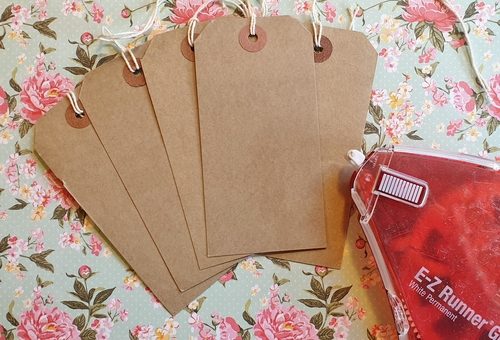
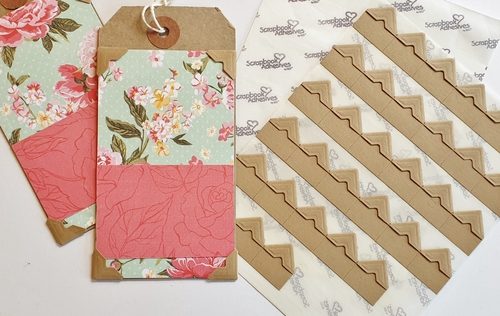
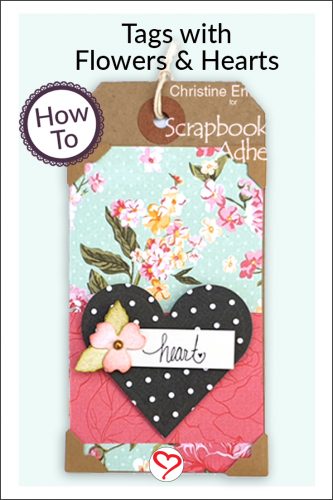
Select pretty patterned papers and kraft luggage tags. Cut the papers to size and affix into place with E-Z Runner® Grand Refillable Dispenser. These dispensers have 150 feet of long-lasting adhesive, and when it’s gone you can easily drop in a refill. There is a quick video to use them below.
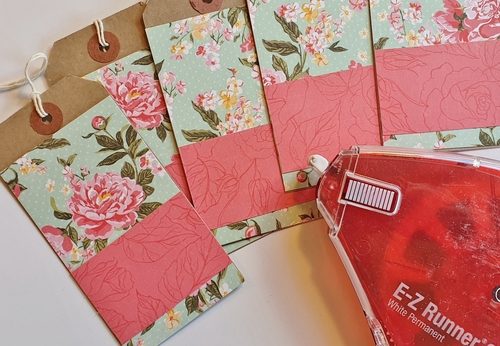
Determine your tag design. My tag layout is fairly simple. Next, cut pieces of patterned paper. I used the reverse of the floral paper. Position and affix to create a block across the bottom of each tag.
A perfect way to enhance your tags is to add Kraft Creative Photo Corners. These are self-adhesive and embossed. You’ll find them in a variety of colors including white, which you can ink to customize the color to your projects.
Embellish with Flowers and Hearts
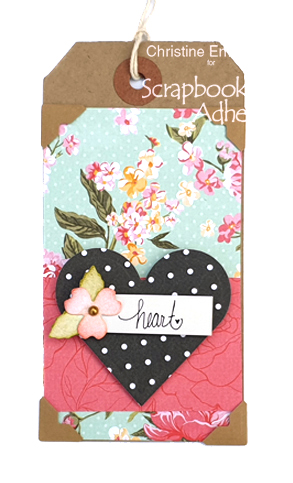
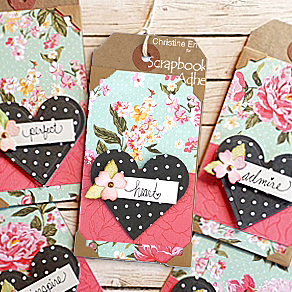
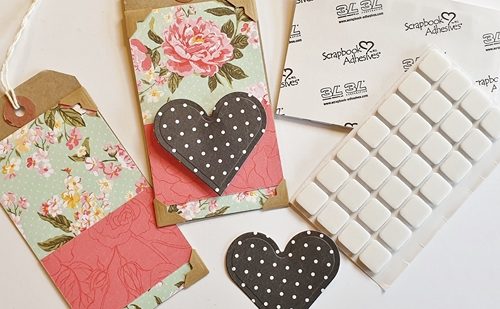
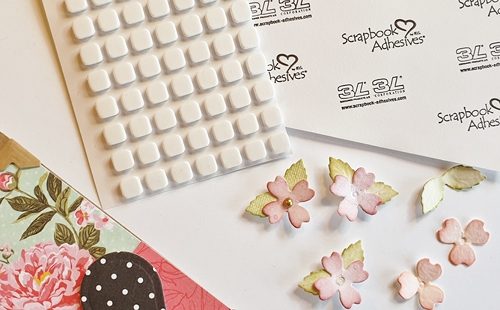
For the main design elements, I die-cut leaves, flowers and hearts. Start by adding the heart die cut as the base of the tag embellishments. You can use a combination of 3D Foam Squares White Mix in regular and small sizes to secure it to the base and give it a pop of dimension.
Make sure to ink the flowers and leaves to match the color scheme in the tags. Then begin layering the die cuts starting from the flowers and leaves. Don’t forget to add a pearl to each flower center.
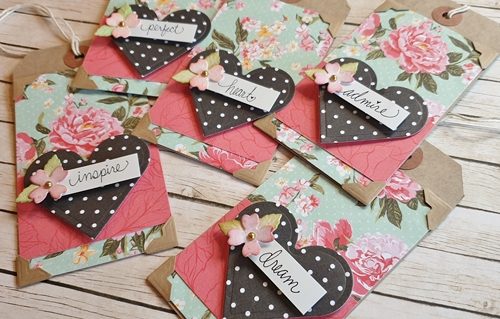
Here are the finished tags with some handwritten inspirational words, perfect for my craft loving friends.
Here’s a 60-second video showing how to use and refill your E-Z Runner Grand Dispenser:
Thanks for stopping by and don’t forget to check out the great products on the website.
Christine
Creative Time: 25 Minutes
Skill Level: Beginner
Materials Needed
Scrapbook Adhesives by 3L®
Other
Luggage Tags; White Card; Patterned Paper (Photo Play Paper Co.: Belle Fleur Collection); Etched Dies (Spellbinders Paper Arts: Classic Hearts, Swallow and Heart Flowers); Distress Inks; Printed Sentiment Stickers; Pearls
Love It. Pin It!
Visit our Website and Blog!
Sign up for our Newsletter so you never miss a contest or giveaway!


By Christine Collins August 20, 2019 - 2:20 am
Very pretty tags Christine, I love the sticky foam pads, the best quality that’s I’ve used.
Chris xx
By Margie August 20, 2019 - 4:11 am
Love these tags Christine, especially the photo corners and the handwritten sentiments. Thanks also for the link to the video on refilling the E-Z Runner Grand – it looks so easy, even I can do that! Margie xxx
By Jackie Durrant August 20, 2019 - 4:34 am
What a great little project Christine xx
By Sharon Brand August 20, 2019 - 6:51 am
These tags are really pretty!
By PATRICIA HOWARTH August 20, 2019 - 2:11 pm
Hi Christine, These tags are so pretty !! The grand E-Z runner and the foam pads are the best I have ever used.
Lots of love from Patricia xx
By Christine Keeble August 21, 2019 - 6:09 am
Hello Christine, Love these tags, a good way to use up lots of paper that’s too small for a card, and the photo corners add such a nice finishing touch, Thanks for sharing. .crafting hugs Christine x
By hazel young August 22, 2019 - 12:49 am
Beautiful tags Christine, love the use of the photo corners xx Hazel
By margaret driscoll August 22, 2019 - 8:39 am
These papers make the project so pretty Christine…Love all of it!
By Julia August 24, 2019 - 2:08 am
Really pretty tags, I never think to use photo corners, but they look great, I will have to give them a go
By Karenlotty August 24, 2019 - 2:53 am
Lovely project I will definitely have a play Just need to get some luggage labels!