
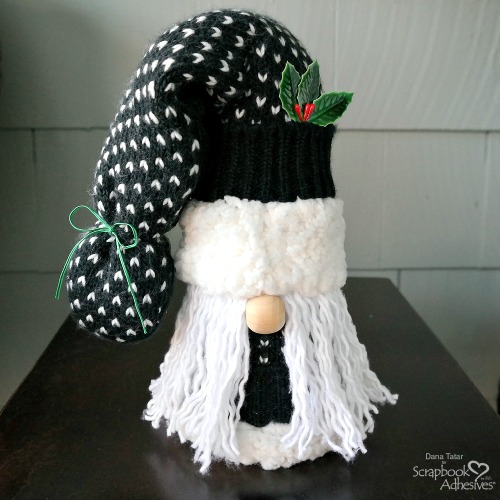
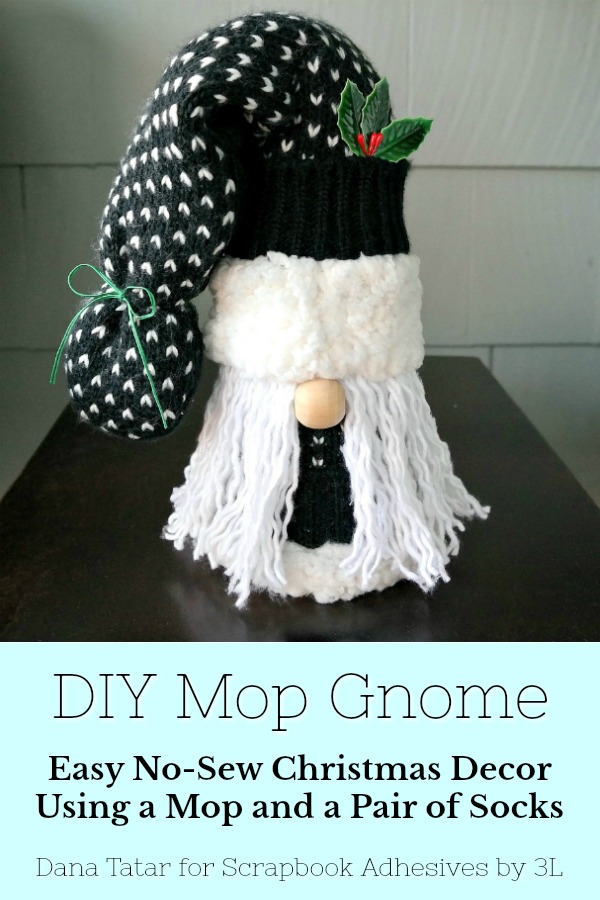
Hi friends! Dana here today sharing a fun holiday décor tutorial. Every home needs a gnome! I created this holiday gnome using a mop, a pair of slipper socks, and Extreme Double-Sided Tape. There is no sewing or hot tools necessary for this project, so it is perfect for crafters of all ages!
Mop Gnome Supplies
- 3.9 in x 8.8 in Foam Cone
- 1 Adult Pair of Slipper Socks
- Libman Tornado Mop Refill
- 1-inch Wood Bead
- Small Foam Ball, or Bell
- Holiday Ribbon
- Holly Stick Embellishment
- Felt
- Extreme Double-Sided Tape 1/2in.
- Adhesive Dots Large
- Adhesive Sheet 4 x 6in.
- Scissors
Gnome Assembly
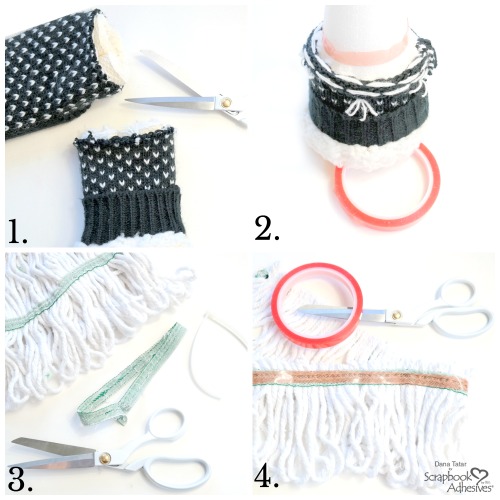
- 1. Use scissors to cut one slipper sock just above the heel. This portion of the sock will become the shirt for the gnome.
- 2. Pull the top portion of the slipper sock over a foam cone with the top fuzzy edge facing down. Apply a strip of 1/2 in Extreme Double-Sided Tape around the cone under the top edge of the sock. Remove the red liner and press the top edge of the sock onto the tape.
- 3. Use scissors to cut the zip tie and the bottom green ribbon from a Libman Tornado Mop Refill. Note: Any mop refill can be used for this project. The stitched portions of the Libman brand mop refill allowed me to quickly add a single strand of mop loops to this project. One Libman Tornado Mop Refill will make 4 gnome beards if using the same size cone.
- 4. Use scissors to cut just above the second green ribbon to remove the bottom portion of the mop refill from the rest of the mop. Once separated, cut the green ribbon where the stitched ends meet to make one long strip of stitched mop loops. Apply 1/2 in Extreme Double-Sided Tape onto the green ribbon.
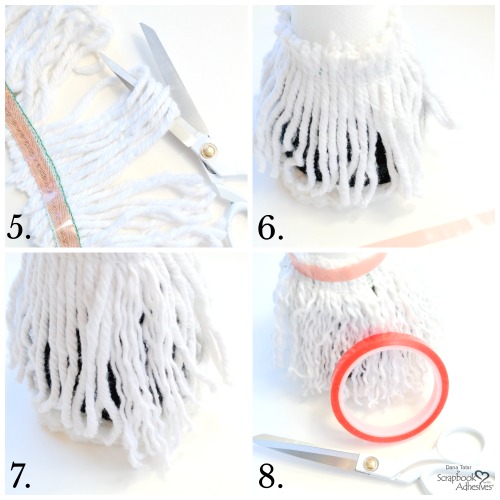
- 5. Use scissors to cut the loops of the mop into single strands.
- 6. Peel the red liner from the tape and press the length of mop around the cone, covering the top edge of the sock.
- 7. Separate the pieces of each mop strand to create a beard for the gnome.
- 8. Apply a strip of 1/2 in Extreme Double-Sided Tape around the top edge of the mop.
Finishing Touches
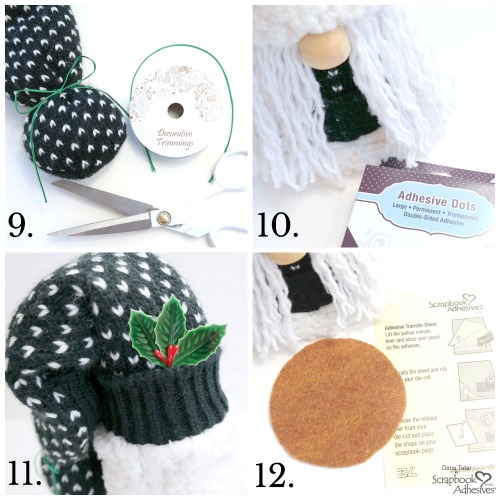
- 9. Insert a small foam ball, or bell, into the top portion of the second sock and tie a length of holiday ribbon around the bottom to hold the ball in place.
- 10. Remove the red liner from the tape applied to the cone in Step 8. Pull the second sock over the top of the cone and press the bottom edge onto the tape to secure it. Use a Large Adhesive Dot to attach a wood bead under the sock cuff. The wood bead is the gnome nose.
- 11. Place a Large Adhesive Dot onto the back of a holly stick. Tuck the holly stick into the cuff of the gnome hat and press to seal.
- 12. Cut a circle from felt to cover the bottom of the cone. Remove the yellow backing paper from a 4×6 in Adhesive Sheet. Align the felt onto the adhesive and press. Use scissors to cut the felt from the adhesive sheet. Remove the back liner and adhere to the bottom of the cone. This piece of felt will protect furniture surfaces from scratches.
Thanks for stopping by today! I hope I have inspired you to create your own holiday décor. Look for another fun décor project in my next post!
~Dana Tatar
Creative Time: 45 minutes
Skill Level: Beginner
Materials needed:
Scrapbook Adhesives by 3L®
Adhesive Sheets 4×6 Inch
Adhesive Dots Large
HomeHobby™ by 3L
Extreme Double-Sided Tape 1/2in
Other
Foam Cone: FloraCraft; Slipper Socks; Wood Bead: Darice; Holly Stick: Darice; Holiday Ribbon; Felt; Tornado Mop Refill: Libman
Pin It!
Visit our Website and Blog!
Sign up for our Newsletter so you never miss a contest or giveaway!


