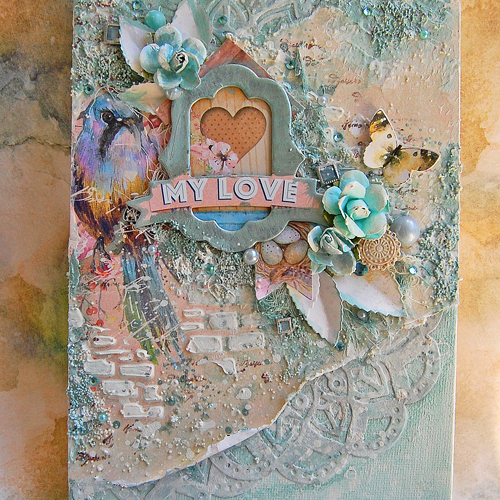
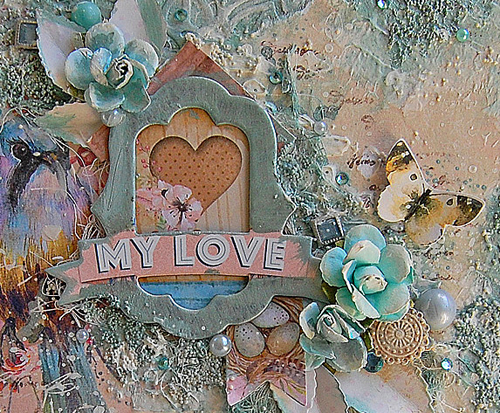
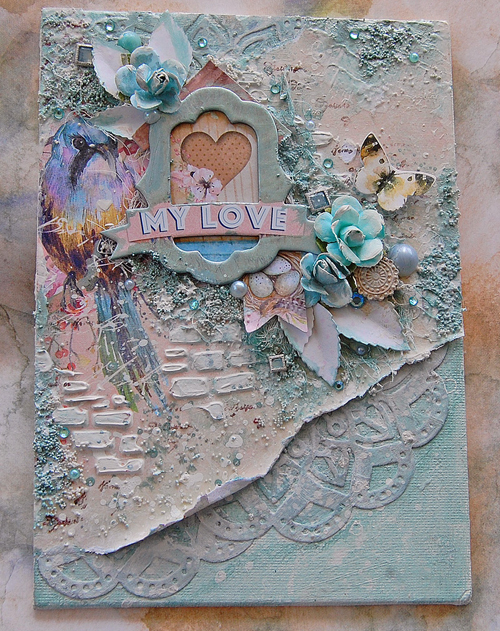
I’m sharing a mixed media canvas with you today. Hello, everyone, Marilyn here and I’d like to show you how I created this canvas with adhesives from wet, Dual Tip Glue Pen, to dry, Premium Double-Sided Tape, that are available at Scrapbook Adhesives by 3L®.
Creating my Mixed Media Canvas
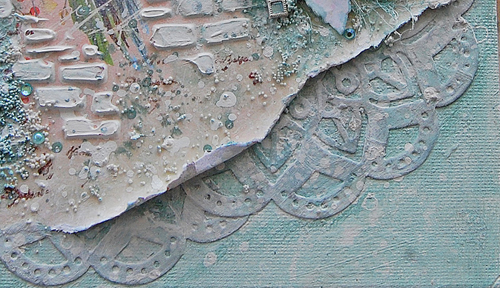
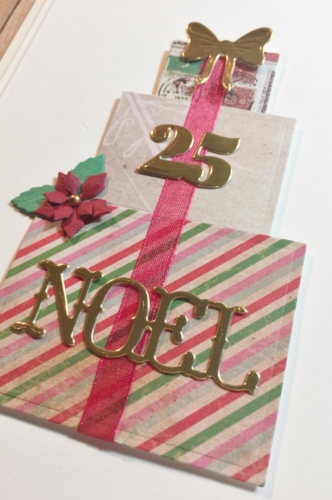
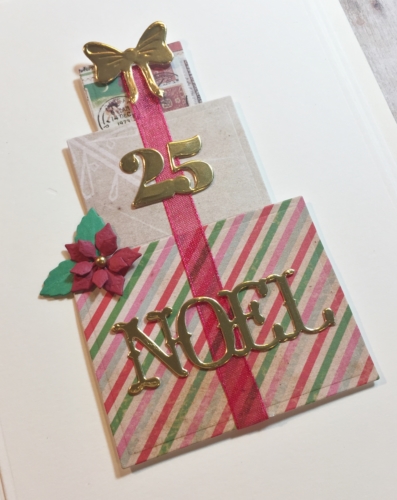
Start with paper doilies that I adhered onto the canvas with the Dual Tip Glue Pen. This creates instant textures on the background.
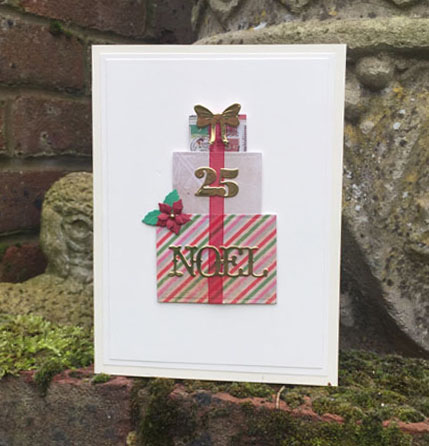
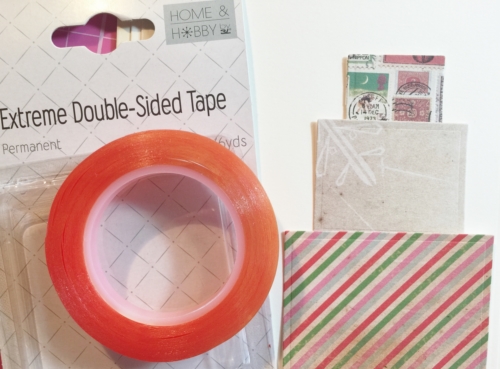
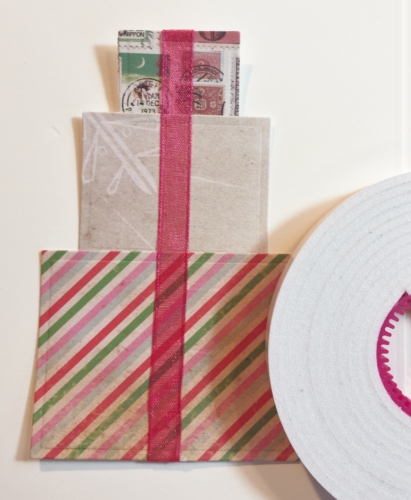
Next, die-cut three rectangles out of festive scrap paper to create gift boxes. Then run a strip of Extreme Double-Sided Tape 1/4″ Permanent down the front to affix ribbon in place.
On the back of my ‘gift tower,’ I attached Crafty Foam Tape and affixed it to my card front because I wanted interest and dimension.
Attach gold die cuts to each gift and add a mini poinsettia for a finishing touch.
Thanks for stopping by today and don’t forget to check out all the great products on the website.
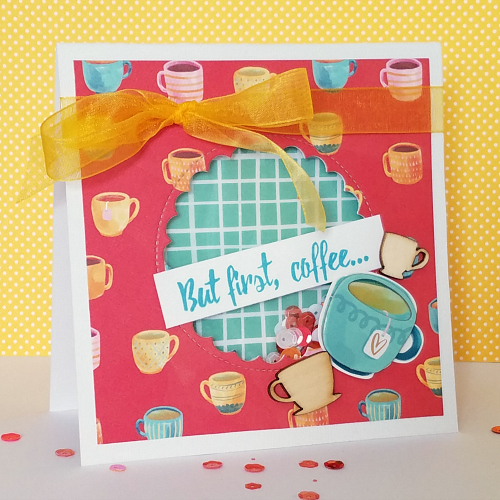
Who loves shaker cards?!? Who thinks they are kind of a challenge to make?!? I rarely even attempted them before I discovered a key ingredient to make the process easier: Keepsake Envelopes! Now I find myself regularly pulling out products to put together a Shaker Card, most notably accompanied by the Keepsake Envelopes. Christine joining you today and I am going to walk you thru how to make a Coffee Shaker Card featuring Keepsake Envelopes.
There are two main adhesive ingredients used for my card: the Keepsake Envelopes and the Crafty Foam Tape. The E-Z Runner® Grand also plays a small role. Additionally, I used a Lawn Fawn die (which you saw me use earlier in the week in this blog post) to create the shaker part of my card.
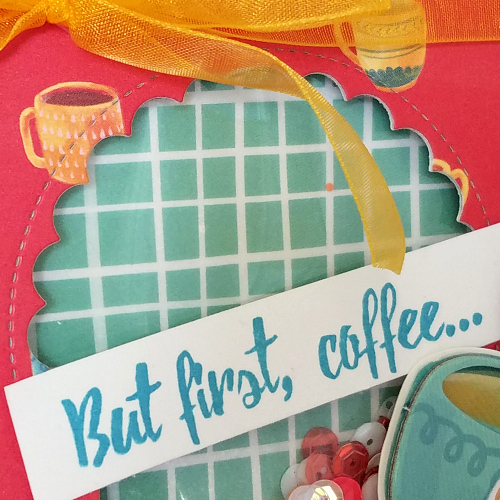
To begin I added the patterned paper to my card base using the E-Z Runner Grand. Next, I ran the card through my die cut machine to cut out the shaker area. After filling the Keepsake Envelope with sequins, I added some patterned paper behind it. The Keepsake Envelopes have adhesive on the back as a result, it is easy to attach them to anything!
Following that, I used Crafty Foam Tape to attach the whole envelope to my card – making sure to add the Crafty Foam Tape to both the outer edge of the envelope and around the opening for the shaker part of the card. Using Crafty Foam Tape allows the stuff inside the shaker to move around more, therefore 30 upping the fun level of the entire card! Finally, after I created this I realized it would have been fun to add some actual coffee into the shaker part…oh well, next time!
Walking through the process with a video tutorial.
Thanks for joining me today – hope your weekend is filled with lots of coffee! -Christine Meyer
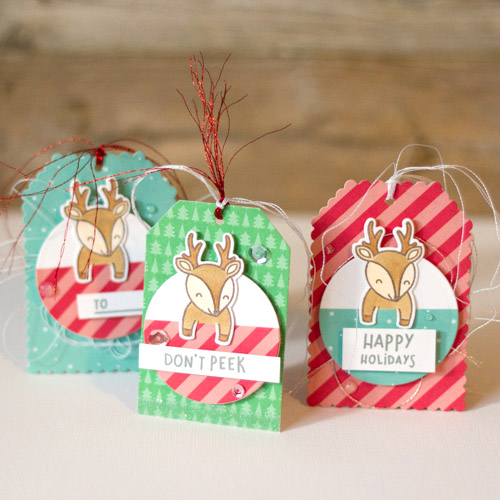
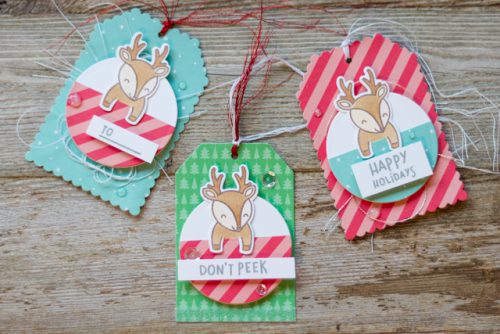
It’s never too early to start creating the perfect tag for all your gifts. I created this cute set of customized gift tags for the upcoming Christmas holiday! Who could resist this sweet reindeer face from the For you Deer Stamp Set?
Each tag is slightly different with varying embellishments to keep that personal touch! I popped up the circled embellishment with 3D Foam Squares for dimension, and added sequins secured by Adhesive Dots Micro and Adhesive Dots Mini. Which tag is your favorite?
Hello, crafty friends! Super excited to be hopping with Lawn Fawn today! I absolutely love this little get well set called, On the Mend. It was so cute, I made THREE cards using it!
The first card I did a bit of masking to get my soup bowl to look like it was in front of the Kleenex box. The images were colored using Copic markers. I kept the card fairly simple so I tucked a scalloped paper underneath the image and attached it to the black card using Crafty Foam Tape. For a final touch, I adhered several sequins to the card using Adhesive Dots Mini.
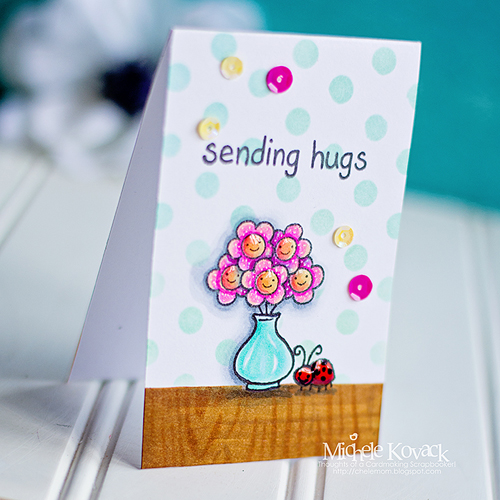
My next card is super simple and super fast! It’s a one layer card using the cute little vase and ladybug designs. First, stamp and mask both of them off so that a polka dot background can be added. Remove the masks and color them with Copic Markers. Add sequins using the Adhesive Dots Mini.
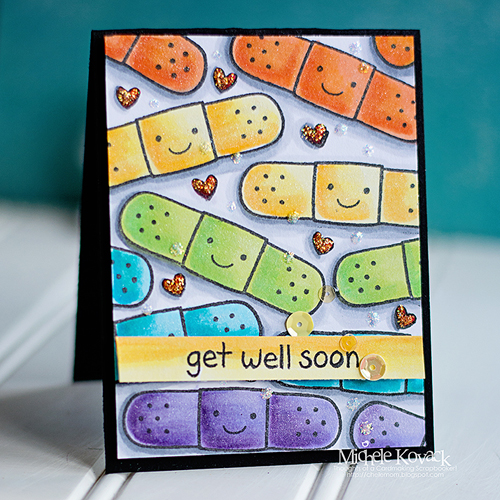
Last but not least, a rainbow Band-Aid card! Because who doesn’t love rainbows and Band-Aids? (I work with 9-year-olds and Band-Aids make EVERYTHING better! LOL!) Stamp the image repeatedly to fill the paper and color with Copic Markers. Adhere the card to the black cardstock using Crafty Foam Tape. Stamp the sentiment and pop it up using the Crafty Foam Tape. Once again, adhere the sequins using Adhesive Dots Mini. Find Michele’s Blog at Thoughts of a Cardmaking Scrapbooker.
Enter to win through the Rafflecopter App. Comments are monitored and will take time to publish. A winner will be randomly picked. International entries are welcome. a Rafflecopter giveaway
If you cannot see the comment section (at the bottom of this post), please click: Lawn Fawn Blog Hop and Giveaway – Day 5 and scroll down to the bottom of the post.
Our Blog Hop and Giveaway with Lawn Fawn is on Day 4! We have more fabulous projects created by both design teams. Join in on the fun. Read through to the end of the post to enter to win one of the giveaways!
Jana Maiwald-McCarthy’s Christmas Tags
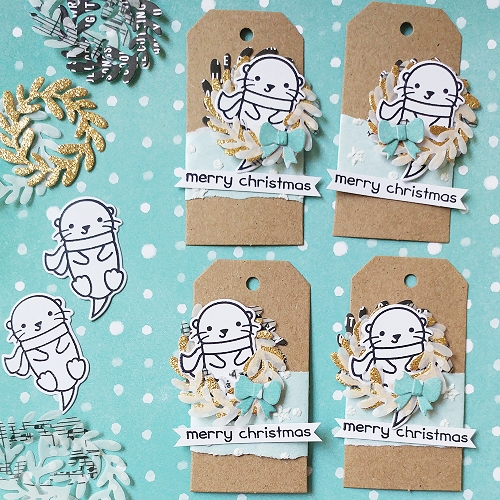
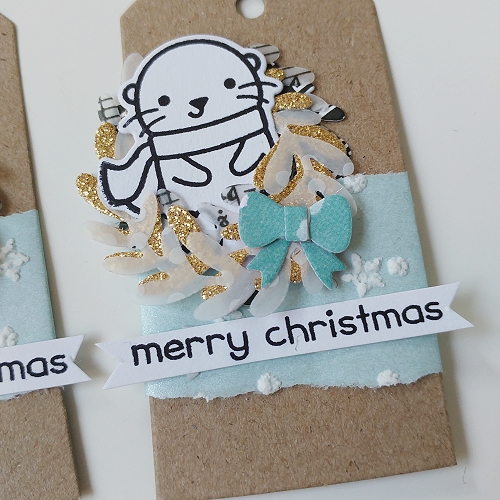
Christmas is a few weeks away and I am getting a head’s start on my gift wrapping. I love to decorate my presents. So when I saw these cute Winter Otter and its matching Winter Otter Lawn Cuts dies, I knew what to make – Christmas present tags!! Using Kraft cardstock tags and papers/vellum from my stash, I got right to work!
I die-cut many wreath shapes from Mini Wreath, using different kinds of paper (patterned, glitter and vellum) to make the wreath stand out. Each wreath will have four layers. To keep it simple, the otters are in black and white for a nice contrast to the craft cardstock tag!
Then, wrap a paper band around each tag and stamp “Merry Christmas” on a piece of white cardstock. To finish, cut the sentiment ends into little fishtail banner.
I can’t wait to add them to gifts! Visit my blog for the tutorial, click: Scissors, Glue and Paper!
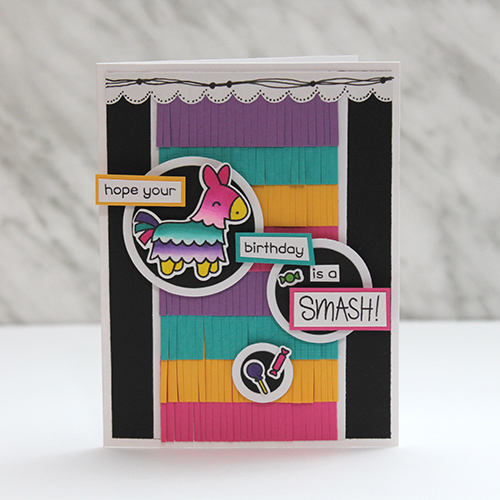
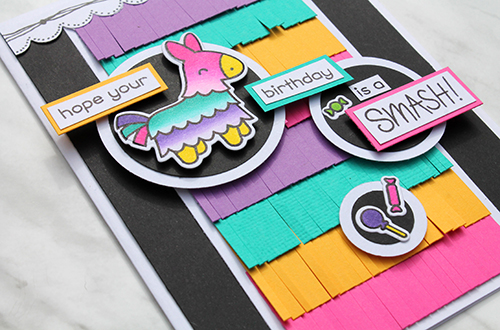
Hey guys, Tracy here and I am super excited to be crafting along on the blog hop. Lawn Fawn’s Year Seven Stamp Set and its matching dies, Year Seven Lawn Cuts caught my eye! Because how could you NOT love these super cute little images?!? Pair these with some of my favourite adhesives, E-Z Runner® Permanent Fine Adhesive and 3D Foam Squares…what do you get? The perfect little birthday card, that’s what!
After cutting rows of fringed background, I punched out circles to mat my cute little elements. Next, I secured the die cuts and punches in a combination of E-Z Runner® Permanent Fine Adhesive and 3D Foam Squares for dimension and fun.
For all of my project details, hop on over to my blog by clicking: Scrappy Chick Blog.
Enter to win through the Rafflecopter App. Comments are monitored and will take time to publish. A winner will be randomly picked. International entries are welcome. a Rafflecopter giveaway
If you cannot see the comment section (at the bottom of this post), please click: Lawn Fawn Blog Hop and Giveaway – Day 4 and scroll down to the bottom of the post.
Today is Day 3 of our Blog Hop and Giveaway with Lawn Fawn! Are you enjoying what you’ve seen so far? We have more to share from both design teams. Hop along with us and find how to enter to win our giveaways at the end of the post.
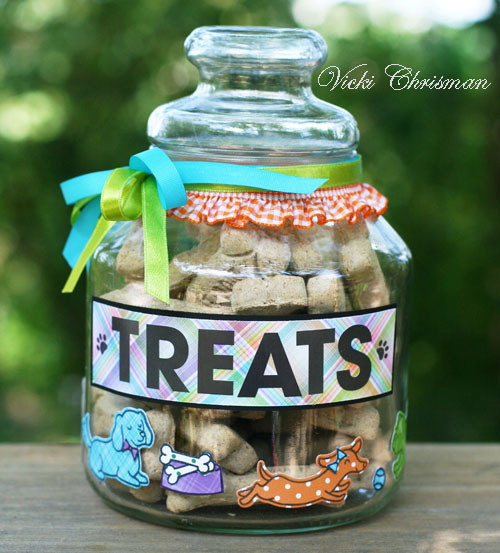
We have two very spoiled pooches. They get their share of treats, so I decided to make a fun treat jar for the counter.
Apply the Adhesive Sheets on the back of the stamped paper before die-cutting which covers your die cuts from edge to edge in a breeze! Simply peel off the back and it ready for placement. It’s great for my curved glass surface! There are so many cute pups in this set, I had to show you the ones on the back side too.
To finish off the Treat Jar with some trim and ribbons, Crafty Power Tape to holds them in place. Now I’ll have a cute jar for my counter and the pooches will certainly be happy too. Come find me at my blog, This Art that Makes Me Happy.
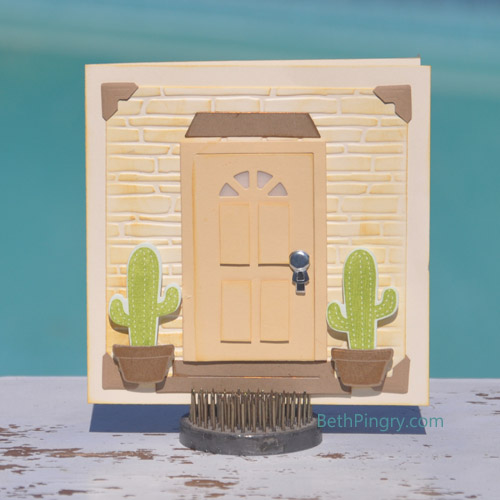
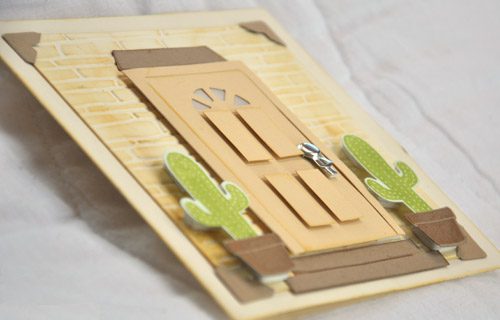
I fell in love with this Shut the Front Door die, what a great idea, and perfect for so many ocassions! The door opens if you want it to, but I adhered it shut for this card.
First I die cut the door twice, so I could fussy cut the panels. Edges were inked to give a little more definition, then adhered with Thin 3D Foam Squares. These are 1mm in height and give a little lift where you want it.
Next, I used Crafty Foam Tape behind the door, it’s on a roll and easy to cut the lengths I need.
For the potted cactus I doubled up 3D Foam Squares, so they actually sit higher than the door. Subtle shades of yellow with yellow ink mimic the colors in the desert.
Here in this photo you can see the different levels of each element and the fun you can have with 3D Foam Products!
Find Beth on her blog at Cookies for Breakfast
Enter to win through the Rafflecopter App. Comments are monitored and will take time to publish. A winner will be randomly picked. International entries are welcome. a Rafflecopter giveaway
If you cannot see the comment section (at the bottom of this post), please click: Lawn Fawn Blog Hop and Giveaway – Day 3 and scroll down to the bottom of the post.
We’re excited to be on Day 2 of the Blog Hop and Giveaway with Lawn Fawn! Learn and enjoy more inspiration and techniques from both design teams. Stick with us till the end of the post for the giveaway details!
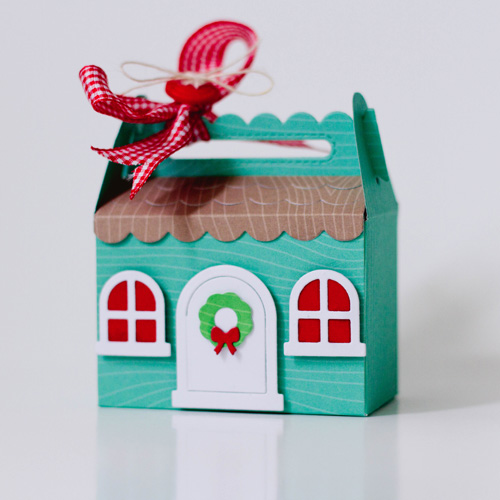
This is the perfect way to give someone a gift card, money, jewelry, candy or anything small! Making these, and putting them around the house would be a great way to decorate for the season as well. Adding some string and ribbon, this could easily turn into an ornament for a Christmas tree. The sky is the limit on ideas. Visit Latisha’s Blog: Designs by Latisha Yoast.
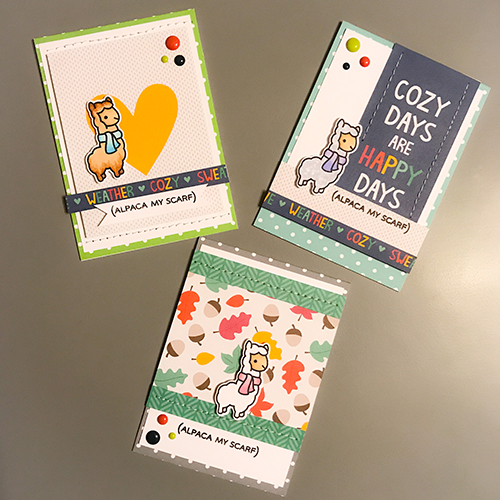
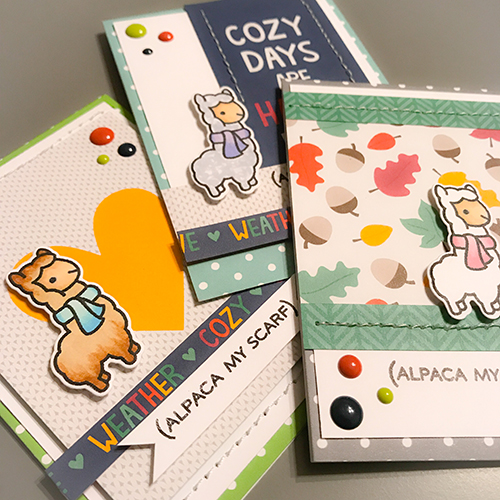
Lawn Fawn has some of the cutest critter stamps ever! This set that I’ve used today is no exception. I played with the Winter Alpaca Clear Stamp Set and the matching Winter Alpaca Lawn Cuts Set. The coordinating dies make cutting these images out, once colored, a breeze.
Enter to win through the Rafflecopter App. Comments are monitored and will take time to publish. A winner will be randomly picked. International entries are welcome. a Rafflecopter giveaway
If you cannot see the comment section (at the bottom of this post), please click: Lawn Fawn Blog Hop and Giveaway – Day 2 and scroll down to the bottom of the post.
Greetings and welcome to Day 1 of the Lawn Fawn Blog Hop and Giveaway with our wonderful friends at Lawn Fawn! We’re ready to share inspiration and tips from both design teams this week. Enjoy and don’t forget to enter to win, we have prizes! Read until the end of the post. Let’s start!
Christine Meyer’s Mum Flower Card
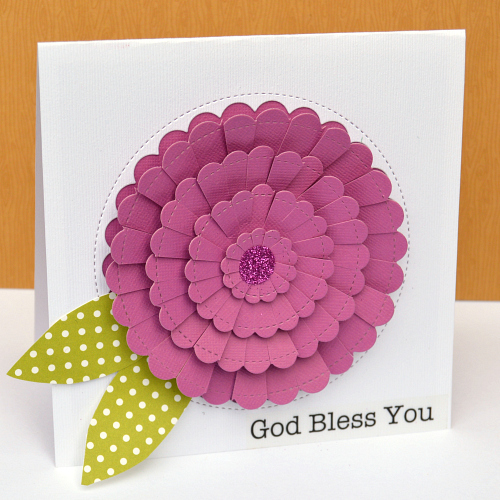
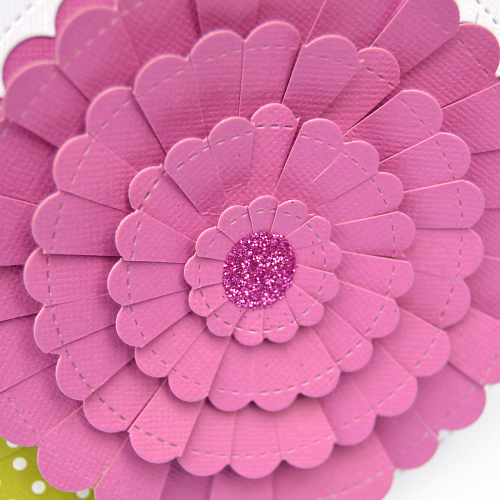
What flower do you think of first when you think of fall? For me, it’s mums! Christine joining you today to share this Mum Flower Card. I love mums and decided I would use the Outside In Stitched Scallop Circle Stackable Die from Lawn Fawn to create a dimensional and pretty centerpiece, the mum.
First, I die-cut out each size of the circles in a colorful cardstock and with my scissors, cut in between each scallop. Make sure not to cut very far down the center – we want to keep those petals! With a combination of 3D Foam Squares White Regular Size and 3D Foam Squares White Small Size, I layered in between each blossom to create additional dimension. Lastly, the flower’s center was embellished by pouring glitter on top of an Adhesive Dots Large and tap off excess well.
If you want to check out more details and a full video tutorial on how to make this flower, head on over to my blog post.
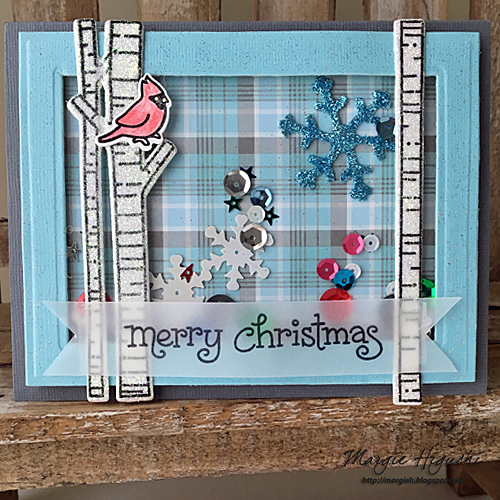
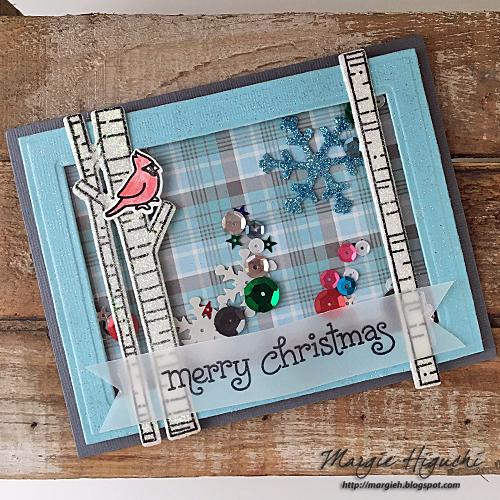
The Joy to the Woods Lawn Cuts tree shapes were die-cut with 3D Foam Creative Sheets, sprinkled the front with white glitter (don’t forget to remove the top liner) and then stamped with the matching stamp. Isn’t it beautiful?! Don’t need glitter paper! LOL! Stamp the cardinal with white cardstock and die-cut. Next, colored it with watercolor pencil.
For the shaker: on the inside top right corner, a 3D Foam Snowflake was sprinkled with blue glitter. In addition, a couple of the sequins were secured with Adhesive Dots Micro so that not all will fall down to the bottom. I assembled my shaker with Crafty Foam Tape White. Then layer in front, the glittered tree die cuts. Sentiment stamped on a strip of vellum that was hand cut and secured with E-Z Runner® Permanent Fine (perfect for vellum!).
If you cannot see the comment section (at the bottom of this post), please click: Lawn Fawn Blog Hop and Giveaway – Day 1 and scroll down to the bottom of the post.
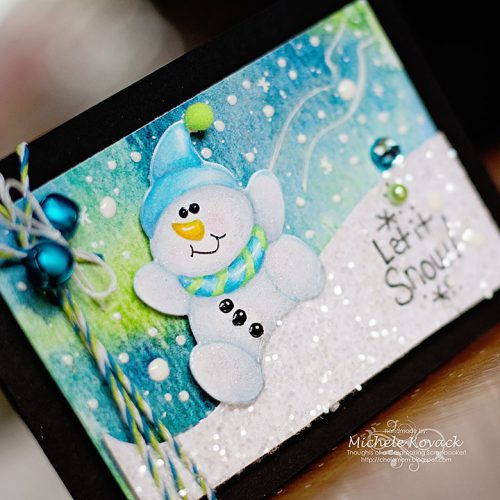
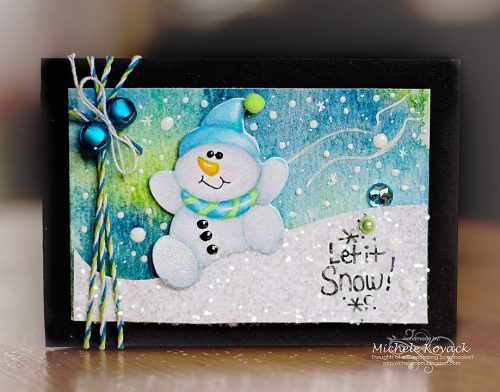
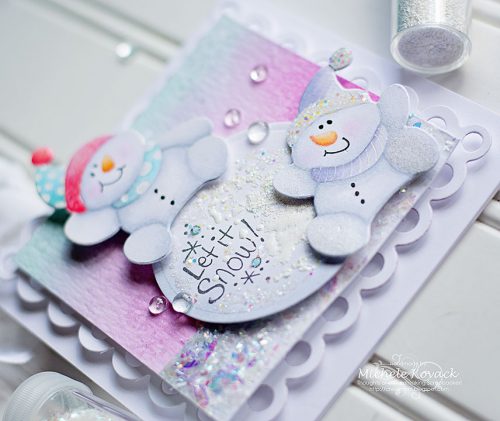
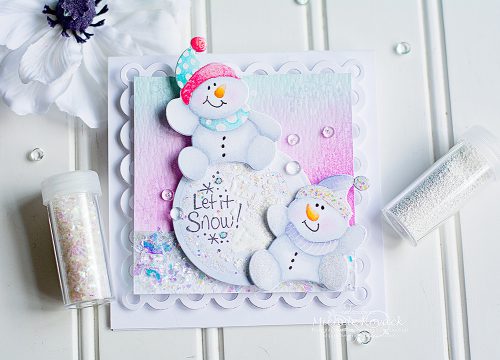
Good morning! Michele here with a couple of winter inspired cards! (As I am sweltering in this 90+ heat in Chicago!) I didn’t officially participate in the Stampendous blog hop a few days ago, but that doesn’t mean I can’t still love on their cute stamps called Snowmen Trio!
How to make the Snowmen Cards
I did a no-line coloring technique for both cards. They were stamped in a very pale blue, colored, and cut out with the coordinating dies. The background of this card was done using water colors and white paint splatters. I hand cut the hill, covered it with glue using the Dual Tip Glue Pen and then sprinkled it with glitter. Next, I adhered the hill and snowman with Crafty Foam Tape. For a final touch, I attached pearls and rhinestones with Dodz Adhesive Dots Mini.
I did a similar effect for this card, just changed the colors up a bit for a more frosty, cool look! Instead of a hill for this snowy guy to glide on, I chose a snowball. I used some of the glitter and embossing powders from Stampendous! called Frantage Encrusted Jewels! So much fun to just sprinkle and heat ’em up! I used more Crafty Foam Tape to pop up the snowmen and my snowball.
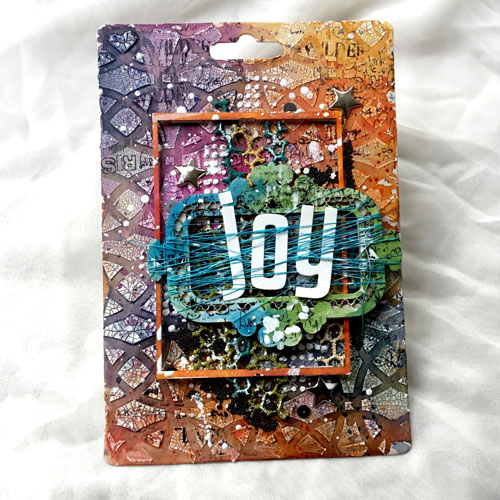
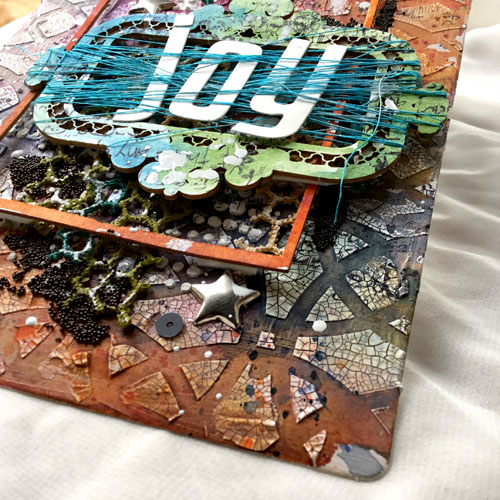
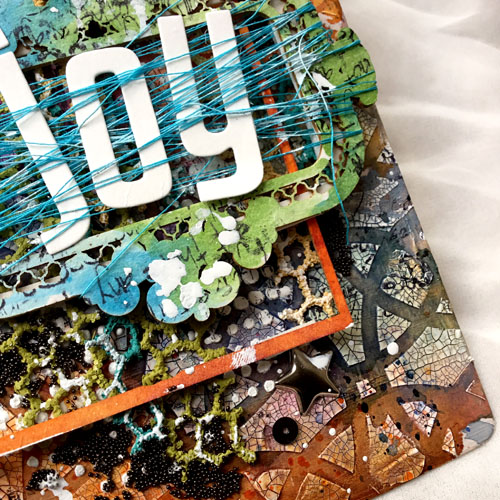
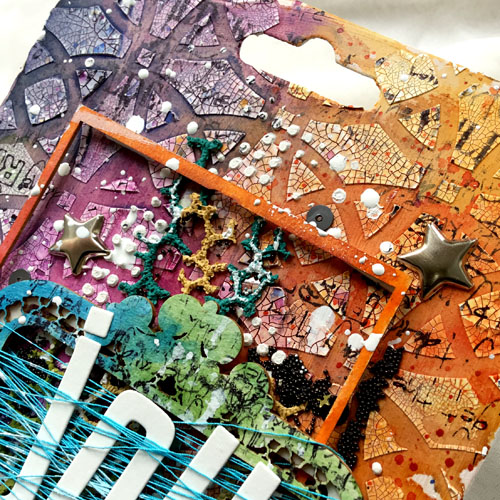
Creating art using recycled packaging is simpler than you think. It brings interest and dimension to your projects. Let me show how I created my recycled panel for my card today.
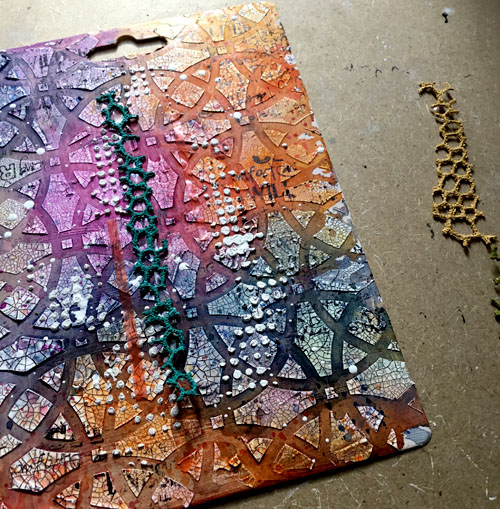
Create the recycled package background
Paint the chipboard package base with white chalk. Once dry, use a stencil with white crackle paste and let dry. Then color with watercolors. Next, stamp randomly with black archival ink and accent with some liquid gesso splashes.
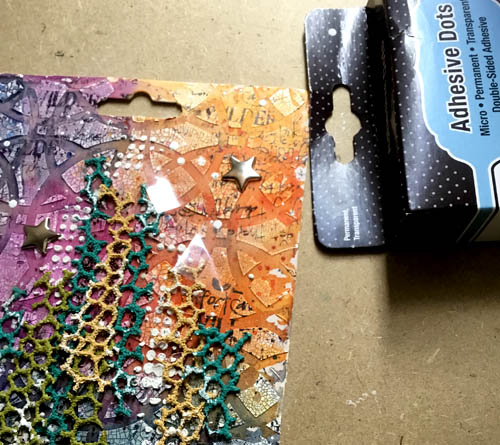
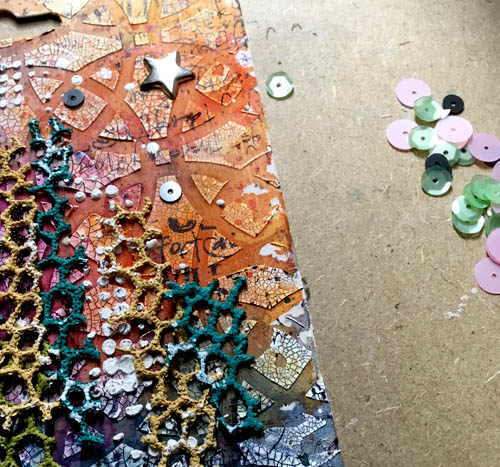
To embellish the top of my panel, add painted chipboards in the following ways:
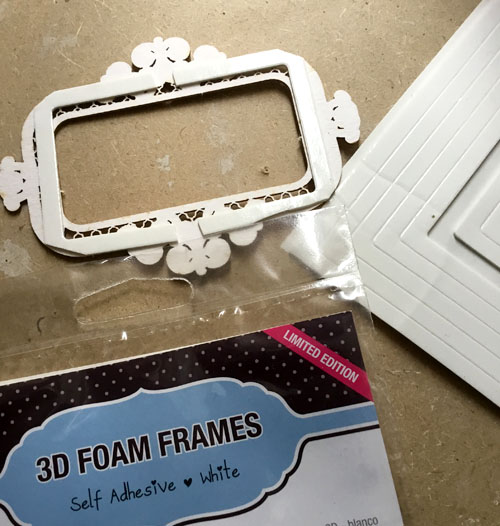
3D Foam Frame trimmed to fit the small but wide frame.
Add 3D Foam Squares cut to fit the large but thin rectangular frame.
Now for the details!
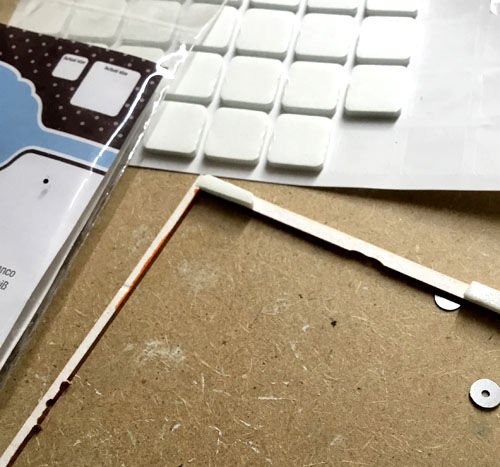
First, remove the liners from the 3D Foam Squares and adhere the larger frame on top of the panel. Remove liners from the smaller frame and wrap the thread around it.
Using the fine tip of the Dual Tip Glue Pen, apply the glue in back of the painted chipboard title and carefully place into the wrapped threads. While the title is drying, I used the Dual Tip Glue Pen to randomly attach the microbeads. The Glue Pen’s fine tip allowed me to be more precise with the placement. Lastly, adhere the small frame on top of the large frame. It’s done!
I hope you liked my recycled panel. This technique can be used not only on cards but on most any project that needs a little bit of interest. My suggestion is to…create, create, create!
Thank you for supporting my time as Guest Designer at Scrapbook Adhesives by 3L®! This is my last post with you. If you like what you see, please join me on my Instagram account by clicking: Sunnyflou Instagram.