You are in our US store • Switch to Europe store

Dotted Happy Thanksgiving Card

Hi, Jamie here with you today and I have a Dotted Happy Thanksgiving card that is perfect to send out to friends and family that can’t be with us for the holiday

Dotted Happy Thanksgiving Card by Jamie Martin for Scrapbook Adhesives by 3L

Create a Dotted Happy Thanksgiving Background

Stamp the sentiment with VersaMark ink and heat emboss with Lettuce Embossing Powder on a piece of white cardstock panel. Make the background by stamping with a dotted background stamp using Citrus ink. Then watercolor the little pumpkin with watercolor pencils using a touch of water since the paper is not watercolor paper.

Dotted Happy Thanksgiving Card by Jamie Martin for Scrapbook Adhesives by 3L

Assembling the Layers

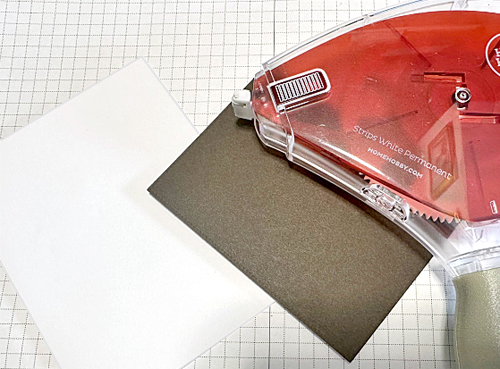
Secure the Dotted Happy Thanksgiving panel with a piece of wine color card using the E-Z Runner Grand Refillable Dispenser.

Dotted Happy Thanksgiving Card by Jamie Martin for Scrapbook Adhesives by 3L

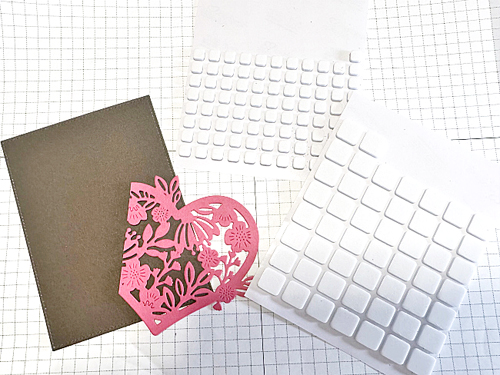
Place a circle die on the right edge of a patterned paper card panel to create an offset window. Next, add 3D Foam Strips on the back of the panel along the edges and around the circle.

Dotted Happy Thanksgiving Card by Jamie Martin for Scrapbook Adhesives by 3L

Pumpkins and leaves were die-cut from white cardstock and colored with orange and green inks.

Dotted Happy Thanksgiving Card by Jamie Martin for Scrapbook Adhesives by 3L

The Finishing Touches

Using circle dies, a circle frame was die-cut from wine cardstock and glued to the top of the circle opening with the Dual Tip Glue Pen. Add a strip of decorative paper to the bottom portion of the card. Use a combination of Dual Tip Glue Pen and 3D Foam Squares to give them differing heights. The Dotted Happy Thanksgiving Card is ready to be sent!

Dotted Happy Thanksgiving Card by Jamie Martin for Scrapbook Adhesives by 3L

Skill Level: Intermediate
Creative Time: 35 minutes

Materials Needed:
Scrapbook Adhesives by 3L®

E-Z Runner Grand Refillable Dispenser
3D Foam Strips
3D Foam Squares White Small

HomeHobby™ by 3L
Dual Tip Glue Pen

Plus
Rubbernecker Stamps – Stamps, Dies, Inks, Decorative Paper
PrintWorks Specialty Paper – Cardstock

Save to Pinterest!

Dotted Happy Thanksgiving Card by Jamie Martin for Scrapbook Adhesives by 3L Pinterest

Visit our Website and Blog!
Sign up for our Newsletter so you never miss a contest or giveaway!

instagram purple icon facebook icon purple pinterest purple icon twitter purple icon YouTube icon blog subscription purple icon

Themed Papers for a Masculine Birthday Card

Hello friends! I often like to challenge myself to use products in a little different way. Today’s masculine birthday card features papers from Photo Play’s “For the Love of Winter” Collection! The blue colors seem perfect for a guy’s card, so I chose papers that didn’t necessarily depict winter to make this card. I’m so happy with how it turned out!

Themed Papers for a Masculine Birthday Card by Judy Hayes for Scrapbook Adhesives by 3L

Masculine Birthday Card Base

To make this card, form a 4 x 6.5 inches card base from white cardstock. Cut a piece of wood-patterned paper to 4 x 6.5 inches. Secure it to the card front using E-Z Runner® Petite Permanent Dots Refillable Dispenser.

Themed Papers for a Masculine Birthday Card by Judy Hayes for Scrapbook Adhesives by 3L

Embellish the Band Accent

Cut a 1 x 7-inch strip of dark blue paper and roll the adhesive along both long edges with E-Z Runner® Petite Permanent Dots Refillable Dispenser. See the image on placement.

Themed Papers for a Masculine Birthday Card by Judy Hayes for Scrapbook Adhesives by 3L

Sprinkle Distress Glaze Uncharted Mariner over the adhesive, tap off the excess and melt with a heating tool. Trim long edges as needed so the glaze pattern is on the very edge.

Themed Papers for a Masculine Birthday Card by Judy Hayes for Scrapbook Adhesives by 3L

Cut a strip of stripe paper to about 0.5 x 7 inches and adhere to the glazed band using E-Z Runner® Petite Permanent Dots Refillable Dispenser.

Secure a piece of 0.75 x 7 inches strip of aqua music paper behind the layered and glazed band along the top edge with the E-Z Runner® Petite Permanent Dots Refillable Dispenser.

Cut “birthday”

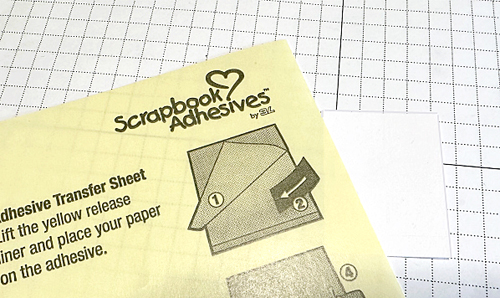
Trim a piece of dark blue paper and black cardstock large enough to cover a “birthday” die. Next, apply a sheet of Adhesive Sheets 4×6 inch to the back of the dark blue paper. Simply pull back the yellow liner, place the dark blue paper facing up on top of the adhesive, cover the liner back on top of the paper and rub the adhesive to transfer it to the paper. Remove the paper and adhere it to the black cardstock.

Themed Papers for a Masculine Birthday Card by Judy Hayes for Scrapbook Adhesives by 3L

View How to Use Adhesive Sheets Video

Place the “birthday” die on the dark blue paper side and run it through the die-cutting machine 2-3 times. Gently remove the die-cut word and set it aside.

Stamp Part of the Sentiment

Themed Papers for a Masculine Birthday Card by Judy Hayes for Scrapbook Adhesives by 3L

Stamp “Happy” with Medieval Blue ink on a piece of wood grain paper. Trim close around the word.

Assemble Masculine Birthday Card

Themed Papers for a Masculine Birthday Card by Judy Hayes for Scrapbook Adhesives by 3L

Use E-Z Runner® Petite Permanent Dots Refillable Dispenser to apply adhesive to the back of the band and adhere across the card front. Trim ends even with card edge.

Grab the dot and plaid banners from the collection’s ephemera pack. Use one of the banners as a template to cut a third banner from music paper. Arrange the banners and secure them to the card using E-Z Runner® Petite Permanent Dots Refillable Dispenser. Tuck the top of the banners under the band or trim to fit.

Themed Papers for a Masculine Birthday Card by Judy Hayes for Scrapbook Adhesives by 3L

Use E-Z Runner® Petite Permanent Dots Refillable Dispenser to fasten the “Happy” strip on the card.

Themed Papers for a Masculine Birthday Card by Judy Hayes for Scrapbook Adhesives by 3L

Squeeze a small amount of glue from Dual Tip Glue Pen onto a scrap of cardstock. Use a small brush to apply glue to the back of the “birthday” die cut. It’s not necessary to completely cover all of it with glue. Place on the card and press firmly in place.

Themed Papers for a Masculine Birthday Card by Judy Hayes for Scrapbook Adhesives by 3L

Tie a bow thread to each button and then place an Adhesive Dots Small on the back of each. Peel off the liners and press in place on the band.

Themed Papers for a Masculine Birthday Card by Judy Hayes for Scrapbook Adhesives by 3L

So what do you think of my Masculine Birthday Card? I challenge you to take a themed pack of papers and turned them into any occasion card creation.

Thanks for Visiting!
Judy Hayes

Creative Time: 40 mins
Skill Level: Intermediate

Materials Needed:
Scrapbook Adhesives by 3L®

Adhesive Dots Small

E-Z Runner® Petite Permanent Dots Refillable Dispenser

Adhesive Sheets 4×6 inch

HomeHobby™ by 3L

Dual Tip Glue Pen

Other

Buttons Galore and More (buttons), Hero Arts Stamps (Sending Love Mail), Imagine Crafts/Tsukineko Versafine Clair (Medieval Blue), PhotoPlay Paper Co. (For the Love of Winter Collection), Ranger Ink (Distress Glaze-Uncharted Mariner), Spellbinders Paper Arts (Yanna’s Layered Script Sentiment), Thread or Crochet Thread (Cream), Cardstock (White, Scrap of Black)

Save to Pinterest!

Themed Papers for a Masculine Birthday Card by Judy Hayes for Scrapbook Adhesives by 3L Pinterest

Visit our Website and Blog!
Sign up for our Newsletter so you never miss a contest or giveaway!

instagram purple icon facebook icon purple pinterest purple icon twitter purple icon YouTube icon blog subscription purple icon

Foiled Dots Grateful Card Tutorial

Hello crafty friends, Martha Lucia here with a fun and easy tutorial to create a Foiled Dots Grateful Card using Adhesive Dots Medium and Metallic Transfer Foil Sheets Nature Colors.

Foiled Dots Grateful Card Tutorial by Martha Lucia Gomez for Scrapbook Adhesives by 3L

The Wear Your Adhesive on the Outside technique used on this Grateful card is one of the simplest and most fun ways to use your adhesive beyond layers of paper.

Creating the Dots

Randomly place the Adhesive Dots Medium on a white smooth cardstock panel. Keep the liner on the dots to protect them until you get your desired look.

Foiled Dots Grateful Card Tutorial by Martha Lucia Gomez for Scrapbook Adhesives by 3L

Have you ever used our Adhesive Dots and Adhesive Lines products? They have a patented dispenser for easy application. View the How to Use Adhesive Dots video below to see how it works.

Next, remove the cover film over the Adhesive Dots that you wanted from the panel to cover them with a single color of Metallic Transfer Foil Sheets Nature Colors .

Foiled Dots Grateful Card Tutorial by Martha Lucia Gomez for Scrapbook Adhesives by 3L

I started with the Cooper Orange and then moved to the Brown and Gold.

Foiled Dots Grateful Card Tutorial by Martha Lucia Gomez for Scrapbook Adhesives by 3L

Creating the card

Once I was satisfied with the tones and position of the Adhesive Dots, I matted the foiled dotted piece with a cajun craze cardstock. I pasted both layer using theE-Z Runner Grand Permanent Strips. 

Foiled Dots Grateful Card Tutorial by Martha Lucia Gomez for Scrapbook Adhesives by 3L

To add a message or sentiment to my card, I decided to use a die cut sentiment in coordinating colors. First, I die cut the Grateful for You Die, twice onto white smooth and cajun craze cardstock.

Foiled Dots Grateful Card Tutorial by Martha Lucia Gomez for Scrapbook Adhesives by 3L

I created a card base using white smooth card stock. Additionally, I pasted both pieces in between created a little shadow using the Glue Pen Dual Tip. I also pasted the decorative layer over the card base using the same E-Z Runner Grand Permanent Strips. 

Foiled Dots Grateful Card Tutorial by Martha Lucia Gomez for Scrapbook Adhesives by 3L

To paste the sentiment over the card base I used the Glue Pen Dual Tip.

Foiled Dots Grateful Card Tutorial by Martha Lucia Gomez for Scrapbook Adhesives by 3L

Thanks for stopping by and don’t be afraid to experiment with the unlimited possibilities with your adhesives!
Martha Lucia

Creative Time: 45 minutes
Skill Level: Beginner

Materials Needed:
Scrapbook Adhesives by 3L®

E-Z Runner Permanent Fine Adhesive
Adhesive Dots Medium
Metallic Transfer Foil Sheets Nature Colors

HomeHobby™ by 3L
Dual Tip Glue Pen

Save to Pinterest!

Foiled Dots Grateful Card Tutorial by Martha Lucia Gomez for Scrapbook Adhesives by 3L Pinterest

Visit our Website and Blog!
Sign up for our Newsletter so you never miss a contest or giveaway!

instagram purple icon facebook icon purple pinterest purple icon twitter purple icon YouTube icon blog subscription purple icon

Pumpkins in Fall Layout

Hello friends!  It’s Shannon up on the blog today bringing you this cute Pumpkins fall-themed layout featuring all kinds of fall goodness!  I wanted to continue playing with the Metallic Transfer Foil sheets.  I had so much fun creating my title using the Foil Sheets and 3D Foam Sheets! 

Pumpkins in Fall Layout by Shannon Allor for Scrapbook Adhesives by 3L

Pumpkins Title

Start with using some dies from my stash to create a title.  I ran the foam sheets through my manual die cutting machine and then peeled the top layer from the letters.

Pumpkins in Fall Layout by Shannon Allor for Scrapbook Adhesives by 3L

Wear Your Adhesives on the Outside with Foil

Next, I applied a brown Foil Sheet to the adhesive.  LOVE how it came out!  Use the same foiling technique that I did with the title to the leaves. It ties in the embellishments to my title – love it!

With a bunch of scraps, I created the base of my layout. But first, ink the edges to give a bit of separation between all of the patterns.  Now it was time to mat my photo using my E-Z Runner Grand.  I love that it provides such a great hold yet I can pick up and move my pieces around if I do it quickly enough! 

Pumpkins in Fall Layout by Shannon Allor for Scrapbook Adhesives by 3L

Finishing Touches

Pop up a few embellishments with the 3D Foam Squares.  This creates both dimension and a bit of a shadow.

Pumpkins in Fall Layout by Shannon Allor for Scrapbook Adhesives by 3L

I love how quickly this Pumpkins fall layout came together!  I used some great adhesives and bits and pieces from my stash!

View Process Video

You can see my complete process here: https://youtu.be/TMvt39aQ9Vw

Happy crafting!
Shannon Allor

Creative Time: 45 mins.
Skill Level: Intermediate

Materials Needed:
Scrapbook Adhesives by 3L®

3D Foam Sheets

Metallic Transfer Foil Sheets Nature Colors

3D Foam Leaves

E-Z Runner® Grand Dispenser

Other: Patterned Paper and Stickers: Echo Park; Ink: Ranger Ink (Distress Oxide Inks); Flair: Scrappin’ Happy Studio; Cardstock: Bazzill Basic Papers

Save to Pinterest!

Pumpkins in Fall Layout by Shannon Allor for Scrapbook Adhesives by 3L Pinterest

Visit our Website and Blog!
Sign up for our Newsletter so you never miss a contest or giveaway!

instagram purple icon facebook icon purple pinterest purple icon twitter purple icon YouTube icon blog subscription purple icon

Cookie Jar Christmas Card

Hi, everyone! It’s hard to believe that Christmas will be here in two months! Teri here to get your holiday cardmaking juices flowing by showing you how to make a super sweet Cookie Jar Christmas Card!

Cookie Jar Christmas Card by Teri Anderson for Scrapbook Adhesives by 3L

Start by stamping a Christmas jar and some cookies to go in and outside of it. Color them in and die-cut them.

Cookie Jar Christmas Card by Teri Anderson for Scrapbook Adhesives by 3L

Place some of the cookies in the jar. Add some strips of Crafty Power Tape toward the bottom of the jar.

Cookie Jar Christmas Card by Teri Anderson for Scrapbook Adhesives by 3L

Apply fine glitter to the adhesive strips. Make sure it won’t come off by burnishing the glitter with a little bit of wax paper. Be sure to rub over the paper firmly with your hand.

Place a jar lid and label on the jar with 3D Foam Squares. Tie a little baker’s twine across the top of a jar. Use an Adhesive Dot to hold the twine in place. Set the jar and any other elements you want to put on your card aside.

Cookie Jar Christmas Card by Teri Anderson for Scrapbook Adhesives by 3L

Decorate the Card Front

Cut a panel of patterned paper to fit on a card. Add strips of adhesive across the top and bottom. Cover the strips with glitter.

Cookie Jar Christmas Card by Teri Anderson for Scrapbook Adhesives by 3L

Mount the patterned panel to your card. Add the cookie jar and your extra cookies to it. Complete the front of the card by adding a few foam hearts topped with glitter to it.

Cookie Jar Christmas Card by Teri Anderson for Scrapbook Adhesives by 3L

Add the Finishing Touches

Cut a piece of patterned paper to fit on the inside of the card. Flip it over and apply E-Z Runner® Permanent Strips on three sides to make a pocket to fit cash or a gift card.

Cookie Jar Christmas Card by Teri Anderson for Scrapbook Adhesives by 3L

Stamp a sentiment on the inside of the card. You could handwrite one instead if you’d prefer. Complete the card by slipping a gift card or cash in the pocket.

Cookie Jar Christmas Card by Teri Anderson for Scrapbook Adhesives by 3L

Thanks so much for stopping by today! I hope you are inspired to get going on your Christmas cards!

Happy creating!
Teri Anderson

Creative Time: 60 Minutes
Skill Level: Intermediate

Materials Needed
Scrapbook Adhesives by 3L®

Other
White Cardstock: Neenah Paper; Patterned Paper: Simple Stories (Sunkissed Collection); Stamp and Dies: Lawn Fawn (How You Bean? and How You Bean? Christmas Add-on Stamp and Die Sets); Glitter: Stampendous!; Twine: The Twinery; Ink: Ranger Ink; Markers Copic

Save to Pinterest!

Cookie Jar Christmas Card by Teri Anderson for Scrapbook Adhesives by 3L Pinterest

Visit our Website and Blog!
Sign up for our Newsletter so you never miss a contest or giveaway!

instagram purple icon facebook icon purple pinterest purple icon twitter purple icon YouTube icon blog subscription purple icon

Creepy Glitter Halloween Card

Hello crafty friends! It’s that spooky time of year, so I thought I would celebrate and share this Creepy Glitter Halloween Card with you. Here are all of the spooky details.

Creepy Glitter Halloween Card by Tracy McLennon for Scrapbook Adhesives by 3L

Firstly, I cut the cardstock layers for my card. The card front is white cardstock, then matted in black cardstock and a white cardstock base.

Creepy Glitter Halloween Card by Tracy McLennon for Scrapbook Adhesives by 3L

Using Distress Oxide Inks and a blending tool, create a simple blended background for the Creepy Glitter Halloween Card. Once blended, splatter the card front with water. Let dry.

Creepy Glitter Halloween Card by Tracy McLennon for Scrapbook Adhesives by 3L

Design the Creepy Glitter Border Card using the Dual Tip Glue Pen, creating a creepy drip-style border. Sprinkle the liquid adhesive with coordinating ultra-fine glitter.

Creepy Glitter Halloween Card by Tracy McLennon for Scrapbook Adhesives by 3L

Repeat the same Dual Tip Glue Pen border on the other side of the card. Let the liquid adhesive and glitter dry completely.

Creepy Glitter Halloween Card by Tracy McLennon for Scrapbook Adhesives by 3L

Adhere the card front to the black cardstock mat and the white cardstock card base using the E-Z Runner® Petite Permanent Dots Refillable Dispenser. Stamp the card sentiment onto the card front using black ink. Stamp the image onto white cardstock and add colour using Zig Clean Color Markers and a water brush. Fussy cut out the image and adhere to the Creepy Glitter Halloween Card using 3D Foam Squares White Mix.

Creepy Glitter Halloween Card by Tracy McLennon for Scrapbook Adhesives by 3L

Thanks so much for stopping by!
Tracy

Skill Level: 60 mins
Creative Time: Intermediate

Materials Needed:
Scrapbook Adhesives by 3L®

3D Foam Squares White Mix
E-Z Runner® Petite Permanent Dots Refillable Dispenser

HomeHobby™ by 3L
Dual Tip Glue Pen

Other:
Cardstock (Black, White); Ultra-fine Glitter; Zig Clean Color Markers; Waterbrush; Archival Ink- Jet Black; Distress Oxide Ink (Faded Jeans, Wilted Violet, Spiced Marmalade, Black Soot, Twisted Citron, Lucky Clover); Water Mister

Save to Pinterest!

Creepy Glitter Halloween Card by Tracy McLennon for Scrapbook Adhesives by 3L Pinterest

Visit our Website and Blog!
Sign up for our Newsletter so you never miss a contest or giveaway!

instagram purple icon facebook icon purple pinterest purple icon twitter purple icon YouTube icon blog subscription purple icon

Fall in Love with Fall Cards

Hi, Connie here with a couple of fall-themed cards, using the Adhesive Sheets and the Metallic Foil Transfer Sheets, to make a unique mixed media style background for the cards.

Fall in Love with Fall Cards by Connie Mercer for Scrapbook Adhesives by 3L

To start this project you will need to get a large stencil, ink, Adhesive Sheets 4 x 6in., Metallic Foil Transfer Sheets in Nature Colors, and white cardstock.

Fall Card Panel Background

Fall in Love with Fall Cards by Connie Mercer for Scrapbook Adhesives by 3L
  • 1. Stencil the pattern onto the white cardstock using brown ink. Dab the Adhesive Sheets 4 x 6in. in random spots on the card panel. Then cut the Bronze Foil sheet from the Metallic Foil Transfer Sheets in Nature Colors into 2″ squares. Crinkle the foil squares to distress them and apply it on top of the exposed adhesive spots (color side up) with a rounded end of a bone folder. Peel off and you’ll see a wonderful look! If there are any sticky spots, simply reapply the foil.
    2. Die-cut the leaves and distress them using Distress Oxide ink or watercolors.
    3. Add stamps to the card background for a trendy mixed media look.

Assembling the Cards

Fall in Love with Fall Cards by Connie Mercer for Scrapbook Adhesives by 3L

The buttons are attached using the Adhesive Dots Medium to the leaves. The sentiment word strips are added to the card front. Use black acrylic to speckle the finished card.

Skill Level: 60 mins.
Creative Time: Intermediate

Materials Needed:
Scrapbook Adhesives by 3L®

E-Z Runner® Grand Refillable Dispenser
Adhesive Sheets 4 x 6in.
Metallic Foil Transfer Sheets in Nature Colors
3D Foam Strips
Crafty Foam Tape 108′
3D Foam White Circles Mix
Adhesive Dots Medium

HomeHobby™ by 3L
Premium Double-Sided Tape 1/2″

Other: Stamps: Darkroom Door; Stencil: Darkroom Door; Craft Dies: AJVD; Ink: Ranger Ink (Distress Oxide in Walnut Stain, Rustic Wilderness, Rusty Hinge and Aged Mahogany); White, Kraft and Black Cardstock; Bone Folder; Acrylic Black Paint; Buttons: Buttons Galore & More, Stickers: Tim Holtz: Small Talk

Save to Pinterest!

Fall in Love with Fall Cards by Connie Mercer for Scrapbook Adhesives by 3L Pinterest

Visit our Website and Blog!
Sign up for our Newsletter so you never miss a contest or giveaway!
instagram purple icon facebook icon purple pinterest purple icon twitter purple icon YouTube icon blog subscription purple icon

Textured Fall in Love Card

Hi everyone, Yvonne here with a Textured Fall In Love Card. I love how the texture of the silk leaves creates a stunning effect on this card front!

Textured Fall in Love Card by Yvonne van de Grjip for Scrapbook Adhesives by 3L

This card is all about adding texture and by using 3D Foam Strips Black you can create extra texture through an uplifting effect for the sentiment on the Fall in Love Card. The great thing about this card is that it’s super easy to make…who would have thought that! Shall we get crafty?

Making the Textured Fall Card Front

Start by making the fall leaves with an embossing punch set. I punched lots of leaves from different shades of fall colors cardstock.

Don’t panic if you don’t have such a punch set…no problem…simply use mulberry leaves which you color using chalk inkpads or paint.

Making the Top Card Panel and Card Base

Simply adhere all the leaves onto a kraft card panel using Adhesive Dots.

Textured Fall in Love Card by Yvonne van de Grjip for Scrapbook Adhesives by 3L

Then carefully cut off the leaf- parts that stick out. Next adhere the leaf-card panel onto an orange card panel and then onto a kraft card base.

Textured Fall in Love Card by Yvonne van de Grjip for Scrapbook Adhesives by 3L

To adhere the panels, I used the E-Z Runner® Grand Refillable Dispenser.

Embellishing the Card

First, stamp the letters FALL onto black cardstock using an embossing ink pad. Then sprinkle white embossing powder upon and tap off any excess embossing powder. Now use a heat tool to melt the embossing powder. Next fuzzy cut the letters.

Textured Fall in Love Card by Yvonne van de Grjip for Scrapbook Adhesives by 3L

For adhering FALL onto the card I used 3D Foam Strips Black.

Then adhere a text strip sticker “in love” onto a kraft banner and adhere the banner onto the card using 3D Foam Strips Black.

And voilá, your Fall in Love card is ready. Easy to create, isn’t it? Wishing you happy crafting!

Yvonne van de Grijp

Textured Fall in Love Card by Yvonne van de Grjip for Scrapbook Adhesives by 3L

Creative Time: 45 minutes

Skill Level: Intermediate

Materials needed:

Scrapbook Adhesives by 3L®

E-Z Runner® Grand Refillable Dispenser

Adhesive Dots Medium Ultra Thin

3D Foam Strips Black

Other

Cardstock (Kraft, Orange, Burgundy, Soft Green, Dark Green, Yellow, Brown)); Alphabet Stamp Set (Marianne Design: Eline’s Alphabet); Dymo; Punch set (Nellie Snellen: Jumbo Floral Punch set: Rose Leaf); Tweezers;  Scissors; Paper Trimmer

Save to Pinterest!

Textured Fall in Love Card by Yvonne van de Grjip for Scrapbook Adhesives by 3L Long Pin

Visit our Website and Blog!
Sign up for our Newsletter so you never miss a contest or giveaway!
instagram purple icon facebook icon purple pinterest purple icon twitter purple icon YouTube icon blog subscription purple icon

Metal Christmas Tags

Hi, Jamie here with you today and I have a couple of Metal Christmas Tags. They are perfect to add to wrapped gifts or gift bags. Plus they are sturdy enough to be used year after year!

Metal Christmas Tags by Jamie Martin for Scrapbook Adhesives by 3L

Metal Christmas Tags Background

Apply several strips of the E-Z Runner Grand across the bottom portion of the metal tag.

Metal Christmas Tags by Jamie Martin for Scrapbook Adhesives by 3L

Place a piece of decorative paper on top of the tape, turn the tag over, and trim off the excess paper.  Next, add a strip of Extreme Double-Sided Tape 1/4″ along the edge of the decorative paper, and then cover a strip of decorative paper on top of the adhesive strip.

Metal Christmas Tags by Jamie Martin for Scrapbook Adhesives by 3L

The Sentiments

Die-cut Merry from decorative paper and the shadow of the Merry from kraft cardstock.

Metal Christmas Tags by Jamie Martin for Scrapbook Adhesives by 3L

Glue the two together using the Dual Tip Glue Pen.

Metal Christmas Tags by Jamie Martin for Scrapbook Adhesives by 3L

Turn the piece over and place 3D Foam Squares Micro Black on the back. Set aside.

Metal Christmas Tags by Jamie Martin for Scrapbook Adhesives by 3L

Accents for the Metal Christmas Tags

Die-cut snowflakes from white glitter paper and kraft paper, and glue the glitter snowflakes on top of the kraft snowflakes with the Dual Tip Glue Pen. Off set it so the kraft paper can be seen.

Metal Christmas Tags by Jamie Martin for Scrapbook Adhesives by 3L

Glue the snowflakes to the metal portion of the tag and pop up the Merry on top of the snowflakes.  Stamp Christmas on white glitter paper, layer onto kraft paper, and then glue down on the decorative paper diagonally.  To finish, add a gold glitter enamel dot.

Metal Christmas Tags by Jamie Martin for Scrapbook Adhesives by 3L

Skill Level: Intermediate
Creative Time: 35 minutes

Materials Needed:
Scrapbook Adhesives by 3L®

E-Z Runner Grand 
3D Foam Squares Micro Black

HomeHobby™ by 3L
Dual Tip Glue PenPlus
Extreme Double-Sided Tape 1/4″

Other Rubbernecker Stamps – Dies, Decorative Paper & Stamps; Metal Tag

Save to Pinterest!

Metal Christmas Tags by Jamie Martin for Scrapbook Adhesives by 3L Pinterest

Visit our Website and Blog!
Sign up for our Newsletter so you never miss a contest or giveaway!
instagram purple icon facebook icon purple pinterest purple icon twitter purple icon YouTube icon blog subscription purple icon

Summer Celebration Scrapbook Page

Do you have summer memories to document? I created a fairly simple and clean summer celebration scrapbook page to record my summer {milestone} birthday with fellow milestone babes! Let me show you how I created this style of layout.

Summer Celebration Scrapbook Page by Margie Higuchi for Scrapbook Adhesives by 3L

Summer Celebration Page Base

Distress the edges of an 11 x 11-inch square cream cardstock. Then adhere to a 12 x 12-inch patterned paper with the E-Z Runner® Grand Permanent Strips Dispenser. For kicks, I tore and split a small area on the top left corner of the cream cardstock.

Cut about eight strips of 2 x 10-inch patterned paper and distress the edges on all. It’s a great way to use up scraps! Next, die-cut a 7.25-inch circle from cream cardstock. Varying the width of the strips, place them on top of the circle with the E-Z Runner® Grand Permanent Strips Dispenser. Designer’s Tip: I cut the width between 1 to 2-inches and shift them at an angle for interest. Trim the edges to form the circle.

Summer Celebration Scrapbook Page by Margie Higuchi for Scrapbook Adhesives by 3L

Secure the layered circle shape and the vertical picture with the E-Z Runner® Grand Permanent Strips Dispenser.

Summer Celebration Scrapbook Page by Margie Higuchi for Scrapbook Adhesives by 3L

Embellish the Page

For a dimensional accent, I used two die-cut butterfly shapes and secured them with Adhesive Lines along their bodies so that I can lift the wings up.

Summer Celebration Scrapbook Page by Margie Higuchi for Scrapbook Adhesives by 3L

With the leftover strip of patterned paper, I created a ribbon tail banner and matted it with a Summer Celebration sentiment on a cream cardstock strip with the E-Z Runner® Grand Permanent Strips Dispenser. Using the same adhesive, place the sentiment below the picture.

Summer Celebration Scrapbook Page by Margie Higuchi for Scrapbook Adhesives by 3L

From the ephemera pack, I clustered a few die-cut shapes together and popped it up with a leftover piece from the 3D Foam Creative Sheet. Place over the bottom right corner of the picture.

Summer Celebration Scrapbook Page by Margie Higuchi for Scrapbook Adhesives by 3L

Wear Your Adhesive on the Outside with Foil

Now the fun part, foiling with adhesives! For my Wear Your Adhesive technique, I am adding foil to the flower centers on the cluster and making faux sequins (vs. sequins) around the layout. Using the small foam circles from the 3D Foam Circles in Black, I centered them on three flowers. Foil them with the yellow and green foil sheets from the Metallic Transfer Foil Sheets in Pastel Colors.

Summer Celebration Scrapbook Page by Margie Higuchi for Scrapbook Adhesives by 3L

Take the top liner off (one at a time), cover the foil sheet (color side UP) over the exposed adhesive, rub with your fingertips to transfer the color, and peel off the foil. If there are missed areas, simply reapply the foil. Repeat with the rest of the centers.

Summer Celebration Scrapbook Page by Margie Higuchi for Scrapbook Adhesives by 3L

Accent the layout with a combination of small and regular circles from the 3D Foam Circles in Black in place of sequins. Use the foiling steps as mentioned to give them sparkle and dimension! I used all the foil colors in the Metallic Transfer Foil Sheets in Pastel Colors.

Summer Celebration Scrapbook Page by Margie Higuchi for Scrapbook Adhesives by 3L

I hope you enjoyed my Summer Celebration scrapbook layout process. What will you document for the summer? Share in the comments below!

Thanks for stopping in!
Margie Higuchi

Creative Time: 40 minutes
Skill Level: Intermediate

Material Needed
Scrapbook Adhesives by 3L®

E-Z Runner® Grand Permanent Strips
3D Foam Circles in Black Mix
Adhesive Lines
3D Foam Creative Sheets Small
Metallic Transfer Foil Sheets in Pastel Colors

Other
Patterned Papers and Ephemera Pack: Kraft n Creativity; Cream Cardstock

Save to Pinterest!

Summer Celebration Scrapbook Page by Margie Higuchi for Scrapbook Adhesives by 3L Pinterest

Visit our Website and Blog!
Sign up for our Newsletter so you never miss a contest or giveaway!
instagram purple icon facebook icon purple pinterest purple icon twitter purple icon YouTube icon blog subscription purple icon