You are in our US store • Switch to Europe store

Simple Sunny Card

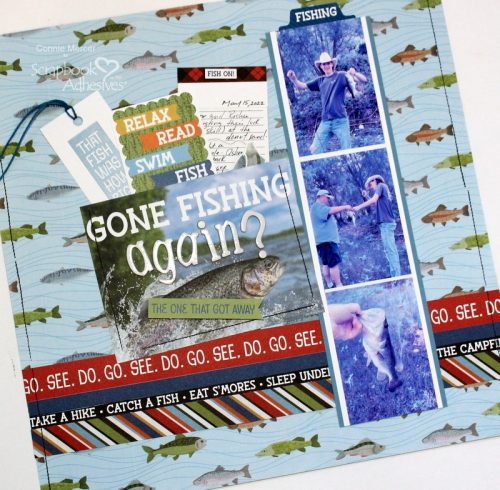
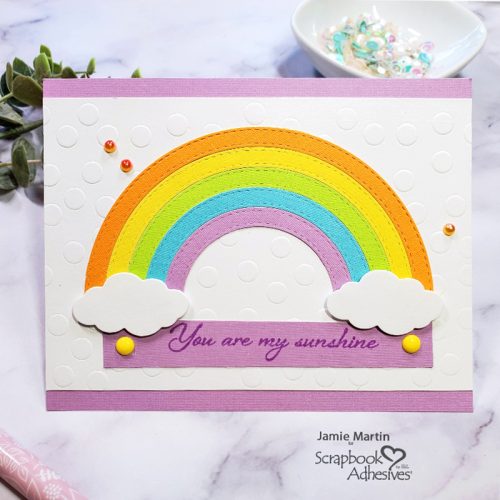
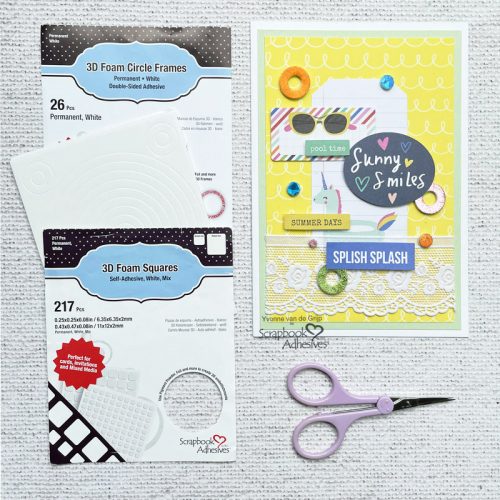
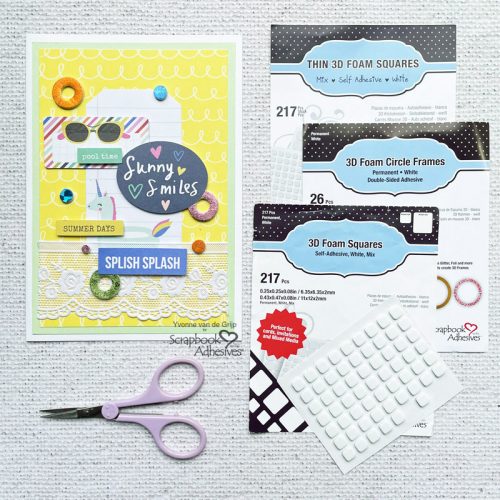
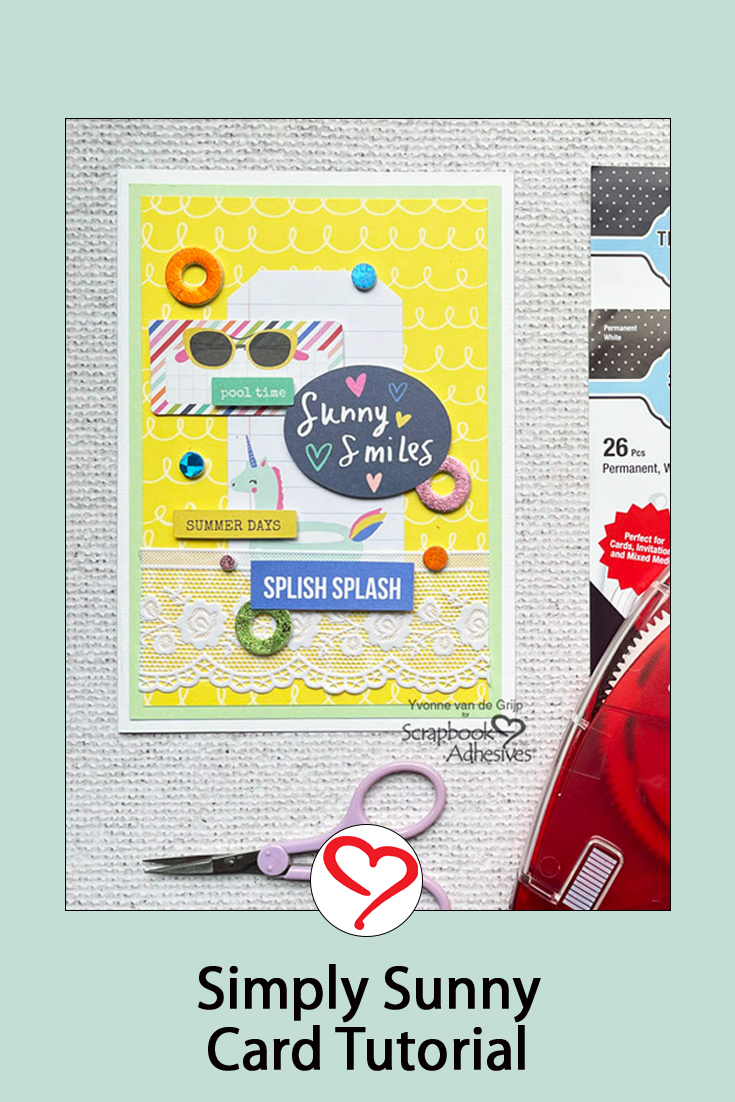
Hi everyone, Yvonne here with a simple Sunny card. This card is very easy to make which makes this also suitable for beginner cardmakers!

Simply Sunny Card by Yvonne van de Grijp for Scrapbook Adhesives by 3L

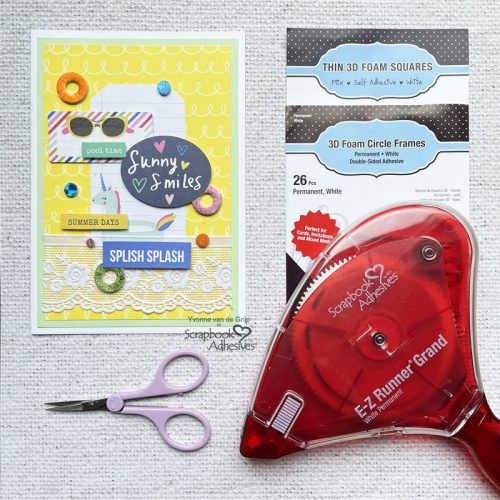
Just some simple layering using ready die-cuts and a technique called Wear Your Adhesive on the Outside will create this fun summer card! Shall we get started?

Making the Top Card Panel

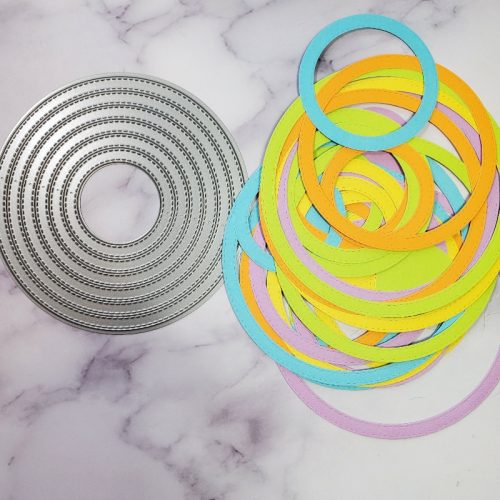
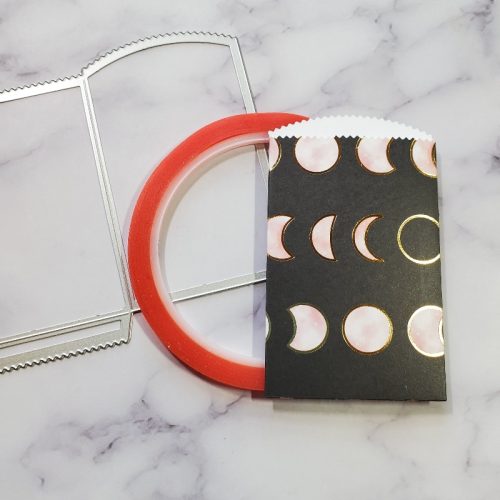
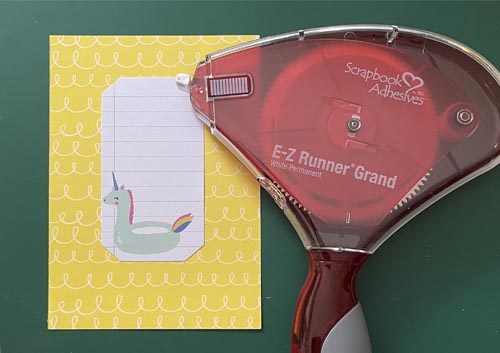
Start making the simple sunny card by trimming a piece of yellow patterned paper to a rectangular size. This will be your top card panel. Then adhere the lined unicorn label onto the card panel using the E-Z Runner® Grand Refillable Dispenser.

Simply Sunny Card by Yvonne van de Grijp for Scrapbook Adhesives by 3L

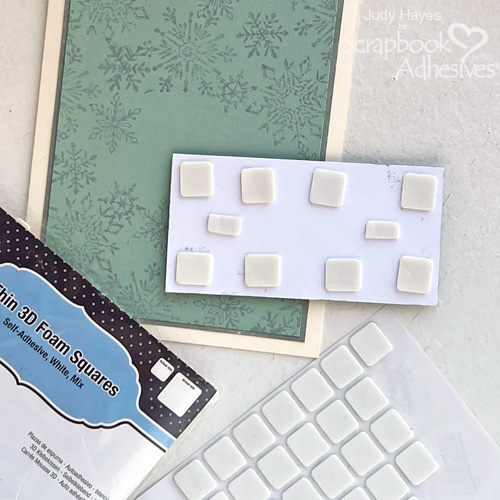
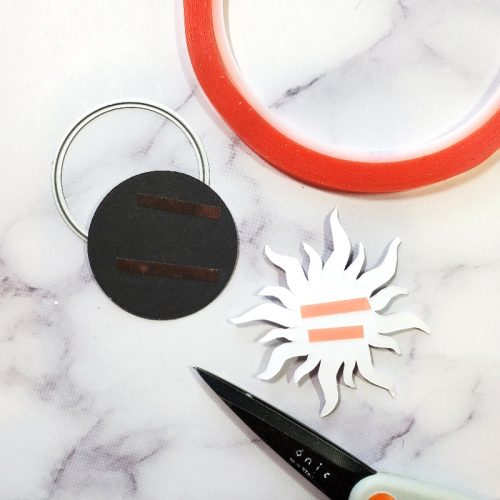
Next adhere a piece of lace onto the panel using the E-Z Runner® Grand Refillable Dispenser for adhering. Now adhere the sunglasses die-cut using Thin 3D Foam Squares White Mix. And then adhere the sentiment die-cuts using 3D Foam Squares White Mix.

Simply Sunny Card by Yvonne van de Grijp for Scrapbook Adhesives by 3L

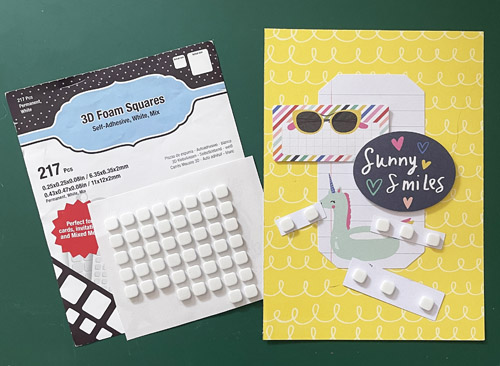
By using various (thin and normal) 3D Foam Squares, you create a fun dimensional effect.

Making the Card Base

To make the card base for your sunny card, adhere the yellow cardpanel onto a soft green cardpanel using the E-Z Runner® Grand Refillable Dispenser. Then adhere upon a white card base using the E-Z Runner® Grand Refillable Dispenser.

Wear Your Adhesive on the Outside

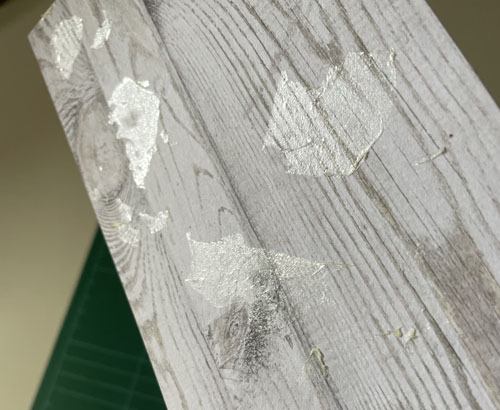
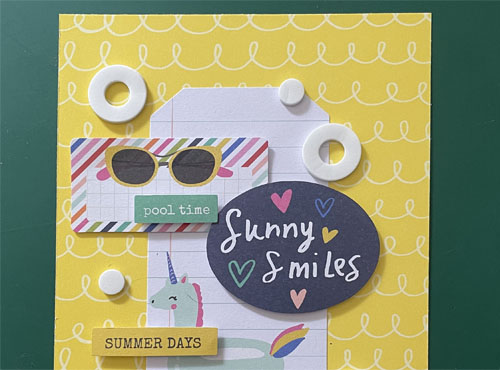
As a finishing touch on this sunny card I adhered some 3D Foam Circle Frames White (the smallest circles from the set) onto the card.

Simply Sunny Card by Yvonne van de Grijp for Scrapbook Adhesives by 3L

Now remove the liner of one of the 3D Foam Circle Frames White and rub a small piece of Metallic Transfer Foil Sheets Pastel Colors onto the 3D Foam Circle Frames White with the colored side facing up. Gently remove the foil. Repeat this with various colors Metallic Transfer Foil Sheets Nature Colors and Metallic Transfer Foil Sheets Celebrate Colors for the other 3D Foam Circle Frames White.

Simply Sunny Card by Yvonne van de Grijp for Scrapbook Adhesives by 3L

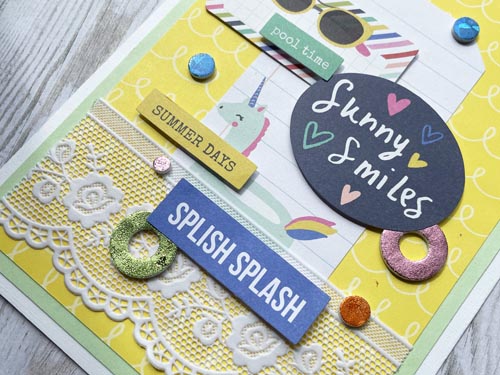
The technique using your adhesive not between layers but on the outside as embellishments is called Wear Your Adhesive on the Outside.

And voilá yours simple sunny card is ready!

Hope you enjoyed this tutorial and wishing you happy crafting!

Yvonne van de Grijp

Simply Sunny Card by Yvonne van de Grijp for Scrapbook Adhesives by 3L

Creative Time: 30 minutes

Skill Level: Beginner

Materials needed:

Scrapbook Adhesives by 3L®

E-Z Runner® Grand Refillable Dispenser

Thin 3D Foam Squares White Mix

3D Foam Squares White Mix

3D Foam Circle Frames White

Metallic Transfer Foil Sheets Pastel Colors, Metallic Transfer Foil Sheets Nature Colors and Metallic Transfer Foil Sheets Celebrate Colors

Other

Cardstock (White, Soft Green); Patterned Paper (Simple Stories™: Sunkissed Collector’s Essential Kit); Scissors; Paper Trimmer
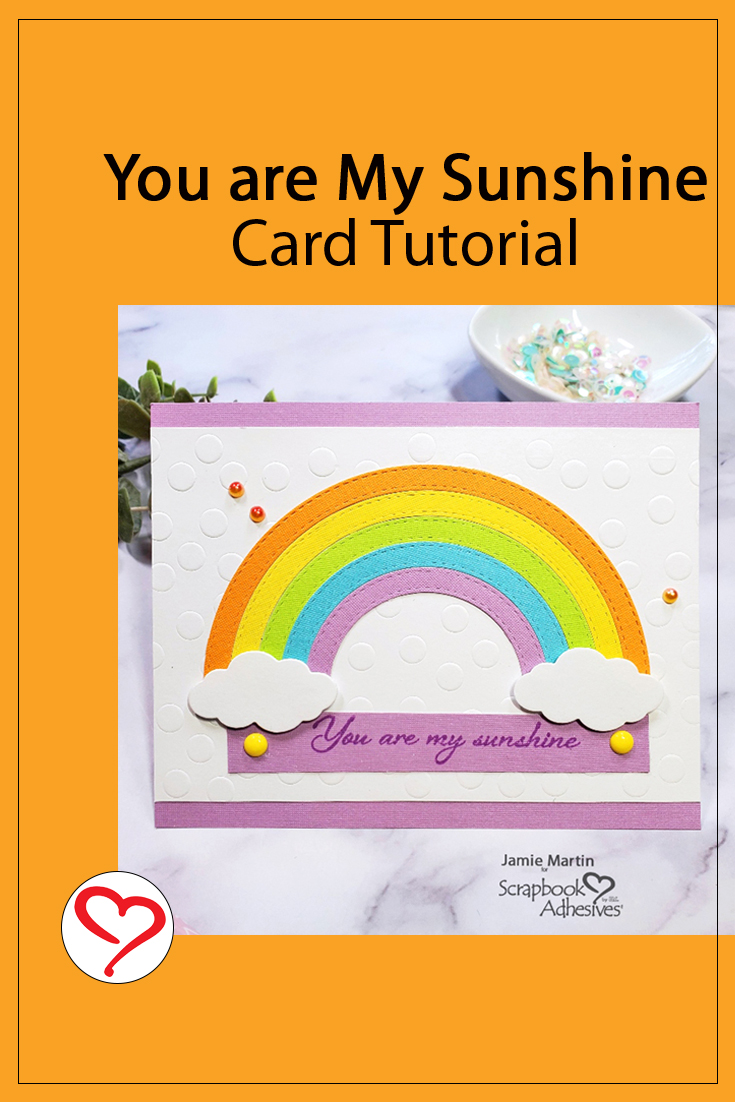
Save to Pinterest!

Simply Sunny Card by Yvonne van de Grijp for Scrapbook Adhesives by 3L Pinterest

Visit our Website and Blog!
Sign up for our Newsletter so you never miss a contest or giveaway!

instagram purple icon facebook icon purple pinterest purple icon twitter purple icon YouTube icon blog subscription purple icon

Gone Fishing Again Scrapbook Page

Hi, Connie here with a Gone Fishing Again Scrapbook Page documenting a not-so-fun fish story…well sort of! LOL! I’m using pattern paper by PhotoPlay called The Great Outdoors and some 3D Foam Strips that not only are for word strips but ephemera too. This page also has a fun pocket on it, secured with the E-Z Runner Grand Refillable Dispenser.

Gone Fishing Again Scrapbook Page by Connie Mercer for Scrapbook Adhesives by 3L

Gone Fishing Again Page Prep

This is a simple scrapbook page design but a fun one. I love making the photos look like photo strips. To do that just mount them on white cardstock leaving a 1/8- inch border between each photo and then mount on a contrasting piece of cardstock and then trim them to a strip. You can do either a vertical or horizontal photo strip. I used the E-Z Runner Grand Refillable Dispenser to put it together. No fancy adhesive is needed!

Gone Fishing Again Scrapbook Page by Connie Mercer for Scrapbook Adhesives by 3L

Step Outs

Gone Fishing Again Scrapbook Page by Connie Mercer for Scrapbook Adhesives by 3L

Stamps are used to create a stitched look around the ephemera pocket. Love the look! To adhere the ephemera to the pocket 3D Foam Strips were a perfect choice.

Gone Fishing Again Scrapbook Page by Connie Mercer for Scrapbook Adhesives by 3L

Thanks for stopping by!!
Oops, I almost forgot the fishing tale. My grandson caught a fish but came back with
Poison Ivy all over his back and chest. Not fun!! Only in Texas!!

Connie Mercer

Creative Time: 30 Minutes
Skill Level: Beginner

Materials Needed:
Scrapbook Adhesives by 3L®

3D Foam Strips
E-Z Runner Grand Refillable Dispenser
E-Z Runner Grand Repositionable Dots Refillable Dots Dispenser
3D Foam Squares White Mix
HomeHobby™ by 3L
Dual Tip Glue Pen

Other: Patterned Paper: PhotoPlay Paper (The Great Outdoors Collection); Stamp: Darkroom Door; Ink: Ranger Ink; Stickers; Twine

Save to Pinterest!

Gone Fishing Again Scrapbook Page by Connie Mercer for Scrapbook Adhesives by 3L Pinterest

Visit our Website and Blog!
Sign up for our Newsletter so you never miss a contest or giveaway!

instagram purple icon facebook icon purple pinterest purple icon twitter purple icon YouTube icon blog subscription purple icon

You Are My Sunshine Card

Hi, Jamie here today with a sweet friendship rainbow card that has a little stamping, a little die-cutting, and a little dry embossing. Join me as I create this You are My Sunshine Card today!

You Are My Sunshine Card by Jamie Martin for Scrapbook Adhesives by 3L

Create a Rainbow

Die-cut different colors of cardstock using a one-piece circle die.

You Are My Sunshine Card by Jamie Martin for Scrapbook Adhesives by 3L

Pick the colors and sizes you want to use and cut them in half.  Place them in order and apply Extreme Double-sided Tape on the back side to keep all of the pieces together.

You Are My Sunshine Card by Jamie Martin for Scrapbook Adhesives by 3L

Make a Sweet Background

Use a dot stencil to dry emboss white cardstock.

You Are My Sunshine Card by Jamie Martin for Scrapbook Adhesives by 3L

Assemble the You are My Sunshine Card Front

Use the E-Z Runner Squares to attach the white dry embossed pane to a purple card. Remove the liner from the back of the rainbow and place it on the white panel.

You Are My Sunshine Card by Jamie Martin for Scrapbook Adhesives by 3L

Die cut two clouds from white cardstock and pop them up on each end of the rainbow using 3D Foam Circles White Mix.

You Are My Sunshine Card by Jamie Martin for Scrapbook Adhesives by 3L

You are My Sunshine!

Stamp the sentiment on purple cardstock using purple ink and place it under the clouds using E-Z Runner Squares.  Place a yellow enamel dot on each side of the sentiment and randomly add smaller enamel dots around the rainbow.

You Are My Sunshine Card by Jamie Martin for Scrapbook Adhesives by 3L

Skill Level: Beginner
Creative Time: 35 minutes

Materials Needed:
Scrapbook Adhesives by 3L®

E-Z Runner Squares Refillable Dispenser
3D Foam Circles White Mix

HomeHobby™ by 3L
Extreme Double-Sided Tape 1/4″

Plus
Rubbernecker Stamps- Stamps, Dies, Stencils
PrintWorks Specialty Paper- All Cardstock

Save to Pinterest!

You Are My Sunshine Card by Jamie Martin for Scrapbook Adhesives by 3L Pinterest

Visit our Website and Blog!
Sign up for our Newsletter so you never miss a contest or giveaway!

instagram purple icon facebook icon purple pinterest purple icon twitter purple icon YouTube icon blog subscription purple icon

DIY Dimensional Home Decor

Hello crafty friends! Tracy here and today I thought I would share an easy DIY Dimensional Home Decor piece I created with leftover bits of a papercraft collection. Here are all of the details.

DIY Dimensional Home Decor by Tracy McLennon for Scrapbook Adhesives by 3L

Have you ever worked with a paper crafting collection and while scrapbooking or cardmaking thought “that phrase or image would make a great home decor piece”? Well, that is exactly what I thought about the phrase I used for this project. I wanted to create a simple little piece that I could frame and have in my craft room.

Let’s Get Started!

The first step to creating this Dimensional Home Decor piece was to pick out the frame I wanted to use. The opening for this is 5 x 7-inch, and the frame is about 8 x 10-inch. I cut a piece of chipboard as a base that was 8 x 10-inch to fit in the frame. Using the E-Z Runner® Ultra Strong Refillable Dispenser I adhered a 6×8 piece of patterned paper to the chipboard base. I like to use E-Z Runner® Ultra Strong Refillable Dispenser in most of my home decor pieces, that way I know they will stay together and last.

DIY Dimensional Home Decor by Tracy McLennon for Scrapbook Adhesives by 3L

Mat the Dimensional Home Decor sentiment in white cardstock and add Creative Photo Corners White to the corners. I just love how this always frames focal pieces and adds a little bit of texture and dimension.

DIY Dimensional Home Decor by Tracy McLennon for Scrapbook Adhesives by 3L

Add the sentiment to the chipboard base using 3D Foam Squares White Regular Size. I also picked out a couple of cardstock stickers to coordinate. First I used cornstarch to de-stick the backs. Then added them to the Dimensional Home Decor piece using 3D Foam Squares White Regular Size.

DIY Dimensional Home Decor by Tracy McLennon for Scrapbook Adhesives by 3L

Thanks so much for stopping by!
Tracy

Skill Level: Beginner
Creative Time: 30 Minutes

Materials Needed:
Scrapbook Adhesives by 3L®

E-Z Runner® Ultra Strong Refillable Dispenser
Creative Photo Corners White
3D Foam Squares White Regular Size

Other:
Echo Park Paper- patterned paper and cardstock stickers; Cardstock- White; Enamel Dots; 5×7 Shadow Box Frame

Save to Pinterest!

DIY Dimensional Home Decor by Tracy McLennon for Scrapbook Adhesives by 3L Pinterest

Visit our Website and Blog!
Sign up for our Newsletter so you never miss a contest or giveaway!

instagram purple icon facebook icon purple pinterest purple icon twitter purple icon YouTube icon blog subscription purple icon

Snowflake JOY Holiday Card

Hello crafty friends! I’m thinking of the holidays in July with this JOY Holiday card featuring the 3D Foam Snowflakes. I cut letters J and Y from 3D Foam Creative Sheets Medium White and covered them all with heat embossed iridescent ice embossing powder. A simple card design to bring Joy this holiday season!

Snowflake JOY Holiday Card by Judy Hayes for Scrapbook Adhesives by 3L

Stamp the Background

Cut a piece of mint green cardstock to 3.625 x 4.875-inches.

Snowflake JOY Holiday Card by Judy Hayes for Scrapbook Adhesives by 3L

Ink a snowflake stamp with Distress Oxide Weathered Wood ink, stamp once on scrap paper, and then stamp on the background. Repeat with small and large snowflakes to fill the background.

Apply Ink to Mat

Cut a piece of white cardstock to 3.75 x 5-inches and to 1.875 x 3.75-inches

Snowflake JOY Holiday Card by Judy Hayes for Scrapbook Adhesives by 3L

Apply Distress Oxide Weathered Wood ink along the edges of each piece. Set aside a small piece

Assemble Card Base

Cut a 5.5 x 8.5-inch cream cardstock and fold to make a 4.25 x 5.5-inch card.

Snowflake JOY Holiday Card by Judy Hayes for Scrapbook Adhesives by 3L

Use E-Z Runner® Petite Permanent Dots Refillable Dispenser to apply adhesive to the inked mat piece and fasten it to the card. Repeat to adhere the snowflake background over the mat on the card.

Cut Letters

Snowflake JOY Holiday Card by Judy Hayes for Scrapbook Adhesives by 3L

Cut a piece of 3D Foam Creative Sheets Medium White large enough for J and Y letter dies. Secure letters to it with removable tape and run through die cutting machine to cut letters.

Emboss Snowflake and Letters

Snowflake JOY Holiday Card by Judy Hayes for Scrapbook Adhesives by 3L

Remove the largest snowflake from 3D Foam Snowflakes and place it on the non-stick craft mat.

Snowflake JOY Holiday Card by Judy Hayes for Scrapbook Adhesives by 3L

Peel liner from the back of each letter and place next to the snowflake on the craft mat. (Designer Tip: I only used the letter and peeled away the shadow part of each letter)

Snowflake JOY Holiday Card by Judy Hayes for Scrapbook Adhesives by 3L

Peel off top liners from letters and the snowflake, cover with iridescent ice embossing powder, remove excess, and heat with a heat tool to emboss.

Make JOY Band

Cut a piece of mint green paper to 1.75 x 3.75 inches.

Snowflake JOY Holiday Card by Judy Hayes for Scrapbook Adhesives by 3L

Secure it to the small piece with the inked edges using E-Z Runner® Petite Permanent Dots Refillable Dispenser to apply adhesive.

Snowflake JOY Holiday Card by Judy Hayes for Scrapbook Adhesives by 3L

Peel the snowflake from the craft mat, place them in the center of the band and place the letters J and Y on either side. Use a ruler to help align letters evenly spaced from the bottom edge.

Attach the JOY Band

Snowflake JOY Holiday Card by Judy Hayes for Scrapbook Adhesives by 3L

Place large Thin 3D Foam Squares White Mix on the back of the band, peel liners and attach the band to the card front.

Stamp the Verse

Snowflake JOY Holiday Card by Judy Hayes for Scrapbook Adhesives by 3L

Stamp verse with Distress Oxide Weathered Wood ink on cream cardstock, cover with clear embossing powder, remove excess, and heat emboss with a heat tool. Trim paper around verse to narrow strip.

Snowflake JOY Holiday Card by Judy Hayes for Scrapbook Adhesives by 3L

Cut 3D Foam Strips to fit verse, peel liner, and place on the back of verse. Peel liner from the back and fasten the verse to the card front.

Snowflake JOY Holiday Card by Judy Hayes for Scrapbook Adhesives by 3L

Thanks for Visiting!
Judy Hayes

Creative Time: 30 Minutes
Skill Level: Intermediate

Materials Needed
Scrapbook Adhesives by 3L®

Other: Ranger Ink (Clear Embossing Powder, Distress Oxide Weathered Wood Ink), Sizzix Tim Holtz (Alphanumeric Shadow Upper), Stampers Anonymous Tim Holtz (Mini Weathered Winter, Holiday Drawings, Tiny Text Christmas), Cardstock (Cream, Mint Green); Embossing Powder (Iridescent Ice)

Save to Pinterest!

Snowflake JOY Holiday Card by Judy Hayes for Scrapbook Adhesives by 3L Pinterest

Visit our Website and Blog!
Sign up for our Newsletter so you never miss a contest or giveaway!

instagram purple icon facebook icon purple pinterest purple icon twitter purple icon YouTube icon blog subscription purple icon

Easy Glitter Embellishments

Hello crafty friends, Martha Lucia here! Today I have an all-occasion card with easy glitter embellishments to create. The possibilities are unlimited with the 3D Foam Butterflies or any other 3D Foam Creative Shape for unique accents on your cards.

Easy Glitter Embellishments by Martha Lucia Gomez for Scrapbook Adhesives by 3L

Made Easy Glitter Embellishments

You can use the 3D Foam Butterflies or any other 3D Creative Foam Shape to decorate your creations. But also, you can use your own designs using your die cuts or punches with the 3D Foam Creative Sheets and Crafty Foam Tape.

Easy Glitter Embellishments by Martha Lucia Gomez for Scrapbook Adhesives by 3L

The process is so easy. Just peel out the top layer of your adhesive shape and covered it with Fine Glitter. Rub the glitter with your finger and remove the excess glitter.

Easy Glitter Embellishments by Martha Lucia Gomez for Scrapbook Adhesives by 3L

With this easy fun technique, you can cover many 3D Foam Shapes at the same time or use different colors to make your projects more interesting. In this sample, I used two different sizes of shapes.

Card Details:

On this card, I printed a digital stamp and sentiment onto white smooth card stock and die cut the right side border with the Classic Swirls Edge Die. Additionally, I cut a light blue piece of card stock a little bigger from the top layer, to use it as a mat. On this piece, I also die-cut the same decorative border.

Easy Glitter Embellishments by Martha Lucia Gomez for Scrapbook Adhesives by 3L

To paste the mat and the decorative layer, I used 3D Foam Squares White Mix. Keep in mind, that you can also use the 3D Foam Squares to create your own glitter embellishments.

Easy Glitter Embellishments by Martha Lucia Gomez for Scrapbook Adhesives by 3L

Now it’s time to assemble the card. First, paste the decorative layer with the Double-Sided Tape Runner Strips.

Easy Glitter Embellishments by Martha Lucia Gomez for Scrapbook Adhesives by 3L

Then, remove the glitter embellishment from the 3D Foam Butterflies sheet and added it to the decorated card. I made three butterflies, with the same shape and different size to embellish my card.

Easy Glitter Embellishments by Martha Lucia Gomez for Scrapbook Adhesives by 3L

Thanks for visiting!
Martha Lucia

Creative Time: 30 Minutes
Skill Level: Beginner

Materials Needed
Scrapbook Adhesives by 3L®

3D Foam Butterflies
3D Foam Squares White Mix

Home Hobby by 3L®
Double-Sided Tape Runner Strips

Other: Hey Girl Digital Stamps from Joy Clair Designs; TriBlend Markers from Spectrum Noir; Classic Swirls Border Die from Gemini by Crafter’s Companion; Fine Glitter

Save to Pinterest!

Easy Glitter Embellishments by Martha Lucia Gomez for Scrapbook Adhesives by 3L Pinterest

Visit our Website and Blog!
Sign up for our Newsletter so you never miss a contest or giveaway!

instagram purple icon facebook icon purple pinterest purple icon twitter purple icon YouTube icon blog subscription purple icon

Foil Stripes Tutorial

Hi, everyone! Do you like cards and scrapbook pages with a little glitz? Teri here with a fun way to add a hint of it by creating background papers with foil stripes!

Foil Stripes Tutorial by Teri Anderson for Scrapbook Adhesives by 3L

Making backgrounds like the one on this card are a piece of cake with metallic transfer foil and Crafty Power Tape Polybag 81ft!

Making the Foil Stripes

Start by cutting a piece of cardstock to fit. Randomly add strips of Crafty Power Tape Polybag 81ft across it. To make sure the tape is firmly on your paper panel, rub your hand over it. An air hockey paddle works well for this too!

Foil Stripes Tutorial by Teri Anderson for Scrapbook Adhesives by 3L

Remove the release paper from a couple of pieces of tape at a time. Apply foil to the tape strips. I used the Metallic Transfer Foil Sheets Nature Colors to color my elements.

Be sure to rub the foil (color side UP) onto the tape until it completely burnishes onto it. Repeat this process until you’ve covered the panel with all the foil stripes you want! You can make all your stripes the same color or you can mix it up by using a couple of different colors of foil.

Foil Stripes Tutorial by Teri Anderson for Scrapbook Adhesives by 3L

Adhere your striped panel to a card. Add several 3D Foam Stars and 3D Foam Circles White Mix to it. Add foil to them.

Foil Stripes Tutorial by Teri Anderson for Scrapbook Adhesives by 3L

Finish with a Sentiment

Stamp a sentiment on a strip of cardstock. Flip it over and apply E-Z Runner® Petite Permanent Dots Refillable Dispenser all the way across it. The more adhesive you use, the better! Add some twine or thread to the back of the sentiment strip.

Foil Stripes Tutorial by Teri Anderson for Scrapbook Adhesives by 3L

Flip the sentiment strip over and add it to your card. Want your sentiment strip to really pop? Consider applying it to the card with 3D Foam Circles White Mix. Complete the card by adding a few sequins to it with Adhesive Dots Micro!

Foil Stripes Tutorial by Teri Anderson for Scrapbook Adhesives by 3L

I hope you are inspired by this foil stripes tutorial to give this technique a try!

Happy creating!
Teri Anderson

Creative Time: 45 Minutes
Skill Level: Beginner

Materials Needed:
Scrapbook Adhesives by 3L®

Other
Cardstock: Neenah Paper; Stamps: My Favorite Things (From the Heart); Ink Pad: Ranger Ink; Gold Thread: Kreinik; Sequins: Pretty Pink Posh

Save to Pinterest!

Foil Stripes Tutorial by Teri Anderson for Scrapbook Adhesives by 3L Pinterest

Visit our Website and Blog!
Sign up for our Newsletter so you never miss a contest or giveaway!

instagram purple icon facebook icon purple pinterest purple icon twitter purple icon YouTube icon blog subscription purple icon

Ranch Life a Scrapbook Page

Hi, Connie here with a fun Ranch Life scrapbook page that includes big horns. You know, deer antlers and a little boy. They go together well. I used The Great Outdoors Paper Collection by PhotoPlay as inspiration for my design. The E-Z Runner® Grand Repositionable Dots Refillable Dispenser came in handy to create a border for the layout.

Ranch Life a Scrapbook Page by Connie Mercer for Scrapbook Adhesives by 3L

To start, you’ll need to do a few cuts. The camping gear pattern paper is 11″ x 11 1/2″. The cream cardstock is 9″ x 9″ and the pine trees are 8 1/2″ x 8 1/2″. Decide on the border paper you want and set it aside. The embellishments are from the collection but you can always add your own.

Creating Ranch Life

Ranch Life a Scrapbook Page by Connie Mercer for Scrapbook Adhesives by 3L

The squares are popped up and then stickers are added.

Ranch Life a Scrapbook Page by Connie Mercer for Scrapbook Adhesives by 3L

To create the title, adhere the letters, Ranch Life, with the Dual Tip Glue Pen. The journal strips were popped up with 3D Foam Strips but every other strip piece was secured with the Dual Tip Glue Pen for interest.

Ranch Life a Scrapbook Page by Connie Mercer for Scrapbook Adhesives by 3L

Thanks so much for stopping by. Hope you enjoy this Ranch Life scrapbook page. It was fun to watch this boy find those horns.
Connie Mercer

Skill Level: Beginner
Creative Time: 50 minutes

Materials Needed:
Scrapbook Adhesives by 3L®

E-Z Runner Grand Repositionable Dots Refillable Dispenser
E-Z Runner Grand Refillable Dispenser
3D Foam Strips
3D Foam Squares White Mix
HomeHobby™ by 3L
Dual Tip Glue Pen
Other: PhotoPlay: The Great Outdoors, twine and stickers

Save to Pinterest!

Ranch Life a Scrapbook Page by Connie Mercer for Scrapbook Adhesives by 3L Pinterest

Visit our Website and Blog!
Sign up for our Newsletter so you never miss a contest or giveaway!

instagram purple icon facebook icon purple pinterest purple icon twitter purple icon YouTube icon blog subscription purple icon

Steampunk Gear Card

Hi everyone, Yvonne here with a Steampunk Gear card. Gears and steampunk style go hand-in-hand so well!  The gold elements on the card panel were added using a technique called Wear Your Adhesive on the Outside. The dimension is so easily created using 3D Foam products. Shall we make this card together? Let’s get started.

Steampunk Gear Card by Yvonne van de Grijp for Scrapbook Adhesives by 3L

Steampunk Card Top Panel

Trim a piece of wood patterned cardstock to a rectangular size. Use small pieces of Adhesive Sheets 4×6-inch (I used leftover pieces from past projects), peel off the yellow liner, and dab the adhesive onto the patterned paper randomly.

Steampunk Gear Card by Yvonne van de Grijp for Scrapbook Adhesives by 3L

Next, wrinkle up some Metallic Transfer Foil Sheets Holographic Colors, unfold and start dabbing over the spots you made with the Adhesive Sheets 4×6 inch. This creates a worn and distressed look of gold.

This is what we call Wear Your Adhesive on the Outside technique. It is to bring your adhesive from between layers of material/papers and bring them out to shine like embellishments. Make more use of your adhesive products!

Steampunk Gear Card by Yvonne van de Grijp for Scrapbook Adhesives by 3L

Steampunk Gear Elements

Die-cut the steampunk gears from chipboard. Paint them black and let dry. Rub copper and dark grey gilding wax to color the gears. Adhere the steampunk gears onto the card panel with 3D Foam Strips.

Steampunk Gear Card by Yvonne van de Grijp for Scrapbook Adhesives by 3L

By stacking the gears, you create a lovely dimensional design.

Steampunk Gear Card by Yvonne van de Grijp for Scrapbook Adhesives by 3L

Mat the top card panel with the steampunk gears onto a kraft card panel using the E-Z Runner® Grand Refillable Dispenser. Next, adhere to a black card base using the E-Z Runner® Grand Refillable Dispenser.

Finishing the Card

Adhere sentiment stickers onto kraft cardstock and cut out banners. Adhere the banners onto the card using 3D Foam Strips and voilá your steampunk card is ready.

Wishing you happy crafting!

Yvonne van de Grijp

Steampunk Gear Card by Yvonne van de Grijp for Scrapbook Adhesives by 3L

Creative Time: 60 minutes

Skill Level: Advanced

Materials needed:

Scrapbook Adhesives by 3L®

E-Z Runner® Grand Refillable Dispenser

3D Foam Strips

Adhesive Sheets 4×6 inch

Metallic Transfer Foil Sheets Holographic Colors

Other

Etched Dies (Sizzix: Bigz™L: Mechanical);  Die Cutting and Embossing Machine (Spellbinders® Paper Arts: Platinum 6 Machine); Cardstock (Kraft, Black, Wood Patterned); Gilding Wax (Coosa Crafts: Copper, Graphite); Sentiment Stickers (Tim Holtz: Thoughts); Craft Knife; Scissors; Paper Trimmer

Save to Pinterest!

Steampunk Gear Card by Yvonne van de Grijp for Scrapbook Adhesives by 3L Pinterest

Visit our Website and Blog!
Sign up for our Newsletter so you never miss a contest or giveaway!

instagram purple icon facebook icon purple pinterest purple icon twitter purple icon YouTube icon blog subscription purple icon

Sparkly Gift Tag and Holder

Hi, Jamie here with you today on how to custom create a sparkly gift tag and holder. I had so much fun creating one that I made two! You can place them on a gift bag, attached to a gift, or placed on the front of a card.

Sparkly Gift Tag and Holder by Jamie Martin for Scrapbook Adhesives by 3L

If you’re like me, this is a great way to use up some of the beautiful decorative paper that you’ve been hoarding.

Sparkly Gift Tag and Holder by Jamie Martin for Scrapbook Adhesives by 3L

Sparkly Tag Holder

The tag holder was die-cut from a piece of decorative paper. To assemble, I used the Extreme Double-sided tape 1/8″ to seal the seams.

Sparkly Gift Tag and Holder by Jamie Martin for Scrapbook Adhesives by 3L

Embellish the Front of the Holder

I fussy cut a sun from one of the paper packs and adhered with the Extreme Double-sided tape 1/8″ to a black cardstock circle shape.

For You was die-cut from gold glitter paper, layered onto black cardstock, and popped up on the tag holder using 3D Foam Circles Black Mix.

A small butterfly was cut out from the paper pack and popped up on the right corner of the For You again using the 3D Foam Circles. These foam circles are perfect to pop up curvy shapes!

Sparkly Gift Tag and Holder by Jamie Martin for Scrapbook Adhesives by 3L

Add them on a die-cut tag with the Extreme Double-sided tape 1/8″. Thread a piece of black ribbon to the top of the tag and tied with gold cord.

Sparkly Gift Tag and Holder by Jamie Martin for Scrapbook Adhesives by 3L

Create a Second Sparkly Tag & Holder Set

Create the tag holder in the same step as above but with a little different twist in embellishing.

Sparkly Gift Tag and Holder by Jamie Martin for Scrapbook Adhesives by 3L

Place two strips of Extreme Double-sided Tape 1/8″ and one of Extreme Double-sided Tape 1/4″ diagonally at the bottom right of the holder. Then remove the liners and sprinkle Gold Micro Glitter over the tapes. Rub in to secure the glitter and shake off excess.

Sparkly Gift Tag and Holder by Jamie Martin for Scrapbook Adhesives by 3L

Skill Level: Beginner
Creative Time: 35 minutes

Materials Needed:
Scrapbook Adhesives by 3L®

3D Foam Circles Black Mix

HomeHobby™ by 3L
Extreme Double-sided Tape 1/8″
Extreme Double-sided Tape 1/4″

Plus Dies: Sizzix/Tim Holtz & Stephanie Bernard; Glitter: Stampendous; Patterned Papers: Recollections

Save to Pinterest!

Sparkly Gift Tag and Holder by Jamie Martin for Scrapbook Adhesives by 3L Pinterest

Visit our Website and Blog!
Sign up for our Newsletter so you never miss a contest or giveaway!

instagram purple icon facebook icon purple pinterest purple icon twitter purple icon YouTube icon blog subscription purple icon