You are in our US store • Switch to Europe store

Tiny Skinny Card Tutorial

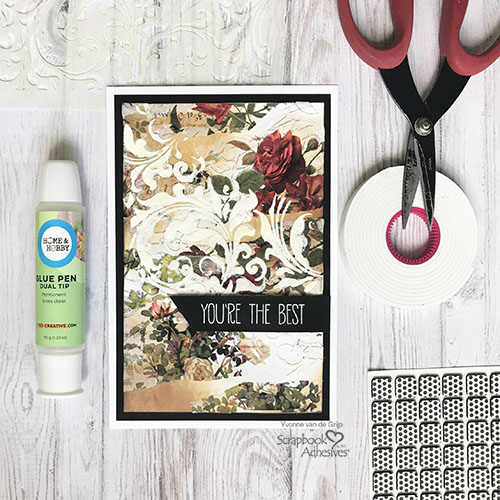
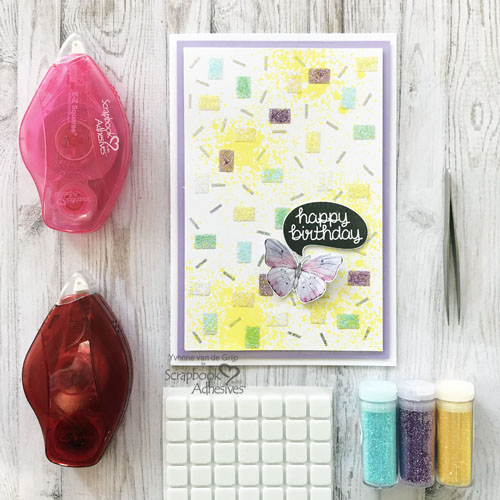
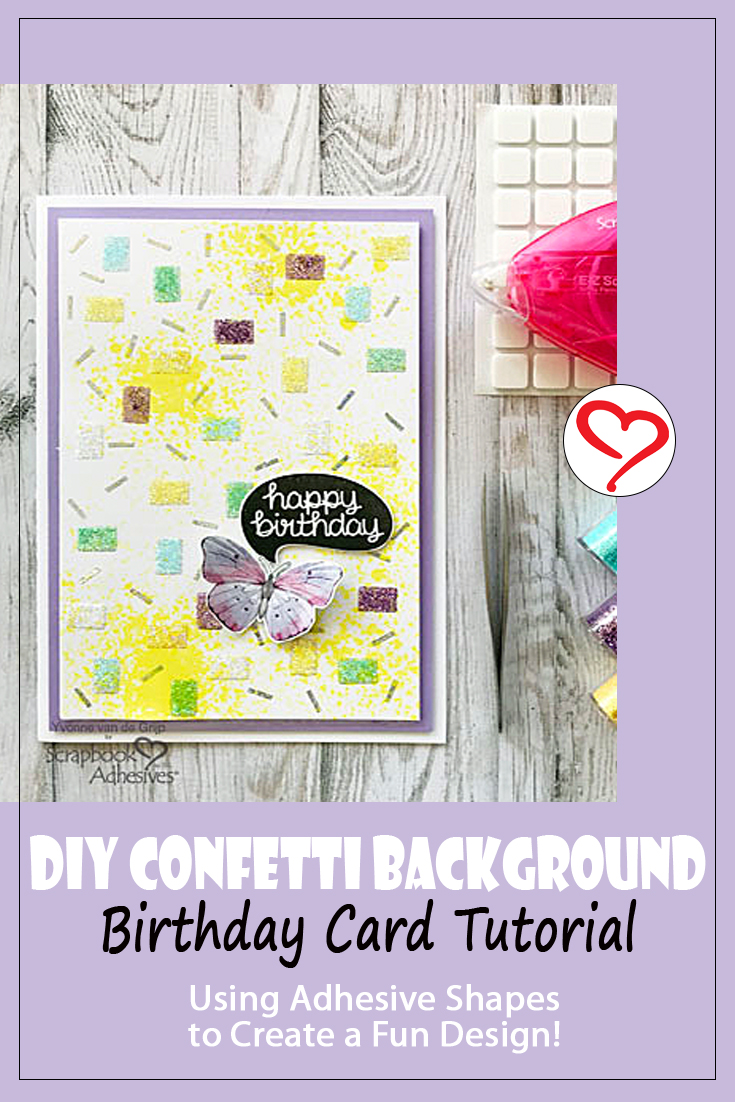
Hi, all! Back to school will be in session soon, and I’ve got a fun way to add a little cheer for your kids. Teri here and I’m going to show you how to make my version of skinny cards!

Tiny Skinny Card Tutorial by Teri Anderson for Scrapbook Adhesives by 3L

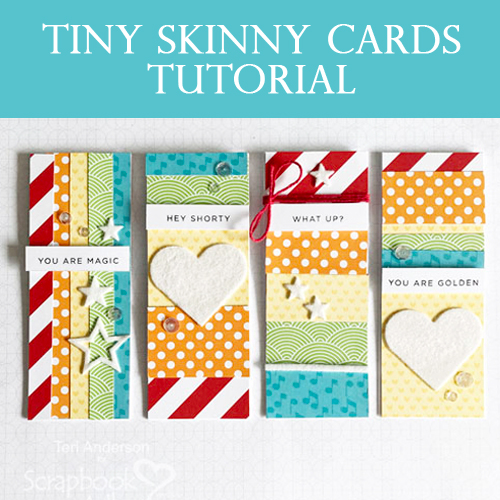
These tiny cards are perfect for leaving a quick note in your child’s lunch box or backpack to let them know you are thinking about them. Doing online schooling this year? Use these tiny cards to leave encouraging notes by their computers or tablets! Skinny cards are easy to make and can be put together quickly with a few basic papercraft supplies! Let’s get started.

Skinny Cards Basics

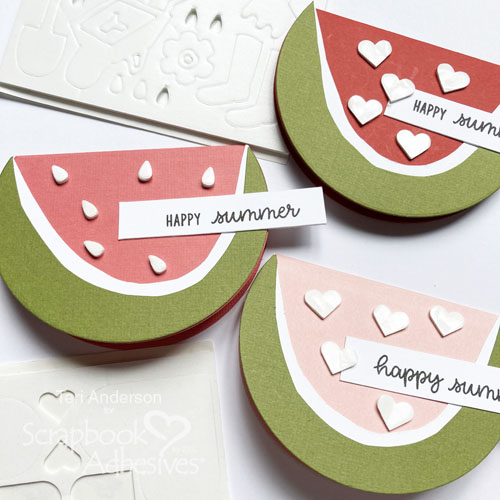
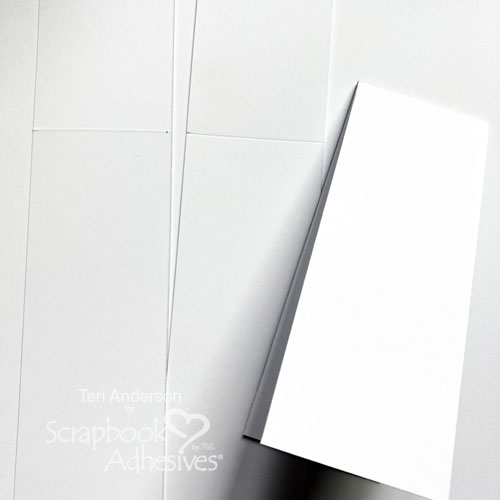
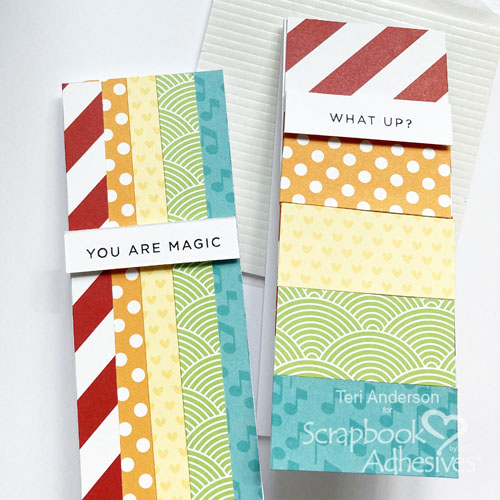
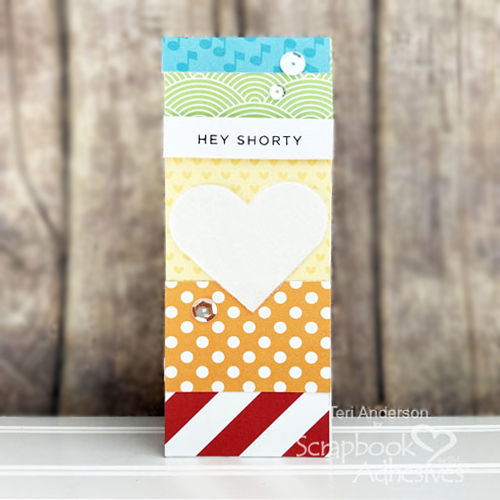
Begin by taking cutting several 2 1/8″ x 11″ pieces of cardstock. Score and fold them in half to make several skinny card bases.

Tiny Skinny Card Tutorial by Teri Anderson for Scrapbook Adhesives by 3L

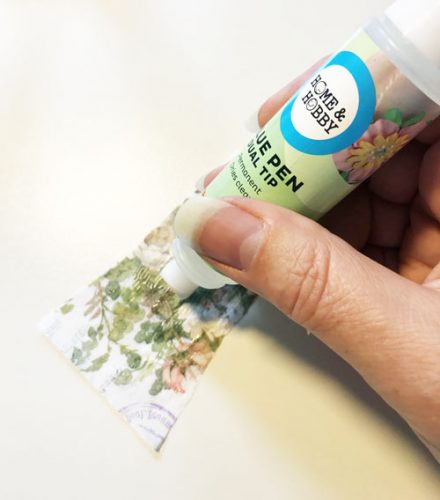
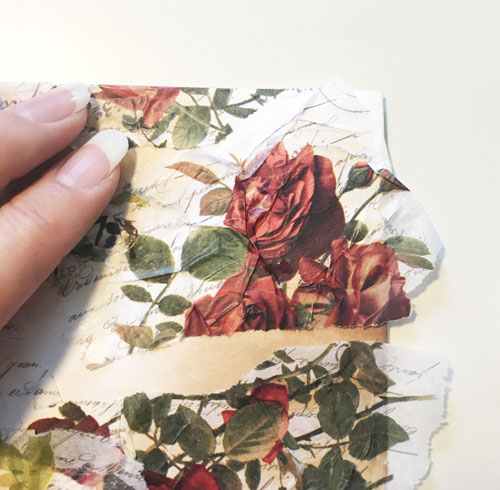
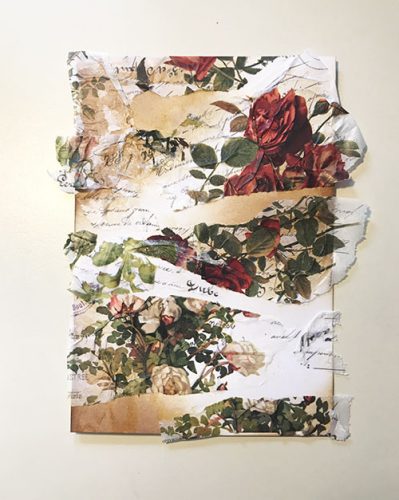
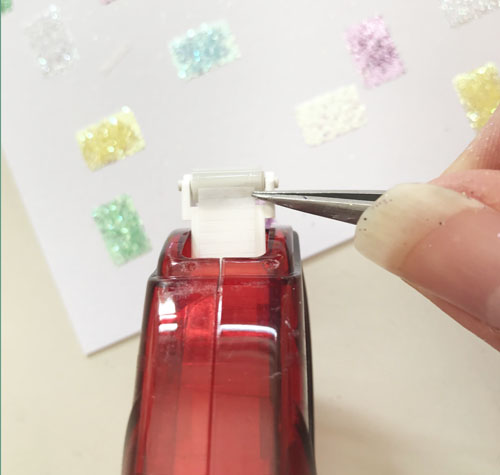
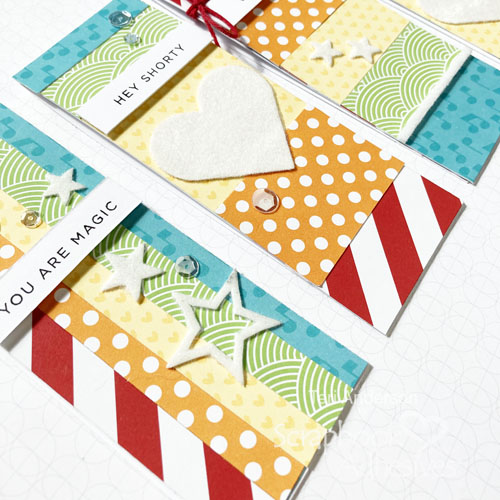
Cover your cards with patterned paper strips. You can arrange them vertically or horizontally. This is a good opportunity to use up your stash of paper scraps! Adhere the strips with the E-Z Runner® Permanent Strips Refillable Dispenser.

Tiny Skinny Card Tutorial by Teri Anderson for Scrapbook Adhesives by 3L

Next, stamp sentiments on strips of cardstock. Give them dimension by lifting them up and adhering them to your cards with Crafty Foam Tape or 3D Foam Strips.

Tiny Skinny Card Tutorial by Teri Anderson for Scrapbook Adhesives by 3L

Embellishing the Card Front

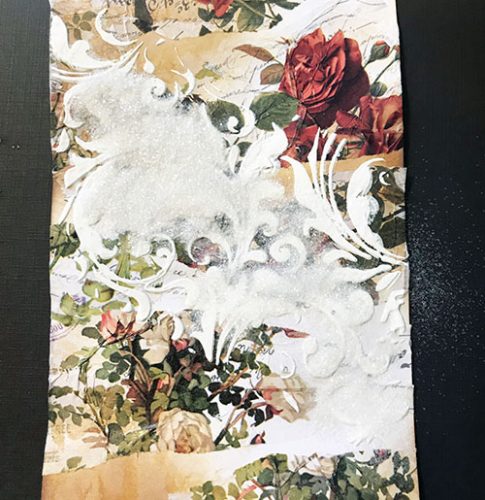
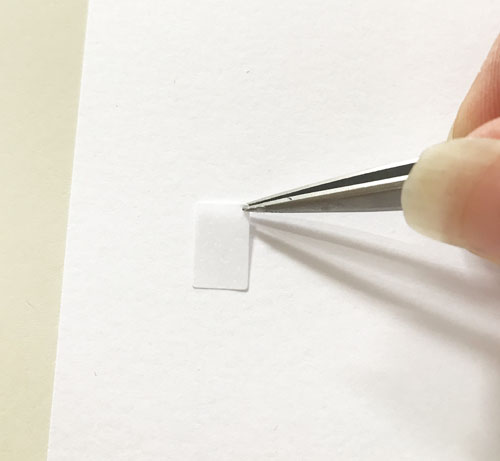
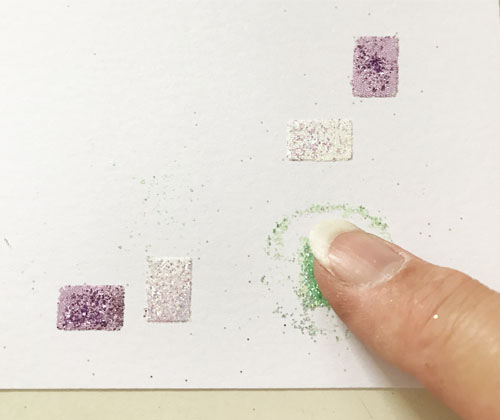
Apply several 3D Foam Stars (or some other 3D Foam shape of your choosing) to your cards. Remove the release paper and apply flock or glitter to the stars. Want them to sparkle? Try using the Metallic Transfer Foil Sheets instead!

Tiny Skinny Card Tutorial by Teri Anderson for Scrapbook Adhesives by 3L

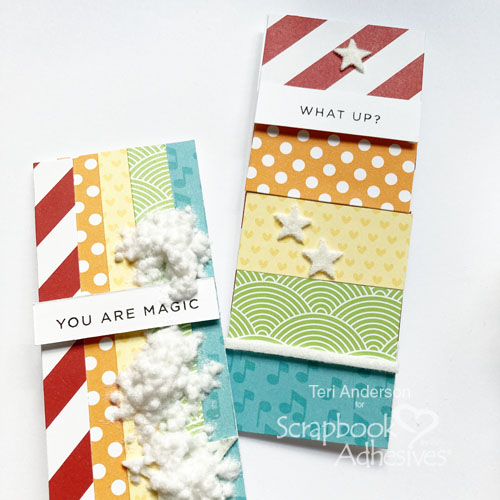
Complete your cards by adding some twine or sequins and securing them with Adhesive Dots Micro.

Tiny Skinny Card Tutorial by Teri Anderson for Scrapbook Adhesives by 3L

Design for a Different Look

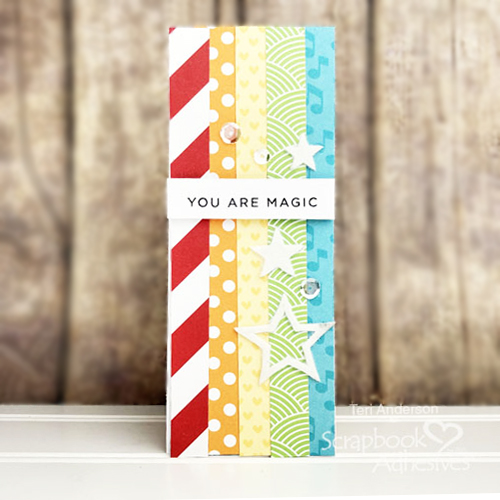
It’s easy to change up the look of these skinny cards! Rather than decorating your skinny cards with paper strips that are approximately the same size, mix it up! Use big strips and small strips.

Tiny Skinny Card Tutorial by Teri Anderson for Scrapbook Adhesives by 3L

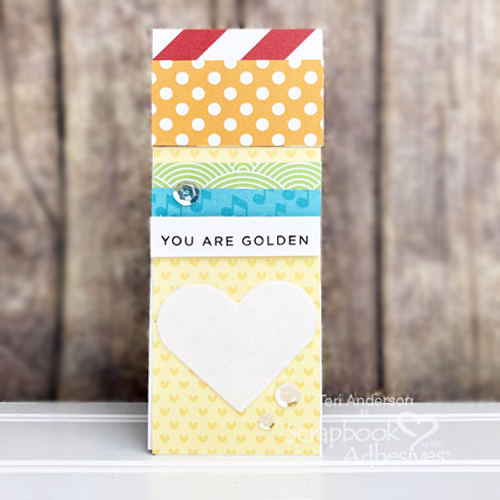
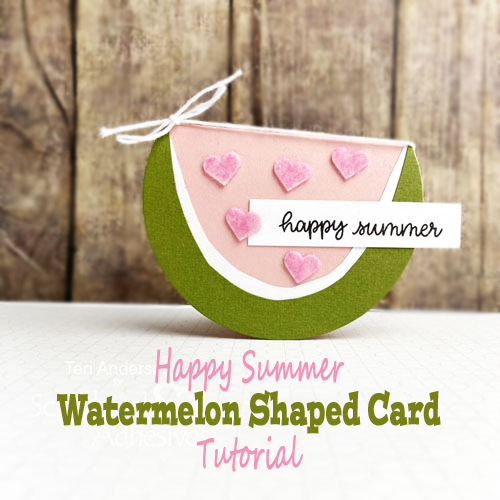
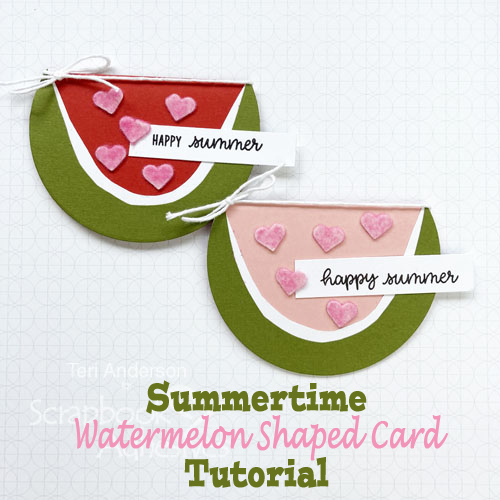
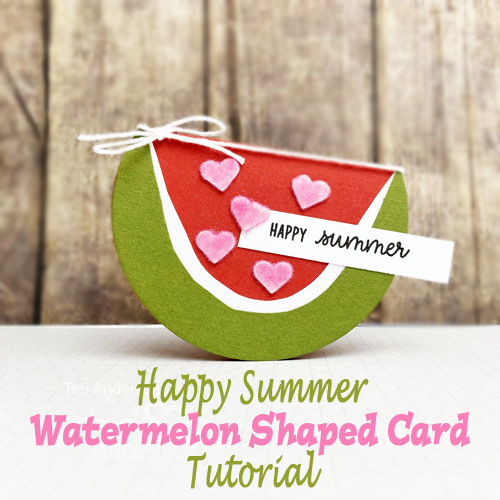
Consider decorating your cards with something rather than stars. 3D Foam Hearts are a nice alternative as hearts work with most card sentiments. Or die-cut your favorite shape with the 3D Foam Creative Sheets. Many options!

Another option is using paper die-cuts instead. Cut several of the same die cuts from cardstock. Stack them on top of each other and then adhere them to your skinny cards with the E-Z Dots® Permanent Refillable Dispenser.

Tiny Skinny Card Tutorial by Teri Anderson for Scrapbook Adhesives by 3L

I hope you enjoyed this tutorial and are inspired to make some skinny cards of your own. Remember, there are no rules when it comes to making skinny cards. Decorate them however you want them to look!

Happy creating,
Teri Anderson

Creative Time: 45 Minutes
Skill Level: Beginner

Materials Needed
Scrapbook Adhesives by 3L®

Other
White Cardstock: Georgia Pacific; Patterned Papers: Doodlebug Design, Lawn Fawn, American Crafts; Stamps: Simon Says Stamp! (Simple Sentiments No. 1 Stamp Set); Black Ink Pad: Ranger Ink; Flock: Stampendous!; Twine: Whisker Graphics; Sequins: Pretty Pink Posh

Love It? Save It to Pinterest!

Tiny Skinny Card Tutorial by Teri Anderson for Scrapbook Adhesives by 3L Pinterest

Visit our Website and Blog!
Sign up for our Newsletter so you never miss a contest or giveaway!

instagram purple icon facebook icon purple pinterest purple icon twitter purple icon YouTube icon blog subscription purple icon

Make My Heart Smile Altered Serving Tray

Hello crafty friends! Tracy here, and today I have a fun little altered project to share using paper crafting products, a little wooden tray, and some fabulous adhesives. See all the details on how I created my altered serving tray.

Make My Heart Smile Altered Serving Tray by Tracy McLennon for Scrapbook Adhesives by 3L

Altered Serving Tray Step Outs – Step 1:

Cover the pine wood mini tray with white acrylic paint using a foam brush and let it dry.

Cut a piece of plaid patterned paper to go all around the outside of the tray and adhere them to the sides with Extreme Double-Sided Tape 1/4in. This tape is fantastic for adhering things onto tough to stick surfaces like wood.

Make My Heart Smile Altered Serving Tray by Tracy McLennon for Scrapbook Adhesives by 3L

Step 2:

Let’s make pretty layers in the altered serving tray with patterned papers. Cut two strips of the striped patterned paper that fit the long side of the inside bottom, and a large piece of the pink polka dot pattern to layer on top to cover the rest of the space. Adhere all the pieces using Extreme Double-Sided Tape 1/4in.

Mat the photo in white cardstock and adhere inside the tray using Crafty Foam Tape White for a little lift.

Cut a piece of the light pink patterned paper, slightly smaller than the tray, and tear the right-hand edge. Adhere to the left-hand side of the tray using Crafty Foam Tape White.

Make My Heart Smile Altered Serving Tray by Tracy McLennon for Scrapbook Adhesives by 3L

Step 3:

Let’s start adding embellishments to finish off the altered serving tray! First, tie a burlap string bow on the sentiment tag and secure it with an Adhesive Dots Small. Then adhere the tag using 3D Foam Squares White Regular Size on the left side of the tray.

For a fun touch, I added the coffee cup embellishments to the corner of the matted photo using Thin 3D Foam Squares White Mix.

Lastly, I added the embellishment to the upper right corner of the tray using Adhesive Dots Small, along with a few gems for some sparkle.

Done! This altered serving tray is perfect for a personalized gift or a great pick me up for someone who needs one!

Make My Heart Smile Close Up by Tracy McLennon for Scrapbook Adhesives by 3L

I hope you enjoyed the Make My Heart Smile Altered Serving Tray project. Thanks so much for stopping by!
Tracy McLennon

Creative Time: 60 Minutes
Skill Level: Intermediate

Materials Needed:
Scrapbook Adhesives by 3L®

Thin 3D Foam Squares White Mix
3D Foam Squares White Regular Size
Adhesive Dots Small
Crafty Foam Tape White

HomeHobby™ by 3L
Extreme Double-Sided Tape 1/4in

Other
Patterned Papers and Embellishments: Pebbles Inc.; Wood Serving Tray; Paint: DecoArt (Acrylic Paint in White); Foam Brush; White Cardstock; Gems; Burlap String

Save it on Pinterest!

Make My Heart Smile Altered Serving Tray by Tracy McLennon for Scrapbook Adhesives by 3L Pinterest

Visit our Website and Blog!
Sign up for our Newsletter so you never miss a contest or giveaway!

instagram purple icon facebook icon purple pinterest purple icon twitter purple icon YouTube icon blog subscription purple icon

Gifts from the Sea Art Journal Pages

Hi, Connie here with a couple of seasonal art journal pages called Gifts from the Sea. Created using acrylic paint and ephemera, I wanted to show how adhesives work well on a mixed media surface.

For example, I used Extreme Double-Side Tape 1/4-inch to secure the larger embellishments, and a combination of Adhesive Dots Medium and 3D Foam White Circles to secure the smaller stamped images. Let me show you how!

Gifts from the Sea Art Journal Pages by Connie Mercer for Scrapbook Adhesives by 3L

Art Journal Pages Instruction

Gifts from the Sea Art Journal Pages by Connie Mercer for Scrapbook Adhesives by 3L
  1. Use acrylic paints and inks to create the backgrounds. For more depth, stencils and collage materials were also added. On heavy cardstock, images were stamped and watercolored with ink. Then trimmed out.
  2. Using the Dual Tip Glue Pen like a collage medium, adhere the ephemera pieces to the art journal pages. Spread the liquid glue on the back of the ephemera with the fingertips for better control. Next use pieces of a torn vintage dictionary text.
  3. & 4. To secure the larger stamped images, use the Extreme Double-Side Tape 1/4-inch. This worked great against the painted background.
Gifts from the Sea Art Journal Pages by Connie Mercer for Scrapbook Adhesives by 3L

The Adhesive Dots Medium came in handy for the large bottles.

Gifts from the Sea Art Journal Pages by Connie Mercer for Scrapbook Adhesives by 3L

To lift the smaller bottles on the pages, I used the 3D Foam Circles White Mix to overlap the larger bottles.

See the finished pages below. I hope you enjoyed my Gifts from the Sea Art Journal Pages and inspires you to create a seasonal page!

Gifts from the Sea Art Journal Pages by Connie Mercer for Scrapbook Adhesives by 3L

Thanks for stopping by~
Connie Mercer

Creative Time: 60 minutes
Skill Level: Intermediate

Materials Needed
Scrapbook Adhesives by 3L®

Adhesive Dots Medium
3D Foam Circles White Mix

HomeHobby™ by 3L
Dual Tip Glue Pen
Extreme Double-Sided Tape 1/4″

Other:
Stamps: Darkroom Door (Bottles, Labels and stencils) and Gina K Designs (Gifts from the Sea); Ink: Ranger Ink (Distress Oxide and Archival Ink); Acrylic Paint

Save To Pinterest!

Gifts from the Sea Art Journal Pages by Connie Mercer for Scrapbook Adhesives by 3L Pinterest

Visit our Website and Blog!
Sign up for our Newsletter so you never miss a contest or giveaway!

instagram purple icon facebook icon purple pinterest purple icon twitter purple icon YouTube icon blog subscription purple icon

You’re the Best Tissue Paper Card

Hi everyone, Yvonne here and today I would like to show you how to make a gorgeous vintage background for your card using tissue paper. My secret ingredient for adhering is Dual Tip Glue Pen! Shall we make this card together?

You're the Best Tissue Paper Card by Yvonne van de Grijp for Scrapbook Adhesives by 3L

Tissue Paper Card Background Steps

I created this card using tissue paper to design your own patterned paper.

Start with a rectangular white card panel and distress it by using brown ink and an ink blending tool.

You're the Best Tissue Paper Card by Yvonne van de Grijp for Scrapbook Adhesives by 3L

Tear some decorated tissue paper into pieces. Use the broad tip of the Dual Tip Glue Pen to apply glue to the back of the tissue paper.

You're the Best Tissue Paper Card by Yvonne van de Grijp for Scrapbook Adhesives by 3L

Adhere the pieces to the card panel. No need to perfectly adhere them, wrinkles in the tissue paper are okay!

You're the Best Tissue Paper Card by Yvonne van de Grijp for Scrapbook Adhesives by 3L

Use the pointed tip of the Dual Tip Glue Pen to place a small drop on your fingertip and rub over the loose ends of the tissue paper to adhere to the card panel.

You're the Best Tissue Paper Card by Yvonne van de Grijp for Scrapbook Adhesives by 3L

Cut excess tissue paper sticking out with scissors. If the tissue paper is still moist, let dry. Tip: you can use a heat gun to speed up the drying.

Tissue Card Panel Details

To give more depth to the tissue paper card panel, use a stencil and texture paste. After applying texture paste over the stencil, add some sparkle with dry glitter while wet. Tap off any excess glitter for a sparkly effect!

You're the Best Tissue Paper Card by Yvonne van de Grijp for Scrapbook Adhesives by 3L

Then dry thoroughly or use a heat gun to hurry the drying process.

You're the Best Tissue Paper Card by Yvonne van de Grijp for Scrapbook Adhesives by 3L

The Card Base

Adhere the tissue card panel onto a black card panel using Crafty Foam Tape White. Then place it on a white card base using the E-Z Runner® Ultra Strong Refillable Dispenser.

You're the Best Tissue Paper Card by Yvonne van de Grijp for Scrapbook Adhesives by 3L

Adding the Sentiment

Stamp a sentiment onto black cardstock using watermark ink. Sprinkle white embossing powder over it and melt with a heat gun. Next, trim to banner shape and adhere to the card panel using 3D Foam Squares Black Mix.

You're the Best Tissue Paper Card by Yvonne van de Grijp for Scrapbook Adhesives by 3L

And voila…You’re the Best Tissue Paper Card is ready. I hope you enjoyed this tutorial!

Wishing you happy crafting!
Yvonne van de Grijp

You're the Best Tissue Paper Card by Yvonne van de Grijp for Scrapbook Adhesives by 3L

Creative Time: 45 minutes
Skill Level: Intermediate

Materials Needed
Scrapbook Adhesives by 3L®

Crafty Foam Tape White
E-Z Runner® Ultra Strong Refillable Dispenser
3D Foam Squares Black Mix

HomeHobby™ by 3L

Dual Tip Glue Pen

Other
White and Black Cardstock; Tissue Paper: Tim Holtz idea-ology (Collage Paper Floral); Stencil: Tim Holtz (Flourish); Glitter: Ranger Ink (Distress Dry Glitter); Embossing Powder: WOW! Embossing Powder (White); Texture Paste: Prima Marketing (Finnabair Texture Paste White Crackle); Stamp Avery Elle (Handwritten Notes); Inks: Ranger Ink (Distress Oxide Vintage Photo) and Tsukineko (Versamark Watermark Ink); Spatula; Scissors; Ink Blending Tool; Heat Gun; Bone Folder; Paper Trimmer

Save It to Pinterest!

You're the Best Tissue Paper Card by Yvonne van de Grijp for Scrapbook Adhesives by 3L Pinterest

Visit our Website and Blog!
Sign up for our Newsletter so you never miss a contest or giveaway!

instagram purple icon facebook icon purple pinterest purple icon twitter purple icon YouTube icon blog subscription purple icon

3D Foam Fries and Hot Dog Layout

Hi friends! Dana here today sharing a scrapbook layout that I created to celebrate national hot dog month. If you’re from Detroit, the only way to eat a hot dog is a Detroit-style Coney, which is a beef dog with bean-less chili, mustard, and white onions. Don’t forget the side of French fries!

3D Foam Fries and Hot Dog Layout by Dana Tatar for Scrapbook Adhesives by 3L

I had a lot of fun creating my own French fries to embellish this page using 3D Foam Strips and White Crafty Foam Tape.

How to Create French Fries with 3D Foam

3D Foam Fries and Hot Dog Layout by Dana Tatar for Scrapbook Adhesives by 3L

To create my embellishment, I first cut and folded a small container from patterned paper to hold the French fries. I used Extreme Double-Sided Tape 1/8 Inch to hold the sides of the container together.

Next, I cut two pieces of Crafty Foam Tape White approximately 3 inches long. Press the adhesive into glittered yellow flocking powder, removed the adhesive liner from the back of the tape, and then secured the flocked French fries into the container.

Repeat this same technique with 3D Foam Strips until the container was full. I applied puffy stickers to the center of the fry container as a fun finishing touch.

Layered 3D Title with Adhesive Dots

3D Foam Fries and Hot Dog Layout by Dana Tatar for Scrapbook Adhesives by 3L

I wanted to create a balanced design, so I added a 3D title to the page. A raw wood veneer die-cut was a fun choice. I secured this embellishment to my layout using Adhesive Dots Mini.

Next, I applied chipboard letter stickers to the bottom of the wood veneer die-cut. I reinforced these stickers with Adhesive Dots Mini to be sure that they stayed in place.

Thanks for stopping by today! I’d love to learn about the signature hot dog in your area. Do you also enjoy a side of fries or are your dogs served with something else?

Leave me a note in the comments section with your must-have toppings!
~Dana Tatar

Creative Time: 45 minutes
Skill Level: Beginner

Materials Needed:
Scrapbook Adhesives by 3L®

E-Z Runner Grand Ultra Strong
Adhesive Dots Mini
Crafty Foam Tape White
3D Foam Strips

HomeHobby™ by 3L
Extreme Double-Sided Tape 1/8 Inch

Other
Patterned Paper: American Crafts, October Afternoon; Die-Cuts: Nikki Sivils; Wood Veneer Die-Cut: Heidi Swapp; Puffy Stickers: Bella Blvd; Chipboard Letters: American Crafts; Glittered Flock: Martha Stewart

Save it to Pinterest!

3D Foam Fries and Hot Dog Layout by Dana Tatar for Scrapbook Adhesives by 3L

Visit our Website and Blog!
Sign up for our Newsletter so you never miss a contest or giveaway!

instagram purple icon facebook icon purple pinterest purple icon twitter purple icon YouTube icon blog subscription purple icon

Hello Friend Mini Book

Hello crafty friends! Judy here to share a fun gnome Hello Friend Mini Book. It’s a perfect little book to give a special friend! I also put together an envelope to make this into an adorable ensemble!

Hello Friend Mini Book by Judy Hayes for Scrapbook Adhesives by 3L

Hello Friend Mini Step Outs

For a little “head of time” prep work, I stamped with black ink and applied Adhesives Sheets on the back before die-cutting all these cute little gnomes. Once cut, I colored each with waterbased markers. There are nine of these little cuties!

Hello Friend Mini Book by Judy Hayes for Scrapbook Adhesives by 3L

Basic Book Binding Steps

The basic book is made with a combination of mat board, white cardstock, and Premium Double-Sided Tape 1/2in.

The front and back covers are mat boards cut to 3.625-inch square.

Each page measures 3.5 inches square and made with white cardstock. There are five pages in total.

The binding is made from white cardstock cut 1 1/8 x 3.5-inches. Score each binding lengthwise in half and folded. There are six binding pieces for this book.

Hello Friend Mini Book by Judy Hayes for Scrapbook Adhesives by 3L

With the pieces prepped, let’s start with the binding! Apply Premium Double-Sided Tape 1/2in to one outer side of each of the folded binding pieces. Attach all the binding pieces together with folded edges even to create the spine of the book.

Next, adhere the pages and both covers to the binding, using the Premium Double-Sided Tape 1/2in. The pages are fastened to the flaps of the binding. There you have it, a basic mini book!

Hello Friend Mini Pages

To make page designs, it’s easier to assemble before putting them in the book. Apply Adhesive Sheets 6×12 inch on the back of the patterned papers used for pages, covers, and decorative elements (ie. borders).

There are 10 pages all measuring 3.5-inch square each. They are the inside pages attached back to back like a sandwich around the white cardstock pages already in the book. Create background page designs and set aside.

You need two inside cover pages. Cut them to 3.625-inch squares and design as desired. Set aside.

To attach your first inside page to the white cardstock page, remove the liner and place it on the first page. Add your second page to the back – remove the liner and make sure to cover the flap. Repeat for the rest of the inside pages.

Then adhere the outside covers and lastly, cover the inside front and back cover pages making sure they hide the hinge feature.

Page by Page Details

For the inside front cover and page one: Stamp “Hello gnomie” and cut black cardstock for the mat. Use the E-Z Runner® Micro Refillable Dispenser to fasten those together and in place. Remove the liner from the gnome before adhering.

Hello Friend Mini Book by Judy Hayes for Scrapbook Adhesives by 3L

Pages 2 and 3: Stamp all verses and mat with black cardstock. Adhere all with E-Z Runner® Micro Refillable Dispenser.

Hello Friend Mini Book by Judy Hayes for Scrapbook Adhesives by 3L

Pages 4 and 5: Stamp the toadstools design and random dots with black ink on the pages. Every page has a few dots…some are not so obvious. Add the elements with the E-Z Runner® Micro Refillable Dispenser and the gnome by removing the liner.

Hello Friend Mini Book by Judy Hayes for Scrapbook Adhesives by 3L

Pages 6 and 7: Attached all the elements on the page with the E-Z Runner® Ultra Strong Refillable Dispenser.

Hello Friend Mini Book by Judy Hayes for Scrapbook Adhesives by 3L

Pages 8 and 9: Trace two hearts onto the dot paper and sand the edges to give a white edge. Adhere all with E-Z Runner® Ultra Strong Refillable Dispenser.

Hello Friend Mini Book by Judy Hayes for Scrapbook Adhesives by 3L

Page 10 and inside back cover: left blank to add a personal note or for a photo or two.

Hello Friend Mini Book by Judy Hayes for Scrapbook Adhesives by 3L

The Envelope Element

Using printer paper, I created a 4.5-inch square envelope and assembled it with Premium Double-Sided Tape 1/2in.

First, apply Adhesive Sheets 6×12 inch to the back of the coordinating patterned papers. Cut to fit the flap and its opposite side. Take the backing off and place on to the envelope.

The flap tucks under a plaid strip with a heart. Secure the plaid strip on each end with Premium Double-Sided Tape 1/2in and using the same tape, attach the heart on top to finish.

Just a side note: I learned this style of binding from a class given by Mixed Media Artist, Seth Apter. To fit my style, I adapted to make it work for this Hello Friend Mini Book! It pays to apply what you learn from others 🙂 I hope you enjoyed it!

Thanks for Visiting!
Judy Hayes

Hello Friend Mini Book by Judy Hayes for Scrapbook Adhesives by 3L

Creative Time: 60 Minutes
Skill Level: Intermediate

Materials Needed:
Scrapbook Adhesives by 3L®

HomeHobby™ by 3L

Other:
Patterned Papers: PhotoPlay Paper Co. (Tulla & Norbert’s Excellent Adventure Collection); Imagine Crafts/Tsukineko Versafine Onyx Black Ink; Karin Markers; Ranger Clear Embossing Powder; Stampers Anonymous Tim Holtz Stamps: Tiny Toadstools, Tiny Text; Card Stock: White, Black; Mat Board (Cardboard)

Save it to Pinterest!

Hello Friend Mini Book by Judy Hayes for Scrapbook Adhesives by 3L Pinterest

Visit our Website and Blog!
Sign up for our Newsletter so you never miss a contest or giveaway!

instagram purple icon facebook icon purple pinterest purple icon twitter purple icon YouTube icon blog subscription purple icon

Hot Air Balloon Shaker Card

Hello crafty friends and welcome back! Tracy here, and today I have a fun and interactive little Hot Air Balloon Shaker Card tutorial to share with you. In these crazy days of less contact, I think we should be sending more cards to brighten up the days of the ones we love. What better fun to share than a bright and cheery shaker card. Here are all of the details.

Hot Air Balloon Shaker Card by Tracy McLennon for Scrapbook Adhesives by 3L

Let’s Get Started on this Shaker Card:

I started with the Creative Embellishments hot air ballon shaker kit, which includes all of the pre-cut pieces you need. I painted the top and base pieces of chipboard. Then I also painted the sides of the remaining chipboard pieces.

Hot Air Balloon Shaker Card by Tracy McLennon for Scrapbook Adhesives by 3L

Next step, is to adhere the base, and middle chipboard pieces together using the Dual Tip Glue Pen. Also adhere the top chipboard piece to the acetate layer, again using the Dual Tip Glue Pen.

Hot Air Balloon Shaker Card by Tracy McLennon for Scrapbook Adhesives by 3L

When created a shaker card, it is so important that your layers are completely dry before adding any of your shaker contents. So…while that sits and dries, create your simple card base.

Cue drying music.

The card base is white cardstock and then I cut layers of Bloom Street patterned paper. Adhere the patterns to the base using the E-Z Runner® Grand Refillable Dispenser, as well as the top layer with Creative Photo Corners White. The reason I used the E-Z Runner® Grand Refillable Dispenser paired with the Creative Photo Corners White is that a shaker card can be a little weighty. I wanted the look of the Creative Photo Corners White, but needed the stability of the E-Z Runner® Grand Refillable Dispenser.

Hot Air Balloon Shaker Card by Tracy McLennon for Scrapbook Adhesives by 3L

The shaker is completely dry. Now I added the fabulous fun of this sequins mix from Spiegelmom Scraps.

Hot Air Balloon Shaker Card by Tracy McLennon for Scrapbook Adhesives by 3L

Complete the shaker card balloon by adding the top piece using the Dual Tip Glue Pen. Again, let this dry completely before adding it to your card front.

Hot Air Balloon Shaker Card by Tracy McLennon for Scrapbook Adhesives by 3L

Adhere the shaker card piece to the card front using Adhesive Dots Medium. Next, add the die cut sentiment using Thin 3D Foam Squares White Mix. Then adhere the other cardstock sticker pieces.

Hot Air Balloon Shaker Card by Tracy McLennon for Scrapbook Adhesives by 3L

Thanks so much for stopping by to check out my Hot Air Balloon Shaker Card!
Tracy

Creative Time: 45 minutes (plus drying time)
Skill Level: Intermediate

Materials needed:
Scrapbook Adhesives by 3L®
Creative Photo Corners White
Thin 3D Foam Squares White Mix
Adhesive Dots Medium
E-Z Runner® Grand Refillable Dispenser

HomeHobby™ by 3L
Dual Tip Glue Pen

Other
Pink Paislee- Bloom Street Collection (patterned paper, cardstock stickers, ephemera), Cardstock (White), Spiegelmom Scraps Sequins Mix (I Love You More), Creative Embellishments Chipboard (Hot Air Balloon Shaker Kit), DecoArt- White Acrylic Paint

Save It to Pinterest!

Hot Air Balloon Shaker Card by Tracy McLennon for Scrapbook Adhesives by 3L Pinterest

Visit our Website and Blog!
Sign up for our Newsletter so you never miss a contest or giveaway!

instagram purple icon facebook icon purple pinterest purple icon twitter purple icon YouTube icon blog subscription purple icon

Celebrate Today Scrapbook Layout

Have you ever looked at a scrapbook collection and thought, although cute, the embellishments just aren’t quite what you need? That is exactly what happened to me today with my Celebrate Today scrapbook layout!

Christine joining you with a layout that showcases my teens and grandma and how I used Scrapbook Adhesives by 3L to make embellishments that better suited my needs.

Celebrate Today Layout by Christine Meyer for Scrapbook Adhesives by 3L

The embellishments that came with this collection were in a light and silly kawaii style. While I wanted that overall theme for the layout, I knew a bunch of the embellishments was just not going to work with my teenagers! So I decided to create some of my own embellishments using the 3D Foam Hearts.

Make Your Own Embellishments

Our 3D Foam products are incredibly easy to add foil to, making them perfect for personalizing your layout. We also have a variety of shapes available so you don’t even have to do any cutting.

To add foil to the products all you do is to peel off the top layer to reveal the top sticky side. Then place the foil on top of it, rub to transfer the color, and pull the foil up. Magically it adheres!

Celebrate Today Layout by Christine Meyer for Scrapbook Adhesives by 3L

With hearts already worked into this collection – I knew that the 3D Foam Hearts were the perfect addition. Although I covered them with foil, you can cover them with so many other things as well: glitter, embossing powder, paper; there are so many possibilities!

Celebrate Today Layout by Christine Meyer for Scrapbook Adhesives by 3L

As showcased in this picture the hearts also come in a variety of sizes!

Celebrate Today Layout by Christine Meyer for Scrapbook Adhesives by 3L

Although I’ve highlighted the 3D Foam Hearts, I used a couple of other adhesives on today’s layout! Many elements on it, including the banner and kawaii heart seen here, were popped up with 3D Foam Squares. I also made use of the E-Z Runner Grand throughout the layout.

Celebrate Today Layout Process Video

To see how I did my foiling, as well as the rest of the layout, you can check out this process video.

Creative Time: 45 minutes
Skill Level: Intermediate

Materials Needed:
Scrapbook Adhesives by 3L®

Crafty Foam Tape 108′
E-Z Runner Grand Refillable Dispenser
3D Foam Squares White Mix and 3D Foam Hearts
Metallic Transfer Foil Sheets – Holographic Colors

Other
Scrapbook Kit: The ScrapRoom featuring Pebbles Inc. and Nuvo Drops

Save to Pinterest!

Celebrate Today Layout by Christine Meyer for Scrapbook Adhesives by 3L Pinterest

Visit our Website and Blog!
Sign up for our Newsletter so you never miss a contest or giveaway!

instagram purple icon facebook icon purple pinterest purple icon twitter purple icon YouTube icon blog subscription purple icon

Summertime Watermelon Shaped Card Tutorial

Hi, friends! Let’s celebrate the summer with these sweet watermelon shaped cards. If you’re staying home, making these cards will help spread a little cheer to loved ones. Teri here to show you how so let’s get started.

Summertime Watermelon Shaped Card Tutorial by Teri Anderson for Scrapbook Adhesives by 3L

These cards are easy to make and are sure to make your family and friends smile!

Creating the Watermelon Shaped Card

Start by folding a piece of cardstock in half. Take a large circle die and temporarily anchor to the panel. Run it through your die-cutting machine and you’ll have a watermelon base.

Summertime Watermelon Shaped Card Tutorial by Teri Anderson for Scrapbook Adhesives by 3L

Keep the leftover piece of paper and die in tacked, we’ll be using this as a guide for the next step. Set it on top of a piece of green cardstock. Temporarily anchor the die and run the stack through a die-cutting machine. You’ll end up with a partial green circle for your watermelon skin.

Summertime Watermelon Shaped Card Tutorial by Teri Anderson for Scrapbook Adhesives by 3L

For the rind (the white part of the watermelon), repeat the last step but with white cardstock to give you a partial white circle.

Use your scissors to trim the partial green circle to make the watermelon skin. Don’t worry if your cutting is wonky and not perfect, it’s supposed to be! That’s what makes these watermelon cards charming and unique.

Summertime Watermelon Shaped Card Tutorial by Teri Anderson for Scrapbook Adhesives by 3L

Adhere the green “skin” to your partial white circle with E-Z Dots® Permanent Refillable Dispenser. Use your scissors again to cut the white circle to create your “rind.”

Summertime Watermelon Shaped Card Tutorial by Teri Anderson for Scrapbook Adhesives by 3L

Affix your layers to your pink watermelon base with E-Z Dots® Permanent Refillable Dispenser.

Embellishing the Watermelons

Summertime Watermelon Shaped Card Tutorial by Teri Anderson for Scrapbook Adhesives by 3L

Stamp a sentiment on a strip of white cardstock with black ink. Add it to the card with E-Z Dots® Permanent Refillable Dispenser.

To mimic the look of seeds, I used the small hearts from the 3D Foam Hearts on two cards and the raindrops from the 3D Foam Garden Shapes on the third.

To Wear Your Adhesive on the Outside, I peel the top liner off and cover them with flock or glitter…you could even use foil! Make sure to press into the adhesive to secure before tapping off the excess.

Summertime Watermelon Shaped Card Tutorial by Teri Anderson for Scrapbook Adhesives by 3L

Complete your card by adding some twine to the top of it! Use an Adhesive Dot to keep the twine in place.

Design Suggestions for Watermelon Shaped Cards

Summertime Watermelon Shaped Card Tutorial by Teri Anderson for Scrapbook Adhesives by 3L

The cool thing about this card design is you can change it up by using different colors of cardstock for the melon. Pink, red and dark pink are all options!

You can also mix it up by using different foam shapes to make the seeds. There’s really no wrong (or right) way to do it!

Summertime Watermelon Shaped Card Tutorial by Teri Anderson for Scrapbook Adhesives by 3L

And don’t forget that these cards will stand up! The weight of the sentiment strip and “seeds” might make it lean one way or another. Don’t worry about that as it adds to the charm of these cards!

Summertime Watermelon Shaped Card Tutorial by Teri Anderson for Scrapbook Adhesives by 3L

I hope you enjoyed today’s Watermelon Shaped Card tutorial and are inspired to make some “one-in-a-melon” watermelon cards of your own!

Happy crafting,
Teri Anderson

Creative Time: 45 Minutes
Skill Level: Beginner

Materials Needed
Scrapbook Adhesives by 3L®

Other
White Cardstock: Neenah Paper; Red, Pink, Dark Pink and Green Cardstocks: American Crafts; Circle Dies: Hero Arts; Stamps: Sunny Studio (Fabulous Flamingos Stamp Set); Black Ink Pad: Ranger Ink; Flock: Stampendous!; Twine: The Twinery

Love It? Save to Pinterest!

Summertime Watermelon Shaped Card Tutorial by Teri Anderson for Scrapbook Adhesives by 3L Pinterest

Visit our Website and Blog!
Sign up for our Newsletter so you never miss a contest or giveaway!

instagram purple icon facebook icon purple pinterest purple icon twitter purple icon YouTube icon blog subscription purple icon

DIY Confetti Background Birthday Card

Hi everyone, Yvonne here with a celebratory twist to making a confetti background in a birthday card! By taking a look at the shapes of the E-Z Squares® Refillable Dispenser and E-Z Runner® Permanent Strips Refillable Dispenser, I came up with this fun design!

With a bit of glitter and foil, it’s SO easy and no special tools. You bring adhesives outside from layers and to make embellishments to Wear Your Adhesive on the Outside. I’ll show you how.

DIY Confetti Background Birthday Card by Yvonne van de Grijp for Scrapbook Adhesives by 3L

DIY Confetti Background

Pick up an adhesive square shape with a pair of tweezers from the E-Z Squares® Refillable Dispenser. Then randomly place onto a white card panel.

DIY Confetti Background Birthday Card by Yvonne van de Grijp for Scrapbook Adhesives by 3L

Place about five of the adhesive square shapes from the E-Z Squares in a cluster. Sprinkle pink glitter on one adhesive square, rub the glitter with fingertips to secure, and tap off excess.

Repeat this step on the other squares using different color glitter. I used pink, white, purple, green, blue, and yellow glitter.

Then continue creating more square and glitter clusters until you get your desired look.

DIY Confetti Background Birthday Card by Yvonne van de Grijp for Scrapbook Adhesives by 3L

Adding More Confetti Design

Again use tweezers to pick up the tiny strips of the E-Z Runner® Permanent Strips Refillable Dispenser and then adhere onto the glittered card panel.

DIY Confetti Background Birthday Card by Yvonne van de Grijp for Scrapbook Adhesives by 3L

Tip: use  tweezers with a pointy tip for easier picking up of the tiny tape strips. Adhere the strips all over the card panel.

Then cut a small piece of silver foil from  Metallic Transfer Foil Sheets Holographic Colors and rub the foil with your finger (with the bright side facing up) over the stripes for an extra glittery and festive touch.

DIY Confetti Background Birthday Card by Yvonne van de Grijp for Scrapbook Adhesives by 3L

Then use a yellow mister to spray some yellow accents to the card front for extra color.

DIY Confetti Background Birthday Card by Yvonne van de Grijp for Scrapbook Adhesives by 3L

This also gives an extra accent to the glitter and holographic elements you just added.

The Card Base

First, adhere the glittered white card panel onto a slightly larger lilac card panel and then onto a white card base using Crafty Foam Tape White. Using Crafty Foam Tape White gives an extra dimension to your Happy Birthday card.

Finishing the card.

Cut out a stamped Happy Birthday sentiment and adhere to the card front using Crafty Foam Tape White.

Next cut out a butterfly from patterned paper and fold the butterfly slightly. With a pair of tweezers pick up a tiny strip of  E-Z Runner® Permanent Strips Refillable Dispenser and place on the back of the body of the butterfly. Then cut a square from 3D Foam Squares White Regular Size in half and adhere to the back of the wings.

DIY Confetti Background Birthday Card by Yvonne van de Grijp for Scrapbook Adhesives by 3L

Remove the liner and the butterfly to the card front. The 3D Foam Squares make the wings pop up!

DIY Confetti Background Birthday Card by Yvonne van de Grijp for Scrapbook Adhesives by 3L

And voila…your Happy Birthday card is ready to be sent! I hope you enjoyed this DIY Confetti Background tutorial.

Wishing you happy crafting,
Yvonne van de Grijp

DIY Confetti Background Birthday Card by Yvonne van de Grijp for Scrapbook Adhesives by 3L

Creative Time: 30 minutes
Skill Level: Intermediate

Materials Needed
Scrapbook Adhesives by 3L®

E-Z Squares® Refillable Dispenser
E-Z Runner® Permanent Strips Refillable Dispenser
Metallic Transfer Foil Sheets Holographic Colors
Crafty Foam Tape White
3D Foam Squares White Regular Size

Other
White and Lilac Cardstock; Glitter: Prima Marketing (Art ExtraVagance Glitter set A Bloom); Stamp: Lawn Fawn® (Chit Chat); Black ink Pad; Butterfly (Mintay Papers: Wing Book); Ink Spray (Craft Emotions, Yellow); Tweezers, Bone Folder; Paper Trimmer

Save It to Pinterest!

DIY Confetti Background Birthday Card by Yvonne van de Grijp for Scrapbook Adhesives by 3L Pinterest

Visit our Website and Blog!
Sign up for our Newsletter so you never miss a contest or giveaway!

instagram purple icon facebook icon purple pinterest purple icon twitter purple icon YouTube icon blog subscription purple icon