You are in our US store • Switch to Europe store

Thinking of You Circle Frame Card

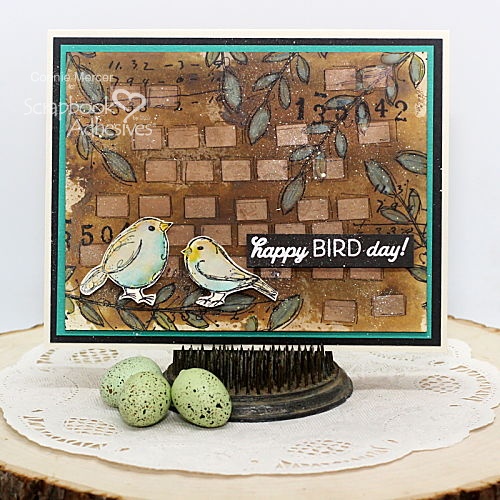
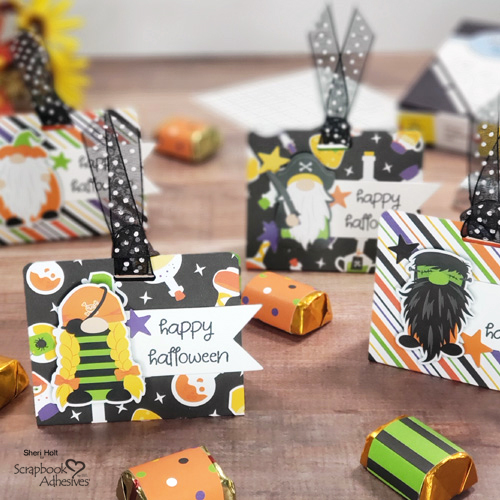
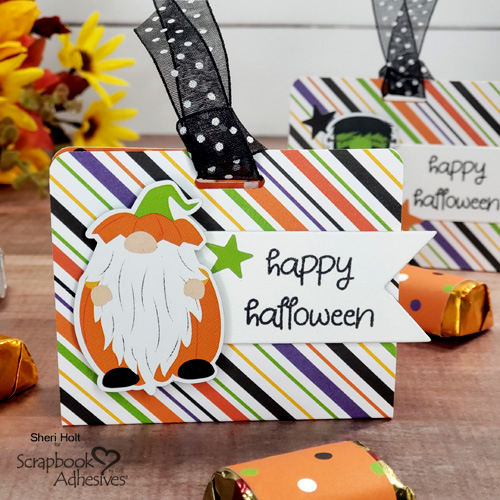
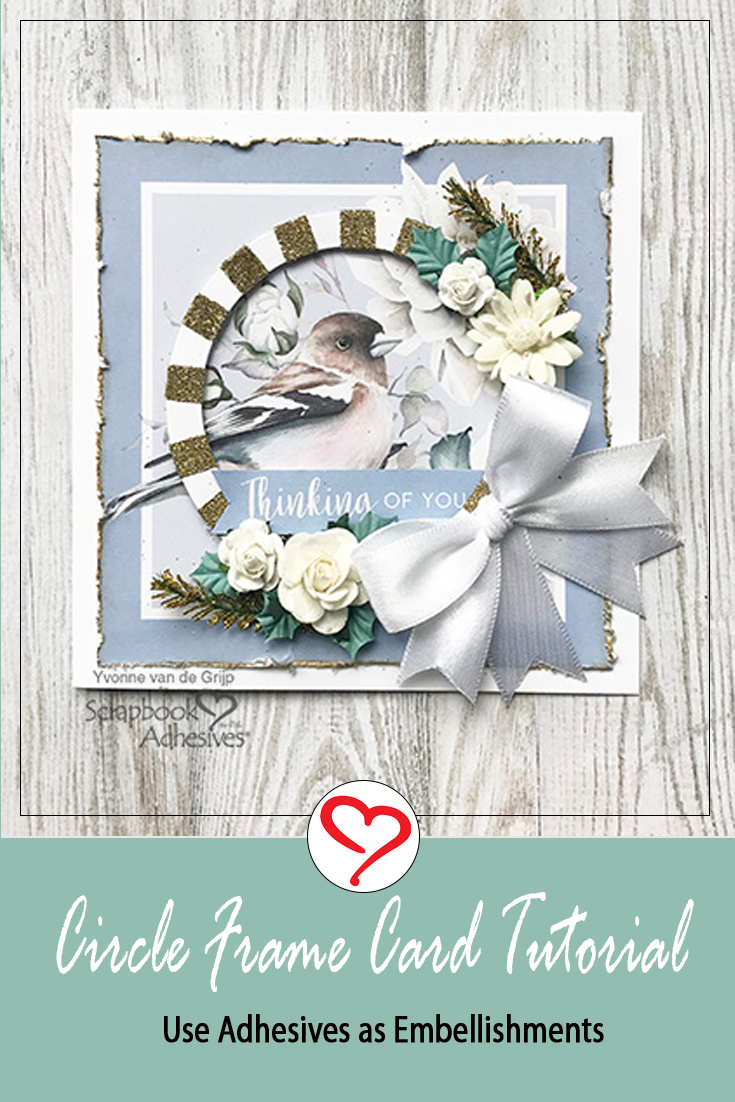
Hi everyone, Yvonne here with a romantic Circle Frame Card with some gorgeous and easy to create details like a double bow and a glittered frame. Using the E-Z Squares® Refillable Dispenser it’s super easy to create a glittered circle frame!

Thinking of You Circle Frame Card by Yvonne van de Grijp for Scrapbook Adhesives by 3L

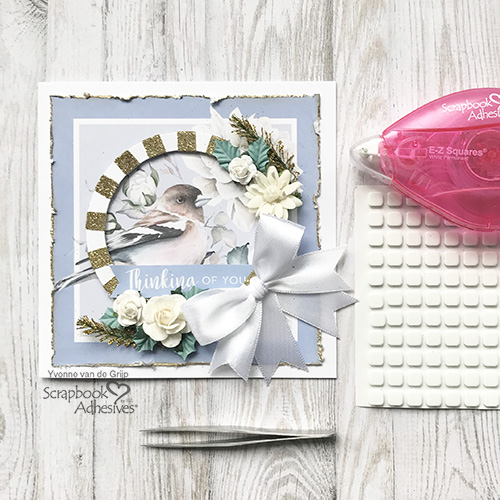
Bonus! I have the secret to transforming a single bow in a double-tailed bow is… well… let me first show you how to make the Double Bow Frame Card. Then I will let you in on my bow secret (wink wink)! Shall we get started?

The Circle Frame

Let’s create the base of the frame by nesting two circle thin metal dies to die-cut a ring shape with white cardstock. I used washi tape to secure the dies to avoid shifting while cutting.

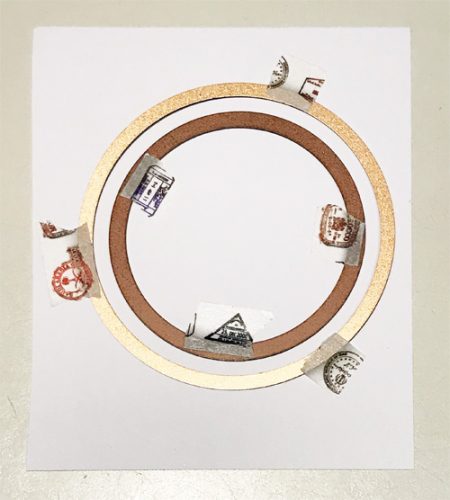
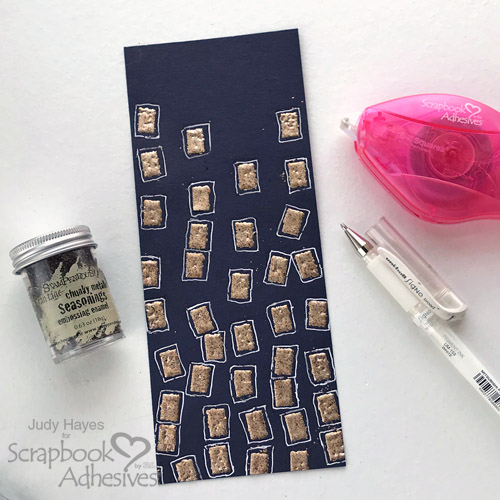
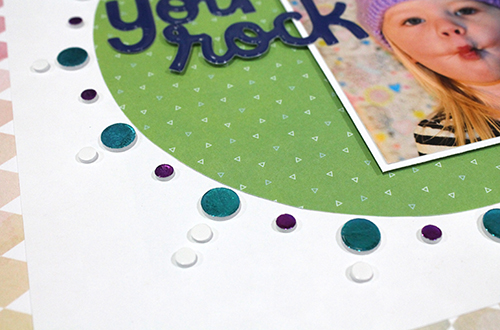
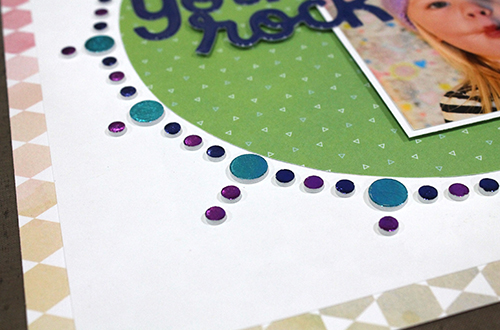
To start to embellish the frame, use tweezers to pick up a square from the E-Z Squares® Refillable Dispenser and place onto the circle frame. Repeat this step, leaving a small gap in between, until you complete the circle.

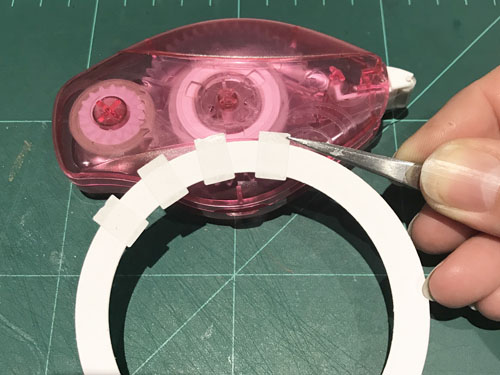
Next, fold in the square ends to the back of the frame.

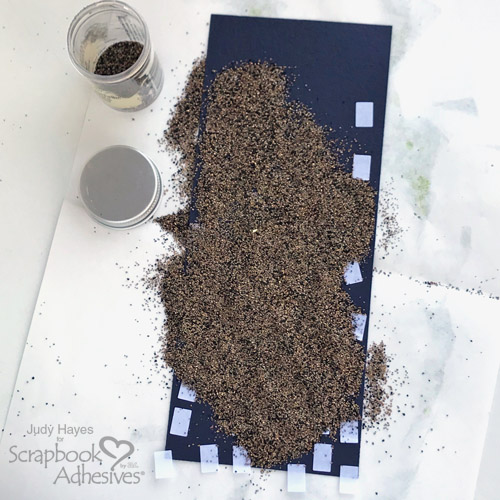
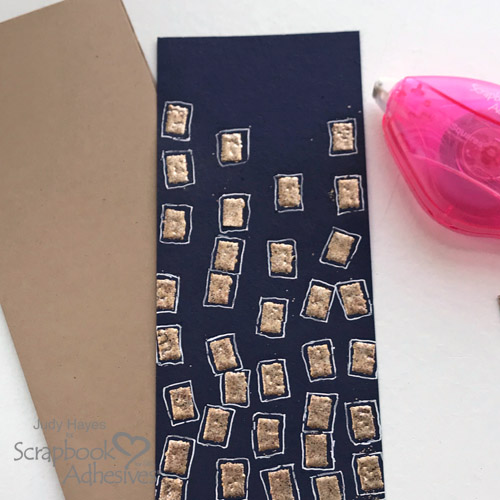
Sprinkle gold glitter embossing powder over the E-Z Squares. Make sure to press the powder into the squares to secure before tapping off the excess.

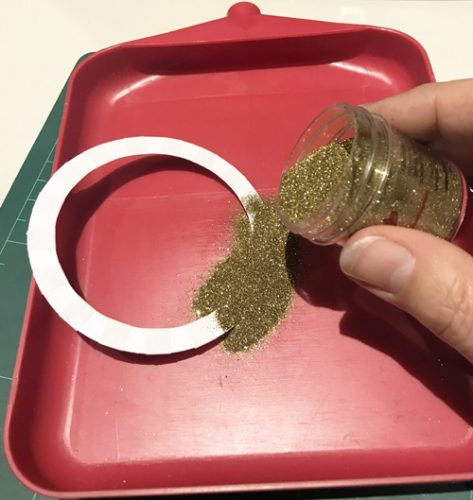
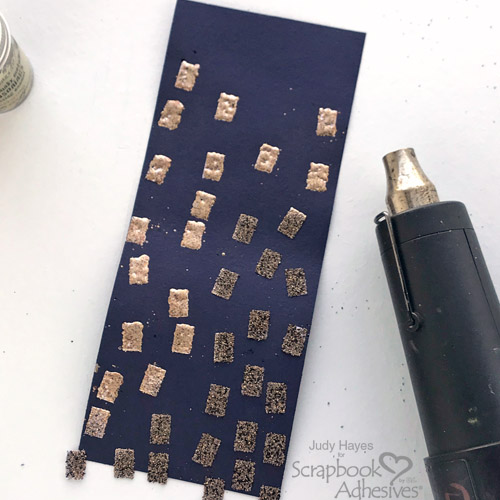
Use a heating tool to melt the powder. Yes…the E-Z Squares are heat resistant! This technique is called Wear Your Adhesive on the Outside.

The Card Panel

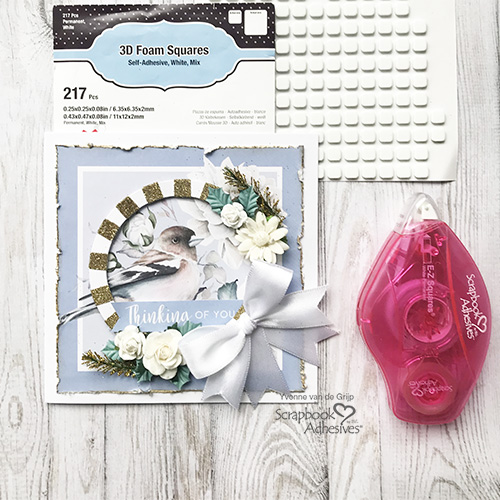
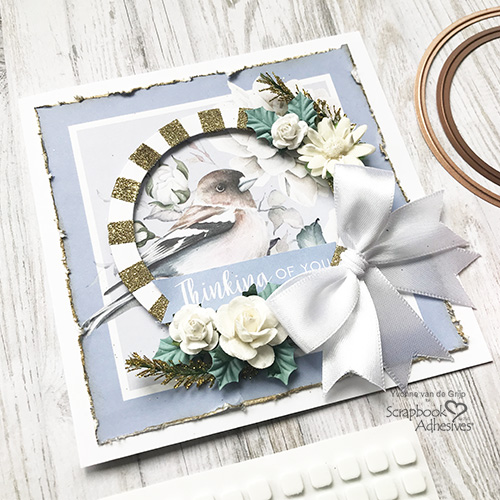
For my card panel, I used a pretty design from a patterned paper. Then adhere the glittered circle frame over the bird image with some 3D Foam Squares White Mix to create a beautiful dimensional effect.

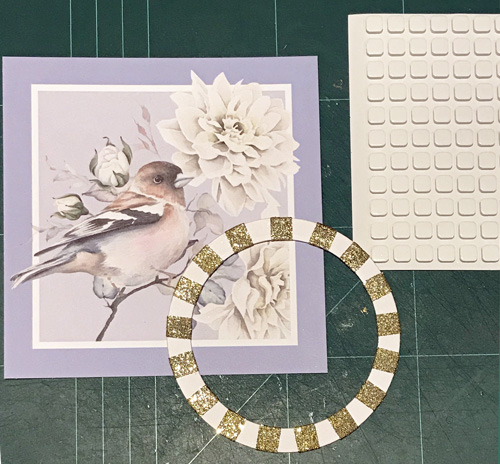
Lastly, distress the edges of the square image and slightly ink the edges using brown ink.

Fold a square card from white cardstock and adhere the circle frame card panel on top with the E-Z Squares® Refillable Dispenser.

Double Tail Bow

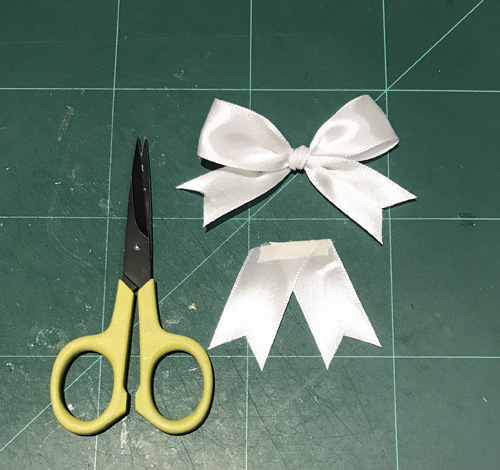
Let’s start with a simple white satin bow and set that aside. Next, cut two pieces of white satin ribbon, cut the ends like a fishtail and adhere them together with Premium Double-Sided Tape 1/4in on the top, as shown in the picture.

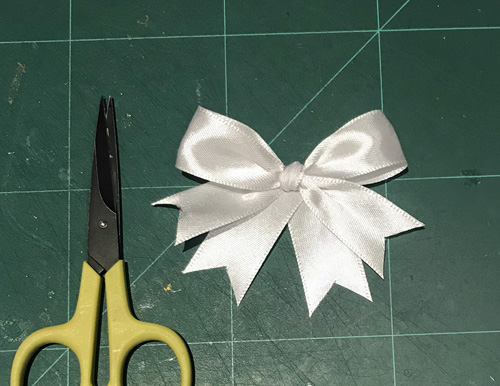
Connect the tails and the bow using Premium Double-Sided Tape 1/4in to create the double bow embellishment. Yep…it’s that simple! Try it on your next card creation!

Embellishing Touches

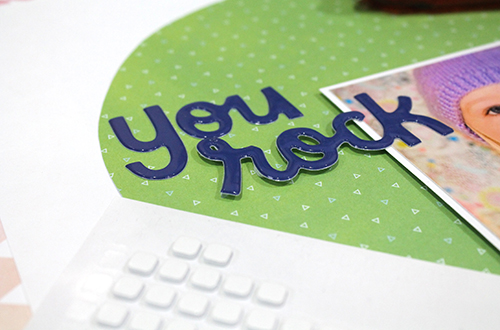
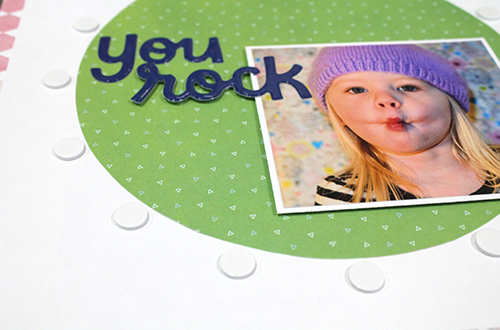
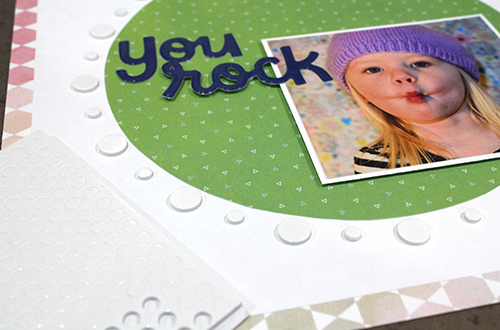
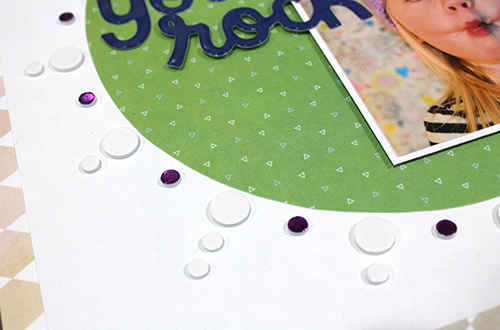
Adhere the double tail bow to the circle frame with Premium Double-Sided Tape 1/4in. Lift and add the sentiment using 3D Foam Squares White Mix to the circle. Finally, use the Dual Tip Glue Pen to adhere clusters of flowers, stamens, and leaves around the bow.

Thinking of You Circle Frame Card by Yvonne van de Grijp for Scrapbook Adhesives by 3L

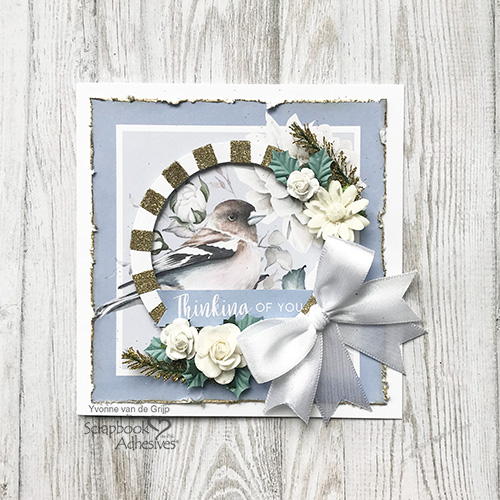
Voila…your Thinking of You Circle Frame Card is ready to be sent! I hope you enjoyed this tutorial and wish you happy crafting.
Yvonne van de Grijp

Thinking of You Circle Frame Card by Yvonne van de Grijp for Scrapbook Adhesives by 3L

Creative Time: 30 minutes
Skill Level: Intermediate

Materials Needed
Scrapbook Adhesives by 3L®

E-Z Squares® Refillable Dispenser
3D Foam Squares White Mix

HomeHobby™ by 3L
Dual Tip Glue Pen
Premium Double-Sided Tape 1/4in

Other
Etched Dies and Die Cutting Machine: Spellbinders® Paper Arts (Standard Circles Small, Standard Circles Large, Platinum 6 Machine); White Cardstock; Patterned Paper: The Paper Boutique (Morning Whispers 12×12” Paper Pad); Embossing Powder: WOW! Embossing Powder (Gold Tinsel); Heat Tool; Paper Distress Tool; Ink: Ranger Ink (Distress Ink in Frayed Burlap); Mulberry Flowers and Leaves; Stamens: White Satin Ribbon; Tweezers; Scissors; Washi Tape; Paper Trimmer

Save to Pinterest!

Thinking of You Circle Frame Card by Yvonne van de Grijp for Scrapbook Adhesives by 3L Pinterest

Visit our Website and Blog!
Sign up for our Newsletter so you never miss a contest or giveaway!

instagram purple icon facebook icon purple pinterest purple icon twitter purple icon YouTube icon blog subscription purple icon

Mixed Media Background with Adhesive

Hi, Connie here with a really cool mixed media background using the E-Z Squares Refillable Dispenser. You’re going to love this!! Let me show you how cool this is!

Mixed Media Background with Adhesive by Connie Mercer for Scrapbook Adhesives by 3L

Mixed Media Background Steps

Mixed Media Background with Adhesive by Connie Mercer for Scrapbook Adhesives by 3L
  1. On an already inked mixed media cardstock (heavy cardstock is fine too), use a ruler or a long acrylic stamping block as a guide to applying lines of E-Z Squares Refillable Dispenser.
  2. As you can see, the lines aren’t straight and are random.
  3. Using color mediums such as Panpastels Brown /Black, rub the color over the E-Z Squares. Then outline the squares with a fine line marker.
  4. Stamp images to the background. I used leaf branches. Color them using Distress Oxide ink.
Mixed Media Background with Adhesive by Connie Mercer for Scrapbook Adhesives by 3L

5. Double mat with two colors of cardstock and adhere to the card front with the E-Z Runner Grand Refillable Dispenser.

6. Apply the Crafty Foam Tape 108′ to the back of the card panel.

7. The crafty foam tape was added around the edges and one strip in the middle. This helps to adhere a warped panel straight on the card base.

8. Using the 3D Foam Squares White Small Size, place the stamped birds and embossed sentiment to the card front.

Here are some close-up images of the finished card.

Mixed Media Background with Adhesive by Connie Mercer for Scrapbook Adhesives by 3L

Thanks for stopping by~
Connie Mercer

Creative Time: 40 minutes
Skill Level: Intermediate

Materials Needed
Scrapbook Adhesives by 3L®

E-Z Squares Refillable Dispenser and E-Z Squares Refill
3D Foam Square White Small Size
Crafty Foam Tape 108
E-Z Runner Grand Refillable Dispenser and E-Z Runner Grand Permanent Strips Refill

Other
Embossing Powder: WOW! Embossing Powder; Coloring: PanPastels and Ranger Ink (Distress Oxide ink); Stamps: Darkroom Door, and A Jillian Vance Design; Black Marker

Love It? Save It to Pinterest!

Mixed Media Background with Adhesive by Connie Mercer for Scrapbook Adhesives by 3L Pinterest

Visit our Website and Blog!
Sign up for our Newsletter so you never miss a contest or giveaway!

instagram purple icon facebook icon purple pinterest purple icon twitter purple icon YouTube icon blog subscription purple icon

WindowRama Shaker Card Tutorial

Hi friends! Dana here today sharing how to use the Stampendous WindowRama Dome Jar Shaker Cutting Dies to create a dimensional dome shaker card.

Typically, I am not a card maker. In fact, I usually struggle with more complicated card designs. I was pleasantly surprised by how easy it was to put this fun shaker card together using the helpful instructions and some of my favorite adhesive products.

WindowRama Shaker Card Tutorial by Dana Tatar for Scrapbook Adhesives by 3L

WindowRama Dome Shaker Card Cuts

I modified my design slightly for patterned paper lovers. In order for the window to reveal a cloudy sky pattern, I needed to cut an additional piece of paper to fit inside the back panel. The second print on the backside of striped patterned paper is visible on the inside edges of the card when folded flat.

  1. Die-cut two patterned paper pieces with the WindowRama Die 1. Create the flaps for the front stripe and back yellow panels for the card. Die-cut an additional piece from sky patterned paper and trim off the flaps. Secure it to the center of the back yellow panel (front side).
  2. To create a window, place WindowRama Die 7 in the center of the front stripe panel and die-cut.
  3. For the glass dome base, die-cut with Die 10 and woodgrain patterned paper. The base plaque is die-cut with Die 11 and white cardstock.
  4. Lastly, die-cut with Die 15 and clear acetate twice to make the outer shaker frames.

WindowRama Shaker Card Assembly

5. For the shaker feature, apply 3D Foam Strips around the edge of one acetate piece and add a butterfly die cut and glass glitter inside. On the second acetate, add Extreme Double-Sided Tape 1/8in. on the edges with the top liner on. Sandwich the two acetates with the 3D Foam Strip to seal.
6. Peel the top liner from the shaker and press it onto the backside of the front card panel.
7. Stamp a sentiment onto the oval plaque and attached it to the glass dome base using E-Z Runner Ultra-Strong Refillable Dispenser.
8. Attach the base to the card front, covering the bottom curve of the window with Extreme Double-Sided Tape 1/8in. Sandwich the front and back panels with 1/2-inch Premium Double-Sided Tape.

Shaker Card Details

It’s the details that count. Two colors of glass glitter were added inside the shaker to complement the cloud patterned paper inside the card. In addition, a small piece of Extreme Double-Sided Tape secured the butterfly die cut to the back of the shaker so it would always be in flight.

Furthermore, the oval plaque has two holes for brads but I used adhesive pearls instead. Either option looks great!

I hope I have inspired you to try creating dimensional shaker cards. In addition to a dome shaker, this die set also cuts mason jar and gumball machine windows that are fun to use to create cards with or without a shaker feature.

Thanks for stopping by today!
~Dana Tatar

Creative Time: 45 Minutes
Skill Level: Intermediate

Materials Needed
Scrapbook Adhesives by 3L®

HomeHobby™ by 3L

Stampendous®

  • WindowRama Dome Jar Shaker Cutting Die
  • Shake It Up Perfectly Clear Stamps

Other Patterned Papers: American Crafts and Kaisercraft; Butterfly Die Cut: American Crafts; Pearls: Flourish with a Bling; Ink: Ranger Ink; White Cardstock; Acetate; Heart Sticker; Glass Glitter

Save It to Pinterest!

Visit our Website and Blog!
Sign up for our Newsletter so you never miss a contest or giveaway!

instagram purple icon facebook icon purple pinterest purple icon twitter purple icon YouTube icon blog subscription purple icon

Wonky Embossed Squares Congrats Card

Hello crafty friends! I had fun putting together this congrats card with a wonky embossed squares background. With E-Z Squares® Refillable Dispenser and chunky metallic embossing powder, it’s so easy to do.

Wonky Embossed Squares Congrats Card by Judy Hayes for Scrapbook Adhesives by 3L

Wonky Embossed Square Card Steps

Start with a 3.625 x 8.625-inch slimline card base cut from Kraft cardstock. Make a 3.5 x 8.5-inch card panel out of dark blue cardstock.

Randomly roll the E-Z Squares® Refillable Dispenser across the dark blue card panel to create a pattern similar to the image shown.

Wonky Embossed Squares Congrats Card by Judy Hayes for Scrapbook Adhesives by 3L

Pour Chunky Metallic Seasonings Embossing Enamel over the square adhesive. Press onto squares with fingers to secure and tap off excess.

Wonky Embossed Squares Congrats Card by Judy Hayes for Scrapbook Adhesives by 3L

Use a heating tool to melt embossing enamel. Some will melt and some not but that’s OK, it was a look I was going for. Cut off squares that extend beyond the edge.

Wonky Embossed Squares Congrats Card by Judy Hayes for Scrapbook Adhesives by 3L

A Little Detailing

Use a white pen to outline squares to anchor the design against the dark background.

Wonky Embossed Squares Congrats Card by Judy Hayes for Scrapbook Adhesives by 3L

Attach the card panel to the Kraft card base using E-Z Squares® Refillable Dispenser.

Wonky Embossed Squares Congrats Card by Judy Hayes for Scrapbook Adhesives by 3L

Stamp Congrats sentiment with dark blue ink on Kraft cardstock and cut into a strip.

Wonky Embossed Squares Congrats Card by Judy Hayes for Scrapbook Adhesives by 3L

Cut a piece of the dark blue mat to border the sentiment. Press one edge into the Versamark ink pad and cover with Chunky Metallic Seasonings Embossing Enamel. Heat to melt. Repeat on all edges.

Wonky Embossed Squares Congrats Card by Judy Hayes for Scrapbook Adhesives by 3L

Adhere the sentiment to the dark blue mat using E-Z Runner® Micro Refillable Dispenser.

Wonky Embossed Squares Congrats Card by Judy Hayes for Scrapbook Adhesives by 3L

Add Thin 3D Foam Squares Black Mix to the back of the sentiment and secure at the top of the card.

Wonky Embossed Squares Congrats Card by Judy Hayes for Scrapbook Adhesives by 3L

To finish, outline the matted sentiment with a white pen.

Wonky Embossed Squares Congrats Card by Judy Hayes for Scrapbook Adhesives by 3L

Here is a second look at the finished card.

Wonky Embossed Squares Congrats Card by Judy Hayes for Scrapbook Adhesives by 3L

Thanks for Visiting!
Judy Hayes

Creative Time: 25 Minutes
Skill Level: Beginner

Materials Needed
Scrapbook Adhesives by 3L®

E-Z Squares® Refillable Dispenser
E-Z Runner® Micro Refillable Dispenser
Thin 3D Foam Squares Black Mix

Other:
Stamps: Altenew (Sentiments and Quotes Stamp Set); Ink: Tsukineko (Versafine Clair in Medieval Blue and Versamark Ink); Embossing Powder: Stampendous (Chunky Metallic Seasonings Embossing Enamel); White Pen: Uni-Ball Signo Broad White; Deep Blue and Kraft Cardstock

Save It to Pinterest!

Wonky Embossed Squares Congrats Card by Judy Hayes for Scrapbook Adhesives by 3L Pinterest

Visit our Website and Blog!
Sign up for our Newsletter so you never miss a contest or giveaway!

instagram purple icon facebook icon purple pinterest purple icon twitter purple icon YouTube icon blog subscription purple icon

College Visit Scrapbook Layout

Hi there Scrapbook Adhesives by 3L Fans! Christine Meyer joining you today with a grown boy layout – a college visit. To really make it awesome I did a technique showcasing the E-Z Squares® Refillable Dispenser to create a unique background!

College Visit Scrapbook Layout by Christine Meyer For Scrapbook Adhesives by 3L

Sometimes you have great products but you just want to make a fun background. Have you ever thought about ways to make a background using adhesives? Although I have done it several times (including earlier this month) – I’ve never done one with the E-Z Squares® but they were the perfect product to Wear Your Adhesive Outside!

E-Z Squares Background

College Visit Scrapbook Layout by Christine Meyer For Scrapbook Adhesives by 3L

To create this background, I just ran the E-Z Squares® Refillable Dispenser up and down the page creating angled lines of varying heights. Then I added embossing powder, heated it up, and voila! A super easy background that didn’t require any special tricks or time to create!

Other Adhesives on this Layout

College Visit Scrapbook Layout by Christine Meyer For Scrapbook Adhesives by 3L

With a bold background on this college visit layout, I knew I wasn’t going to need to add a lot! Crafty Foam Tape, 3D Foam Squares, and of course the E-Z Runner® Grand all combine to create layers of fun!

College Visit Scrapbook Layout by Christine Meyer For Scrapbook Adhesives by 3L

Here you can see how the layers came together to create a final bold and colorful topping to this fun background.

College Visit Layout Process Video

You can check out the entire process for this layout and made this background in the video below. And, spoiler alert, if you like the idea but want it less bold, you’ll get a sneak peek into my layout that will be coming up here next! I’ll be doing the same technique but with a more subtle feel!

Creative Time: 60 Minutes
Skill Level: Beginner

Materials Needed:
Scrapbook Adhesives by 3L®

3D Foam Squares White Small Size
E-Z Squares® Refillable Dispenser
Crafty Foam Tape 108ft
E-Z Runner® Grand Dispenser

Other
Patterned Papers: Simple Stories (Bro & Co Collection); Embossing Powder: Wow! Embossing Powder; Heating Tool

Save It to Pinterest!

College Visit Scrapbook Layout by Christine Meyer For Scrapbook Adhesives by 3L

Visit our Website and Blog!
Sign up for our Newsletter so you never miss a contest or giveaway!

instagram purple icon facebook icon purple pinterest purple icon twitter purple icon YouTube icon blog subscription purple icon

Halloween Nugget Treat Holders

Hello! Sheri here, and today I have an adorable easy Halloween Nugget Treat Holder tutorial. These would make great little gifts for the office too. Halloween isn’t just for kids, right? Let me share how I created these!

Halloween Nugget Treat Holders by Sheri Holt for Scrapbook Adhesives by 3L

Halloween Nugget Treat Holder Steps

For each treat holder, you will need to cut a piece of 3” x 6” patterned cardstock for the base. Cut two strips of 1” x 3” cardstock to wrap your nuggets. FYI, one 12 x 12″ sheet of cardstock will make six treat holders.

With the 3 x 6-inch patterned cardstock base, score 2 1/2” and 3 1/3” on the long (6″) side. Fold to create a flat base. Round the corners and punched a hole for the ribbon.

Designer’s Tip: Make the ribbon opening fun with a shaped hole puncher or even staple the ribbon to the holder to close it.

Halloween Nugget Treat Holders by Sheri Holt for Scrapbook Adhesives by 3L

Wrap the 1″ x 3″ strip of patterned paper around each nugget. Seal the end with an Adhesive Line. I think they are my new favorite thing! These Adhesive Lines are the perfect size to fit the 1” wide strip. Also, the lines can be used to hold the candies in place on the base of the holder.

Halloween Nugget Treat Holders by Sheri Holt for Scrapbook Adhesives by 3L

Lastly, attach a sentiment, ribbon, and your favorite character on the front with 3D Foam Squares for a fun dimension.

Halloween Nugget Treat Holders by Sheri Holt for Scrapbook Adhesives by 3L

This project couldn’t be any easier – just add fun two-sided patterned papers like this Halloween collection!

Halloween Nugget Treat Holders by Sheri Holt for Scrapbook Adhesives by 3L

Thanks for stopping by to check out my Nugget Treat Holders for Halloween!
Sheri Holt 

Creative Time: 20 minutes
Skill Level: Beginner

Materials needed:
Scrapbook Adhesives by 3L®

3D Foam Squares White Mix
Adhesive Lines

Other
Patterned Paper and Clear Stamp: Photo Play Paper (Gnome for the Holidays Halloween Collection); Banner Die: Avery Elle (Dotted Die Banner); Black Ink: Tsukineko (Memento Ink in Tuxedo Black); Ribbon; Chocolate Nuggets Candy

Love It? Save It to Pinterest!

Halloween Nugget Treat Holders by Sheri Holt for Scrapbook Adhesives by 3L Pinterest

Visit our Website and Blog!
Sign up for our Newsletter so you never miss a contest or giveaway!

instagram purple icon facebook icon purple pinterest purple icon twitter purple icon YouTube icon blog subscription purple icon

Layered Butterflies Friendship Cards

Hi, everyone! How about adding pretty layered butterflies to your handmade cards? Teri here, and I’m going to show you a fun way to do just that with a twist!

These butterflies can be made quickly with just a few basic paper crafting supplies, and they look awesome when added to cards. Let’s get started!

Layered Butterflies Friendship Cards by Teri Anderson for Scrapbook Adhesives by 3L

Layered Butterflies Basics

Start by cutting a piece of foam from a 3D Foam Creative Sheets Medium White. Cover it with lightweight cardstock.

Then die-cut some butterflies from it. Any solid butterfly die will work!

Designer’s Note: Use a little Washi tape to hold the die in place while you cut so it doesn’t shift around if you need to run it through your machine more than once.

You’ll also want to cut some butterflies from vellum.

Layered Butterflies Friendship Cards by Teri Anderson for Scrapbook Adhesives by 3L

Assembling the Butterflies

Layered Butterflies Friendship Cards by Teri Anderson for Scrapbook Adhesives by 3L

Place an Adhesive Line in the middle of each foam butterfly. Center a vellum butterfly on top. You can keep the vellum flat or you can curl the edges with your fingers.

Layered Butterflies Friendship Cards by Teri Anderson for Scrapbook Adhesives by 3L

For the butterfly center, wrap twine or jute around the middle. Tie a knot at the top. Snip off the ends of the twine with your scissors. If you leave a little twine at the ends, it will make the butterflies look like they have antennae!

Layered Butterflies Friendship Cards by Teri Anderson for Scrapbook Adhesives by 3L

Simply remove the backing paper and adhere them to your cards! It adds a sweet dimensional element that your friends will love.

Layered Butterflies Friendship Cards by Teri Anderson for Scrapbook Adhesives by 3L

Layered Butterflies with Sequins

You are not limited to using twine to decorate your butterflies!

Layered Butterflies Friendship Cards by Teri Anderson for Scrapbook Adhesives by 3L

Rather than twine, I used Adhesive Lines on these butterflies for my second card before placing a line of sequins onto it.

Layered Butterflies Friendship Cards by Teri Anderson for Scrapbook Adhesives by 3L

The sequins add a hint of glitz to the card if I do say so! Not a fan of sequins? Trying using gems or beads instead!

Layered Butterflies Friendship Cards by Teri Anderson for Scrapbook Adhesives by 3L

Bonus: Creating Backgrounds for the Layered Butterflies Cards

One more tip I wanted to give you! Notice the backgrounds on both cards? Take a stencil and ink to create them!

To keep the stencil from shifting while applying ink, I rolled E-Z Dots® Repositionable adhesive to it. This helps hold it in place without damaging the cardstock as I sponged ink through the stencil design!

Layered Butterflies Friendship Cards by Teri Anderson for Scrapbook Adhesives by 3L

Thank you for checking out today’s tutorial. I hope you might try making a few layered butterflies of your own! Let me know if you do!

Happy crafting,
Teri Anderson

Creative Time: 60 Minutes
Skill Level: Beginner

Materials Needed
Scrapbook Adhesives by 3L®

Other
White Cardstock: Neenah Paper; Vellum: Neenah Paper; Stencil: My Favorite Things; Red, Orange, Yellow, Green Ink Pads: My Favorite Things; Black Ink Pad: Ranger Ink; Dies: Echo Park Paper (Butterfly), My Favorite Things (Rectangle); Stamps: Pretty Pink Posh (Encouraging Greetings Stamp Set); Sequins: Pretty Pink Posh; Black Ink Pad: Ranger Ink; Twine: The Twinery

Save It to Pinterest!

Layered Butterflies Friendship Cards by Teri Anderson for Scrapbook Adhesives by 3L Pinterest

Visit our Website and Blog!
Sign up for our Newsletter so you never miss a contest or giveaway!

instagram purple icon facebook icon purple pinterest purple icon twitter purple icon YouTube icon blog subscription purple icon

You Rock Foam Circle Layout

Hello scrapbooking friends, Tracy here. Today, I have a fun Wear Your Adhesive on the Outside technique with a pretty foam circle layout. Accented with foil, it really makes the page shine! Let me show you all of the details.

You Rock Foam Circle Layout by Tracy McLennon for Scrapbook Adhesives by 3L

Create a Foam Circle Layout Design

Center white cardstock over a patterned paper using the E-Z Runner® Grand Refillable Dispenser.

Cut a large circle from patterned paper and attach it to the middle of the layout with the E-Z Runner® Grand Refillable Dispenser.

Mat the cropped photo in white cardstock and place toward the bottom right of the circle with 3D Foam Squares White Mix.

You Rock Foam Circle Layout by Tracy McLennon for Scrapbook Adhesives by 3L

Add the title stickers, one directly onto the circle, and lift the other with 3D Foam Squares White Mix.

You Rock Foam Circle Layout by Tracy McLennon for Scrapbook Adhesives by 3L

Foam Circle Design

Start the Foam Circle by adding the large 3D Foam Circles White Mix, all around the center patterned circle.

You Rock Foam Circle Layout by Tracy McLennon for Scrapbook Adhesives by 3L

Next, place the smaller 3D Foam Circles in between the large ones.

You Rock Foam Circle Layout by Tracy McLennon for Scrapbook Adhesives by 3L

For a sunburst-inspired look, I added the small 3D Foam Circles out from the large circles.

You Rock Foam Circle Layout by Tracy McLennon for Scrapbook Adhesives by 3L

Wear Your Adhesive on the Outside

Remove the backing from the first row of small 3D Foam Circles. Then place a piece of purple foil from the Metallic Transfer Foil Sheets Variety Colors over the circle with the color side facing you, and gently rub with your fingertip to transfer the color.

You Rock Foam Circle Layout by Tracy McLennon for Scrapbook Adhesives by 3L

Remove the backing from the large 3D Foam Circles and add teal foil from the Metallic Transfer Foil Sheets Variety Colors, repeating the above steps.

You Rock Foam Circle Layout by Tracy McLennon for Scrapbook Adhesives by 3L

There was still more space in my circle design so I decided to add more small 3D Foam Circles. Those additions were foiled in the blue foil from the Metallic Transfer Foil Sheets Variety Colors.

The remaining 3D Foam Circles were foiled in the purple foil from the same foil set.

You Rock Foam Circle Layout by Tracy McLennon for Scrapbook Adhesives by 3L

Adding Embellishments

Finally, I added triangles in the corners of the white cardstock to anchor the page. Then placed some simple embellishments around the matted photo using a combination of 3D Foam Squares White Mix and Thin 3D Foam Squares Black Mix.

You Rock Foam Circle Layout by Tracy McLennon for Scrapbook Adhesives by 3L

Thanks so much for stopping by!
Tracy McLennon

Creative Time: 60 minutes
Skill Level: Intermediate

Materials Needed
Scrapbook Adhesives by 3L®

Thin 3D Foam Squares Black Mix
3D Foam Squares White Mix
E-Z Runner® Grand Refillable Dispenser
3D Foam Circles White Mix
Metallic Transfer Foil Sheets Variety Colors

Other
Pink Paislee- Bloom Street Collection (patterned paper, cardstock stickers, die cuts), Thickers Words, Yellow Burlap String, Cardstock- White

Save It to Pinterest!

You Rock Foam Circle Layout by Tracy McLennon for Scrapbook Adhesives by 3L Pinterest

Visit our Website and Blog!
Sign up for our Newsletter so you never miss a contest or giveaway!

instagram purple icon facebook icon purple pinterest purple icon twitter purple icon YouTube icon blog subscription purple icon

Make a Wish Photo Card

Hi, Connie here with a Make a Wish Photo Card to commemorate not only a special birthday but also today is World Photo Day! Adding a photo to a card is an extra fun way to make it personal. I used the Creative Photo Corners Black to achieve this. Such a great look!!

Make a Wish Photo Card by Connie Mercer for Scrapbook Adhesives by 3L

Make A Wish Card Instructions

  1. Double mat a card panel with white cardstock, and patterned paper with the E-Z Runner Grand Permanent Strips Refillable Dispenser.
  2. Mat the picture on white cardstock using the E-Z Runner Grand Permanent Strips Refillable Dispenser.
  3. Place a Creative Photo Corners Black to each corner of the matted picture (measures 3 x 3.5-inch).
  4. Add 3D Foam Squares White Small Size to the back of the flag style die cut.
Make a Wish Photo Card by Connie Mercer for Scrapbook Adhesives by 3L

Use the E-Z Runner Grand Permanent Strips Refillable Dispenser to adhere a piece of white cardstock to cover the inside of the card. With another piece of white cardstock, stamp a Happy Birthday sentiment on it.

Double mat the sentiment panel with blue cardstock, and center to the inside of the card with the E-Z Runner Grand Permanent Strips Refillable Dispenser. Lift the stickers with the 3D Foam Circles White Mix.

Make a Wish Photo Card by Connie Mercer for Scrapbook Adhesives by 3L

Here are some closer looks at the Make a Wish Photo Card. Enjoy!

Make a Wish Photo Card by Connie Mercer for Scrapbook Adhesives by 3L

Thanks for stopping by~
Connie Mercer

Creative Time: 30 Minutes
Skill Level: Beginner

Materials Needed
Scrapbook Adhesives by 3L®

E-Z Runner Grand Refillable Dispenser
E-Z Runner Grand Permanent Strips Refill
Creative Photo Corners Black
3D Foam Squares White Small Size
3D Foam Circles White Mix

Other
Patterned Papers, Stickers, Stamps, and Embellishments: PhotoPlay Paper (Confetti Collection); Blue and White Cardstock

Save It to Pinterest!

Make a Wish Photo Card by Connie Mercer for Scrapbook Adhesives by 3L Pinterest

Visit our Website and Blog!
Sign up for our Newsletter so you never miss a contest or giveaway!

instagram purple icon facebook icon purple pinterest purple icon twitter purple icon YouTube icon blog subscription purple icon

Doggone Cute Birthday Card

Hi everyone, Yvonne here with a doggone cute dimensional birthday card. Scrapbook Adhesives by 3L® 3D Foam Products are the best to add that little bit of extra dimension to your card.

Doggone Cute Birthday Card by Yvonne van de Grijp for Scrapbook Adhesives by 3L

I know it may look a bit complicated, but even a beginning card maker can create this card! Let me show you how I made it.

Doggone Cute Grass Layers

Die-cut several grass borders from two shades of green cardstock. Then ink the edges of the grass with green ink. Simply rub the ink over the edges directly from the ink and let dry to prevent staining.

Doggone Cute Birthday Card by Yvonne van de Grijp for Scrapbook Adhesives by 3L

Place Thin 3D Foam Squares White Mix to the back of the grass borders but leave the liners on. Determine your layout design first before removing the liners. Start adhering the bottom layer to a piece of soft blue card panel, then the middle layer, and finally, the top layer.

Doggone Cute Birthday Card by Yvonne van de Grijp for Scrapbook Adhesives by 3L

Create the Card Base

Create a top-folding card with white cardstock that is slightly larger than the card panel you have just created. Then adhere the grass card panel onto the card base with the E-Z Runner® Permanent Strips Refillable Dispenser.

Make the Clouds

Die-cut and emboss several clouds from white cardstock. For a dimensional sky, I used a combination of 3D Foam Squares White Mix and Thin 3D Foam Squares White Mix. This way the clouds look more realistic. For some extra fun, let the clouds overlap the top (blue) layer a bit.

Those Doggone Cute Doggies

First, fussy cut the cute dogs from the designs in the patterned paper. To cut out the detailed dogs  I used tiny scissors, but you could also use a sharp craft knife.

When finished cutting, adhere the dog shapes on and between the grass layers using Thin 3D Foam Squares White Mix for interest and dimension.

Doggone Cute Birthday Card by Yvonne van de Grijp for Scrapbook Adhesives by 3L

Finishing the Card

Stamp the happy birthday sentiment on white cardstock and cut with its matching die. Adhere the sentiment to the card using 3D Foam Squares White Mix.

Finally, finish the card by adhering some tiny rhinestones to the dog collars for a subtle and fun spark. And…voila…your Doggone Cute dimensional birthday card is ready.

Doggone Cute Birthday Card by Yvonne van de Grijp for Scrapbook Adhesives by 3L

I hope you enjoyed this card making tutorial and wish you happy crafting!
Yvonne van de Grijp

Doggone Cute Birthday Card by Yvonne van de Grijp for Scrapbook Adhesives by 3L

Creative Time: 40 minutes
Skill Level: Beginner

Materials Needed
Scrapbook Adhesives by 3L®

3D Foam Squares White Mix
Thin 3D Foam Squares White Mix
E-Z Runner® Permanent Strips Refillable Dispenser

Other
Lawn Fawn (Chit Chat Clear Stamps and Die-templates); Avery Elle (Die-template: Pierced Clouds Sky); Jillibean Soup (Fur Fusion: Dancing Dogs Patterned Paper); Cardstock (White, Green, Blue); Inkpads (Distress Oxide: Lucky Clover, Archival inkpad Jet Black); Rhinestones; Scissors; Paper Trimmer.

Save It to Pinterest!

Doggone Cute Birthday Card by Yvonne van de Grijp for Scrapbook Adhesives by 3L Pinterest

Visit our Website and Blog!
Sign up for our Newsletter so you never miss a contest or giveaway!

instagram purple icon facebook icon purple pinterest purple icon twitter purple icon YouTube icon blog subscription purple icon