
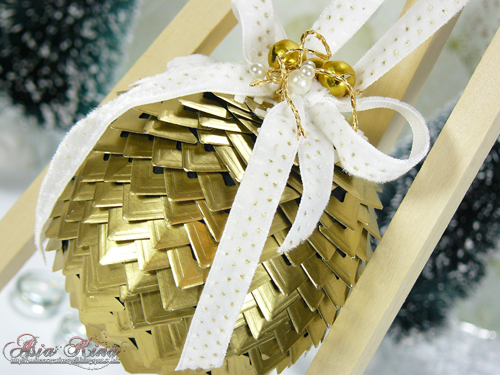
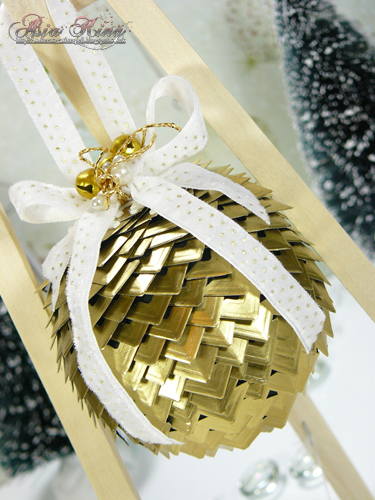
Hello everyone! It’s Asia King. The project I am sharing today is perfect for the season. I’ve made a DIY bauble ornament for my Christmas tree. DIY meaning here – decorate it yourself. My leading embellishment is probably not one that you’d normally think of for this but it’s really surprising what you can achieve with it. Well, see for yourself – and let me know what you think!
Making the Bauble Ornament
For my ornament I used Creative Photo Corners in Gold – lots and lots of them! I used 4 packets for this project. Simply adhere them to a foam bauble in horizontal layers. The permanent adhesive on the Creative Photo Corners worked really well on the foam and I did not need to add anything else. My layers were also tight enough to keep the whole ‘structure’ secure.
When I got to the top I simply attached some ribbon to create a bow and a hanger, a glittered 3D Foam Snowflake – and secured it all with decorative pins. And that’s it! Super easy but so much fun!
Although I created a Christmas bauble, you can take this idea so much further. How about some pine cones or Easter eggs? And if you don’t have enough corners in the same colour, don’t worry! Simply paint them or heat emboss them to match :).
Happy Christmas crafting!
Big crafty hugs

- Creative Time: 30 Minutes
- Skill Level: Intermediate
Supply List:
- Gold Creative Photo Corners
- 3D Foam Snowflakes
- ribbon, twine
Find more unique ways to use Creative Photo Corners for texture on your projects!
By Kelly December 14, 2013 - 4:38 pm
WOW!! Asia, this is incredible! Totally cool idea and my goodness, what a stunning effect!
By Angela P December 14, 2013 - 9:35 pm
GORGEOUS! Love it Asia!
By Sue McRae December 14, 2013 - 10:15 pm
What a clever idea!
By barbara macaskill December 15, 2013 - 1:33 am
BEAUTIFUL! So simple yet VERY elegant! TFS!
By Carmen M. December 15, 2013 - 6:07 am
What a really cool project. So creative. Wow it turned out beautiful
By Loly Borda December 15, 2013 - 6:10 am
Such a creative use of the corners! Love the result. TFS