
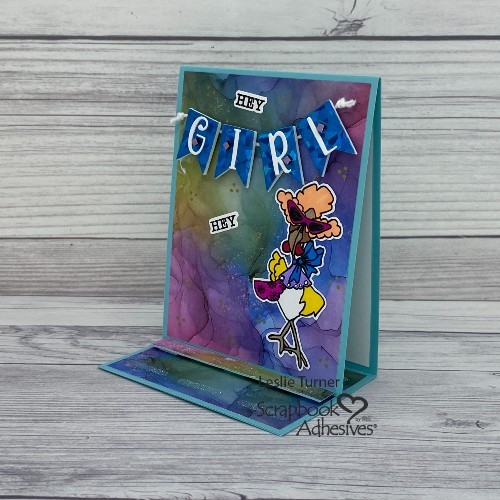
Hi everyone! Happy weekend – I hope you’re having a good one! Leslie here with you today sharing a tutorial for a friendship fun fold card, a tall tented easel card. I used some fun papers, stamps and dies in my stash and I employed my new favorite ‘Wear Your Adhesive on the Outside’ technique.
Cut Card Base & Layers
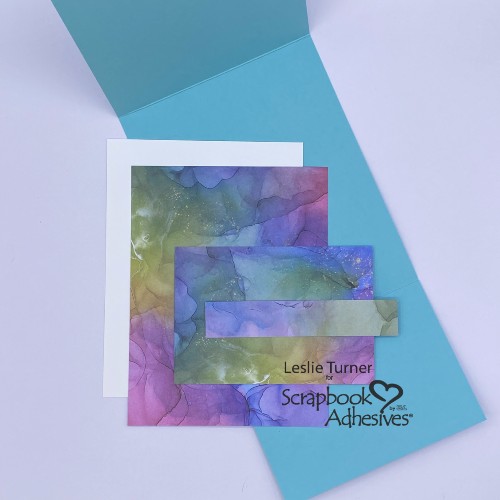
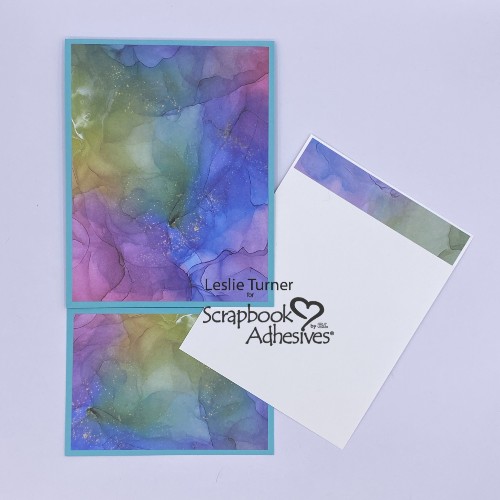
For the card base, cut a piece of colored cardstock at 4-1/4″ x 12″. With the long side across the top, score it at 5-1/2″ and 11″. Burnish the score lines with a bone folder. Adhere a 4-1/4″ x 3″ piece of cardstock to the top of the 1″ flap with the E-Z Runner® Permanent Strips Refillable Dispenser. Be sure to butt the smaller piece up against the score line for a smooth fold.
For the inside of the card, cut a 4″ x 4-1/4″ panel from white cardstock.
Cut the patterned paper layers in the following sizes:
Back: 4″ x 4-1/4″
Bottom: 2-3/4″ x 5-1/4″
Embellishing strip: 1/2″ x 4″
Assemble Layers
Using E-Z Runner® Permanent Strips Refillable Dispenser, adhere the patterned paper layers to the card base and inside sentiment panel.
Create Focal Elements for Friendship Fun Fold Card
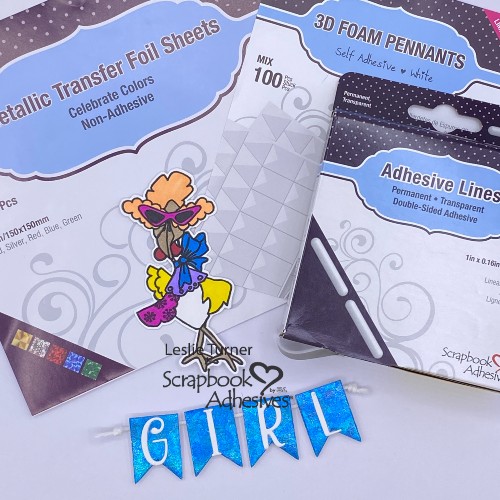
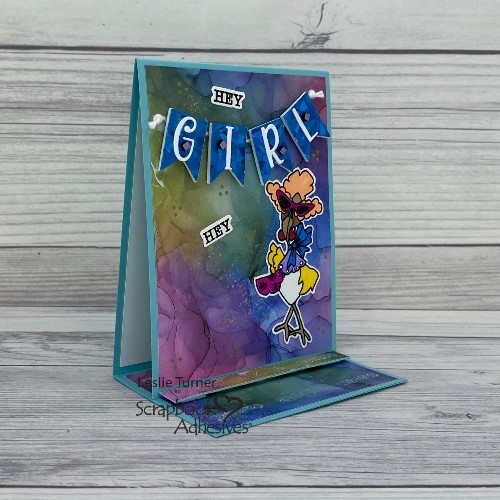
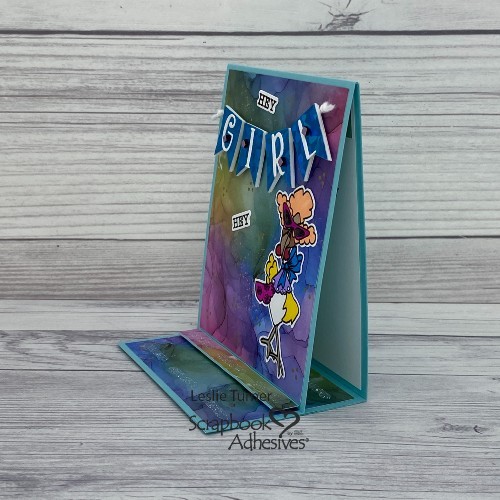
Stamp, color and cut the focal image. Now let’s make the banner! I will use the 3D Foam Pennants with the blue foil from the Metallic Transfer Foil Sheets Celebrate Colors. For more support, I stuck the pennants to white cardstock and trimmed around the edges. Remove the liner from one pennant. Place the blue foil on top of the exposed adhesive (color side facing you) and rub to transfer the color. Peel off the foil to reveal the color. Repeat the foiling on the remaining pennants.
This is the ‘Wear Your Adhesive on the Outside’ technique where you stretch your adhesive use to become embellishments! Apply Adhesive Sheets 4 x 6in. to the back of white cardstock and die cut the letters G-I-R-L. Peel off the liner and place each letter on a foiled pennant. Apply Adhesive Lines to the top of the pennants and affix them to a length of white twine with knotted ends.
Build Front Panel for Friendship Fun Fold Card
Use Thin 3D Foam Squares White Mix on the back of the pennants and place close to the top of the card front. Add fun tiny embellishments to the banner by adding lavender foil from the Metallic Transfer Foil Sheets Pastel Colors to 3D Foam Squares Micro Black. Second time using the Wear Your Adhesive on the Outside. So easy!
Add sentiments and the focal image to the card front with a combination of the Dual Tip Glue Pen and E-Z Runner® Permanent Strips Refillable Dispenser. For a little interest, I randomly placed a three-dot triangle pattern on the card front panel with a gold pen.

Wear Your Adhesive on the Outside with Adhesive Lines
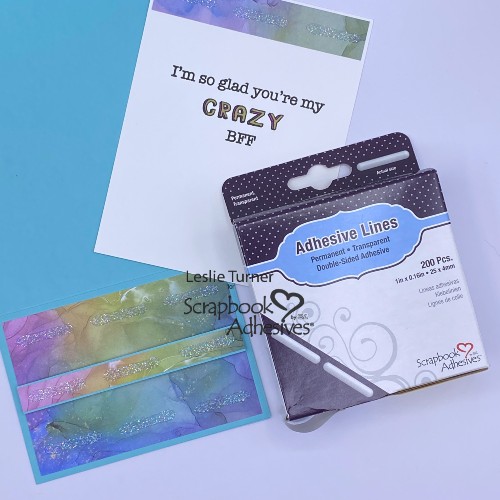
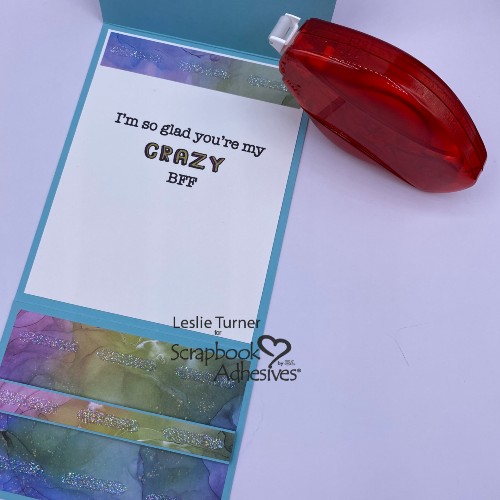
Third time’s charm… Wear Your Adhesive on the Outside with Adhesive Lines and diamond glitter! Apply a row of adhesive lines on the top of the sentiment panel and cover with glitter. Press to secure and tap off excess. Afterwards, stamp a sentiment on the panel.
Also add a row of adhesive lines on the top and bottom of the lower panel and cover with glitter. Next, add a row of Adhesive Lines to a strip of patterned paper layered on a strip of cardstock and glitter. Use 3D Foam Squares White Mix behind the layered strip and center on the bottom base. This will serve as a stopper for the card to stand to display.
Complete Friendship Fun Fold Card
Finally, adhere the inside sentiment panel to the inside of the card base with E-Z Runner® Permanent Strips Refillable Dispenser. The card is now complete! Here are two additional angles to view.
Thanks for visiting!
Leslie
Creative Time: 45 minutes
Skill Level: Intermediate
Materials Needed:
Scrapbook Adhesives by 3L®
E-Z Runner® Permanent Strips Refillable Dispenser
3D Foam Pennants
3D Foam Squares Micro Black
Metallic Transfer Foil Sheets Celebrate Colors and Metallic Transfer Foil Sheets Pastel Colors
Adhesive Sheets 4 x 6in.
Adhesive Lines
Thin 3D Foam Squares White Mix
3D Foam Squares White Mix
HomeHobby™ by 3L
Dual Tip Glue Pen
Other: Cardstock: CutCardStock Basis 12×12 Aqua and Neenah Solar White
Paper: Craft Consortium Ink Drops – Vivid 6×6 paper pad
Stamps: Prickley Pear Stamps Hey Girl Hey stamp set
Ink: Versafine Onyx Black ink, white paint pen, gold dual tip pen, assorted markers
Dies: Prickley Pear Stamps Hey Girl Hey die set
Accessories: Fiskars 12″ ProCision Rotary Bypass Paper Trimmer, Mini MISTI, Big Shot, Ranger Glossy Accents, Doodlebug Design Lily White Doodle Twine, Stampin’ Up Dazzling Diamonds Glitter
Click Preferred Retailers List
Save to Pinterest!

Visit our Website and Blog!
Sign up for our Newsletter so you never miss a contest or giveaway!


