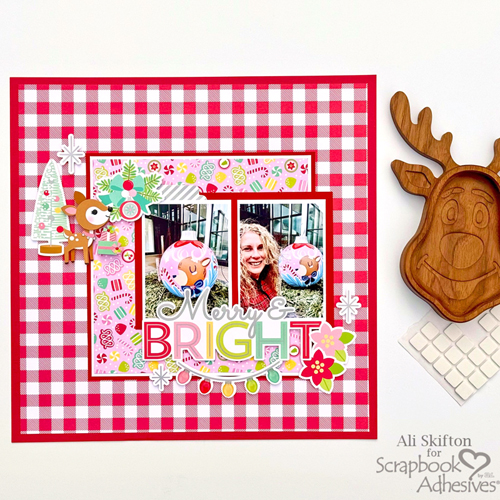
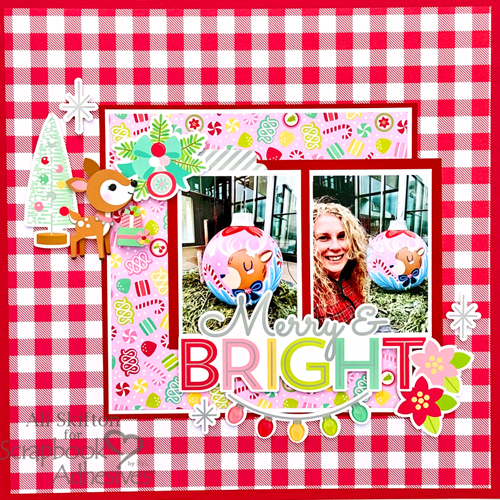
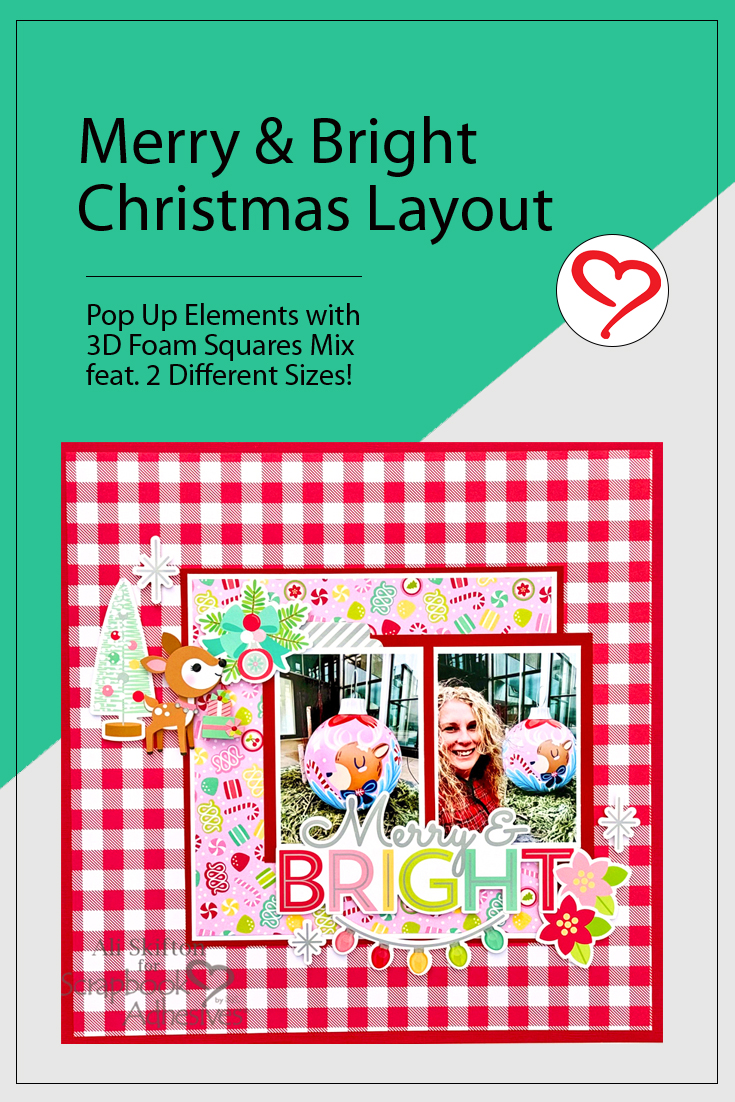
Deck the Halls! Ali here today and I am excited to share this fun Merry & Bright Christmas Layout with you featuring the 3D Foam Squares White Mix, to bring dimension and interest. I love looking at all the Christmas lights and decorations in the city!
Merry & Bright Christmas Back Story
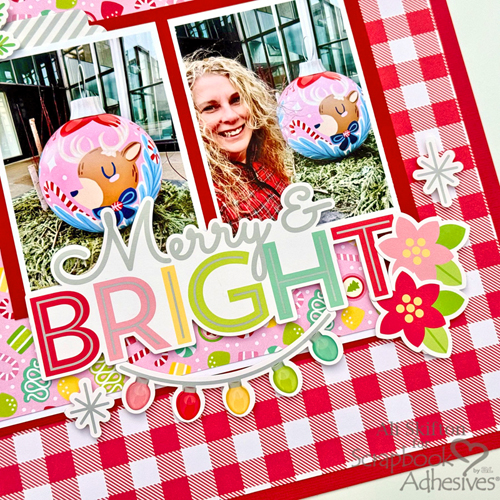
Downtown Milwaukee has 15 ornaments on display and this one was my favorite that I have found on this fun excursion. It is so pretty in pink with this cute deer painted on this bulb. I knew I wanted to scrap it with the fun Christmas colors in the new Doodlebug Christmas collection, Tinsel Time! I love the pinks and reds together.
Then I started embellishing the layout. Using the 3D Foam Squares White Mix, I gave my die cuts some dimension. The mix is perfect to use with all ephemera sizes too. For example, I used both sizes on the back of my title and lightbulbs. Just love how it turned out!
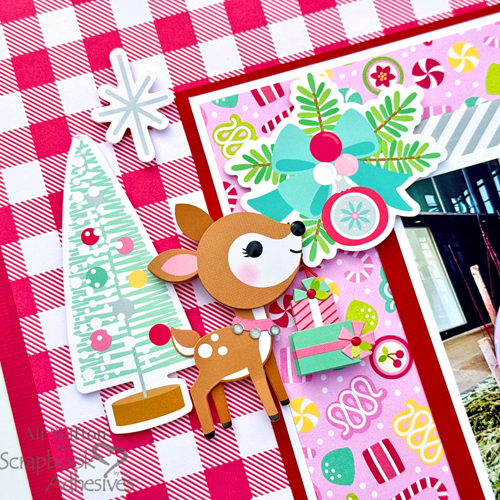
I even added more foam behind the Doodle Pop to make that cute deer really stand out on my page.
Have you documented your holiday happenings yet? I hope this gives you inspiration to start!
Happy holidays and thanks for visiting! Ali Skifton (FunAdventuresWithAli)
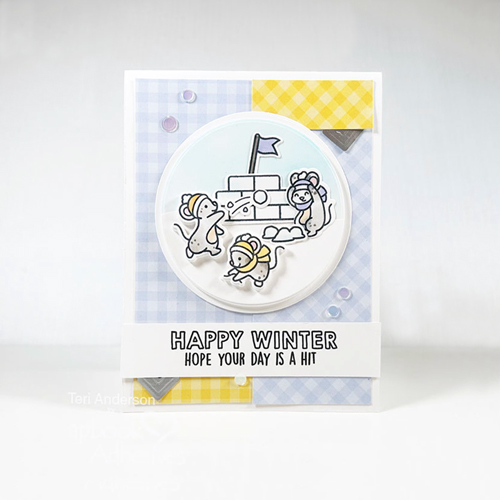
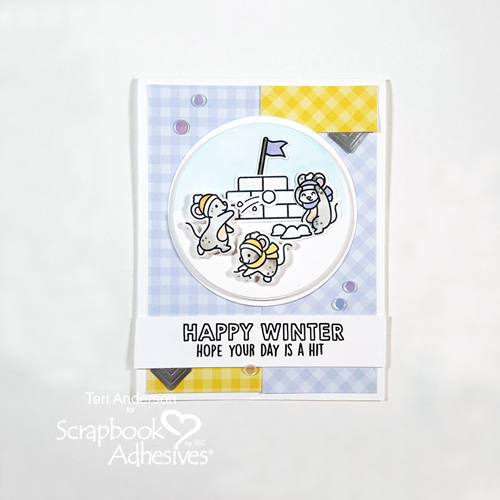
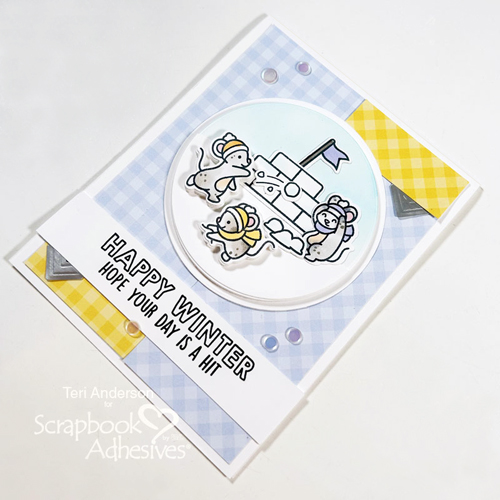
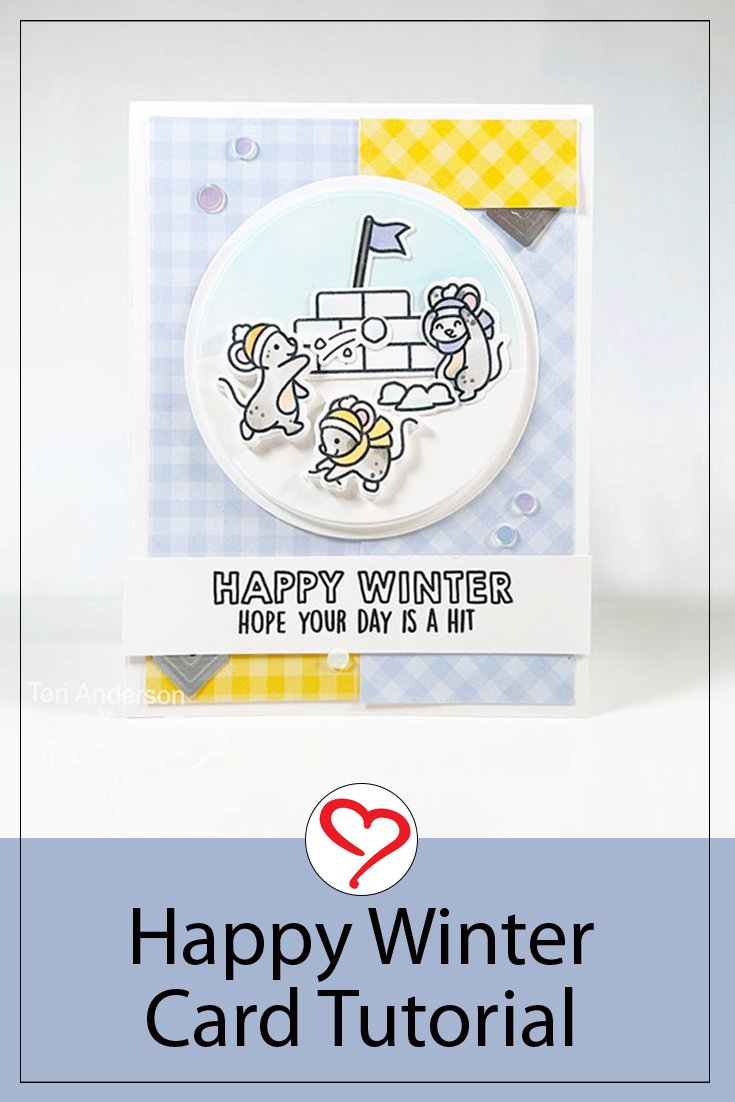
Hi, all! Ready for freezin’ season? Teri here with a winter-themed card, Happy Winter Card, with some “snow much fun” ways to use adhesives when you create!
Make the Happy Winter Card Base and Front
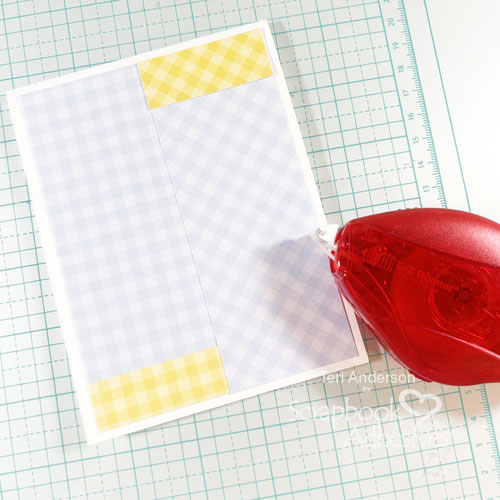
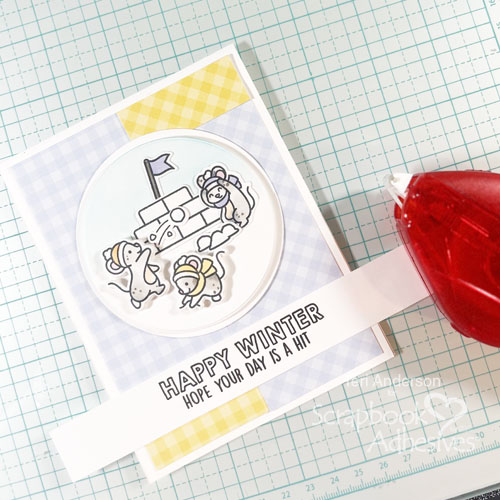
Start by creating your card base from a piece of white cardstock. Cover it with strips of patterned paper with the E-Z Runner® Permanent Refillable Dispenser. Designer’s Tip: Make it interesting by using a couple of different colors in your patterned papers rather than one. Piece them together to make one big panel.
Make a Scene
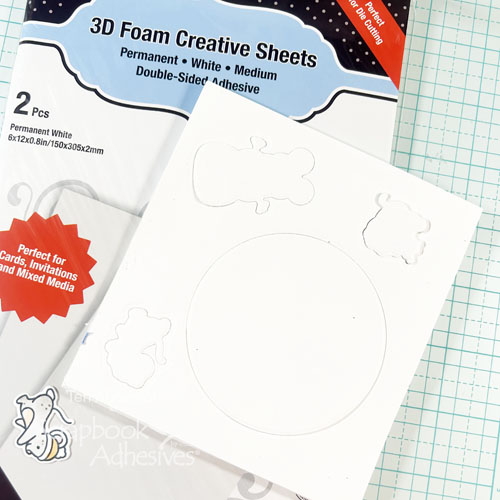
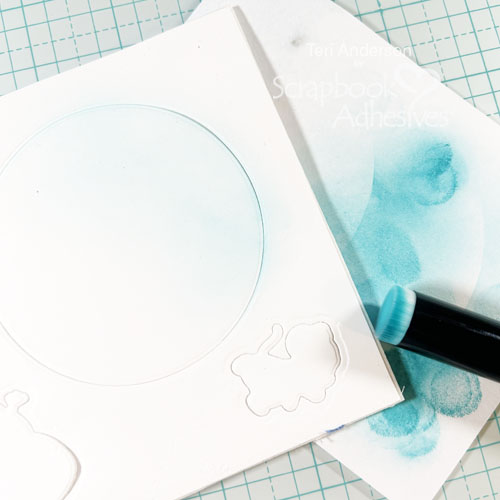
Mount a piece of white cardstock to a sheet from the 3D Foam Creative Sheets. Die-cut a circle on it to create the focal point for your Happy Winter card. Designer’s Tip: If you are using element stamps with matching dies, save yourself time by cutting them as well.
Apply a light layer of ink to your circle. Don’t worry if you go over the lines. Die-cut a larger circle and mount the foam mounted circle it.
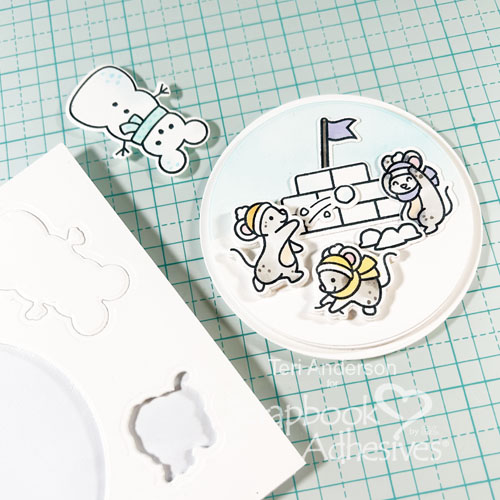
Die-cut a second small circle and cut it in half, making a wiggly line with your scissors as you go. Place half of the circle on your foam-mounted circle for a hill.
Create a snowy scene by adding winter images to it. Adhere some of the images to the foam-mounted mats you cut earlier to give the scene extra dimension.
Embellish Your Card
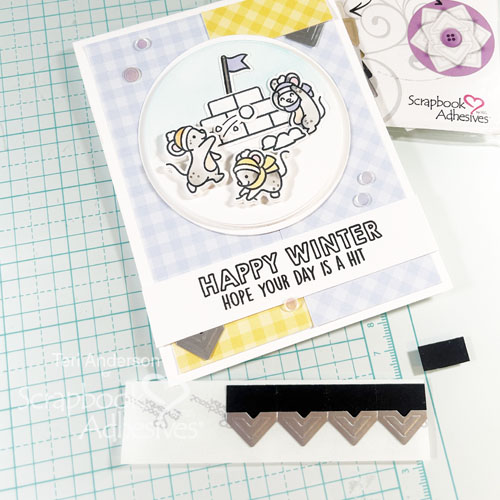
Affix your circle, along with a sentiment stamped on a strip of cardstock, onto your card. Use Adhesive Dots to add sequins to your card. I find it works best to place the dots on my card first.
Give your card a little extra sparkle by randomly adding two Creative Photo Corners in a metallic color. Designer’s Tip: Photo corners not only keep your photos in place but you can use them like embellishments on cards.
I hope you enjoyed today’s Happy Winter Card Tutorial! Let me what you think about it!
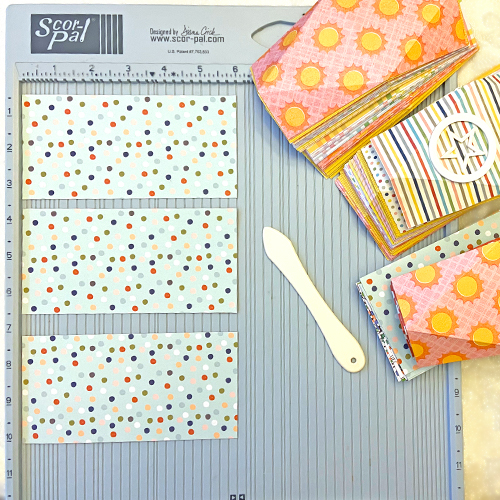
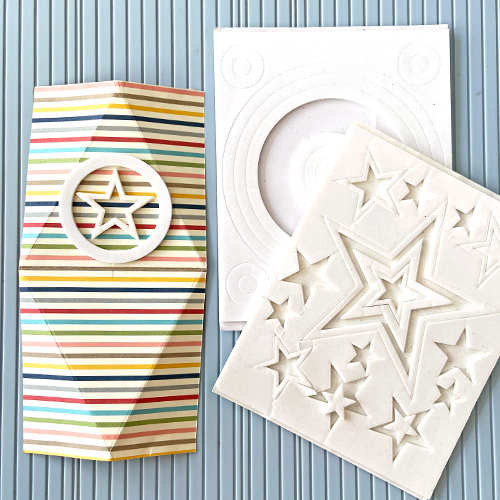
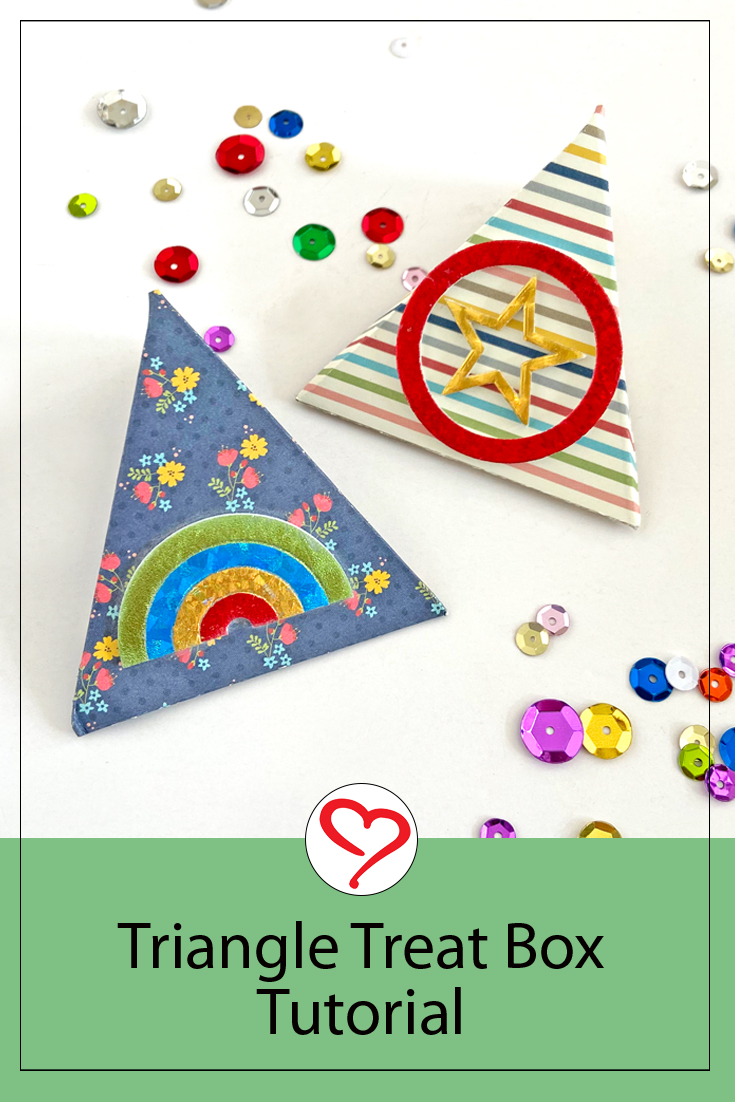
For a quick treat box and to use up my patterned paper stash, I created this Triangle Treat Box. They are so easy and fun to make. You may want to get the kids involved too. Hi, Margie here today and I am happy to share my process.
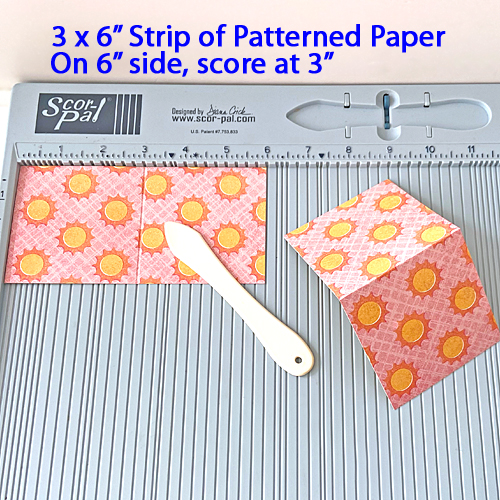
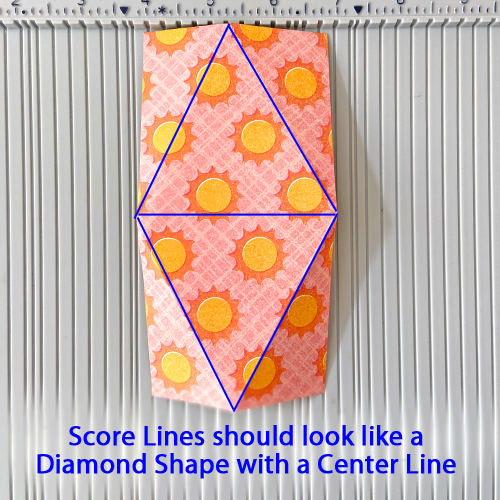
Triangle Treat Box Base
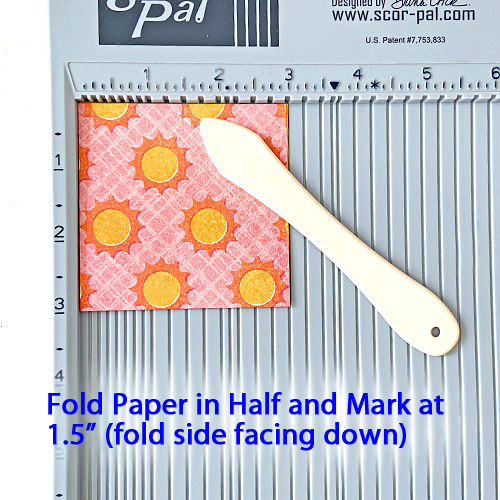
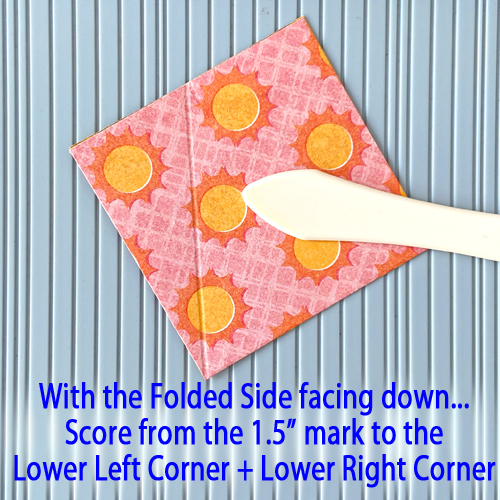
My base is a 3 x 6-inch strip of patterned paper. With the 6-inch side up, score at 3 inches. Fold in half and place the square folded side facing down. Mark at 1.5-inch. Keep the folded side down and place on a diagonal, score from the 1.5-inch mark to the lower left corner. Shift to the lower right corner and score from the 1.5-inch mark to the lower right corner. Spread out the paper and burnish the scored lines. You’ll see a Diamond shape with a center line.
Wear Your Adhesive on the Outside with 3D Foam Shapes
Foil the foam shapes by removing the top liner and with the foil color facing you, gently rub into the foam to transfer the color. For these treat boxes, I used the foils from the Metallic Transfer Foil Sheets Celebrate Colors.
This technique is called Wear Your Adhesive on the Outside. It is one way to expand the use of your adhesives, from underneath layers to make custom embellishments. No special tools are needed and great for kids’ crafts!
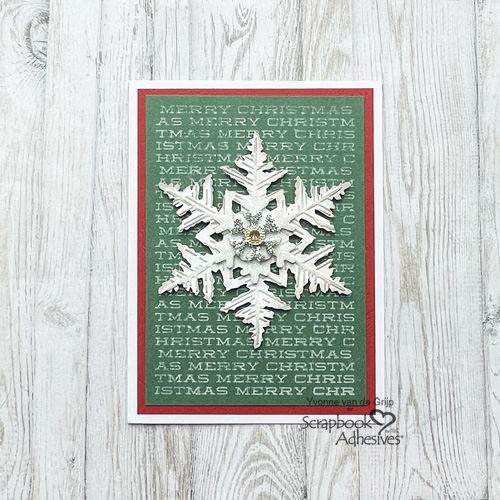
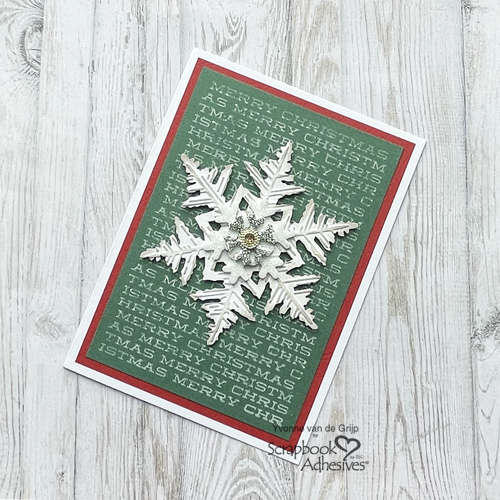
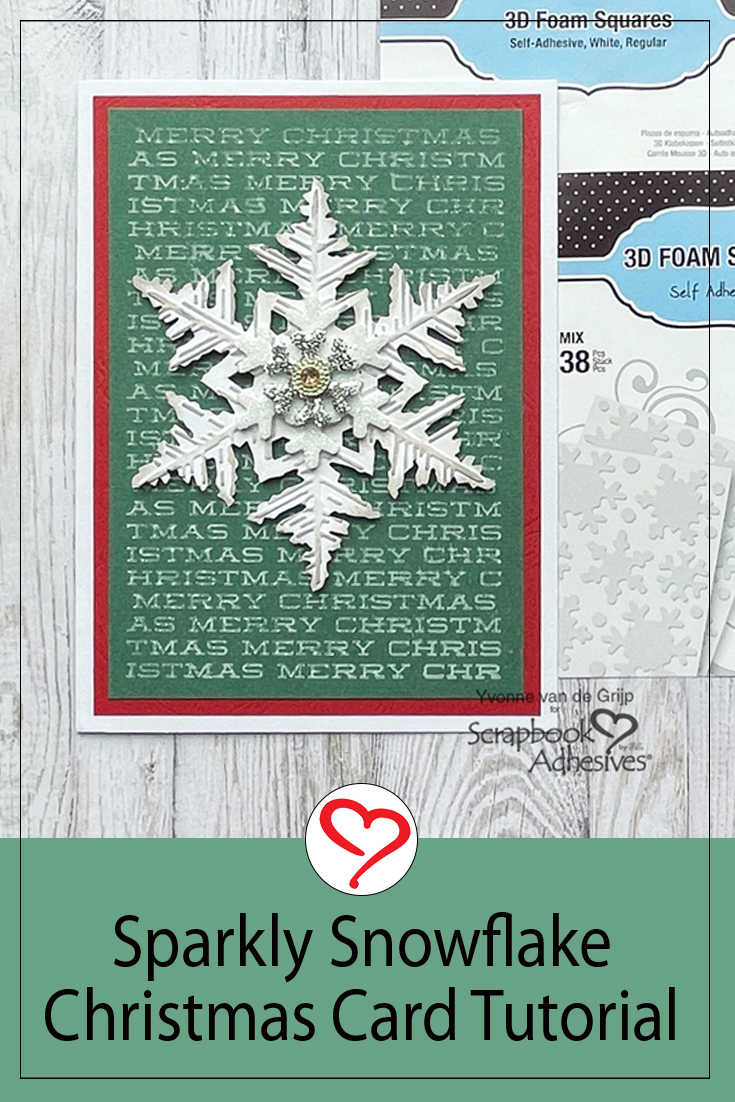
Hi everyone, Yvonne here with a Snowflake Christmas Card which can also be used as a menu card on your Christmas dinner table. I love making my adhesive shine using the Wear Your Adhesive on the Outside technique.
It’s such a quick and easy way to add that extra sparkle to your project. Would you like to join me in making this card? Let’s get started!
Christmas Snowflake Top Card Panel
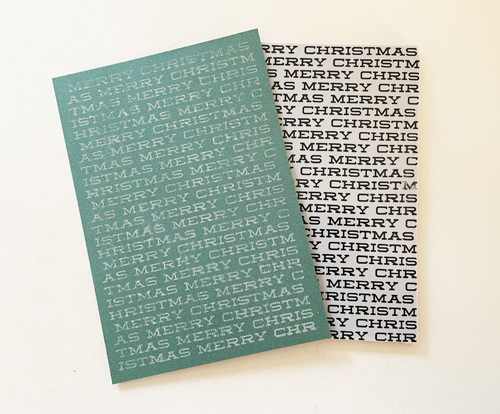
To make the top card panel, stamp a background text on dark green cardstock, using a chalk-soft green ink pad. I picked out this Merry Christmas text for a great background design! The ink color brings a soft and subtle look even with a bold stamp design. Let the ink dry.
Card Base
Trim the stamped card panel to a rectangular size. The stamp I used is slightly smaller than the trimmed card panel, but it leaves a nice plain border around it. Mat to a red card panel and then to a white card base. I used the E-Z Runner® Permanent Strips Refillable Dispenser to affix the layers of the Christmas Snowflake Card.
Snowflake fun
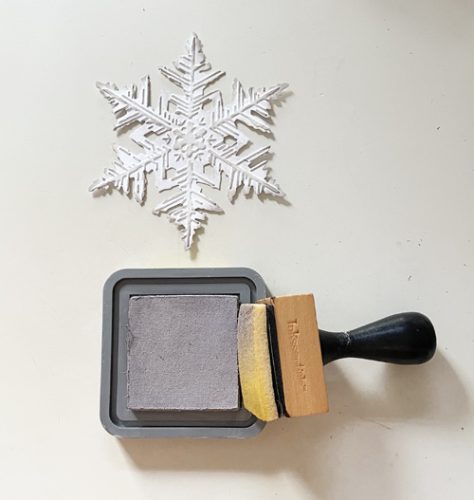
For the large snowflake, I used a die and embossing folder from white cardstock and highlighted the embossed areas with grey ink and an ink blending tool. Secure the snowflake to the card front of the Christmas Snowflake Card with 3D Foam Squares White Mix.
Wear Your Adhesive on the Outside
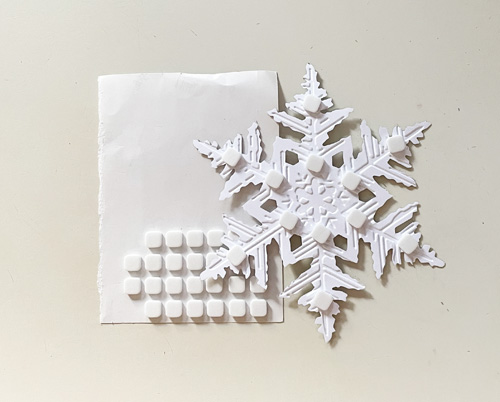
For a beautiful detail on the Snowflake Christmas Card, I centered a medium snowflake from the 3D Foam Snowflakes to the embossed snowflake. After removing the top liner, I covered it with white glitter, pressed into it to secure it, and tapped off the excess.
Next, I placed a small foam snowflake on top of the medium snowflake and repeated the glittering steps with silver glitter. The Wear Your Adhesive on the Outside technique brings your adhesives out between the layers and uses them as embellishments. It’s easy and fun to do!
For the finishing touch, add a self-adhesive rhinestone onto the centre of the snowflake. Tip: if you don’t have a nice rhinestone, you can also use a pretty button that can be attached to the snowflake using Adhesive Dots Medium.
And voilá, the Christmas Snowflake card is ready. I wish you a happy holiday crafting!
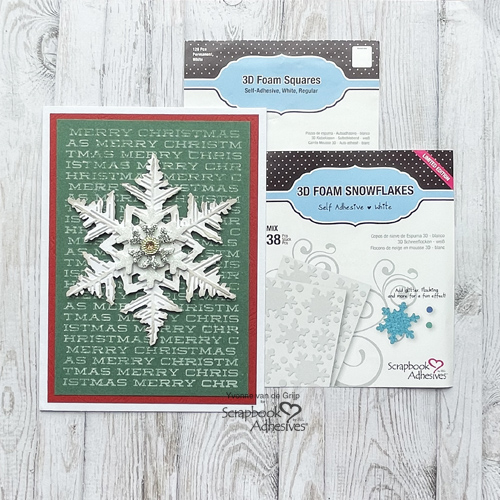
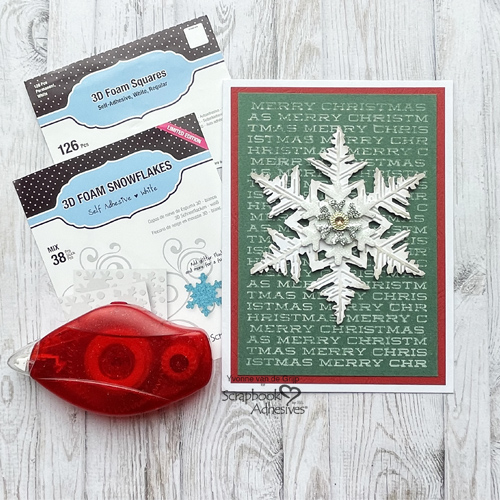
Other: White, Red and Dark Green Cardstock; Die-Cutting and Embossing Machine (Spellbinders Paper Arts®: Platinum 6 Machine); Die & Embossing Folder (Sizzix®: Tim Holtz® Alterations: Layered Snowflake); Inks: Ranger Ink (Distress® Oxide®: Old Paper, Hickory Smoke); Ink Blending Tool; White and Silver Glitter; Rhinestone (Jolee’s Boutique®: Dual Tone Prizm Spinel); Paper Trimmer; Scissors
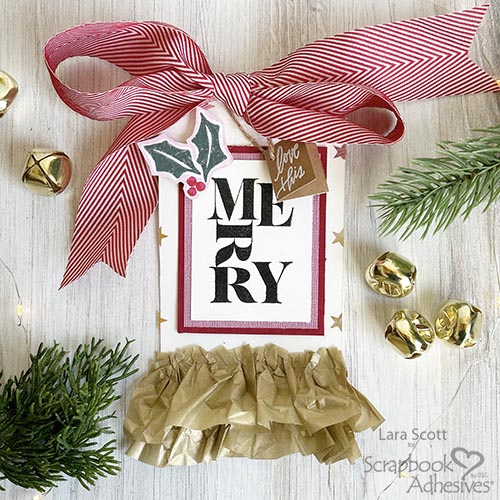
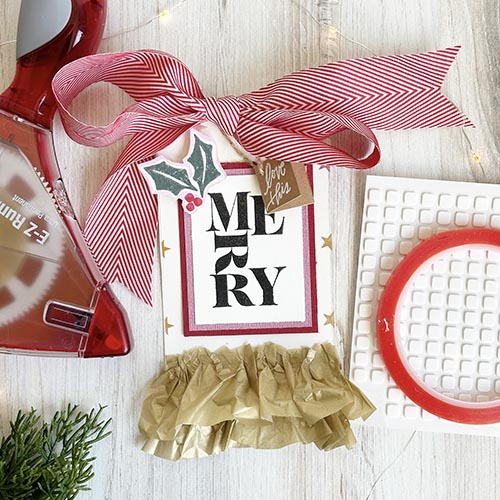
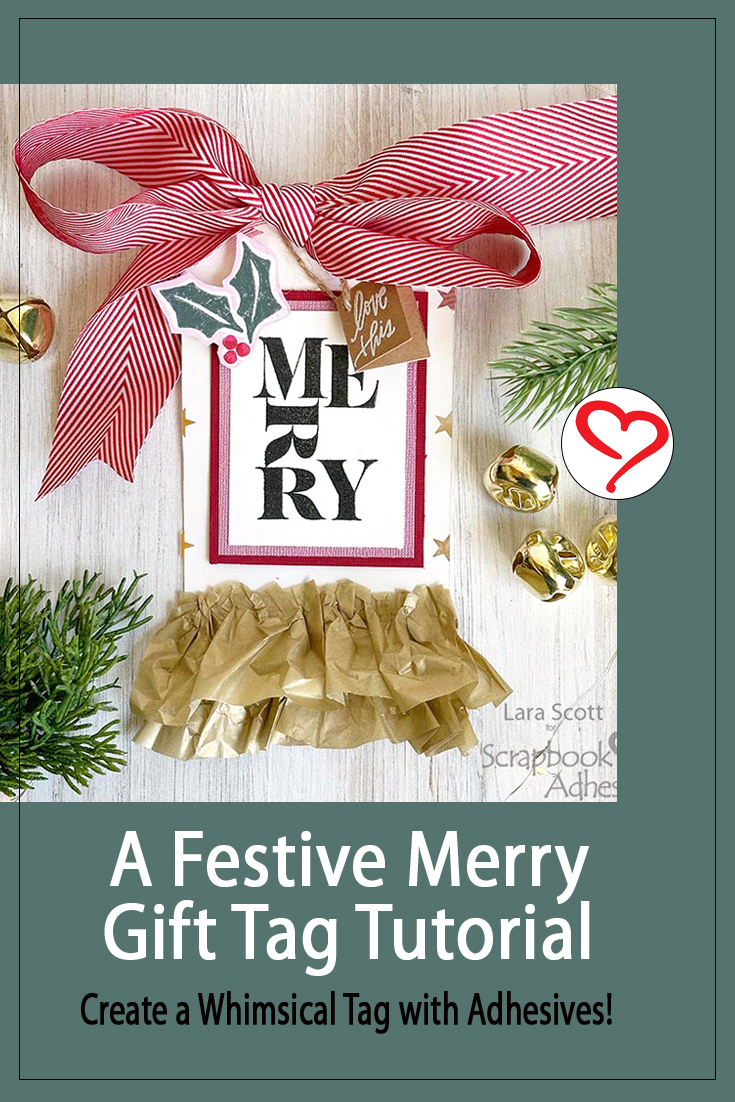
Hi, Lara here again today! This Festive Merry Gift Tag covers anything from Christmas to Happy Holidays, Seasons Greetings, or Happy Whatever You Celebrate! I decided to create a little holiday merry gift tag that can be used for gifts or your Christmas Countdown/Daily.
Festive Merry Gift Tag Design
The base of this Merry Gift tag is just white cardstock cut into a tag shape, or you can use a precut tag. Then, I cut a piece of star acetate the same size as the first tag and layered it on top for interest.
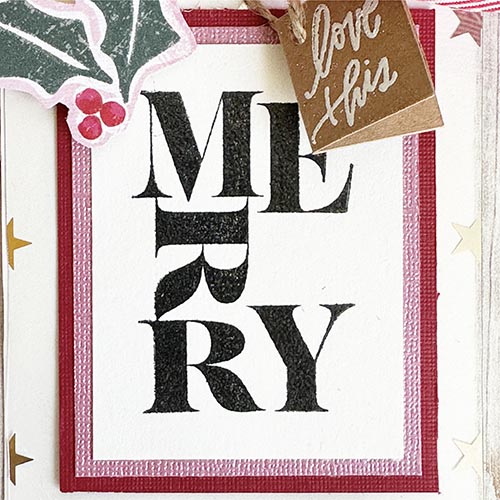
Stamped Sentiment
Stamp “Merry” on white cardstock with Onyx Black ink. Then pour clear embossing powder, tap off the excess, and melt it with a heating tool. Double-mat it with pink and red cardstock using the E-Z Runner® Grand Ultra Strong Refillable Dispenser. Attach it to the tag front with the same adhesive.
Embellishments
Fussy cut the holly from patterned paper. Then mount it with a double layer of Thin 3D Foam Squares White Mix. Add a little mini tag with some jute or other thin ribbon. Lastly, I added a large bow with a striped ribbon.
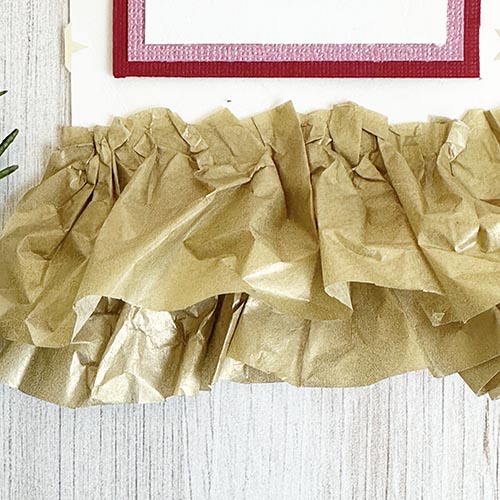
Tissue Paper Ruffle
Using Extreme Double-Sided Tape 1/4in., add a strip of the adhesive across the tag about 1/2″ from the bottom of the Festive Merry Gift Tag. Use a piece of 1.5 x 12″ gold tissue paper to scrunch it onto the tag. For a fuller look, add a second row of the tissue paper if desired.
Here’s the finished look and the adhesives used for this project.
Now you have a great tag to attach to a gift or use on another Christmas project. Thanks for visiting! Lara Scott
Other: Papers: Heidi Swapp; Stamp: Kerri Bradford; Ink: Tsukineko (Versafine in Black Onyx); Embossing Powder: Clear Embossing Powder; Pink, Red and White Cardstock, Star Acetate, Ribbon, Gold Tissue Paper
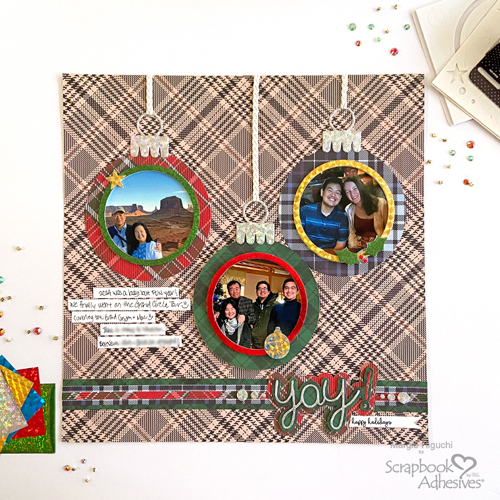
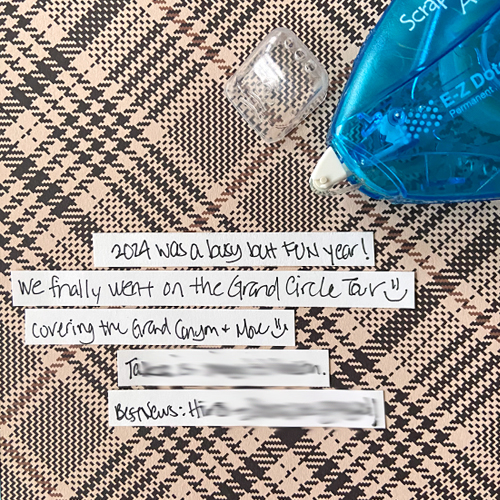
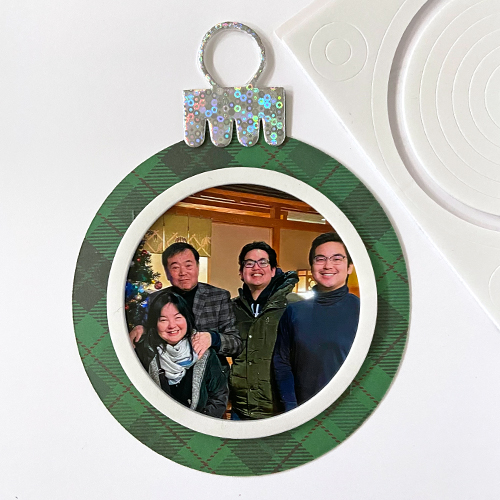
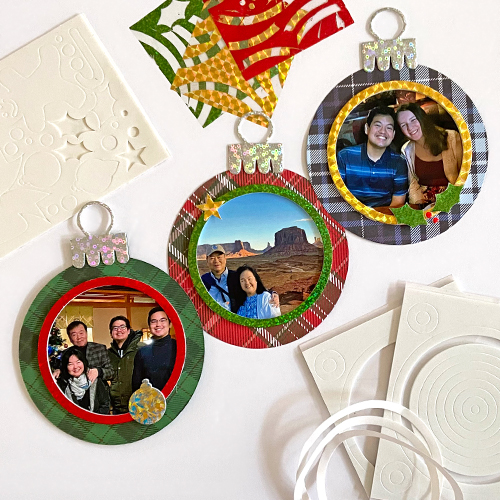
Have you been documenting your holiday events? Since we don’t do a formal gathering, I’ve added photos of things we did during the year. I had an ornament die set that I wanted to create with and featured the 3D Foam Circle Frames to highlight each event. Hi, Margie here today to share my YaY for Happy Holidays Ornament Layout.
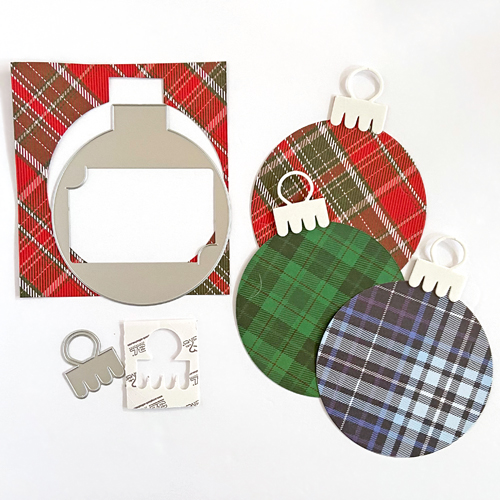
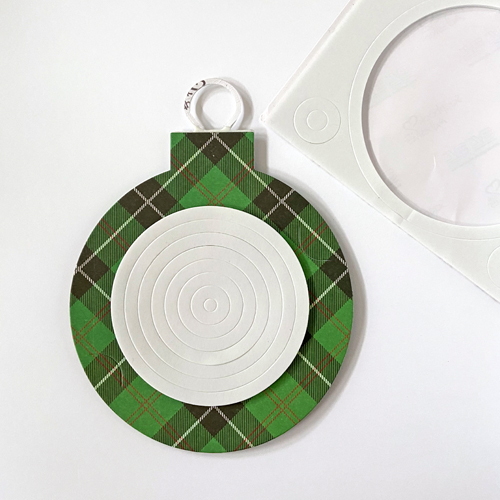
Create the Ornament
Die-cut three ornaments with patterned papers. For the topper, I used 3D Foam Creative Sheets Small White for dimension and interest. After placing the topper on each ornament shape, leave the bottom liner on the back of each hoop.
Apply foil to the topper for the shine! Remove the top liner and place a piece of silver foil from the Metallic Transfer Foil Sheets Celebrate Colors set. Make sure the foil color is facing you. Gently rub to transfer the color to the topper. Remove to reveal the shine! This is what the Wear Your Adhesive on the Outside technique is all about! Set the ornaments aside. Let’s work on the border.
Make the Border
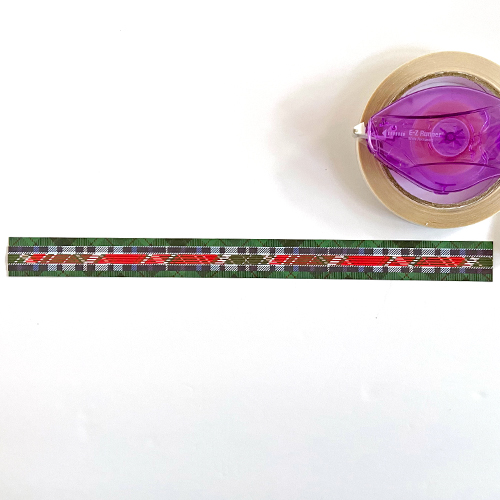
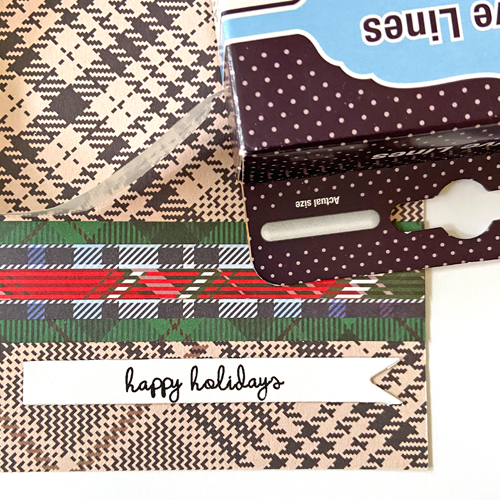
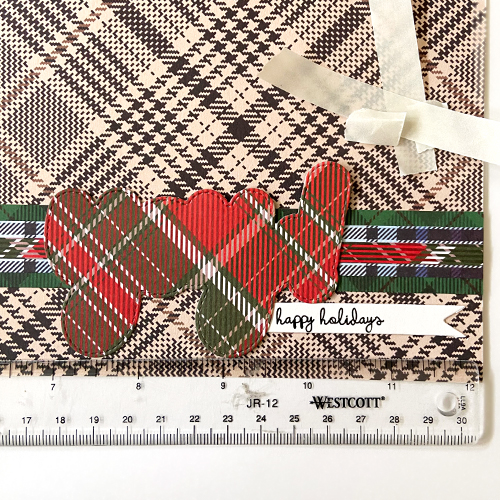
Using the E-Z Runner® Micro Refillable Dispenser, I placed the narrow 0.25 in. border on top of the 0.75 in. border…it’s a perfect size! Mat the layered border on top of the 1.0 in. border with the Crafty Power Tape Polybag 81ft. Lastly, place the finished border about 1.0 in. from the bottom edge of the layout.
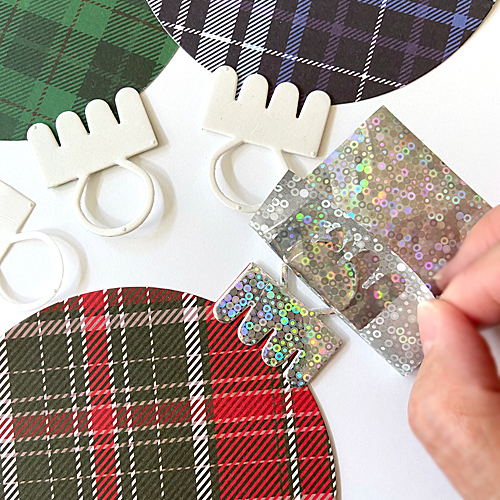
Assemble the Sentiment
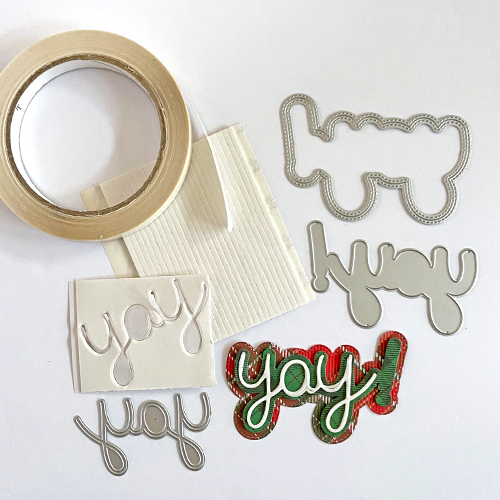
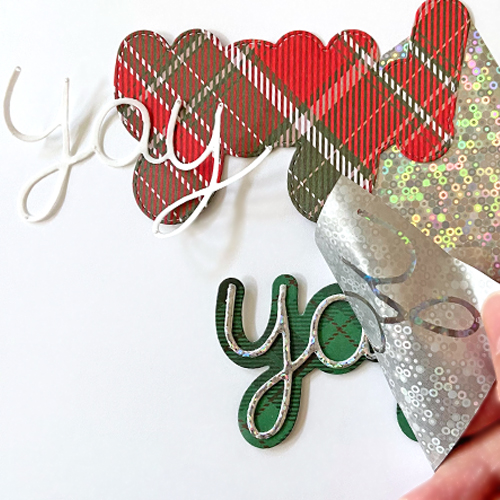
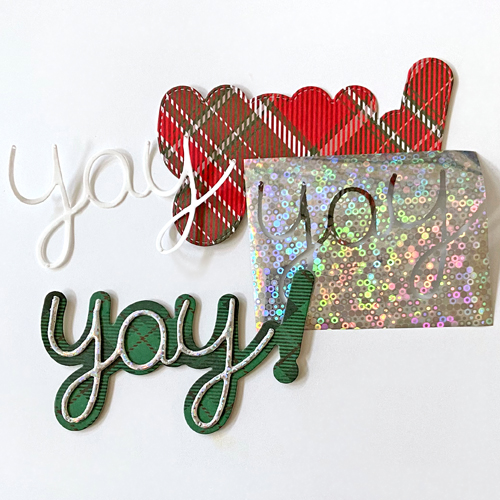
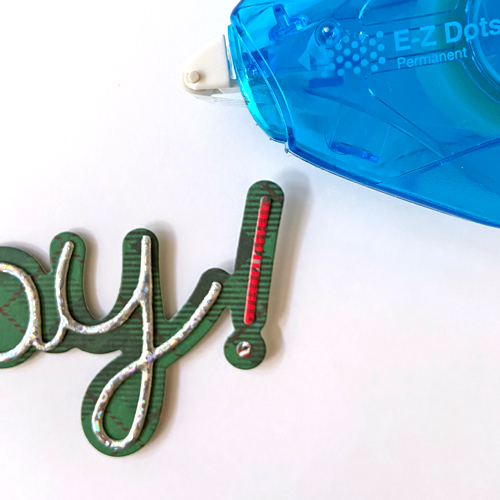
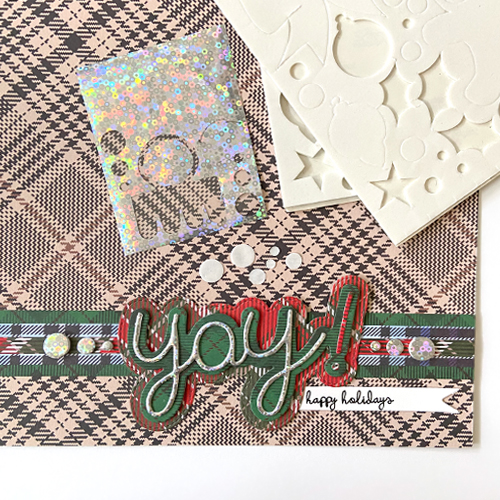
Die-cut the thin “yay” word with the 3D Foam Creative Sheets Small White, the “yay” outline with green patterned paper, and the “yay” shadow (and thin exclamation point) with red patterned paper. Adhere the thin “yay” word onto its outline.
Use the Wear Your Adhesive on the Outside technique, by removing the top liner from the “yay” word and placing a piece of silver foil from the Metallic Transfer Foil Sheets Celebrate Colors with the color side facing you on top of the exposed adhesive. Gently rub/tap to transfer the color to the word. Peel off the foil to reveal the finished look. Reapply the foil in missed areas.
Cut 6 to 10 strips of white cardstock to journal on and adhere them with the E-Z Dots® Permanent Refillable Dispenser. Designer’s Note: I used the ornaments to use guides to determine the strips’ placement.
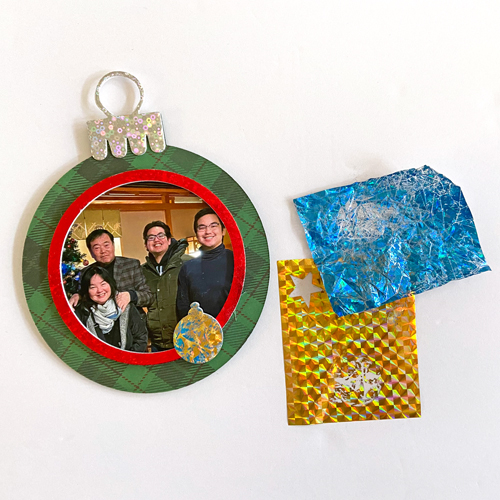
The green ornament will be the only one that will be popped up from the page so I used the rest of the smaller nested foam rings.
After foiling the frame with red foil from the Metallic Transfer Foil Sheets Celebrate Colors, I added a small ornament from the 3D Foam Christmas Shapes. I used the Wear Your Adhesive on the Outside technique with a twist…I wrinkled the blue foil to create a distressed look and placed it on the shape. Then I placed a solid gold foil on top to color the exposed adhesive for an interesting look. Both foil colors are from the Metallic Transfer Foil Sheets Celebrate Colors.
Repeat the embellishing and foiling steps for the other two ornaments using shapes from the 3D Foam Christmas Shapes set. Then adhere them with them to the layout.
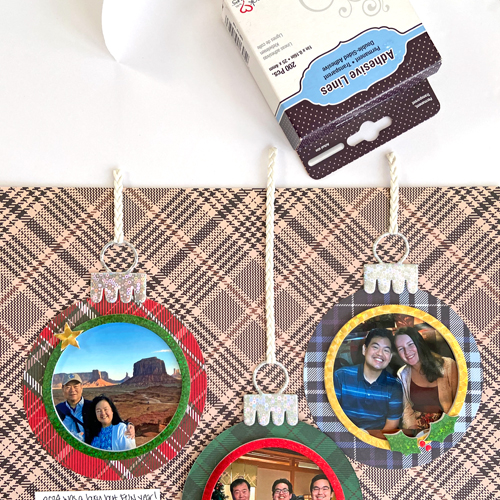
Adding Strings
The final touch…I added some flat rope trim to the ornaments with Adhesive Lines and cut the excess. Now it’s ready to be added to the album.
I hope you enjoyed my YaY for Happy Holidays Ornament Layout. So what will you document first? Share with us!
Other: Patterned Paper: Craft Consortium (Tartan Collection); Craft Dies: Emily Moore Designs (Gift Card Holder Die – The Ornament, yay! Layered Word Die and Card Sentiment Dies); Sentiment: Emily Moore Designs (Digital Happy Holidays Sentiment); Ruler: Wescott T-Ruler; Black Marker; Twine; White Cardstock
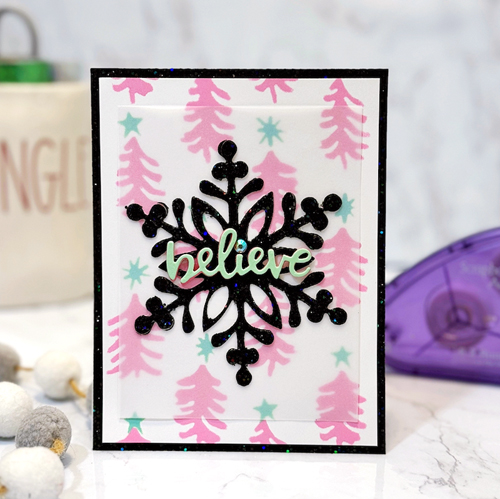
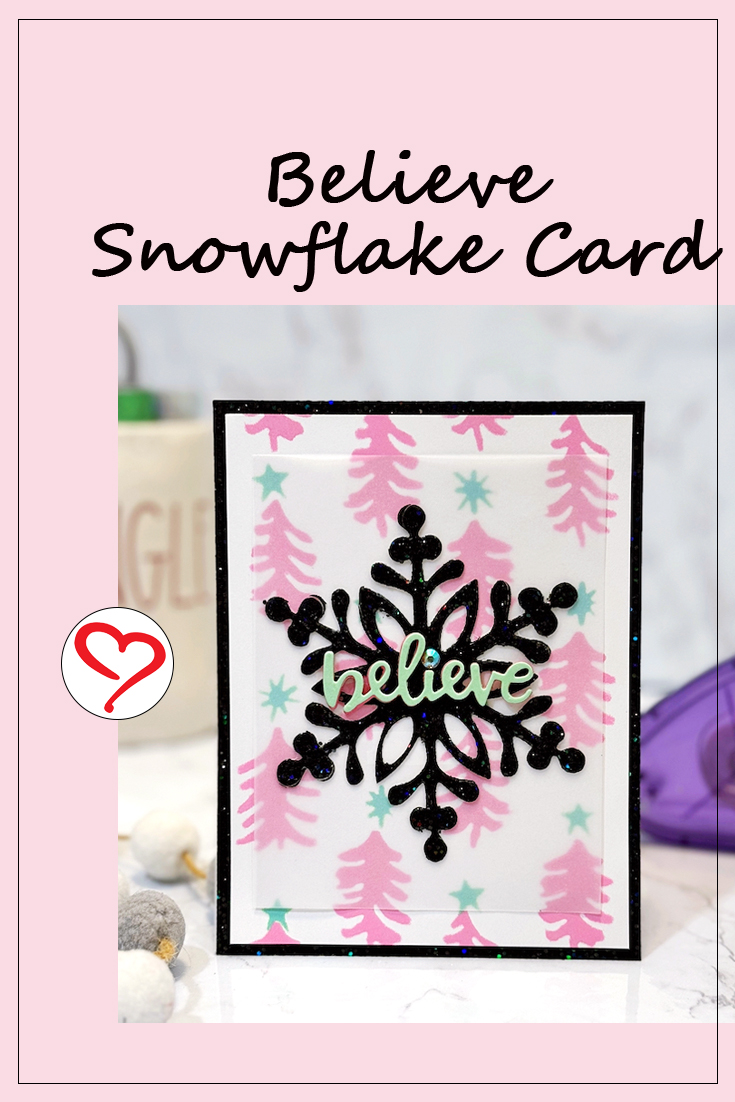
Hello, Jingle here today sharing a holiday card with this Believe Snowflake Card. The great thing about this card is that it has a ton of sparkle and shine, but is quite simple to create! Let’s get started!
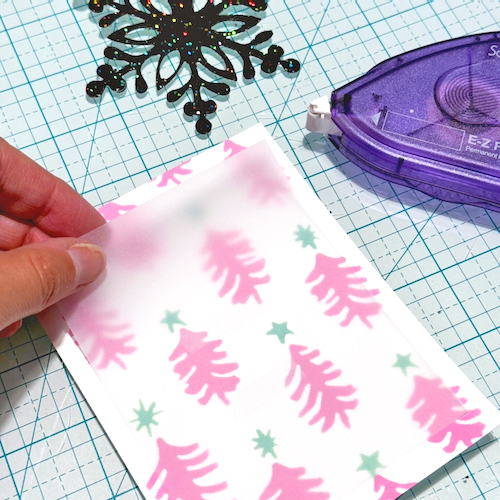
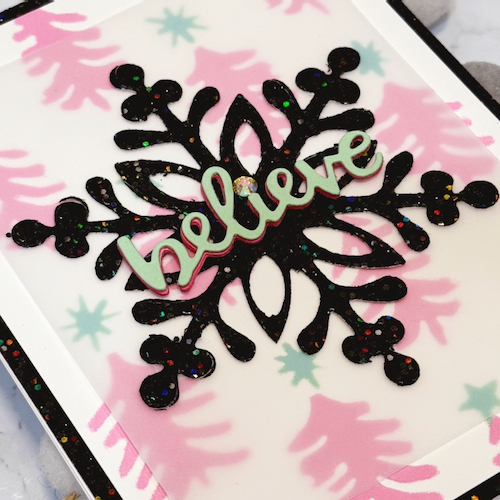
Believe Snowflake Card Background
To create the background, use layered stencils to add pink trees with pistachio-colored stars on top. To make the design a vibrant color, I used Distress Oxide inks.
Once the inks dried, layer a piece of vellum cut a bit smaller than the stenciled panel. This will ensure our focal point (the snowflake) stands out from the pattern. The E-Z Runner® Permanent Fine Adhesive Dispenser (aka Vellum Runner) is perfect for this! It also happens to be one of my personal favorite adhesives!
The Snowflake Design
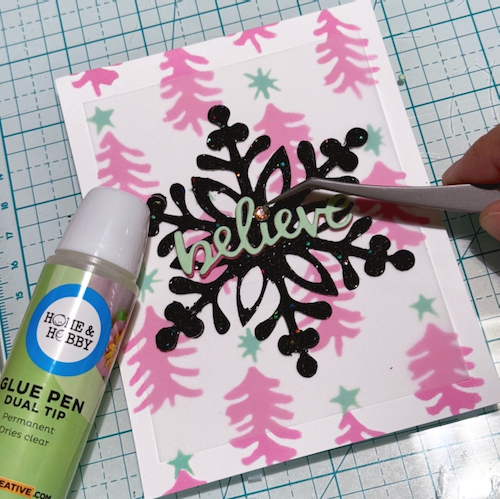
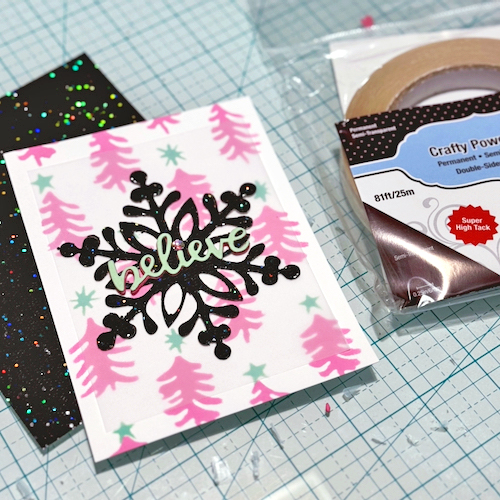
Die-cut a large snowflake from a piece of gorgeous black glitter paper. Yes, snowflakes can be black! Trust me on this. With the E-Z Runner® Permanent Fine Adhesive Dispenser (aka Vellum Runner), I centered the snowflake to the vellum. Isn’t it stunning?!
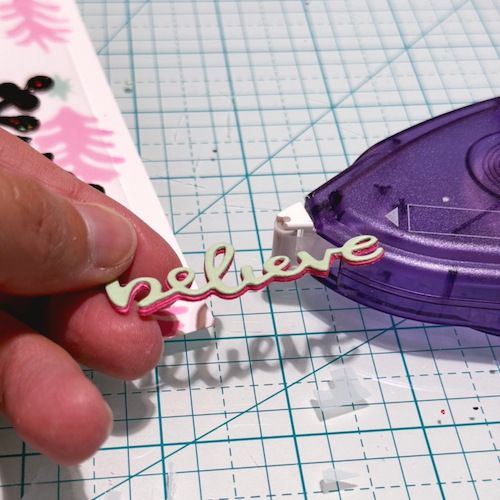
Working on the Sentiment
To create the sentiment, I die-cut the ‘believe’ word from both the pink and mint-colored cardstock several times. I stacked those with the E-Z Runner® Permanent Fine Adhesive Dispenser. I find it works well for detailed words like this. Next, I used the Dual Tip Glue Pen to adhere the sentiment to the snowflake and a gemstone to dot the “I” – adding more sparkle.
Thanks for stopping by! I hope you have enjoyed this Believe Snowflake Card tutorial and I can’t wait to see you again soon! Jennifer Ingle (aka Jingle)
Other: Stencils, Glitter Cardstock: Erin Lee Creative (Whimsy Christmas Trees Stencils and Black Glitter Cardstock); Craft Dies: Erin Lee Creative (Jumbo Snowflake Die) and Newton’s Nook (Main Street Christmas Dies); Ink: Ranger Ink (Distress Oxide in Pistachio and Kitsch Flamingo); White, Mint and Pink Cardstock
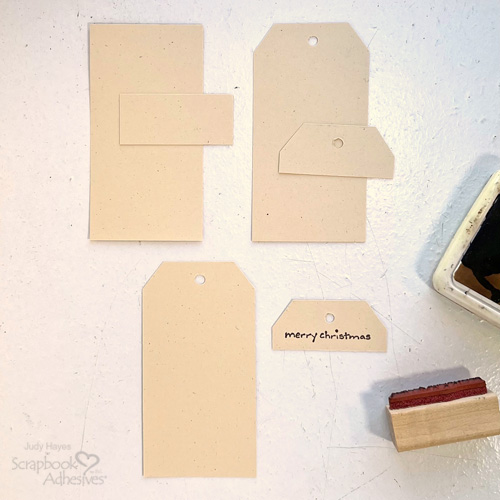
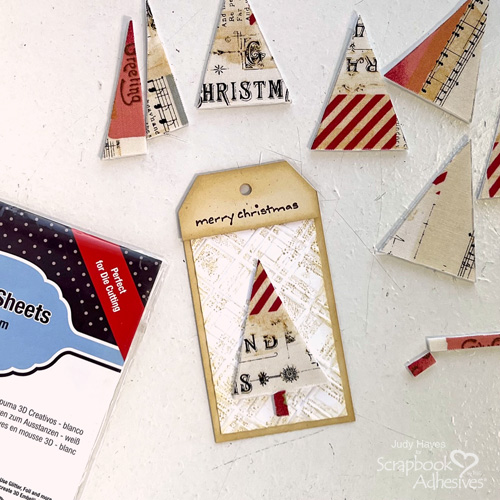
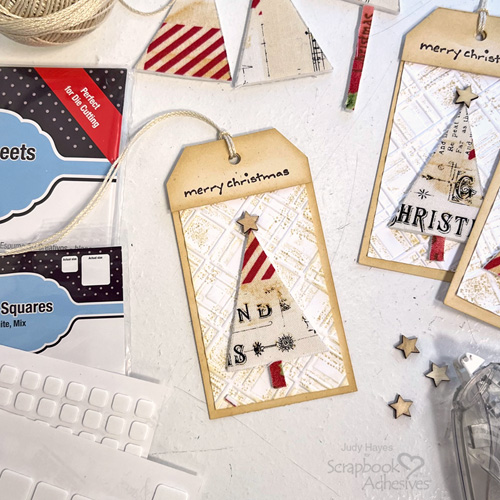
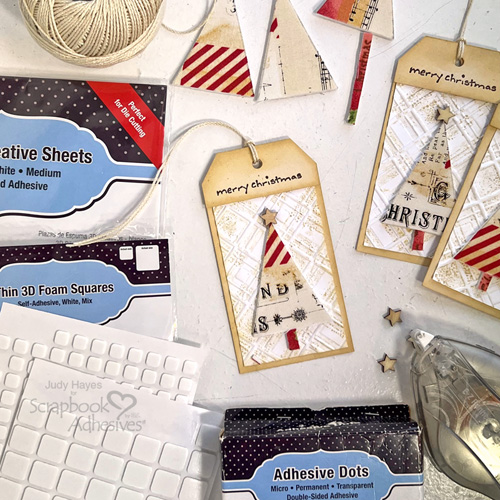
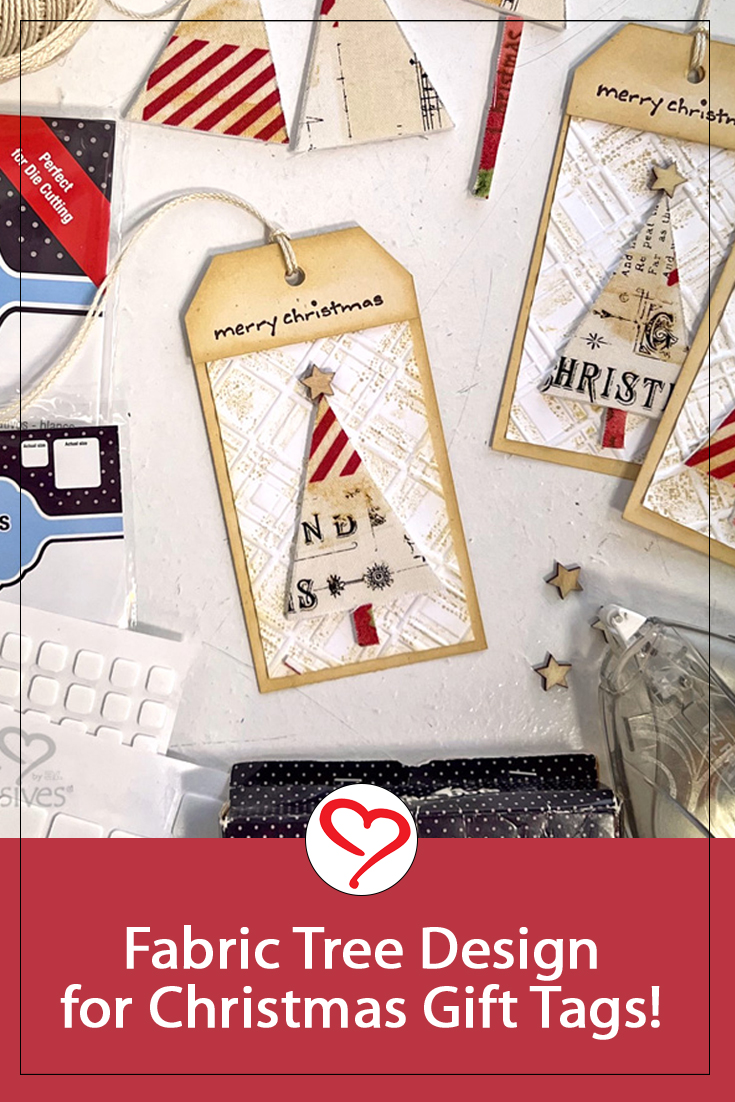
Hi, Judy here today! It’s coming down to crunch time for the holidays but still time to make a few Fabric Tree Christmas tags. These tags feature fabric trees made with 3D Foam Creative Sheets Medium White cut into triangles and covered with fabric. It only takes a small piece of holiday fabric and adds a unique look and texture. (The same technique can be used with patterned paper is place of the fabric.)
Tag and Tag Top
From Balsa cardstock, cut 2.25 x 4.25 inches piece for tag plus 1 x 2.25 inches piece for tag top. Cut angles at top of tag and punch hole. Align tag top piece on tag and cut angles and punch hole same as tag.
Stamp Merry Christmas with Distress Archival Ground Espresso ink on tag top piece.
With foam applicator and Distress Antique Linen ink rub ink around edges of tag ant tag top.
Embossed Background
Tap Distress Antique Linen ink on deboss side of Argyle Plaid embossing folder. Place piece of white cardstock in Argyle Plaid embossing folder and run through die cutting machine to emboss. Cut a piece 2 x 3.5 inches for each tag.
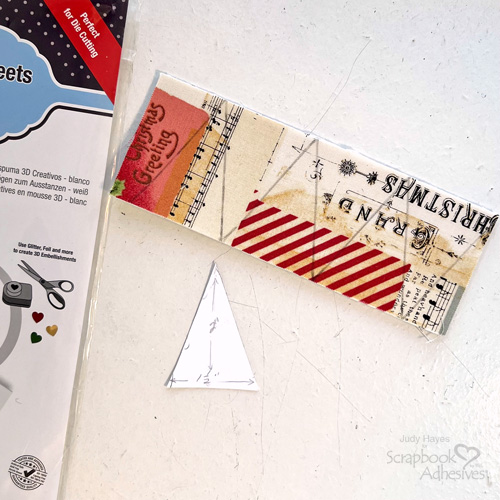
Cut a piece of 3D Foam Creative Sheets Medium White across the width (5.75 inches) x 2.125 inches. Peel off the liner and place the sticky side down on the back of the fabric. Trim fabric edges even with the 3D Foam Creative Sheet.
From a scrap of cardstock, cut a triangle 2.125 inches tall and 1.5 inches wide at the base. Align the triangle pattern bottom along the long side of the fabric-covered 3D Foam Creative Sheet and trace it with a pencil. Turn the triangle upside down, align it with the previous pencil line, and trace again. Repeat. This will make six trees. Cut along each pencil line. Keep scraps to cut a narrow strip for tree trunks.
Optional: To create more varied fabric designs on trees, cut two triangles vertically from the center bottom to the point. These can be mixed and put edges together to form a tree.
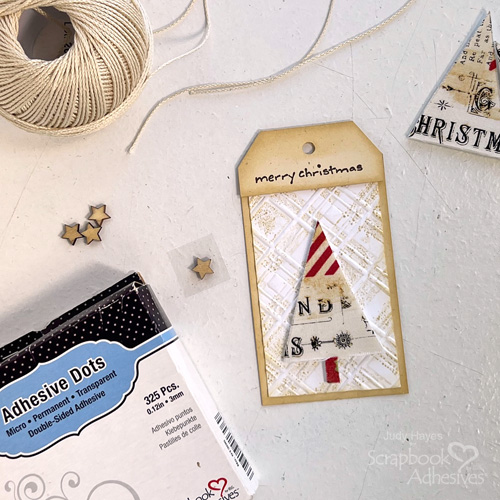
Fasten Tree to Tag
Peel liner from triangle tree and place on tag allowing space at bottom for tree trunk and at top for star. (If using split triangles, peel liners from 2 parts and put together on tag to form triangle tree.)
Cut a narrow strip from a scrap of fabric-covered 3D Foam Creative Sheet and a short piece from it for the tree trunk. Peel the liner and place it at the bottom of the tree on the tag.
Add Star and String
Place Adhesive Dots Micro on the back of a small wood star, peel away the liner, and fasten it at the top of the tree on the tag. Cut a piece of string and loop it through the tag’s opening.
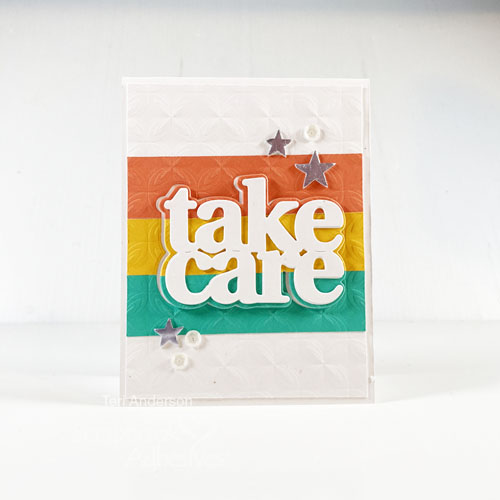
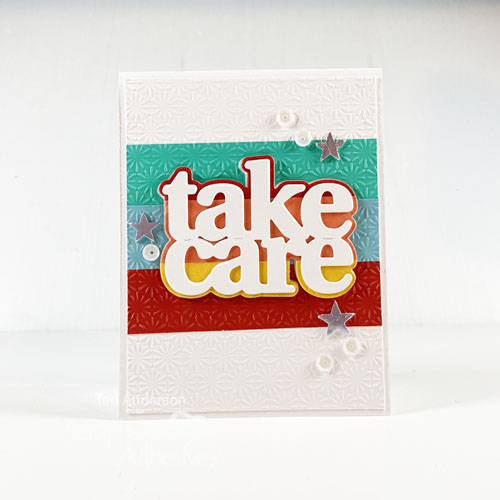
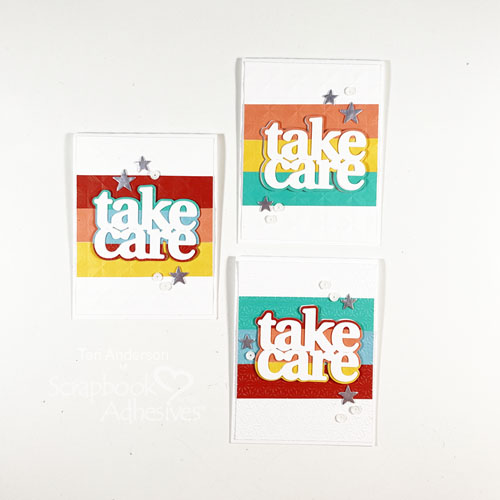
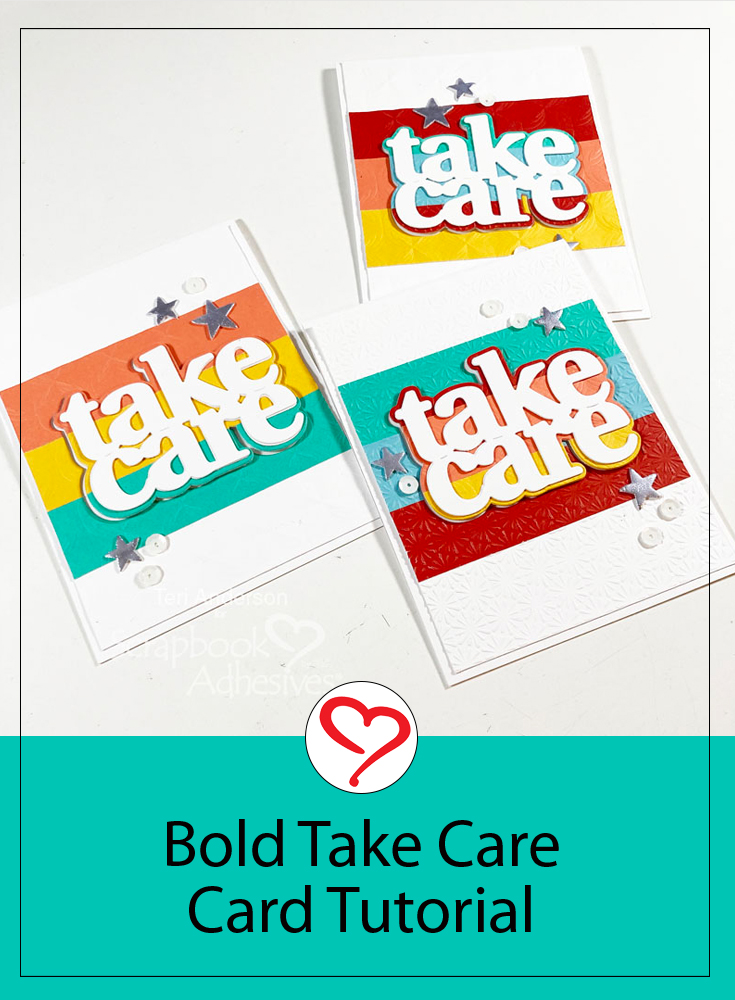
Hi, friends! Cold/flu season is upon us, and there’s no better cure than handmade Bold Take Care Cards for your “under the weather” friends! Teri here to show you how to put together these cards to let them know you’re thinking of them!
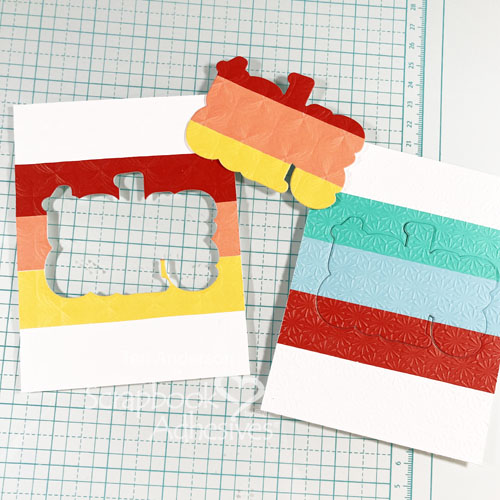
Make the Bold Take Care Card Background
Start by cutting a panel of white cardstock and several strips of colored cardstock. Arrange the strips onto your paper panel. Designer’s Tip: Make multiple cards in one sitting by cutting several panels and strips to make several all at once. Adhere your strips down with the E-Z Runner® Permanent Strips Refillable Dispenser.
Set your panel in an embossing folder and run it through a die-cutting machine to give it texture. Designer’s Tip: Consider spritzing your panel first with water for a crisper and deeper embossing design.
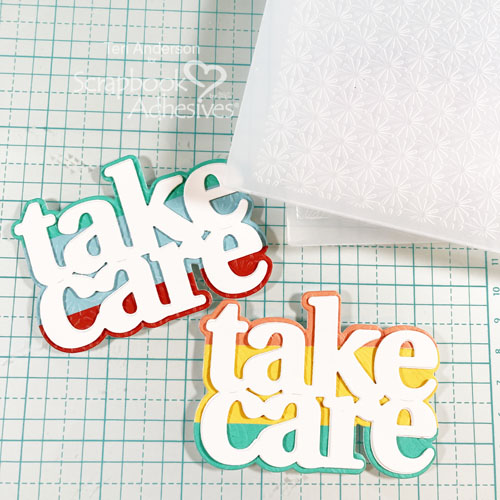
The Sentiment
Die-cut your sentiment outline out of your card panel, and save that piece. Next, die-cut the sentiment from white cardstock several times to stack them for dimension. I used the E-Z Dots® Permanent Refillable Dispenser to secure the stack because it rolls over the shapes without leaving an adhesive residue between the open gaps. Then secure it on its matching sentiment outline piece with the E-Z Runner® Permanent Strips Refillable Dispenser.
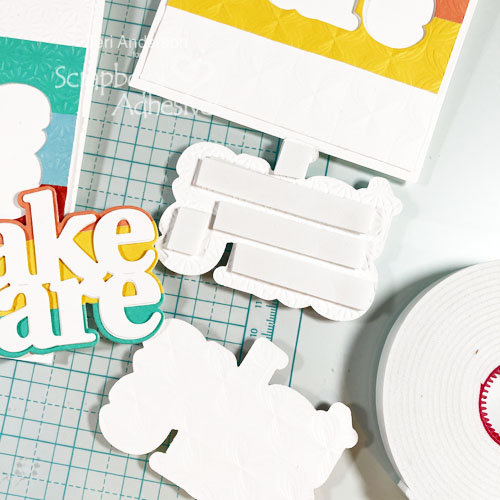
Assemble Your Bold Take Care Card
Trim your cardstock panel to fit on a card base and mount it with the E-Z Runner® Permanent Strips Refillable Dispenser. Apply Crafty Foam Tape to place your sentiment in the opening. Be generous – cut into small strips to fully cover the back of your matted sentiment.
Place your sentiment on your card. If you are making multiple cards at one time, consider using sentiments from different panels together.
Complete your card by adding 3D Foam Stars to the card front. Foil the stars with platinum foil from the Metallic Transfer Foil Sheets Nature to it. Make sure to face the color side up, rub gently to transfer the color, and remove the foil. Lastly, add sequins or other small embellishments.
I hope you are inspired by today’s Bold Take Care Cards post! Are you ready to make some cards of your own? Thanks, as always, for stopping by!
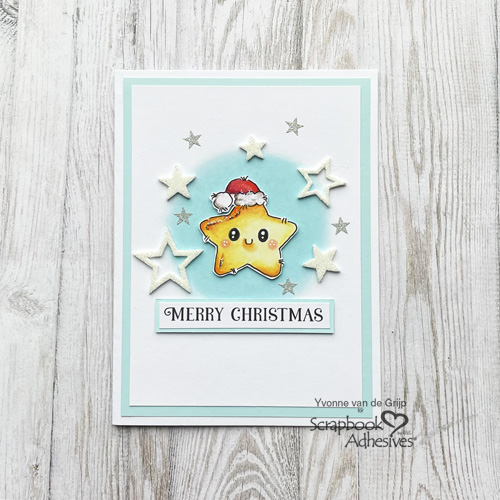
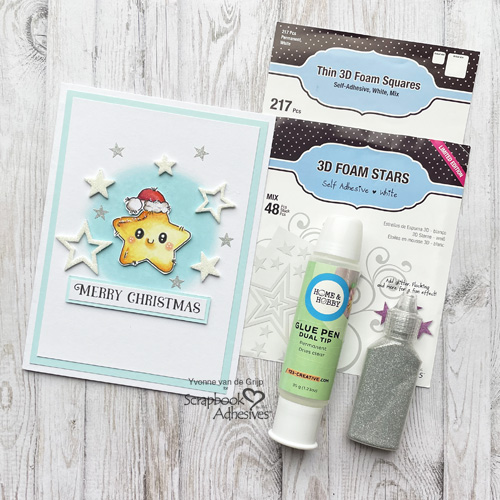
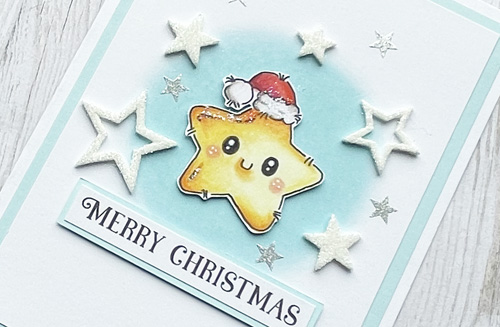
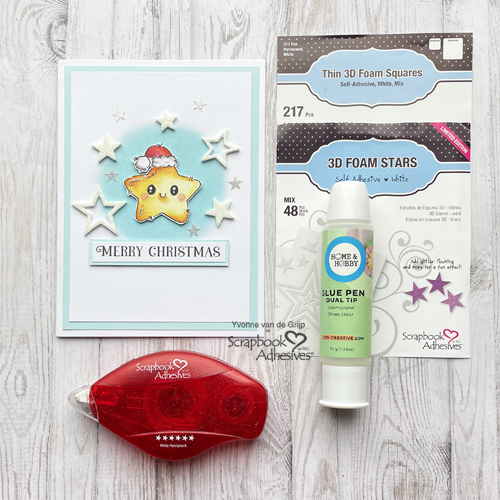
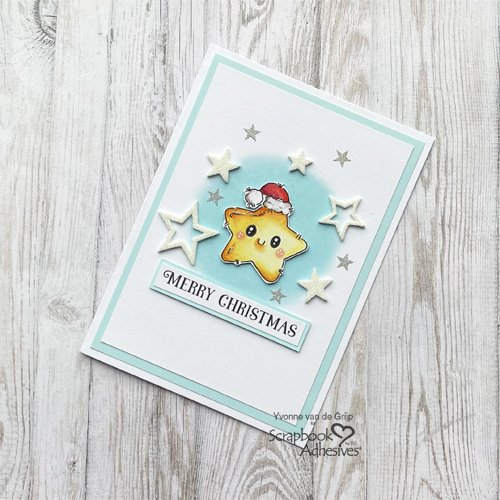
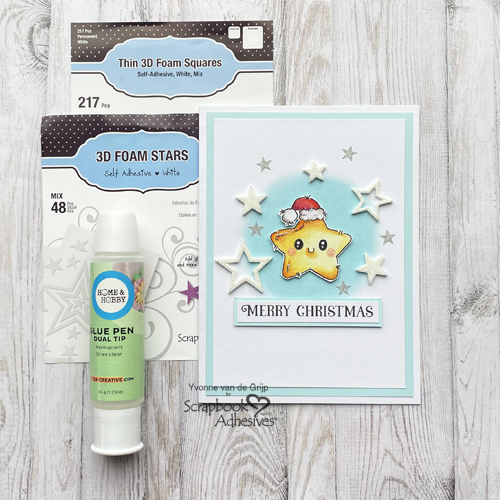
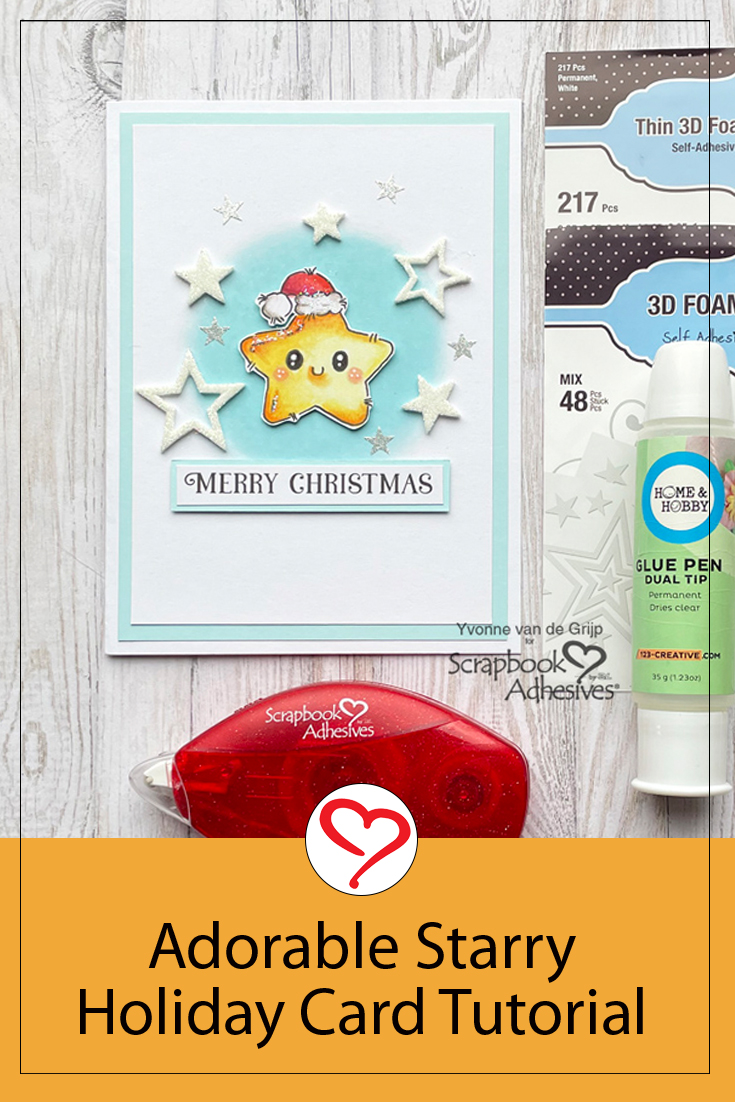
Hi everyone, Yvonne here. Today, I’d like to share how I made this Adorable Starry Christmas Card. I turned it into a sparkly eyecatcher card using the Wear Your Adhesive on the Outside technique. Shall we create this card together?
Starry Christmas Card Front Design
Ink a blue circle background on the card panel with a blending tool. First, dab some ink onto the centre of the circle and spread the ink to a fading circle edge. Mat the inked top card panel with a blue panel and lastly, to a white card base using the E-Z Runner® Grand Refillable Dispenser.
The Star Focal Point
Stamp the star image onto white cardstock, color it, and fussy cut. Next, print the sentiment for the Starry Christmas Card and cut it into a banner shape. Mat the sentiment to a slightly larger blue banner using the E-Z Runner® Grand Refillable Dispenser.
Adhere the star image and the sentiment to the card using Thin 3D Foam Squares White Mix for a subtle dimension. The thin foam is about 1/32-inch in height – half of 1/16-inch.
Wear Your Adhesive on the Outside
To add a sparkly effect to my Starry Christmas Card, I used a technique called Wear Your Adhesive on the Outside. Instead of hiding your adhesive in layers, you make your adhesive shine using them as embellishments!
First, randomly adhere some 3D Foam Stars to the card front. Remove the liner and cover with white glitter. Rub the glitter to secure and tap off the excess. Apply some E-Z Runner®Stars Refillable Dispenser on the card panel and cover them with silver glitter. Again tap off the excess glitter…it’s that easy!
To finish, add a touch of glitter to the star image. Simply apply the Dual Tip Glue Pen to the star, cover with glitter, tap off the excess, and let dry.
Voilá, this Adorable Starry Christmas Card is ready. I hope you enjoyed this tutorial and wish you a happy Christmas crafting!
Other: Stamp and Sentiment: Lili of the Valley Stamps (Happy Christmas Stamp and Cute Christmas Sentiments in Digi Stamps); White and Silver Glitters; Paper Trimmer; Scissors; White and Blue Cardstock