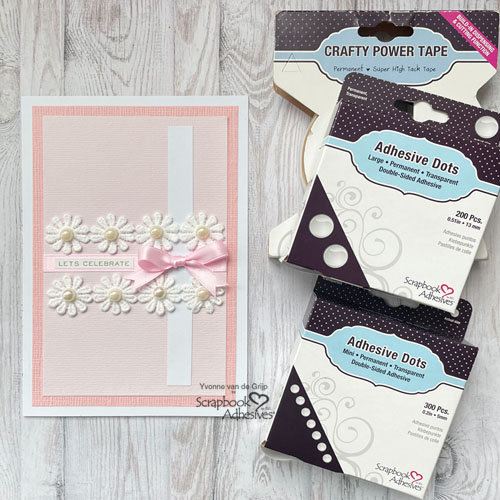
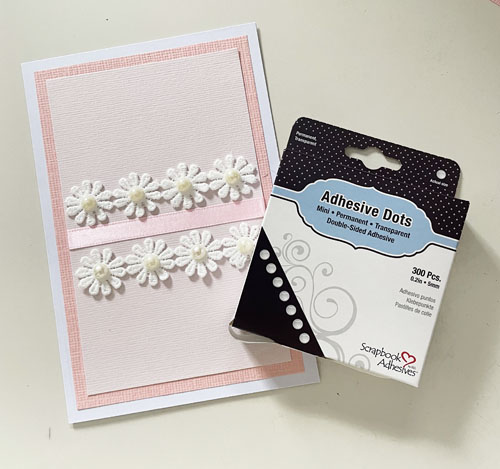
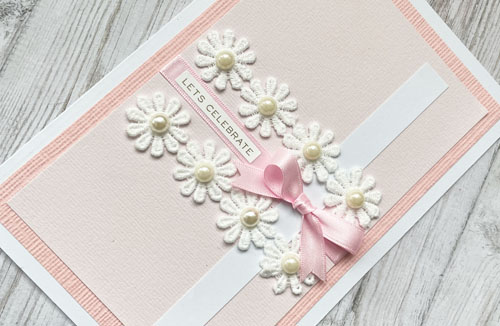
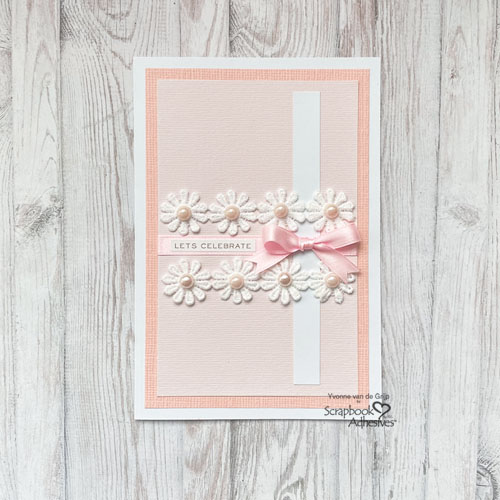
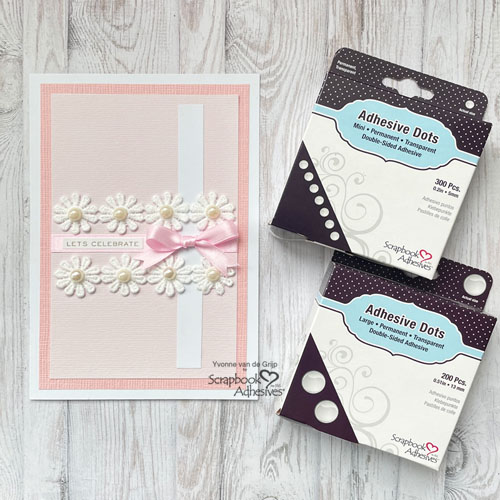
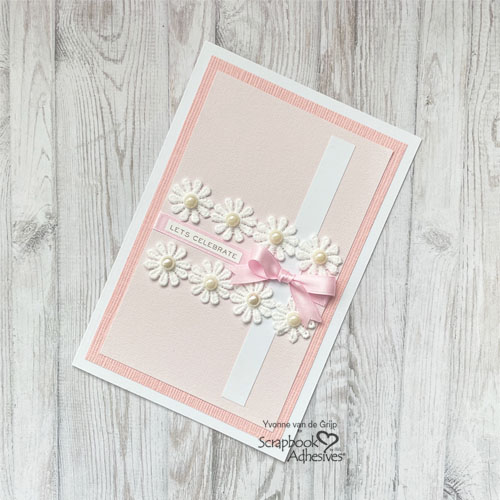
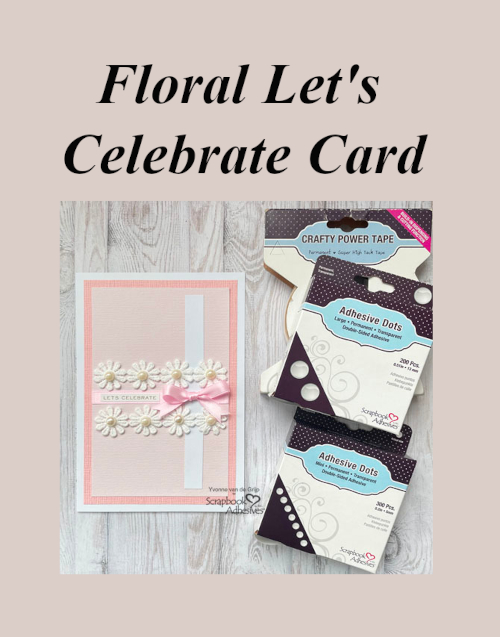
Hi everyone, Yvonne here with a Clean And Simple Style (CAS) Floral Let’s Celebrate Card. There are times that you don’t need a lot of material to create a special card. With that in mind, I have this feminine card. I would love to share.
Panel Layers for the Floral Celebrate Card
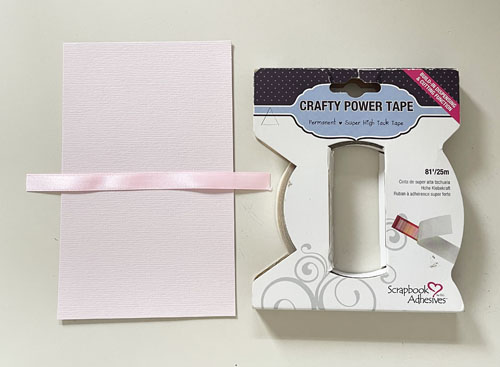
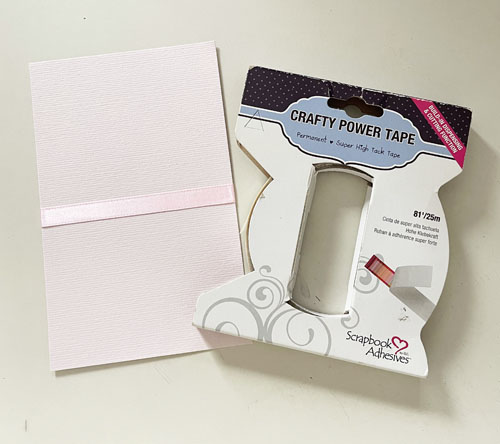
On a soft pink cardstock rectangle panel, center a piece of pink satin ribbon with our tear tape, the Crafty Power Tape Dispenser 81ft. Remove the liner and wrap the ends around the panel to secure.
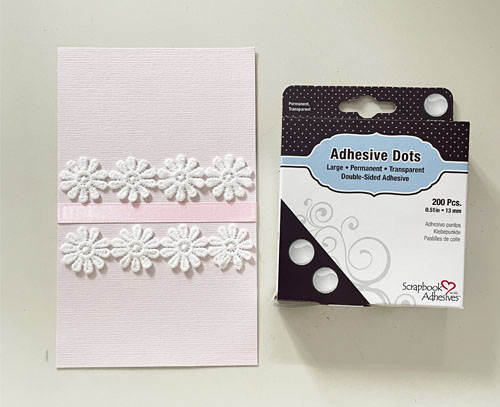
Add flower trim to the top and bottom of the satin ribbon using Adhesive Dots Large. Each flower center is a pearl which does not have any adhesive so I secured them with Adhesive Dots Mini.
To finish, I added a white cardstock strip by tucking it underneath the ribbon flowers. To secure it, I used Crafty Power Tape Dispenser 81ft. A sweet pink bow was adhered with the Adhesive Dots Mini on the white cardstock strip between the flower trim.
For the sentiment, I added a sticker on the satin ribbon. And voilá, the Floral Let’s Celebrate Card is finished!
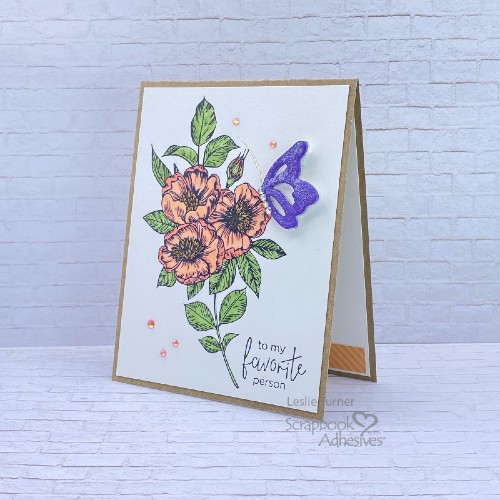
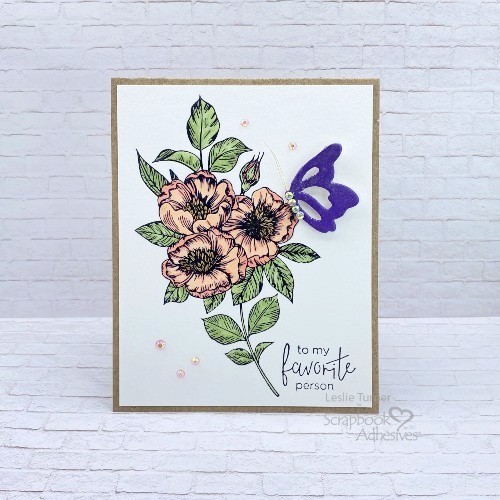
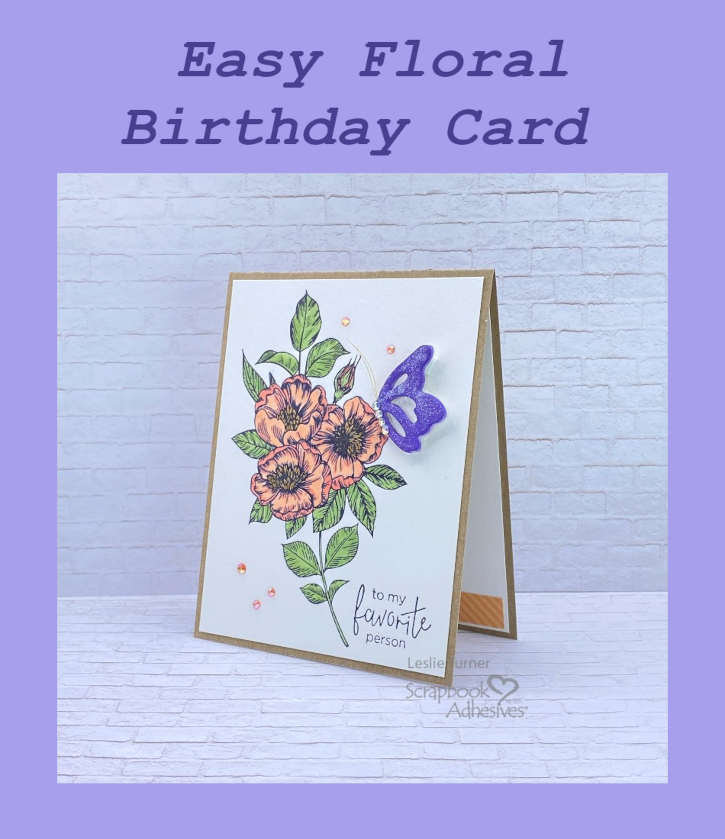
Hi friends, I hope your week has started off on a nice note and you are enjoying some pretty weather! Do you like having extra birthday cards in your stash that are easy to mass-produce? Yes, I do (raise hand)! Leslie here, sharing an Easy Floral Birthday Card with you today. When I say ‘easy’ – I mean that literally! Let me show you this card in more detail.
Card Base Details
I cut a top-folding card base from kraft cardstock at 4-1/4″ x 11″ and scored it at 5-1/2″. Next, I trimmed a cotton cardstock panel to 4″ x 5-1/4″ and pressed the floral image and sentiment into it. Used my BetterPress for this, however, stamps can also be used. Colored the image with alcohol markers and adhered it to the card with E-Z Runner® Grand Permanent Strips Refillable Dispenser. This easy floral birthday card is taking shape!
Wear Your Adhesive on the Outside
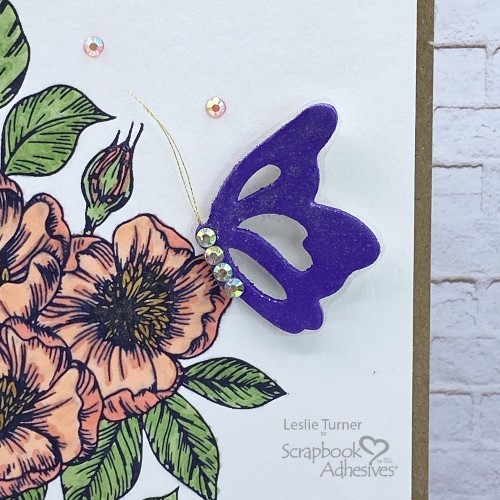
Employed the Wear Your Adhesive on the Outside technique using the 3D Foam Butterflies and purple mica powder. Super easy process – remove the liner, add the mica powder, and rub it to secure. Also very lightly dusted white mica powder onto the wings for some added sheen. Subsequently, I sealed it with a light coat of clear satin urethane spray outside. Wanted to ensure the mica powder wouldn’t rub off.
Afterwards, I stuck the butterfly to a small piece of acetate, tucking in gold thread for antennae. Acetate is great for adding stability. Trimmed around the edges and affixed it to the card front. Thin 3D Foam Squares White Mix (one small square cut in half) was perfect under the body. Additionally, 3D Foam Squares White Mix (two stacked) worked well for slightly more dimension under the wings.
Finally, I added gemstones to the butterfly body using the Dual Tip Glue Pen along with a few on the background. The front of this easy floral birthday card is complete!
Finishing the Easy Floral Birthday Card
Once again using the BetterPress, I pressed an additional sentiment into another 4″ x 5-1/4″ panel of cotton cardstock. Adhered this panel to the inside of the card base with E-Z Runner® Grand Permanent Strips Refillable Dispenser. Last, but not least, I adhered a patterned paper strip to the bottom of the inside panel which completed the card.
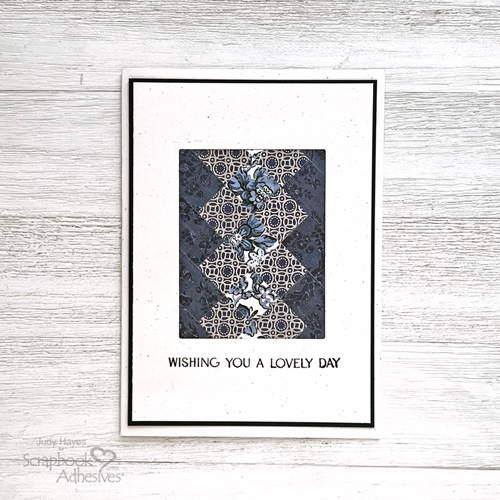
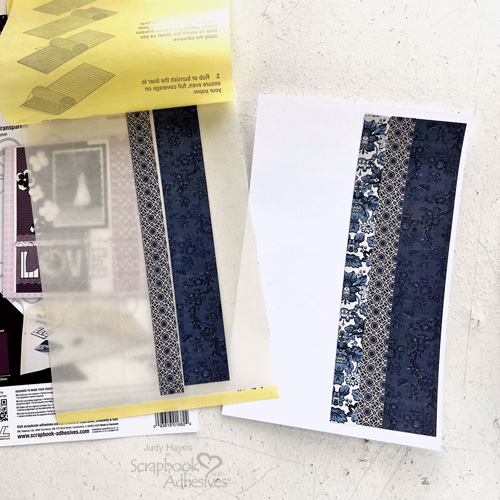
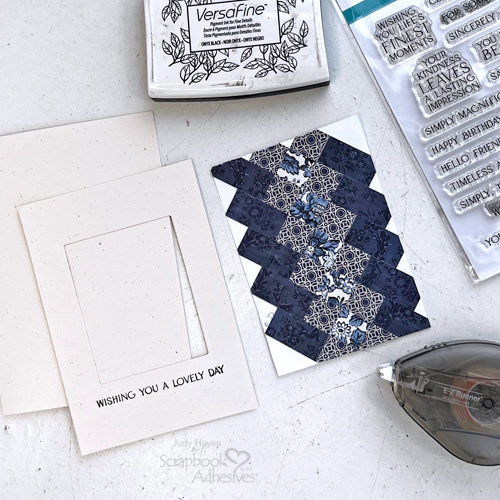
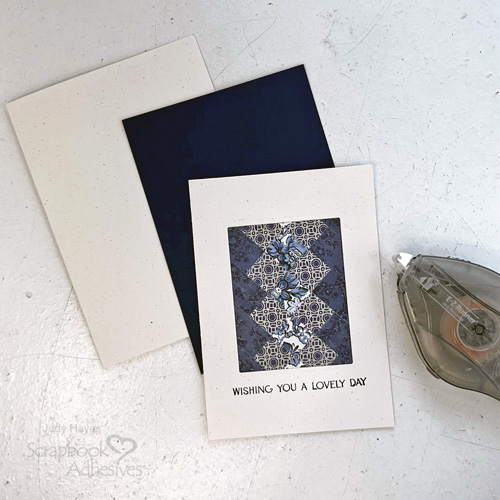
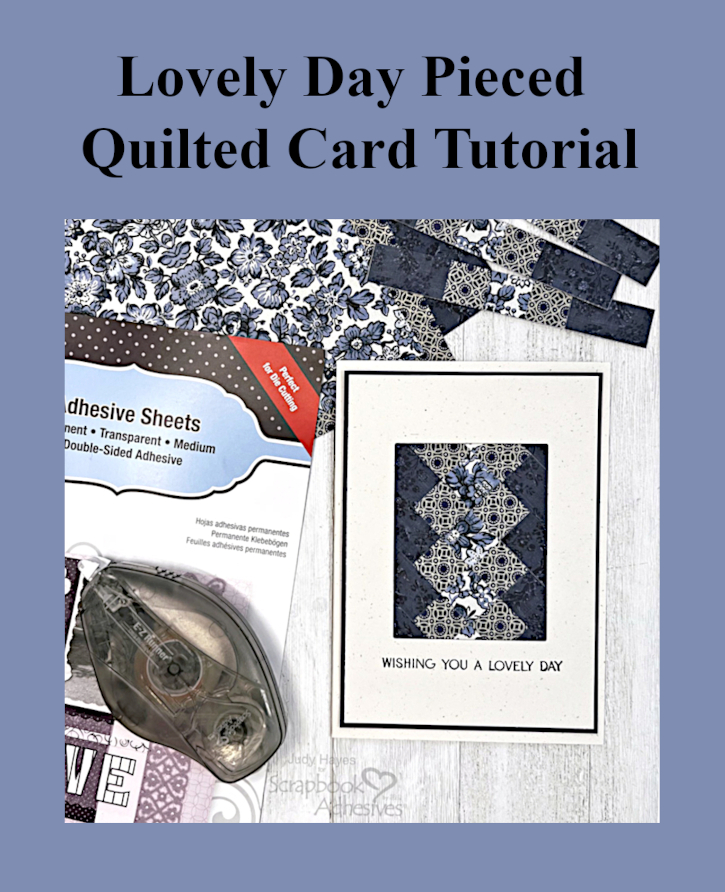
Hi, Judy here today! This Lovely Day Pieced Quilt card was inspired by cards made by my mom years ago when she had a quilt store. I recently found some of them and wondered if I could make a similar card with paper. Her cards had fabric strips sewn together to make the pieced panel. I made the panel with pieced papers. I hope you enjoy this technique.
Quilt Card Layers
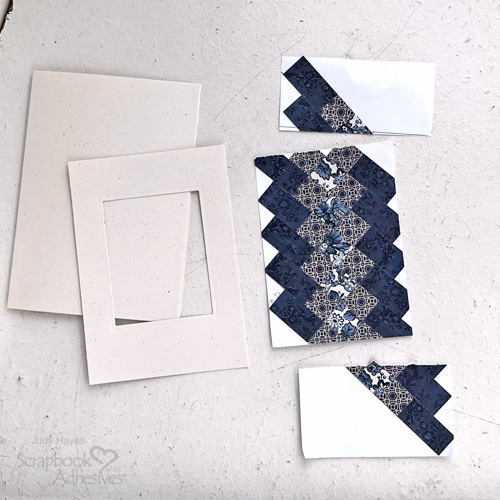
Score and fold in half a piece of 8.5 x 6 inch Birch cardstock to form a 4.25 x 6 inch card base. From another piece of Birch cardstock, cut 3.875 x 5.5 inch panel. To make a window in the panel, die-cut a 2.375 x 3.125 inch rectangle window. Lastly, cut a 4 x 5.625 inch mat from navy cardstock. Designer Tip: Rectangle can be slightly bigger or smaller.
Papers for Quilt Pattern
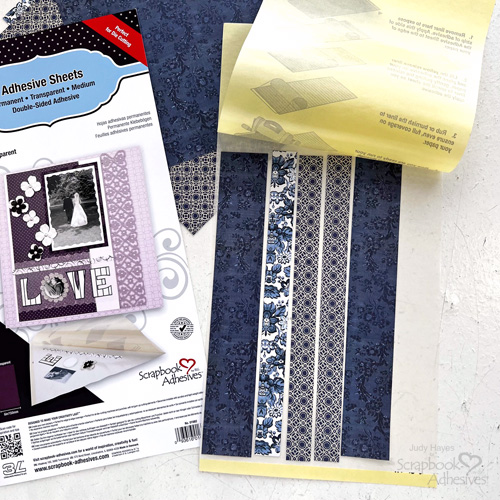
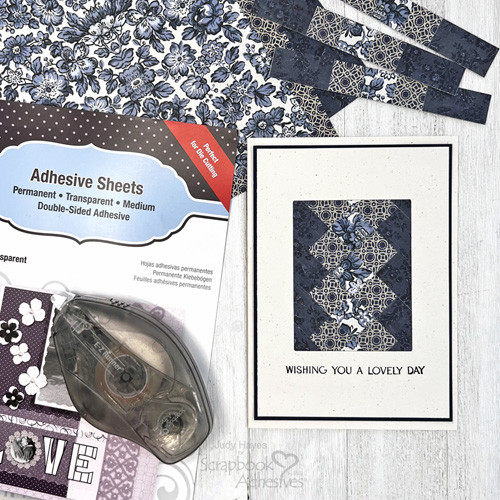
Choose three pattern papers that are dark, medium and light colors. Dark paper (Indigo): cut two 1.25 inch strips about 6 inches long; Medium paper (Tan/Indigo): cut two 0.625 inch strips about 6 inches long and Light paper (blue floral): cut one 0.623 inch strip about 6 inches long. Designer’s Tip: Instead of 6 inch strips, use 8 inch strips to make two cards!
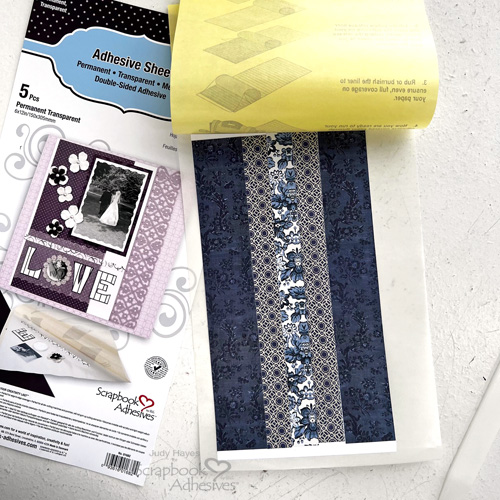
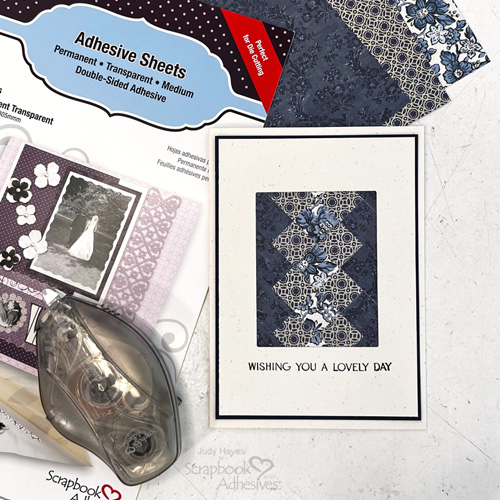
Patterned Strips to Adhesive Sheets
Peel back one end of a sheet from the Adhesive Sheets 6 x 12in., place strips on adhesive with a slight gap between each strip, and replace the liner back over strips. Burnish well with bone folder.
Add Strips to Paper Backing
Peel one dark strip (Indigo with the 1.25 inch width) and place on piece of printer paper. Next, peel a medium strip (0.625 inch width Indigo/Tan) and place right against first strip so edges fit tightly together with no gap.
Continue with light strip (0.625 inch width of Blue Floral), another medium strip and finally dark strip. Trim away printer paper along long outer edges.
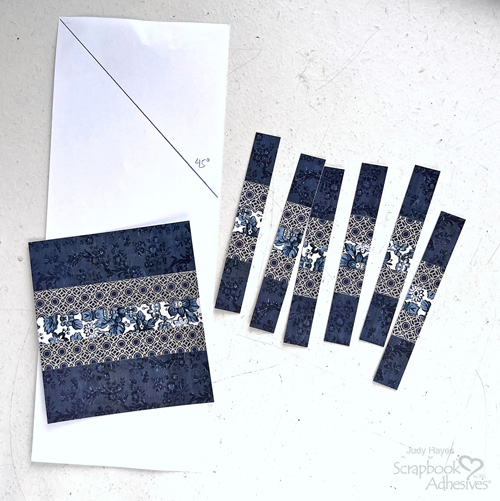
Add Adhesive to Panel and Pieces
Peel back the liner of Adhesive Sheets 6 x 12in. and place panel of assembled strips on the adhesive, cover with liner and rub with bone folder. Do not remove panel. Carefully cut away adhesive sheet around all the edges of the assembled strips. Next, cut one end of assembled strips so that its even. Then cut seven crosswise strips of 0.625 inch each.
Make Pieced Panel
On piece of printer paper cut lengthwise in half (4.25 x 11 inches), draw a line at 45 degree angle from long edge. Designer’s Tip: I use a quilters clear ruler for this step.
Peel the liner from a pieced strip (a straight pin helps to get liner loose) and place it along drawn line. Peel the liner from another pieced strip, align it so center three squares are offset by one square from strip already in place. Repeat placement steps with the strips with the squares offset each time. This will create diagonal pattern like a pieced quilt. Once all the strips are in place, trim away printer paper along side edges. Square up one end and then cut panel about 4 inches long, width does not need to be trimmed.
Stamp Verse
Stamp verse on birch panel below rectangle window with black ink.
Assemble Card
Apply the E-Z Runner® Ultra Strong Refillable Dispenser on back of verse panel along edges of rectangle opening. Place panel over pieced strips panel and press to secure. Using the same adhesive runner, attach to the navy mat and then to the card base.
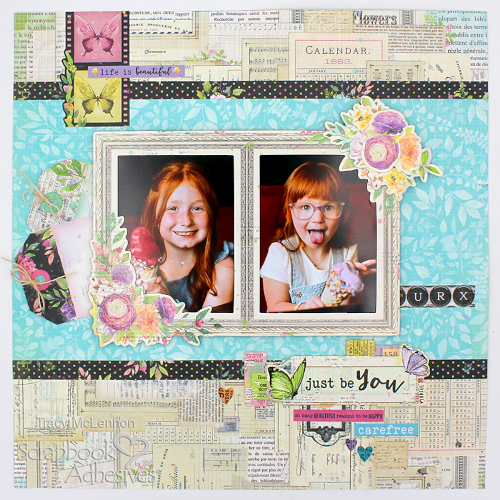
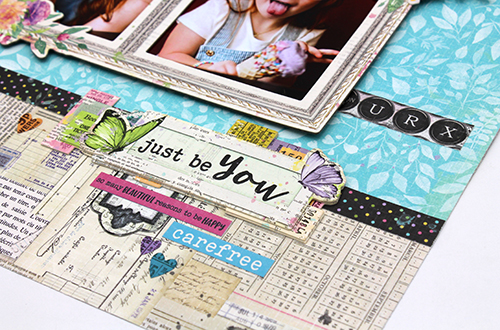
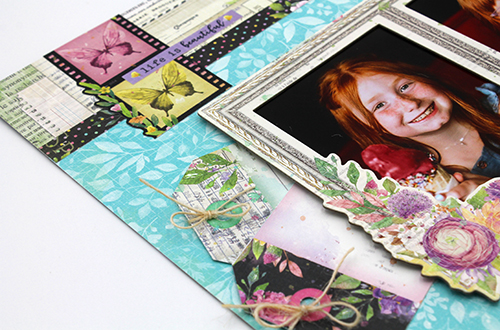
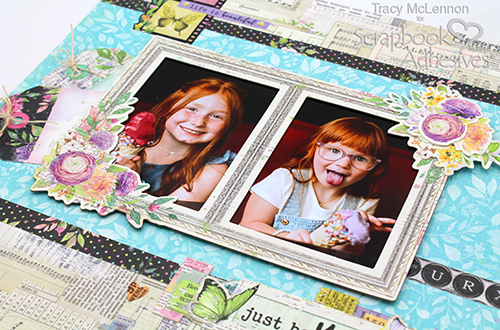
Hello scrappy friends! Tracy here and today, I have a bright Just Be You Layered Layout to share using some of my favourite products. Have you ever had a collection that you loved SO much, you just keep creating with it? I have used this collection SO much, that I now have just bits and pieces left. Let me share details how I used some for this layout 🙂
Let’s Get Crafty!
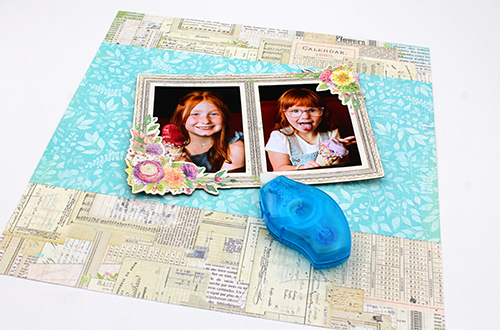
The background is created with a combination of two paper pieces adhered together with the E-Z Runner® Petite Permanent Dots Refillable Dispenser to create a 12 x 12″ layout. The focal point are the two photos which I framed with a coordinating chipboard frame using the same adhesive.
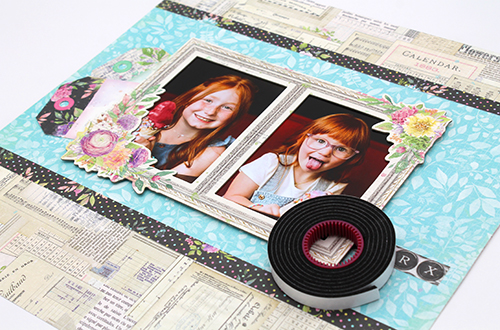
To anchor the layout, I cut and added two narrow black patterned paper strips to the edges of the teal paper with the E-Z Runner® Petite Permanent Dots Refillable Dispenser. Adhere the chipboard frame to the middle of the layout using Crafty Foam Tape Black for extra dimension. Then tuck in a couple of tags on the left side of the photo frame using Thin 3D Foam Squares Black Mix and added burlap string to each for a little bit of texture and dimension.
Just Be You Title Cluster & Accent
With the sticker sheet, I created a title cluster, along with a phrase sticker and a word sticker. Add a border sticker to the right of the frame.
Lastly, let’s create a cluster on the upper left corner with another bunch of stickers, along with a phrase sticker.
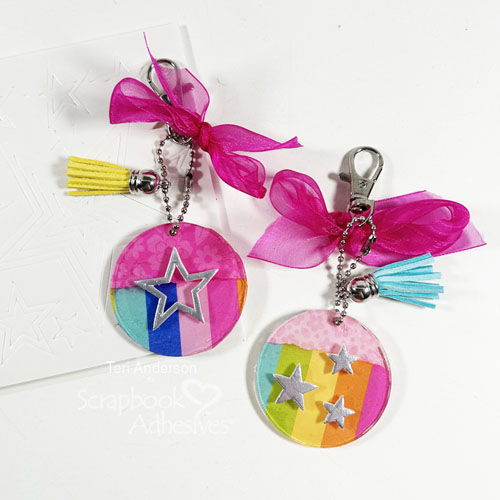
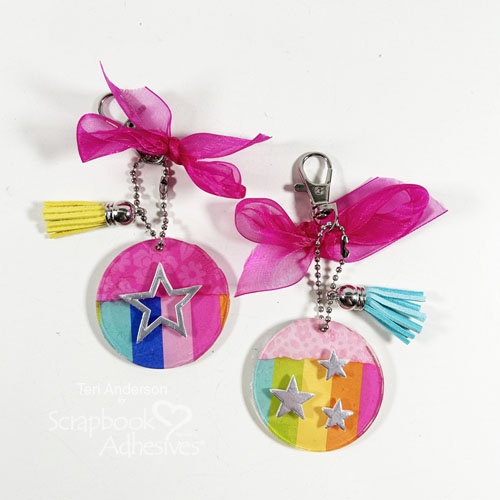
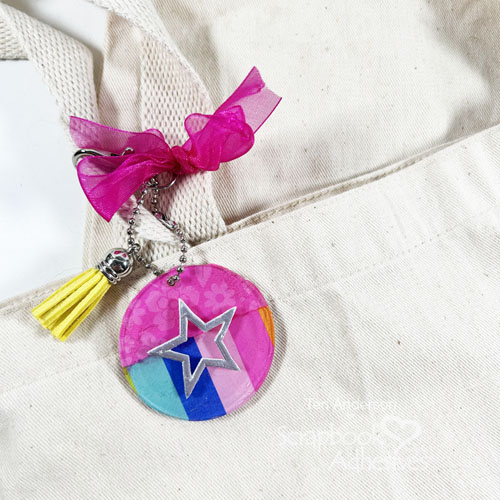
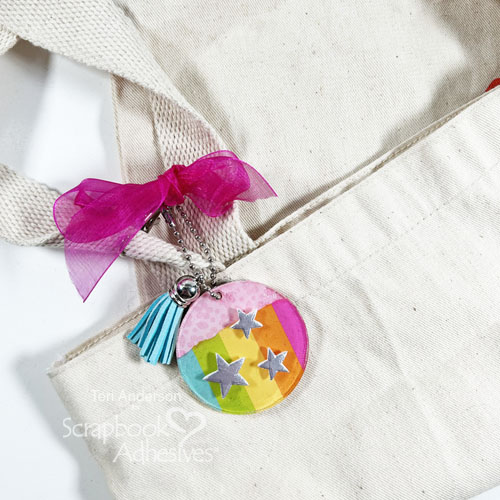
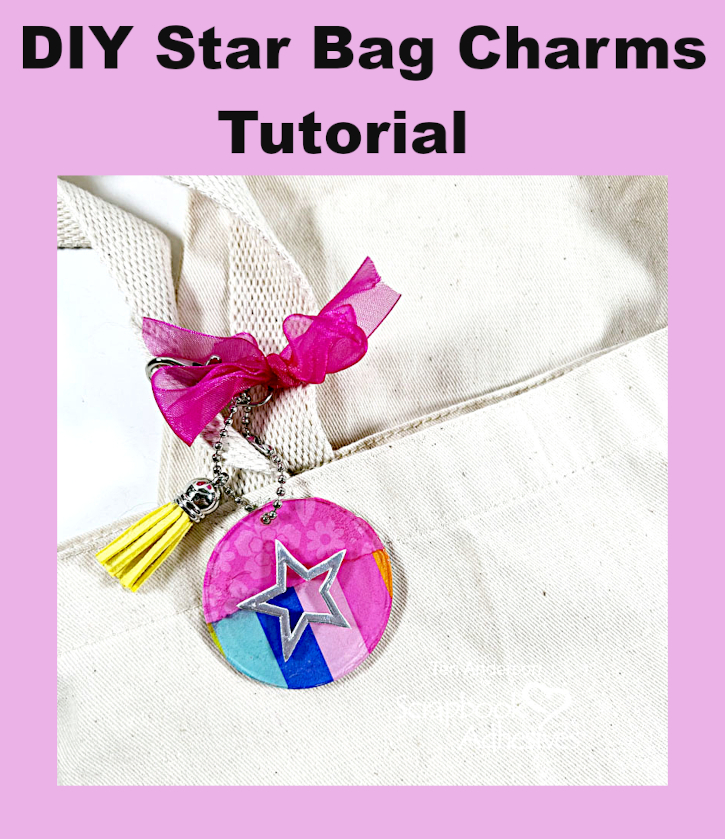
Hi, friends! Looking for a quick gift to take your next Girls Day Out? Teri here to show you how to make super cute DIY Star Bag Charms. These make a fun gift to take a lunch with friends, a crafty retreat or even a bachelorette party!
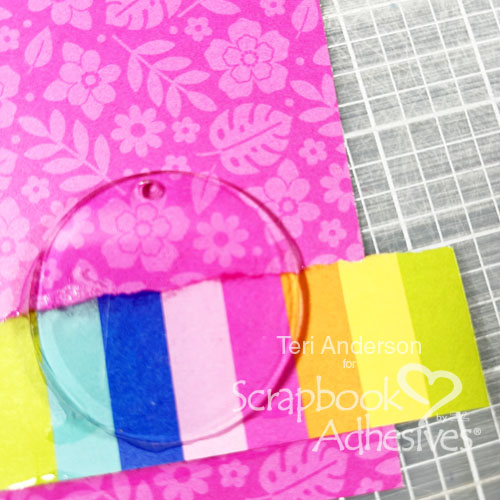
Make the Bag Charm Base and Background
You’ll need some kind of charm that can hang on a key ring or ball chain. I am using some small circles cut from acrylic plastic. You could use a wood disk instead if desired.
Determine your background design with patterned paper. I torn a piece of patterned paper and added it on a second piece with the E-Z Dots® Permanent Refillable Dispenser. Then cover the paper with Dual Tip Glue Pen. Set the disk on it and move the disk around, evening out the glue and pushing out the excess. Let dry completely. Once dried, trim the excess paper from the disk.
Wear Your Adhesive on the Outside with 3D Foam Stars
Place 3D Foam Stars on to the disk with the top liner on. Remove the liner on one of the stars and cover a piece of Platinum foil from the Metallic Transfer Foil in Nature Colors (color side facing you) and rub to transfer the color to the star. Reapply the foil in missed areas. So easy!
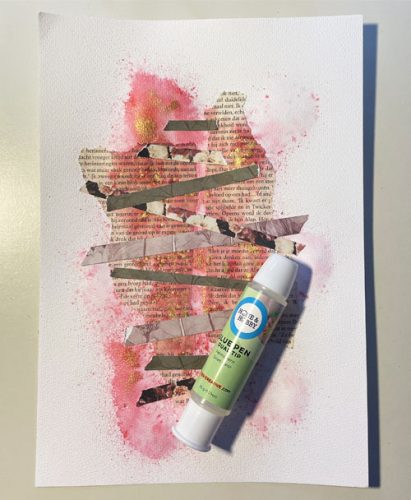
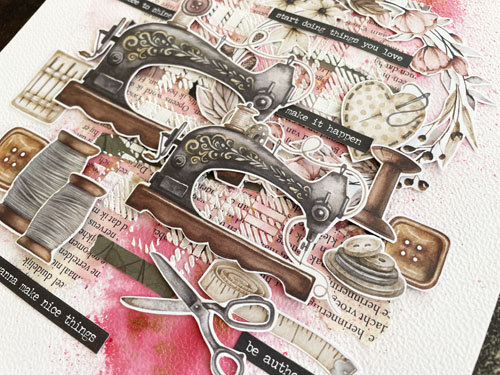
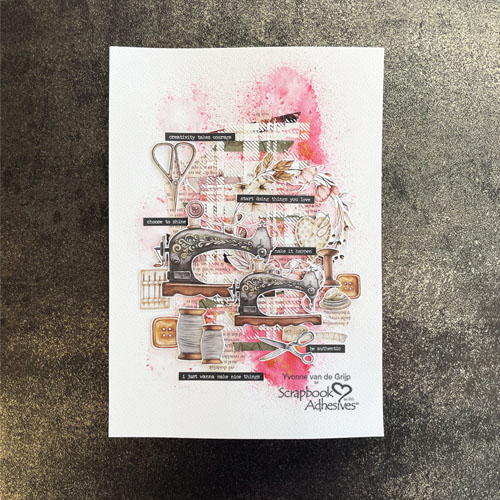
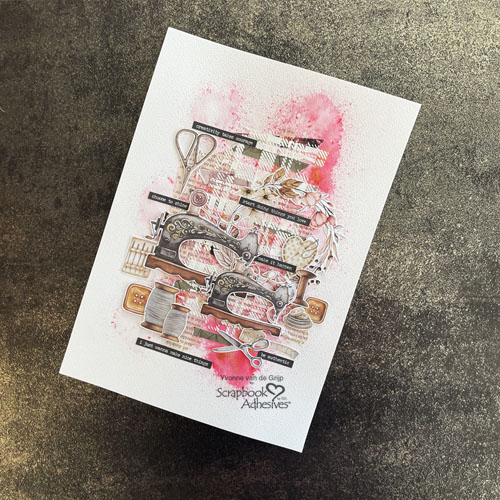
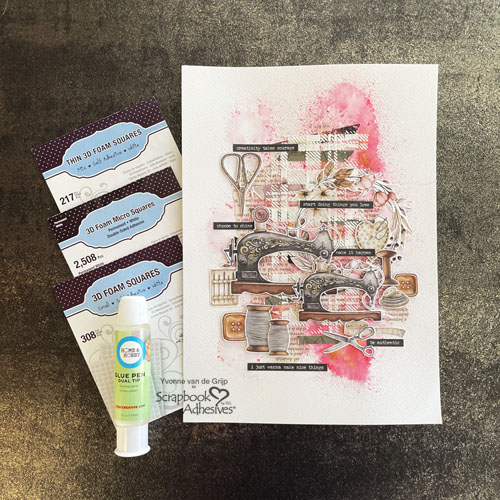
Hi everyone, Yvonne here with a Creative Art Journal Page. Going through my stash, I determine my direction of a sewing theme using vintage sewing machine images and other related elements. This page is all about layering and I would love to share how I made it. Will you join me?
Creative Art Journal Page Background
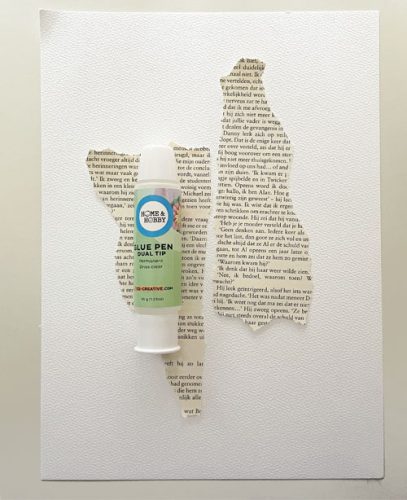
For the background, I adhered two pieces of torn old book pages onto a piece of white thick cardstock using the Dual Tip Glue Pen.
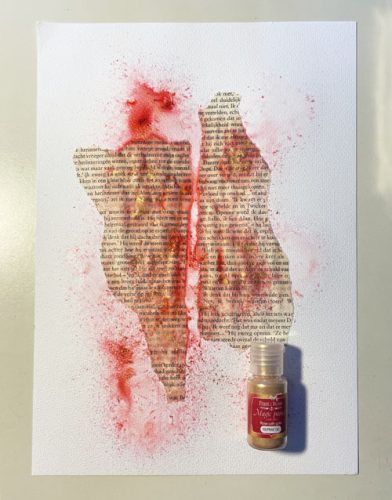
Next I sprinkled some pigment powder on top and misted the powder with water. I moved the color around the page by tilting the cardstock for some design. Now let it dry thoroughly. You can speed that up by using a heat tool.
Building Background Layers
Using the Dual Tip Glue Pen, adhere some patterned paper scraps to the page until you get your desired look. Next, place a stencil over the page. With a spatula and structure paste, create the next layer. Let dry thoroughly. If you’re impatient, use a heat tool to speed up the drying time but be careful of possible bubbling.
Adding Elements
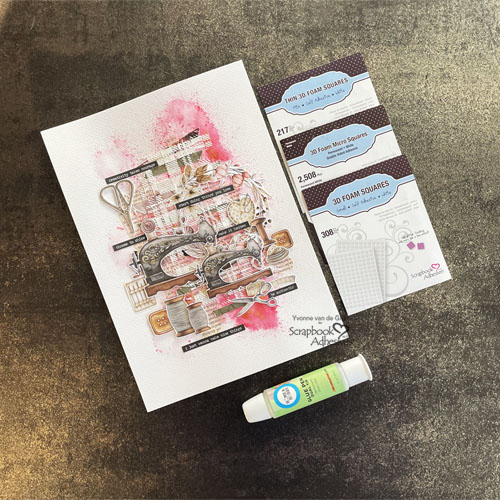
Fussy cut several images with scissor and adhered on the page with the Dual Tip Glue Pen. Pop up some of cut images with Thin 3D Foam Squares White Mix in the foreground. Then lift up more with the other images using 3D Foam Squares White Mix and 3D Foam Squares Micro White. Using the different kinds of foam adhesives, you achieve a variety of 1mm + 2mm heights (1/32″ + 1/16″) for a lovely depth on the page.
The Sentiment-al Touch
To finish, I picked and chose some suitable sentiments to tuck into the designs. I love how it turned out! And voilá, the Creative Art Journal Page is complete!
I hope you’re inspired to create your own Art Journal page. Wishing you happy crafting!
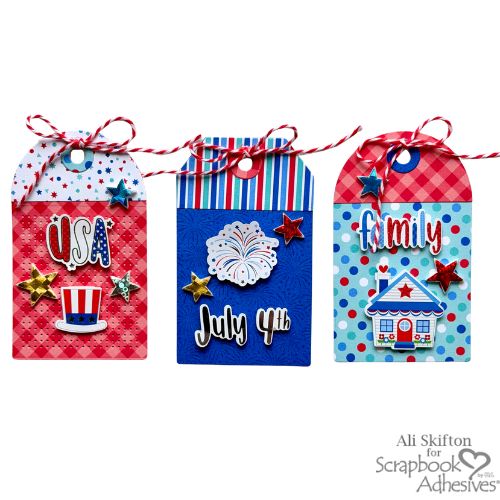
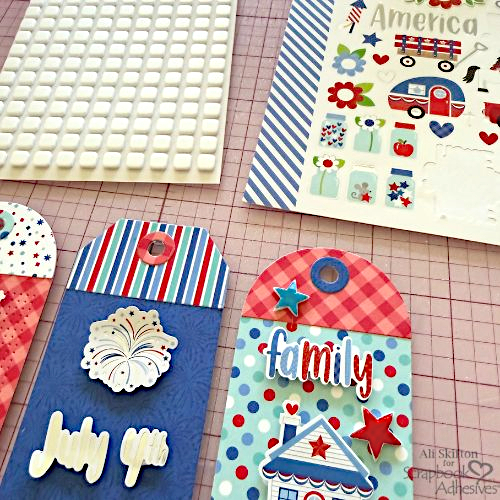
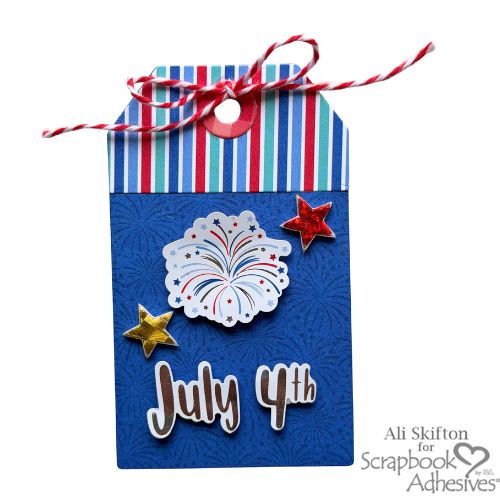
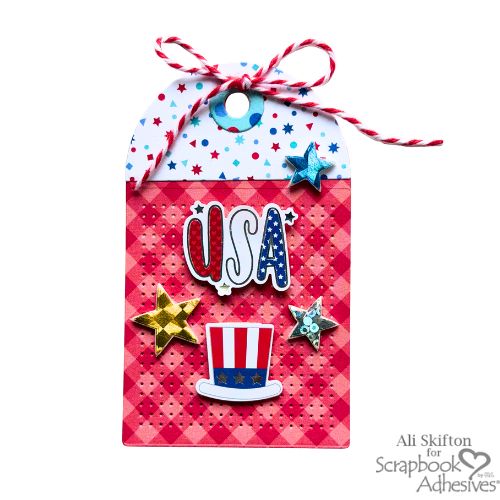
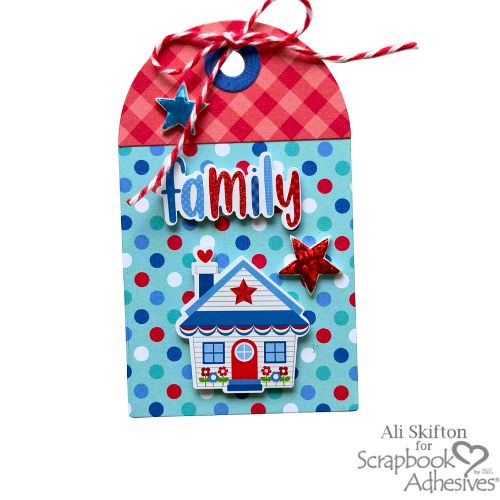
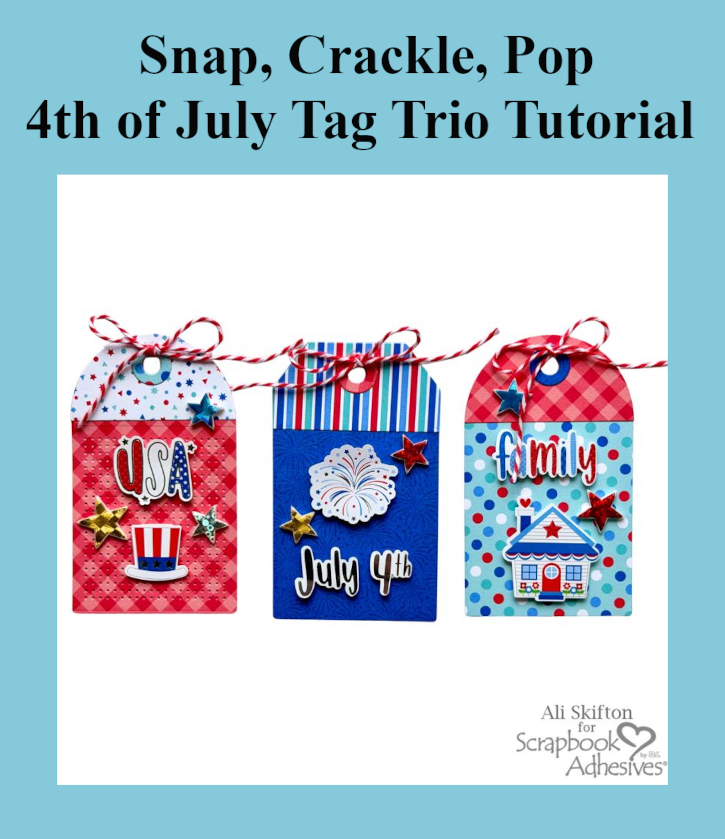
Hi, Ali (FunAdventuresWithAli) here today! I am so excited to share these festive Snap, Crackle, Pop Tag Trio with you! I had an absolute blast creating these using the adorable 4th of July creations featuring the Metallic Transfer Foil Sheets in Holographic Colors and 3D Foam Stars.
Summer is one of my favorite seasons. Celebrating the Fourth of July with my family is always such a special tradition for us. We gather together for a cookout filled with delicious food and laughter. Of course, ending the night watching fireworks light up the sky = perfect! I wanted to capture all those fun and happy summertime vibes in these cheerful handmade tags.
Snap, Crackle, Pop Tag Trio Bases
These tags are such a fun and versatile project! They could be added on a scrapbook layout, tucked into a journal, attached to a party favor…so many ideas! I love creating items that can be used in so many ways. These little tags are full of festive personality.
Doodlebug always creates the cutest Fourth of July collections, so I could not wait to dive into my supplies! I grabbed some 6×6 paper pads and my favorite tag dies to cut tags. Mixing and matching prints was so much fun. I love layering the pieces together to create lots of dimension and interest.
Embellishing Each of the Tag Trio
Using the adorable mini journal stickers from the collection, I started with embellishing the tags. Designer’s Tip: use baby powder on the back of stickers to remove stickiness and use as an element. Add small foam squares from the 3D Foam Squares White Mix to give extra depth.
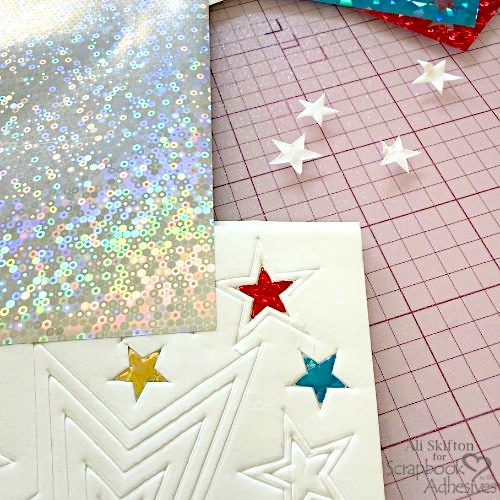
Wear Your Adhesive on the Outside with 3D Foam Stars
The stars are my favorite element in this project because nothing says Fourth of July like sparkling stars and fireworks! The Metallic Transfer Foil Sheets in Celebrate Colors and 3D Foam Stars were perfect for custom embellishments to match the tags. Place the stars on each tag. Remove the top liner from one and cover it with a piece of red foil (color side facing you). Gently rub to transfer the color to the star and peel off to reveal the shine!
Repeat the foiling steps to the rest using other colors like blue, gold and silver. Transferring the foils onto the stars is so satisfying. In less than a minute I had gorgeous shiny embellishments ready to go. They seriously remind me of little firecrackers bursting right off the tags!
Finishing Touches
Thread the red and white twine to the top of each tag for an extra festive touch. I absolutely love how these turned out. They are bright, playful, sparkly, and full of patriotic summer fun. Projects like these always make me excited for all the memories still to come this summer.
Thank you so much for stopping by today! I hope these Snap, Crackle, Pop Tag Trio inspire you to create something fun. Wishing everyone a safe, happy, and joy-filled Fourth of July filled with family, friends, fireworks, and lots of crafty fun!
Thanks for visiting! Ali Skifton (FunAdventuresWithAli)
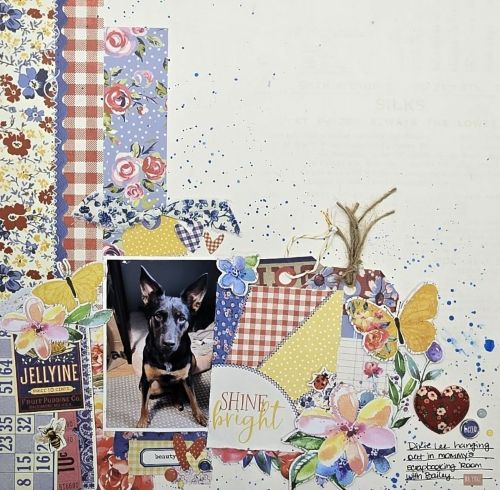
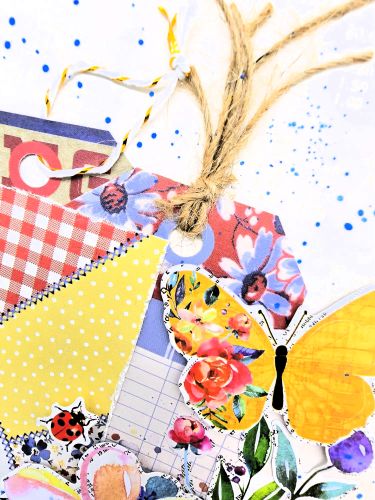
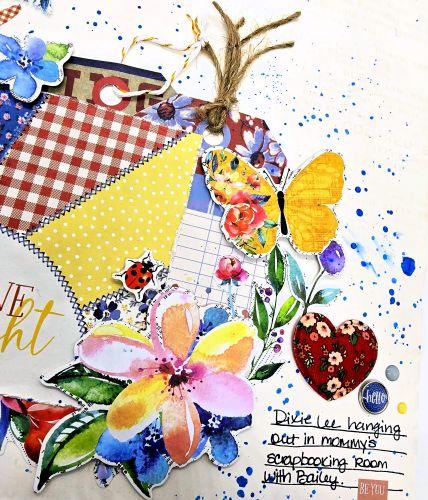
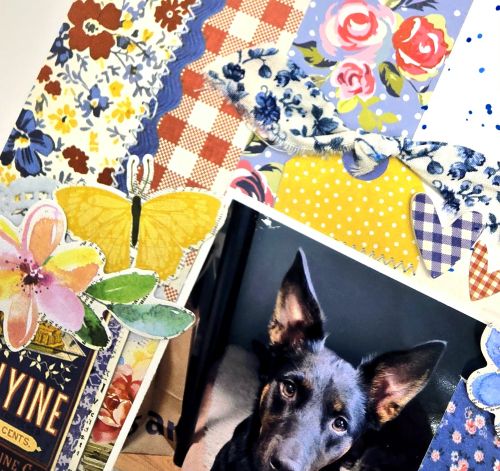
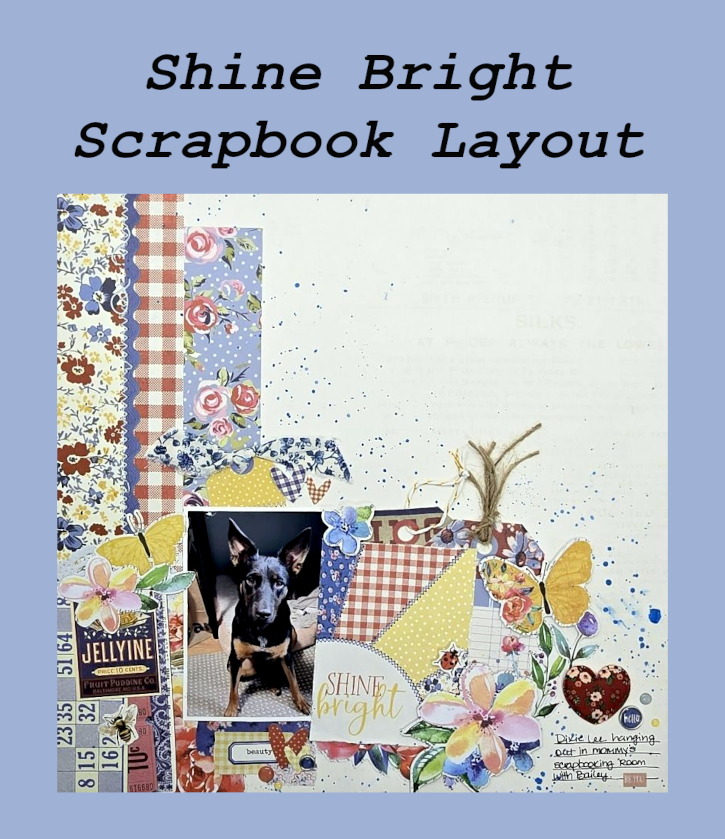
It’s Kristin here, today I’m sharing a heartwarming Shine Bright Layout featuring my adorable dog, Dixie! It highlights one of my favorite photos of her sitting so sweetly and looking absolutely precious. The bright florals, vintage-inspired textures, and color palette worked perfectly with my photo. To add dimension and interest throughout the page, I reached for my favorite products from Scrapbook Adhesives by 3L.
Creating Interest with Foam Adhesives
A favorite way of mine to make a scrapbook layout come alive is by adding layers and dimension. For this page, I used 3D Foam Squares White Mix behind patterned paper pieces, embellishments, and flowers to create depth across the design. It helps draw attention to Dixie’s photo while giving the page a soft, dimensional look.
Layering & the Details
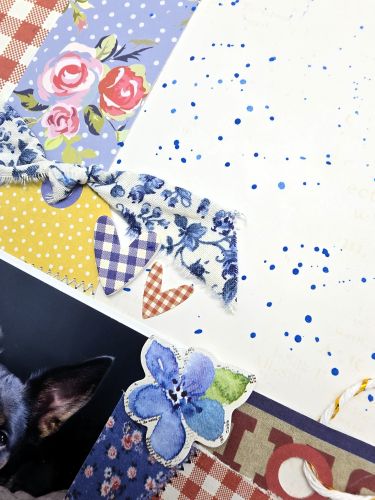
This beautiful collection makes it easy to build wonderful clusters around the photo. I layered floral elements, tags, and soft patterned papers using the E-Z Runner® Grand Refillable Dispenser. The colors in this line added visual interest while keeping the main focus on the photo. I distressed some of the paper edges for extra texture and splattered blue watercolor paint around the layout and a cozy farmhouse feel.
Finishing Touches
To complete the layout, I added a few additional embellishments and layered accents around the page for balance. I pulled the title from a 3×4 card that says, “Shine Bright” – behind that card I used Crafty Foam Tape Black to give it a lift. The combination of vintage-inspired products and dimensional adhesive created a warm, heartfelt design that perfectly captures Dixie’s sweet personality. I love how this layout turned out, and the dimensional elements really help bring the entire design together.
Thanks so much for stopping by today! I hope this project inspires you to add extra layers and dimension to your next scrapbook layout using foam adhesives from Scrapbook Adhesives by 3L.
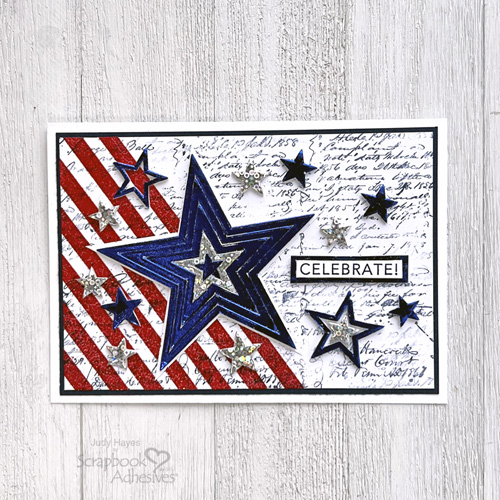
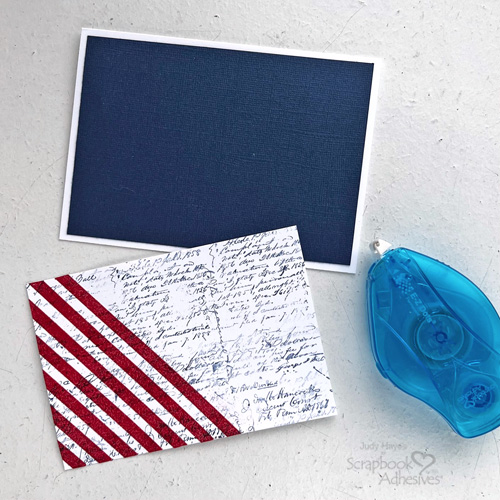
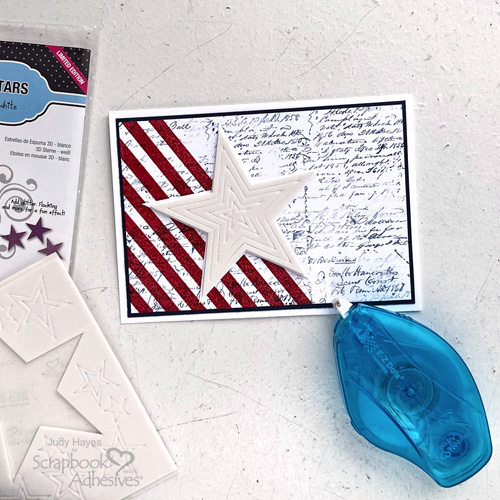
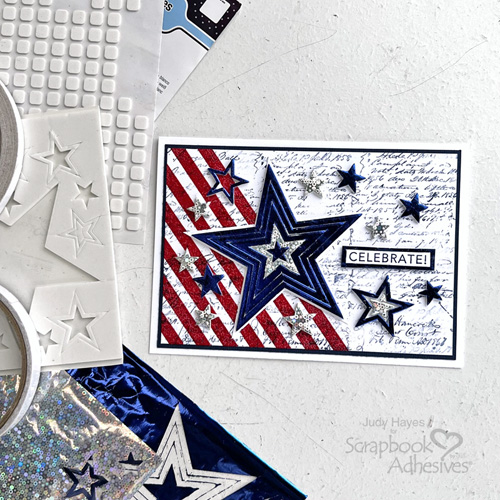
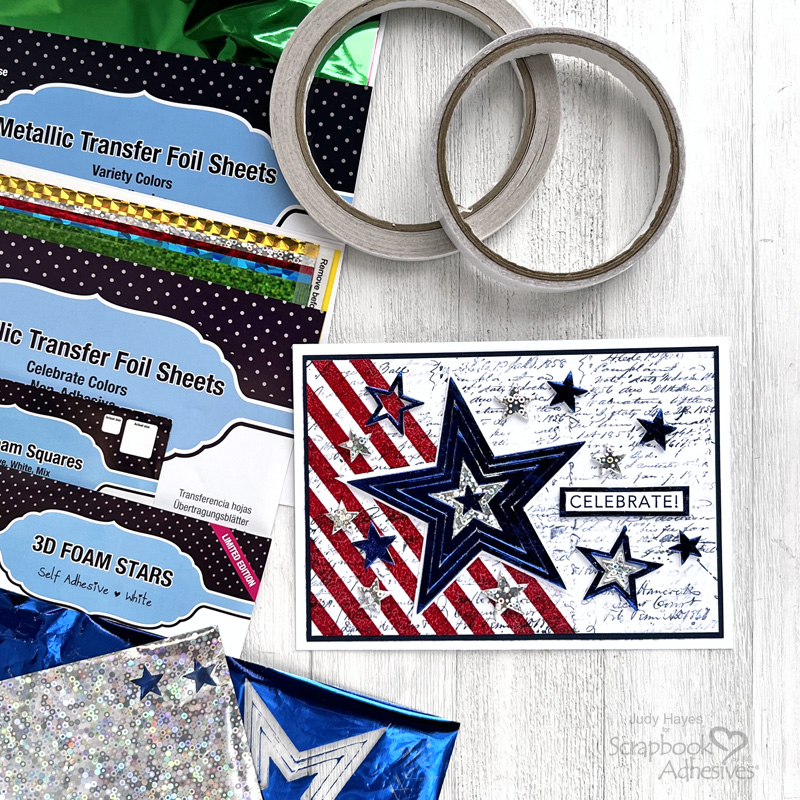
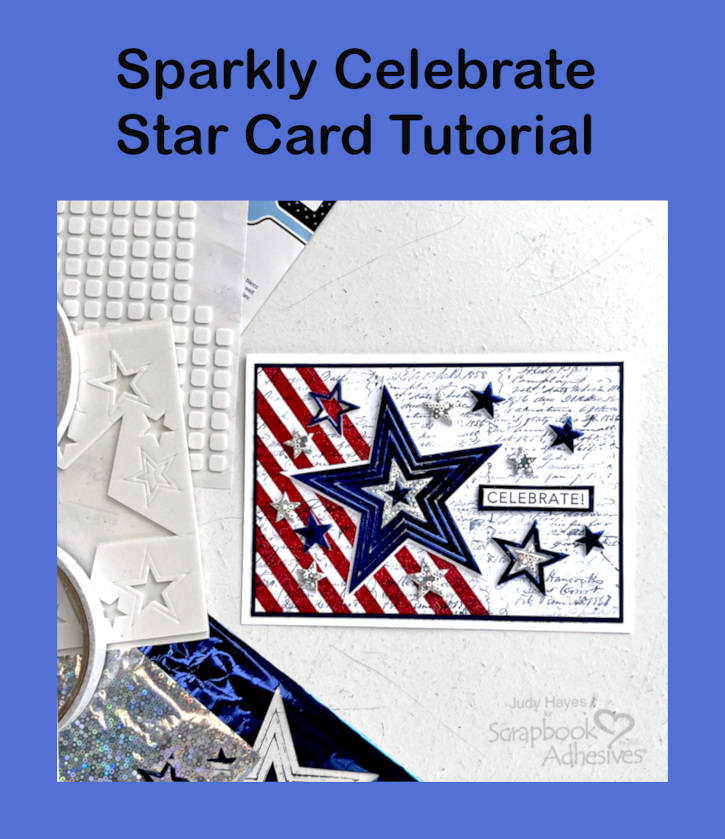
Sparkly Celebrate Stars Card Layers and Background
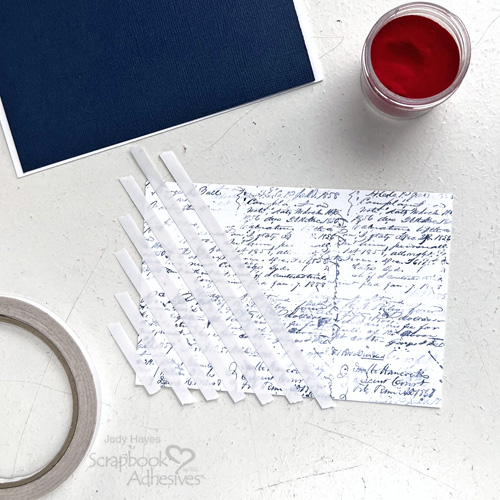
Make a card base by folding in half a piece of 8.5 x 6 inch white cardstock to create a 4.25 x 6 inch card and set aside. Make a mat by cutting a 4 x 5.75 inch navy cardstock and leave for a later step. Cut a 3.875 x 5.625 inch white cardstock panel. Ink a script stamp with Archival Night ink, lightly stamp off on scrap paper and stamp onto white panel. Repeat to completely cover panel.
Make Stripes on the White Cardstock Panel
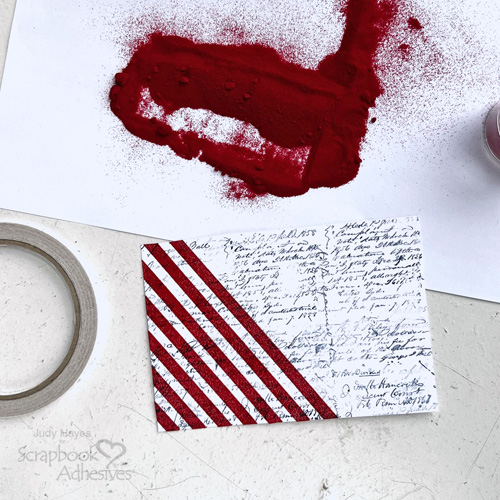
Let’s Wear Your Adhesive on the Outside to our tear tape and embossing powder! Apply strips of Premium Double-Sided Tape 1/4in. at angle across left edge of panel and trim off ends. Rub well with bone folder or fingers to secure. Dust panel with anti-stick powder for crisp lines and from sticking in unwanted areas. Peel off liners, cover with red embossing powder, remove excess and heat emboss with a heat tool.
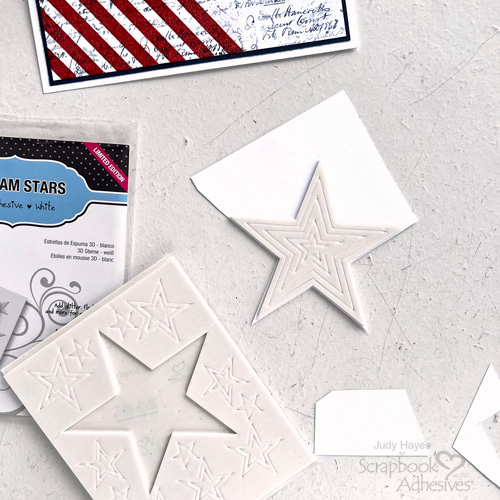
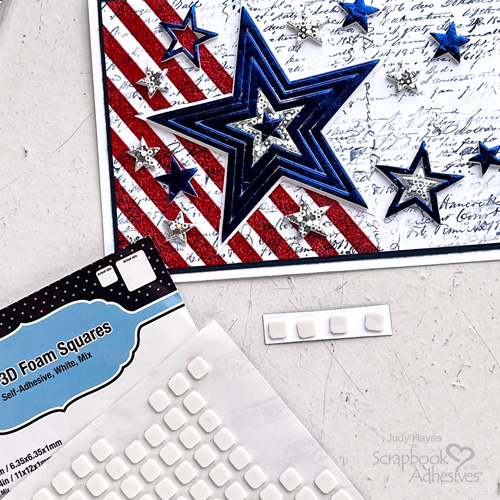
Use needle tool to carefully lift all points of large star section (five nested stars together) from a sheet of 3D Foam Stars. To give it more support, I removed all the backing and place the star on a piece of white cardstock. Then cut around the star leaving a narrow margin of white cardstock showing along edges.
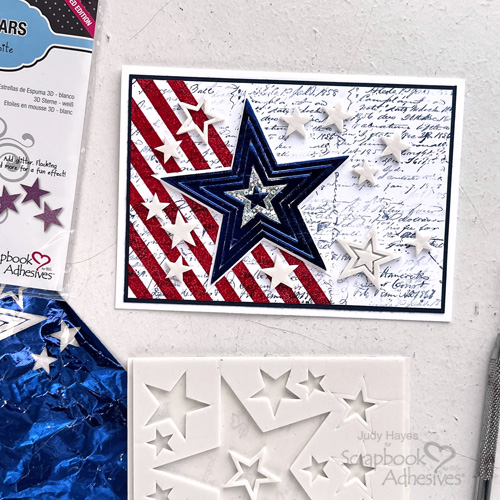
Wear Your Adhesive on the Outside with 3D Foam Stars
Remove the liners from the three largest (outer) stars, cover with the blue foil from Metallic Transfer Foil Sheets Variety Colors. With the color facing you, rub well and peel away to reveal the color. Reapply foil in missed areas. Repeat the foiling steps with the center star in the same blue foil and then remaining star using the silver foil from Metallic Transfer Foil Sheets Celebrate Colors.
Accenting with Small 3D Foam Stars
Randomly place smaller assorted stars from 3D Foam Stars and place on card around the focal point. Make sure to allow space for the greeting. For open stars, peel up each corner using a needle tool and then carefully remove from backing to prevent distortion of star.
Again, use foiling steps with the blue and silver foils on the small 3D Foam Stars.
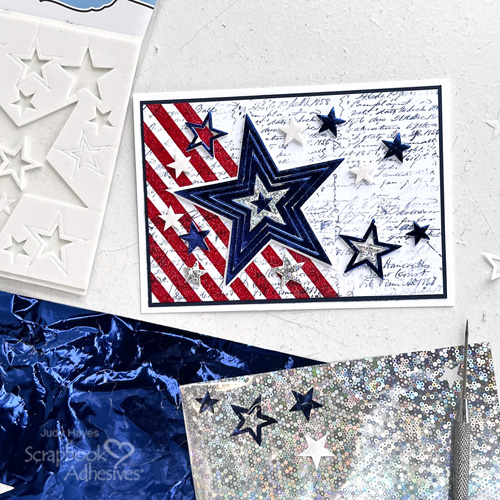
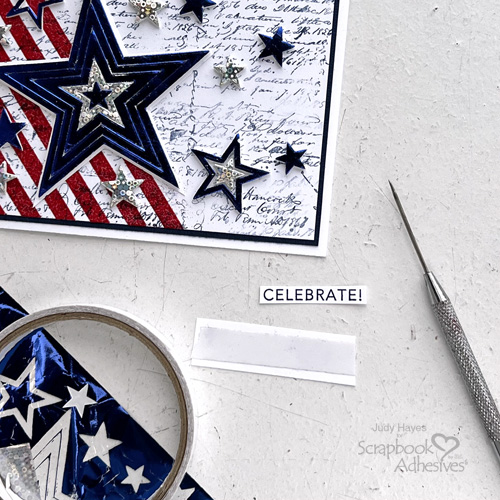
The Greeting
Stamp “Celebrate” with Archival Navy ink on white cardstock and cut to a narrow strip. Place about 2 inch piece of Premium Double-Sided Tape 1/2in. on scrap of white cardstock and rub well to secure. Peel off liner and place greeting centered over strip of Premium Double-Sided Tape 1/2in.
I like how the script shows through the red embossed stripes and all the dimensional stars have color, shine and sparkle to them. Time to Celebrate!
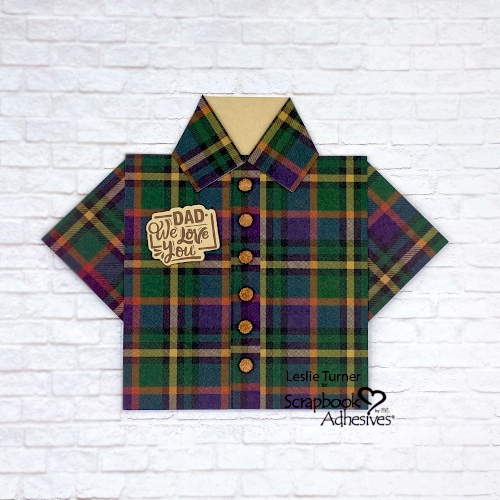
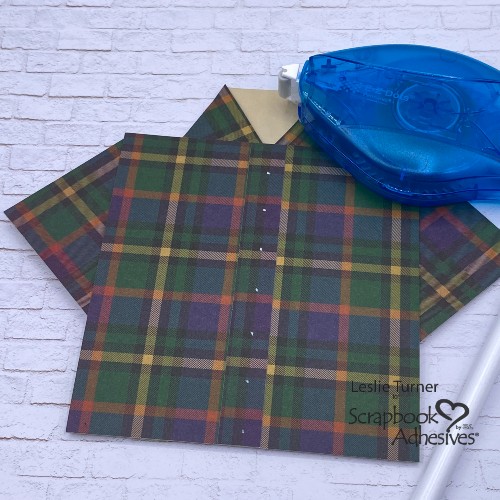
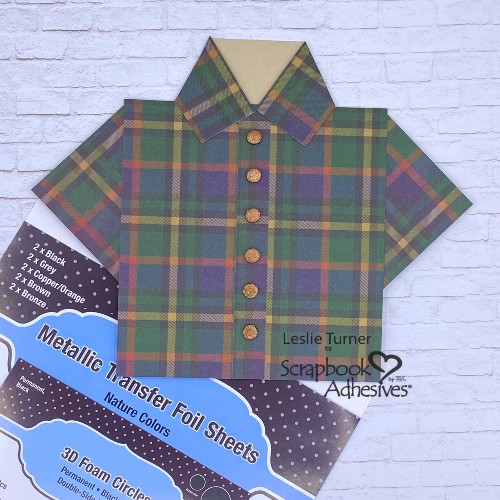
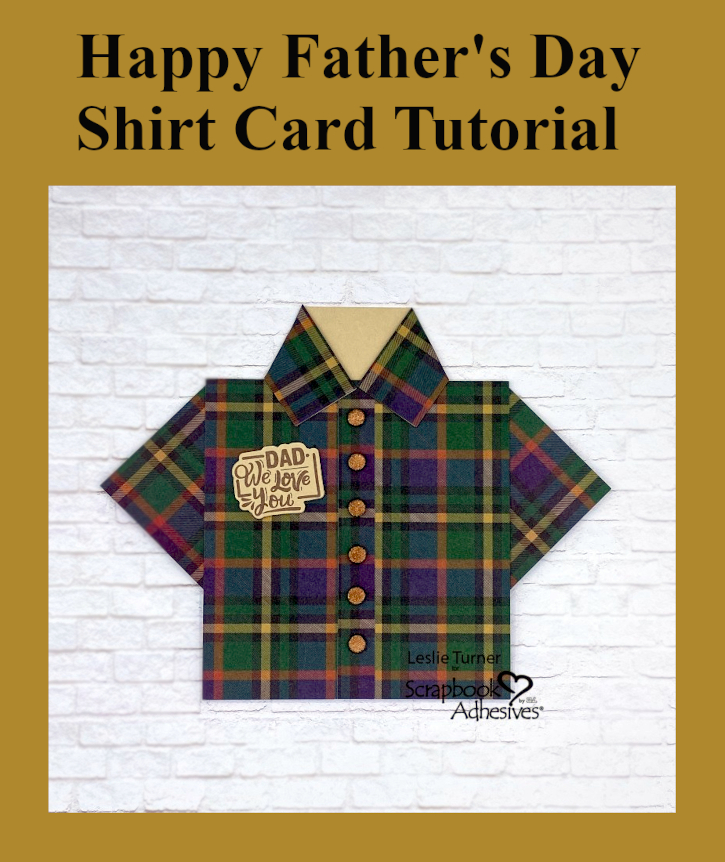
Hi friends, happy Hump Day – I hope you’re having a nice week! Do you have any Father’s Day card ideas in mind? It’ll be here in a few weeks and I have a fun Father’s Day shirt card tutorial for you. Leslie here, sharing my own design that I came up with last year, and I’ve made quite a few of them. So many, in fact, that my blog readers probably groan when they see another one, lol! But that’s okay… THIS one showcases our unique Wear Your Adhesive on the Outside technique. See those super cute buttons?! Let’s get started!
Cut the Card Base & Layers
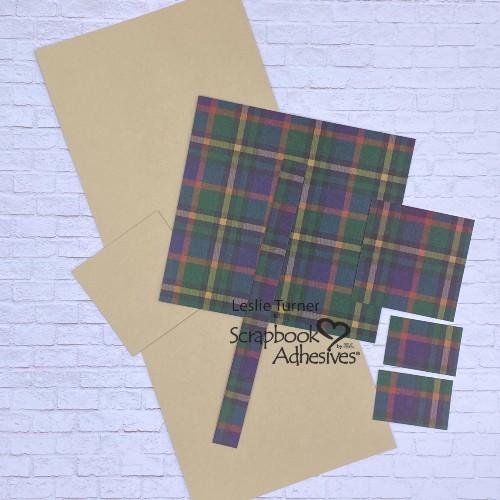
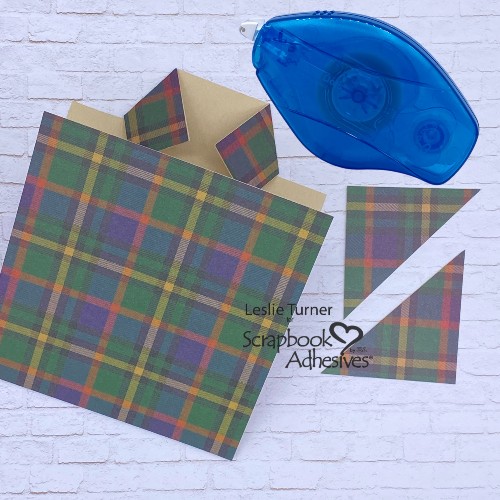
KRAFT CARDSTOCK: Card base: 4-1/4″ x 10″, scored at 4-1/2″ Sleeves: 2-1/8″ x 2-1/8″ square (will be cut in half diagonally)
PLAID PATTERNED PAPER: Shirt front: 4-1/4″ x 4-1/2″ Sleeves: 2-1/8″ x 2-1/8″ square (will be cut in half diagonally) Collar: 1″ x 1-1/2″ (cut two) Placket: 1/2″ x 6″
Create the Collar
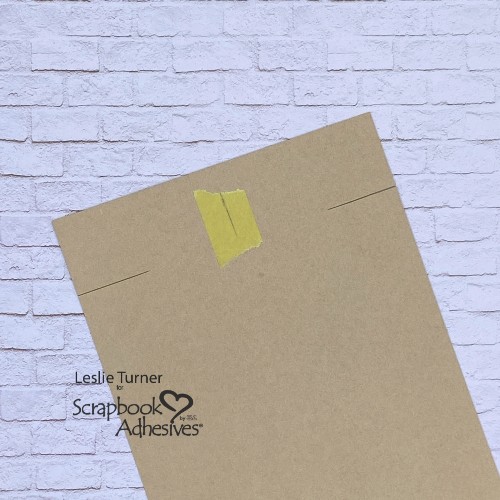
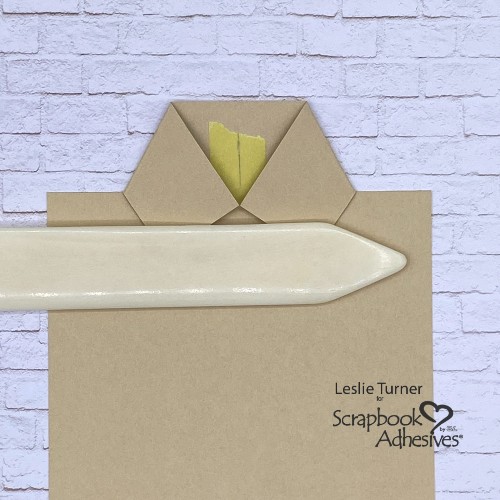
Fold the card base on the score line. You’ll notice the back flap is 1″ higher than the front flap. Place a piece of low-tack tape vertically down the center of the card base. Then make two pencil marks vertically at the 2-1/8″ point and connect them with a line.
Unfold the card base and place it in your trimmer with the long edge across the top. The low-tack tape should be on your left. Measure 1″ inward from the left edge and make a 7/8″ cut downward from the top edge. Rotate the card base and repeat on the other side. These narrow flaps will form the collar on your Father’s Day shirt card.
Carefully fold each narrow flap inward at an angle. The points on each flap should meet in the middle at the pencil line on the low-tack tape. Remove the tape.
Adhere the Layers
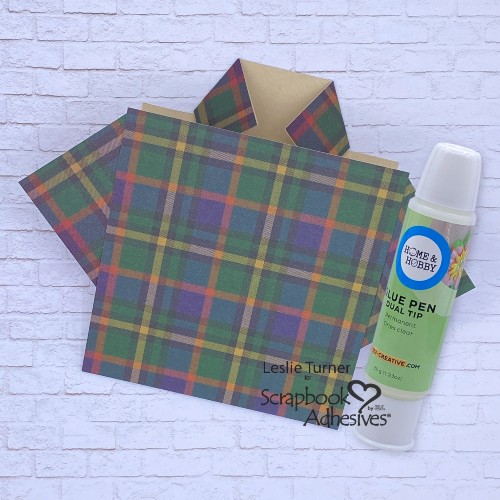
Firstly, adhere the patterned paper layer to the front of the Father’s Day shirt card base. I used the E-Z Dots® Permanent Refillable Dispenser for these steps.
Secondly, adhere the two collar pieces to each side of the collar and trim off the angled edges.
Thirdly, adhere the patterned paper square to the kraft cardstock square, and then cut in half diagonally.
Attach the Sleeves
Apply a very thin line of glue from the Dual Tip Glue Pen to the long edge of each sleeve piece. Open the card and glue one sleeve to each side of the lower portion of the card base. You only need to go inward about 1/8″, and be sure to line up the points with the bottom edge. When you fold the card back up, the front should now look like this.
Finish the Collar & Add Placket/Buttons
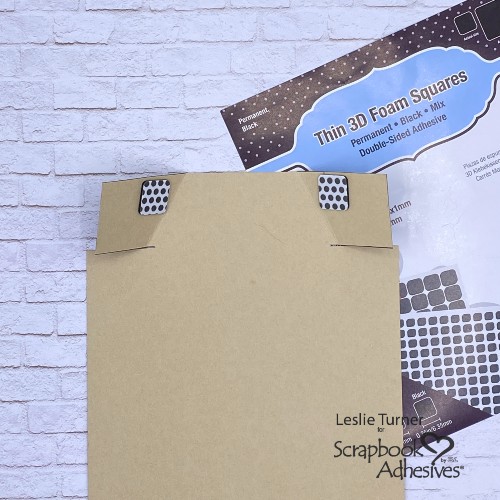
Add Thin 3D Foam Squares Black Mix to the inside of the collar flaps. Be mindful of the placement before adhering the flaps down so they don’t show. Line them up with the top edge and place them close to the fold line but don’t impede the fold line. Having these in place will help keep the card closed once assembly is complete.
Once again using the E-Z Dots® Permanent Refillable Dispenser, add the placket down the center front. Trim off any excess at the bottom. With a ruler and white charcoal pencil, mark where you want your buttons to be placed. Made seven dots on mine but ended up rubbing off the bottom one. Designer tip: Just in case you decide to change the placement of your buttons, don’t use ink.
Let’s employ the Wear Your Adhesive on the Outside technique – my new favorite! Bronze foil from the Metallic Transfer Foil Sheets Nature Colors and 3D Foam Circles Black Mix worked great! Simply remove the liner from the circles and press the foil (color side up) onto them. Makes for some pretty buttons on this spiffy Father’s Day shirt card!
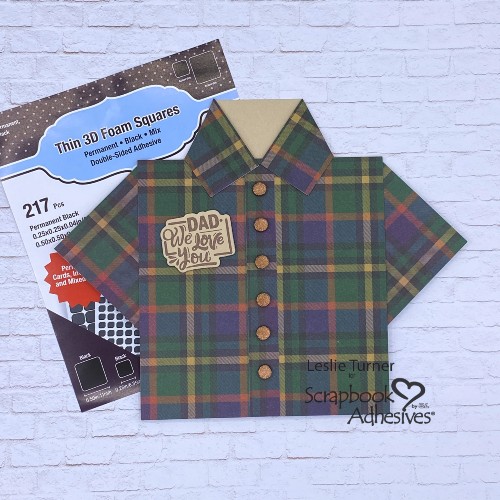
Inside: Add a sentiment panel layered with kraft and dark green cardstock. Assemble with E-Z Dots® Permanent Refillable Dispenser. Embellish with a strip of the patterned paper used for the shirt, and stamp a sentiment. Voila – your awesome Father’s Day shirt card is finished!
Other: Cardstock/Paper: CutCardStock Sandcastle and Lessebo Hunter Green cardstock, Craft Consortium Tartan 6×6 Double-Sided Paper Pad Stamps: Brutus Monroe Remote King and Super Sentimental Stamp Sets Ink: Catherine Pooler Over Coffee Ink Dies/Punches: Brutus Monroe Remote King Die Set Accessories: Fiskars 12″ ProCision Rotary Bypass Paper Trimmer, Mini MISTI, Big Shot