You are in our US store • Switch to Europe store

Happy 4th Patriotic Stars Tag

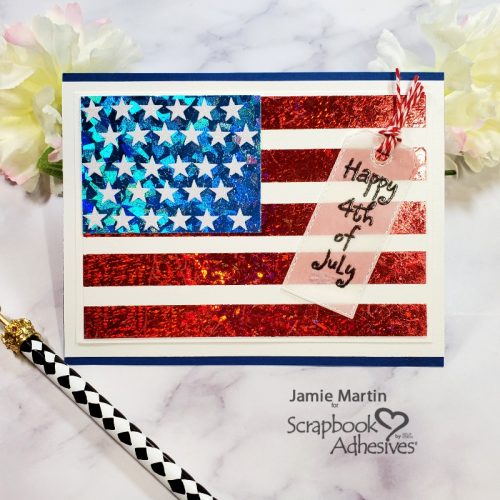
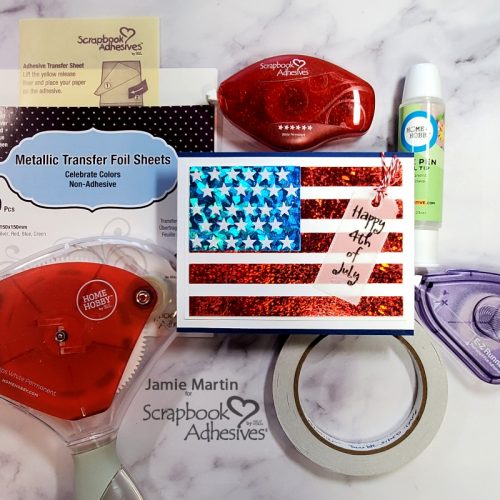
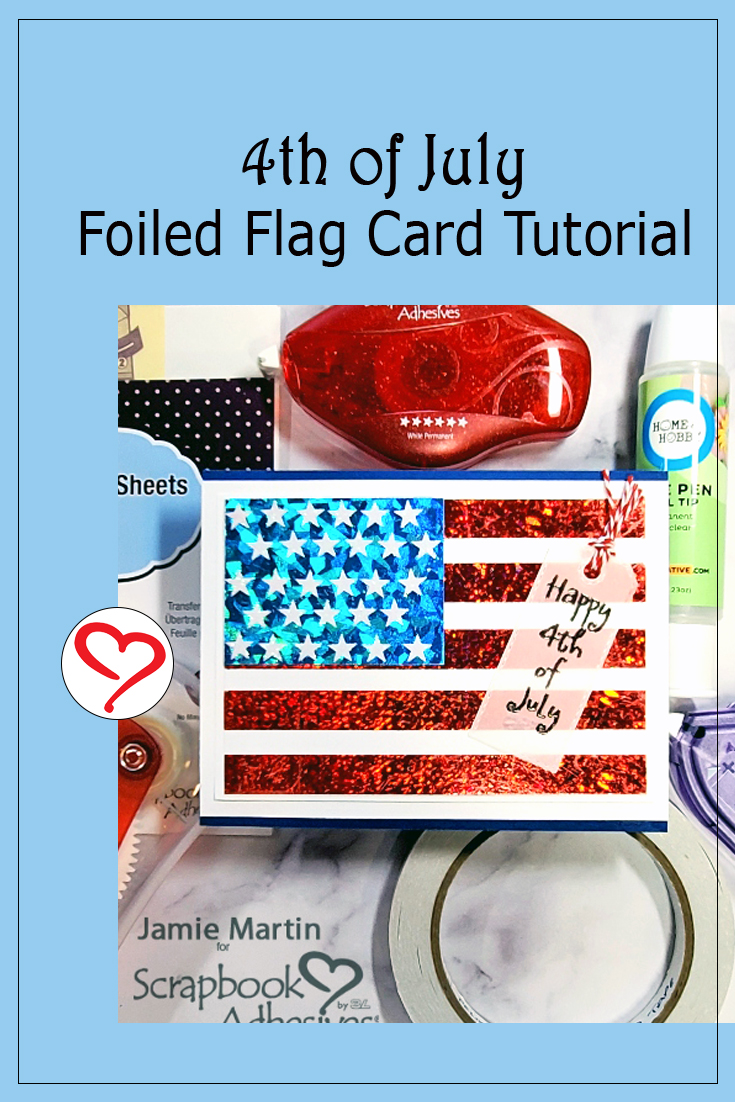
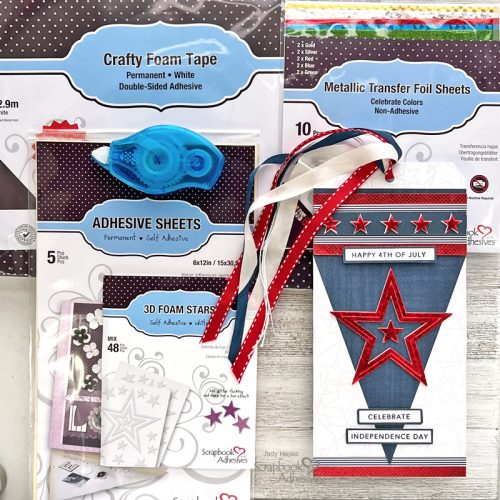
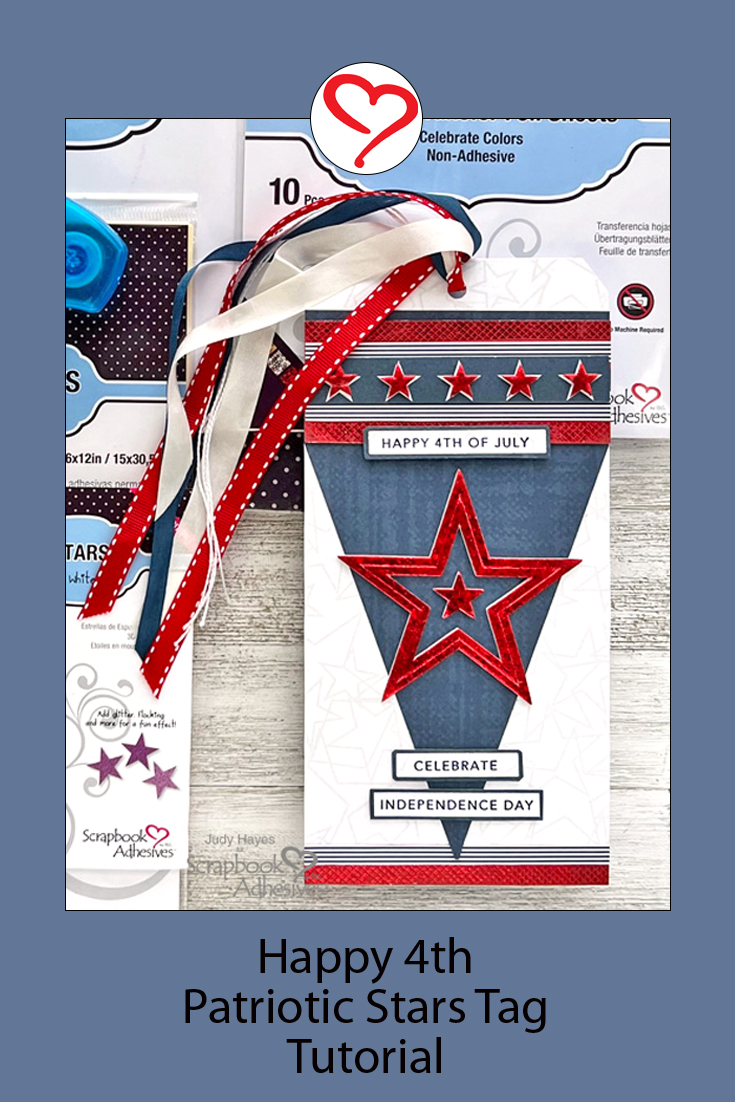
Hello crafty friends! It’s almost time to celebrate the 4th of July! To me, that means stars along with red, white, and blue. Try 3D Foam Stars and bright red foil from Metallic Transfer Foil Sheets Celebrate Colors together to make this Happy 4th Patriotic Stars Tag! I like to set a tag like this on a mantle or shelf as decor.
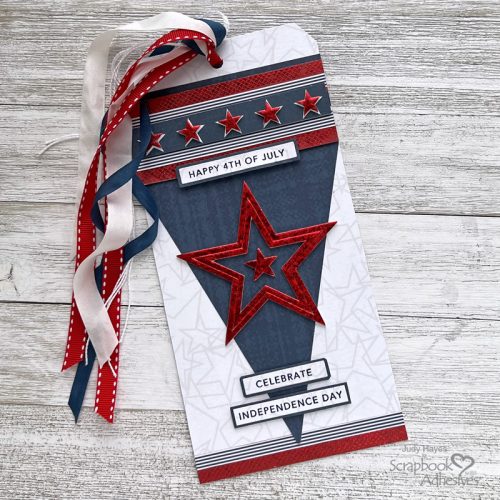
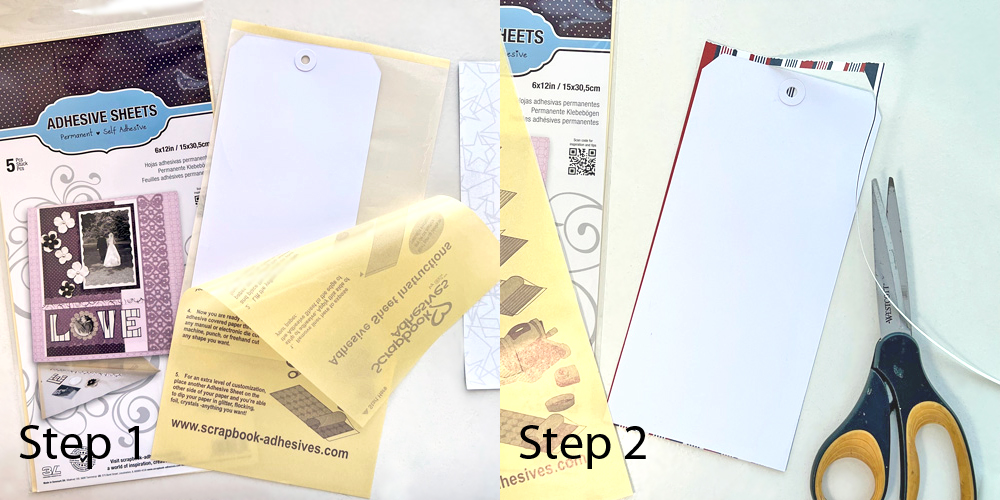
Happy 4th Patriotic Stars Tag by Judy Hayes for Scrapbook Adhesives by 3L

Tag Base

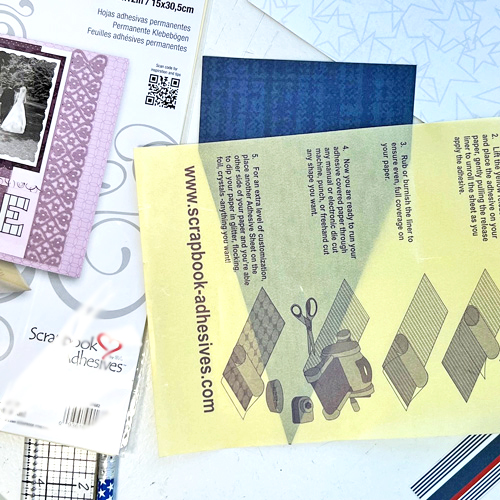
  1. Start with a #10 white tag and a slightly larger piece of star patterned paper. Apply a piece of Adhesive Sheets 6 x 12-inch to the tag front. Simply lift the liner and place the tag facing down onto the exposed adhesive. Cover with the liner and rub well to transfer the adhesive to the tag front. Place the tag adhesive side down to the back side of the star patterned paper.
  2. Flip the tag on its back and trim off excess paper around the edges. Punch a hole at the top.
Happy 4th Patriotic Stars Tag by Judy Hayes for Scrapbook Adhesives by 3L

Blue Pennant

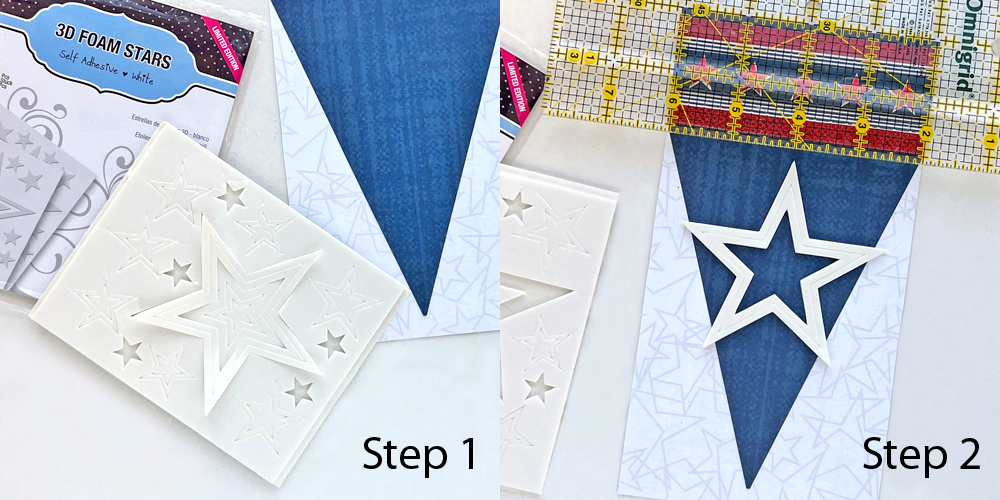
To create your pennant, cut a piece of blue patterned paper the same width as the tag and 7.5 inches long. Starting about 2 inches from the top, make a diagonal cut to the center of the opposite end.

Happy 4th Patriotic Stars Tag by Judy Hayes for Scrapbook Adhesives by 3L

Use the remainder of the Adhesive Sheets 6 x 12-inch and apply the adhesive to the back of the pennant. Adhere to the tag so the point is about .5 inches from the bottom.

Star Border

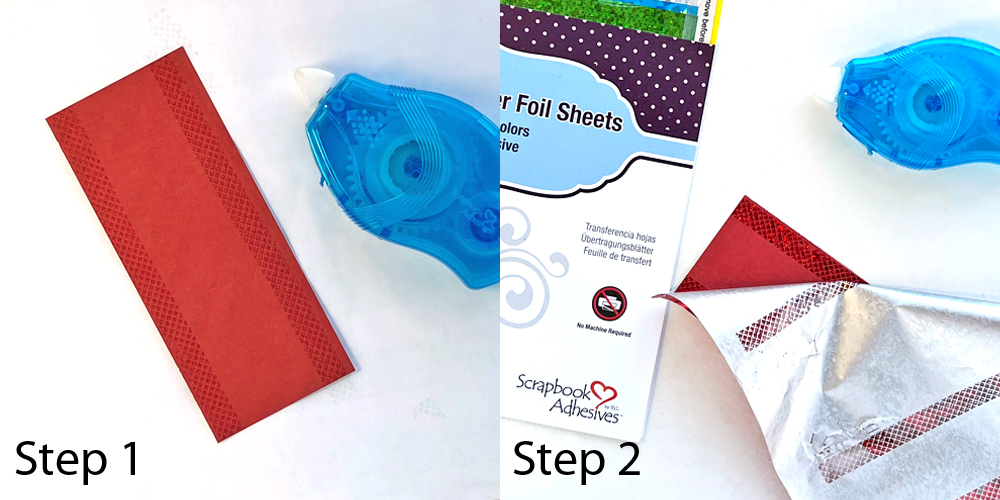
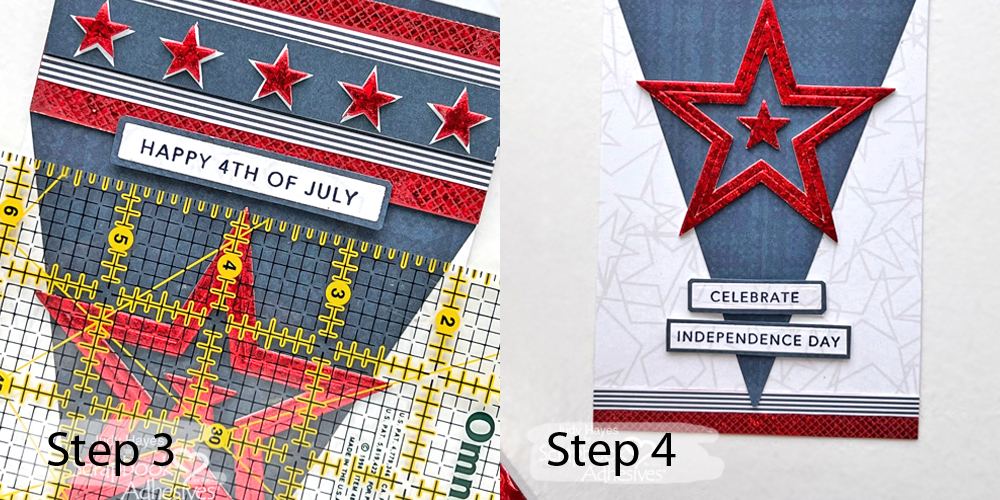
  1. With a piece of 1.75 x 4.125-inch red patterned paper, roll the E-Z Runner® Petite Permanent Dots Refillable Dispenser along each long edge of the paper.
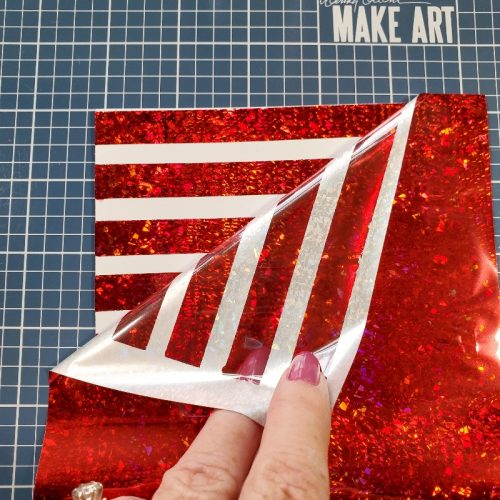
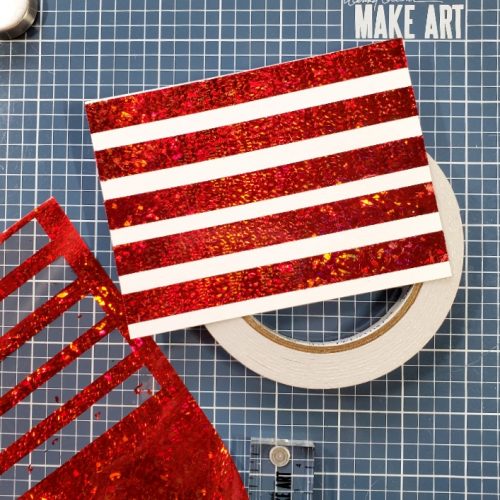
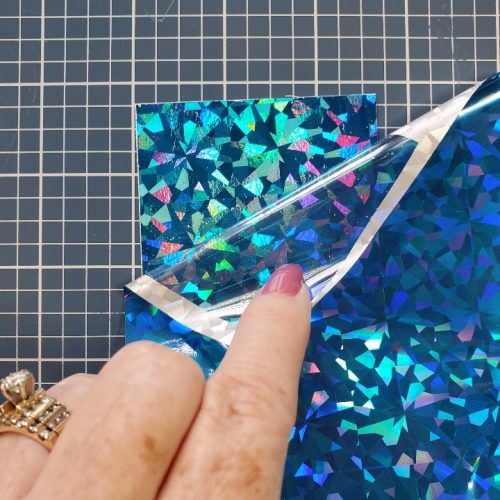
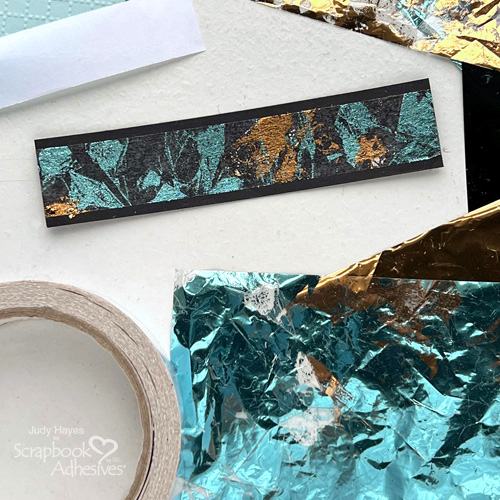
  2. Place a piece of red foil from the Metallic Transfer Foil Sheets Celebrate Colors over adhesive (COLOR side UP) and rub well to transfer the foil. Peel away the foil sheet. Reapply the foil in missed areas. Trim edges if needed so that the foil pattern is at the very edge.
Happy 4th Patriotic Stars Tag by Judy Hayes for Scrapbook Adhesives by 3L

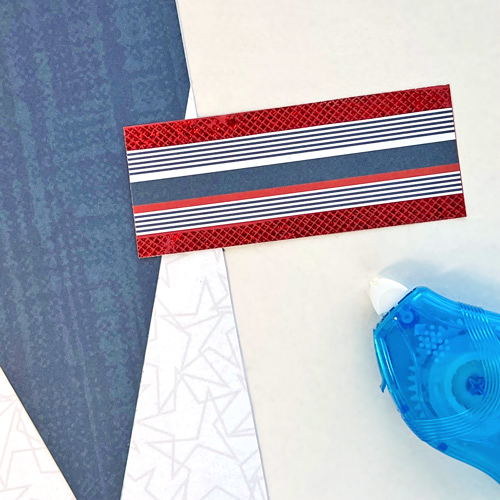
Cut a piece of stripe patterned paper, making sure the pattern runs lengthwise. Each long edge has a border of navy and white stripes (about 1.125 wide x 4.125 inches). Using the E-Z Runner® Petite Permanent Dots Refillable Dispenser, secure to the center of foiled red paper.

Happy 4th Patriotic Stars Tag by Judy Hayes for Scrapbook Adhesives by 3L
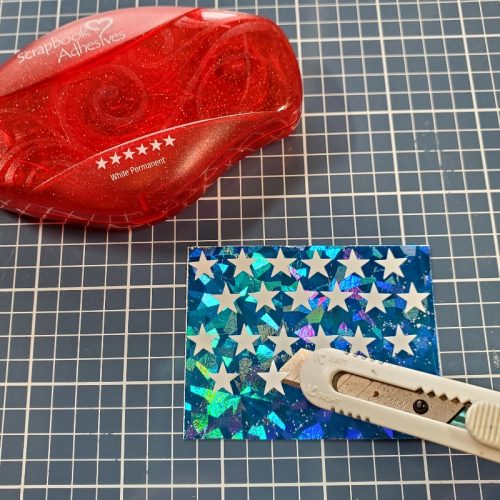
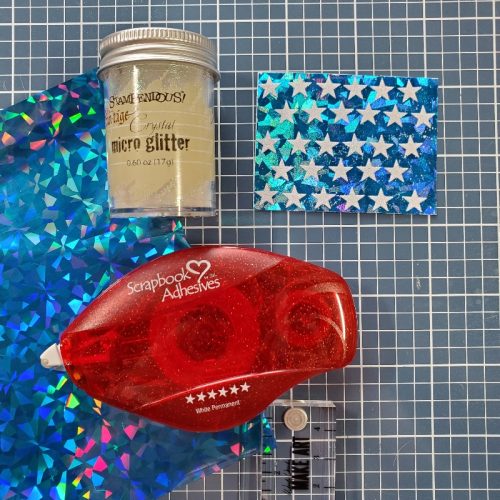
  1. Cut a strip of the 5 stars patterned paper, and place a small foam star from the 3D Foam Stars sheet over each star of the strip.
  2. Peel the top liner from a star, cover with red foil from the Metallic Transfer Foil Sheets Celebrate Colors (COLOR side UP), and rub the foil well. Peel the foil off. Repeat the foiling steps until all the stars are foiled.
Happy 4th Patriotic Stars Tag by Judy Hayes for Scrapbook Adhesives by 3L
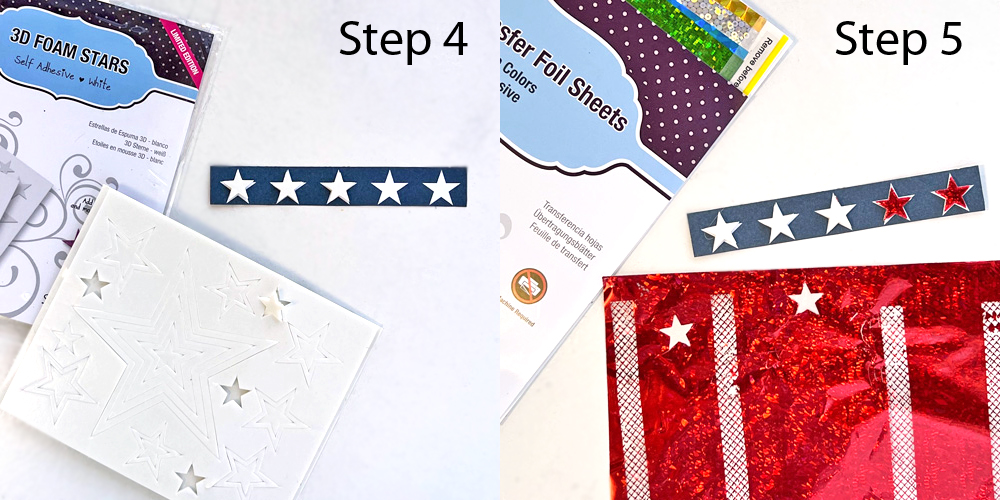
  1. Add a piece of Crafty Foam Tape 108ft to the back of the star strip. Peel the liner off and attach the star border over the striped piece.
  2. Then on the back of the layered border, a piece of Crafty Foam Tape 108ft along each of the long edges. Peel the liners off and adhere to the top of the tag
Happy 4th Patriotic Stars Tag by Judy Hayes for Scrapbook Adhesives by 3L

Bottom Border

Cut a piece of 0.5 x 4.125-inch red paper. Use the same process as the Star Border steps 1 & 2 to create the bottom border with the E-Z Runner® Petite Permanent Dots Refillable Dispenser.

This time cut a narrow strip of 0.25 x 4.125-inch navy and white stripe paper. Secure the strip with the E-Z Runner® Petite Permanent Dots Refillable Dispenser and secure it along the unfoiled edge of the red paper.

Happy 4th Patriotic Stars Tag by Judy Hayes for Scrapbook Adhesives by 3L

Lastly, adhere the strip to the bottom of the tag with the E-Z Runner® Petite Permanent Dots Refillable Dispenser. Peel off the pennant tip, if needed, to place the border.

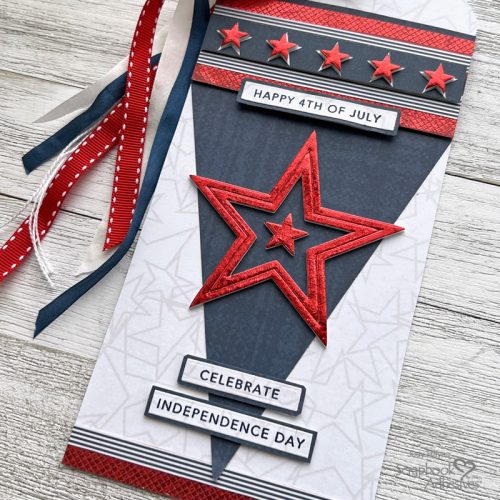
The Focal Star Design

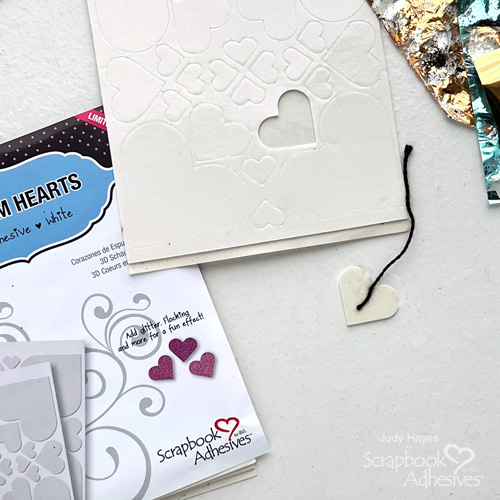
  1. From the 3D Foam Stars sheet, carefully pull up the points of the two largest stars together.
  2. Place them on the tag about 0.5 inches below the foiled star border. Use a ruler to align it in the center.
Happy 4th Patriotic Stars Tag by Judy Hayes for Scrapbook Adhesives by 3L

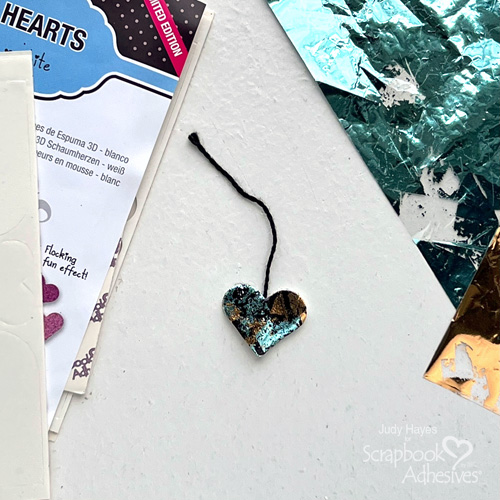
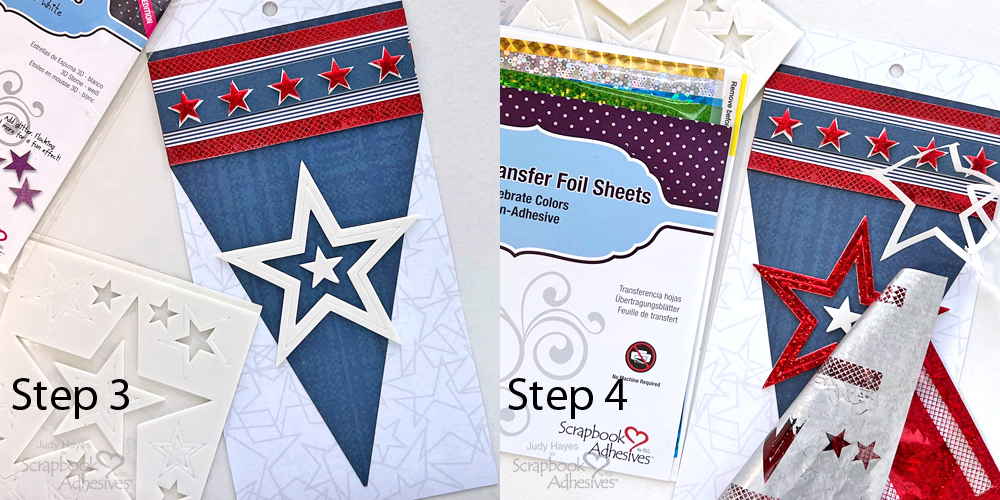
Next, find a medium foam star (they are usually nested with another star in a corner of the 3D Foam Stars sheet). Place it in the center of the large star on the tag.

Foil the large star first. Peel back the liners from one of the points to expose the adhesive. Place the red foil from the Metallic Transfer Foil Sheets Celebrate Colors (COLOR side UP) and rub well with your fingertips. Peel off the foil to reveal the color. Reapply foil in missed areas. Repeat the foiling steps with the center star.

Happy 4th Patriotic Stars Tag by Judy Hayes for Scrapbook Adhesives by 3L

Stamp and Add Word Sentiment

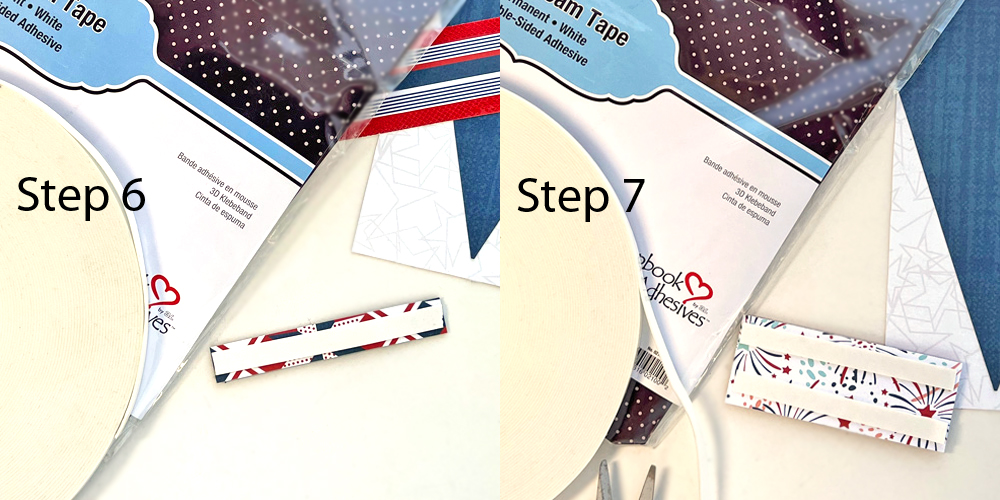
  1. Stamp the words with Archival Night ink and clear heat emboss. Use a coordinating die, cut the words into strips. Apply adhesive using the E-Z Runner® Petite Permanent Dots Refillable Dispenser to the strips and mat them with navy patterned paper. Repeat for all the words.
  2. Attach each word strip with the Crafty Foam Tape 108ft. This tape has a lower height range than our regular Crafty Foam Tape so there’s less bulk. It’s perfect for dimensional cards going through the mail!
Happy 4th Patriotic Stars Tag by Judy Hayes for Scrapbook Adhesives by 3L
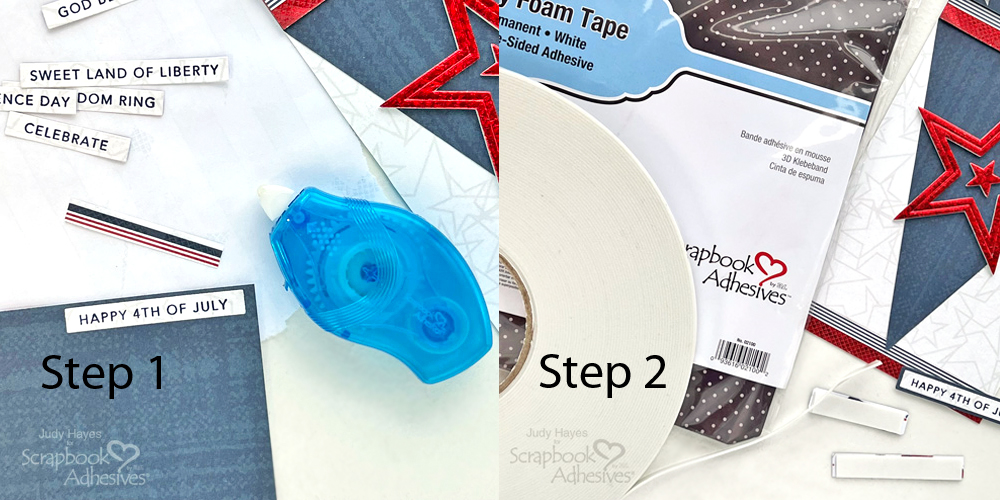
  1. If needed, use a ruler to align and center the “Happy 4th of July” strip at the bottom edge of the tag and above the large star.
  2. For the bottom of the tag and at the tip of the pennant, use the ruler to position the “Celebrate” and Independence Day” strips. Peel the liners off and fasten them in place.
Happy 4th Patriotic Stars Tag by Judy Hayes for Scrapbook Adhesives by 3L

Add Ribbons

Gather together red, white, and navy ribbons, along with white string. Thread through the hole and tie a knot at top of the tag.

Happy 4th Patriotic Stars Tag by Judy Hayes for Scrapbook Adhesives by 3L

I hope you enjoyed my process on this Happy 4th Patriotic Stars Tag. Have a great 4th of July!

Happy 4th Patriotic Stars Tag by Judy Hayes for Scrapbook Adhesives by 3L

Thanks for Visiting!
Judy Hayes

Creative Time: 30 Minutes
Skill Level: Intermediate

Materials Needed
Scrapbook Adhesives by 3L®

Other: Photoplay (Stars and Stripes Collection Pack), Ranger (Archival Ink Night, Clear Embossing Powder, #10 White Tag), Taylored Expressions (Mini Strips Die, Patriotic Mini Strips), Ribbons (Red, Blue, White), White String

Save to Pinterest!

Happy 4th Patriotic Stars Tag by Judy Hayes for Scrapbook Adhesives by 3L Pinterest

Visit our Website and Blog!
Sign up for our Newsletter so you never miss a contest or giveaway!

instagram purple icon facebook icon purple pinterest purple icon twitter purple icon YouTube icon blog subscription purple icon

Quick and Easy 5 Minute Card

Hello crafty friends! I think we’ve all been there, you are headed out to an event and realize you didn’t make a card. Today I am sharing a quick and easy solution, the 5 Minute Card. Here are all of the details.

Quick and Easy 5 Minute Card by Tracy McLennon for Scrapbook Adhesives by 3L

Let’s Get Started

The easiest way to create an Easy 5 Minute Card, is to keep it clean, simple but striking. I chose to go with white, black, and gold. Cut the cardstock and handmade paper layers for the card. Start by taking the black cardstock card front and adding the Thickers sticker sentiment to the bottom. Now, I began adding the stars trickling down from the top of the card using the E-Z Runner® Stars Refillable Dispenser.

Quick and Easy 5 Minute Card by Tracy McLennon for Scrapbook Adhesives by 3L

Once satisfied with the number of stars on the Easy 5 Minute Card, rub the Metallic Transfer Foil Sheets – Pastel Colors over top of the stars (COLOR side UP). I chose the Pastel Yellow from the Metallic Transfer Foil Sheets – Pastel Colors, as it most closely matched the puffy sticker.

Quick and Easy 5 Minute Card by Tracy McLennon for Scrapbook Adhesives by 3L

To adhere the layers of the Easy 5 Minute Card together I chose the E-Z Runner® Ultra Strong Refillable Dispenser. Although hard to see in my photos, I used a layer of handmade paper between the black cardstock and the white cardstock card base. It has flecks of gold and silver, and it just had that special bit of texture for this Easy 5 Minute Card. When adhering any textured paper, I turn to my E-Z Runner® Ultra Strong Refillable Dispenser. That’s it! There is your Easy 5 Minute Card.

Quick and Easy 5 Minute Card by Tracy McLennon for Scrapbook Adhesives by 3L

Thanks so much for stopping by!
Tracy McLennon

Creative Time: 5 Minutes
Skill Level: Beginner

Materials Needed:
Scrapbook Adhesives by 3L®

E-Z Runner® Stars Refillable Dispenser
Metallic Transfer Foil Sheets in Pastel Colors
E-Z Runner® Ultra Strong Refillable Dispenser

Other
Cardstock (Black, White); Handmade Paper; Thickers- Puffy Word Sticker

Save to Pinterest!

Quick and Easy 5 Minute Card by Tracy McLennon for Scrapbook Adhesives by 3L Pinterest

Visit our Website and Blog!
Sign up for our Newsletter so you never miss a contest or giveaway!

instagram purple icon facebook icon purple pinterest purple icon twitter purple icon YouTube icon blog subscription purple icon

Easy Slimline Card with Dimension

Hello there, Martha Lucia here to share an easy slimline card with dimensions featuring the 3D Foam Circle Frames White. To embellish the card, I’ve added some elements from the Sunkissed Collector’s Essential Kit by Simple Stories.

Easy Slimline Card with Dimension by Martha Lucia Gomez for Scrapbook Adhesives by 3L

First, I created the card base with pink cardstock. The size of my slimline cards is 8-1/2″x3-1/2″ closed. Then, I added a second layer created with designer paper from the Sunkissed Collection. To adhere the layer, I used the E-Z Runner Grand Refillable Dispenser.

Easy Slimline Card with Dimension by Martha Lucia Gomez for Scrapbook Adhesives by 3L

With the same color of cardstock, I die cut the third large size of the Delighted Lace Rectangle Slimline Die. In addition, I created a rainbow cutting in a half sheet of the 3D Foam Circle Frames White.

Wear Your Adhesive on the Outside with Foil

To embellish the rainbow, I used three different colors of Metallic Transfer Foil Sheets Pastel Colors: Yellow, Blue and Green. Remove the top liners of the circles and pressed the foil (color side UP) over the adhesive to transfer the color. Easy, simple, and fun!

Easy Slimline Card with Dimension by Martha Lucia Gomez for Scrapbook Adhesives by 3L

Using the large size of 3D Foam Squares White Mix, I adhered the foiled layer over the decorated card base. I love this package of adhesive because it includes two different sizes that are perfect to add dimension to small and large pieces.

Easy Slimline Card with Dimension by Martha Lucia Gomez for Scrapbook Adhesives by 3L

But my project is not ready yet! I continue the embellished process using a Chipboard Sticker from the same Simple Stories Collection Kit. To add it, I used the Adhesive Dots Medium. They are strong and flexible at the same time to let me play around with the free area of the decorative layer.

Easy Slimline Card with Dimension by Martha Lucia Gomez for Scrapbook Adhesives by 3L

As a final touch, a few Journal Bits were included on top of the decorative layer. These are thin pieces and you can enhance them, by just adding more dimension. For it, I used the small size of 3D Foam Squares White Mix.

Final Touches

Easy Slimline Card with Dimension by Martha Lucia Gomez for Scrapbook Adhesives by 3L

Additionally, for a distressed look, I used scraps of the foil. It was the easy part because I only add a few touches of E-Z Runner Petite Permanent Dots over the decorated card to change totally my look.

Easy Slimline Card with Dimension by Martha Lucia Gomez for Scrapbook Adhesives by 3L

Voila, my easy slimline card with dimensions is finished and you can easily recreate this idea for many occasions!

Easy Slimline Card with Dimension by Martha Lucia Gomez for Scrapbook Adhesives by 3L

Thanks for stopping by and see you soon with more inspiration!

Skill Level: Beginner
Creative Time: 25 minutes

Materials Needed:
Scrapbook Adhesives by 3L®

Metallic Transfer Foil Sheets Pastel Colors
3D Foam Circle Frames White
3D Foam Squares White Mix
E-Z Runner® Grand Refillable Dispenser
E-Z Runner Petite Permanent Dots
Adhesive Dots Medium

Other:
Sunkissed Collector’s Essential Kit by Simply Stories, Delighted Lace Rectangle Slimline Die by Joy Clair Designs, Pink Cardstock

Save to Pinterest!

Easy Slimline Card with Dimension by Martha Lucia Gomez for Scrapbook Adhesives by 3L Pinterest

Visit our Website and Blog!
Sign up for our Newsletter so you never miss a contest or giveaway!

instagram purple icon facebook icon purple pinterest purple icon twitter purple icon YouTube icon blog subscription purple icon

Radiate Positivity Shaker Card

Hello, Margie here with a unique interactive card called Radiate Positivity Shaker Card. It’s a shaped one-sided flap that opens. I love how it turned out and it was easy thanks to the 3D Foam Circle Frame to shape the shaker feature.

***ETA: Congratulations to Joanne from Canada!!!
Thanks to all who participated in the giveaway. Hope to host another one real soon!***

Right now we have a New & Noteworthy Giveaway with our friends at Scrapbook and Cards Today Magazine. Be sure to read all the way through the end to find out how to enter. Better Hurry! It ends next Wednesday (June 29, 2022) at midnight Eastern.

Radiate Positivity Shaker Card by Margie Higuchi for Scrapbook Adhesives by 3L

Radiate Positivity Card Instructions

Let me show you how, along with a video tutorial. This project was first shared with our retailer friends at a virtual trade show and we thought you would enjoy it too! I’ll share the written steps first on how I created the card so that you can print it out. Then I’ll go through the process visually with the video.

Card Flap, Greeting and Message Cloud

  1. With a piece of 4.75 x 5.50-inch white cardstock, score 0.25-inch on the left side and crease. Position one of the cloud border dies from top left to the bottom right of scored + folded piece and cut. Stamp sentiment in the lower-left corner in black ink. Set aside.
  2. Using the leftover cardstock + making sure the corner is facing down on the right side, cut a shape out of the other cloud border die. This is where you can write a short note.

Card Base

  1. Using a cloud design embossing folder, emboss a piece of 4.25 x 5.50-inch Icy Mint cardstock. Tip: Mist lightly with water to get a crispier impression.
  2. Cut a piece of 4.25 x 5.50-inch out of white cardstock. Use this card panel to cover the back of the card to hide the flap as the last step.

Shaker Pieces

  1. Nest together the 2.00-inch circle into the 2.25-inch circle die to create a ring. Secure with washi tape to prevent shifting and cut with Sour Lemon cardstock.
  2. Using the larger 2.25-inch circle only, die-cut out of clear acetate and stamp with the sun image using permanent black ink.

Card Assembly

  1. Apply Crafty Power Tape to the scored flap area and secure it to the left-side of the embossed card panel (the flap part is on the backside). Then adhere the other white cloud piece to the lower right-side corner.
  2. Adhere the 4.25 x 5.50-inch white card panel to the back of the embossed card panel with Crafty Power Tape. Trim edges if necessary.

Shaker Assembly

  1. Apply E-Z Runner® Micro Strips around the backside of the ring and place a clear acetate circle over it.
  2. Next, add the 3D Foam Circle Frames White #6 (#1 being the smallest circle) on top of the acetate. Designer’s Note: the size of the ring and the 3D Foam Circle Frame are not the exact size, so gently pull the foam circle frame to fit the ring.
  3. Determine placement of the shaker element on the embossed card panel. Add shaker elements on the panel, remove the circle frame liner and secure on top of the shaker elements to finish.

View Radiate Positivity Shaker Card Video

I hope you enjoyed my Radiate Positivity Shaker Card. It’s a unique card so give it a try and send someone positive vibes! Don’t forget to scroll down for a chance to win an adhesive package!

Thanks for stopping in!
Margie Higuchi

Creative Time: 30 minutes
Skill Level: Intermediate

Materials Needed:
Scrapbook Adhesives by 3L®
Crafty Power Tape 81ft Polybag
E-Z Runner® Micro Strips
3D Foam Circle Frames White

Other:
Hero Arts: Cloudy Sky Scene Die Set, You Shine Stamp Set and Intens-ified Black Ink Pad
Embossing Folder and Die-Cutting Machine: Spellbinders® Paper Arts (Above the Clouds Embossing Folder, and Platinum 6 Die-Cutting and Embossing Machine); Cardstock: Bazzill Basic Paper (Icy Mint and Sour Lemon Cardstock); Clear Acetate; White Cardstock (65lb for flaps/110lb for back); Scoreboard; Gold Chunky Glitter

Save to Pinterest!

Radiate Positivity Shaker Card by Margie Higuchi for Scrapbook Adhesives by 3L Pinterest

Enter to Win an Adhesive Giveaway

Now that you’ve seen our shaker card highlighting the 3D Foam Circles. Want to give it a try? There is an adhesives giveaway that can help recreate a shaker card of your own! Ends next Wednesday (June 29th at Midnite Eastern)!!

👇 Click the image below to take you there! 👇

Visit our Website and Blog!
Sign up for our Newsletter so you never miss a contest or giveaway!

instagram purple icon facebook icon purple pinterest purple icon twitter purple icon YouTube icon blog subscription purple icon

Aloha Flower Cards

Hi everyone! Looking for a unique card with a summertime feel? Teri here to show you how to make tropical-inspired Aloha cards that are perfect to send over the next few months! Let’s send an Aloha~!

Aloha Flower Cards by Teri Anderson for Scrapbook Adhesives by 3L

Elements of an Aloha Card

Start by creating a couple of floral backgrounds with stencils and ink. Don’t have any stencils that will work? Use tropical-themed patterned papers instead!

Aloha Flower Cards by Teri Anderson for Scrapbook Adhesives by 3L

Apply a strip of Crafty Power Tape Polybag 81ft on the edge of a cardstock strip. Designer’s Tip: I find an air hockey paddle is a great tool for burnishing tape as it’s flat and allows you to apply pressure evenly because it has felt underneath it. Take the top liner off. Then, with the color-side up, gently rub a piece of bronze foil from the Metallic Transfer Foil Sheets Nature Colors, with your fingertips to the tape.

Aloha Flower Cards by Teri Anderson for Scrapbook Adhesives by 3L

Adhere your floral stenciled paper onto a card and then add the strip to it with the E-Z Runner® Petite Permanent Dots Refillable Dispenser. Decorate the foiled strip with a small strip of patterned paper and a couple of Creative Photo Corners Kraft.

Aloha Flower Cards by Teri Anderson for Scrapbook Adhesives by 3L

Create a sentiment on a strip of cardstock. Set it on your card for measurement and placement.

Aloha Flower Cards by Teri Anderson for Scrapbook Adhesives by 3L

Remove the sentiment strip. Randomly add some adhesive from the E-Z Runner® Petite Permanent Dots Refillable Dispenser to it and place the gold thread on it. Make sure that it peeks out from behind the sentiment.

Aloha Flower Cards by Teri Anderson for Scrapbook Adhesives by 3L

Mount your sentiment strip on your card with Crafty Foam Tape White. Complete the card by applying a couple of Adhesive Dots Micro to it and burnishing foil onto them.

Aloha Flower Cards by Teri Anderson for Scrapbook Adhesives by 3L

Change the Look with Lighter Colors and More

You can follow these steps to make a whole bunch of cards!

Aloha Flower Cards by Teri Anderson for Scrapbook Adhesives by 3L

Mix up your design by using a slightly lighter color scheme! You can also change where you place the Creative Photo Corners Kraft on your foiled strip of cardstock.

Aloha Flower Cards by Teri Anderson for Scrapbook Adhesives by 3L

Another way to mix things up is to add more Adhesive Dots Micro to your design!

Aloha Flower Cards by Teri Anderson for Scrapbook Adhesives by 3L

I hope you are inspired to make a few tropical-inspired cards of your own!

Happy creating!
Teri Anderson

Creative Time: 60 Minutes
Skill Level: Intermediate

Materials Needed:
Scrapbook Adhesives by 3L®

Other
White and Kraft Cardstock: Neenah Paper; Stamps: Waffle Flower (Tropical Sentiments); Stencils: Waffle Flower (Layered Orchid); Ink Pads: Ranger Ink; Gold Metallic Thread: Kreinik; Air Hockey Paddle

Save to Pinterest!

Aloha Flower Cards by Teri Anderson for Scrapbook Adhesives by 3L Pinterest

Visit our Website and Blog!
Sign up for our Newsletter so you never miss a contest or giveaway!

instagram purple icon facebook icon purple pinterest purple icon twitter purple icon YouTube icon blog subscription purple icon

Mixed Media Spring Tags

Hi, Connie here with a couple of mixed media spring tags. I used the Adhesive Sheets 4X6 and embossing powder to create the mixed media style background. So easy and so FUN!!! I added some collage areas using old text paper and of course, red rubber stamps!

Mixed Media Spring Tags by Connie Mercer for Scrapbook Adhesives by 3L

Gathering supplies can be fun too. Pick out a pretty embossing powder and text paper.

Mixed Media Spring Tags by Connie Mercer for Scrapbook Adhesives by 3L

Spring Tags Background

Mixed Media Spring Tags by Connie Mercer for Scrapbook Adhesives by 3L
  • 1. Preparing and laying out all supplies needed. The Adhesive Sheets 4X6 and pretty embossing powder.
    2. Dab the Adhesive Sheet 4X6 on the front of the tag and pull off quickly. Repeat until you get the coverage of adhesive on the tag front.
    3. Cover the adhesive with embossing powder and shake off extra.
    4. Using an embossing heat tool set the embossing powder. The powder will melt when it is set.
Mixed Media Spring Tags by Connie Mercer for Scrapbook Adhesives by 3L

Add another layer of ink using stencils to create more interest in the background.

Stamped Embellishments

Mixed Media Spring Tags by Connie Mercer for Scrapbook Adhesives by 3L

Add ribbon or twine to complete the Spring Tags. These are great for an art journal or gift-giving.

Thanks for stopping by.
Connie Mercer

Creative Time: 60 Minutes
Skill Level: Intermediate

Materials Needed:
Scrapbook Adhesives by 3L®

Adhesive Sheets 4×6
3D Foam Strips
3D Foam Circles White Mix
HomeHobby™ by 3L
Dual Tip Glue Pen

Other: Stamps and Stencils: Darkroom Door; Ink and Embossing Powder: Ranger Ink; Word Stickers: Tim Holtz

Save to Pinterest!

Mixed Media Spring Tags by Connie Mercer for Scrapbook Adhesives by 3L Pinterest

Visit our Website and Blog!
Sign up for our Newsletter so you never miss a contest or giveaway!

instagram purple icon facebook icon purple pinterest purple icon twitter purple icon YouTube icon blog subscription purple icon

Live Love Laugh Dimensional Card

Hello crafty friends! Tracy here, and today I have a pretty little card to share that features a ton of dimension. Here are all of the details on how I created this Live Love Laugh Dimensional Card.

Live Love Laugh Dimensional Card by Tracy McLennon for Scrapbook Adhesives by 3L

When crafting I love dimensional pieces and this Easy Dimensional Card is no exception. With just a few products and a couple of easy tips, you will be creating with dimension in no time.

Gathering Pieces of the Card

First I cut my card base layers. The card base is 5×7 from white cardstock. Next, I cut the patterned paper layer to 4.75 x 6.75 and distressed the edges. I cut another piece of leafy patterned paper to 2.5×6.75. I tore one edge and then distressed the others. Using a circle punch or die, cut the circle from patterned paper. I also gathered the die cut pieces that I wanted to use.

Live Love Laugh Dimensional Card by Tracy McLennon for Scrapbook Adhesives by 3L

Adhere the patterned paper and the patterned circle to the Easy Dimensional Card base using E-Z Runner® Permanent Strips Refillable Dispenser. Then add the torn border strip to the card using Crafty Foam Tape White.

Live Love Laugh Dimensional Card by Tracy McLennon for Scrapbook Adhesives by 3L

Add the sentiment strip to the card using 3D Foam Squares White Small Size. Now I added the first leafy pieces around the patterned circle using Thin 3D Foam Squares Black Mix.

Next, I began adding more leaf and floral layers to the dimensional card using both 3D Foam Squares White Small Size and a combination of that and the Thin 3D Foam Squares Black Mix to create dimension between each little layer. The butterfly is a layered die cut shape, so I added the top wing to the base with Thin 3D Foam Squares Black Mix.

Live Love Laugh Dimensional Card by Tracy McLennon for Scrapbook Adhesives by 3L

The final touch for the Easy Dimensional Card is to add a few gems and pearls for a little extra sparkle.

Live Love Laugh Dimensional Card by Tracy McLennon for Scrapbook Adhesives by 3L

Thanks so much for stopping by!
Tracy

Creative Time: 30 minutes
Skill Level: Beginner

Materials Needed:
Scrapbook Adhesives by 3L®

Thin 3D Foam Squares Black Mix
3D Foam Squares White Small Size
Crafty Foam Tape White
E-Z Runner® Permanent Strips Refillable Dispenser

Other:
Paper Distress Tool; Gems; Pearls; 49 & Market Patterned Paper and Die Cuts; Circle Die; White Cardstock

Save to Pinterest!

Live Love Laugh Dimensional Card by Tracy McLennon for Scrapbook Adhesives by 3L Pinterest

Visit our Website and Blog!
Sign up for our Newsletter so you never miss a contest or giveaway!

instagram purple icon facebook icon purple pinterest purple icon twitter purple icon YouTube icon blog subscription purple icon

Elegant Photo Corner Notebook

Hi everyone, Yvonne here with a new project using a small plain notebook and Creative Photo Corners to turn into an Elegant Photo Corner Notebook! Wouldn’t this be a lovely gift for a good friend?

Elegant Photo Corners Notebook by Yvonne van de Grijp for Scrapbook Adhesives by 3L

Try this project idea to decorate an address book or as a card front. Shall we make the Elegant Notebook together? Let’s get started!

Cover the Notebook

Start by making a cover for the notebook. Take a piece of patterned paper that is approximately one inch larger on all sides of the opened notebook. Use the E-Z Runner® Grand Refillable Dispenser to adhere the paper to the outside of the notebook.

Elegant Photo Corners Notebook by Yvonne van de Grijp for Scrapbook Adhesives by 3L

 Next, miter the corners and fold the paper to the edges of the notebook. See the areas as shown in the picture below.

Elegant Photo Corners Notebook by Yvonne van de Grijp for Scrapbook Adhesives by 3L

Then adhere all the tab pieces to the inside of the covers using the E-Z Runner® Grand Refillable Dispenser.

Elegant Photo Corners Notebook by Yvonne van de Grijp for Scrapbook Adhesives by 3L

Photo Corners Embellishment

Adhere a row of Creative Photo Corners Kraft onto the cover of the notebook. Then adhere a row of Creative Photo Corners Gold onto the cover as shown in the picture below.

Elegant Photo Corners Notebook by Yvonne van de Grijp for Scrapbook Adhesives by 3L

To cover the black sections of the Creative Photo Corners Gold, I adhered a row of Creative Photo Corners Kraft as shown in the picture below.

Elegant Photo Corners Notebook by Yvonne van de Grijp for Scrapbook Adhesives by 3L

Next, use the E-Z Runner® Micro Refillable Dispenser to adhere pink satin ribbon over the Photo corners.

Elegant Photo Corners Notebook by Yvonne van de Grijp for Scrapbook Adhesives by 3L

Fold the ends to the inside of the Elegant Notebook and attach using the E-Z Runner® Micro Refillable Dispenser.

Finishing the Notebook

To finish the Elegant Photo Corner Notebook, I added some self-adhesive pearls. If your pearls do not adhere well, simply use Adhesive Dots Micro for extra secure adhering. For a wonderful accent, adhere an elegant white satin bow to the cover using the E-Z Runner® Grand Refillable Dispenser.

Elegant Photo Corners Notebook by Yvonne van de Grijp for Scrapbook Adhesives by 3L

And voilá, your Elegant Photo Corner Notebook is ready to be gifted to a special friend…or keep it yourself!

Wishing you happy crafting,

Yvonne van de Grijp

Elegant Photo Corners Notebook by Yvonne van de Grijp for Scrapbook Adhesives by 3L

Creative Time: 40 minutes
Skill Level: Intermediate

Materials needed:
Scrapbook Adhesives by 3L®

E-Z Runner® Grand Refillable Dispenser

E-Z Runner® Micro Refillable Dispenser

Creative Photo Corners Kraft

Creative Photo Corners Gold

Other: Small notebook; Patterned Paper; Satin Ribbon (soft pink 1/8 inch, White ½ inch); Self-adhesive pearls (white); Craft Knife; Scissors

Save to Pinterest!

Elegant Photo Corners Notebook by Yvonne van de Grijp for Scrapbook Adhesives by 3L Pinterest

Visit our Website and Blog!
Sign up for our Newsletter so you never miss a contest or giveaway!

instagram purple icon facebook icon purple pinterest purple icon twitter purple icon YouTube icon blog subscription purple icon

4th of July Foil Flag Card

Hi, Jamie here with you today and since the 4th of July is just around the corner, I have a flag card made using adhesives and foil and it’s surprisingly easy.

4th of July Foil Flag Card by Jamie Martin for Scrapbook Adhesives by 3L

Create the Foil Flag

Place strips of Premium Double-Sided Tape 1/2″ on a white cardstock panel, to fill the panel but leave spaces between the tape.

4th of July Foil Flag Card by Jamie Martin for Scrapbook Adhesives by 3L

Remove the paper liner on the tape and place red foil from the Metallic Transfer Foil Sheets Celebrate Colors on top of the tape with the pretty side up. Rub the foil with your finger, then remove the foil.

4th of July Foil Flag Card by Jamie Martin for Scrapbook Adhesives by 3L

Trim off the white cardstock at the bottom of the pane, then layer this onto a slightly larger white cardstock panel using the E-Z Runner® Grand Refillable Dispenser and set aside.

4th of July Foil Flag Card by Jamie Martin for Scrapbook Adhesives by 3L

Place an Adhesive Sheet 4″ x 6″ on the same size piece of white cardstock and cut a piece to 2″ x 2 1/2″, save the rest to use later. Remove the paper liner from the cut piece and place blue foil from the same pack, on the top with the pretty side up.  Rub the foil sheet and remove the foil carrier from the panel.

4th of July Foil Flag Card by Jamie Martin for Scrapbook Adhesives by 3L

Add in the Stars

Using a craft knife, remove the stars from the E-Z Runner® Stars and place them on the blue foil panel until it is filled.

4th of July Foil Flag Card by Jamie Martin for Scrapbook Adhesives by 3L

Sprinkle this with Crystal Micro Glitter, rub in the glitter and shake off excess.  Return the unused glitter to the jar and attach the panel to the left upper corner of the red foil striped panel using the E-Z Runner® Grand.

4th of July Foil Flag Card by Jamie Martin for Scrapbook Adhesives by 3L

Assemble and Finish the Foil Flag Card

Stamp the sentiment on vellum with Onyx Black VersaFine Ink and emboss with clear embossing powder.  Die-cut using a tag die and tie the top with red and white twine.  Attach the tag diagonally to the right side of the flag using the E-Z Runner® Permanent Fine Adhesive, it’s pretty much invisible through the vellum.

A dot of glue from the Dual Tip Glue Pen was placed on the backside of the twine so that it wouldn’t unravel. Use the E-Z Runner® Grand to attach the flag to a top folding dark blue card.

4th of July Foil Flag Card by Jamie Martin for Scrapbook Adhesives by 3L

Creative Time: 20 minutes
Skill Level: Intermediate

Materials Needed:
Scrapbook Adhesives by 3L®

E-Z Runner® Grand Refillable Dispenser
E-Z Runner® Stars Refillable and E-Z Runner® Permanent Fine Adhesive
Metallic Transfer Foil Sheets Celebrate Colors
Adhesive Sheets 4″ x 6″

HomeHobby™ by 3L
Dual Tip Glue Pen
Premium Double-Sided Tape 1/2″

Plus
Rubbernecker Stamps- 4th of July Fireworks Stamp Set, Nested Stitch Tag Dies
Stampendous- Crystal Micro Glitter, Clear Embossing Powder

Save to Pinterest!

4th of July Foil Flag Card by Jamie Martin for Scrapbook Adhesives by 3L Pinterest

Visit our Website and Blog!
Sign up for our Newsletter so you never miss a contest or giveaway!

instagram purple icon facebook icon purple pinterest purple icon twitter purple icon YouTube icon blog subscription purple icon

Foiled Band and Heart Card

Hello crafty friends! A pretty foiled band and heart make this card so pretty. Premium Double-Sided Tape 1-inch holds all the foils on the band. It is a tear-able tape with a wonderful width size. The 3D Foam Hearts are a double-sided adhesive foam shaped into a heart. It is very sticky which makes it easy to apply foil to it. This technique is called Wear Your Adhesive on the Outside which is such a fun technique to do with partially used pieces of foil!

Foiled Band and Heart Card by Judy Hayes for Scrapbook Adhesives by 3L

Emboss Card Front

Cut an 8.5 x 5.5-inch piece of aqua cardstock. Fold to form a 4.25 x 5.5 inches top fold card. Unfold and place the front of the card in the Quilted embossing folder and emboss with a die-cutting machine.

Make a Foiled Band

Cut a piece of 1.25 x 5.5-inch black cardstock. Apply a piece of Premium Double-Sided Tape 1-inch on it and rub firmly to secure.

Foiled Band and Heart Card by Judy Hayes for Scrapbook Adhesives by 3L

Remove the liner and randomly place the partially used piece of blue foil from the Metallic Transfer Foil Sheets Pastel Colors set on the tape, press lightly so a small area of foil sticks. Repeat this step with the gold and black foils from the Metallic Transfer Foil Sheets Nature Colors set to cover the tape completely. Photo shows only some blue and gold foil applied.

Designer Tip: Foil that has patterns and areas already used allows spaces and shapes to add texture interest to the foiled band. Some of the patterns on this card resulted from foil that had been used over stamped images embossed with sticky embossing powder.

Next, add Thin 3D Foam Squares Black Mix on the back of the foiled band, peel liners, and adhere across the card front.

Verse Square

Stamp the verse on black cardstock with embossing ink, sprinkle with gold embossing powder, remove excess, and heat with a heat gun to emboss.

Center square die around the verse and run through a die-cutting machine to cut square. Use a gold metallic marker to add a gold edge.

Foiled Heart

Foiled Band and Heart Card by Judy Hayes for Scrapbook Adhesives by 3L

Remove a medium foam Heart from a sheet of 3D Foam Hearts. Place an end of black pearl cotton on the center of the sticky side of the heart. Place another heart over the string. The heart will be two layers thick.

Foiled Band and Heart Card by Judy Hayes for Scrapbook Adhesives by 3L

Remove the liner from one side and randomly apply the same combination of foil (blue, gold, and black) same as the foiled band. Press lightly when adding foil to get small areas of each color. Continue until the heart is completely covered with foil. Repeat on the other side of the heart.

Attach the Heart to the Verse

Foiled Band and Heart Card by Judy Hayes for Scrapbook Adhesives by 3L

Apply Thin 3D Foam Squares Black Mix to the back of verse square. Peel liner off Thin 3D Squares near the center of verse square. Lay end of the string from the heart over Thin 3D Squares.

Final Touches to the Card

Peel liners from remaining Thin 3D Foam Squares Black Mix and press verse with heart in place on the card.

Foiled Band and Heart Card by Judy Hayes for Scrapbook Adhesives by 3L

Thanks for Visiting!
Judy Hayes

Foiled Band and Heart Card by Judy Hayes for Scrapbook Adhesives by 3L

Creative Time: 20 Minutes
Skill Level: Intermediate

Materials Needed
Scrapbook Adhesives by 3L®

HomeHobby™ by 3L

Other: Penny Black Stamp Set (Eloquence), Ranger Ink (Gold Embossing Powder, Embossing Ink), Sizzix Tim Holtz Texture Fades (Quilted), Spellbinders Die (Fairmont Square), Cardstock (Black, Aqua), Black Pearl Cotton (String), Gold Marker

Save to Pinterest!

Foiled Band and Heart Card by Judy Hayes for Scrapbook Adhesives by 3L Pinterest

Visit our Website and Blog!
Sign up for our Newsletter so you never miss a contest or giveaway!

instagram purple icon facebook icon purple pinterest purple icon twitter purple icon YouTube icon blog subscription purple icon