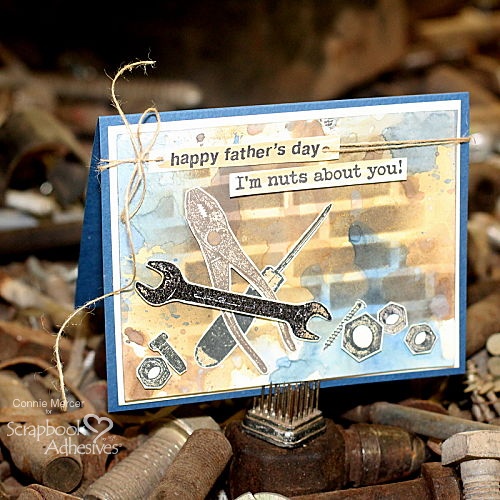
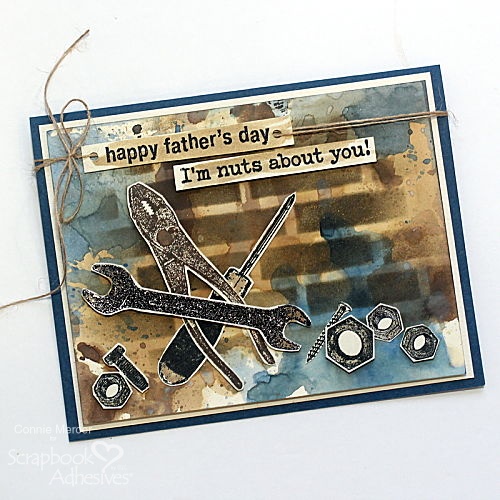
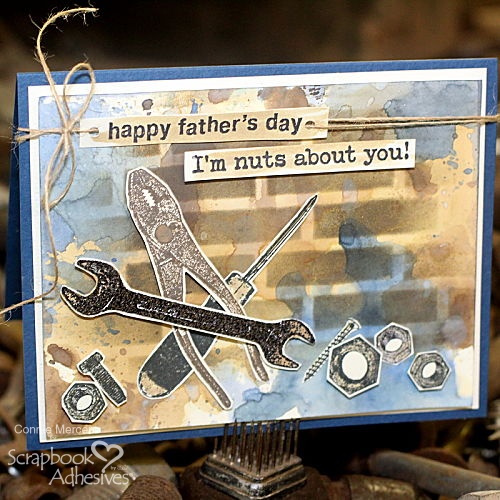
Hi, Connie here with a dimensional Father’s Day card. June will be here before we know it, so let’s create a mixed media-inspired card for our dads! Creating a Father’s Day card with 3D Foam products will make this card POP!
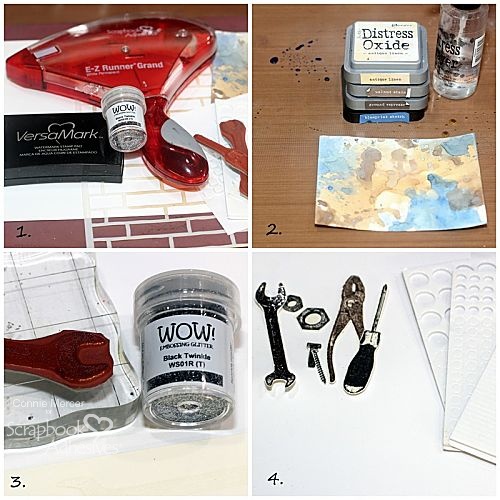
Create a background using inks by watering it down and use it as watercolors. Layer colors and heat dry after each color until the desired look is achieved.
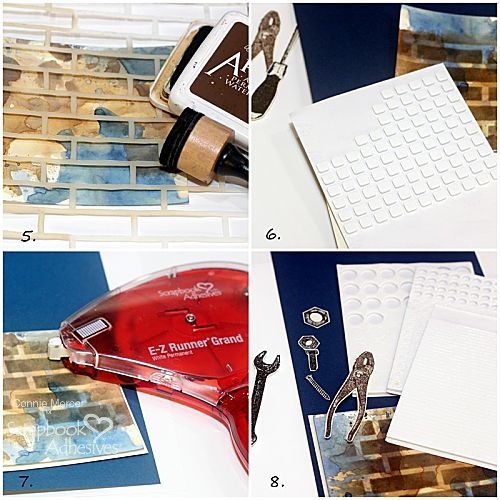
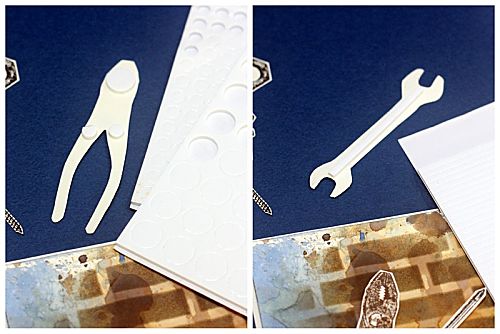
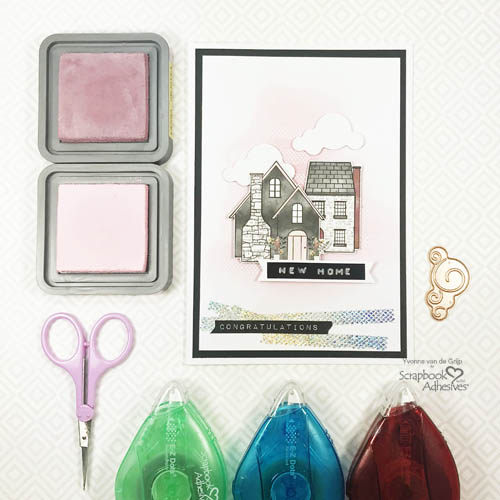
Stamp tool images with ink and one image with VersaMark. Emboss the VersaMark image with embossing powder. Trim all images out.
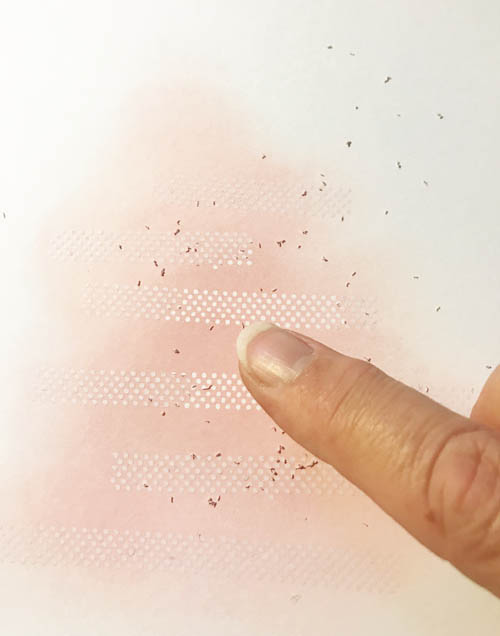
Next, gently apply ink onto the card panel over the adhesive lines. Be sure to apply gently so that you are not rubbing the adhesive away yet. Let the ink dry.
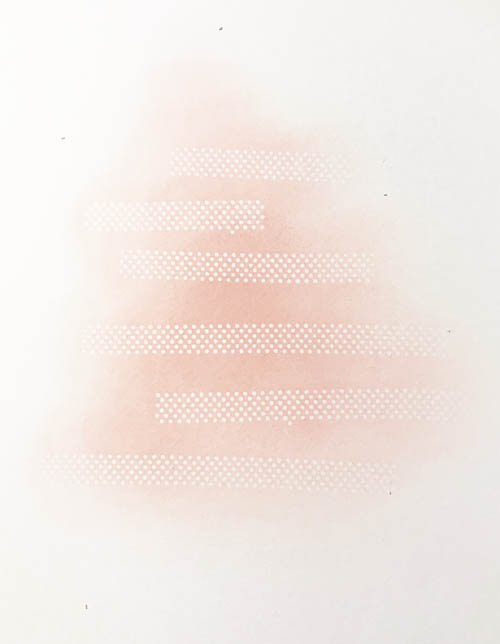
Once the ink has dried, simply rub the adhesive off with your fingers. This is where you will see the magic happen! The adhesive acts as a resist and leaves a subtle white dotted design. This works like a mask when you apply ink onto the card panel. What a great effect! Wasn’t that easy?
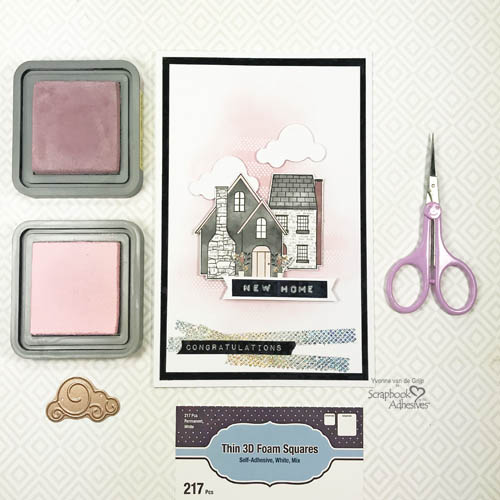
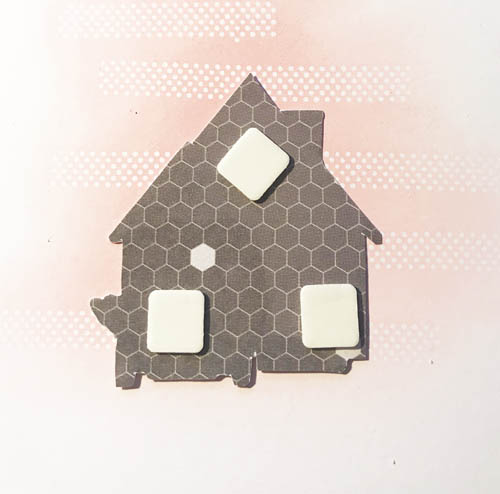
Next, add Thin 3D Foam Squares White Mix to the back of each of the clouds. Determine placement on the card front, remove liners, and adhere the cut pieces.
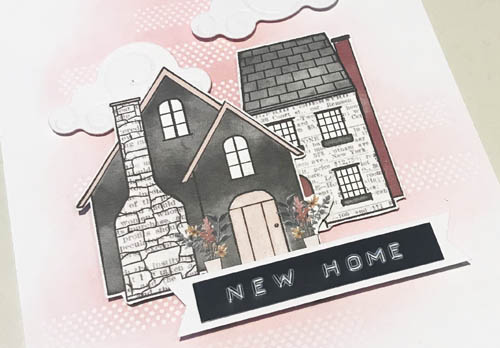
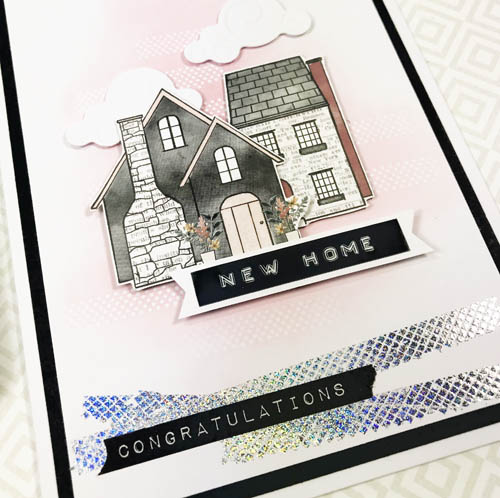
Type out New Home on the label maker and place it on a piece of white cardstock. Hand-cut into a matted banner and adhere to the card by stacking two Thin 3D Foam Squares White Mix to make it really pop up!
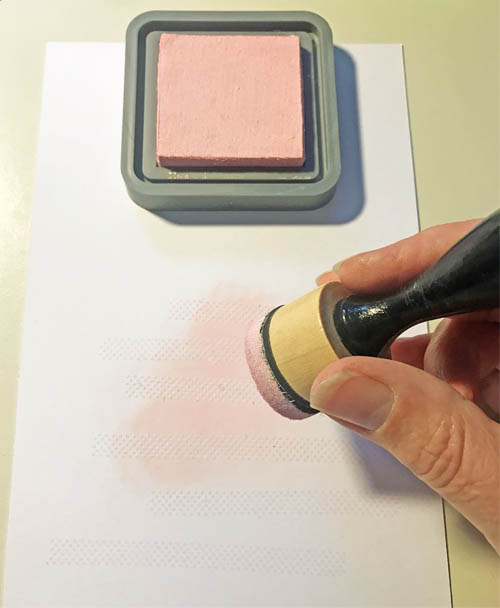
Wear Your Adhesive on the Outside
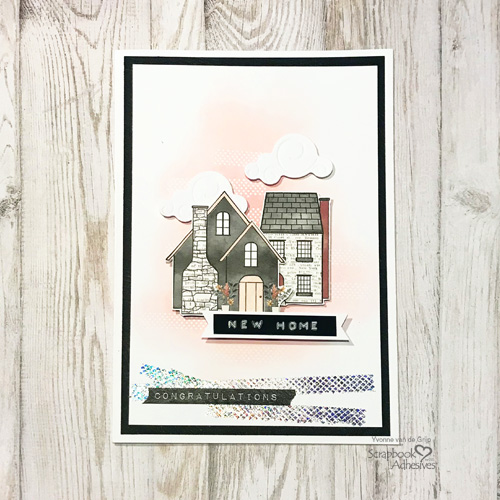
With a lot of space left on the bottom, I decided to add a foiled accent and match the design from the resist background.
Instead of a resist technique, I will do a Wear Your Adhesive on the Outside technique. Use them on the outside and create unique embellishments instead of using the adhesive between layers. You can perfectly match your projects using mediums such as foil, embossing powder, glitter, microbeads, flock, and more!
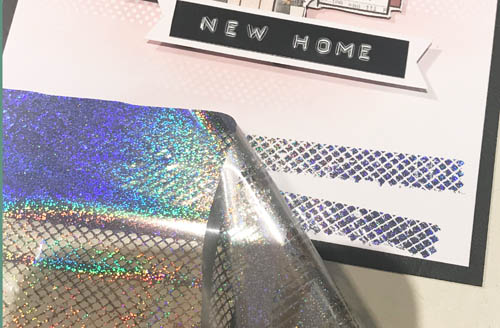
To start, I ran the adhesive over the card in several horizontal stripes. Next, place a piece of Metallic Transfer Foil Sheets Holographic Colors color side UP over the adhesive and gently rub with your fingertip to transfer the color to the adhesive. Then peel off the foil to create a gorgeous glittery effect! It’s that easy + fast and the best part, no tools required!
The Finishing Touches
For the final touch, I tore a piece of washi tape with the word, Congratulations, and made it a part of the sentiment to the card by adding it on top of the foiled accent.
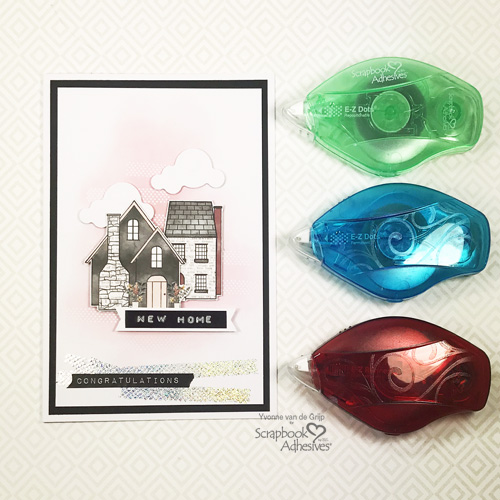
Voila… your New Home card is ready. I hope you enjoyed this tutorial and try these fun and easy techniques!
Other Etched Dies and Die Cutting Machine: Spellbinders® Paper Arts (Sun and Clouds, Platinum 6 Machine); White and Black Cardstock; Patterned Cardstock: American Crafts (Auburn Lane); Sentiments: Dymo and Washi Tape Craft Emotions; Inks: Ranger Ink (Distress Oxide in Spun Sugar and Victorian Velvet); Scissors; Paper Trimmer; Bone Folder
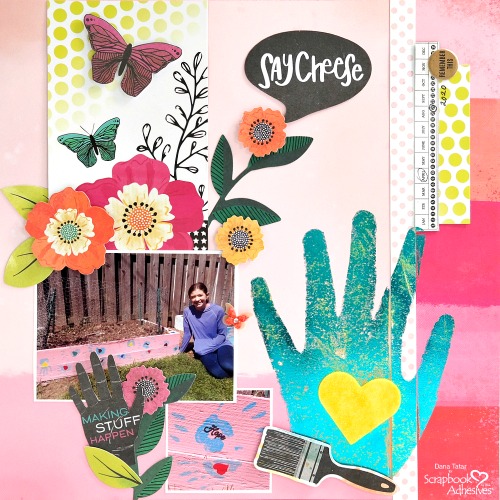
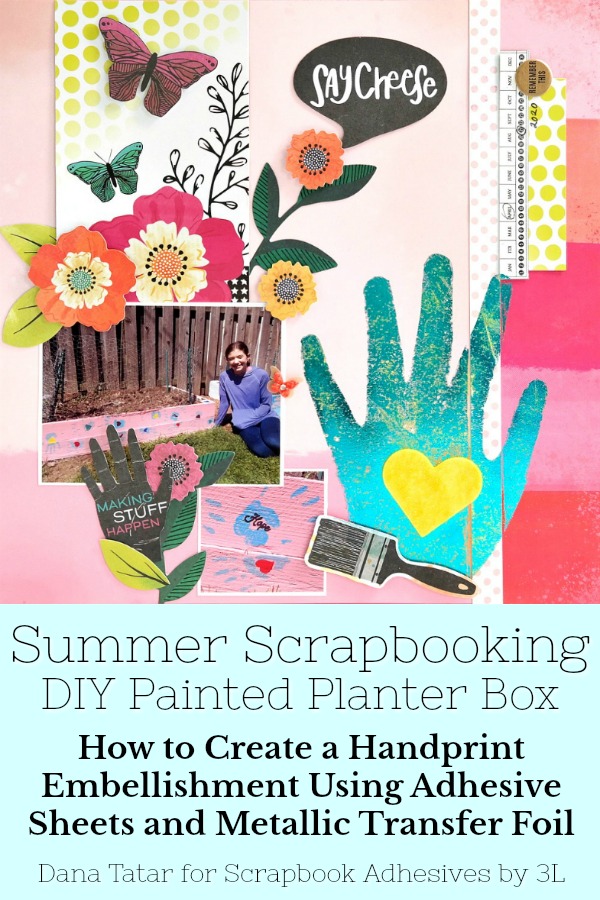
Hi friends! Dana here today sharing a fun Summer layout that I created with the help of my daughter. We are working on painting the planter boxes in our backyard. My daughter designed her box with handprints and hearts. I wanted to document this event and I thought that including her handprint on my scrapbook page would be a great way to coordinate with our project, and also record the size of her hand at age 11.
Both my daughter and I enjoyed working on both projects. Having her handprint on this scrapbook layout ensures that I’ll remember this moment long after the paint on the planter box fades.
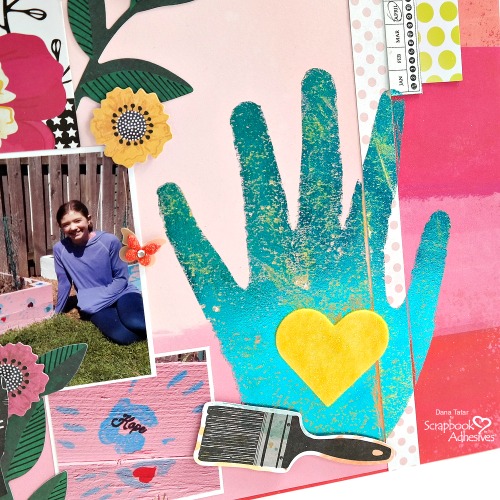
Metallic Transfer Foil Handprint Embellishment
After I assembled the base patterned papers and other page elements, I traced the outline of my daughter’s hand onto an Adhesive Sheet 6 x 12-inch. I cut the handprint out and pressed it onto the page. Next, I peeled the top liner from the hand and covered it with a sheet of Metallic Transfer Foil Variety Colors. Finally, after firmly pressing down on the foil sheet (color-side up) to transfer the color, I removed the foil to reveal the metallic handprint embellishment.
To add another layer of color, and to match the design on the planter box, I applied a 3D Foam Heart to the center of the handprint. I sprinkled a layer of glittered yellow flock onto the foam heart. The metallic foil and the glittered flock really sparkle in the light!
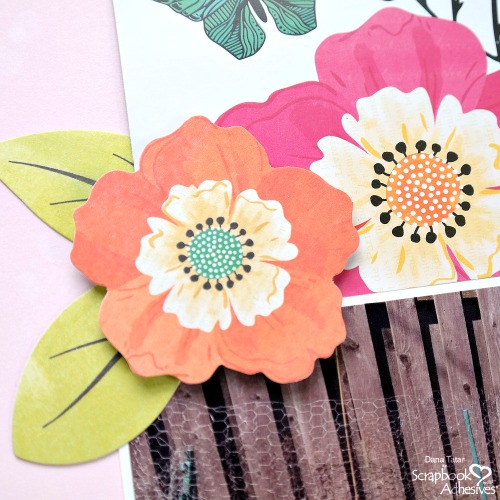
Adding Dimension to Die-Cut Flowers
I used 3D Foam Circles to attach several of the die-cut flowers to my layout to help raise the shapes off of the page.
Thanks for stopping by today! I hope I have inspired you to create art with your children! ~Dana Tatar
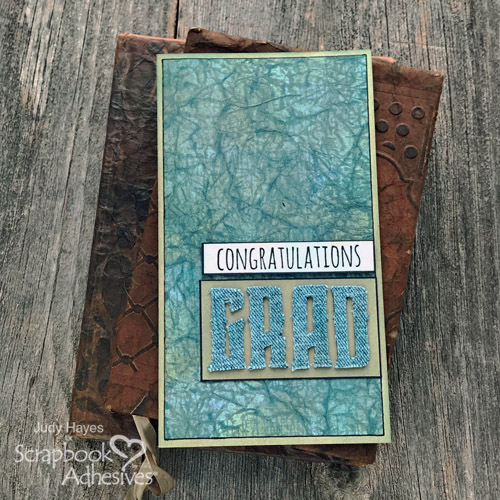
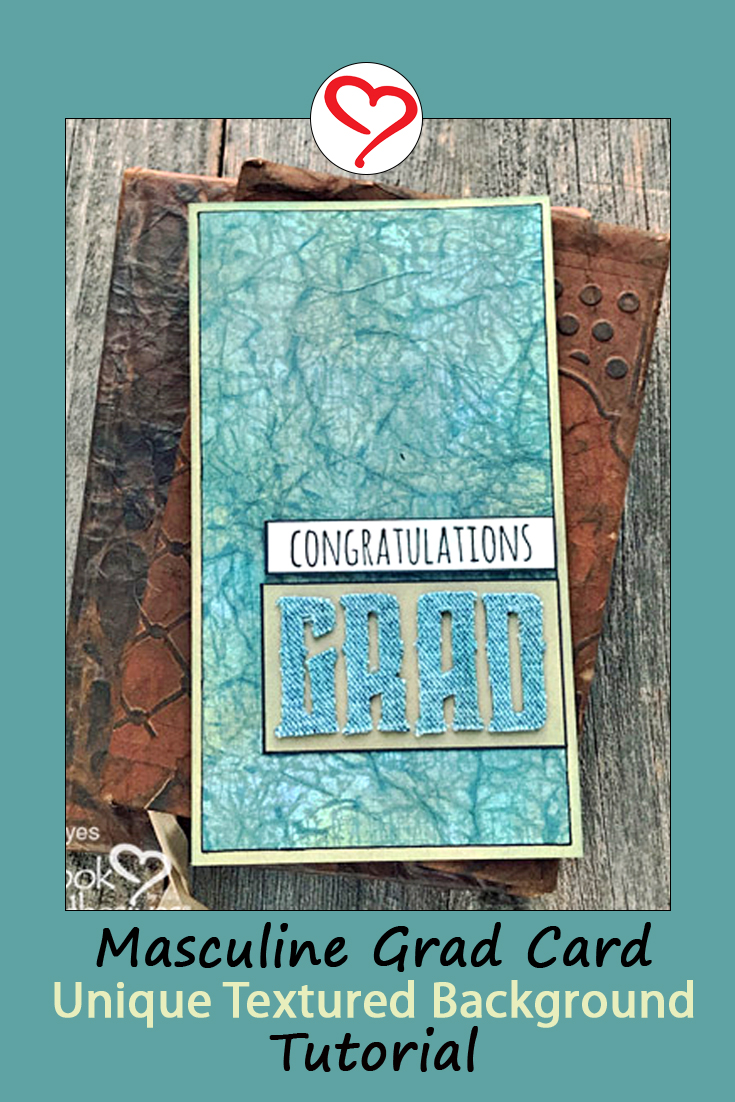
Hello crafty friends! It’s Judy here with a textured grad card with a masculine look. It’s that time of year, even with all the change in our world, seniors will soon graduate. I’d like to show you how I achieved this wonderful background to make a card for that special grad!
Textured Grad Card Background
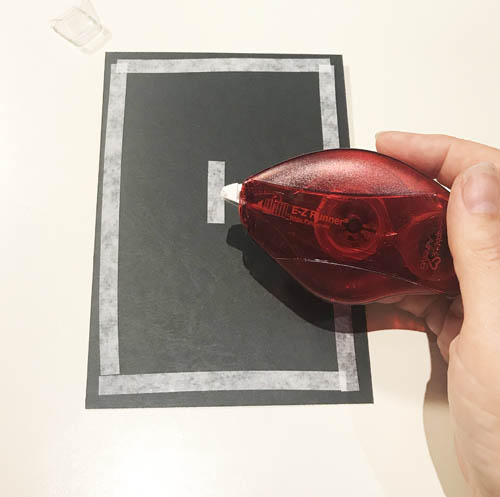
Rub and blend several ink colors over a crumpled printer paper. There’s a subtle grid pattern stamped on it for a little more interest. Iron the paper to flatten and smooth it before applying a sheet of Adhesive Sheets 4×6 inch to the back. Then cut to size…keep that excess piece for later.
The Adhesive Sheets 4×6 inch makes it easy to attach the background to a 3.5 x 6.25-inch tan card base. Think like a sticker with edge-to-edge coverage. The paper is quite flexible and soft after inking. Next, I traced around the edge with a black fine point marker for definition.
Add the Grad
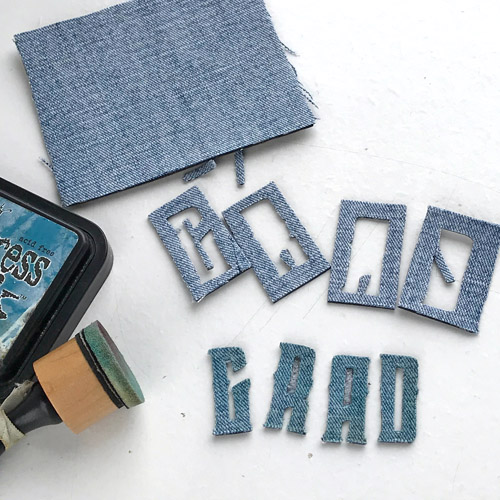
Recycle a piece of worn denim by adhering a piece of 3D Foam Creative Sheets Small Black on the back and die-cutting the letters GRAD. Make sure to keep the negative pieces of the material. I’ll show you what I did with them 🙂
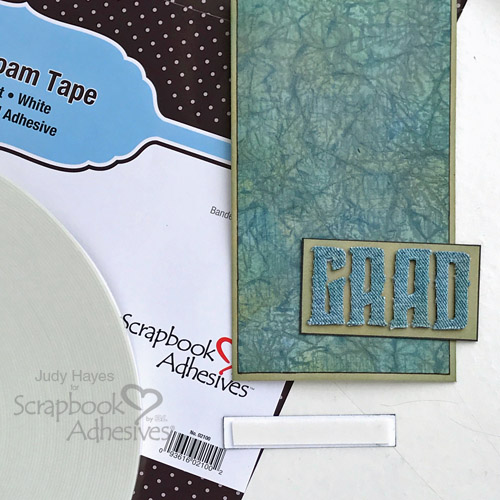
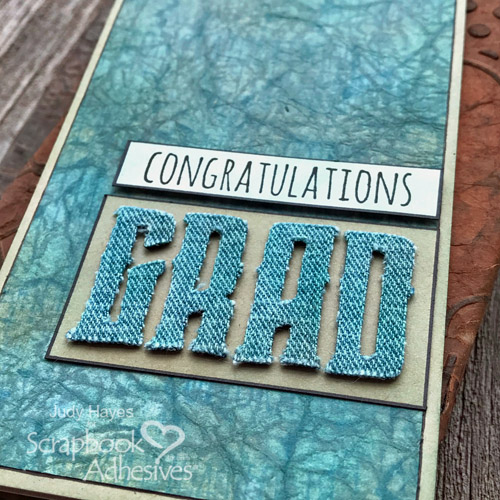
For each letter, I edged with blue ink to coordinate with the background paper. On a piece of rectangular tan cardstock, I distressed it with a combination of blue and brown inks. Then I took off the bottom liner of the letters and adhere them to the cardstock. Next, I edged the cardstock with a black marker. Adhere to the card base with the E-Z Runner® Ultra Strong Refillable Dispenser. When it comes to adhering to a textured or ink surface, the Ultra Strong adhesive is the perfect solution.
After stamping the Congratulations sentiment with black ink on white cardstock, I distressed it again with the same combination of blue and brown inks. It’s hard to see that in my photos because it’s subtle. With the Crafty Foam Tape White, place it above the Grad sentiment. I really like that Crafty Foam Tape White is not thick! It fit the back of my verse perfectly.
An Encore Card
Remember the negative pieces from the letters? I used those along with scraps of background paper to put together another card. Now I have two cards that I can send out!
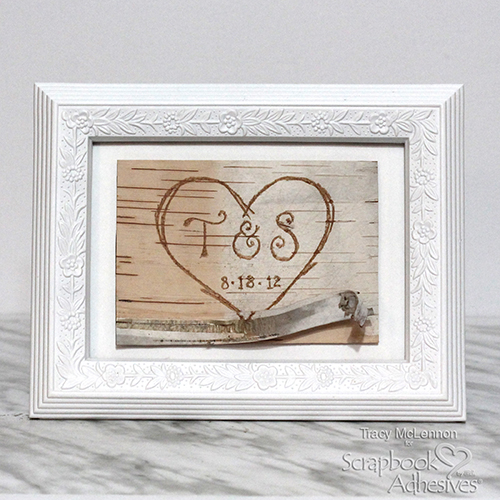
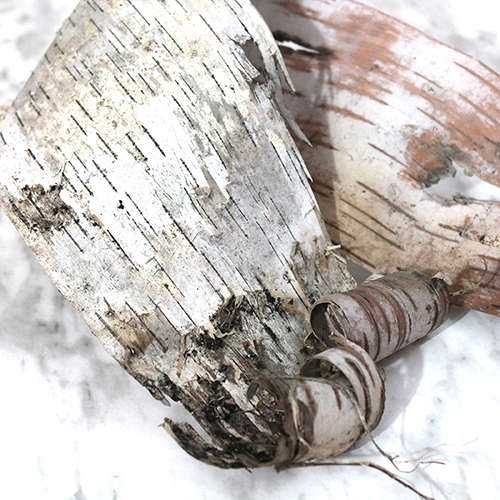
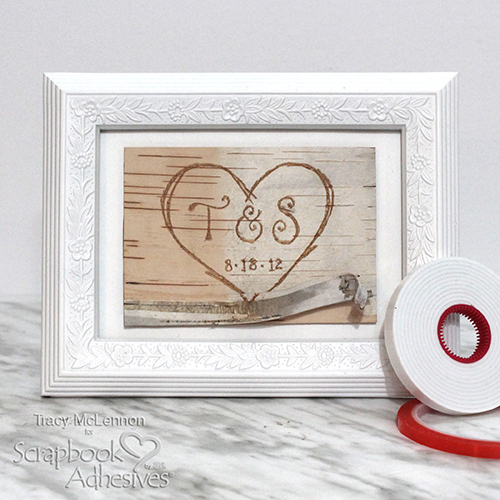
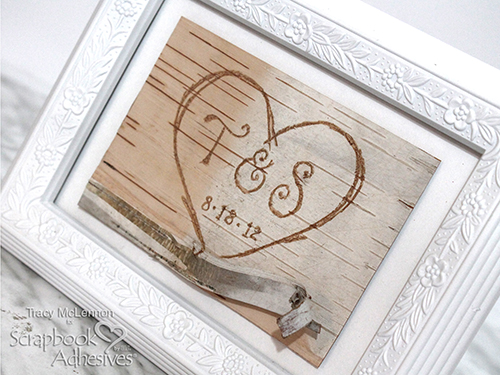
Hello crafty friends and welcome back. Tracy here, and today I have a fun little home decor project to share. I created this Framed Birch Bark Decor piece using minimal supplies and bark I got from my own back yard. Here are all of the details.
Birch Bark Prep
I am so very lucky to have a large birch bark tree, right in our backyard. Each year it sheds huge pieces of its bark. This bark is so useful for many crafty projects. It is easily trimmed with a rotary cutter and can be punched out or die cut.
For this project, I cut a 4 x 6-inch piece to be placed into my 5 x 7-inch frame. Designer’s Tip: once you bring the birch bark in your home, give it a few days to dry. To make sure it dries flat, place in between newspaper and stack books on top.
To add your design to the bark, you can use a knife or nail. Something that can scratch the bark easily. Another option is to draw or stamp on it.
Building Layers
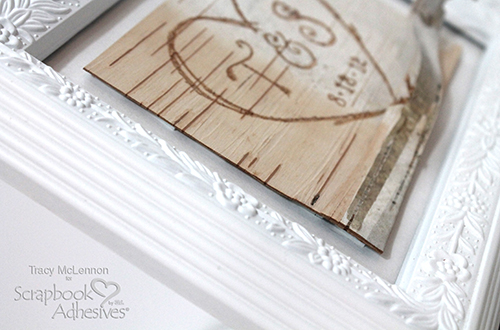
Cut a piece of white chipboard to fit in the frame for the background and adhere into the frame.
On the back of the birch bark, add strips of Extreme Double-Sided Tape 1/4in and then place strips of the Crafty Foam Tape White on top of the double-sided tape. Next, remove the liners and center in the frame. Now it’s ready to display!
See what you can find in your back yard. Perhaps there is some crafty inspiration waiting just outside.
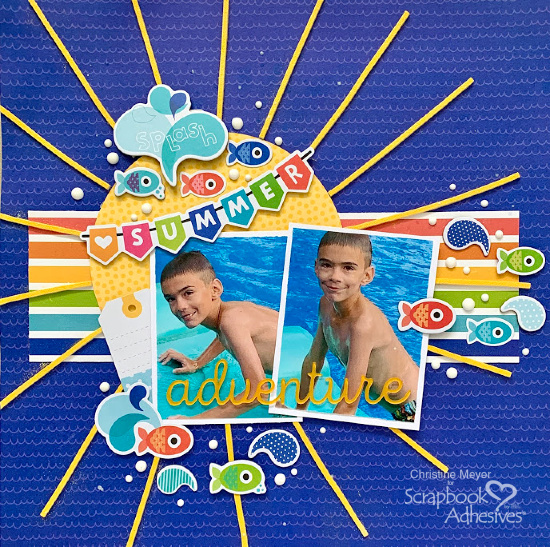
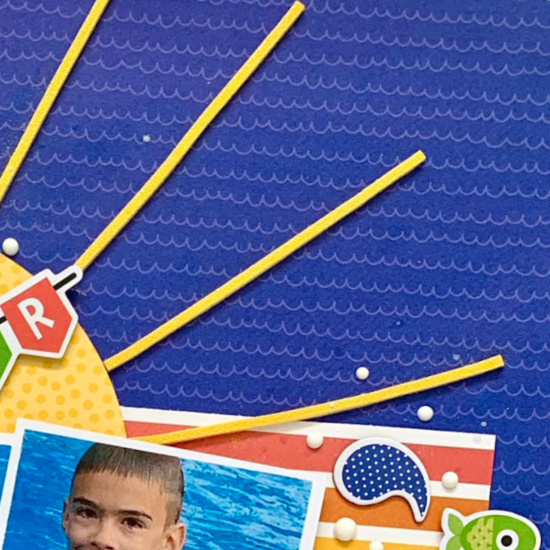
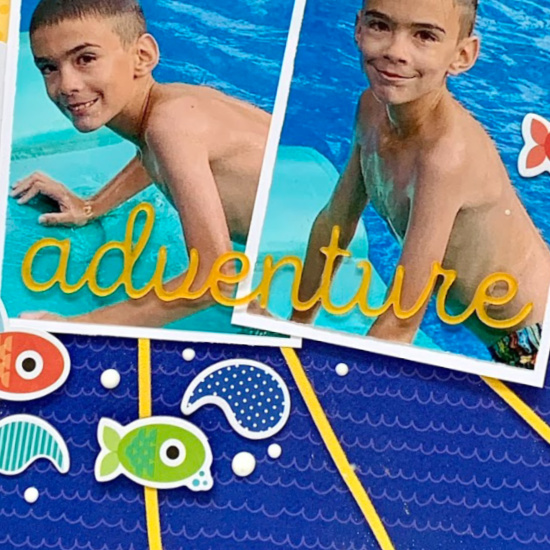
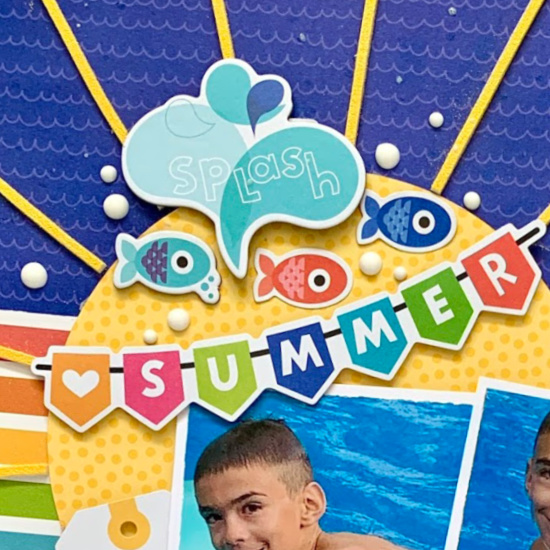
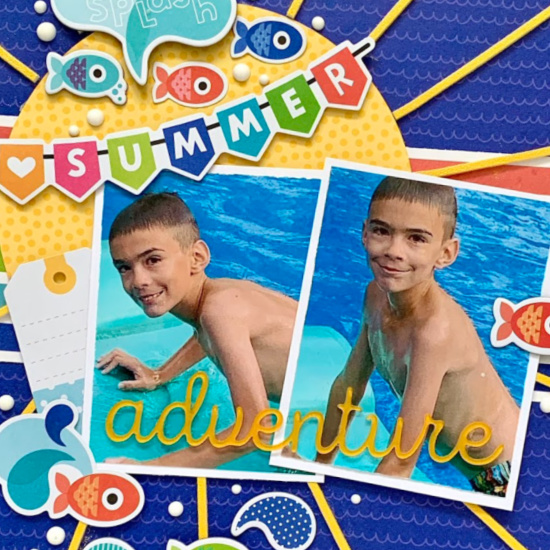
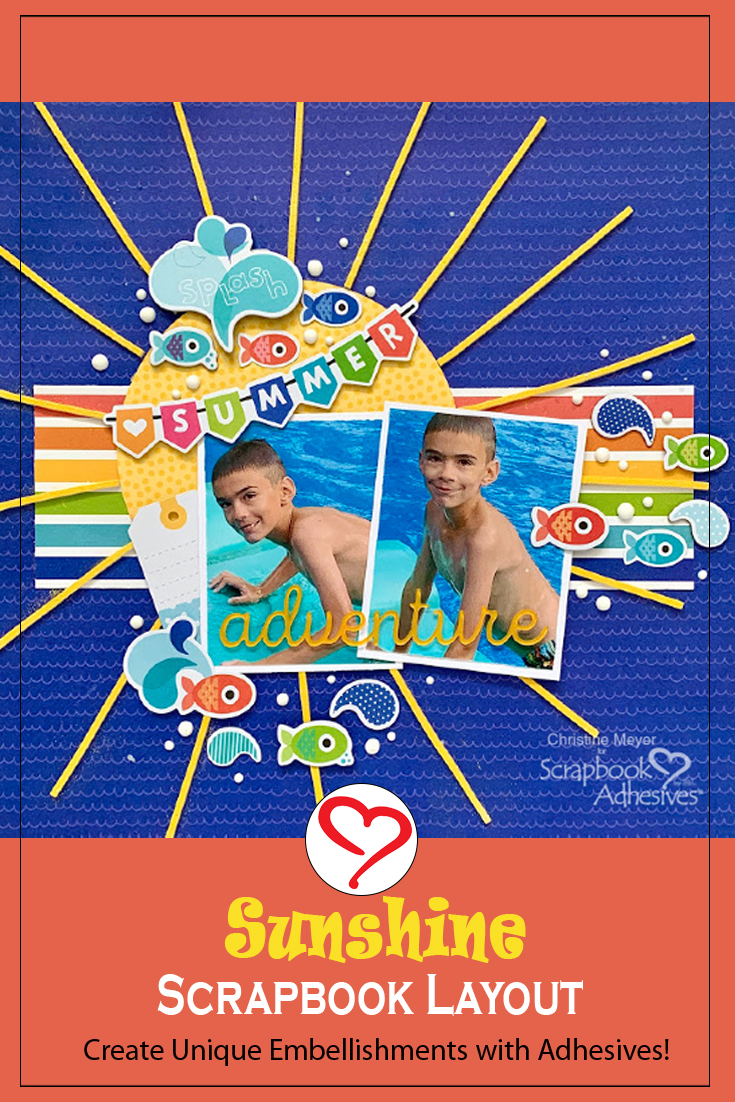
There are so many fun embellishments available in the scrapbooking world but every once in a while I like to go out on my own and get creative! One great way to do that is by using adhesives as embellishments! Christine Meyer joining you today with a Sunshine Scrapbook Layout featuring 3D Foam Strips as embellishments.
After putting my circle for the sunshine where I wanted it, I went all the way around and added one line of the 3D Foam Strips about every inch. Then I peeled off the top and added yellow embossing powder. I heated up the powder so that it set. I made sure to do this step before adding my pictures and other embellishments so that I didn’t mess up anything.
Adhesive Details
While the 3D Foam Strips certainly steal the show, this layout is packed with additional adhesives!
This picture demonstrates how much adhesive can impact the look of your layout – the E-Z Runner Grand keeps things flat and secure while 3D Foam adhesives pop them up creating a multi-level look.
You can check out some details on this Sunshine Scrapbook Layout over on my YouTube Channel!
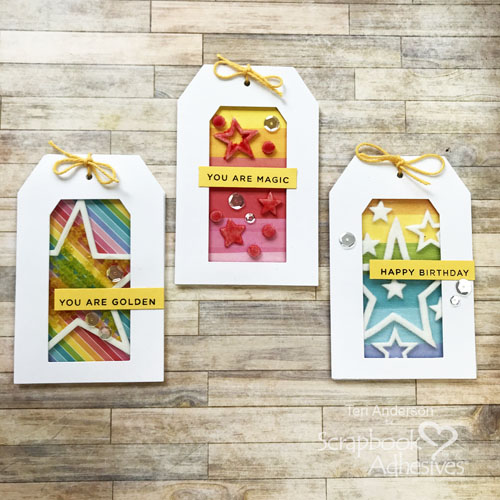
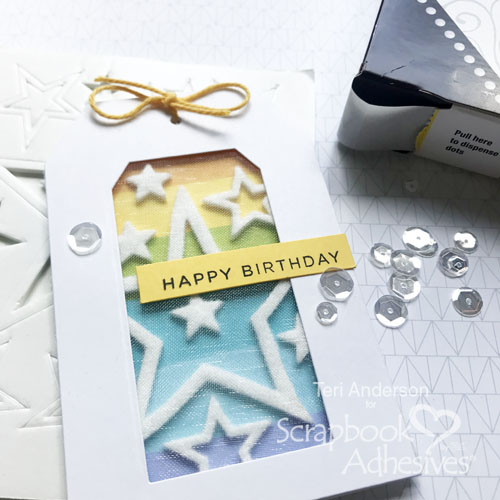
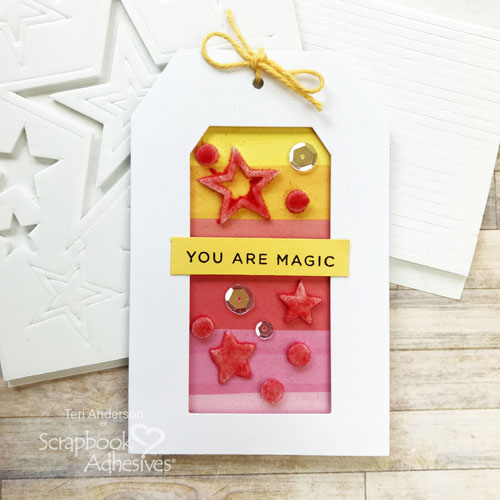
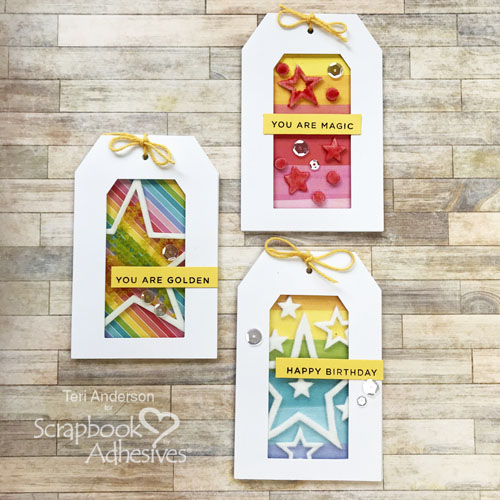
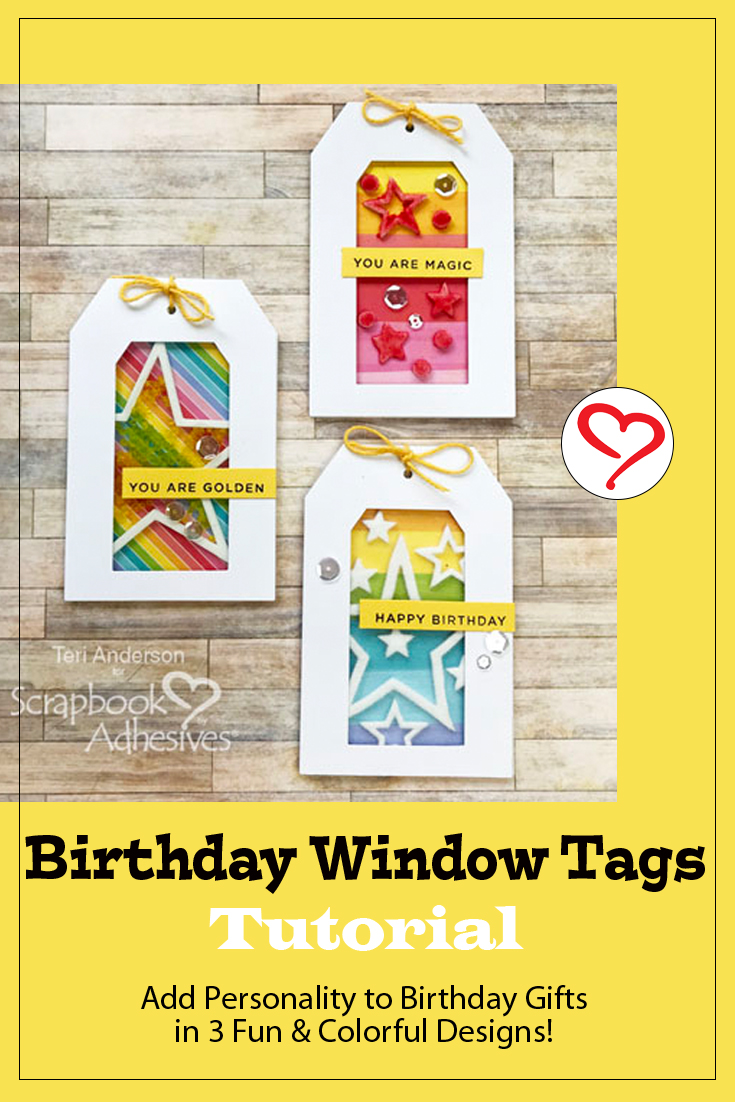
Hi, friends! Looking for a fun way to add a little personality to the next birthday gift you wrap? Teri here, and I’ll show you how to make colorful birthday window tags that are sure to make the special girl (or guy) smile!
Birthday Window Tags Basics
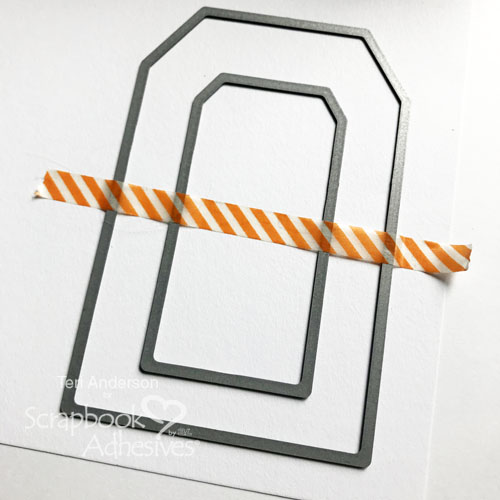
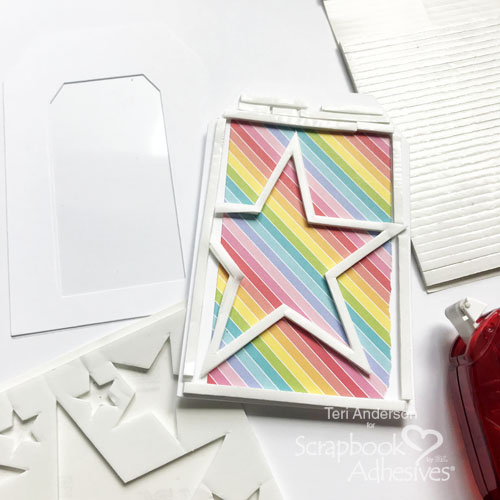
To create the window, nest and center the small tag die into the larger tag die. Secure the dies with washi tape. Designer’s Note: neutralize the washi tape by tapping it on your shirt or pants a couple of times before use. Then die-cut with white cardstock to make your window tag.
Take off the smaller tag die and die-cut a large solid tag from white cardstock and from tulle material.
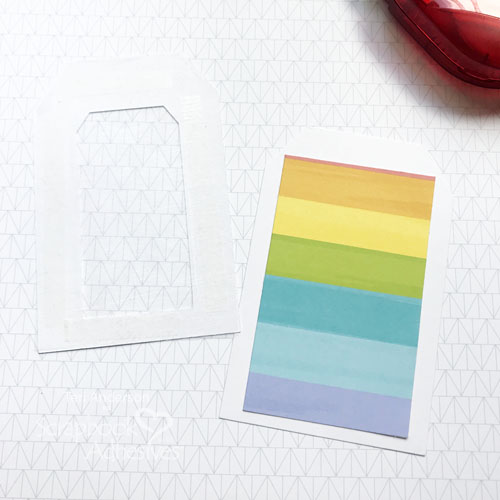
Add a piece of patterned paper (or cardstock) to the solid cardstock tag with the E-Z Runner® Permanent Strips Refillable Dispenser. Using the same adhesive, secure the tulle behind the window tag’s opening. Now we have our basics down!
Embellishing Details
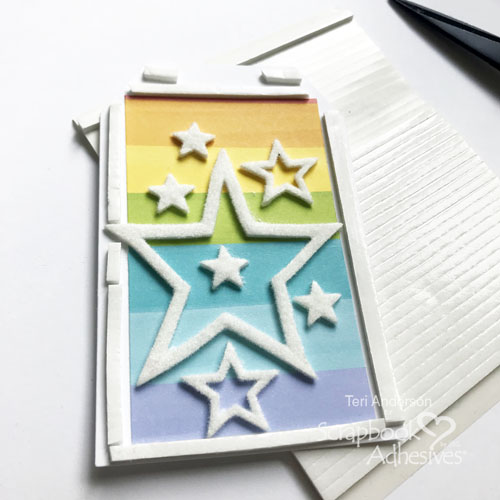
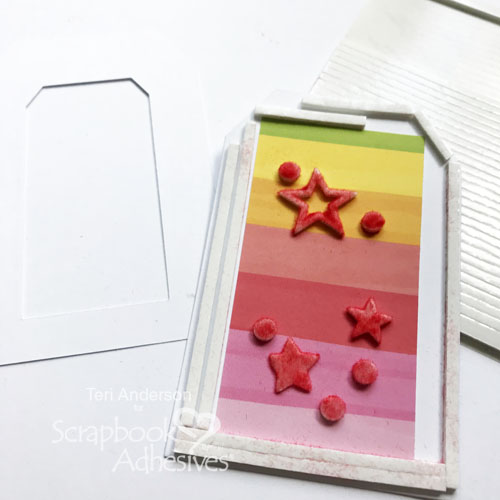
Randomly place several 3D Foam Stars on the patterned paper panel. Wear Your Adhesive on the Outside by cover them with either glitter or flock. Simply peel off the top liner, pour flock over them, press to secure, and tap off excess. EASY!
For the edges around the tag, apply 3D Foam Strips. You can use a whole strip and cut pieces to complete the edges. Remove the top liner and place the window tag on top of the star tag.
Punch a hole on top of your tag, thread the twine and tie a bow. Stamp or computer-generate a sentiment, cut it into a strip. Add a few sequins. Secure both with Adhesive Dots Micro.
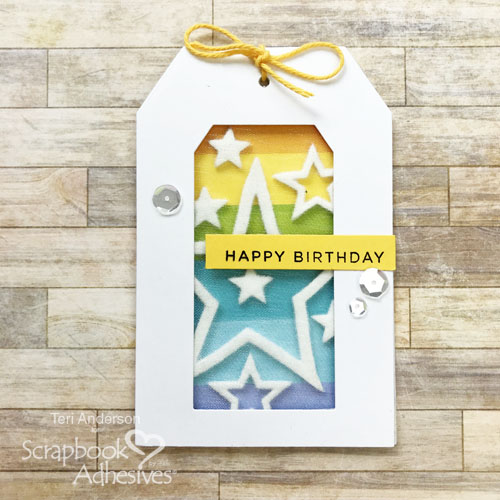
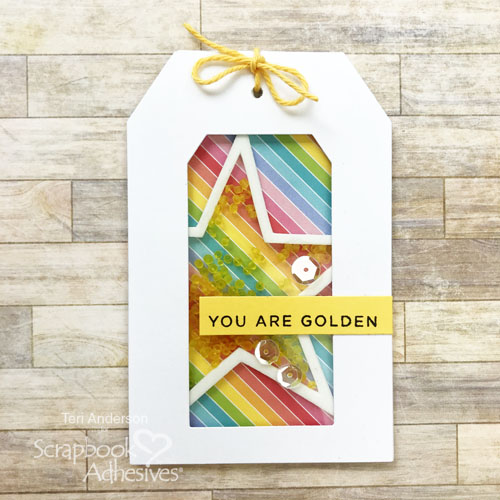
Window Tag without Tulle
Tulle not your thing? You can easily make a window tag with no tulle!
Follow the same steps as the first tag, just skip cutting a tag from tulle. Add stars to the patterned paper panel and cover the stars with flock. But how about adding a few 3D Foam Circles for visual interest!
Complete with a twine bow, a sentiment strip and a few sequins! The end result? Kinda magical, if you ask me!
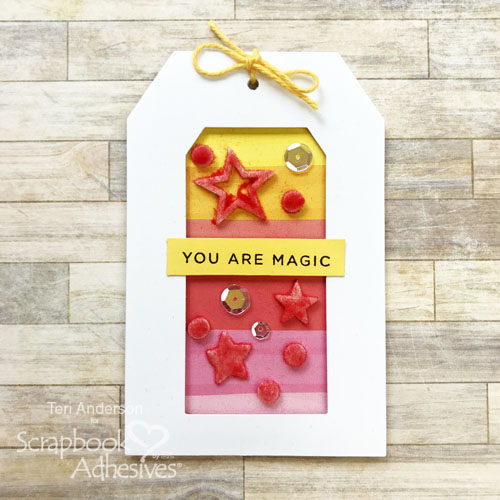
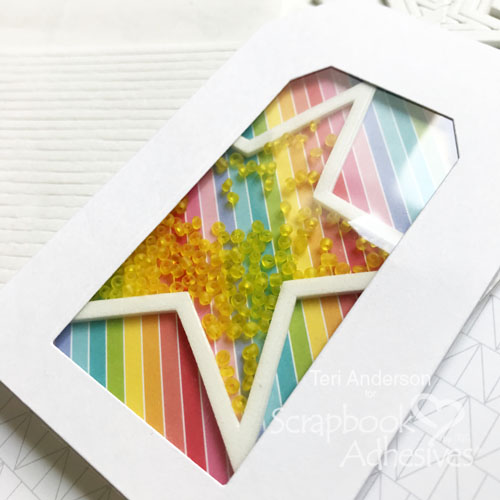
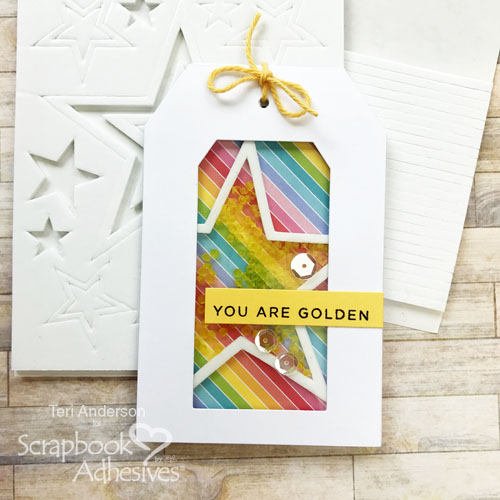
Shaking Up a Window Tag
Another fun twist of window tags is to turn one into a shaker tag! It’s easy! Replace the tulle in your window to put transparency behind it.
Add small beads or sequins in the middle of the star. Next, adhere your window tag on top to seal. Rub your fingers along the edges of the tag to make sure your shaker has firmly adhered.
Punch a hole on top and tie a twine bow. Add a sentiment strip, twine and a few sequins using Adhesive Dots Micro!
I hope you enjoyed today’s tutorial and are inspired by make a few birthday tags of your own!
If you decide to try one of these window ideas, please let me know! I’d love to leave some love on your projects!
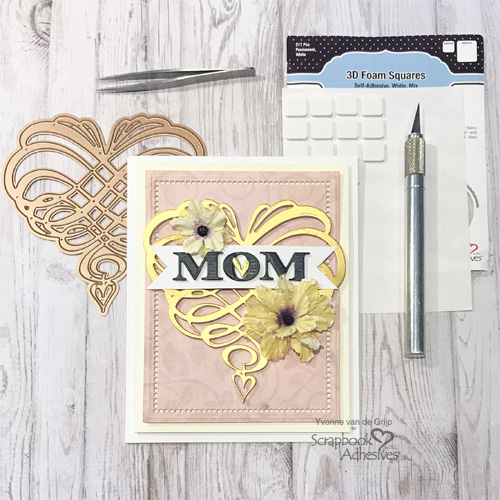
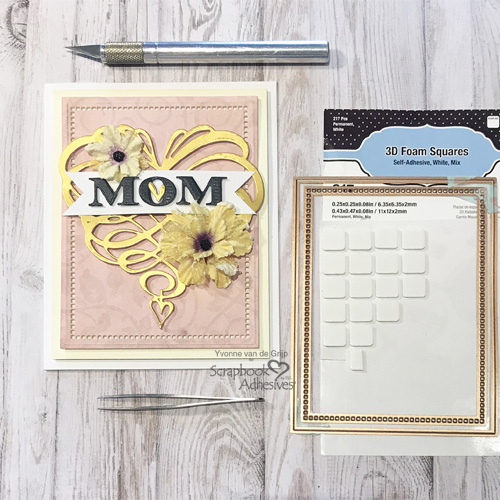
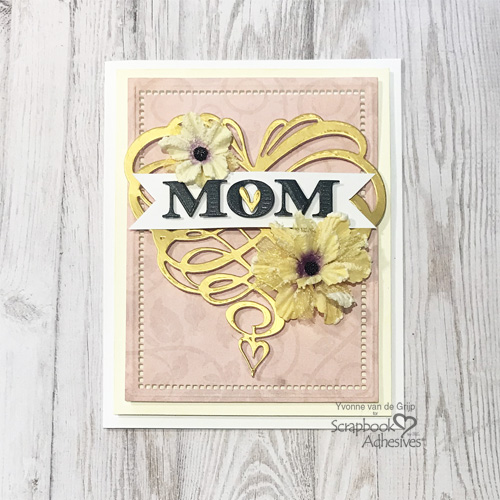
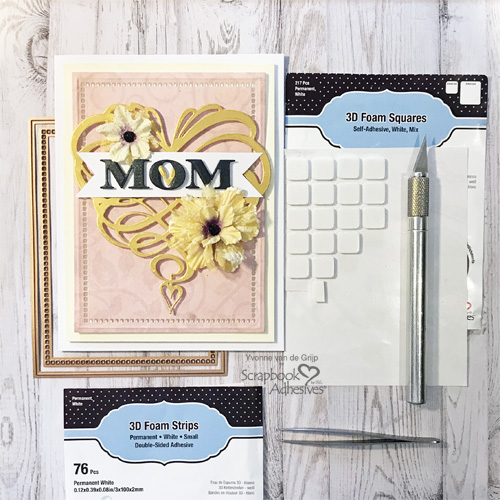
With Mother’s Day coming up within a week, this sweet swirl heart mom card was created with my mom in mind. I know she is going to love this one! My mom loves flowers so adding them with sunny colors will bring a smile to her face for sure.
To dress up the flower centers with Adhesive Sheets and microbeads to make them something special. I’ll show you how so let’s get started!
Swirl Heart Mom Card Base Layers
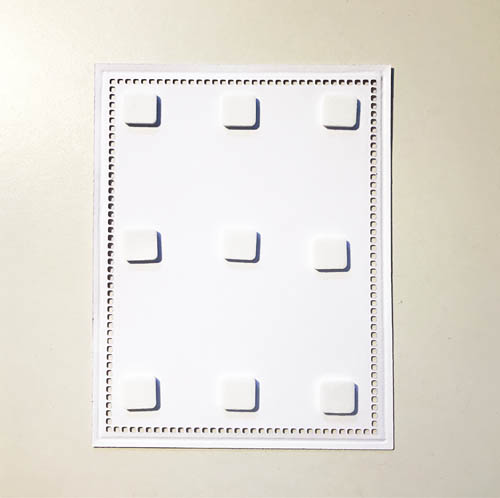
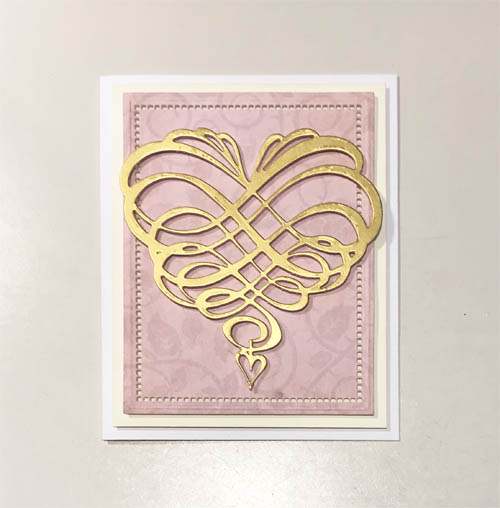
Make a rectangle-shaped white card base. There will be two card panels. The bottom panel is a creme-colored panel lifted up with 3D Foam Squares White Mix and adhered to the card base. Next, die-cut and emboss a pierced rectangle shape from pink patterned cardstock that was adhered to the card base again using 3D Foam Squares White Mix.
Swirl Heart and Banner
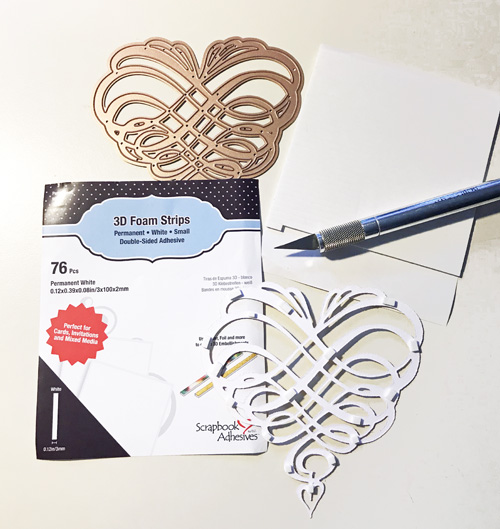
Die-cut a flourished heart shape from gold cardstock. As a focal element, I wanted to give it dimension so I lifted it up with 3D Foam Strips. To fit behind the intricate design, I cut the strips into smaller pieces with a craft knife to prevent them from sticking out from behind. Then I centered it on the layered card front.
The letters MOM were die-cut and embossed from dark grey metallic cardstock. Adhere the letters onto a hand-cut white banner using 3D Foam Strips. I used a left-over heart die cut from the flourished heart so I added it in the letter O with a tiny piece of 3D Foam Strips. Isn’t it cute?
Finishing Up
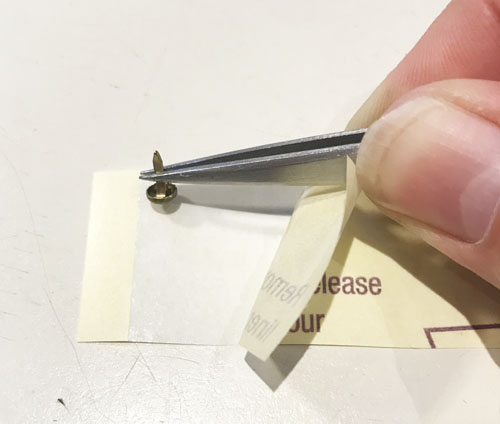
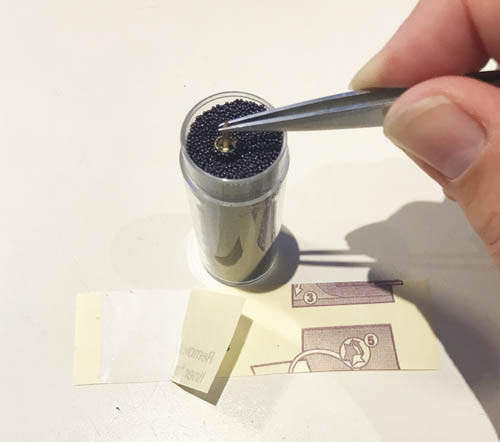
To finish the card, I wanted to stack a couple of mulberry flowers. But the center needed something other than a dull gold brad. So I had an idea! I tapped the top of the brad with a piece of leftover Adhesive Sheets 4×6 inch to make it tacky.
Next, dip the brad into a jar of black microbeads. I pressed the beads into the brad to secure and covered. Now I can stack the flowers and thread the brad through to create a unique flower center! So fun and easy…no special machine to achieve this. Another way to Wear Your Adhesive on the Outside!
Finally, adhere the flowers to the card front using 3D Foam Squares White Mix. Voila…the Swirl Heart Mom Card is ready to send or gift to your mom!
Other Etched Dies and Die Cutting Machine: Spellbinders® Paper Arts (Hemstitch Rectangles, Simply Said, Swirl Heart, and Platinum 6 Machine); White, Creme, Pink Patterned, Gold, and Dark Grey Metallic Cardstock; Mulberry Flowers (Prima Marketing); Brads; Micro Beads; Paper Trimmer; Scissors; Tweezers; Craft Knife
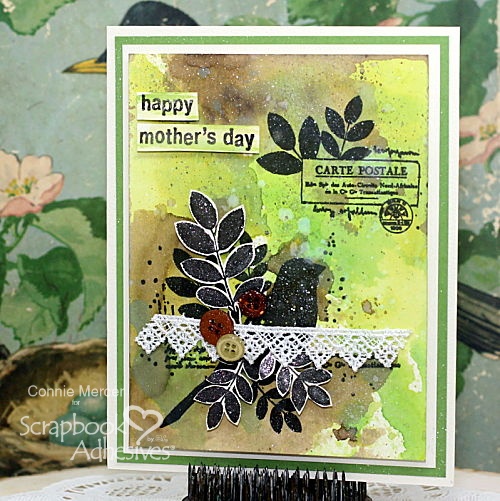
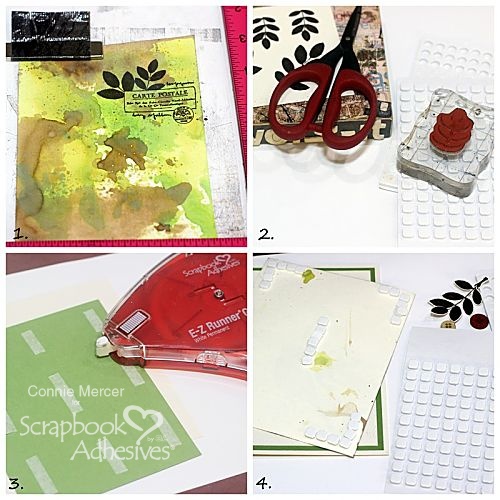
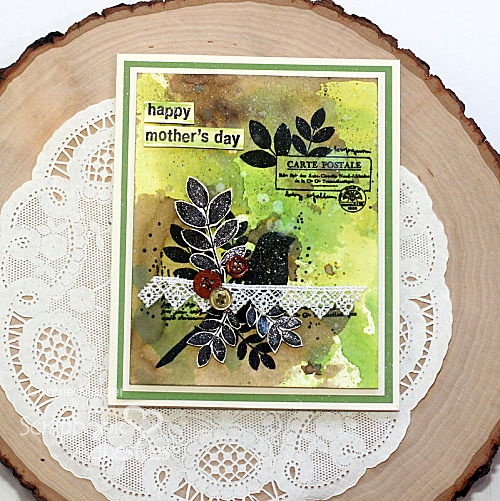
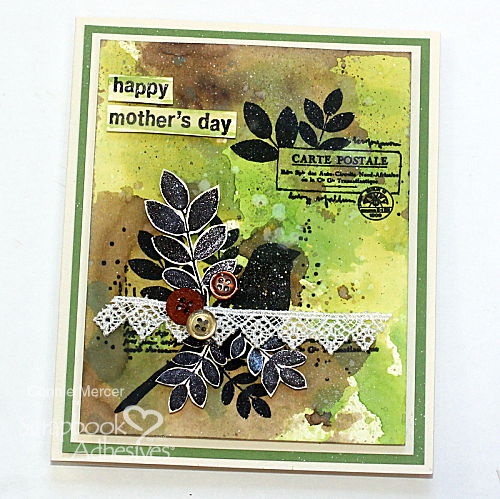
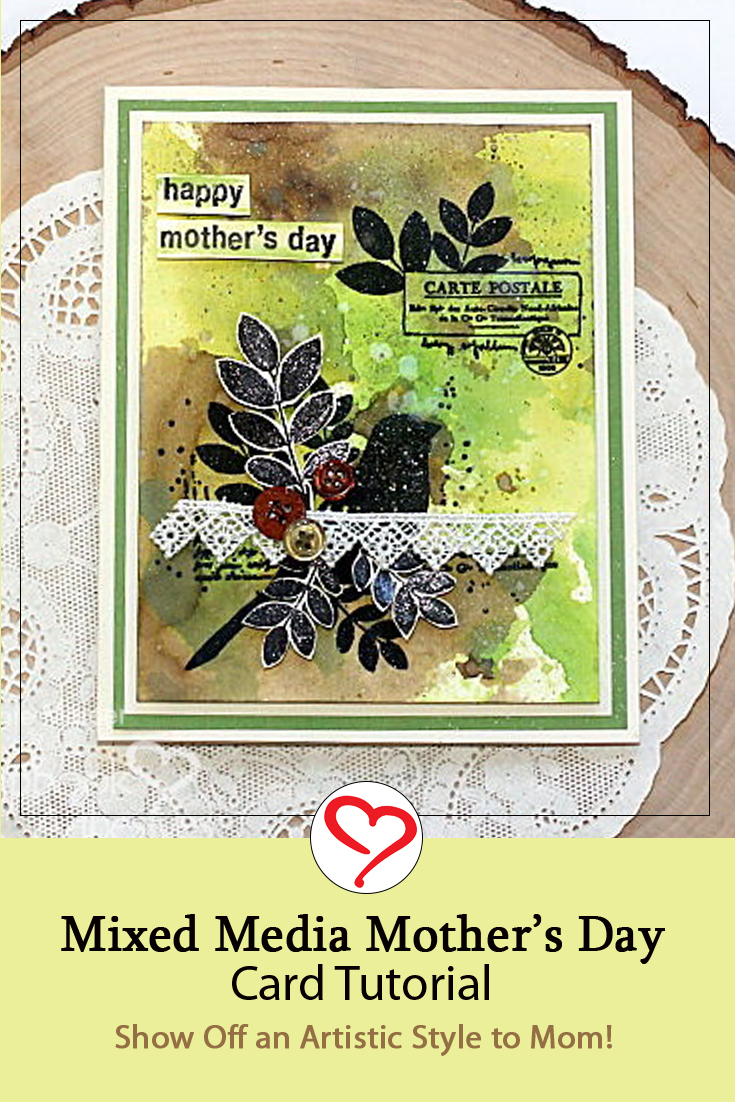
Hi, Connie here with an artistic twist on this Mixed Media Style Mother’s Day card. I created it with lots of texture and dimension and, of course, with help from Scrapbook Adhesives by 3L® in that department. They are the best!!!
Mixed Media Style Background
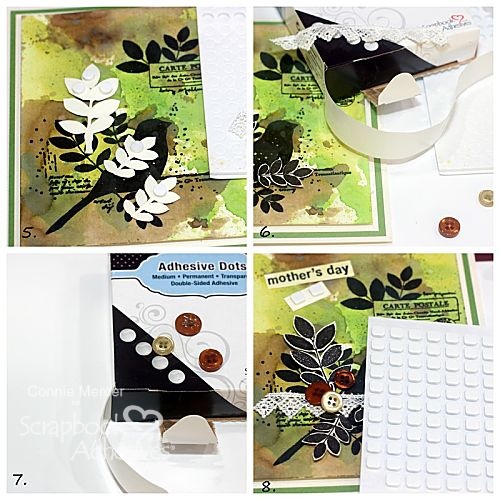
1. Create a background on mixed media paper using various inks. Stamp focal images on the card background.
2. Stamp extra images for added dimension and trim out. Put aside.
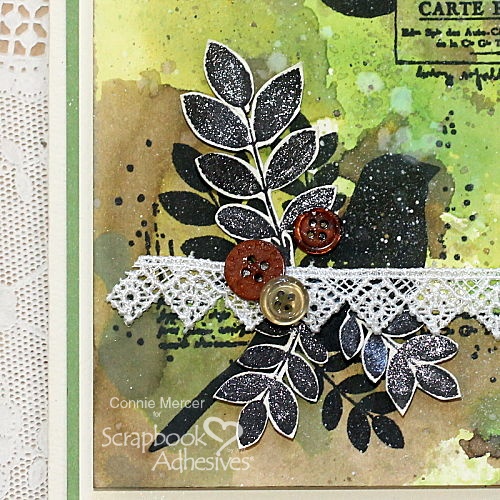
5. Add the extra cut out stamped images from Step 2 to the bird focal cluster, using 3D Foam Circles White Mix in the small size. Perfect for that added dimension we all love.
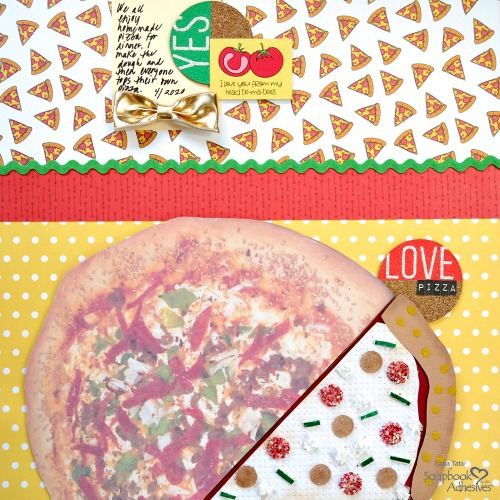
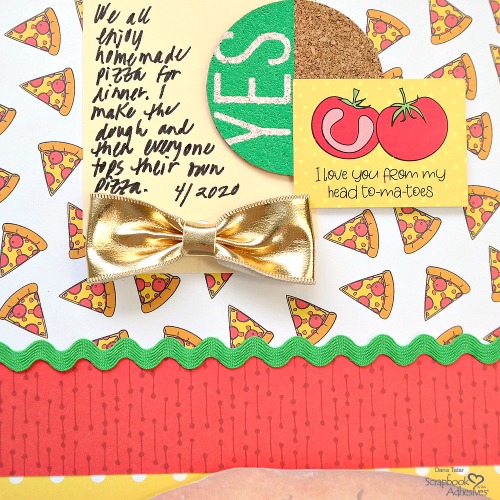
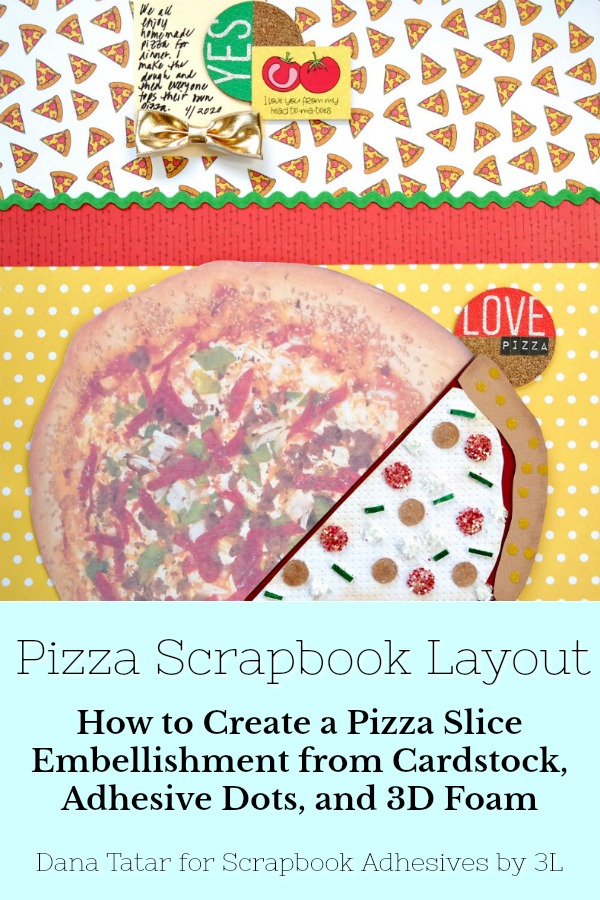
Hi friends! Dana here today sharing a scrapbook layout about one of my favorite foods — pizza. I’ve really enjoyed cooking more elaborate meals for my family with my extra free time. One dinner that we all always agree on is homemade pizza. I make the dough and everyone adds their preferred topping to their own pizza.
Building my own pizza slice embellishment for this scrapbook layout using cardstock, Adhesive Dots, and 3D Foam was so much fun!
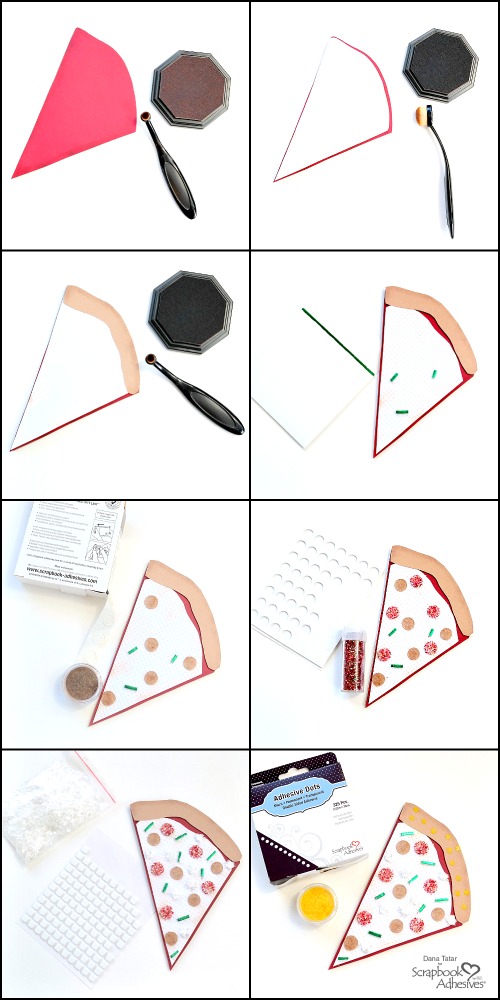
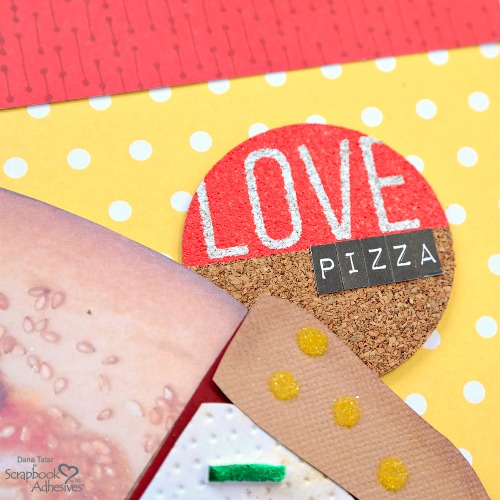
Pizza Slice Embellishment Tutorial
First, begin by cutting a piece of red cardstock into a triangular shape to create the base of the pizza slice. Next, cut a slightly smaller piece of white cardstock for the cheese layer. Then, cut a crust shape piece of brown cardstock to top the back edge of the slice. Apply ink to each layer to mimic browning. Secure the sauce, cheese, and crust pieces of cardstock together using the E-Z Runner Ultra Strong Dispenser.
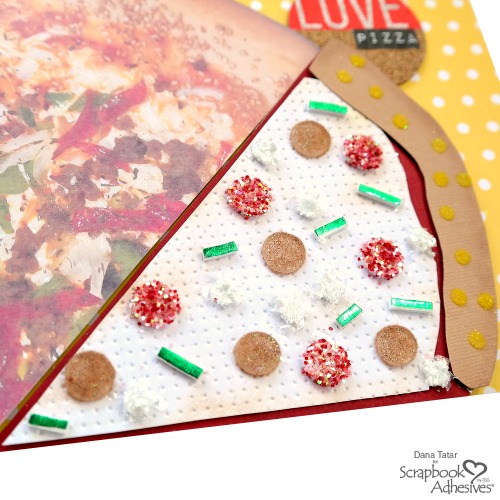
Last, but not least, embellish the pizza slice with “toppings.” Anything goes here. Have fun! I detail what products I used for my pizza slice below.
Sausage: Press 3D Adhesive Dots onto the slice. Remove the top liner square and sprinkle on brown flocking powder. Gently tap to remove the excess powder.
Pepperoni: Apply 3D Foam Circles onto the slice. Remove the top liner and add chunky red glitter to the adhesive. Gently tap to remove the excess glitter.
Onions: Place Small 3D Foam Squares onto the slice. Peel off the liner and sprinkle mica flakes over the adhesive. Gently tap to remove the excess flakes.
Sesame Seeds: I love a flavored crust! Press Micro Adhesive Dots randomly over the crust cardstock. Remove the liner and brush on yellow flocking powder. Gently tap to remove the excess powder.
Assembling the Layout
Select patterned papers for the base of the layout. I chose fun prints from the Photo Play Paper No Pun Intended (They had me at pizza print patterned paper!) and Tulla and Norbert collections. I printed a photo of my homemade pizza on an 8.5×11 inch piece of photo paper. Then, I cut the pizza photo down to about a 7 inch circle and trimmed away some of the bottom edge. I used the E-Z Runner Ultra Dispenser to secure a 4-inch pizza print and 1 inch red print to the base yellow dot patterned paper. Once I had the base complete, I attached the pizza photo and pizza slice embellishment to the page using Crafty Foam Tape.
To play up the circle design theme, I added a cork circle sticker to the bottom half of the page for a fun title spot. Small letter stickers were perfect on top of the cork circle to finish the title.
Finishing Touches
I used Micro Adhesive Dots to attach a strip of ricrac ribbon across the top of the layout to cover the seam of my patterned papers. Then, I created a journaling spot using a blank tag, another cork circle sticker, a cardstock sentiment sticker and a shiny gold bow. I purposely selected embellishments that were circle or triangle shaped to help emphasize the pizza shaped theme.
It is hard to say what is more fun, making a fresh pizza, or creating a pizza themed scrapbook layout! There are some toppings that will never make it onto my pizza; mushrooms, olives, and anchovies. I do, however, love the somewhat controversial topping of pineapple! I’d love to hear what you like on your pizza. Leave me a comment below, or better yet, create your own pizza embellishment and share it with us on Facebook or Instagram! ~Dana Tatar