You are in our US store • Switch to Europe store

Foiled Rainbow Layout

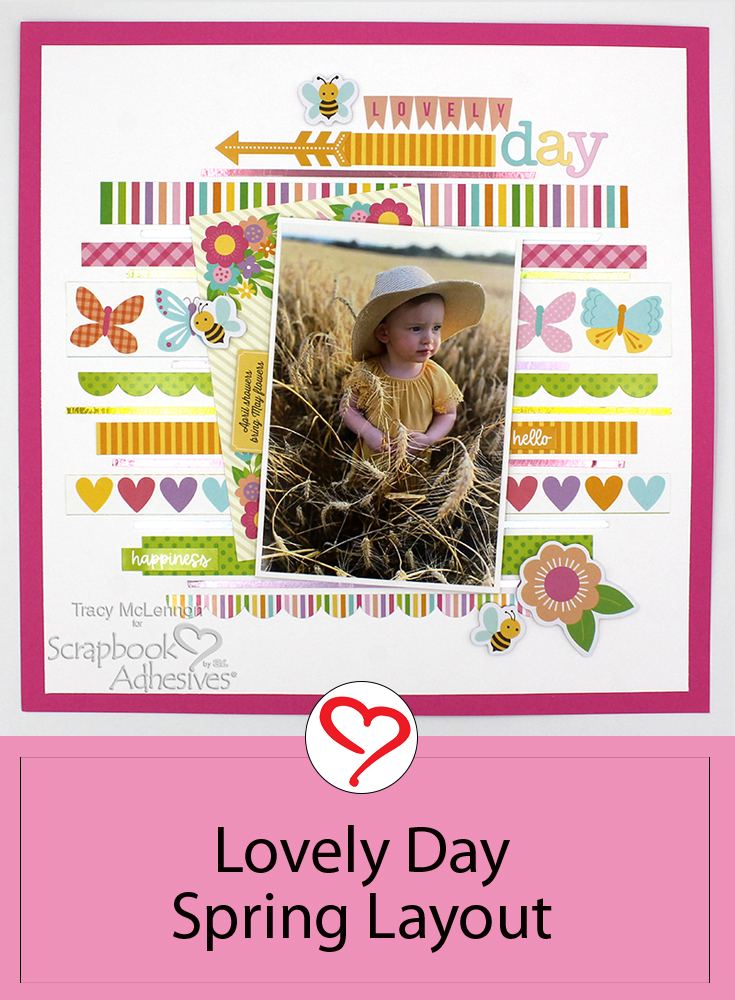
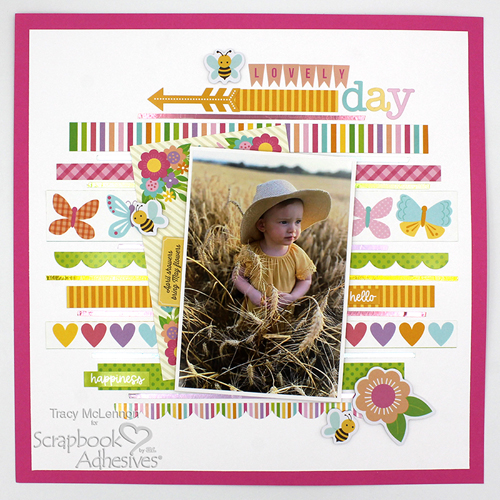
Hello scrappy friends! Tracy here and today I have Foiled Rainbow Layout to share with you. I love creating with bright and beautiful colors. Here are all of the details on how I created this scrapbook layout.

Foiled Rainbow Layout by Tracy McLennon for Scrapbook Adhesives by 3L

Let’s Get Crafting!

White cardstock is the background for this Foiled Rainbow Layout, and I added the strip of green patterned paper up the right side of the layout using the E-Z Runner® Ultra Strong Refillable Dispenser.

Foiled Rainbow Layout by Tracy McLennon for Scrapbook Adhesives by 3L

Mat the cropped photo in white cardstock using the E-Z Runner® Ultra Strong Refillable Dispenser. Add strips of patterned paper to the background border using the E-Z Runner® Ultra Strong Refillable Dispenser. Add the matted photo and the larger patterned mat to the Foiled Rainbow Layout using Crafty Foam Tape Black.

Foiled Rainbow Layout by Tracy McLennon for Scrapbook Adhesives by 3L

Use a circle template to start placing the 3D Foam Circles Black Mix on either side of the border.

Foiled Rainbow Layout by Tracy McLennon for Scrapbook Adhesives by 3L

I chose 5 colors of foil from Metallic Transfer Foil Sheets Variety Colors. Remove the backing from one set of colours first. Repeat the foiling steps until all of the 3D Foam Circles Black Mix are covered.

Foiled Rainbow Layout by Tracy McLennon for Scrapbook Adhesives by 3L

I love how all of the Metallic Transfer Foil Sheets Variety Colors pop off of this layout.

Foiled Rainbow Layout by Tracy McLennon for Scrapbook Adhesives by 3L

The next step for the Foiled Rainbow Layout is to add all of the fabulous embellishments around the layout from this beautiful collection.

Foiled Rainbow Layout by Tracy McLennon for Scrapbook Adhesives by 3L

Thanks so much for stopping by!
Tracy

Creative Time: 45 mins
Skill Level: Intermediate

Materials Needed:
Scrapbook Adhesives by 3L®
E-Z Runner® Ultra Strong Refillable Dispenser
Crafty Foam Tape Black
3D Foam Circles Black Mix
Metallic Transfer Foil Sheets Variety Colors

Other: Bo Bunny Green Patterned Cardstock; Vicki Boutin Color Study Collection; White Cardstock

Save to Pinterest!

Foiled Rainbow Layout by Tracy McLennon for Scrapbook Adhesives by 3L Pinterest

Visit our Website and Blog!
Sign up for our Newsletter so you never miss a contest or giveaway!

instagram purple icon facebook icon purple pinterest purple icon twitter purple icon YouTube icon blog subscription purple icon

Christmas Tree Shaped Cards

Hi, everyone! Can you believe Christmas is just a few months away? Teri here to help you get a start on your holiday cardmaking by showing you how to make some super easy, super cute Christmas Tree Shaped Cards!

Christmas Tree Shaped Cards by Teri Anderson for Scrapbook Adhesives by 3L

These Christmas trees are sure to make all your holiday card recipients smile!

Make the Tree Shaped Card Base

Start by creating a triangle pattern from cardstock. Set the pattern on two pieces of cardstock. Trace the pattern and cut two triangles at one time.

Designer’s Tip: If you have a die-cutting machine and triangle dies, skip the pattern and use your dies to cut two triangles out.

Christmas Tree Shaped Cards by Teri Anderson for Scrapbook Adhesives by 3L

Adhere your triangles together to make a tree card. Be sure to fold the bottom panel where you’ve not put adhesive on it so you can open your card up and write a message inside.

Christmas Tree Shaped Cards by Teri Anderson for Scrapbook Adhesives by 3L

Blend green dye ink onto your card front and splatter a few small drops of water onto your cards. Use a paper towel to remove any excess water. Let the water and ink dry.

Design the Tree Shaped Cards

Place 3D Foam Strips across your card. Trim the excess. Next, mount a small 3D Foam Star at the top. If any portion of the backside portion of your star is not on the card, apply a little foam on it as well. This will keep that back portion from sticking to anything.

Christmas Tree Shaped Cards by Teri Anderson for Scrapbook Adhesives by 3L

Wear Your Adhesive on the Outside with 3D Foam Elements

Burnish a piece of bronze foil from the Metallic Transfer Foil Sheets in Nature onto the 3D Foam pieces. Remember to face the color side to you to rub the color into the pieces. Missed areas can be reapplied with the foil.

Christmas Tree Shaped Cards by Teri Anderson for Scrapbook Adhesives by 3L

Finishing Touches of the Tree Shaped Cards

Decorate your tree cards by randomly affixing buttons onto them with the Adhesive Dots Medium Ultra Thin. Want your card to have a more whimsical look? Add some twine to one…or several of them!

Christmas Tree Shaped Cards by Teri Anderson for Scrapbook Adhesives by 3L

I hope you are inspired by today’s Christmas Tree Shaped Cards tutorial. So get started on making your holiday cards. Thanks so much for stopping by today.

Happy Creating!

Teri Anderson

Creative Time: 60 mins
Skill Level: Intermediate

Materials Needed:
Scrapbook Adhesives by 3L®

E-Z Dots® Permanent Refillable Dispenser

3D Foam Strips and 3D Foam Stars

Adhesive Dots Medium Ultra Thin

Metallic Transfer Foil Sheets Nature Colors

Other: Cardstock: Neenah; Ink: Catherine Pooler (Green, Light Green); Twine: Lawn Fawn; Buttons

Save to Pinterest!

Christmas Tree Shaped Cards by Teri Anderson for Scrapbook Adhesives by 3L Pinterest

Visit our Website and Blog!
Sign up for our Newsletter so you never miss a contest or giveaway!

instagram purple icon facebook icon purple pinterest purple icon twitter purple icon YouTube icon blog subscription purple icon

Textured Celebrate You Card

Hello everyone, Yvonne here. Today is World Cardmaking. We have such a wonderful hobby bringing smiles to many who receive our creative work. Not only did I make this Textured Celebrate You Card for YOU but also consider it as a virtual hug!

Textured Celebrate You Card by Yvonne van de Grijp for Scrapbook Adhesives by 3L

I would love to share how I made the card, wanna join me?

Celebrate You Card Panel

First, apply an Adhesive Sheet 4×6 inch on the back of a white card panel. My cardstock was slightly larger and as a result, I added an extra piece of Adhesive Sheets 4×6 inch to cover the missed area. Designer’s Note: use the edge of a bone folder to rub the adhesive sheet for extra security to the cardstock.

Cut a wavy border using a pair of scissors on the right side of the panel. 

Carefully pull the white liner down about an inch and place strands of embroidery floss horizontally over the sticky area as pictured. Repeat until the panel is covered and cut off the excess embroidery floss on the wavy side.

Textured Celebrate You Card by Yvonne van de Grijp for Scrapbook Adhesives by 3L

Card Layers

To create the card base for the Celebrate You Card, mat both the card panel and a lilac card layer using the E-Z Runner® Permanent Strips Refillable Dispenser. Then adhere the layered panel onto a white card base.

Embellishing

For dimension, I adhered a window shape to the card front using Crafty Foam Tape 108ft which I cut into small strips to hide behind the shape. If I had the 3D Foam Strips in Black which are 1/8″ in width, then I would use them.

Textured Celebrate You Card by Yvonne van de Grijp for Scrapbook Adhesives by 3L

Voilá, the Textured Celebrate You Card is ready! Wishing you happy crafting and don’t forget to celebrate your cardmaking talent today!

Yvonne van de Grijp

Textured Celebrate You Card by Yvonne van de Grijp for Scrapbook Adhesives by 3L

Creative Time: 60 minutes

Skill Level: Intermediate

Materials needed:

Scrapbook Adhesives by 3L®:

E-Z Runner® Permanent Strips Refillable Dispenser

Adhesive Sheets 4×6 inch

Crafty Foam Tape 108ft

Other: Patterned Paper: Mintay Papers (Dreamer Collection); Sticker: Tim Holtz® idea-ology® (Label Stickers); White and Lilac Cardstock; Embroidery Floss; Paper Trimmer; Scissors

Save to Pinterest!

Textured Celebrate You Card by Yvonne van de Grijp for Scrapbook Adhesives by 3L Pinterest

Visit our Website and Blog!
Sign up for our Newsletter so you never miss a contest or giveaway!

instagram purple icon facebook icon purple pinterest purple icon twitter purple icon YouTube icon blog subscription purple icon

Fall Cut File Scrapbook Layout

Happy Fall Y’all! Ali here today and I am excited to share this Fall Cut File Scrapbook Layout with you featuring the Crafty Foam Tape White 108ft. to bring dimension and interest. Fall is my favorite season, I just love the change of colors.

Fall Cut File Scrapbook Layout by Ali Skifton for Scrapbook Adhesives by 3L

Fall Back Story

These pictures were taken in our yard and I love that we have three big trees that always turn bright orange for the fall season. I used the new fall collection Cider & Donuts from Simple Stories to back this title cut file.

Fall Cut File Scrapbook Layout by Ali Skifton for Scrapbook Adhesives by 3L

Fall Cut File Details

I really enjoy incorporating cut files into my layouts. They add a playful touch and create a bold impression. To give my cut files a bit of depth, I always reach for my trusty Crafty Foam Tape White 108ft. It’s by far the best foam tape I’ve ever used. The fact that it can be cut to any length is a huge plus, especially when dealing with larger spaces.

Fall Cut File Scrapbook Layout by Ali Skifton for Scrapbook Adhesives by 3L

Thanks for visiting, and I wish you a wonderful Fall season!

Ali Skifton (FunAdventuresWithAli)

Creative Time: 120 mins
Skill Level: Intermediate

Materials Needed:
Scrapbook Adhesives by 3L®

E-Z Runner® Grand Refillable Dispenser

3D Foam Squares White Mix

Crafty Foam Tape White 108ft

Other: Patterned Papers and Ephemera: Simple Stories (Cider & Donuts Collection); Flair: Scrappin Happy Studio; Cut File

Click Preferred Retailers List

Save to Pinterest!

Fall Cut File Scrapbook Layout by Ali Skifton for Scrapbook Adhesives by 3L Pinterest

Visit our Website and Blog!
Sign up for our Newsletter so you never miss a contest or giveaway!

instagram purple icon facebook icon purple pinterest purple icon twitter purple icon YouTube icon blog subscription purple icon

Spooky 31 Halloween Tag Duo

Hi, Lara here today! I’m continuing my Halloween-themed tags from the last time I introduced Spooky Halloween Gift Tags, to this Spooky 31 Halloween Tag Duo. Grabbing items from my paper crafting stash, I pull this duo together. Let me show you how!

Spooky 31 Halloween Tag Duo by Lara Scott for Scrapbook Adhesives by 3L

Spooky Pumpkin Tag

For this Spooky Pumpkin Tag, cover a shipping tag with black and white patterned paper. Next, I added a pumpkin from a Halloween paper line I designed and adhered it using the 3D Foam Strips Black. Place a few gems from Buttons Galore and More with the Dual Tip Glue Pen to the pumpkin eyes. The sentiment was some letters stickers to spell out Spooky. Lastly, thread some seam binding through the tag opening, and for interest I tied several knots into them.

Spooky 31 Halloween Tag Duo by Lara Scott for Scrapbook Adhesives by 3L

31 Haunted House Tag

The 31 Haunted House Tag was covered with orange stars patterned paper. The focal point is the haunted house die-cut shape that was secured with the 3D Foam Strips Black. The 31 numbers are stickers that I have had for years and are perfect for this tag. Attach a gold gem on each side of the number 31 with the Dual Tip Glue Pen. To finish off, tie a black fringe trim, and edge the tag with a black pen.

Spooky 31 Halloween Tag Duo by Lara Scott for Scrapbook Adhesives by 3L

Thanks for Visiting!
Lara Scott

Spooky 31 Halloween Tag Duo by Lara Scott for Scrapbook Adhesives by 3L

Creative Time: 20 mins
Skill Level: Beginner

Materials Needed:
Scrapbook Adhesives by 3L®

E-Z Runner® Grand Ultra Strong Refillable Dispenser

3D Foam Strips Black

HomeHobby™ by 3L

Dual Tip Glue Pen

Other: Spooky Stickers: Heidi Swapp; Pumpkin Shape: Lara Scott Design; Gold Half Pearls and Gems: Buttons Galore and More; Haunted House Die Cut Shape; Black Yarn; White Seam Binding; Orange Star Patterned Paper and Black & White Plaid Patterned Paper; Black Number Stickers

Click Preferred Retailers List

Save to Pinterest!

Spooky 31 Halloween Tag Duo by Lara Scott for Scrapbook Adhesives by 3L Pinterest

Visit our Website and Blog!
Sign up for our Newsletter so you never miss a contest or giveaway!

instagram purple icon facebook icon purple pinterest purple icon twitter purple icon YouTube icon blog subscription purple icon

Foiled BOO! Halloween Card

Hi, Judy here today to share a BOO! Halloween card. I had fun using Metallic Transfer Foil Sheets Nature Colors and Metallic Transfer Foil Sheets Celebrate Colors with E-Z Squares® Refillable Dispenser to make a collage of foil from which to cut letters for BOO!. And look at those cat’s eyes with some holographic foil to make them glow!

Foiled BOO! Halloween Card by Judy Hayes for Scrapbook Adhesives by 3L

BOO! Card Base Layers

For the card, cut gray cardstock 9 x 6.5 inches, score, and fold to form a 4.5 x 6.5 inch card. Lightly rub Distress Black Soot Ink around the edges.

Cut orange cardstock 4 x 5.875 inches and lightly rub Distress Black Soot around the edges.

From gray cardstock, cut a 3.875 x 5.75-inch rectangle.

Background

Apply Distress Black Soot ink with a foam applicator to rub darker ink around the edges of the gray cardstock layer. Then blend the ink across the entire piece. Use a heat gun to dry the ink.

Foiled BOO! Halloween Card by Judy Hayes for Scrapbook Adhesives by 3L

Ink web stamp with Distress Picket Fence ink and stamp on the top right corner. Also, stamp a small web at the bottom right corner.

Foiled BOO! Halloween Card by Judy Hayes for Scrapbook Adhesives by 3L

Adhere the gray piece to the orange mat using the E-Z Dots® Permanent Refillable Dispenser. Then attach it to the card front with the same adhesive.

Die Cut Pieces

Foiled BOO! Halloween Card by Judy Hayes for Scrapbook Adhesives by 3L

Die-cut two cats and three bats from a piece of black cardstock. I used dies and a die-cutting machine.

Foiled BOO! Halloween Card by Judy Hayes for Scrapbook Adhesives by 3L

Place the cats facing down on scrap paper and apply the E-Z Dots® Permanent Refillable Dispenser over the heads and eyes. Excess adhesive dots will stick to scrap paper. Cut tiny pieces of gold foil from Metallic Transfer Foil Sheets Celebrate Colors to fit over each cat. Secure the foil to the back of each cat’s head with the gold side down to show through the eyes.

Foiled BOO! Halloween Card by Judy Hayes for Scrapbook Adhesives by 3L

Cut 3D Foam Squares Black Mix to fit on the back of each cat’s head and body. Apply Adhesive Dots Micro to the back of the bats’ wings.

Foiled BOO! Halloween Card by Judy Hayes for Scrapbook Adhesives by 3L

Stamp Greeting

On a scrap of gray cardstock, stamp the greeting using Versafine Black Onyx ink, cover with clear embossing powder and heat emboss with a heat tool. Cut the greeting apart into two strips.

Foiled BOO! Halloween Card by Judy Hayes for Scrapbook Adhesives by 3L

Cut pieces of 3D Foam Creative Sheets Small Black to fit the back of each verse strip, peel the liner, and attach them to the back.

Metallic Foil Collage

Cut a piece of black cardstock large enough to fit all letter dies for the word “BOO!” Randomly apply the E-Z Squares® Refillable Dispenser across it. Press gold foil from Metallic Transfer Foil Sheets Celebrate Colors over each square. Then add more adhesive squares and press orange, brown, gold, and black foils from Metallic Transfer Foil Sheets Nature Colors. Overlap some colors and repeat colors to fill in spaces as desired.

Foiled BOO! Halloween Card by Judy Hayes for Scrapbook Adhesives by 3L

Cover the entire foiled piece with black embossing powder, remove excess but allow some powder to cling to the foils, and heat emboss with a heat tool. The heat tool will melt the embossing powder and create a texture in the foils.

Foiled BOO! Halloween Card by Judy Hayes for Scrapbook Adhesives by 3L

Cut a piece of 3D Foam Creative Sheets Small Black the same size as the foiled piece, peel the liner, and apply to the back.

Cut Foil Letters

Place the letter dies “B, O O !” on the foiled piece, tape it in place, and run it through a die-cutting machine. Designer Tip: If you want to use the negative space for another project, place them in a line or allow space to cut them apart.

Foiled BOO! Halloween Card by Judy Hayes for Scrapbook Adhesives by 3L

Carefully peel each letter off and place them on a scrap of release paper or a nonstick craft mat. Carefully remove the centers of “B” and “O” and put them back in place in cut-out (if you want to use them for another project).

Attaching the Pieces to the Card

Arrange pieces on the card to determine spacing.

Foiled BOO! Halloween Card by Judy Hayes for Scrapbook Adhesives by 3L

Peel liners from verse strips and place them near the bottom left corner of the card. Lightly place BOO! across card. If lightly placed, letters can be moved as needed. Press firmly in place once letters are placed as desired. Remove liners from the back of the sitting cat and secure it in the bottom right corner.

Foiled BOO! Halloween Card by Judy Hayes for Scrapbook Adhesives by 3L

Remove liners from the standing cat and position it at the top of the “BOO!” Next, peel the liners from the bats and place them at the top of the card…and it’s finished!

Foiled BOO! Halloween Card by Judy Hayes for Scrapbook Adhesives by 3L

BOO! Happy Halloween!

Thanks for visiting!
Judy Hayes

Creative Time: 45 mins
Skill Level: Advanced

Materials Needed:
Scrapbook Adhesives by 3L®

E-Z Squares® Refillable Dispenser and E-Z Dots® Permanent Refillable Dispenser

3D Foam Squares Black Mix and 3D Foam Creative Sheets Small Black

Adhesive Dots Micro

Metallic Transfer Foil Sheets Nature Colors and Metallic Transfer Foil Sheets Celebrate Colors

Other: Stamp: Stampers Anonymous (Tim Holtz Unraveled); Ink: Imagine Crafts/Tsukineko (Versafine Onyx Black), Ranger Ink (Distress Black Soot, Distress Picket Fence); Embossing Powder: Ranger Ink (Clear, Black); Craft Dies: Sizzix (Tim Holtz Toil & Trouble, Alphanumeric Bulletin); Medium Gray, Orange + Black Cardstock

Click Preferred Retailers List

Save to Pinterest!

Foiled BOO! Halloween Card by Judy Hayes for Scrapbook Adhesives by 3L Pinterest

Visit our Website and Blog!
Sign up for our Newsletter so you never miss a contest or giveaway!

instagram purple icon facebook icon purple pinterest purple icon twitter purple icon YouTube icon blog subscription purple icon

Halloween Rosette Layout

Bring texture and color with this FUN Treat or Treat Halloween Rosette Layout! Hi, Margie here today to show you my process. Try this rosette idea in your next project.

Halloween Rosette Layout by Margie Higuchi for Scrapbook Adhesives by 3L

Halloween Rosette

Cut four 3.5 x 12-inch patterned paper strips. With the long side facing up on the scoreboard, score every 0.50-inch and accordion fold (starting with a mountain fold).

Next, adhere each end with six Adhesive Lines (place three lines on each side of the mountain) to form a ring. To form the rosette, push the sides to create a 7.5-inch circle and secure it with a 3D Foam Creative Sheet Small White on its back. Set it aside.

Create the Background on the Layout

Using the rosette as my guide, I stenciled my background with two different colors of Interference Inks (Crush Velvet Shimmer + Charcoal Gold Shimmer). In case the stencil shifts, I used the E-Z Dots® Repositionable Refillable Dispenser to secure it. When done, I rub off the dots…simple!

I chose a light green shimmer cardstock to match the shimmer inks. I love how it looks.

To add more depth, I smooshed the charcoal ink on a non-stick craft sheet and added water to it. Then I splattered on the layout with the mixture. When dried, remove the 3D Foam Creative Sheets Small White liner from the back of the rosette and center on the layout.

Add the Details

First, I matted the picture with orange cardstock. Then off-set mat with a patterned paper for a cute look. Next, place a 3D Foam Creative Sheet Small White on the matted photo and adhere it to the rosette. Then create a couple of clusters with elements from the ephemera pack using a combination of 3D Foam Strips and E-Z Runner® Petite Permanent Dots Refillable Dispenser.

Finishing with the Title

Cut the “trick or treat” title from the cover sheet of the Halloween collection and angle cut the end. Use 3D Foam Strips to pop up the candy element on the title. Secure it onto the layout with the E-Z Runner® Petite Permanent Dots Refillable Dispenser. Lastly, randomly add black and orange rhinestones to the layout.

Halloween Rosette Layout by Margie Higuchi for Scrapbook Adhesives by 3L

I hope you enjoyed the Halloween Rosette Layout. Give a rosette element to your next paper crafting project a try.

Happy Creative Day to You!
Margie Higuchi

Creative Time: 45 mins
Skill Level: Intermediate

Materials Needed:
Scrapbook Adhesives by 3L®

E-Z Dots® Repositionable Refillable Dispenser, E-Z Runner® Petite Permanent Dots Refillable Dispenser

E-Z Runner® Grand Permanent Dots Refillable Dispenser

3D Foam Creative Sheets Small White and 3D Foam Strips

Adhesive Lines

Other: Patterned Papers, Ephemera + Stencil: KNC Essentials (Spooky Collection); Embellishment: Doodlebug Design (Black + Orange Rhinestones); Ink: Cloud 9 with Lisa Horton (Interference Inks in Crushed Velvet Shimmer + Charcoal Gold Shimmer); Scoring Board + Paper Creaser; Orange, Black + Light Green Shimmer Cardstock

Click Preferred Retailers List

Save to Pinterest!

Halloween Rosette Layout by Margie Higuchi for Scrapbook Adhesives by 3L Pinterest

Visit our Website and Blog!
Sign up for our Newsletter so you never miss a contest or giveaway!
instagram purple icon facebook icon purple pinterest purple icon twitter purple icon YouTube icon blog subscription purple icon

Buzzing By To Say Hi!

Hi, this is Jingle here today with a creative Buzzing By Card that showcases how to create an interesting background on a fun-themed design.

Buzzing By To Say Hi by Jennifer Ingle for Scrapbook Adhesives by 3L

There seems to be a trend of using bees in all kinds of crafting and decor lately, and I am here for it! They truly are quite adorable and the puns, oh, the puns! I don’t know about you, but I am always up for a good pun.

Buzzing By To Say Hi by Jennifer Ingle for Scrapbook Adhesives by 3L

Card Panel Background

For this card, not only are these adorable chubby bees the focal point, I made a bee background using layering stencils. For a bit more interest, I sprayed a layer of shimmer spritz through the wings stencil. It provides such a pretty, shimmery look to the background!

Buzzing By To Say Hi by Jennifer Ingle for Scrapbook Adhesives by 3L

The rest was simple! I centered a die-cut circle with Crafty Foam Tape White 108ft. Next, use the Thin 3D Foam Squares Black Mix to adhere the bees and the sentiment strip to the card. This adds just a bit of dimension! Lastly, the Crafty Foam Tape Black 108ft was the perfect choice for adhering the completed panel to a black card base. It gives just a bit of lift and a whole lot of fun!

I hope this has inspired you to buzz around with some bee-themed supplies along with your favorite foam tapes!

Thanks for buzzing by!
Jennifer Ingle (aka Jingle)

Creative Time: 20 mins
Skill Level: Beginner

Materials Needed:
Scrapbook Adhesives by 3L®

Thin 3D Foam Squares Black Mix

Crafty Foam Tape White 108ft. and Crafty Foam Tape Black 108ft.,

Other: Gem Stones: Spellbinders; Stamps: Honey Bee Stamps (Babees); Sentiment (MFT Stamps) Ink: black, yellow; Shimmer Spritz: Tsukineko; Craft Dies: Waffle Flower Crafts (Nested Circles); Black, White, Grey Cardstock: MFT Stamps; Layering Stencils: Rabbit Hole Designs (What’s the Buzz 3 Layers)

Click Preferred Retailers List

Save to Pinterest!

Buzzing By To Say Hi by Jennifer Ingle for Scrapbook Adhesives by 3L Pinterest

Visit our Website and Blog!
Sign up for our Newsletter so you never miss a contest or giveaway!

instagram purple icon facebook icon purple pinterest purple icon twitter purple icon YouTube icon blog subscription purple icon

Halloween Pumpkin Shaped Cards

Hi, everyone! Getting ready for Halloween? Teri here to show you to make some super cute and easy shaped pumpkin cards!

Halloween Pumpkin Shaped Cards by Teri Anderson for Scrapbook Adhesives by 3L

Pumpkin Shaped Card Base

Start by cutting two large circles from white cardstock. Take one of the circles and fold it a little way down from the top. Place temporary adhesive above the fold line.

Halloween Pumpkin Shaped Cards by Teri Anderson for Scrapbook Adhesives by 3L

Set the two circles on top of each other. Use your scissors to cut a little off the bottom of the card. Remove the back circle. Rub off the temporary adhesive with your finger. Take the top circle and blend orange ink onto it. Once you do this, turn your circles into your card base by placing permanent adhesive above the score line on the second circle and mounting it to the orange circle.

Embellish the Front

Cut a mouth, triangle eyes, and a stem from cardstock. They don’t have to be perfect. In fact, the more imperfect they are, the more whimsical your final card will be.

Blend black ink onto the pumpkin’s eyes and mouth. If the small pieces shift, use a little temporary adhesive underneath them such as the E-Z Dots® Repositionable Refillable Dispenser. After you’re done inking, just rub the adhesive off – so easy and no damage to your surface. Lastly, blend green ink onto your stem.

Detailing the Pumpkin Shaped Card

Adhere the face elements onto your pumpkin. Use a small circle from the 3D Foam Circle White Mix (or even a 3D Foam Squares White Regular) to place the stem at the top of your card. Be sure to let part of the stem hang off the card.

Stamp a sentiment on a strip of white cardstock. Adhere it to your card. Tie jute around the stem, using an Adhesive Dots Micro to hold the bow in place.

Change It Up a Little

You can create all kinds of shaped pumpkin cards with different sentiments. You can also use wiggle eyes instead of ones made from cardstock.

Halloween Pumpkin Shaped Cards by Teri Anderson for Scrapbook Adhesives by 3L

I hope my tutorial inspired you today. So let’s make some Pumpkin Shaped Cards!

Thanks so much for stopping by today!

Happy Creating!

Teri Anderson

Creative Time: 45 minutes

Skill Level: Beginner

Materials needed:

Scrapbook Adhesives by 3L®

E-Z Runner® Permanent Strips Refillable Dispenser, E-Z Runner® Petite Dots Refillable Dispenser, and E-Z Dots® Repositionable Refillable Dispenser

3D Foam Circles White Mix

Adhesive Dots Micro

Other: Cardstock: Neenah; Stamps: Lawn Fawn (Pick of the Patch Stamp Set); Dies: Waffle Flower (Circles); Inks: Ranger Ink (Black), Catherine Pooler (Orange, Green); Wiggle Eyes: Darice; Jute: Lawn Fawn

Save to Pinterest!

Halloween Pumpkin Shaped Cards by Teri Anderson for Scrapbook Adhesives by 3L Pinterest

Visit our Website and Blog!
Sign up for our Newsletter so you never miss a contest or giveaway!

instagram purple icon facebook icon purple pinterest purple icon twitter purple icon YouTube icon blog subscription purple icon

Happy Day Layered Card

Hello, crafty cardmaking friends! Tracy here, and today I have a simple Happy Day Layered Card to share. Here are all of the crafty details.

Happy Day Layered Card by Tracy McLennon for Scrapbook Adhesives by 3L

Happy Day Focal Point Design

First I chose the pink chipboard frame from the collection and added yellow cardstock behind it. This is the base of the Happy Day Layered Card. Then I found that one of the 3D Foam Circle Frames White fits inside the chipboard frame. To make it sparkle, I decided to foil it with the silver foil from the Metallic Transfer Foil Sheets Celebrate pack. Simply remove the top liner of the 3D Foam Circle Frames White, place the silver foil (color side facing you) over the exposed adhesive and gently rub to transfer the color.

Happy Day Layered Card by Tracy McLennon for Scrapbook Adhesives by 3L

Card Layers

Cut a piece of patterned paper to cover the white cardstock card base. Adhere it together using the E-Z Runner® Ultra Strong Refillable Dispenser. Place cardstock stickers on either side of the chipboard frame. Next, I chose the card sentiment sticker and added that to the Happy Day Layered Card front using 3D Foam Squares White Regular Size.

Happy Day Layered Card by Tracy McLennon for Scrapbook Adhesives by 3L

Embellishing the Card Front

Add the self-adhesive chipboard photo corners to the card front. Adhere the layered frame piece to the card base using the E-Z Runner® Ultra Strong Refillable Dispenser.

Happy Day Layered Card by Tracy McLennon for Scrapbook Adhesives by 3L

Thanks for stopping by!
Tracy

Creative Time: 30 minutes
Skill Level: Beginner

Materials needed:
Scrapbook Adhesives by 3L®
E-Z Runner® Ultra Strong Refillable Dispenser
Metallic Transfer Foil Sheets Celebrate Colors
3D Foam Squares White Regular Size
3D Foam Circle Frames White

Other: Patterned Papers, Ephemera, and Stickers: Paige Evans Collection; White and Yellow Cardstock

Save to Pinterest!

Happy Day Layered Card by Tracy McLennon for Scrapbook Adhesives by 3L Pinterest

Visit our Website and Blog!
Sign up for our Newsletter so you never miss a contest or giveaway!

instagram purple icon facebook icon purple pinterest purple icon twitter purple icon YouTube icon blog subscription purple icon