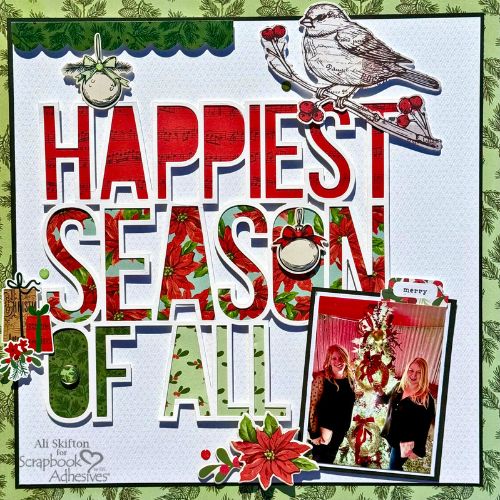
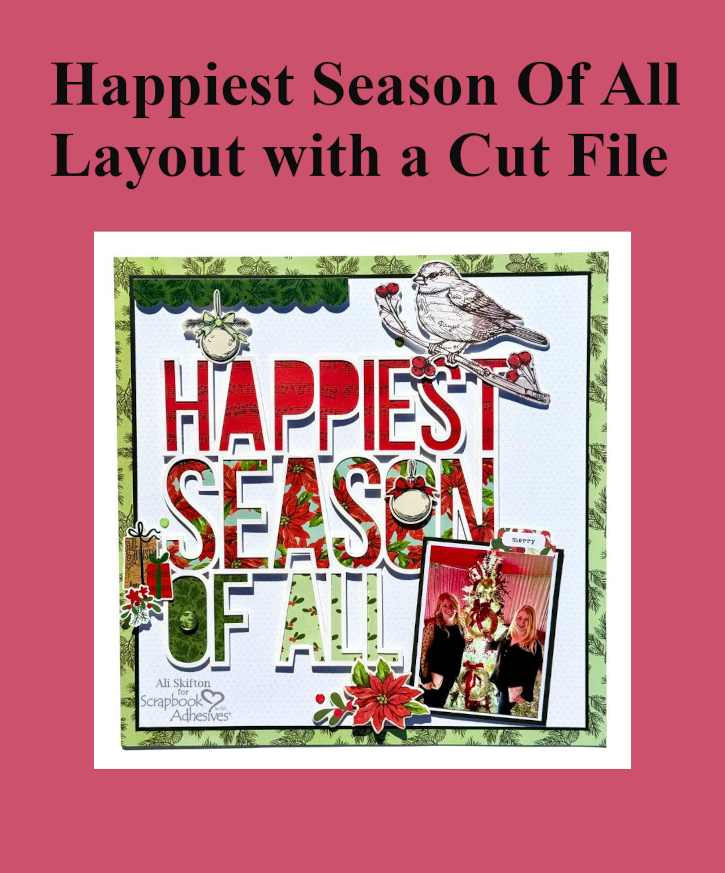
Hi, Ali (FunAdventuresWithAli) here today! I’m so excited to share a festive Christmas layout with you today—Happiest Season of All. This page was such a joy to create, and I love how perfectly everything came together.
Happiest Season Of All Story
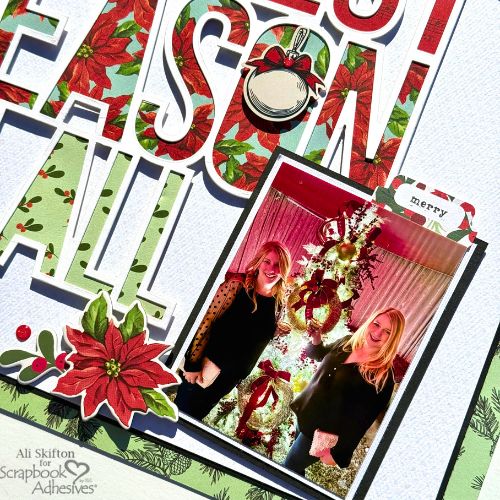
The picture I chose is one of my absolute favorites. Last Christmas, Anne and I visited the Mariah Carey Bar in Chicago, and it was every bit as magical as you’d expect—sparkling lights, gorgeous decorations, and total holiday vibes in every corner. We took this photo in front of the most beautiful Christmas tree, and it instantly brought back all the joy and fun of that weekend. It really was the perfect kickoff to the holiday season.
Building the Christmas Layout
To build the foundation of my layout, I used my E-Z Runner® Grand Refillable Dispenser to double-mat the background. I love how a double mat gives the page structure and a touch of sophistication. After that, I adhered the title cut file using foam strips, then moved on to my favorite part—embellishing!
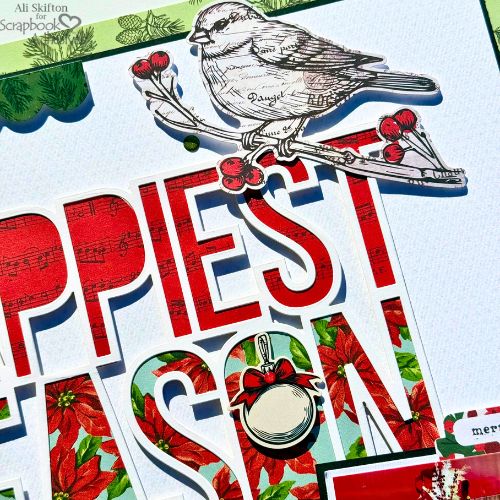
For the title, I used a cut file with skinny letters, which worked beautifully with my 3D Foam Strips. The foam added just the right amount of dimension, making the title pop without overwhelming the design. I paired the cut file with the new Simple Stories collection, All Wrapped Up. The colors and patterns in this line matched my photo so well that it almost felt meant to be.
I added stickers and ephemera pieces around the layout, using 3D Foam Squares White Mix to give the smaller embellishments some lift. It was especially fun to pop up the tiny ornaments and add enamel dots to the centers of the ribbon bows for an extra festive touch. I also used a mix of foam square sizes along the sticker border to keep everything visually dynamic.
For my photo, I reached for the Crafty Foam Tape in White 54ft. It gave the picture just the right elevation above the title and helped draw the eye directly to the focal point of the page.
All in all, this layout was such a fun and cheerful project—truly capturing the happiest season of all. Thanks so much for stopping by and sharing a little crafty Christmas magic with me. Until next time, happy creating!
Warm Wishes, Ali
Thanks for visiting! Ali Skifton (FunAdventuresWithAli)
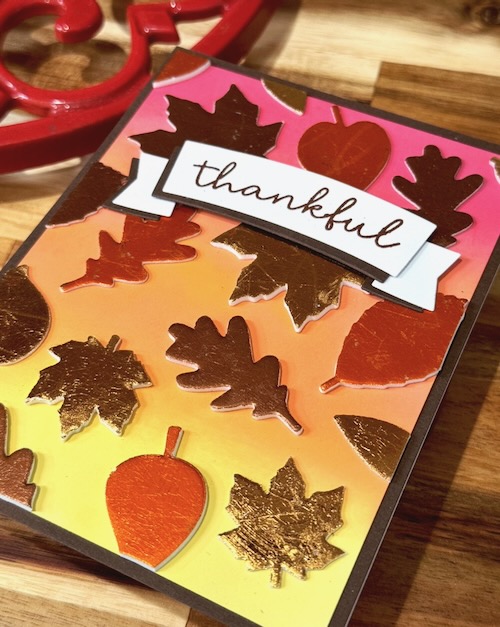
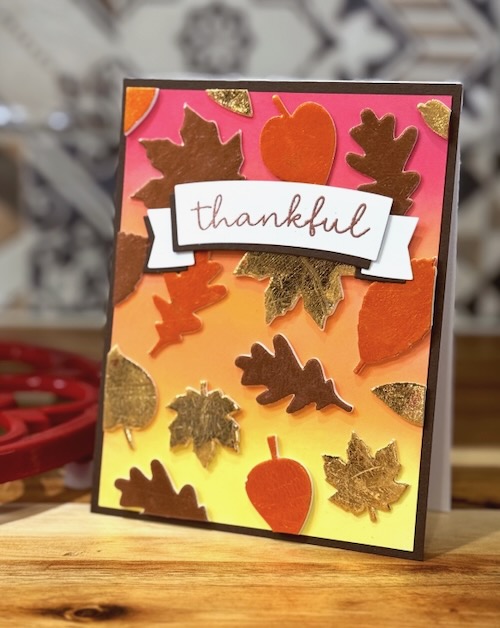
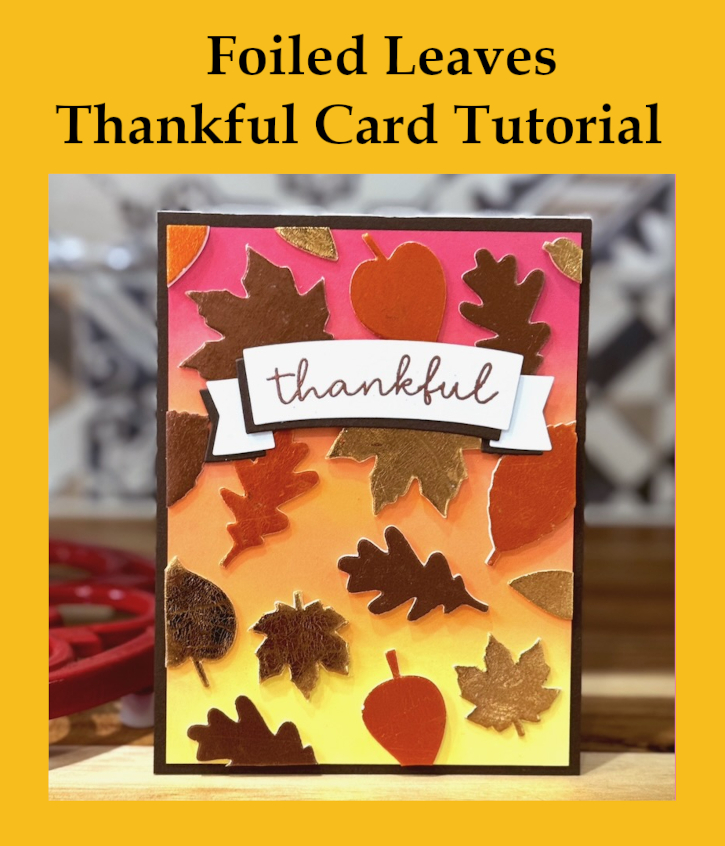
Hello folks, this is Jingle here today with a quick dose of inspiration. Hope you recovered from Thanksgiving if you’re from the United States! The Foiled Leaves Thankful Card I am showing you is really so simple to create. The background is a beautiful ink blending of three Distress Oxide colors for a warm autumn look.
Wear Your Adhesive on the Outside with 3D Foam Leaves
This technique is SO FUN! It’s simple and easy to do…get the kids involved. Randomly place some 3D Foam Leaves on the ink blended panel. One by one, remove the liner and add various foil colors from the Metallic Transfer Foil in Nature Colors for gorgeous autumn leaves look! Remember to place the foil color side facing you and rub to transfer the color to the leaves…that’s it!
And that, my friends, is how you create a fast card that will really WOW the recipient! What is your go-to for quick cards that pack a punch? Leave a comment to let us know!
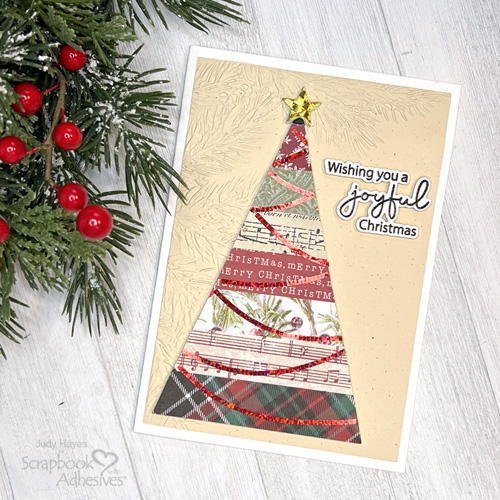
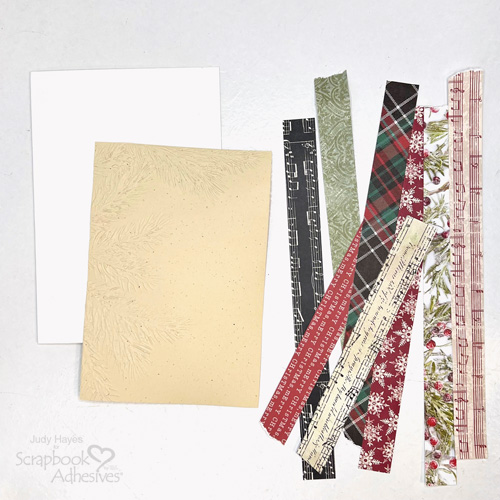
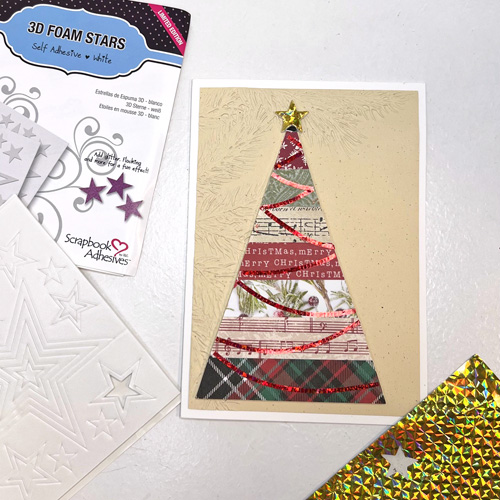
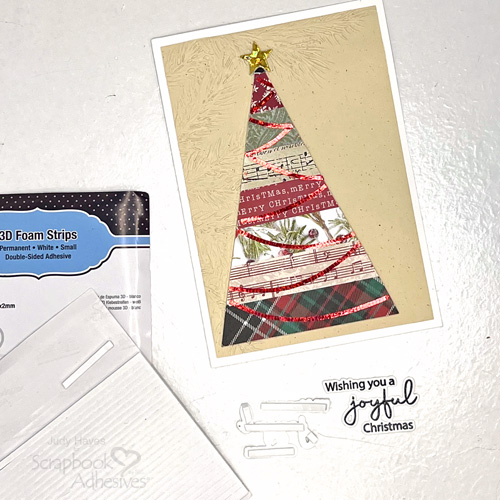
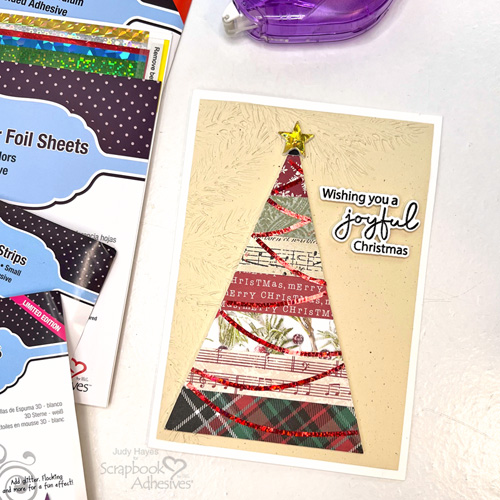
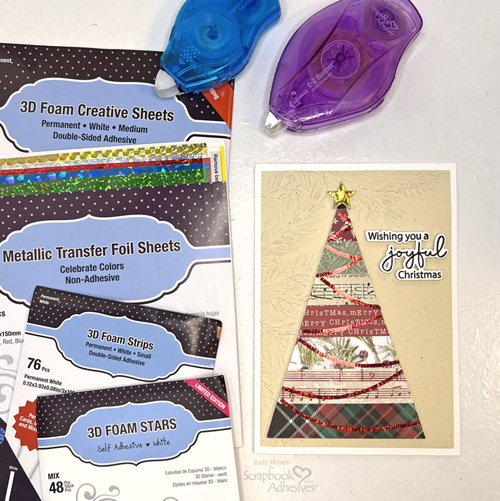
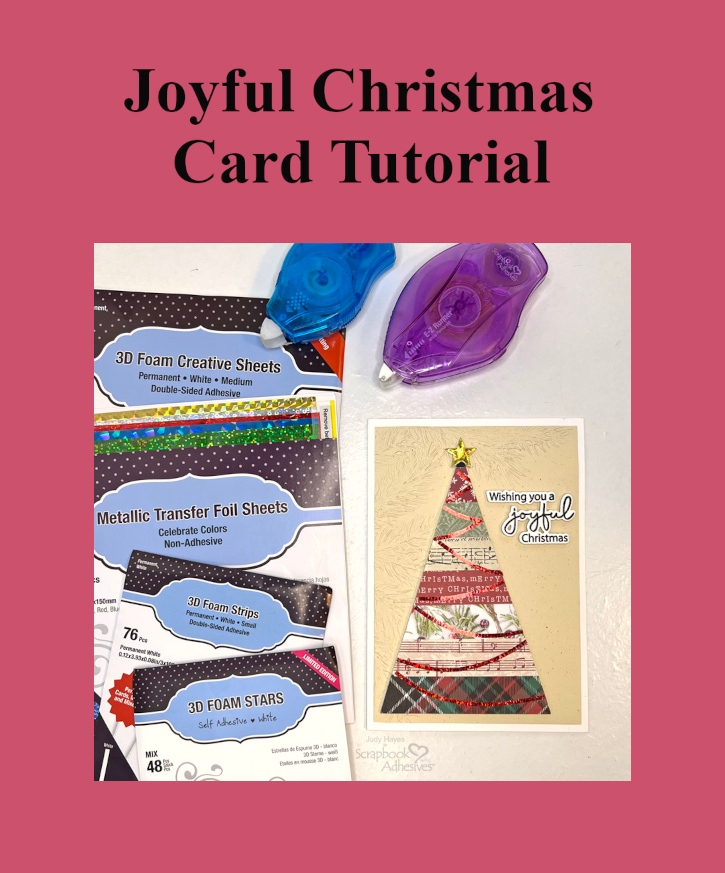
Hi, Judy here today! My inspiration for this Joyful Christmas Card came from a pieced and quilted fabric tree project I saw online. I decided to make something similar by using assorted paper strips to create the tree and added foil garlands and a gold foil star. Read on for all the directions.
Joyful Christmas Card Layers & Strips
Fold a piece of 9 x 6.5″ white cardstock in half to create a 4.5 x 6.5″ card base. Place a 4.25 x 6.25″ rectangle Balsa cardstock in a Pine Branches embossing folder and emboss the design. Adhere both with the E-Z Runner® Micro Refillable Dispenser. Next, for the patterned strips, choose an assortment of eight Christmas theme papers and cut a 0.75 inches wide strip from each one.
Create the Tree Shape
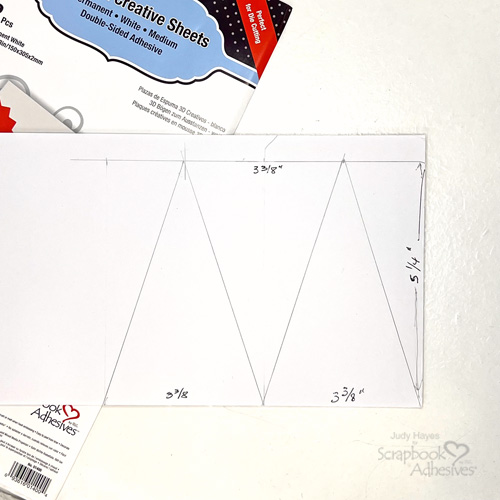
First, I need to create a tree template. On the paper liner side of the 3D Foam Creative Sheets Medium White, draw a 3.375″ wide base + 5.25″ tall triangle (picture shows three triangles to make multiple cards). Cut along the lines.
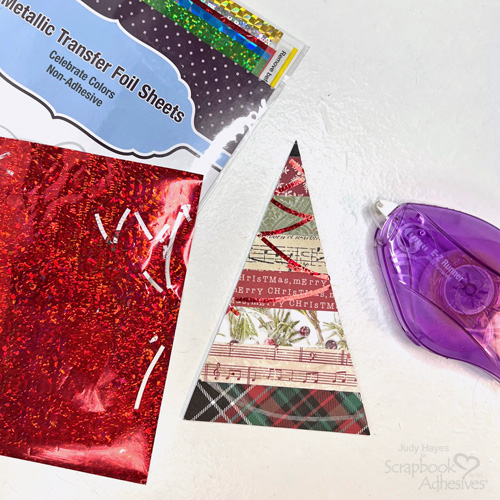
To adhere the strips, start from the triangle base, partially peel the back liner and add a strip of paper. Continue to peel the liner and add more papers until the entire triangle is covered. Flip the triangle and trim off excess.
Wear Your Adhesive on the Outside with the E-Z Runner Micro
To make it shine, cut a piece of red foil from the Metallic Transfer Foil Sheets Celebrate Colors, and press firmly over the lines with the color side facing you to transfer the color. Peel away to reveal the shine! Designer’s Tip: Try practicing to roll the E-Z Runner® Micro Refillable Dispenser on scrap paper first to give confidence in applying such a thin line.
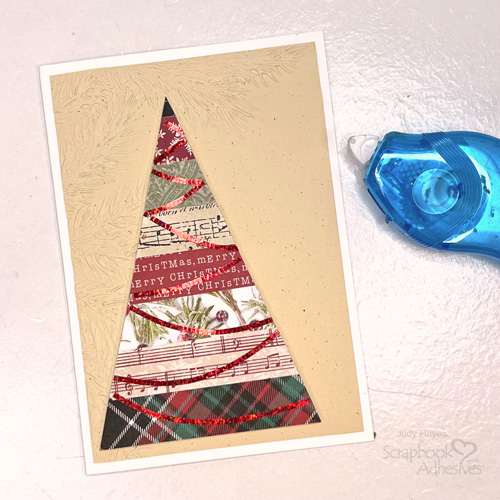
To place the tree onto the card front, peel the liner from the back of tree along the bottom and align the tree on the card towards the left side. Press in place. Completely peel away the liner and press the tree in place.
Adding the Finishing Touches with the Star and Sentiment
Place a small star from the 3D Foam Stars on top of the tree. Repeat the foiling step with a piece of the gold foil from the Metallic Transfer Foil Sheets Celebrate Colors. For the sentiment, stamp the greeting with black ink on a piece of white cardstock and heat emboss with a clear embossing powder. Cut with its coordinating die and adhere with 3D Foam Strips.
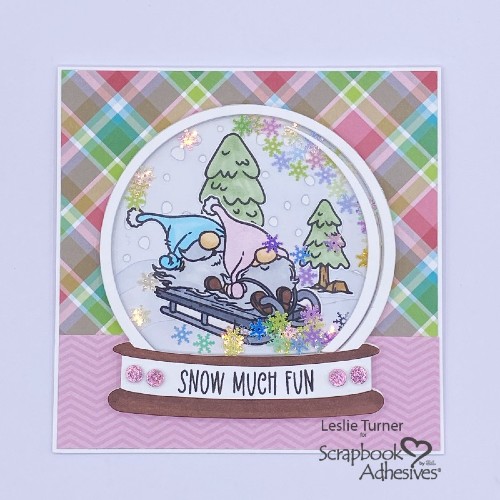
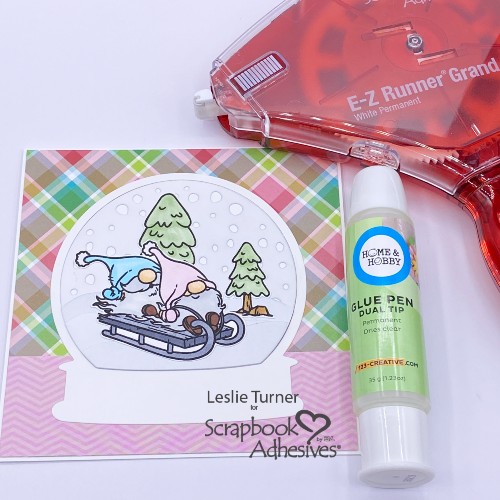
Hey everybody – happy Friday to you! Are you a fan of shaker cards? Which do you like more… to make them or to receive them? For me, a big bold YES to all of the above, lol! I’m a huge fan and I like to make them as much as I like receiving them! Leslie here, sharing a tutorial for creating a Winter/Christmas-themed snowglobe shaker card in non-traditional pastel colors. I used Trinity Stamps dies/stamps and of course, lots of amazing Scrapbook Adhesives products to put it all together! So let’s make a shaker card!
Snowglobe Base & Layers
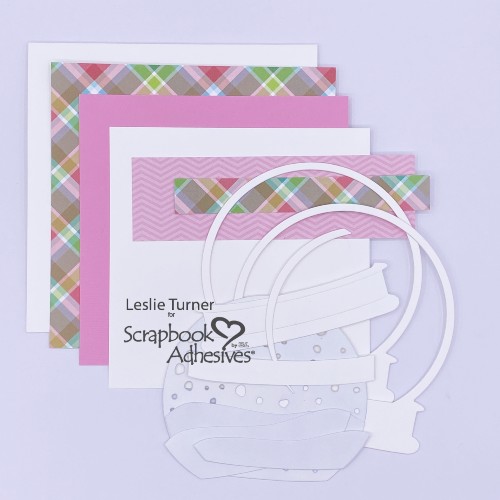
WHITE HEAVYWEIGHT CARDSTOCK: Card base: 5-1/4″ x 10-1/2″, scored at 5-1/4
PATTERNED PAPER: Front layering panel (pastel plaid): 5-1/8″ x 5-1/8″ Bottom strip (pink chevron stripe): 1-1/2″ x 5-1/8″ Embellishing strip (pastel plaid): 5/8″ x 4-5/8″
PINK CARDSTOCK: Inside layering panel: 4-7/8″ x 4-7/8″
WHITE CARDSTOCK: Sentiment panel for inside: 4-3/4″ x 4-3/4″
Snowglobe Pieces
Die cut all the snowglobe pieces from white cardstock using the Trinity Stamps Snowglobe Card dies. 1. Cut two stand pieces and trim the top and bottom off the second one to add as a band with the sentiment. 2. Also cut five of the main snowglobe frame and hang onto three of the snowglobe center pieces. They are not all shown in the photo below. 3. Next, cut the snowflake background and two snowbanks (one slightly higher than the other) from those extra pieces. 4. Use a blending brush to apply very light blue ink to the background and both snowbank pieces. 5. Finally, glue two of the frames together and set aside. Glue two more frames together and set them aside. You’ll have one frame left over.
Adhere Layers
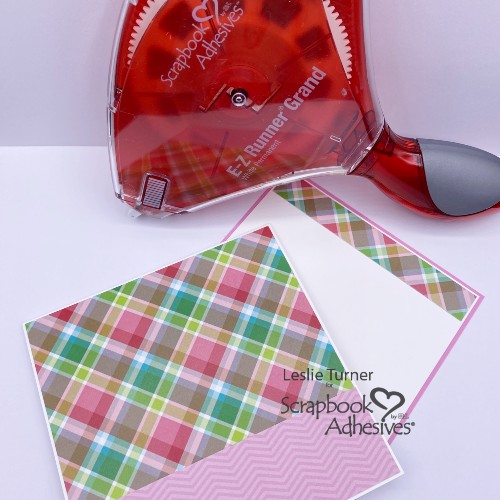
Using the E-Z Runner® Grand Permanent Strips Refillable Dispenser, adhere the pastel plaid panel to the front of the card base. Add the pink chevron stripe across the bottom. Similarly, adhere the pastel plaid embellishing strip to the white inside layering panel, then adhere that to the pink cardstock panel.
Build Snowglobe Shaker Card Scene
Firstly, adhere the single frame to the card front using the Dual Tip Glue Pen. Secondly, glue the background and both snowbanks flat inside the frame, once again using the Dual Tip Glue Pen. Don’t use foam inside the shaker because the shaker bits will get hung up.
Stamp the gnomes and trees from the Trinity Stamps Sledding Fun stamp set in black ink on white cardstock. Color them, fussy cut them, and adhere them flat to the background using the Dual Tip Glue Pen as well.
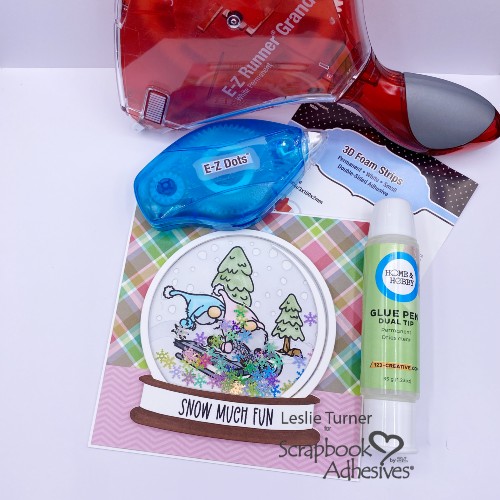
Assemble Shaker
Cut a piece of acetate from packaging for the shaker front. I’ve always used stiff acetate made for shakers but decided to try packaging this time. I actually prefer this method as it’s easier to work with and it’s easier to photograph. Use the E-Z Dots® Permanent Dispenser to apply adhesive to the back of one of the frame sections and the front of the other frame section. Sandwich the acetate between the frame pieces and press together to adhere.
Color the whole stand piece with a brown marker and adhere the white band using the E-Z Runner® Grand Permanent Strips Refillable Dispenser. Additionally, stamp a sentiment from the Trinity Stamps Sledding Fun stamp set in black ink, centering it on the band, and glue the stand to the frame.
Glue the reflection piece to the right side, on top of the acetate. using the Dual Tip Glue Pen.
Now it’s time to add the 3D Foam Strips around the globe frame. In addition, use Crafty Foam Tape White 54ft. at the bottom behind the stand portion. Lay some shaker bits inside the snowglobe. I used iridescent snowflakes that pulled in all the colors in my paper. Pull the release paper off the strips and tape, and secure the frame in place.
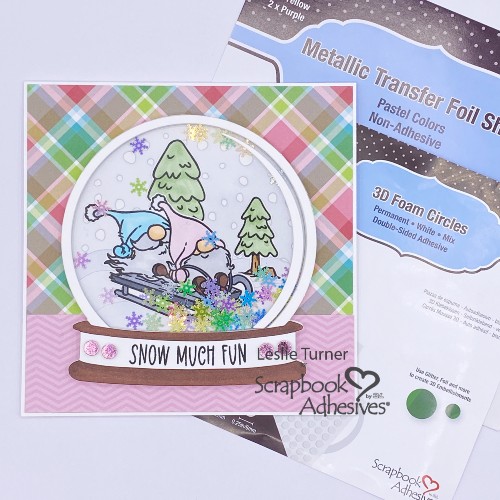
Complete Snowglobe Shaker Card
Employ the ‘Wear Your Adhesive on the Outside’ technique using 3D Foam Circles White Mix and pink foil from the Metallic Transfer Foil Sheets Pastel Colors. The smaller circles fit perfectly on both sides of the sentiment. When applying the foil on the foam circles, remember to face the coloring to you and rub the foil to transfer the color.
Lastly, stamp a sentiment (from the same Trinity Stamps Sledding Fun stamp set) in black ink on the inside sentiment panel. Once again using the E-Z Runner® Grand Permanent Strips Refillable Dispenser, adhere it to the card base. That’s it… easy peasy! This fun snowglobe shaker card is complete!
Thanks so much for visiting – we’ll see you next time! Leslie
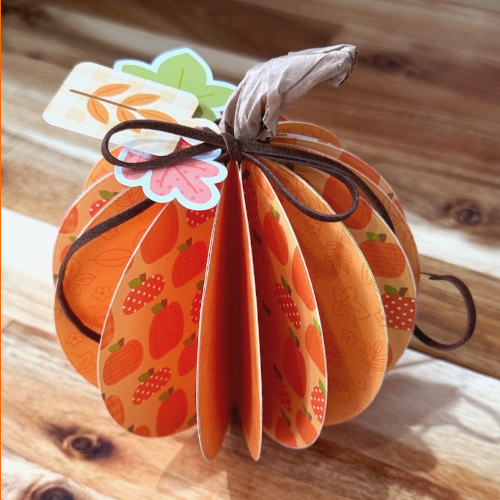
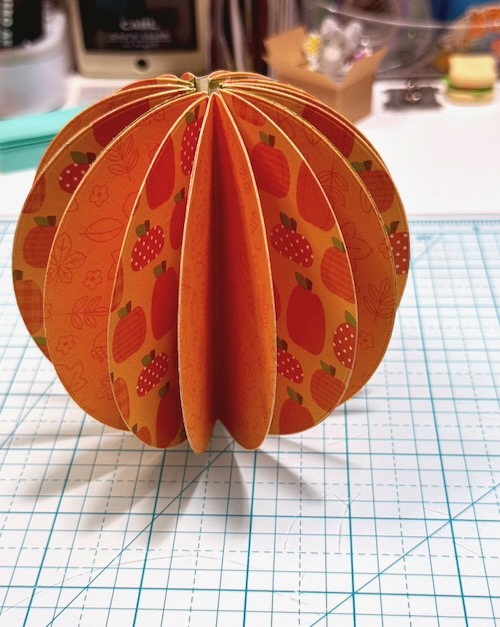
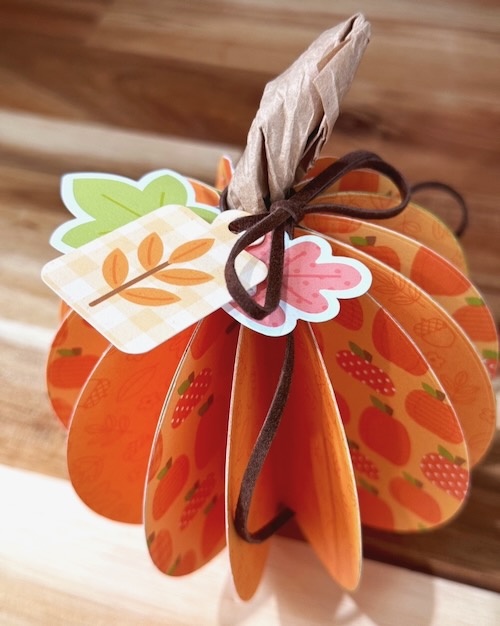
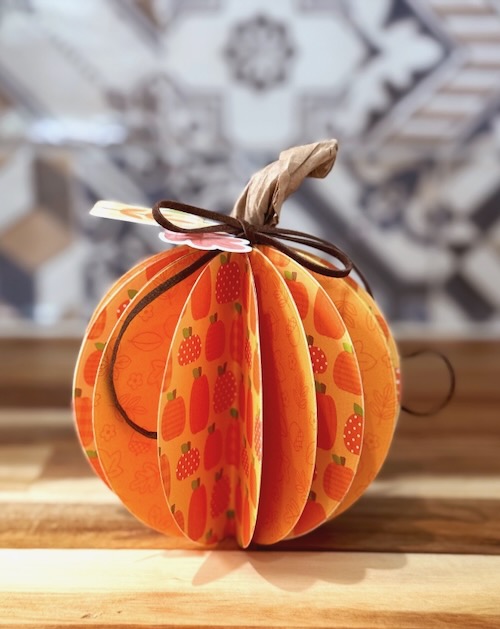
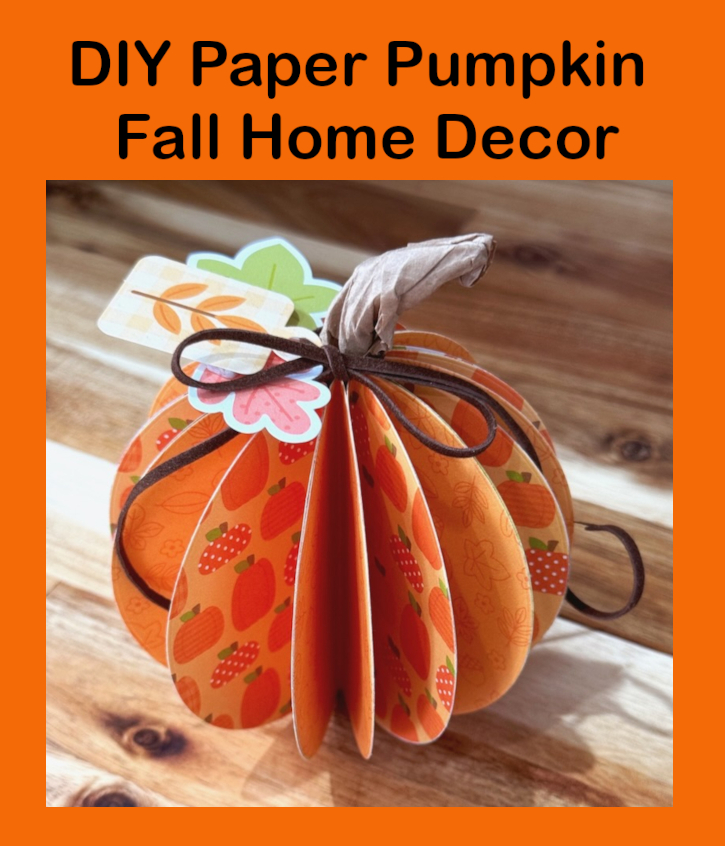
Hi friends, Jingle here with you today to share a super fun decor project perfect for your fall table settings! This little Paper Pumpkin Decor is so much fun to create and you can change it up to create several with each one having it’s own fun design!
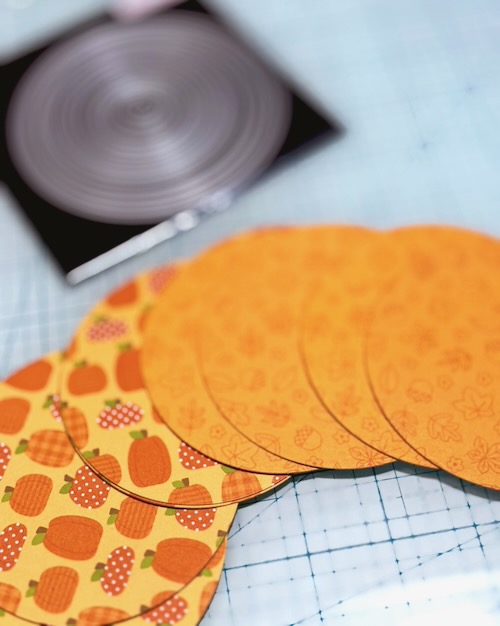
Let’s get started! To begin, die cut 16 circles from patterned paper. I used 8 each of two different designs. The size you choose will determine the size of your pumpkin. Mine are just under 4 inches.
Next, you need to fold each circle exactly in half, like a taco, with the side you want showing on the inside of your ‘taco’.
Assembling the Pumpkin
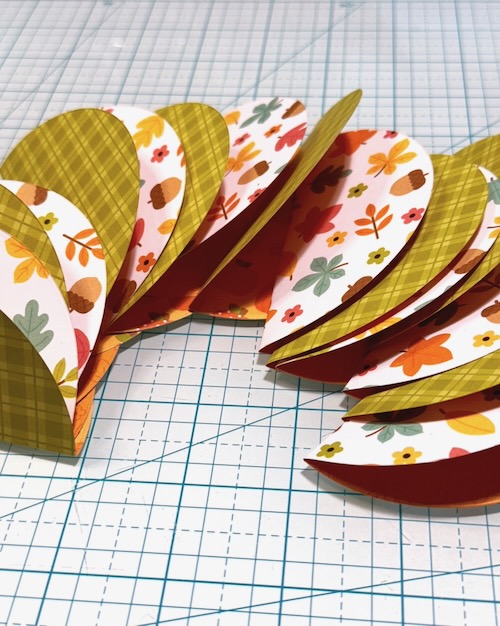
Now we can begin putting the pumpkin together. Using a very strong adhesive, I chose Extreme Double-Sided Tape 1/4in because I knew I could depend on it to hold the entire project together nicely, we are going to adhere the back of one ‘taco’ to the back of the other design as shown in the photo below.
Be sure to carefully align your half circles to maintain the spherical shape when it is completed.
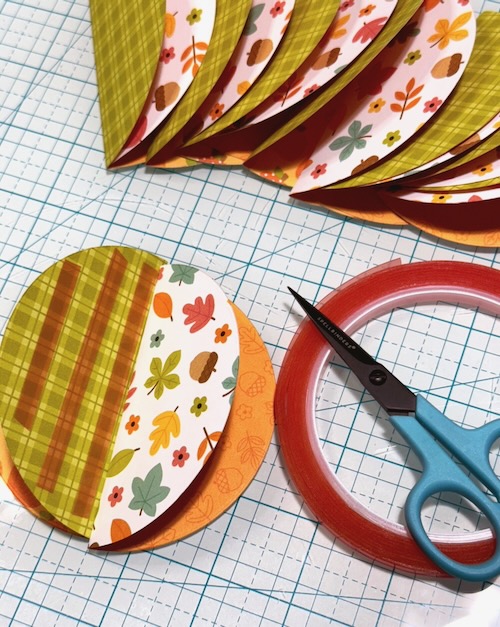
Adhere all of your ‘tacos’ until the final one. With that one, you will adhere it directly to the two final exposed ‘wrong sides’ in your pumpkin. You should have a completed sphere as shown below. If you would like a fuller pumpkin or a simpler one, you may adjust the number of circles used to create different looks.
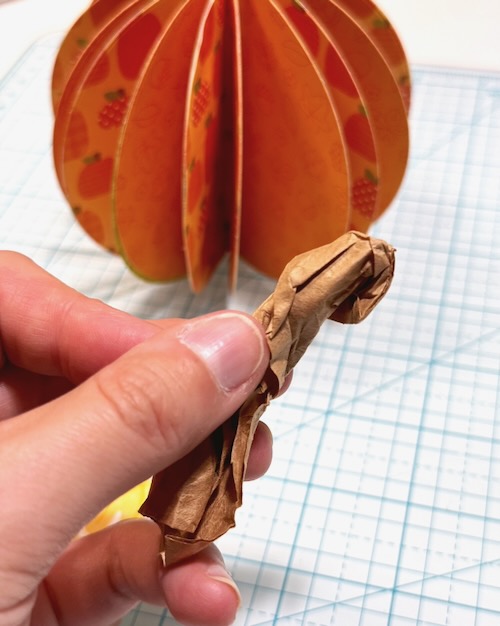
Adding the Stem and Decor
Now that the pumpkin is complete let’s add the stem and a bit of fun decoration to it!
To create the stem, cut a piece of brown paper lunch bag and crumple into a stem like shape.
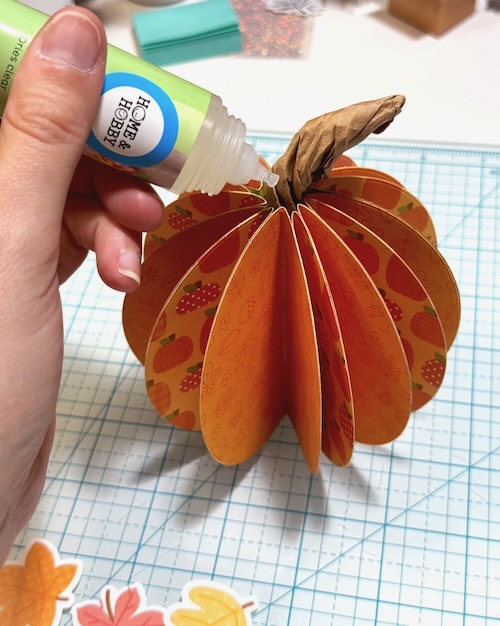
Position the stem in the hole at the top of the pumpkin. this is pretty easy to do, so you can tuck it in there and adjust to the height and look you want. Then you want to use the Dual Tip Glue Pen in the hole around the stem to ensure it stays in place.
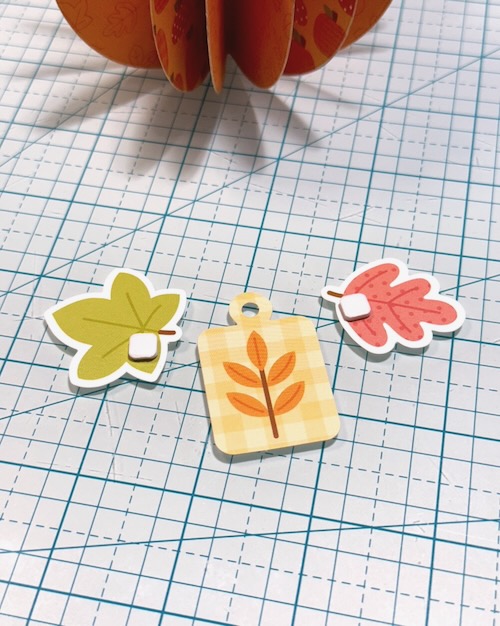
Select three die cut pieces to accent the top of the pumpkin. Using 3D Foam Creative Sheets Small White, adhere the leaf pieces to the tag. This will keep the whole arrangement in place. Next, you will tie the tag to the stem with a length of faux leather ribbon.
Take a few moments to shape and position your faux leather where you want it and there you have it! Your beautiful completed decor piece!
Thank you so much for joining me today! I hope you create a pumpkin or two for your own table! This is a great one to adapt for the kiddos, too. My six year old made one using only 8 circles and he loved the process. Make it a family craft night and show us what you made!
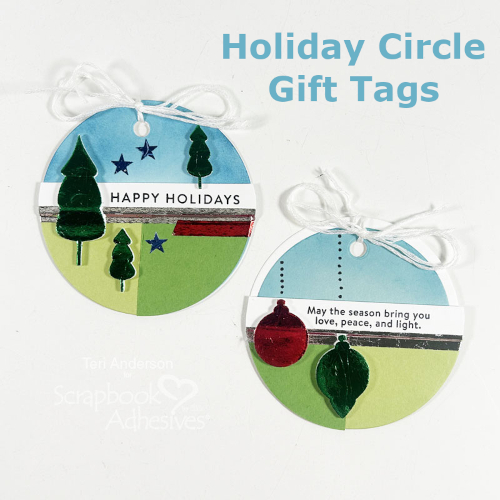
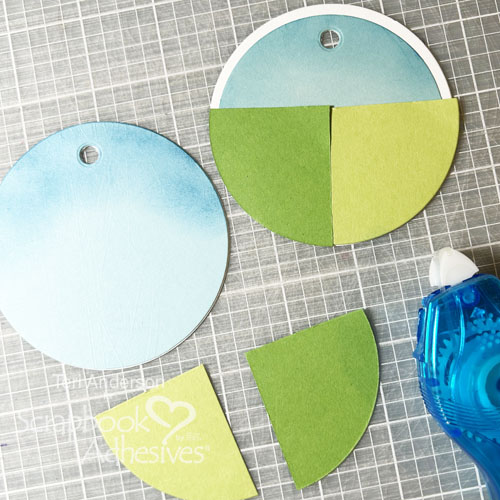
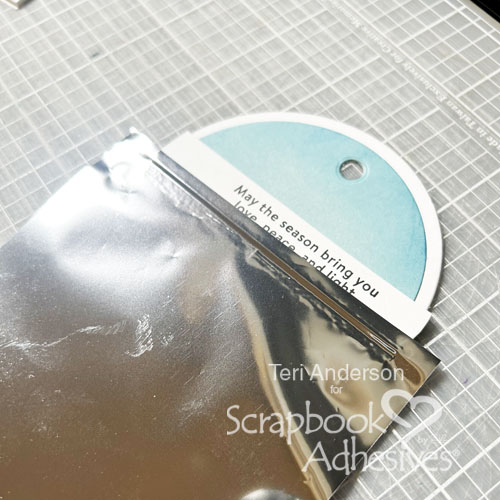
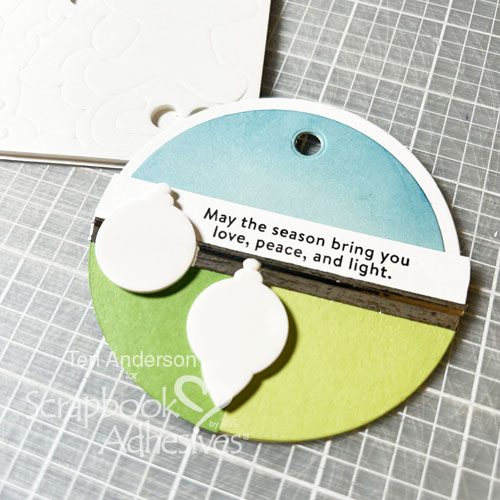
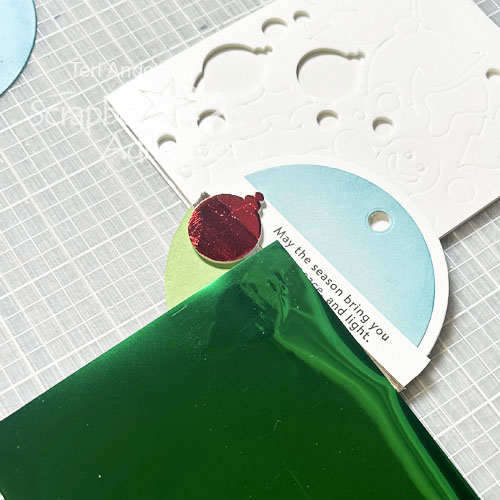
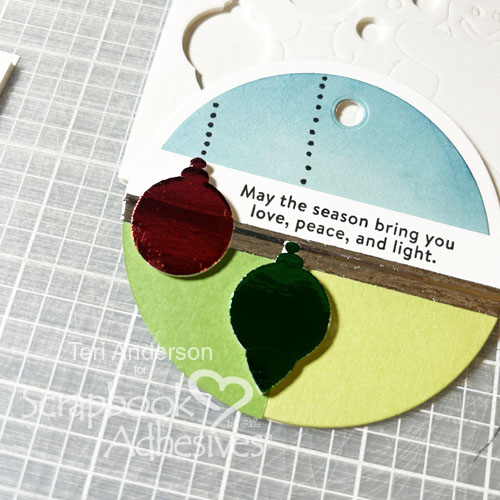
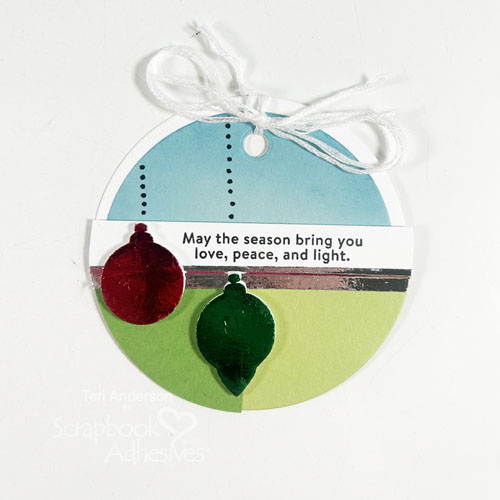
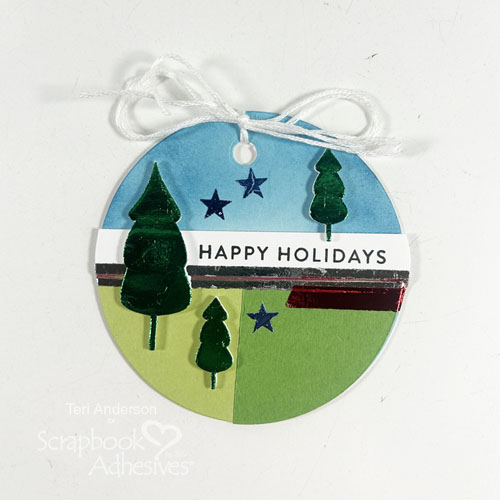
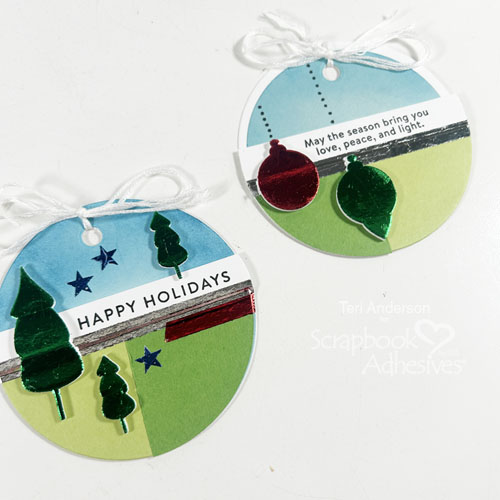
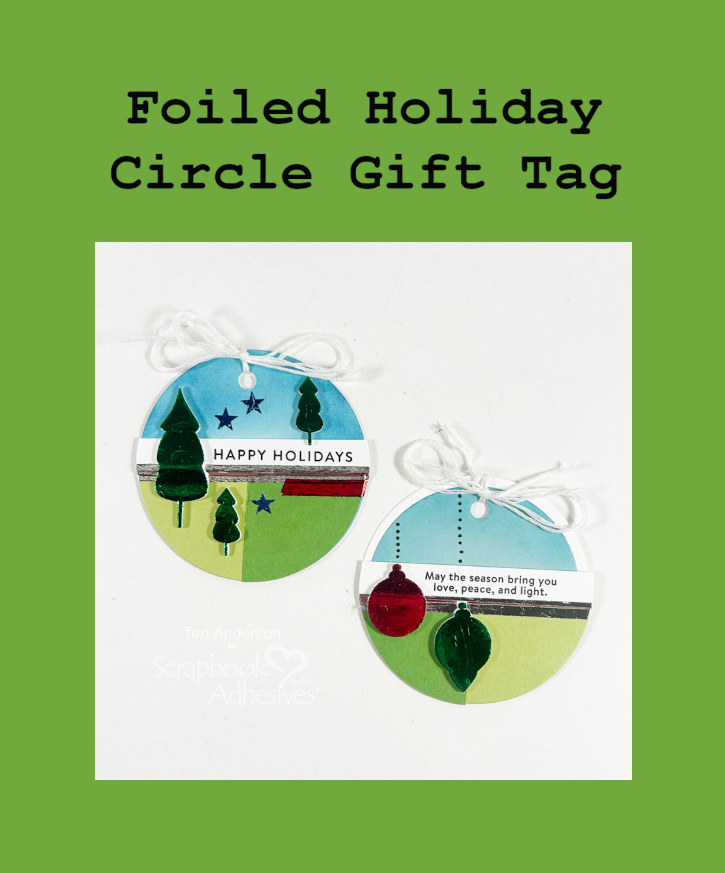
Hi, friends! Christmas will be here before you know it! Teri here to help you get in the mood by showing you how to make some fun Foiled Holiday Circle Gift Tags with foil and 3D Foam Shapes on them.
Make Those Circle Gift Tags
Die-cut a couple of large circles as the tag base with white cardstock. Then cut several large circles in different colors of cardstock. Cut up those colored cardstock circles and add a few to your large circle with the E-Z Dots® Petite Permanent Refillable Dispenser. Designer’s Tip: For interest, add a little ink on the edges. Lastly, punch a small hole on the top.
Add the Sentiment and Wear Your Adhesive on the Outside
Grab a couple of foam ornament shapes and a sheet of green foil from the 3D Foam Holiday Embellishment Kit with Foil. Repeat the foiling steps mentioned above. Then “hang” them by drawing some stitched line or string with a black pen or marker.
I used the foam tree shapes from the same kit on the other Holiday Circle Gift Tag and did the foiling steps (ie. Wear Your Adhesive on the Outside technique). Then to fill out the design, I randomly rolled a few E-Z Runner Stars Refillable Dispenser and make them shine with the foiling steps to them as well.
Finish the Tags
Complete the tags by threading white floss through the punched hole. Ribbon also makes a nice touch too!
These tags would be perfect to decorate your holiday gifts or super fun to tie on bags of holiday treats. So many gift presentation ideas! Ready to make some Foiled Holiday Circle Gift Tags of your own? I hope you are and would love to see the results!
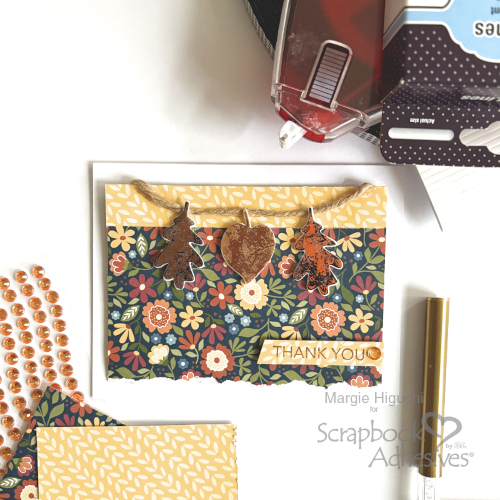
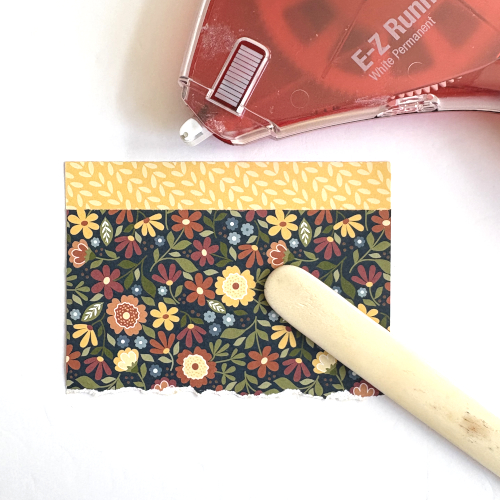
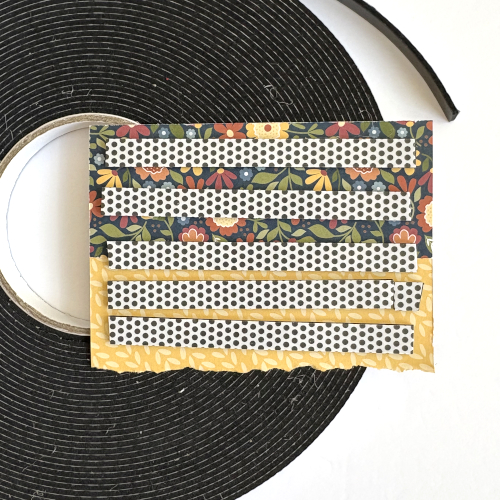
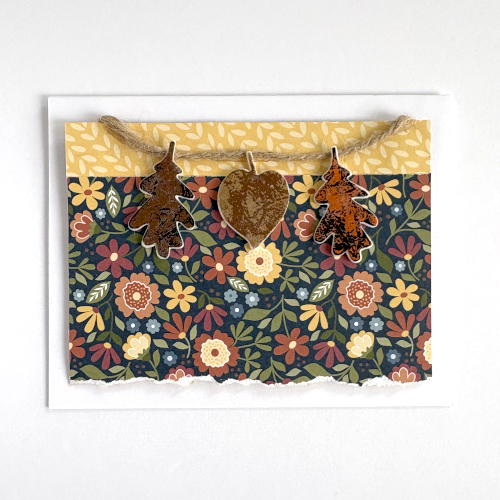
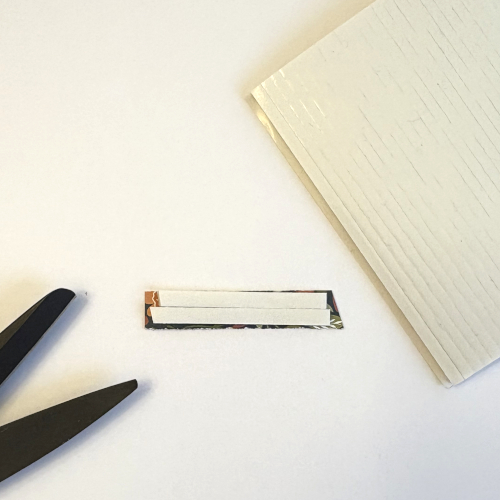
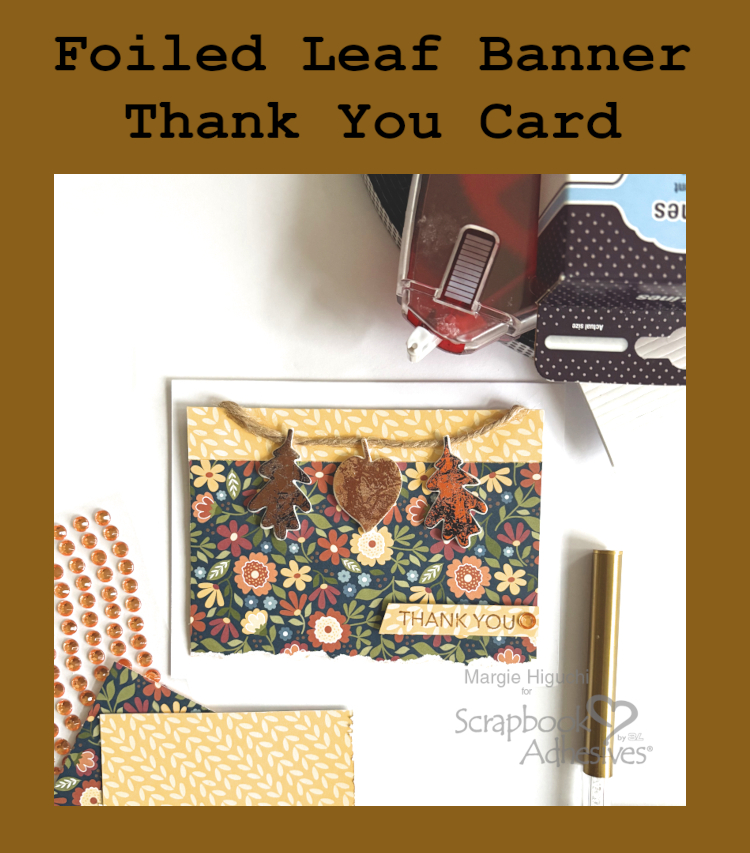
Happy Fall Y’all! I had some fall-themed collection on my desk so I decided to use them and our 3D Foam Leaves to create a Leaf Banner Thank You Card. Hi, Margie here today to show you how I created some interest to foiling without any special tools!
Leaf Banner Card Panel Layers
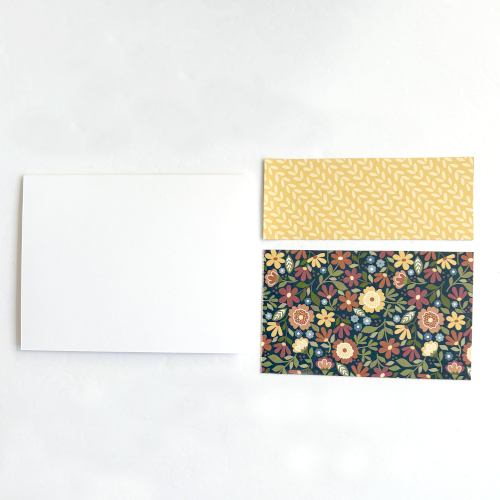
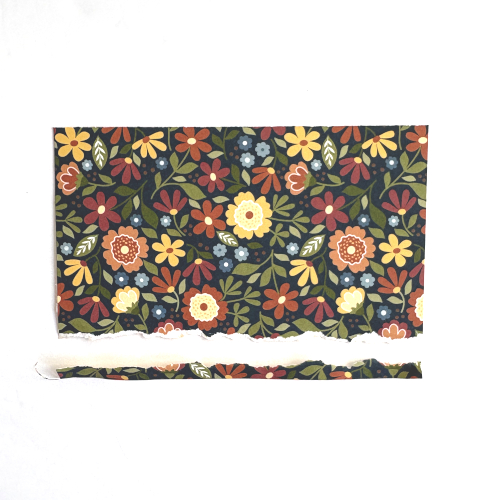
For an A2-size (5.5 x 4.25″) standard white cardstock card base, I cut a 4 7/8 x 2-inch yellow patterned strip of paper. The larger patterned paper was 4 7/8 x 3-inch.
This is the results below! Designer’s Tip: Use an anti-static powder tool to alleviate any stickiness from the foam.
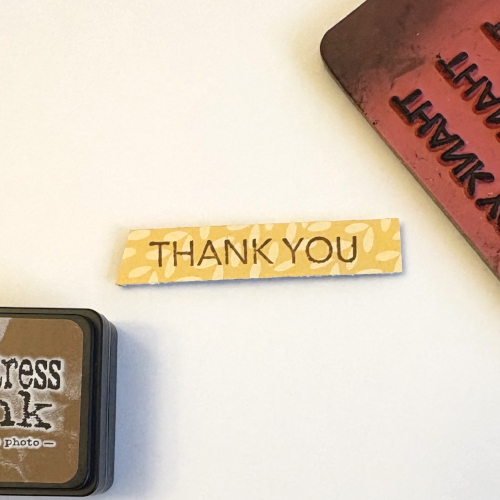
Card Sentiment
Stamp the sentiment with dark brown ink on a 2.25 x 0.50-inch strip of yellow pattern paper. Trim the strip to fit the card front. Secure and lift the strip with 3D Foam Strips. Then add the large orange rhinestone at the end of the sentiment to finish.
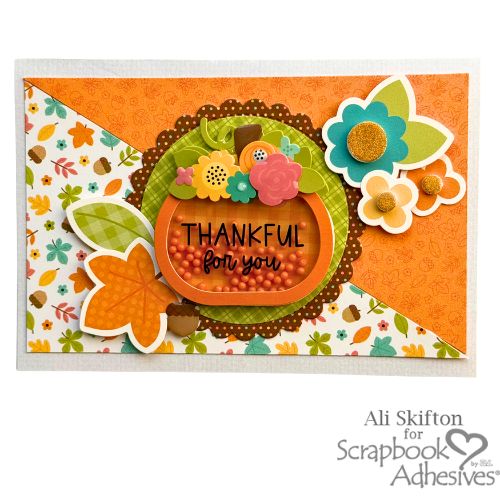
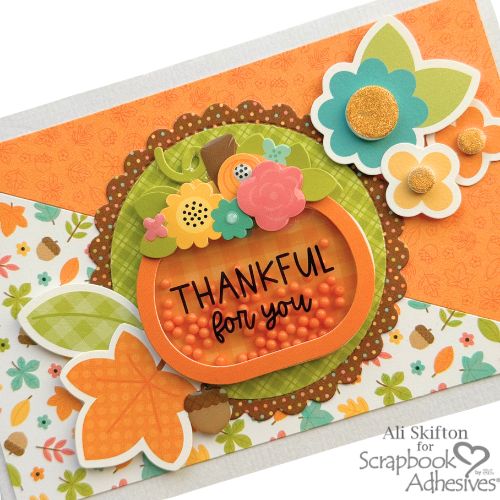
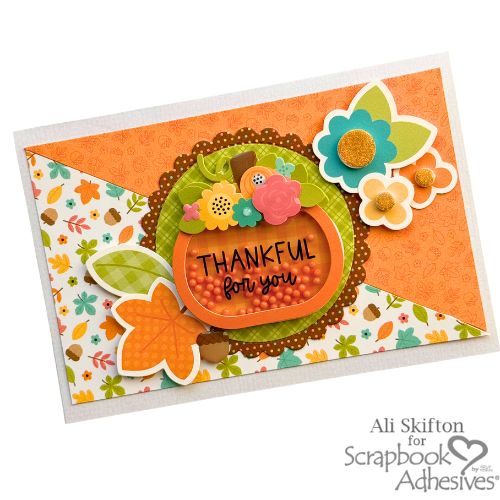
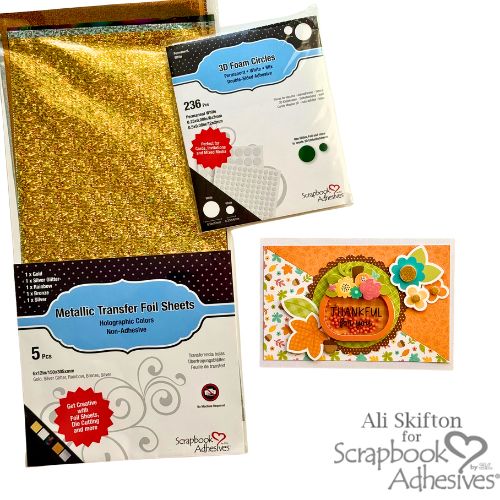
Hi, Ali here today! Today, I’m so excited to share a special Thanksgiving card I created for my husband, Jeff. This Thankful for You Shaker Card is perfect because of the colors, patterns, and cozy autumn vibes. I tried a few new-to-me products, 3D Foam Circles White Mix and Metallic Transfer Foil Sheets Holographic Colors. Once I started using them, I couldn’t stop! They added so much texture, shimmer, and dimension to my card that I’m already dreaming up ways to use them again for Christmas cards and winter projects.
Building the Background
Choose two patterned papers from the 6×6 Farmhouse paper pad. I love how well these papers coordinate! Cut each sheet on the diagonal and pieced together to form the background for my card front. This simple cut added visual interest and a bit of rustic charm. Adhere with the E-Z Runner® Permanent Strips Dispenser.
Layering the Focal Point
Layer a scalloped circle with a slightly smaller circle to frame the focal point to the card’s center. Place a fun and an interactive element, Doodle-Pop pumpkin shaker, to the layered circle. Love how the shaker adds a little movement and sparkle! Because it’s a heavier embellishment, I used extra adhesive to make sure it stayed firmly attached.
Adding Dimension and Shine
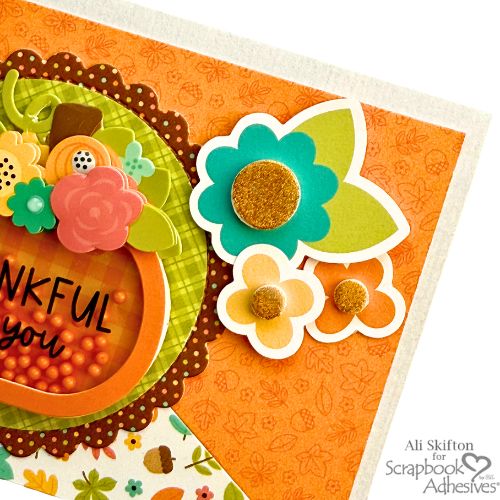
Let’s add the details…because it’s all in the details, right? Some of the cute leaves, acorn and floral pieces were randomly placed around the circle with a combination of the E-Z Runner® Permanent Strips Dispenser and 3D Foam Squares White Mix for depth and texture.
Now, the real fun began…Wear Your Adhesive on the Outside technique! I centered some of the 3D on the floral accents. Remove one of the top liners. Cut a smaller piece of fine gold foil from the Metallic Transfer Foil Sheets Holographic Colors pack and with the color side facing you, rub the foil color into the foam circle. Peel off to reveal the color. Repeat the steps with the other foam circles. It was unbelievably easy!
The gold really makes the flowers pop! It’s such a simple technique, but it brings an elegant shimmer to the design that catches the light beautifully.
Final Touches and Thoughts
After everything was in place, I stepped back and couldn’t help but smile. The combination of warm colors, layered textures, and metallic shine perfectly captured the cozy spirit of Thanksgiving.
Creating this card reminded me why I love handmade crafts so much—they’re not just paper and glue, but tiny pieces of joy and gratitude we can share with the people we love.
I hope this Thankful for You Shaker Card inspires you to try out this Wear Your Adhesive on the Outside technique with 3D Foam shapes and Metallic Transfer Foil Sheets for your own seasonal creations. Trust me, once you start experimenting, the possibilities are endless—from Christmas cards to scrapbook layouts to gift tags!
Wishing you all a very Happy Thanksgiving filled with warmth, creativity, and love.
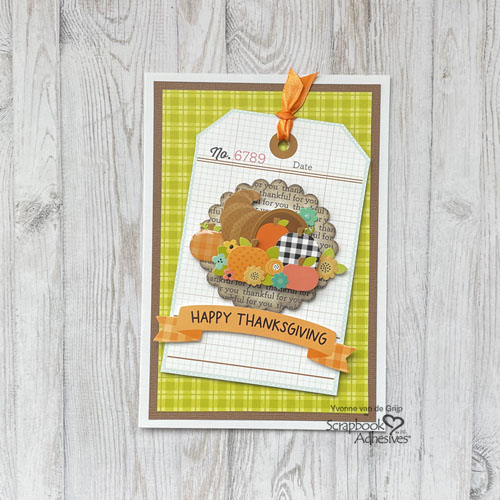
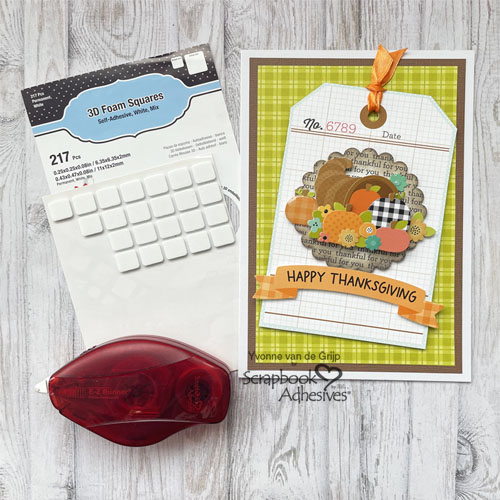
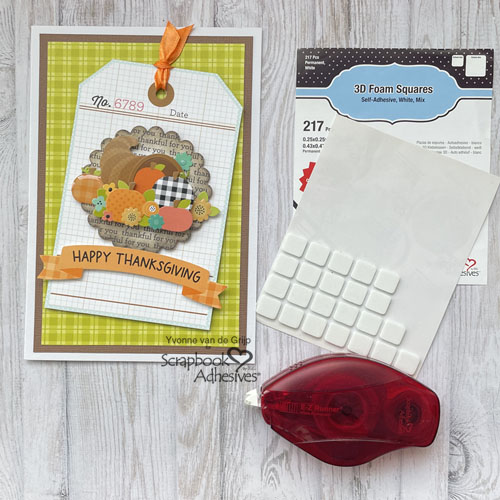
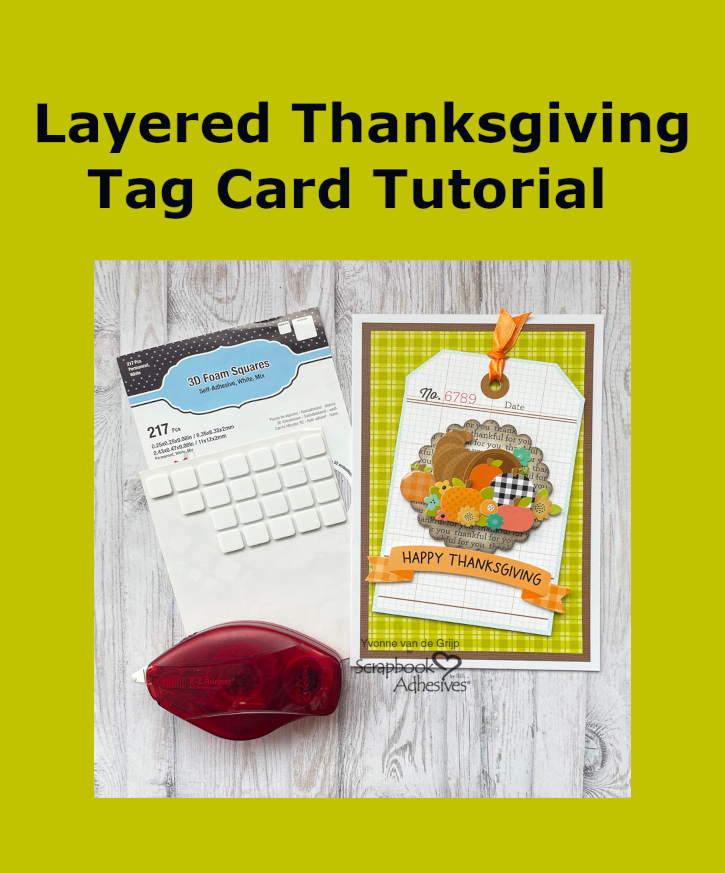
Hi everyone, Yvonne here with some inspiration for Thanksgiving cardmaking. This Layered Thanksgiving Tag Card is all about adding interest to create a beautiful dimensional card.
The great thing is that it’s easy to make and beginner-friendly. Let’s get started!
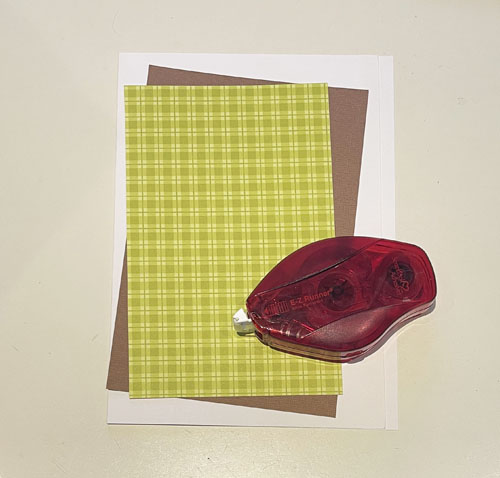
Layered Thanksgiving Card Base
Start by trimming green patterned cardstock to a rectangular size and mat on a brown panel. Next, secure the layered panel to a white card base. I used the the E-Z Runner® Permanent Strips Refillable Dispenser to adhere all the layers!
Create a Tag Shape
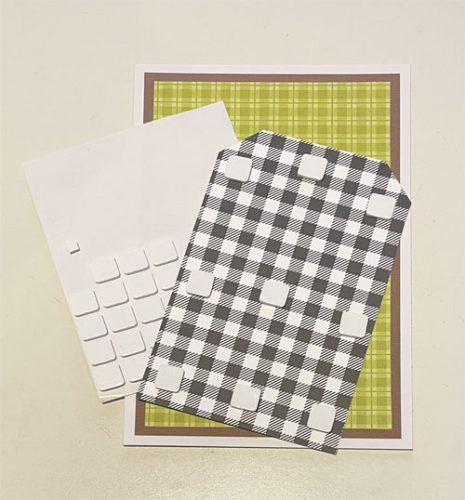
Cut a large tag from patterned paper and punch a hole towards the top of the tag. Next, thread an orange ribbon through the punched opening. For dimension, add several regular size squares from the 3D Foam Squares White Mix pack on the back of the tag and place it diagonally on the card front.
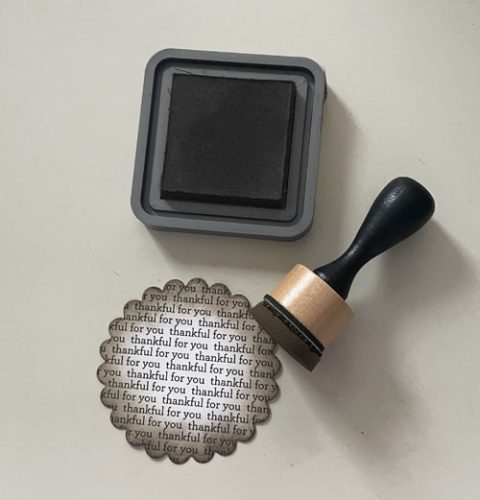
Die-cut a scalloped circle from patterned paper and distress the edges by inking with brown ink and an ink blending tool. Center the inked circle to the tag right below the line using several squares from the 3D Foam Squares White Mix.
Adding Elements
For the focal point, I centered the doodle-pop sticker on the scalloped circle. The sentiment was from the cardstock ephemera pack and I used the smaller squares from the 3D Foam Squares White Mix pack to place it under the circle.
Voilá! Your Layered Thanksgiving Tag Card is ready…ten days till the big turkey day! In the meantime, wishing you happy crafting!
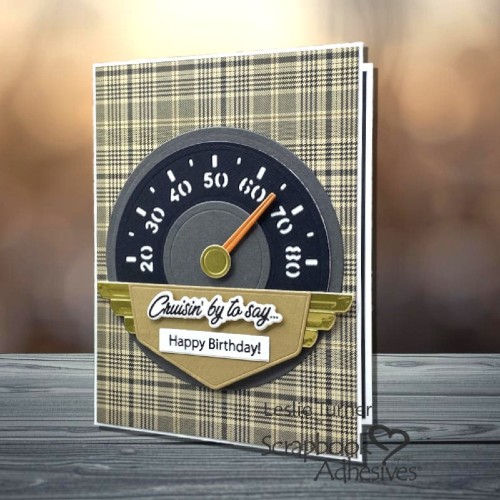
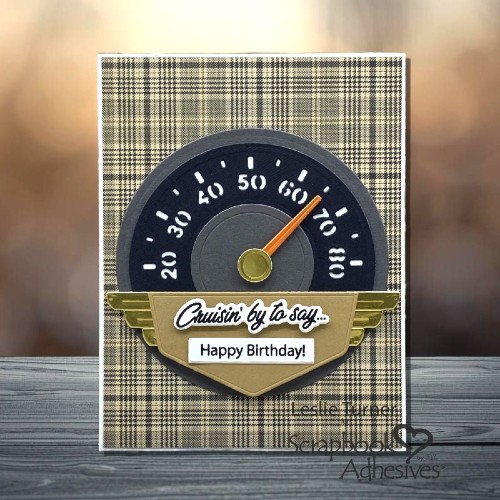
Hey everybody, happy weekend! Don’t you just love having extra birthday cards in your stash? Seems I make more birthday cards than any other kinds of cards, so if masculine, it’s a bonus! Leslie here, sharing a cruisin’ birthday card that would be fun to mass produce with different manly background papers. This card features several of my absolute favorite Scrapbook Adhesives products!
Once again, I reached for the E-Z Runner® Grand Permanent Strips Refillable Dispenser to adhere the patterned paper to the card base. Also used it to adhere the focal element (without any additional embellishments), and this completed front of this cruisin’ birthday card.
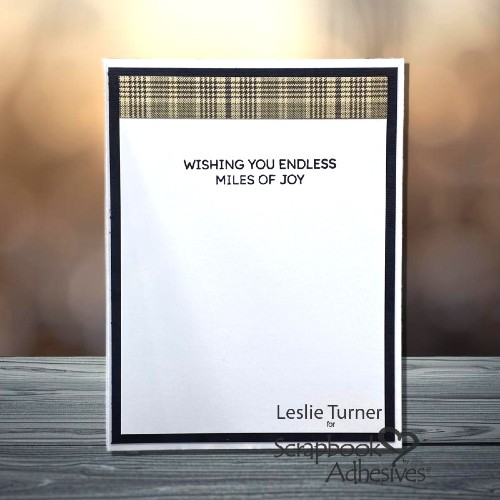
Finishing The Inside
And yes, I’m one of those nerdy crafters who finishes the insides of my cards. I generally like to incorporate one or more of the patterned papers used on the front. Occasionally I will leave the inside blank to customize it for the person receiving it, but this card needed a cruisin’ birthday card sentiment. The E-Z Runner® Grand Permanent Strips Refillable Dispenser was used to adhere the layers on the inside. This is unquestionably my go-to adhesive for all of my crafting!
Thanks so much for visiting – we’ll see you next time! Leslie