You are in our US store • Switch to Europe store

‘Beautiful’ Layout with E-Z Runner®Permanent Fine Adhesive Dispenser

Merry Christmas! It’s Erica and today I’m sharing a layout I created using the E-Z Runner® Permanent Fine Adhesive Dispenser and E-Z Runner® Grand Refillable Dispenser.

Beautiful Layout by Erica Houghton for Scrapbook Adhesives by 3L

The E-Z Runner® Permanent Fine Adhesive Dispenser is a strong, clear, double-sided vellum adhesive. It’s exactly what I needed to adhere my photo overlay and ‘beautiful’ title.

Here are a few close-ups:

Beautiful Layout by Erica Houghton for Scrapbook Adhesives by 3L

Scrapbook Adhesives by 3L®:
E-Z Runner® Permanent Fine Adhesive Dispenser
E-Z Runner® Grand Refillable Dispenser
Other:
Paper (Authentique Paper); Flowers (Manor House Creations & Petaloo); Title (Heidi Swapp); Photo Overlay (Becky Higgins); Buttons (Sewology)

Wishing you all the best in the holiday season! Thanks for joining me today!
Erica Houghton

Layered Rusty Glass Jar Lid Ornament with 3D Foam Squares

Michele here with a layered rusty glass jar lid ornament using 3D Foam Squares Mix White. I love making this kind of ornaments each year (I have 35!). This year I made five new ones 🙂 Let me briefly explain what I did for this one…

Layered Rusty Glass Jar Lid Ornament by Michele Kovack for Scrapbook Adhesives by 3L

Using a rusty glass jar lid as the base, I added a doily with the Dual Tip Glue Pen by applying it on the back of the lid.  Rubbed a bit of glue to the perimeter of the lid and sprinkled mica flakes over it.  Then die-cut two poinsettias out of water color paper and color them using water colors.  I applied a bit of glue over each flower petal and sprinkled glitter over it. I added more glue to the centers and added mini gold beads.

Layered Rusty Glass Jar Lid Ornament 2 by Michele Kovack for Scrapbook Adhesives by 3L

The poinsettias were layered using 3D Foam Squares Mix White. I used Dodz Adhesive Dots Small to add the gold sequins.  I punched a hole at the top and threaded rustic twine through it.

Supplies:
Scrapbook Adhesives by 3L®:

Dodz Adhesives Dots Small
3D Foam Squares Mix White
Home Hobby:
Dual Tip Glue Pen
Other:
Poinsettia Die: JustRite Papercraft®
WaterColors: Zig Clean Color Markers
Gold Beads: Martha Stewart Craft
Watercolor Paper: Canson
Mica Flakes
Ball Glass Jar Lid
Sequins

I’m excited to have my kiddos home and the rest of my immediate family is coming over today!

From all of us at Scrapbook Adhesives by 3L®, Merry Christmas to all of you!
Michele

Winter Scene Using 3D Foam Snowflakes and Trees

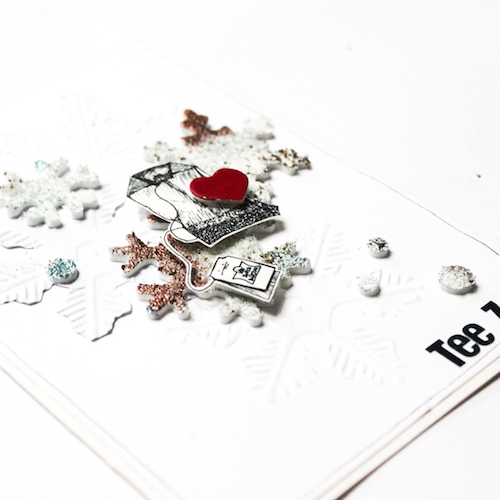
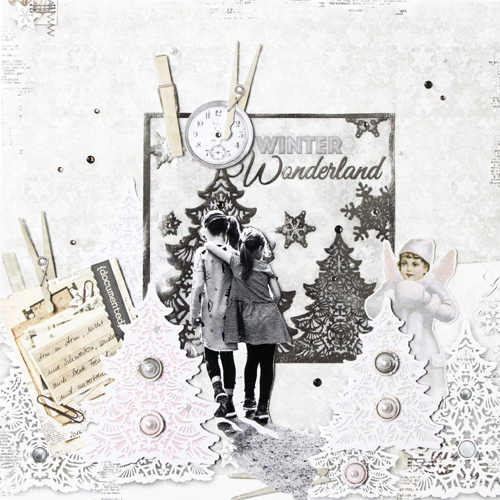
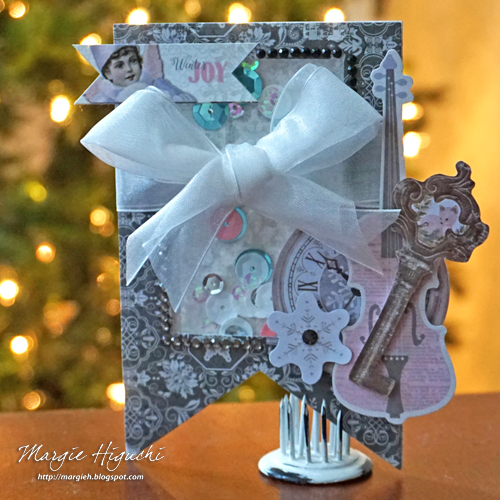
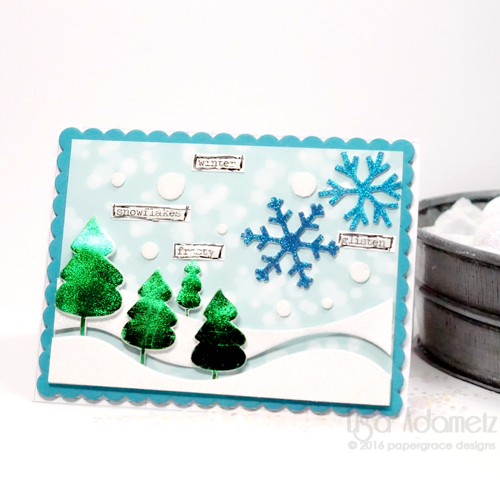
Hi crafty friends! It’s Lisa on the blog today and I’m freaking out just a teensy bit that Christmas is just 2 days away! Yikes! So I’ve created a sweet and peaceful Winter scene using our 3D Foam Trees and 3D Foam Snowflakes. A card like this (and maybe some eggnog) will be just the thing to calm your spirits.

lisaadametz-winterscene-12232016-1

Using the 3D Foam Trees and Snowflakes makes it so easy to create the perfect Winter scene as the come in multiple sizes. Both can be used with either foil or glitter (as I did here), or even used with embossing powder!

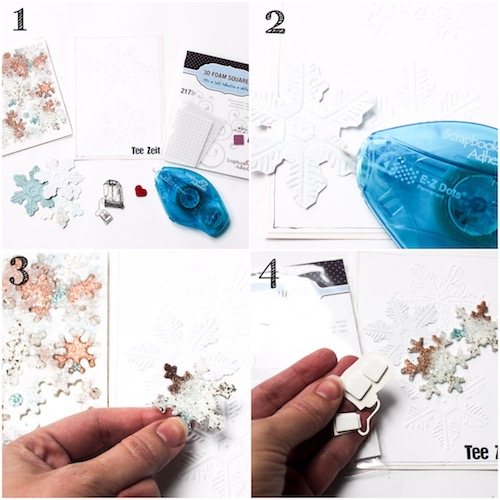
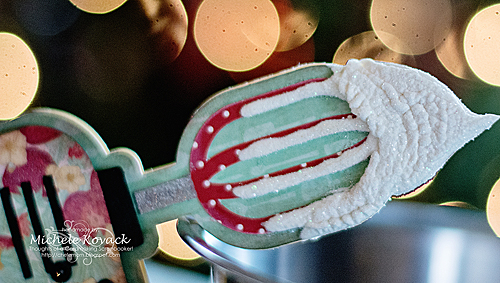
It’s very simple to foil and glitter the 3D Foam as you can see in my photos below:

lisaadametz-winterscene-12232016-4

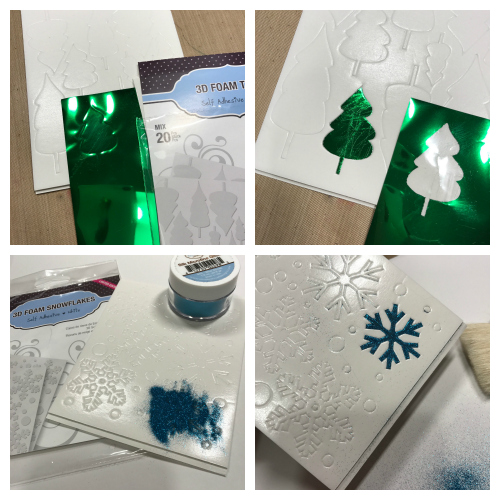
In the case of the glitter, I used a microfine glitter and burnished it into the shape and used a soft brush to brush away any excess. Both the foil and the glitter turn out beautifully.

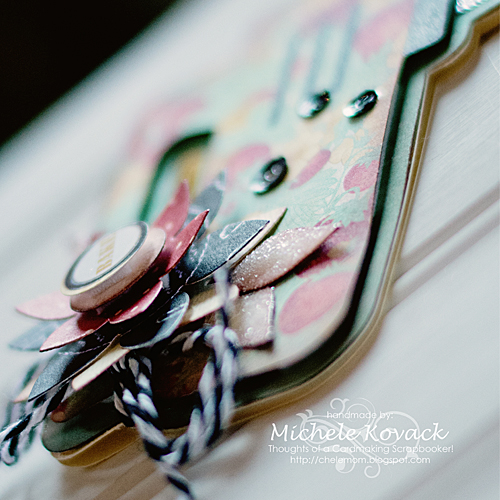
I also used glitter on the round snowflakes included in the 3D Foam Snowflakes package. These would be fun to make a pile of snowballs with!

I finished my scene by die-cutting 2 snow drifts out of glitter paper and using 3D Foam Squares – White Mix to adhere the snow drifts onto a piece of Lawn Fawn patterned paper. The trees already have the adhesive on them and were tucked into the snow drift.  All the other pieces were adhered whereever was pleasing to the eye, as well.

The patterned paper was adhered using my E-Z Runner® Ultra Refillable Dispenser onto a die-cut piece of cardstock which was popped up using, yes, MORE 3D Foam Squares – White Mix. It’s a nice thick card. 🙂

I didn’t want to use a traditional greeting for this card, so I just used a few stickers that say “winter” “snowflakes” “frosty” and “glisten” and I gave them a little shiny coat of Glossy Accents to make them stand out a bit more.

This was a fun card to make for me. I easy enough to make a few of at a time using different foil and glitter colors, too.

Here are some different views for you:

lisaadametz-winterscene-12232016-2

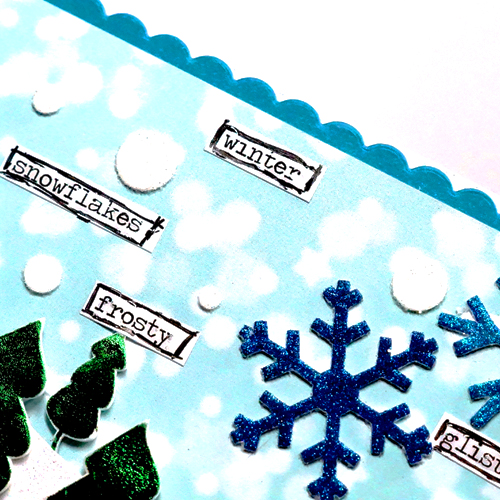
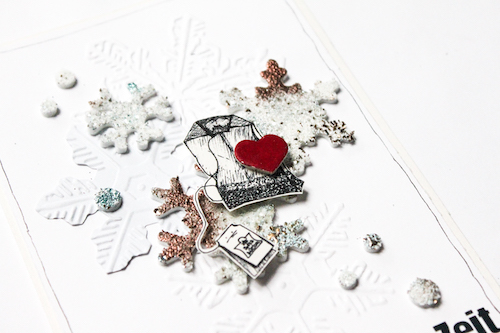
So you can see my little stickers better. I used a black pen to haphazardly go around the sticker.

lisaadametz-winterscene-12232016-3

I like this pic. It shows the foil really well and the cute round snowflake/snowballs. 😉

Thanks so much for joining me! Wishing you all a very Happy Holiday.

SUPPLIES:
Scrapbook Adhesives by 3L®:

3D Foam Squares  – Mix White
3D Foam Trees
3D Foam Snowflakes
E-Z Runner® Ultra Refillable Dispenser

Other Products:
Dies: Lawn Fawn
Cardstock: Neenah, Taylored Expressions
Patterned Paper: Lawn Fawn
Other: Glitter: Elizabeth Craft Designs, Ranger. Glitter Paper: Darice. Stickers: Tim Holtz. Designer Foil.

Lisa Adametz-sig

Save

Visit our Website and Blog!
Sign up for our Newsletter so you never miss a contest or giveaway!

instagram purple icon facebook icon purple pinterest purple icon twitter purple icon YouTube icon blog subscription purple icon

Winter Card with 3D Foam Snowflakes Tutorial

Hi there, it’s Stephanie here today. Christmas is coming and it’s cold outside, so I made a easy card with 3D Foam Snowflakes and glitter and embossing powders.

stephanie_wintercard_1-1-von-1

Here is how I made it.

stephanie_wintercard_2

1. With my card panel, I embossed it with a snowflake embossing folder to for a subtle background. For my sentiment, I used alpha stickers. Then laid out all my materials I wanted to use. I embellished my 3D Foam Snowflakes with Glitter and heat embossed some Embossing Powder. I fussy cut my stamped image of a tea bag and painted a little red heart chipboard  piece.

2. I used the E-Z Dots® Permanent Refillable Dispenser to adhere a snowflake die cut.

3. Then I choosed some of the 3D Foam Snowflakes and little circles.

4. With 3D Foam Squares Mix – White I adhered the stamp and the little heart.

stephanie_wintercard_3-1-von-1

And inside the card I used a Keepsake Envelope to put some tea in it and another 3D Foam Snowflake to decorate it.

stephanie_wintercard_4-1-von-1

I wish you all a Merry Christmas, have a beautiful day with lots of love, nice presents, happy moments and fun.

Thanks for visiting me today! Have a great day!
Stephanie

Supplies from Scrapbook Adhesives by 3L®
3D Foam Snowflakes
3D Foam Squares Mix – White
Keepsake Envelopes Mix
E-Z Dots® Permanent Refillable Dispenser

How to Create a Jolly Santa Jar

Hi all! Tami Mayberry here with you today to share a fun and easy Santa jar you can create for both gift-giving and home décor displays. It’s not only super cute it’s super simple! Here’s how to make it:

DIY Santa Jar by Tami Mayberry for Scrapbook Adhesives by 3L

  1. Following manufacturer’s instructions, paint jar with chalk paint and seal using clear wax.

jar1_tami

  1. Cut a piece of white felt the same height as jar and desired width; rub with sandpaper to create a fur look.

jar2_tami

  1. Attach felt to jar using Extreme Double-Sided Tape 1/8″.

jar3_tami

  1. Wrap jar with ribbon securing overlapping ends to back with Premium Double-Sided Tape 1/4″.

jar5_tami

  1. Nesting square and scalloped square dies together, die-cut buckle shape from soda can. Attach to jar front using Extreme Double Sided Tape 1/8″. Note: If you don’t have the dies needed, you could also cut this from metallic paper or use a real buckle.

jar6_tami

  1. Attach buttons to jar using Dodz Adhesive Dots 3D.

jar7_tami

  1. Wrap gold lid band with Premium Double-Sided Tape 1/4″.

jar8_tami

  1. Remove backing; attach glitter ribbon.

jar9_tami

  1. Attach chalkboard sticker to lid center; place on jar.

jar10_tami

And there you have it!
Tami Mayberry

Scrapbook Adhesives by 3L® supplies:

Other:

  • Mason jar with gold lid
  • DecoArt Chalky Finish paint
  • DecoArt Crème Wax
  • Ribbon: 1-inch-wide black, red glitter
  • Circle chalkboard label sticker
  • 2 black buttons
  • White felt
  • Sandpaper
  • Paintbrush
  • Soda can
  • Dies: square, scalloped square
  • Die-cutting machine

Our Most Favorite Holiday Blog Posts Ever!

Hi friends, today we want to share a round up of Holiday blog posts from our Design Team. We’ve got home decor, ornaments, gift tags, cards and even a scrapbook layouts. If you’re looking for inspiration, start scrolling!

We’d love it if you would PIN in your favorites. Need more ideas? Check out our Christmas Crafts Pinterest Board!

We love Stephanie Schutze’s ethereal style and the way she incorporates her daughters into her projects! See how she uses 3D Foam Trees in this Winter Layout HO HO HO

Winter Scrapbook Page by Stephanie SchutzeMichele Kovack works pink into her Christmas card, with a tutorial so you can make this Merry Christmas Card too!

Pink Merry Christmas Card by Michele Kovack

Margie Higuchi has a Sparkly Christmas Page with 3D Foam Stars and a tutorial on how to make those stars shine with glitter.

A Sparkly Christmas Page by Margie Higuchi

Lisa Adametz tells us how to make not just one, but a ton of cards at once. And this is just super cute, with 3D Foam Squares to lift the mittens off the paper. Check out her Let’s Cuddle card.

Let's Cuddle Card by Lisa Adametz

We envision Latisha Yoast’s house to be fully decked out for the holidays. Just make yourself cozy and grab a candy cane from this adorable jar. Notice the Photo Corner Gift Tag is covered in Creative Photo Corners for a cool texture!

Photo Corner Gift Tag & Jar of Candy Canes by Latisha Yoast

Judy Hayes makes paper flowers look so real in this Poinsettia Tag. She shows how Gold Pigment Powder completes the vintage look.

Poinsettia Tag tutorial by Judy Hayes for Scrapbook Adhesives by 3L

Do you have some last minute gifts to wrap? Erica Houghton has a solution! Her quick and easy tutorial shows how to use the E-Z Runner Grand to embellish Gift Bags!

IMG_3975_ED_2Christine Emberson’s tutorial take a foam ball and turns it into a Pine Cone with Creative Photo Corners.

Festive Pinecones Tutorial by Christine EmbersonBeth Pingry tells us how 3D Foam Squares take cards from drab to fab with a little lift. She tells us how to make multiple cards For a Christmas Card Swap with crafty friends.

Beth Pingry Christmas Card 1For Amy Tsuruta, the holidays wouldn’t be complete without a warm cup of cocoa. She makes sure her friends are set up with these Cocoa Gift Treats.

Cocoa Gift Treat Envelopes by Amy TsurutaAJ Otto shares her secrets for Home Made Holidays, and how to get that little 3D Foam Christmas gingerbread man so fuzzy and cute!

Homemade Holidays by AJ Otto

Thanks for sticking with us, we hope this post has inspired you! We wish you all the best this season as you celebrate with your loved ones!


Visit our Website and Blog!
Sign up for our Newsletter so you never miss a contest or giveaway!

instagram purple icon facebook icon purple pinterest purple icon twitter purple icon YouTube icon blog subscription purple icon

2016 Blog Hop with Bo Bunny Round Up

We were so excited to participate in our last manufacturer blog hop of the year with Bo Bunny that we extended our prize entry deadline ONE MORE DAY! YAY!! Check this post till the very end 🙂

Thought it would be fun to round up all the artwork from the week into one post AND to give our design team members a “round” of applause for all the inspiration, tips, techniques and tutorials throughout.

Day One of 2016 Blog Hop with Bo Bunny:

Beautiful Life Card by Christine Emberson for Scrapbook Adhesives by 3L

Beautiful Life Card by Christine Emberson


Kiss The Cook Treat Sack by Latisha Yoast for Scrapbook Adhesives by 3L

Kiss the Cook Treat Sack and Tag by Latisha Yoast

Day Two of 2016 Blog Hop with Bo Bunny:

Let It Snow Pocket Card w Hot Cocoa by Margie HIguchi for Scrapbook Adhesives by 3L

Let It Snow Pocket Card with Hot Cocoa Mix by Margie Higuchi

If you are interested in creating this card, please click: Let It Snow Hot Cocoa Pocket Card Tutorial by Margie Higuchi.

Peace and Joy Card by Amy Tsuruta for Scrapbook Adhesives by 3L

Peace and Joy Shaped Card by Amy Tsuruta

Day Three of 2016 Blog Hop with Bo Bunny:

MIxer Shaped Card by Michele Kovack for Scrapbook Adhesives by 3L

Mixer Shaped Card by Michele Kovack


Winter Wishes Thank You Card by Judy Hayes

Trio of Winter Wishes Holiday Thank You Cards by Judy Hayes

If you’re interested in creating these cards, please click: Winter Wishes Holiday Thank You Cards Tutorial by Judy Hayes.

Day Four of 2016 Blog Hop with Bo Bunny:

Winter Wonderland Page by Stephanie Schutze for Scrapbook Adhesives by 3L

Winter Wonderland Page by Stephanie Schutze


Beautiful Life Card by AJ Otto for Scrapbook Adhesives by 3L

Floral Beautiful Life Card by AJ Otto

Day Five of 2016 Blog Hop with Bo Bunny:

Winter Joy Shaker Tag by Margie Higuchi for Scrapbook Adhesives by 3L

Winter Joy Shaker Tag by Margie Higuchi

If you’re interested in creating this tag, please click: Winter Joy Shaker Tag Tutorial by Margie Higuchi.

Winter WIshes Mini Album by Erica Houghton for Scrapbook Adhesives by 3L

Winter Wishes Mini Album by Erica Houghton

If you’re interested in seeing the inside pages, please click Winter Wishes Mini Album Pages by Erica Houghton.

Aren’t they amazing?! We are fortunate to work with the best in the industry. We hope to inspire you more in the new year in 2017 – can you believe?! But we’re not done yet, see more inspiration up to the very last day of 2016!

Don’t forget to hop over to our friends at Bo Bunny by clicking:
2016 Blog Hop with Bo Bunny

Blog Hop Prize Details

Scrapbook Adhesives & Bo Bunny Press Blog Hop Dec 2016 Logo

Enter to win by leaving a comment through the Rafflecopter App. A winner will be randomly picked. International entries are welcome.

a Rafflecopter giveaway

If you cannot see the comment section (at the bottom of this post), please click: 2016 Blog Hop with Bo Bunny Round Up and scroll down to the bottom of the post.


Connect with Bo Bunny Press:
Facebook – www.facebook.com/BoBunny
Website – www.bobunny.com
Blog – www.bobunny.blogspot.com
Instagram – https://www.instagram.com/mybobunny/
Pinterest – www.pinterest.com/bobunny
Twitter – https://twitter.com/BoBunnyPress
YouTube – http://www.youtube.com/BoBunnyFun
Email – bopress@bobunny.com

Visit our Website and Blog!
Sign up for our Newsletter so you never miss a contest or giveaway!

instagram purple icon facebook icon purple pinterest purple icon twitter purple icon YouTube icon blog subscription purple icon

2016 Blog Hop with Bo Bunny – Day 5

Welcome to Day 5 of our blog hop with Bo Bunny design team! It’s the last day – can you believe?! We hope that you enjoyed all the tips, techniques and inspiration 🙂 If you missed Day 4, click 2016 Blog Hop with Bo Bunny – Day 4! For all the other days, Day 3 (click 2016 Blog Hop with Bo Bunny – Day 3), Day 2 (click 2016 Blog Hop with Bo Bunny – Day 2) and Day 1 (click 2016 Blog Hop with Bo Bunny – Day 1). Don’t forget about our giveaway opportunity at the end of the post!

Margie Higuchi
I’m so excited to be sharing a shaker banner tag called Winter Joy…you can add a white cord in the back to use as an ornament or a gift tag. The shaker featured is created by using Keepsake Envelopes Mix and Bo Bunny’s Winter Wishes Collection. I LOVED how it turned out!

Winter Joy Shaker Tag by Margie Higuchi for Scrapbook Adhesives by 3L

By cutting a window in my front tag, I can add a medium size envelope perfectly! I mainly used Crafty Foam Tape White to adhere all the pieces together and for dimension and interest. I have a step-by-step tutorial on my blog. If you’re interested, please click Winter Joy Shaker Tag Tutorial.

Winter Joy Shaker Tag 2 by Margie Higuchi for Scrapbook Adhesives by 3L

Supplies List
Scrapbook Adhesives by 3L®:

Crafty Foam Tape White
Keepsake Envelopes Mix
Adhesive Dots Small

Texture Ribbons
Bo Bunny Press:
Winter Wishes Collection
Winter Wishes Combo Sticker Sheet
Winter Wishes Noteworthy Pack
Double Dot Jewels
Other:
Dies (Spellbinders® Creative Arts – A2 Matting Basics & Baby Bunting); Sequins

Erica Houghton
Today I’m sharing a mini album I created using Bo Bunny’s elegant Winter Wishes Collection and Scrapbook Adhesives by 3L® products. The Winter Wishes Collection features a lovely combination of greys, pinks, purples and browns, as well as mix of patterns. I love capturing lots of those wonderful holiday and winter moments which means I need plenty of space for photos.

Winter WIshes Mini Album by Erica Houghton for Scrapbook Adhesives by 3L

So, I actually adhered two albums together using our strongest tape, Extreme Double-Sided Tape ½”. This album can easily hold 24 photos. To securely hold my papers in place, I used E-Z Runner® Grand. For those delicate and tiny embellishments like my shear lace and sequins, Adhesive Dots Mini did the trick!

Winter WIshes Mini Album 2 by Erica Houghton for Scrapbook Adhesives by 3L

Supplies List
Scrapbook Adhesives by 3L®:

E-Z Runner® Grand
Adhesive Dots Mini
Home Hobby:
Extreme Double-Sided Tape ½”
Bo Bunny Press:
Winter Wishes Collection
Winter Wishes Combo Sticker Sheet
Winter Wishes Noteworthy Pack
Double Dot Jewels
Other:
Flowers; Ribbons; Sequins

Don’t forget to hop over to our friends at Bo Bunny by clicking:
Blog Hop with Bo Bunny – Day 5

Blog Hop Prize Details

Scrapbook Adhesives & Bo Bunny Press Blog Hop Dec 2016 Logo

Enter to win by leaving a comment through the Rafflecopter App. A winner will be randomly picked. International entries are welcome.

a Rafflecopter giveaway

If you cannot see the comment section (at the bottom of this post), please click: 2016 Blog Hop with Bo Bunny – Day 5 and scroll down to the bottom of the post.

Connect with Scrapbook Adhesives by 3L®:
Facebook – https://www.facebook.com/ScrapbookAdhesives
Website – https://www.scrapbook-adhesives.com/
Blog – https://www.scrapbook-adhesives.com/blog/
Instagram – https://www.instagram.com/scrapbookadhesivesby3l/
Pinterest – https://www.pinterest.com/SBAdhesivesby3L/
Twitter – https://twitter.com/SBADHESIVESBY3L
YouTube – https://www.youtube.com/user/ScrapbookAdhesives
Newsletter – http://eepurl.com/I6dPj

Connect with Bo Bunny Press:
Facebook – www.facebook.com/BoBunny
Website – www.bobunny.com
Blog – www.bobunny.blogspot.com
Instagram – https://www.instagram.com/mybobunny/
Pinterest – www.pinterest.com/bobunny
Twitter – https://twitter.com/BoBunnyPress
YouTube – http://www.youtube.com/BoBunnyFun
Email – bopress@bobunny.com


2016 Blog Hop with Bo Bunny – Day 4

Welcome to Day 4 of our blog hop with Bo Bunny design team! We are excited to share wonderful inspiration created with both company’s products. See what the two talented design teams have done. If you missed Day 3, click 2016 Blog Hop with Bo Bunny – Day 3, for Day 2, click 2016 Blog Hop with Bo Bunny – Day 2 and for Day 1, click 2016 Blog Hop with Bo Bunny – Day 1. Don’t forget there’s an opportunity to win a giveaway…stay tuned for details at the end of the post!

Stephanie Schütze
Upon first looking at Bo Bunny’s Winter Wishes Collection, I was in love! What a beautiful collection to reflect the cold season.

Winter Wonderland Page by Stephanie Schutze for Scrapbook Adhesives by 3L

But I had already a late summer photo on my table I absolutely wanted to use and I was surprised because it fits perfectly with this collection. It’s like my girls are walking through a winter wonderland! What do you think?

Winter Wonderland Page 2 by Stephanie Schutze for Scrapbook Adhesives by 3L

Supplies:
Scrapbook Adhesives by 3L®:

3D Foam Squares – White, Regular
E-Z Dots® Permanent Refillable Dispenser
Bo Bunny Designs:
Winter Wishes Collection

AJ Otto
Hello, I was given Bo Bunny’s Felicity 12 X 12 Collection Pack and its Noteworthy die cut pack to work with. I used the Splendor pattern for the bottom layer of my card, which was adhered using the E-Z Runner® Grand Dispenser to the card base.

Beautiful Life Card by AJ Otto for Scrapbook Adhesives by 3L

I then adhered the dice cuts onto the white panel using 3D Foam Squares White Mix , stacking each layer up on the other to add depth.  The white panel is also adhered using the 3D Foam Squares.  I then glued the bow on using the Dual Tip Glue Pen, (this assures my bow comes out straight 😉  It dries clear, perfect for adding details and embellishments.

Beautiful Life Card 2 by AJ Otto for Scrapbook Adhesives by 3L

Supplies List
Scrapbook Adhesives by 3L®:

3D Foam Squares Mix
E-Z Runner® Grand Dispenser
Home Hobby:
Dual Tip Glue Pen
Bo Bunny:
Felicity Collection
Felicity Noteworthy Pack

Don’t forget to hop over to our friends at Bo Bunny by clicking:
Blog Hop with Bo Bunny – Day 4

Blog Hop Prize Details

Scrapbook Adhesives & Bo Bunny Press Blog Hop Dec 2016 Logo

Enter to win by leaving a comment through the Rafflecopter App. A winner will be randomly picked. International entries are welcome.

a Rafflecopter giveaway

If you cannot see the comment section (at the bottom of this post), please click: 2016 Blog Hop with Bo Bunny – Day 4 and scroll down to the bottom of the post.

Connect with Scrapbook Adhesives by 3L®:
Facebook – https://www.facebook.com/ScrapbookAdhesives
Website – https://www.scrapbook-adhesives.com/
Blog – https://www.scrapbook-adhesives.com/blog/
Instagram – https://www.instagram.com/scrapbookadhesivesby3l/
Pinterest – https://www.pinterest.com/SBAdhesivesby3L/
Twitter – https://twitter.com/SBADHESIVESBY3L
YouTube – https://www.youtube.com/user/ScrapbookAdhesives
Newsletter – http://eepurl.com/I6dPj

Connect with Bo Bunny Press:
Facebook – www.facebook.com/BoBunny
Website – www.bobunny.com
Blog – www.bobunny.blogspot.com
Instagram – https://www.instagram.com/mybobunny/
Pinterest – www.pinterest.com/bobunny
Twitter – https://twitter.com/BoBunnyPress
YouTube – http://www.youtube.com/BoBunnyFun
Email – bopress@bobunny.com

2016 Blog Hop with Bo Bunny – Day 3

Welcome to Day 3 of our blog hop with Bo Bunny design team! Are you enjoying the wonderful inspiration shared by both talented design teams? If you missed Day 2, click 2016 Blog Hop with Bo Bunny – Day 2! and for Day 1, click 2016 Blog Hop with Bo Bunny – Day 1! Stay tuned for prize giveaway details at the end of the post!

Michele Kovack
Hi there! Michele here with a fun shaped card using papers from Bo Bunny, called Kiss the Cook Collection. I took inspiration from the papers and decided on a mixer card. I used my Silhouette to cut the shaped card. I used Crafty Foam Tape and E-Z Squares Refillable Dispenser to adhere the layers of the card.

MIxer Shaped Card by Michele Kovack for Scrapbook Adhesives by 3L

I wanted to add some “frosting” to the mixer, because we all know that is the BEST part of baking! I used liquid applique in several layers and sprinkled glitter over it.

MIxer Shaped Card 2 by Michele Kovack for Scrapbook Adhesives by 3L

I die cut a flower and layered it using Crafty Foam Tape to give it lots of pop and dimension. I used a sticker from the Kiss the Cook Collection to place in the center of the flower. I adhered a few black sequins using  Adhesives Dots Mini. I had so much fun creating with these super cute papers and stickers! Thank you for stopping by today!

MIxer Shaped Card 3 by Michele Kovack for Scrapbook Adhesives by 3L

Supplies:
Scrapbook Adhesives by 3L®:

Crafty Foam Tape
E-Z Squares Refillable Dispenser
Adhesives Dots Mini
Bo Bunny Designs:
Kiss the Cook Collection (patterned papers & cardstock sticker sheet)

Judy Hayes
Bo Bunny’s Winter Wishes Collection is perfect for some quick thank you cards that I’ll need after the holidays!  I love the soft subdued colors and “snow” theme! I’ve used E-Z Dots® Permanent Refillable Dispenser to fasten the papers to the card fronts.  Winter Wishes Combo Sticker Sheet were used on the cards – so easy and so cute!  3D Foam Creative Sheets were used to die cut pink paper with the words “thanks” and Thank you” for dimension.

Winter Wishes Thank You Card by Judy Hayes

I accented the cards with sequins, using Adhesive Dots Mini – perfect for those small embellishments! Did you know that E-Z Runner® Micro Refillable Dispenser apply a narrow strip of adhesive? They held two strands of  Twine  across cards. Winter Wishes Noteworthy Pack die cuts were popped up with Thin 3D Foam Squares – Mix White. I have detailed tutorials on each card on my blog, just click: Winter Wishes Cards.

Winter Wishes Thank You Card 2 by Judy Hayes

Supplies:
Scrapbook Adhesives by 3L®:

Adhesive Sheets 4 x 6ʺ
Adhesive Dots Mini
E-Z Dots® Permanent Refillable Dispenser
E-Z Runner® Micro Refillable Dispenser
3D Foam Creative Sheets
Thin 3D Foam Squares – Mix White

Bo Bunny:
BoBunny® Winter Wishes Papers, Combo Stickers. Noteworthy
Other:
White card stock, Buttons Galore & More Sequins, Spellbinders Phrase Set One, Phrase Set Two, Twine

Don’t forget to hop over to our friends at Bo Bunny by clicking:
Blog Hop with Bo Bunny – Day 3

Blog Hop Prize Details

Scrapbook Adhesives & Bo Bunny Press Blog Hop Dec 2016 Logo

Enter to win by leaving a comment through the Rafflecopter App. A winner will be randomly picked. International entries are welcome.

a Rafflecopter giveaway

If you cannot see the comment section (at the bottom of this post), please click: 2016 Blog Hop with Bo Bunny – Day 3 and scroll down to the bottom of the post.

Connect with Scrapbook Adhesives by 3L®:
Facebook – https://www.facebook.com/ScrapbookAdhesives
Website – https://www.scrapbook-adhesives.com/
Blog – https://www.scrapbook-adhesives.com/blog/
Instagram – https://www.instagram.com/scrapbookadhesivesby3l/
Pinterest – https://www.pinterest.com/SBAdhesivesby3L/
Twitter – https://twitter.com/SBADHESIVESBY3L
YouTube – https://www.youtube.com/user/ScrapbookAdhesives
Newsletter – http://eepurl.com/I6dPj