Welcome to Day 2 of the 4th Annual Handmade Holidays Blog Hop!
Please click here find the correct post!
![]()
Welcome to Day 2 of the 4th Annual Handmade Holidays Blog Hop!
Please click here find the correct post!
![]()
Welcome to Day 2 of the 4th Annual Handmade Holidays Blog Hop!
A few years ago we were looking for handmade gift ideas and thought it would be great if there was a resource dedicated JUST to handmade gift ideas. Enter the Handmade Holidays hop! We’ve gathered 100+ creative bloggers and manufacturers to bring you inspiring gift ideas you can make now to give to your friends, family, and colleagues. Pin and bookmark these ideas for this holiday season and to use throughout the year! Each day of the hop features approximately 30 gift projects and you can “hop” from one blog to another to check them all out.
The idea was born a few years ago to offer an online ideas ‘library’ dedicated to handmade gift suggestions which you can use all year round.
Enter the Handmade Holidays hop! We’ve gathered over 100 of our creative blogger friends in the craft industry as well as some of our fellow product manufacturers to bring you a plethora of inspiring gift ideas you can make now to give to your friends, family, and colleagues. Pin and bookmark these ideas for this holiday season and to use throughout the year! Each day of the hop features approximately 30 gift projects and you can “hop” from one blog to another to check them all out.
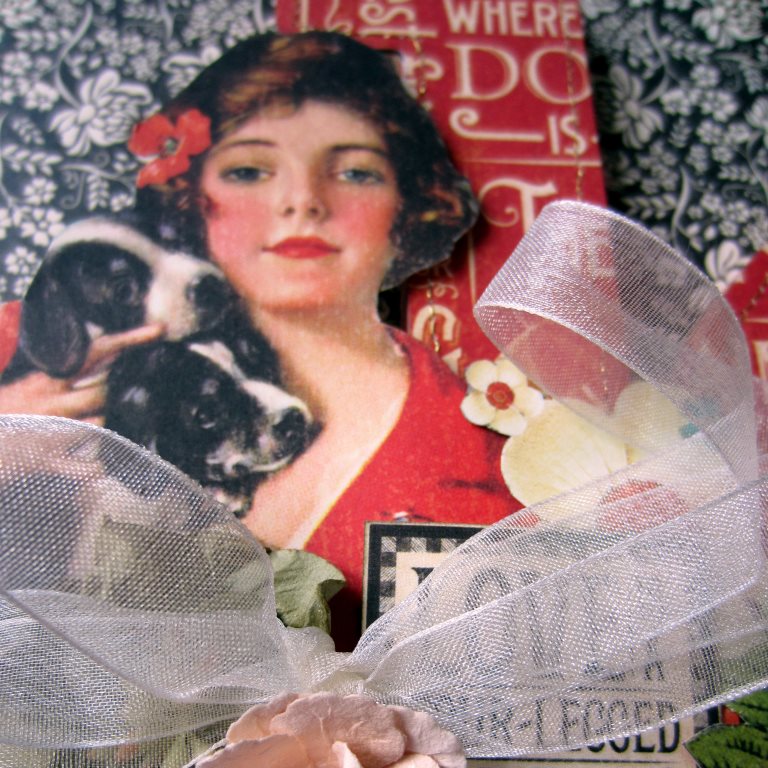
Hello everyone! Asia King here and today I would like to tempt you with this little speak peak of my project for today’s Handmade Holiday’s blog hop. Be sure to check out all the details and my video tutorial on my blog. I hope you enjoy it!
Adhesives used:
3D Foam Pennants, 3D Foam Squares Thin – Mix White, Adhesive Sheets, Ivory Creative Photo Corners, Crafty Power Tape, E-Z Dots® Permanent Refillable, E-Z Dots® Repositionable,
Other supplies:
Neat and Tangled Everday Labels, Clearsnap/Colorbox: Mudslide Ink Spritzer, Smooch Pearlized Accent Ink Mocha & Green Apple, Mix’D Media Inkx Chox Butternut & Sparrow, Art Screen Mandala; Graphic45 Sweet Sentiments papers; dies; Rowlux Illusion Film Clear Moire
Are you ready for lots more creative handmade gift ideas and projects??
Follow along on our blog hop! Simply click on each of the links below to be taken to that post with additional information and photos on how to create a handmade gift project. Have fun and pin away!
![]()
Clearsnap || Ellison Educational Equipment || Walnut Hollow || Graphic45 || Westcott || ICE Resin || Rowland Industries || Scrapbook Adhesives by 3L || Pink and Main || Elizabeth Craft Designs || The Buckle Boutique || Neat and Tangled
Sakura || Fairfield Processing
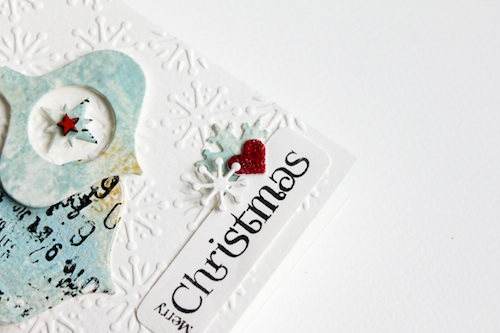
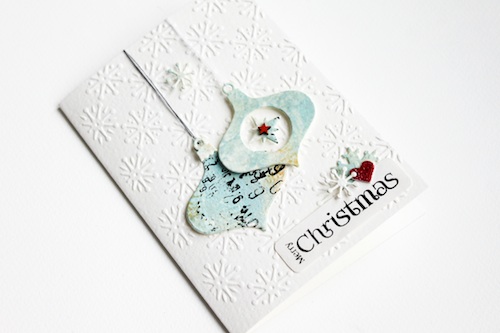
Hi there,
it’s Stephanie here today and I want to show you a Christmas card I made using some of my favorite adhesives.
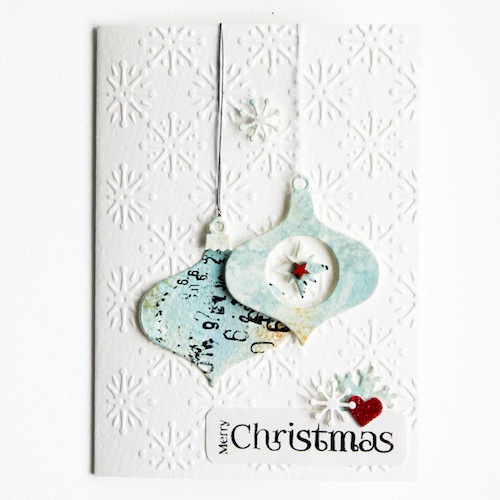
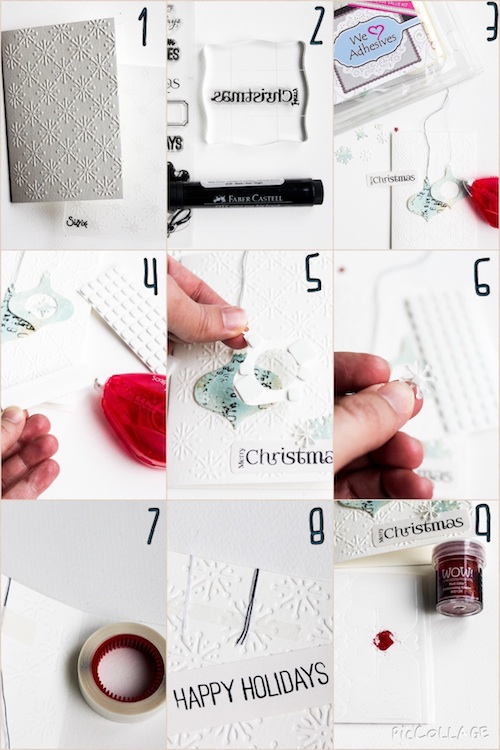
1 – Use your Die Cut Machine to emboss your card with a winter theme. I used an embossing folder with lovely snowflakes.
2 – Stamp your sentiment and cut it out.
3 – Prepare your decorative embellishments: die cut some ornaments, Christmas balls, color a wooden star with red watercolor.
4 – Adhere your sentiment and one of the Christmas ornaments with the E-Z Runner® Permanent Strips Refillable Dispenser
5 – Adhere the other Christmas ornament with the 3D Foam Squares White Small and Regular
6 – You can cut the 3D Foam Squares for smaller, detailed sizes for little paper cuts and embellishments.
7 – Use the Crafty Power Tape to fix the yarn at the back of the card
8 – Adhere another sentiment on this place.
9 – Use the 3D Foam Heart and embellish with red embossing powder for another colored highlight. Yes, you can heat emboss the 3D Foam shapes!
Supplies from Scrapbook Adhesives by 3L®
Other supplies:
Thanks for visiting! I wish you a nice creative day!
Stephanie Schutze
Visit our Website and Blog!
Sign up for our Newsletter so you never miss a contest or giveaway!
Hi everyone, Christine here today with a ‘Happy Us’ card.
My card features Graphic 45 – Couture papers. I matted the patterned paper onto my card base with E-Z Runner® Permanent Strips Refillable. 3D Foam Pennants are affixed onto Graphic 45 paper and cut around, so quick and effective! The red central star is Spellbinders – Stars Five, I’ve placed 3D Foam Squares – Regular on the reverse for dimension.
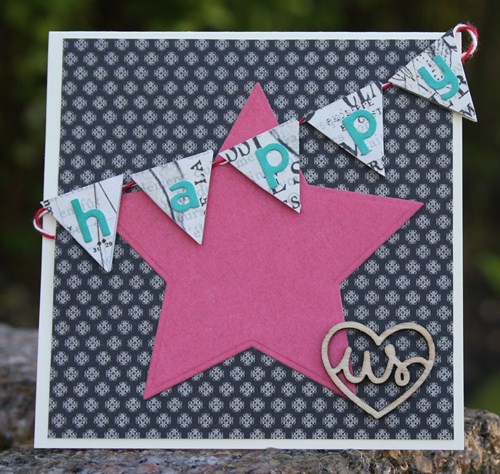 The wooden embellishment is Freckled Fawn, Wood Chip Hearts and these are a dream to adhere with an Adhesive Sheet.
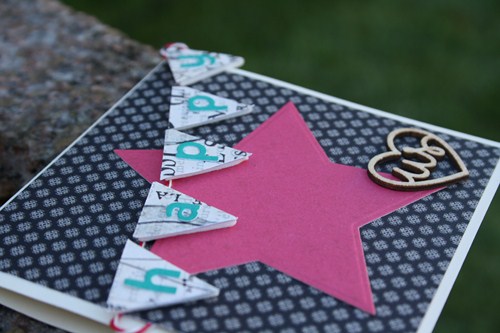
I think it makes an alternative anniversary card!
I have recently been moving craft rooms so my craft stuff has been all over the place! When it came to putting together a card I grabbed a Adhesive Value Kit as I knew everything would be to hand. These are so useful as they contain not just the essential adhesives but embellishments too.
Thank you for joining me today and don’t forget to stop by the Scrapbook Adhesives by 3L® website for all the product info.
Supplies:
It’s November 1st, how did that happen? I am not ready to switch gears to red and green, so I’ll start with silver and gold, and a card that could work for Christmas, New Year’s Day, a wedding or just about anything else, depending on the sentiment stamp you use.
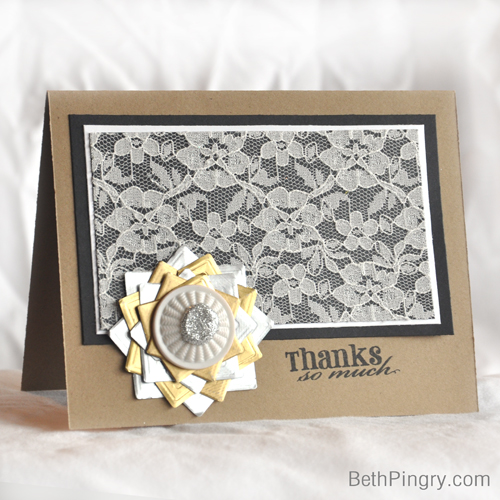
To make the Creative Photo Corner flower embellishment, I created a star with the first layer of Silver, then put the second layer in between the points in Gold, just covering the black part, then repeated with the 3rd layer, then ditto on the 4th, just like this:
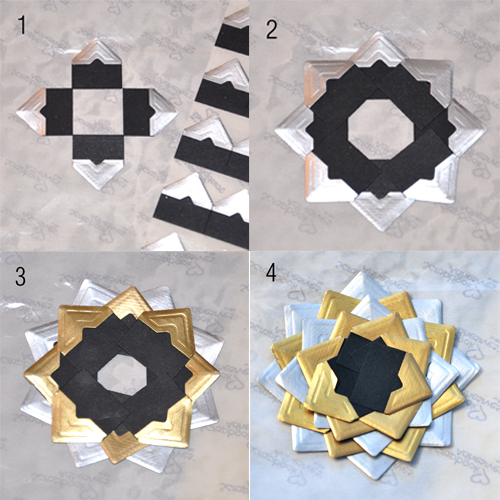 Note that I am using the sheet of non-stick paper the Creative Photo Corners come on. This makes it easy to move them around and assemble the flower. You could also use waxed paper.
To complete the flower, I added an Adhesive Dots 3D to the center of a button then covered it in silver glitter. Using an Adhesive Dots Medium, I adhered the button to the center of the flower.
Next I made the lace covered paper. I applied an Adhesive Sheet to black paper, removed the liner sheet, then added the lace on top of the Adhesive Sheet’s adhesive. I trimmed it down to size in my paper trimmer.
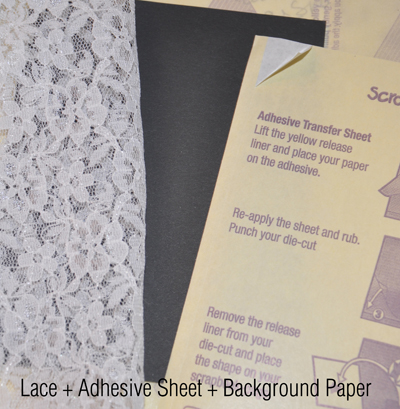 I layered it onto white then black cardstock and used the E-Z Runner® Permanent Strips Refillable Adhesive.
 Next stamp the sentiment and it’s done!
Thanks for visiting today!
Supplies:
Happy Halloween everyone! It’s Kelly here today to share a fun, simple technique to create your own spider web. I love doing Halloween layouts and thought it was time to put together an album for all of my Halloween pages. So I decided to make a ‘cover page’ for this scrapbook, and here it is:
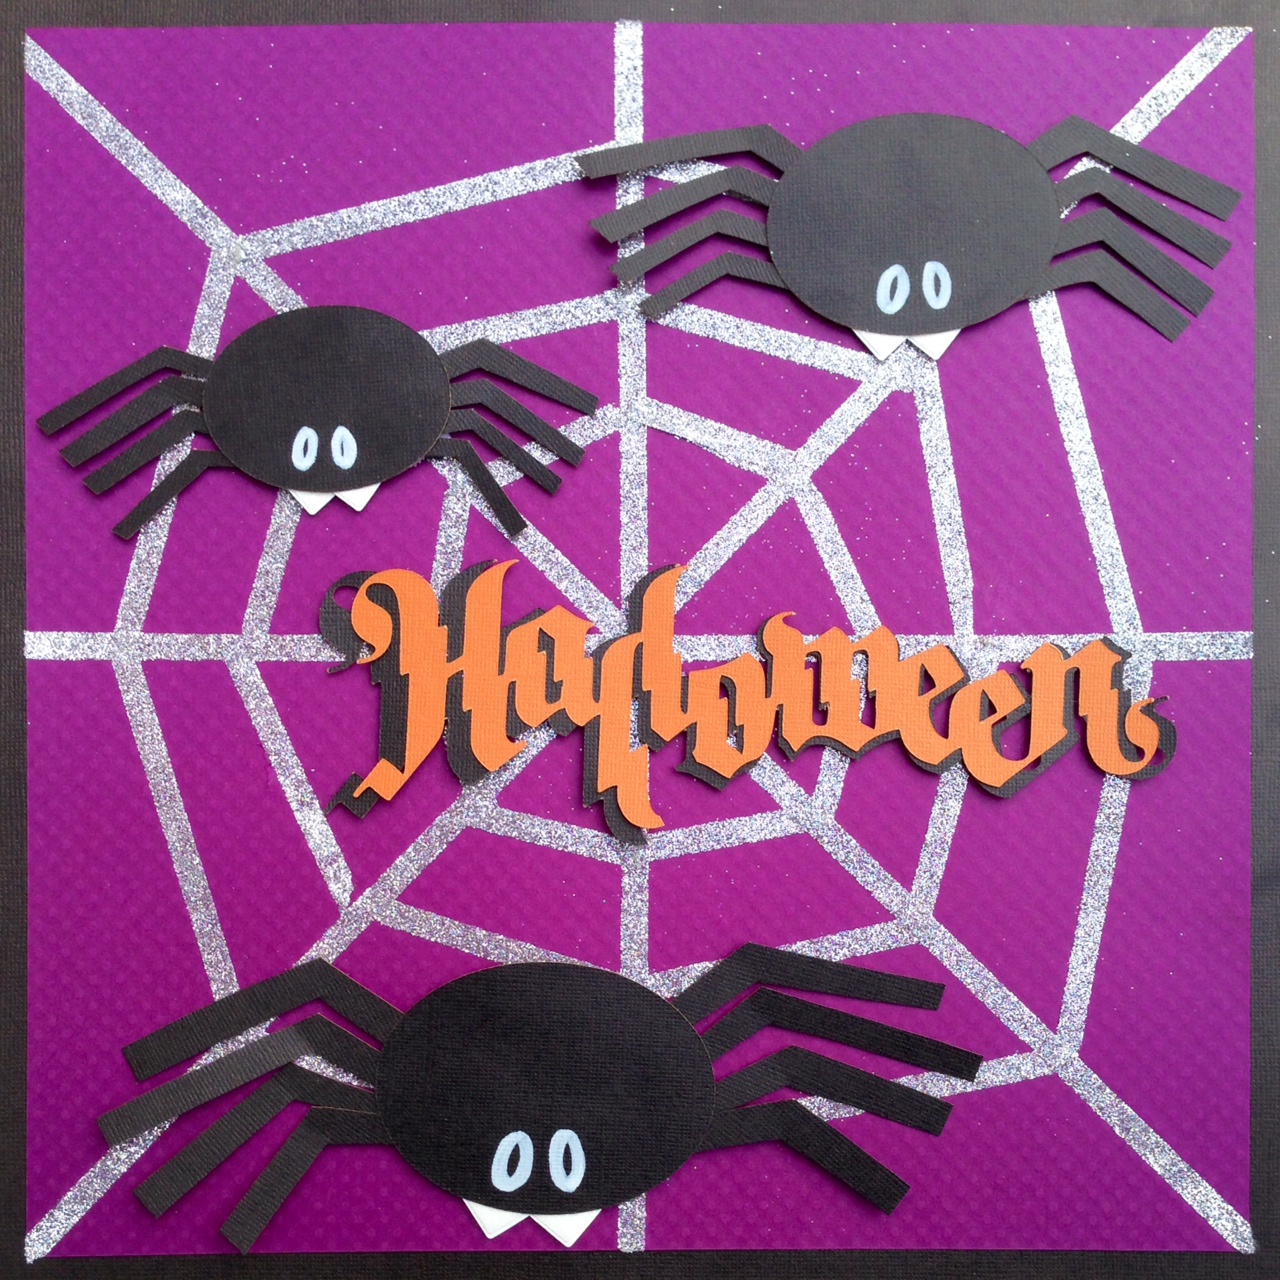
If you’ve seen any of our “Wear Your Adhesives On the Outside” blog posts, then you know that Crafty Power Tape is great for glitter…and with that in mind, I designed this spider web:
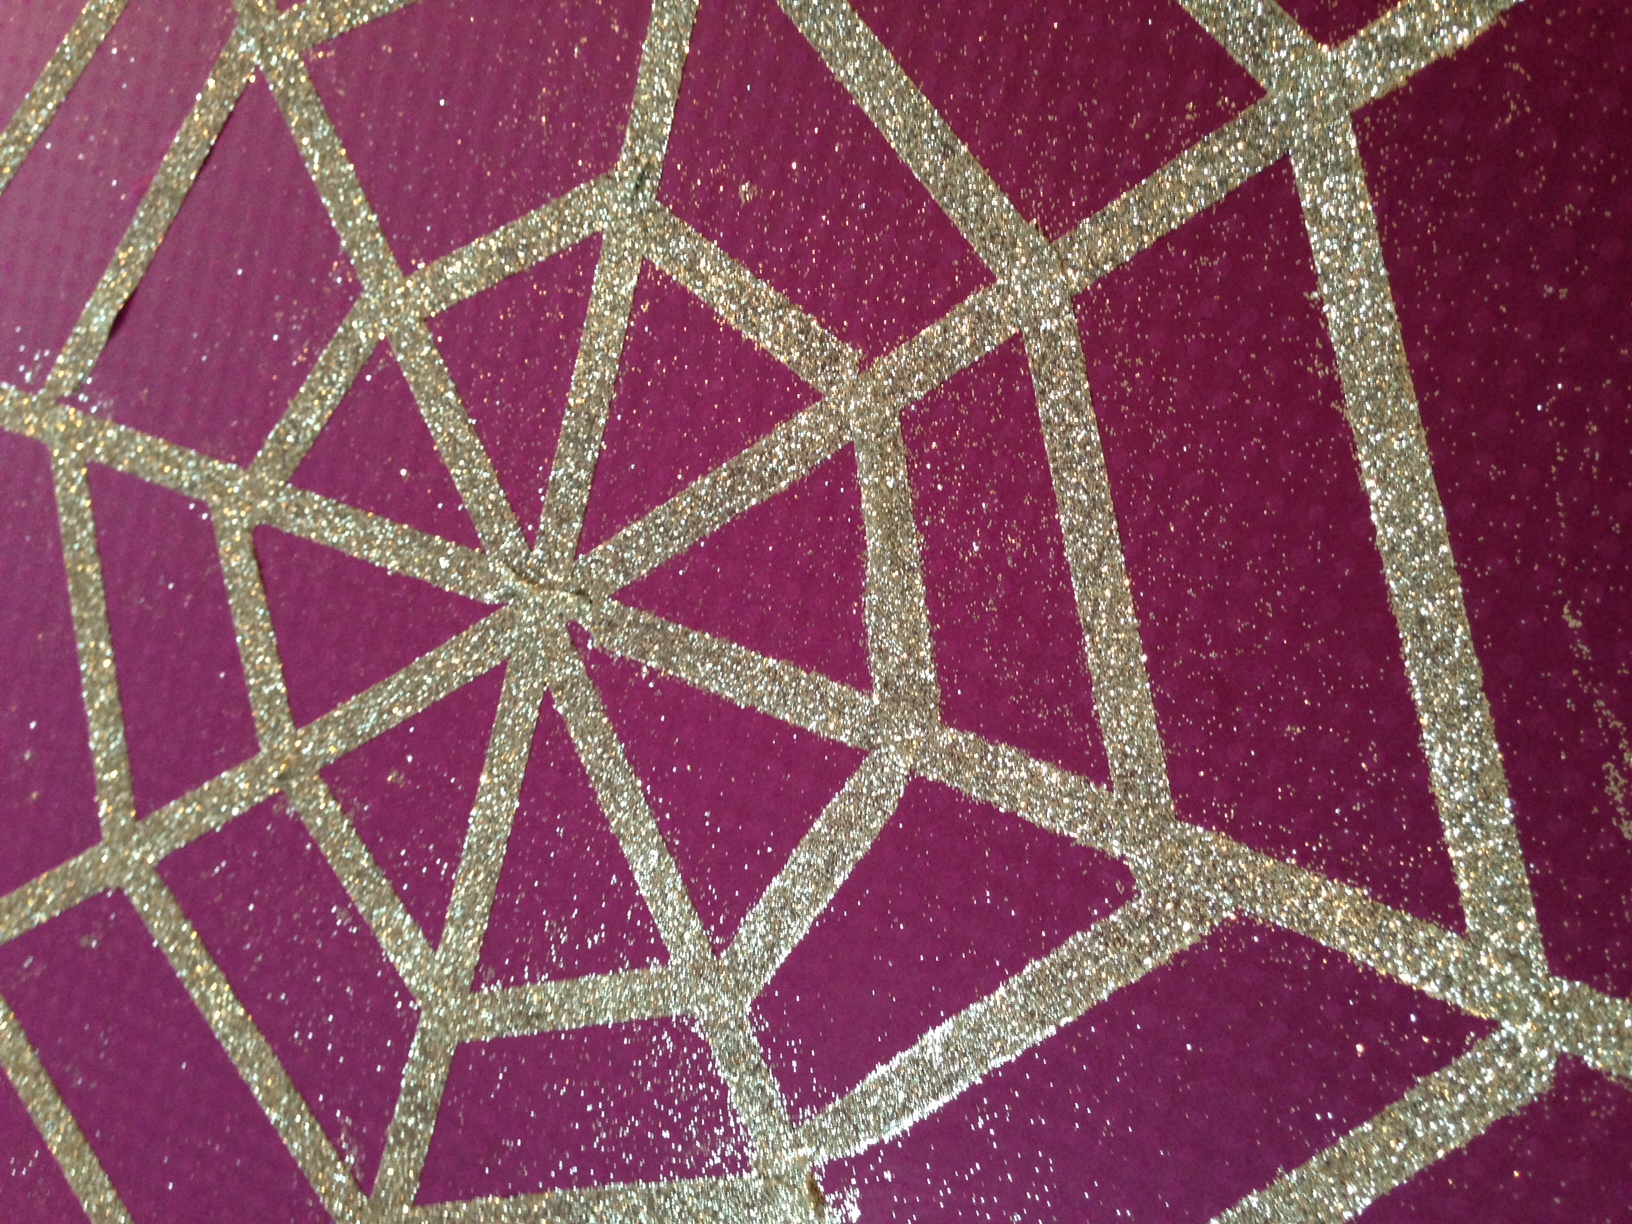
I started with a piece of cardstock that I cut down to 11″ x 11″ and used the handy Crafty Power Tape dispenser to cut off strips. I honestly didn’t measure anything and just kept placing down strips quickly. For more ‘exact’ web lines, I recommend drawing your web with a pencil first. But I’m not really the ‘exact’ crafter! ha ha
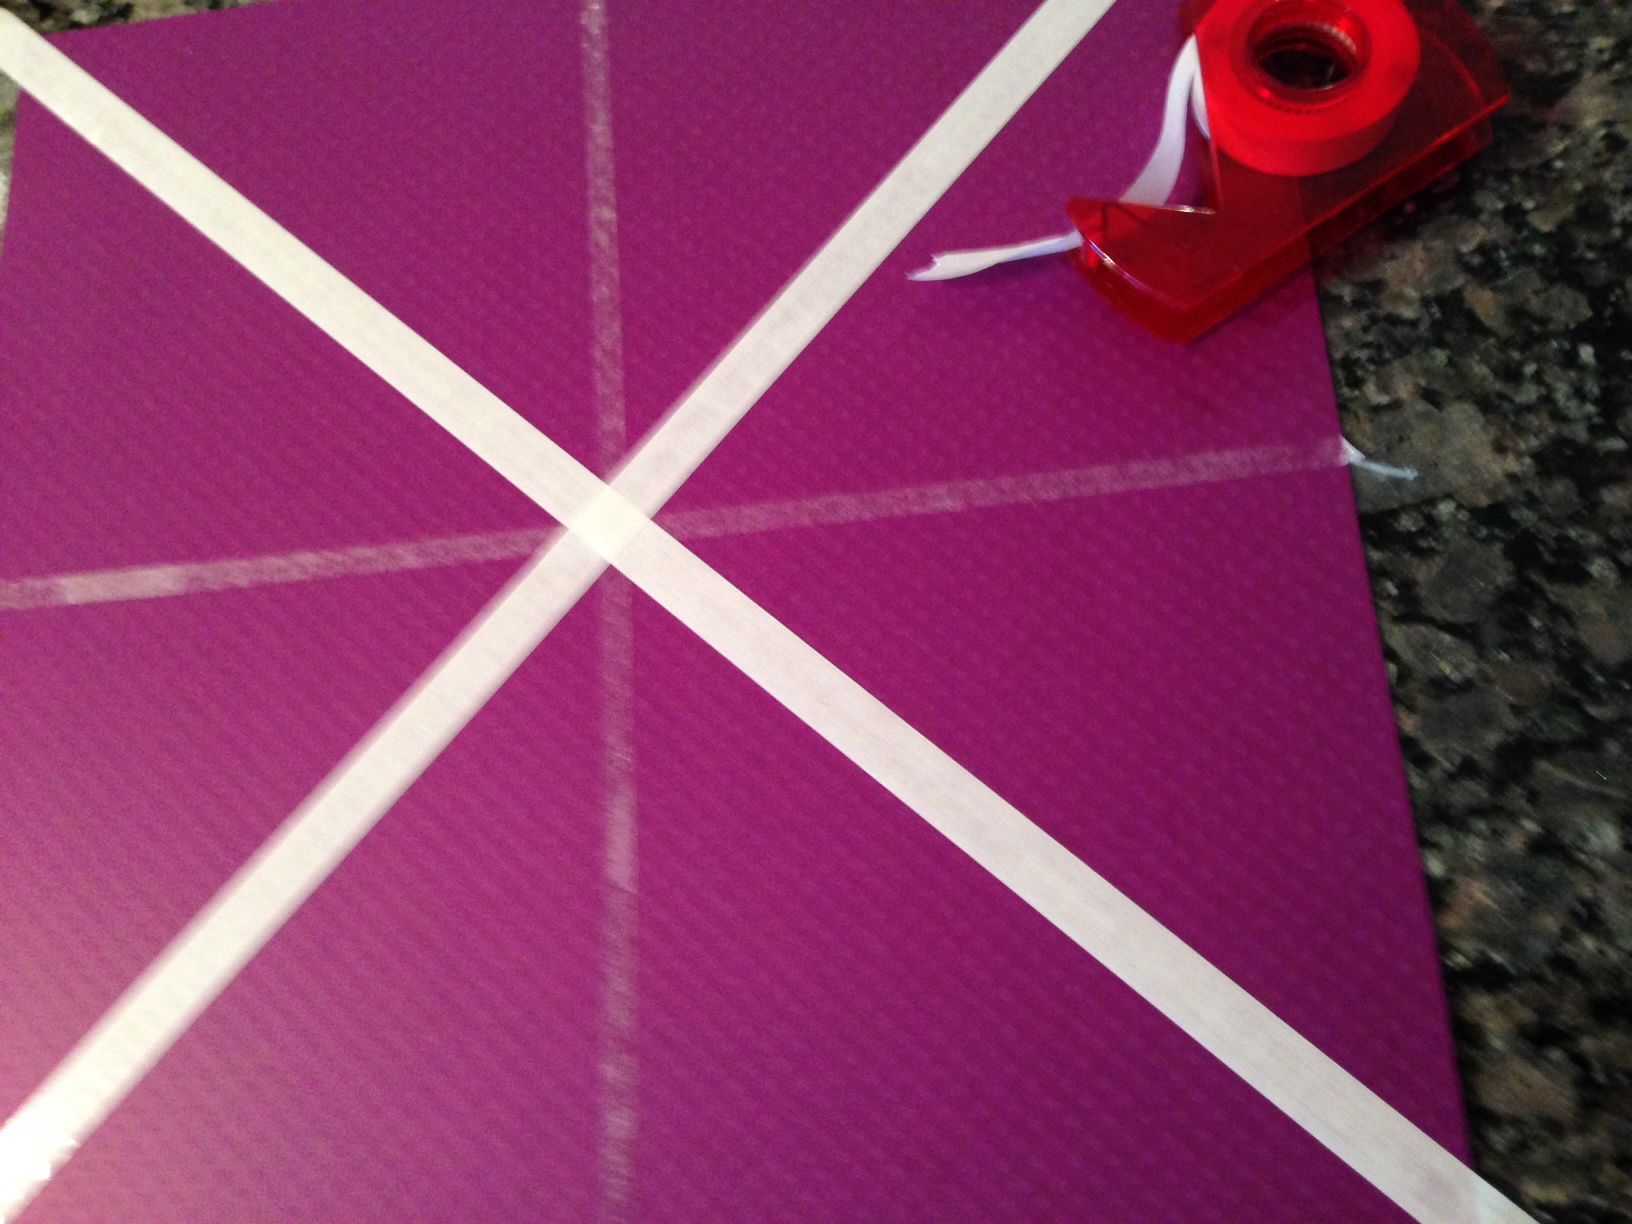
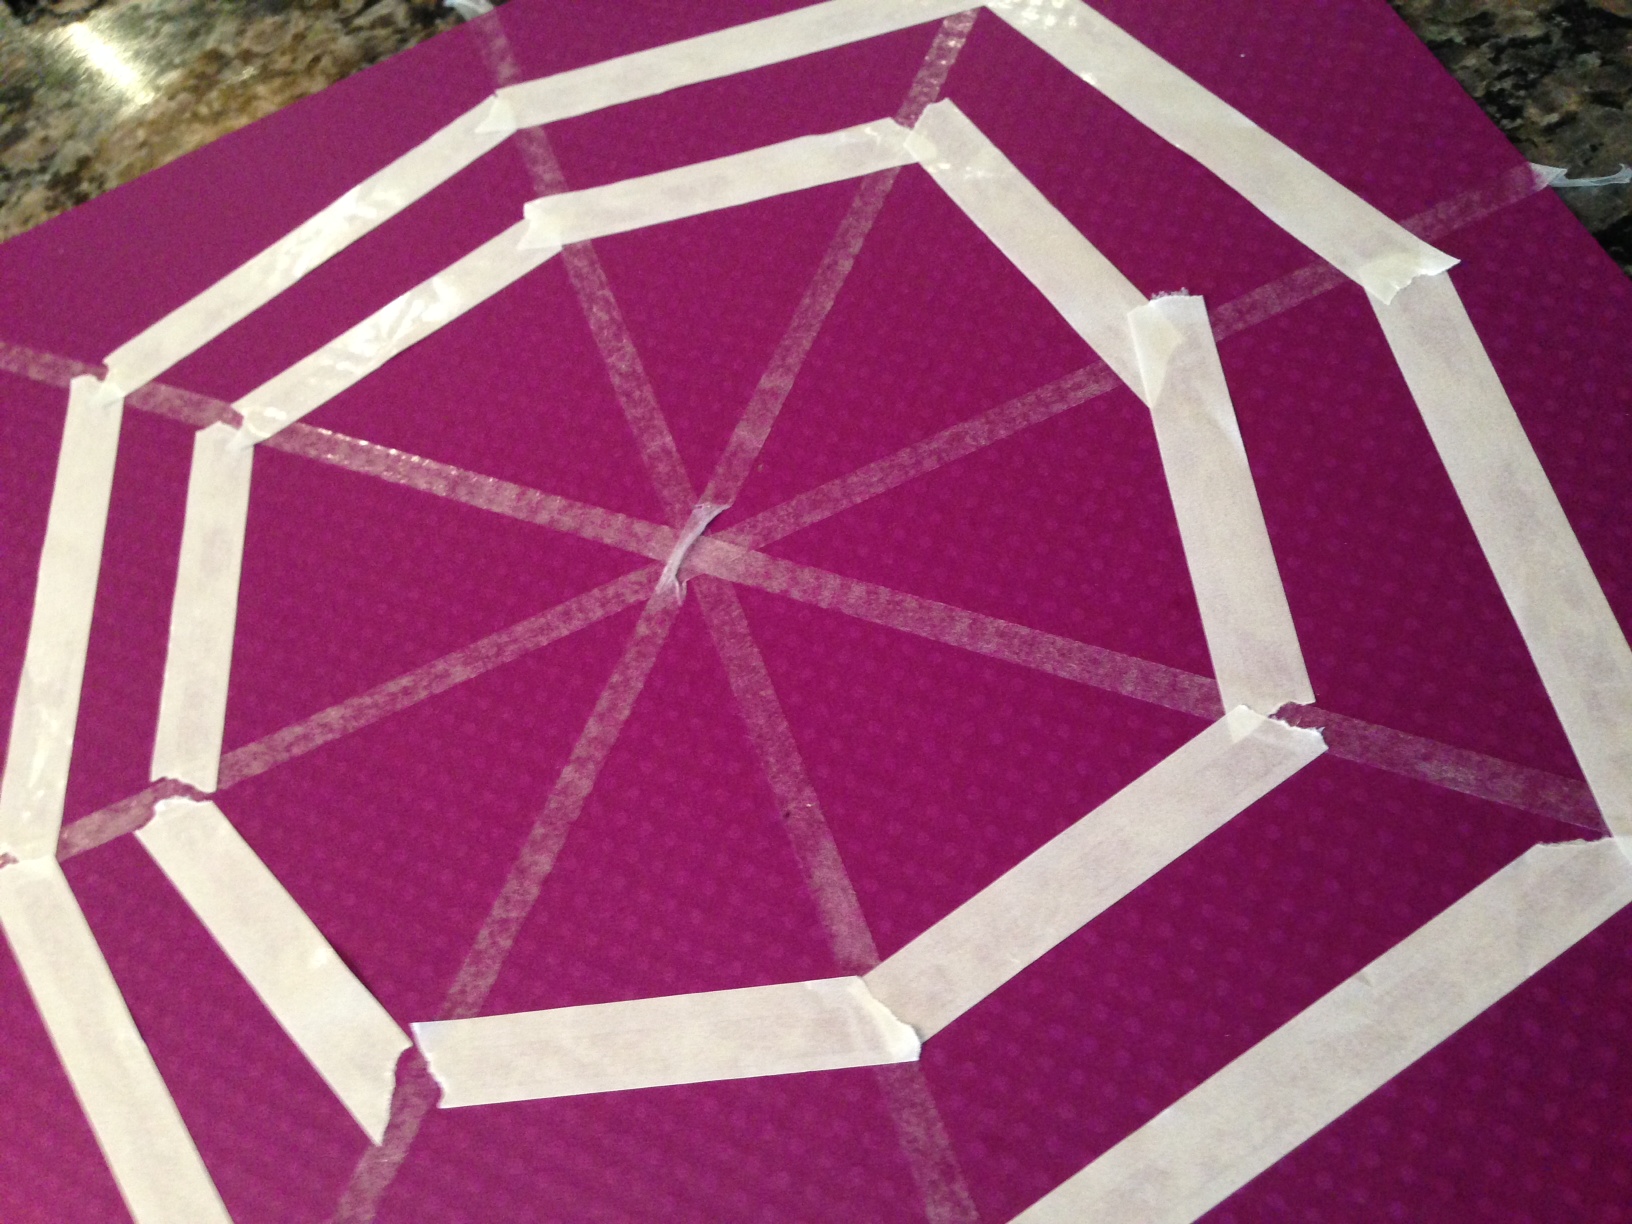
I took off the adhesive backing strips as I went along and was careful that they didn’t overlap each other.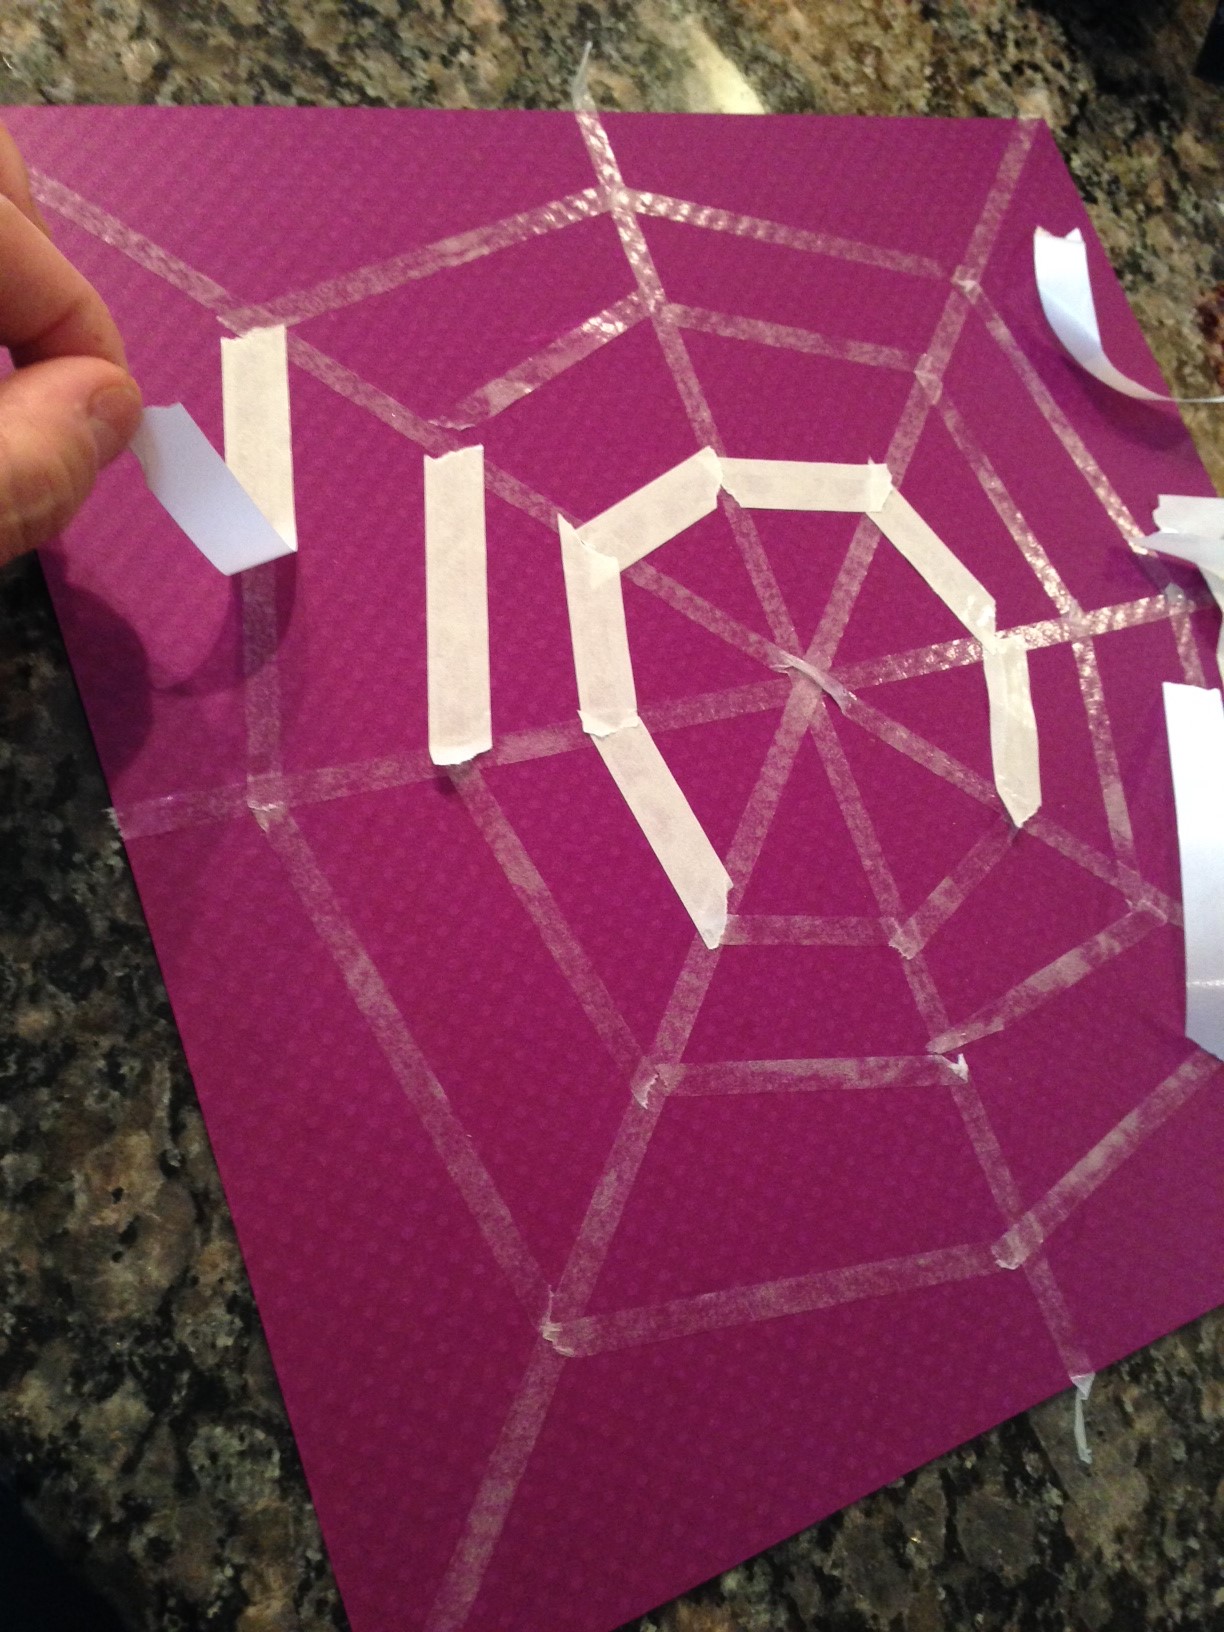
Finally, I dumped silver glitter all over.
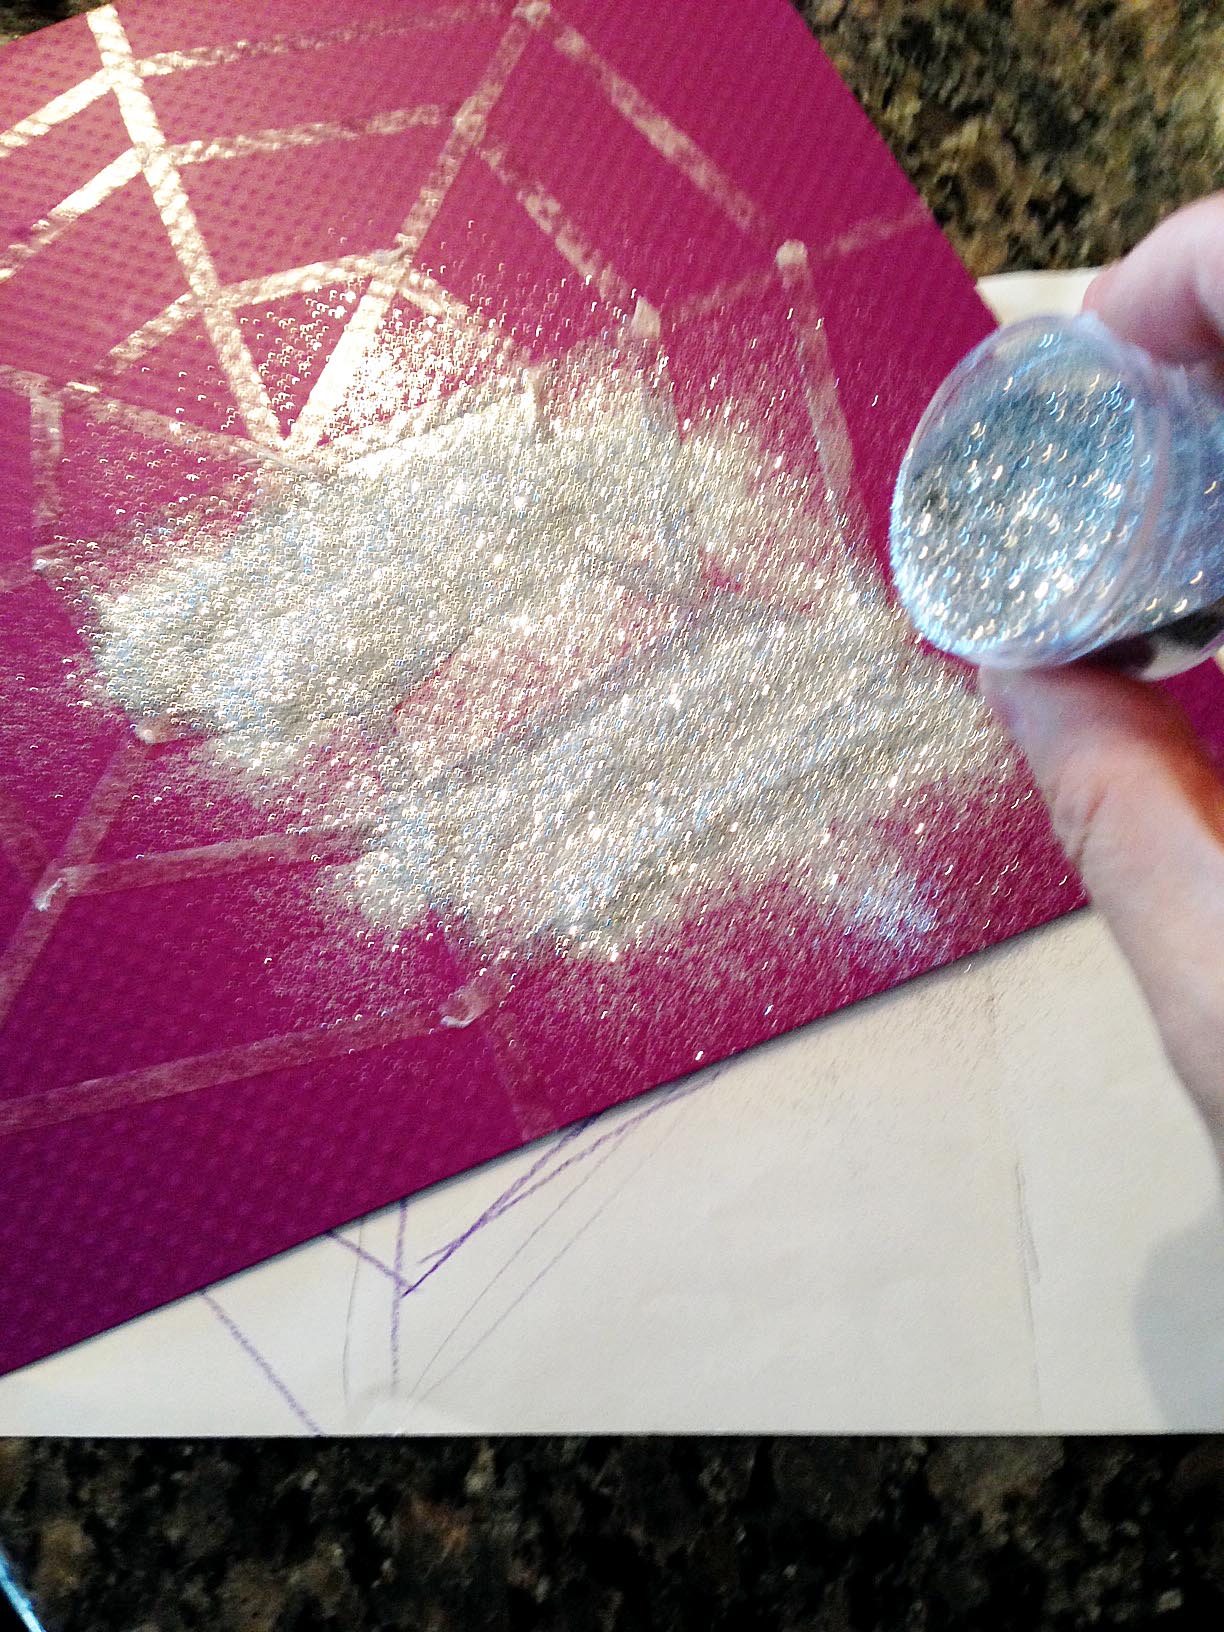
One quick way to get rid of excess glitter is to swipe it away with a Swiffer cloth.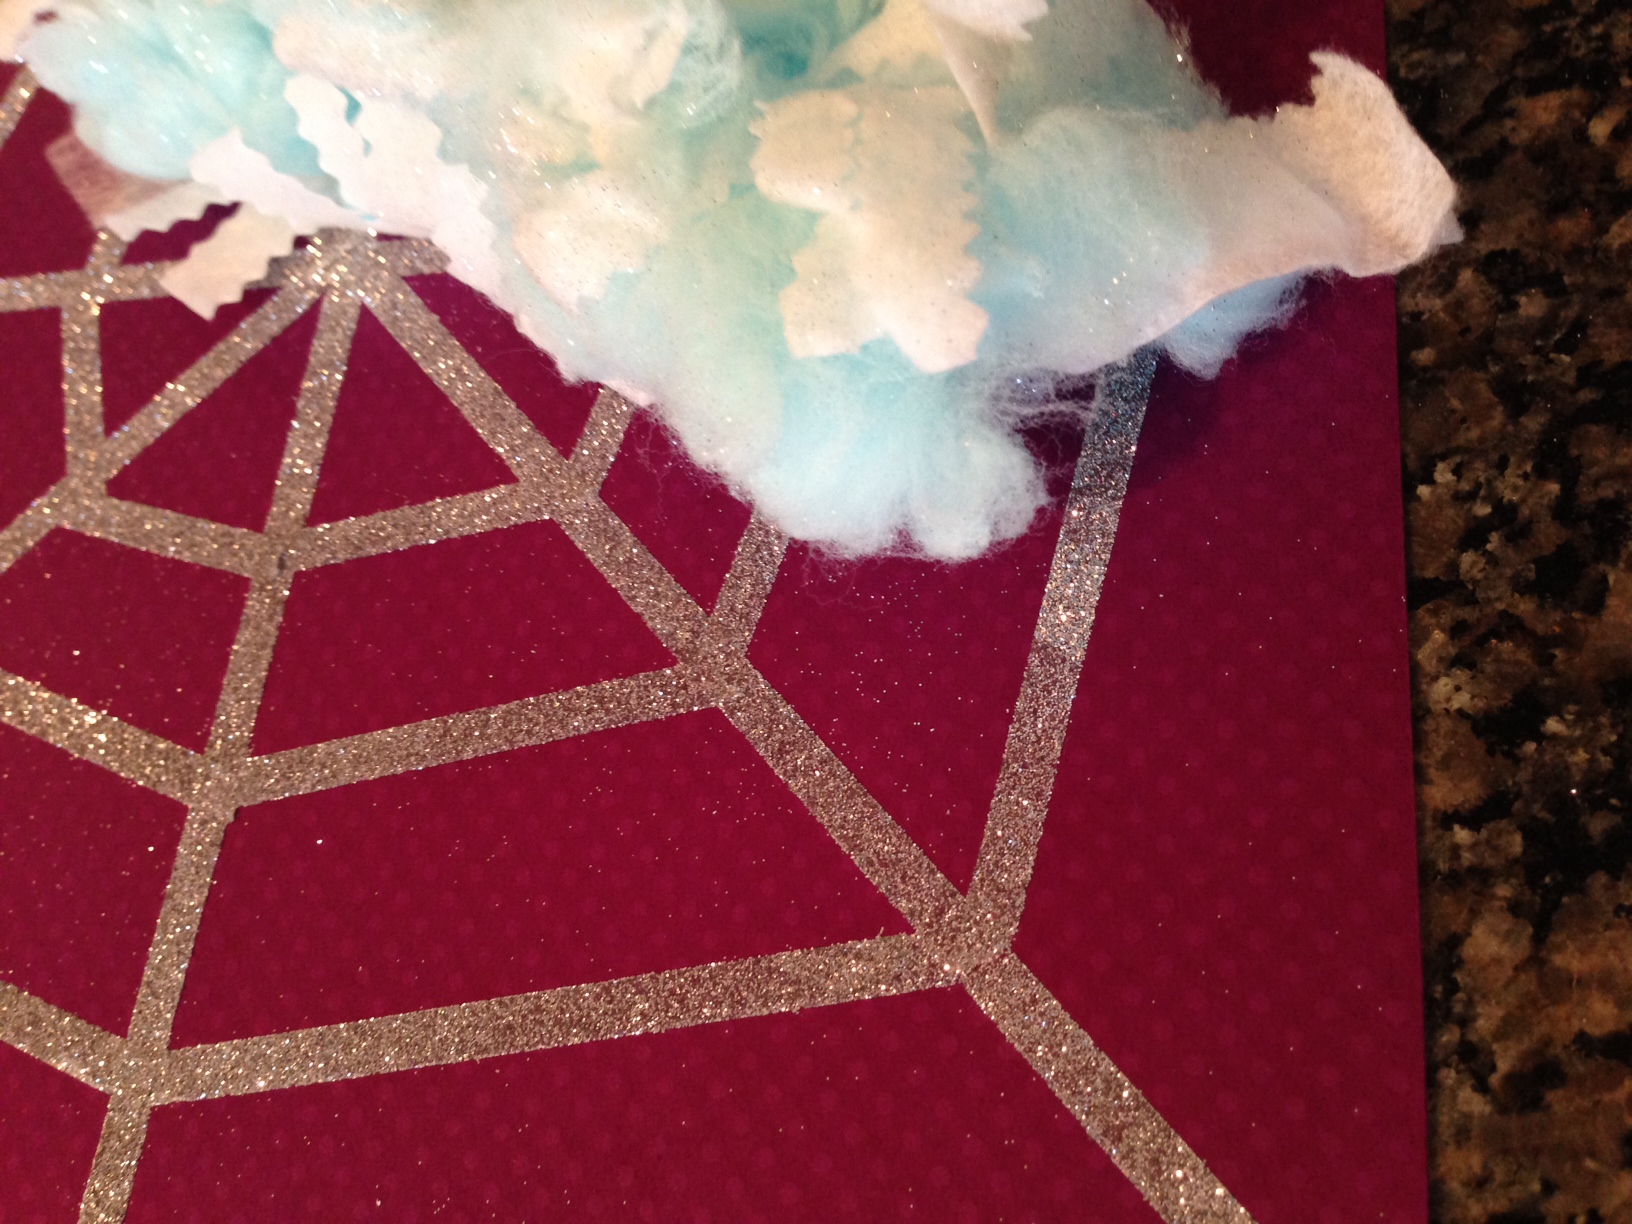
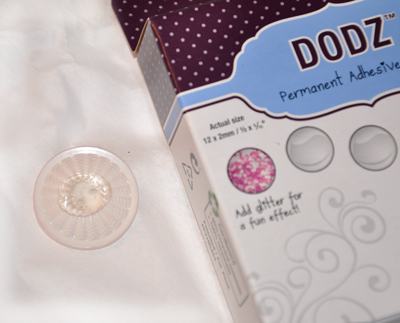
For the spiders, I cut the ovals using my digital cutting machine and then freehand cut the legs. The legs are adhered on the back with Dodz™ Small.
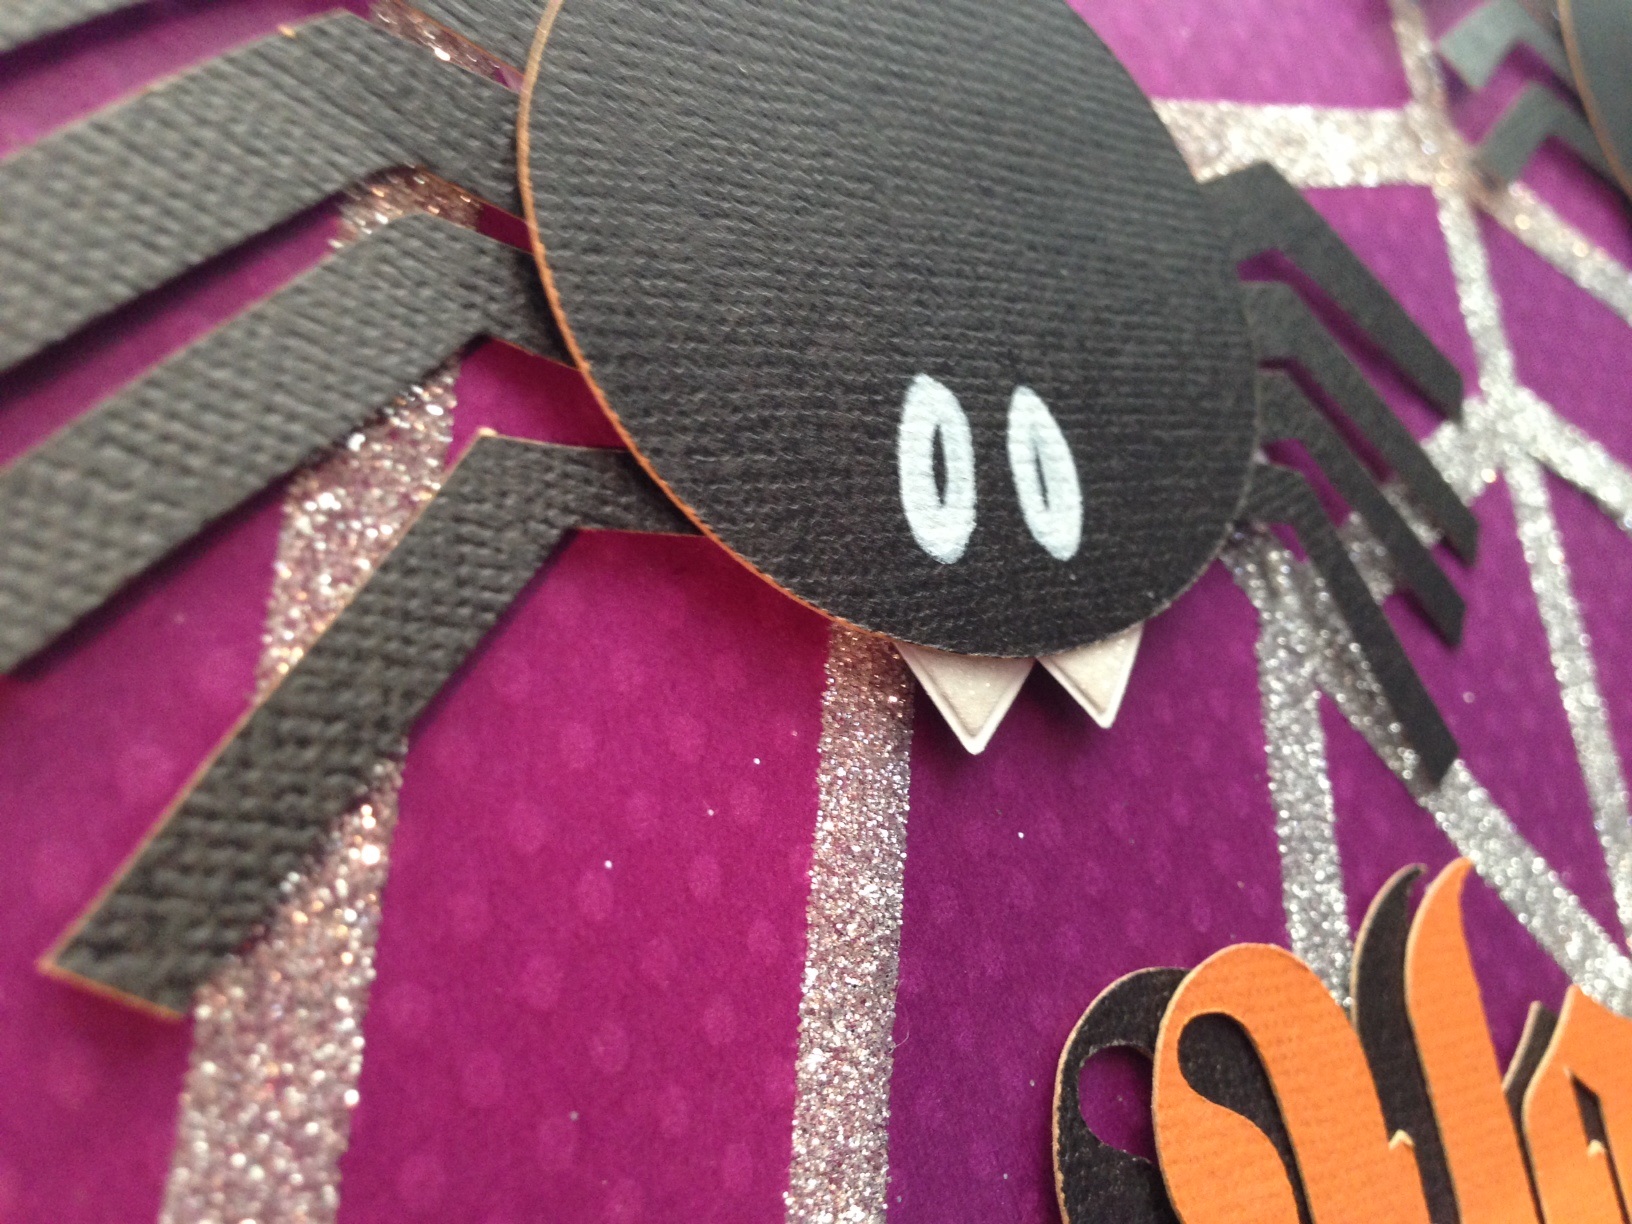
Their fangs are actually Creative Photo Corners! It’s hard to see but those little fangs are really sparkly and cute!
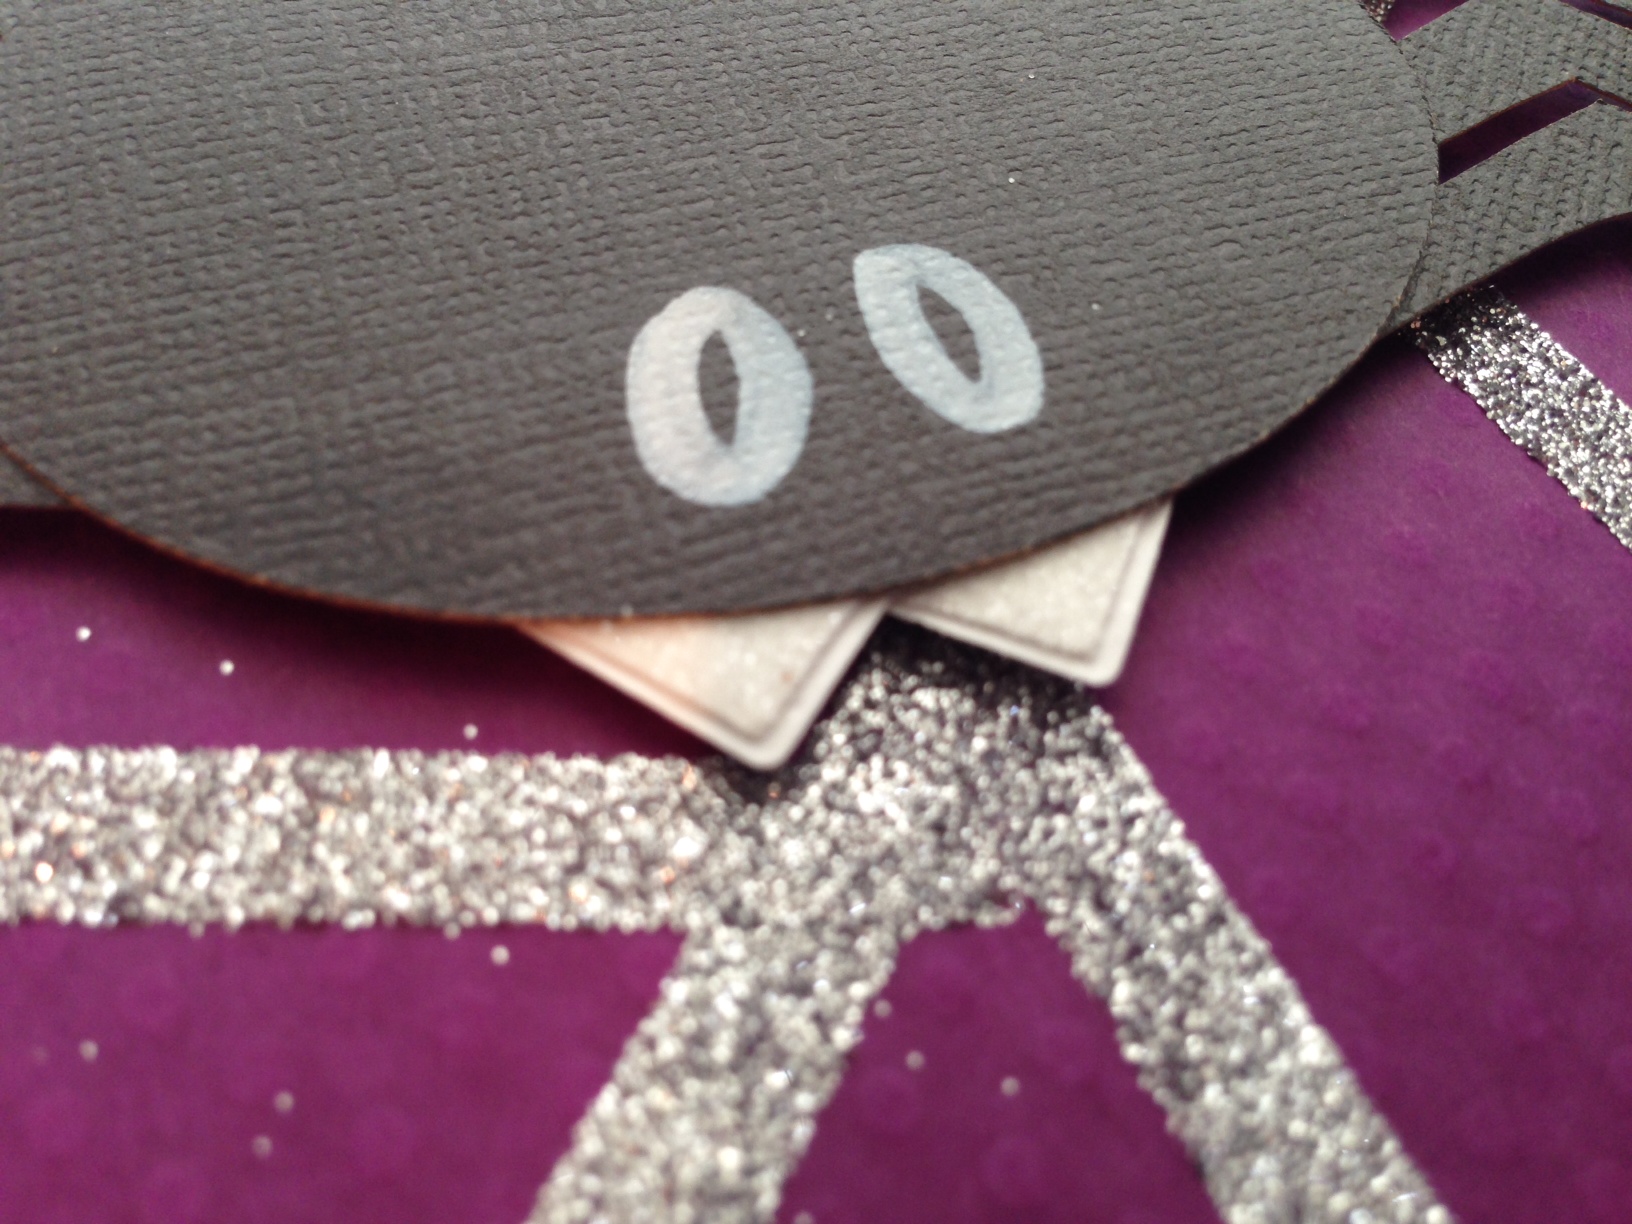 I placed two white Creative Photo Corners upside down and underneath the spider so the sticky triangular point was exposed.
 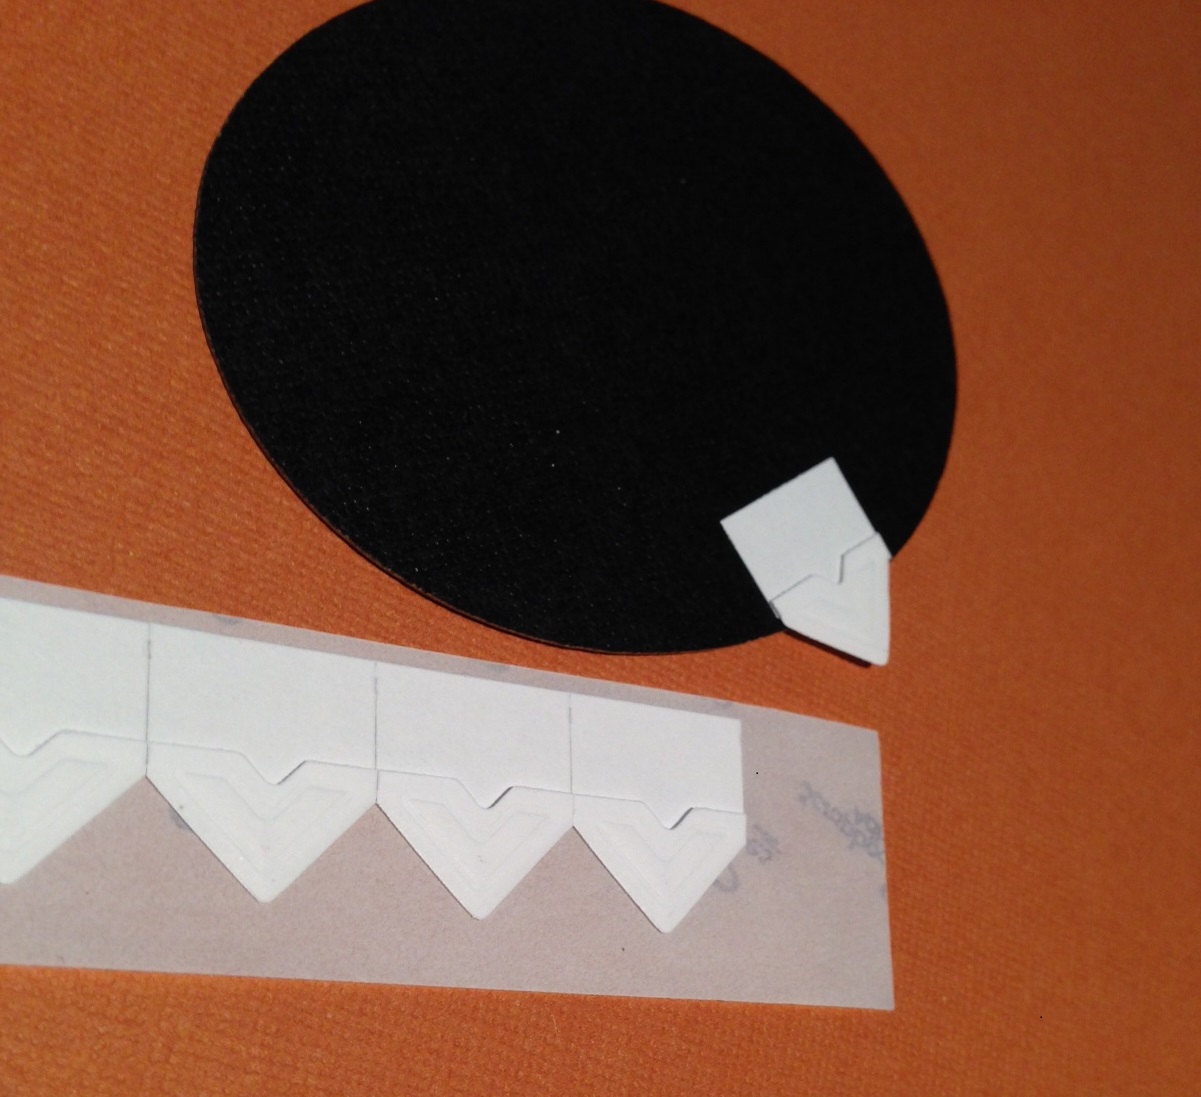 Then I sprinkled those fangs with clear glitter.
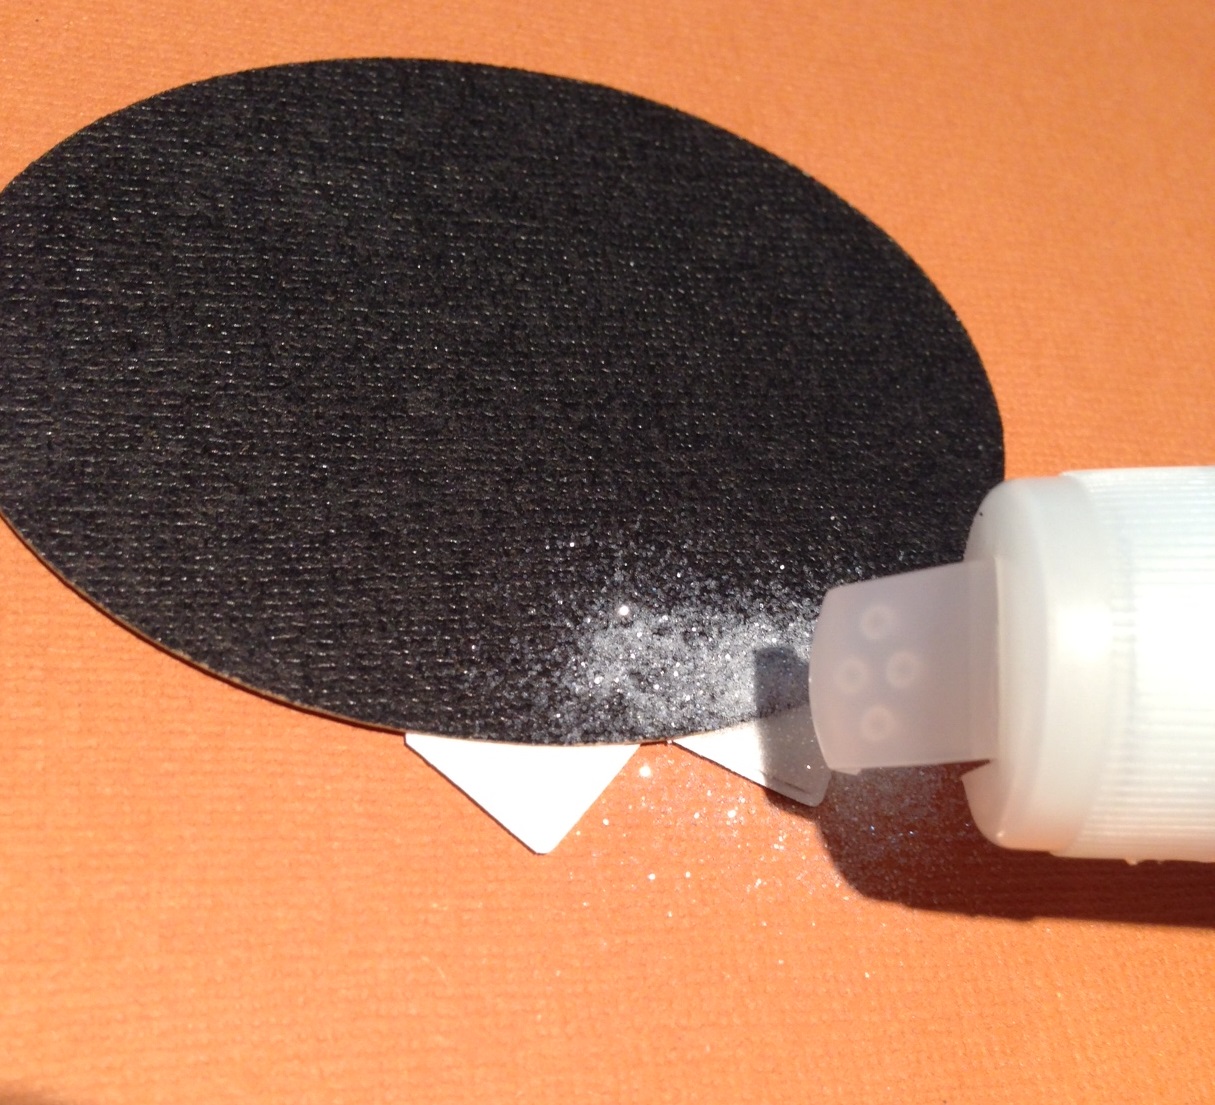 I adhered the spiders to the web with black Crafty Foam Tape. Did you know Crafty Foam Tape comes in black? It’s perfect for working with darker colours like I used here.
 I also adhered my “Halloween” title with black Crafty Foam Tape.
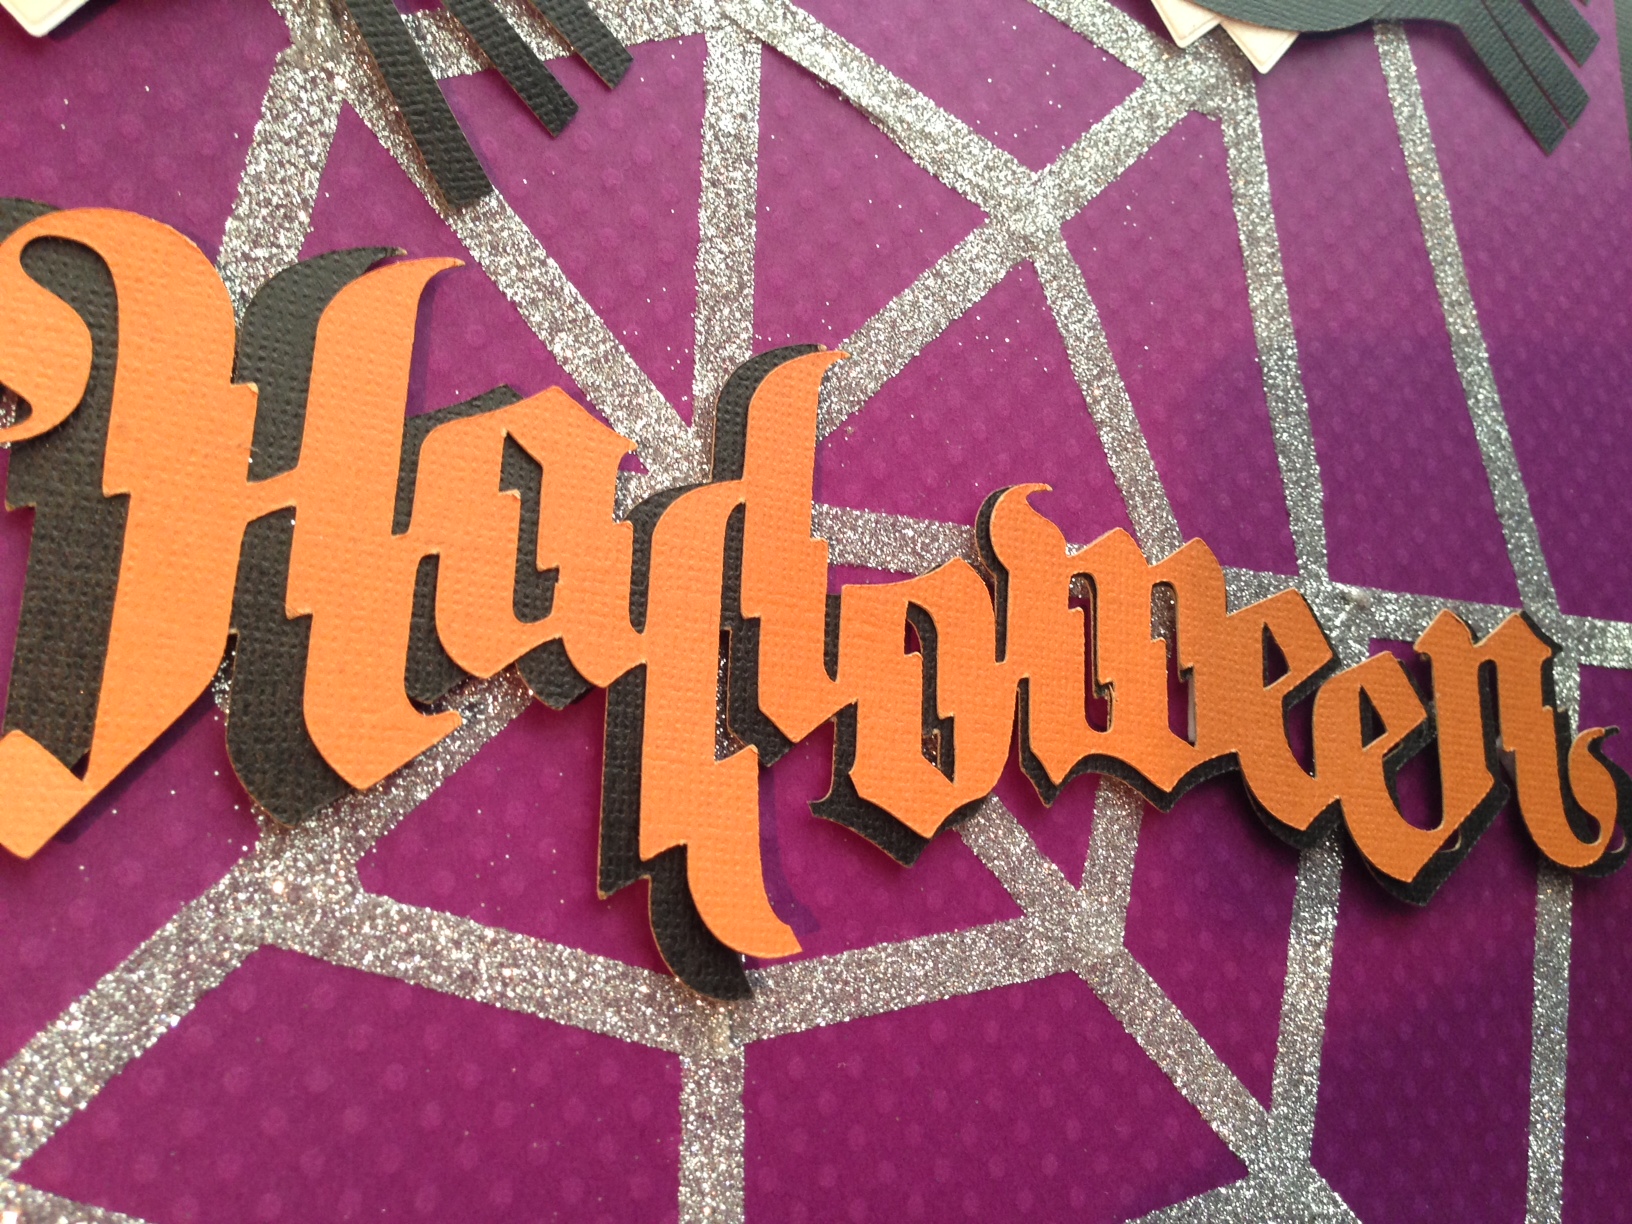 Now I’m excited to put this cover page into my Halloween album and start filling it up with layouts from the past 19 years!
Happy Crafting!
ADHESIVES: Crafty Foam Tape, Adhesive Dots Small, Crafty Power Tape, Creative Photo Corners White
SUPPLIES: Bazzill Basics Paper; Brother ScanNCut; Clearsnap glitter; Faber-Castell pen.
Visit our Website and Blog!
Sign up for our Newsletter so you never miss a contest or giveaway!
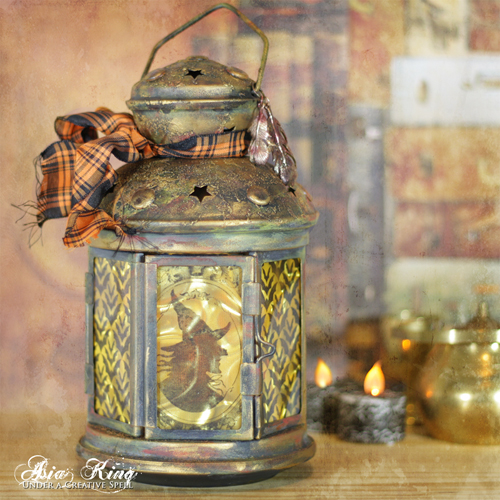
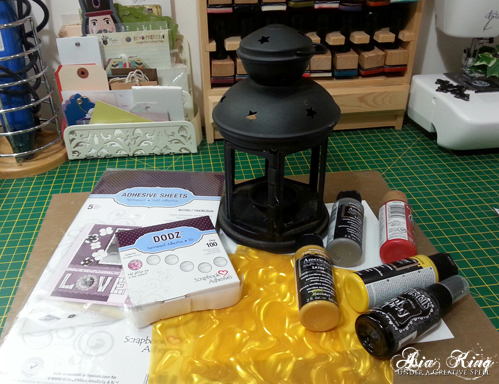
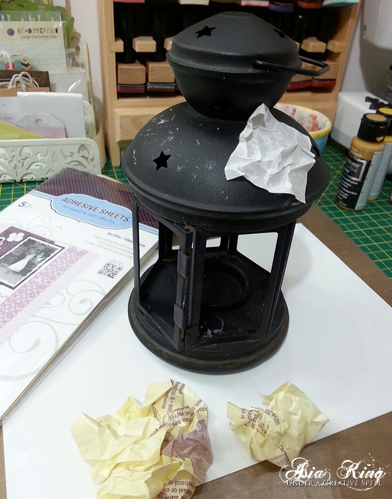
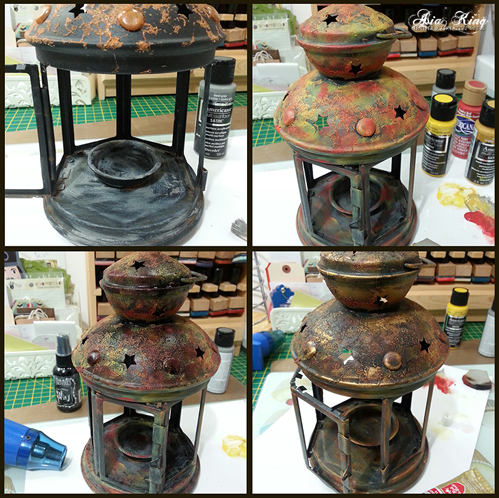
Hello everyone! It’s Asia here and today I am sharing a Halloween lantern project I had soooo much fun making. I couldn’t keep all this fun only to myself so I prepared a tutorial for you as well.
I’ve had this lantern for years and most recently kept it in the garden. Unfortunately during the recent winds the lantern fell, breaking some of the glass panes. It was a perfect excuse to put my hands on it and do some creative Hocus Pocus with my lovely media and favourite adhesives.
First you will need to prepare your lantern to be altered, gather Adhesive Sheets 6″x12″, Adhesive Dots 3D, embossing powder and your paints.
1. Tear a few pieces of Adhesive Sheets 6″x12″ and crumple them in your hands. Peel off the yellow backing sheet and apply the adhesive randomly all over the lantern. Repeat until you are happy with the amount of adhesive transferred.
2. Sprinkle the embossing powder all over the adhesive and brush off the excess.
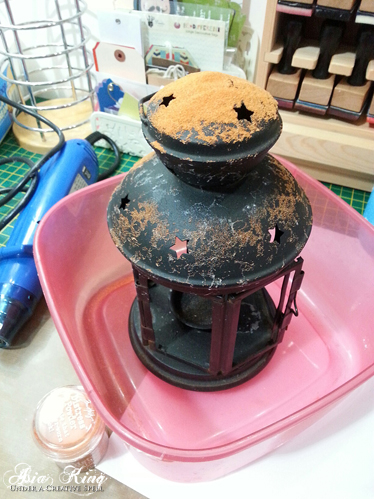
3. Add Adhesive Dots 3D around the domed parts to mimic metal rivets. Cover with the embossing powder.
4. Heat the powder with a heat tool. Use a wooden stick to rotate the lantern during the heating process – do not touch the lantern with your fingers until it had time to cool down. When the powder cools down, rub it off gently to get a gritty, distressed texture.
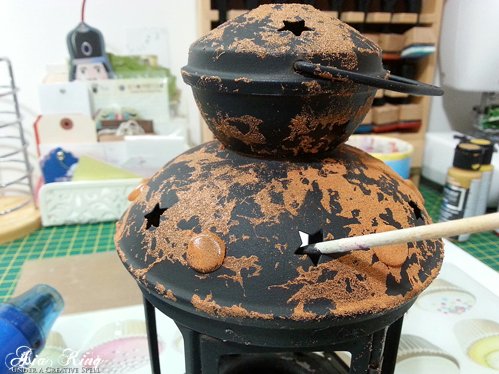
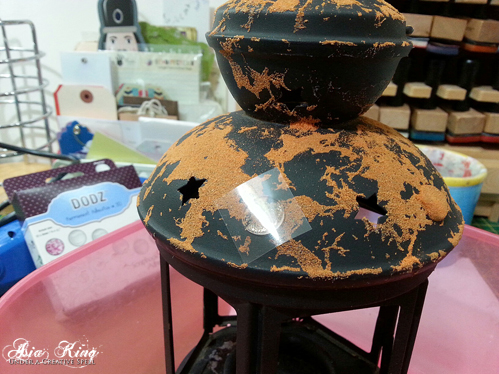
5. Now the messy part. First dry brush some Steel Grey paint for an ash dusty look. Next randomly apply School Bus, Muted Gold and Country Red with a piece of foam all over the lantern. Next spray the lantern with Black Marble and Butterscotch sprays. Heat set. Finally apply Rub’n Buff with your finger all over the piece, more in some places and less in others. Use it to highlight any raised and textured parts.
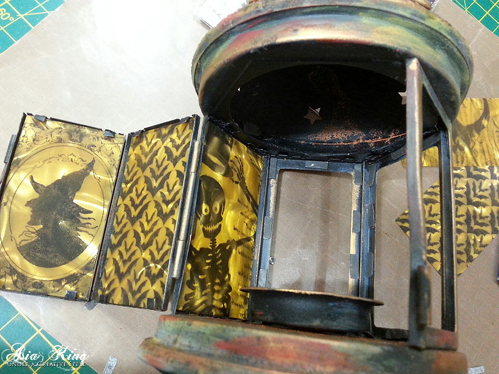
7. Using one of the ‘surviving’ glass panes as a guide, draw outlines for the inserts on your illusion film (be careful when handling the glass in case there are any sharp edges). Cut out the required number of inserts with a Stanley/craft knife.
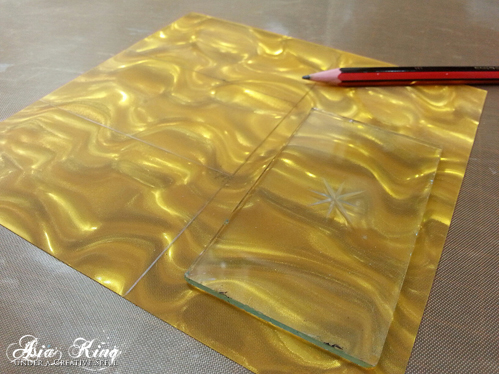
8. As I was going to use collage style stamps, to ensure clean, precise stamping onto my film inserts, I first prepared a stamping guide by drawing extended lines along each edge of the insert. I used the lines as a guide for positioning of the stamp, so the stamped impression included the intended part of the image. Before stamping I secured the inserts within the guide lines with E-Z Dots® Repositionable.
9. Stamp the panels with Halloween images using black StazOn ink.
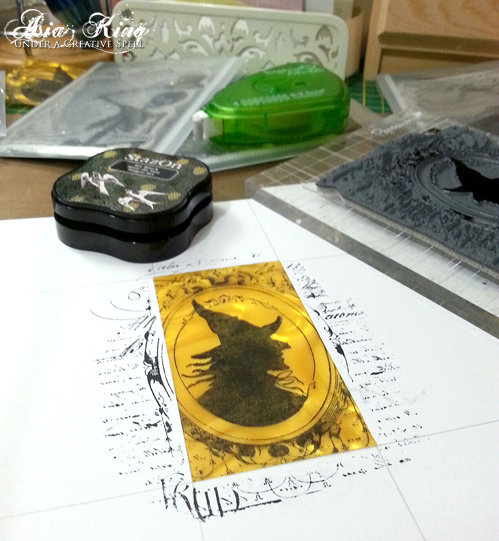
10. Next fill the inner edges of each side/frame with Thin 3D Foam Squares Black. Cut them into smaller pieces where necessary.
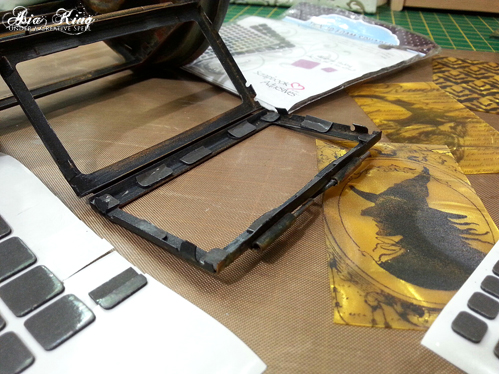
1. Peel off the protective layers from the foam adhesive and place the stamped images over them and into the frames’ recesses.
Here’s the lantern fully assembled.
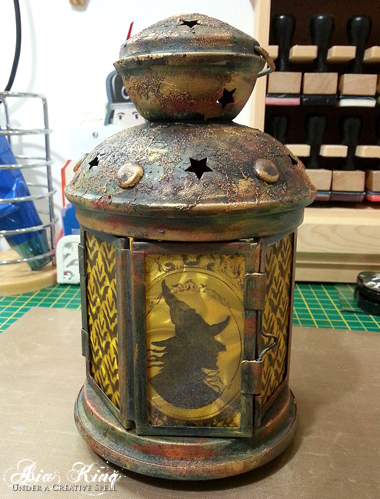
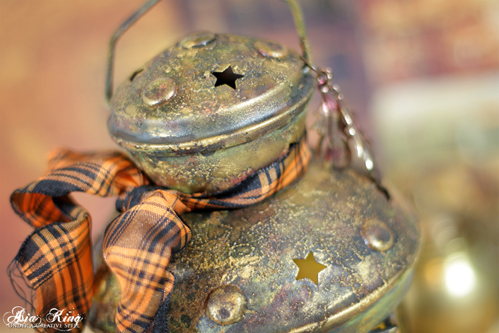
12. You can leave it as it is or add further embellishments. I added a Halloween looking ribbon around the neck and some metal feathers, coloured with alcohol inks for an aged look. The photo below shows the close up detail of the lovely texture you can achieve with your Adhesive Sheets and Adhesive Dots 3D.
And here you can see the lantern lit up as part of my Halloween decor. I love the light effects on the illusion film!
Scrapbook Adhesives by 3L® Supplies:
Other supplies: Stampendous stamps: Mirror Mirror, Raven Background, Skeleton Poem, Damask Bats Media: DecoArt Americana Country Red, DecoArt Multisurface Satin in Muted Gold, School Bus, Steel Grey; Ranger Butterscotch Color Wash, Dylusions Black Marble Ink Spray, Rub’n Buff Grecian Gold, Jet Black StazOn ink, Spiced Marmalade Distress Embossing Powder. Rowlux Illusion Film Gold Moire; metal lantern, ribbon (May Arts), metal feathers/embellishments.
I hope you’ve enjoyed today’s tutorial. Please also visit my blog if you’d like to see more of the close up pictures for this altered Halloween lantern.
Happy Halloween everyone!

Let’s Connect!
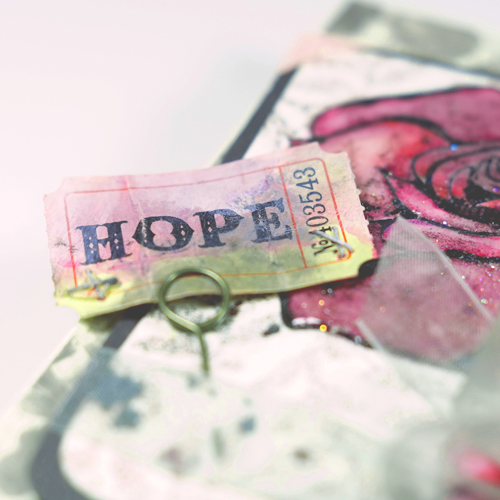
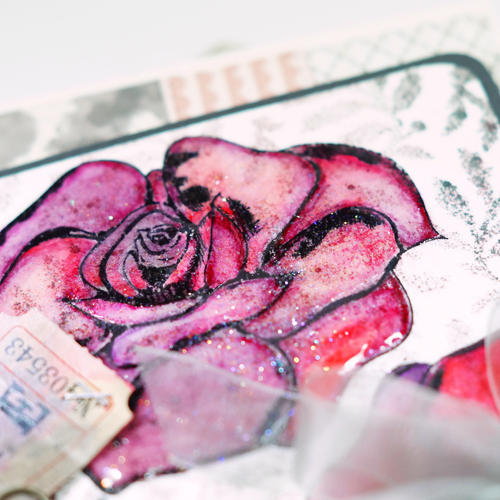
Hi everyone! It’s Lisa with you today. As October winds down I thought I’d make one last pink card to celebrate all the women who have fought, ARE fighting, have beat, and have sadly lost the battle with breast cancer,
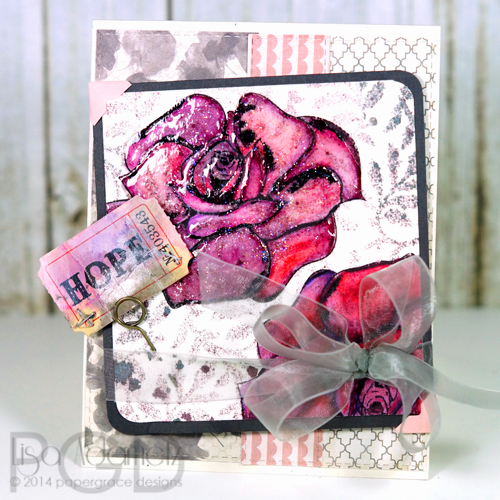
There is TONS of dimension on this card. From the “Hope” ticket tag, the rose itself, to the panel that it’s all on. It’s thick, shimmery, shiny, and super pretty.
The roses are watercolored, stenciled and sprayed over (which really makes them “pop”), on one rose I used a glaze for that high shine (with a teeeensy weeeensy bit of glitter on top), I rounded two corners and then adhered the panel to a grey panel that was cut to size using E-Z Dots® Permanent Refillable. On the grey panel I also rounded two corners and on the opposite corners I added the beautiful Pink Creative Photo Corners (a portion of the sales of the Pink Photo Corners will be donated to the National Breast Cancer Foundation). I inserted the Memo Pin through both layers of paper and then wrapped the ribbon around the panel. I used the Dodz™ Medium under the ribbon to secure the ribbon in place.
On the front of the card base I used dies and patterned paper to cut the 3 panel. To secure to the card base I (again) used my E-Z Dots® Permanent Refillable. Now I was ready to secure my panel! And, of course, I used plenty of 3D Foam Squares Regular, White to do this. I tucked a few under the “Hope” tag, too.
Here’s a few close-ups:
I do hope that you enjoyed today’s card as much as I enjoyed making it. It was truly a labor of love. ♥
Supplies:
From Scrapbook Adhesives by 3L®:
Dodz™ – Medium
E-Z Dots Permanent Refillable
3D Foam Squares White, Regular
Creative Photo Corners, Pink
Other Supplies:
Primitive White, Grey, Watercolor Cardstock; Gelatos, Art GRIP® Aquarelle watercolor pencils (Faber-Castell Design Memory Craft®); The Rubber Café (stamp); Journey Glaze, Sparkle dust (Fun Stamper’s Journey); Memo Pin, Ticket Tag (Tim Holtz); Bloom Sprays (Prima Marketing); Stencil (The Crafter’s Workshop); Patterned Paper (My Mind’s Eye); Dies (My Favorite Things).

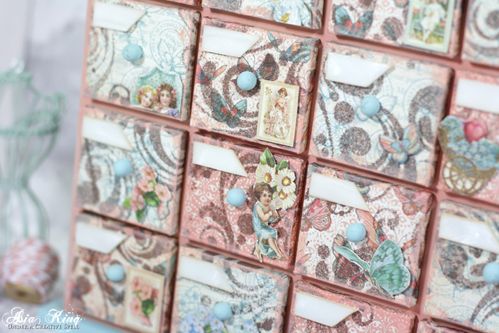
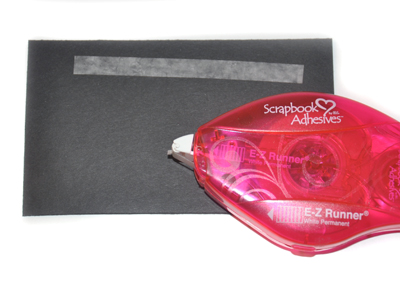
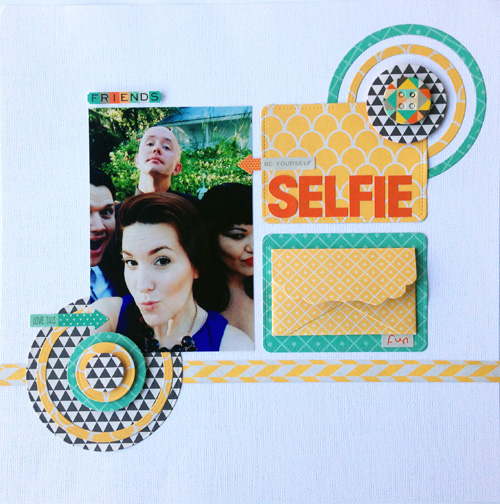
Latisha here today, and I am sharing a scrapbook layout. My husband and I, along with some of our friends, recently attended a wedding. The photographer was having people take out their cameras for a certain shot, and well we decided to do selfies too.
For me, I like to have a plan, especially when making a scrapbook page. Either I sketch out my layout, or maybe a color combination struck my fancy. Being inspired but having a plan, will save a ton of time.

I diecut my pattern paper, photo, and lay everything out. Once I have everything exactly where it will go, and I am happy. I will take a photo of my laid out project with my phone. This is so I have a point of reference when I am adhering everything down.
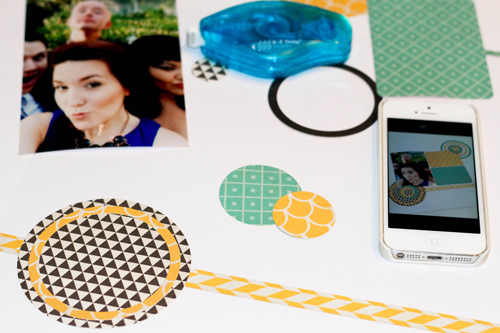
As you can see, I have my phone out with the picture of how I want my layout to look like, with all of my supplies out.
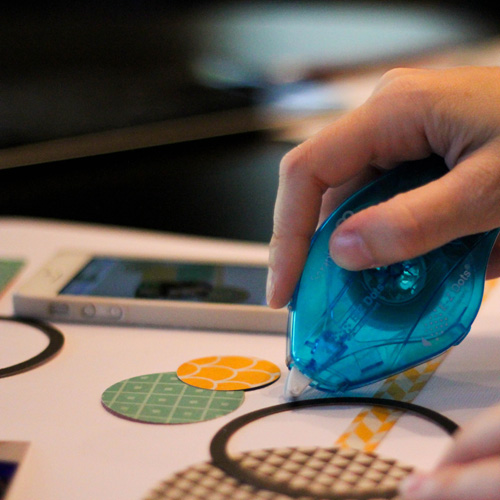
Because I am adhering die cuts with a small area for adhesive to go onto, I like to use the Scrapbook Adhesives by 3L E-Z Dots® Permanent Refillable runner. Adhesive will only go onto the surface area, so no messing with excess adhesive that you need to trim off.
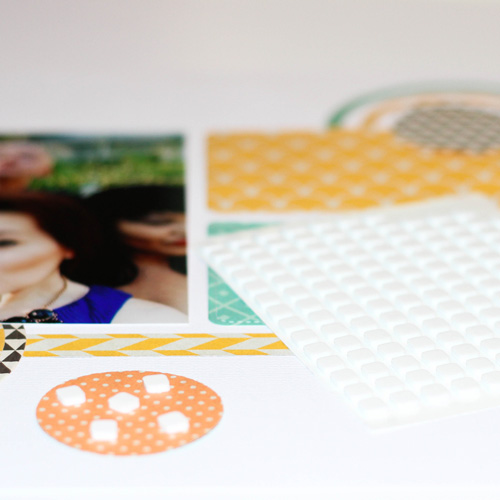
To give the layout some depth I am popping some of the die cuts up using the Scrapbook Adhesives by 3L 3D Foam Squares Small White.
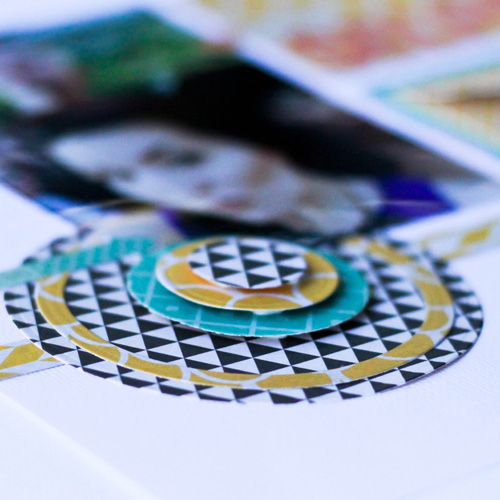
Here is a close up, of the great dimension you can get by using the 3D Foam Squares.

Materials Used:
Scrapbook Adhesives by 3L E-Z Dots® Permanent Refillable
Scrapbook Adhesives by 3L 3D Foam Squares Small White
Fancy Pants Designs True Friend Pattern Paper, stickers, buttons & envelope
Lawn Fawn Stitched journaling die (3×4)
Spellbinders Paper Arts Standard Circles Small
white card stock


