You are in our US store • Switch to Europe store

No-Sew Mop Gnome Tutorial

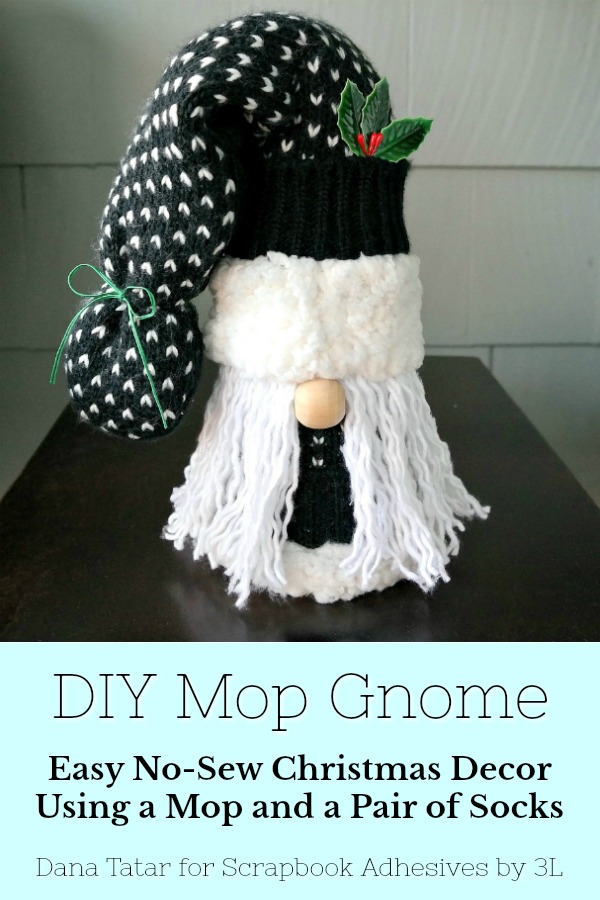
Hi friends! Dana here today sharing a fun holiday décor tutorial. Every home needs a gnome! I created this holiday gnome using a mop, a pair of slipper socks, and Extreme Double-Sided Tape. There is no sewing or hot tools necessary for this project, so it is perfect for crafters of all ages!
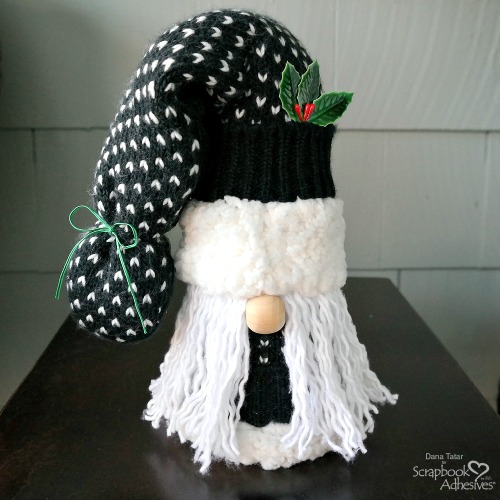
No-Sew Mop Gnome Tutorial by Dana Tatar for Scrapbook Adhesives by 3L

Mop Gnome Supplies

Gnome Assembly

No-Sew Mop Gnome Tutorial by Dana Tatar for Scrapbook Adhesives by 3L
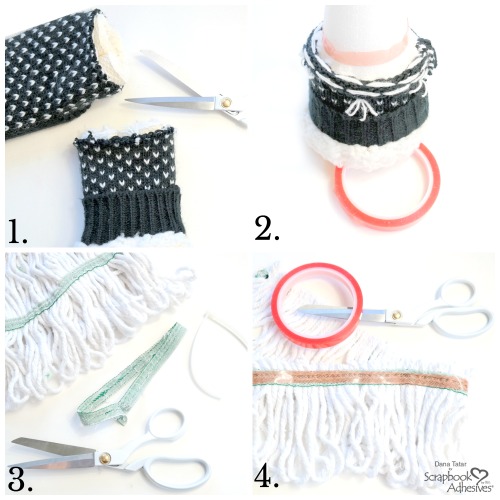
  • 1. Use scissors to cut one slipper sock just above the heel. This portion of the sock will become the shirt for the gnome.
  • 2. Pull the top portion of the slipper sock over a foam cone with the top fuzzy edge facing down. Apply a strip of 1/2 in Extreme Double-Sided Tape around the cone under the top edge of the sock. Remove the red liner and press the top edge of the sock onto the tape.
  • 3. Use scissors to cut the zip tie and the bottom green ribbon from a Libman Tornado Mop Refill. Note: Any mop refill can be used for this project. The stitched portions of the Libman brand mop refill allowed me to quickly add a single strand of mop loops to this project. One Libman Tornado Mop Refill will make 4 gnome beards if using the same size cone.
  • 4. Use scissors to cut just above the second green ribbon to remove the bottom portion of the mop refill from the rest of the mop. Once separated, cut the green ribbon where the stitched ends meet to make one long strip of stitched mop loops. Apply 1/2 in Extreme Double-Sided Tape onto the green ribbon.
No-Sew Mop Gnome Tutorial by Dana Tatar for Scrapbook Adhesives by 3L
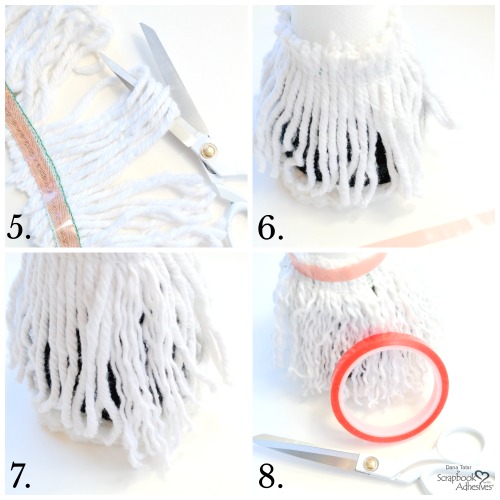
  • 5. Use scissors to cut the loops of the mop into single strands.
  • 6. Peel the red liner from the tape and press the length of mop around the cone, covering the top edge of the sock.
  • 7. Separate the pieces of each mop strand to create a beard for the gnome.
  • 8. Apply a strip of 1/2 in Extreme Double-Sided Tape around the top edge of the mop.

Finishing Touches
No-Sew Mop Gnome Tutorial by Dana Tatar for Scrapbook Adhesives by 3L
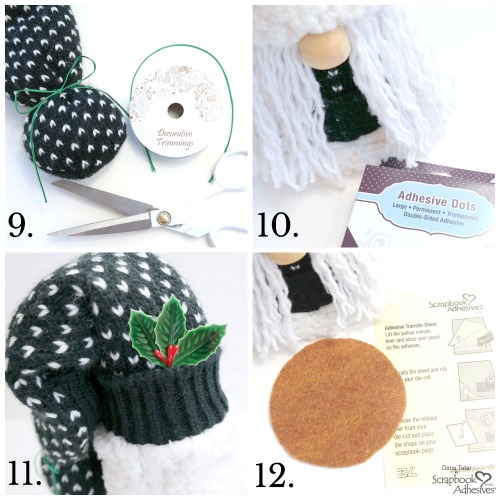
  • 9. Insert a small foam ball, or bell, into the top portion of the second sock and tie a length of holiday ribbon around the bottom to hold the ball in place.
  • 10. Remove the red liner from the tape applied to the cone in Step 8. Pull the second sock over the top of the cone and press the bottom edge onto the tape to secure it. Use a Large Adhesive Dot to attach a wood bead under the sock cuff. The wood bead is the gnome nose.
  • 11. Place a Large Adhesive Dot onto the back of a holly stick. Tuck the holly stick into the cuff of the gnome hat and press to seal.
  • 12. Cut a circle from felt to cover the bottom of the cone. Remove the yellow backing paper from a 4×6 in Adhesive Sheet. Align the felt onto the adhesive and press. Use scissors to cut the felt from the adhesive sheet. Remove the back liner and adhere to the bottom of the cone. This piece of felt will protect furniture surfaces from scratches.

Thanks for stopping by today! I hope I have inspired you to create your own holiday décor. Look for another fun décor project in my next post!
~Dana Tatar

Creative Time: 45 minutes
Skill Level: Beginner

Materials needed:
Scrapbook Adhesives by 3L®

Adhesive Sheets 4×6 Inch
Adhesive Dots Large

HomeHobby™ by 3L
Extreme Double-Sided Tape 1/2in

Other
Foam Cone: FloraCraft; Slipper Socks; Wood Bead: Darice; Holly Stick: Darice; Holiday Ribbon; Felt; Tornado Mop Refill: Libman

Pin It!
No-Sew Mop Gnome Tutorial by Dana Tatar for Scrapbook Adhesives by 3L Pinterest

Visit our Website and Blog!
Sign up for our Newsletter so you never miss a contest or giveaway!

instagram purple icon facebook icon purple pinterest purple icon twitter purple icon YouTube icon blog subscription purple icon

DIY Crafty Organization Box Tutorial

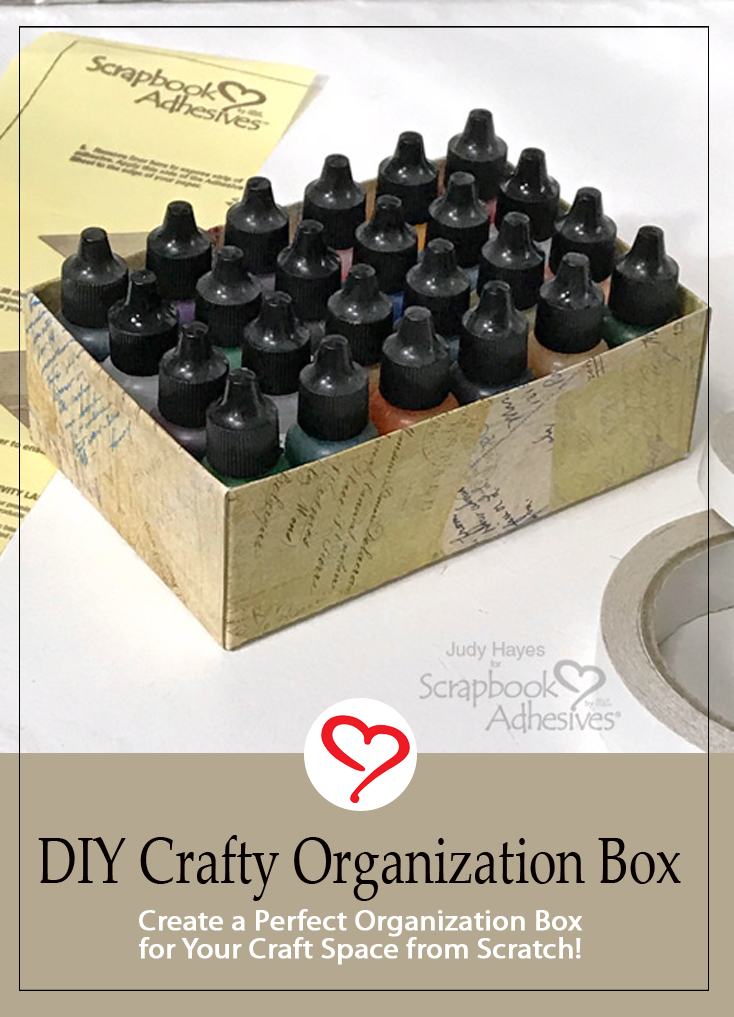
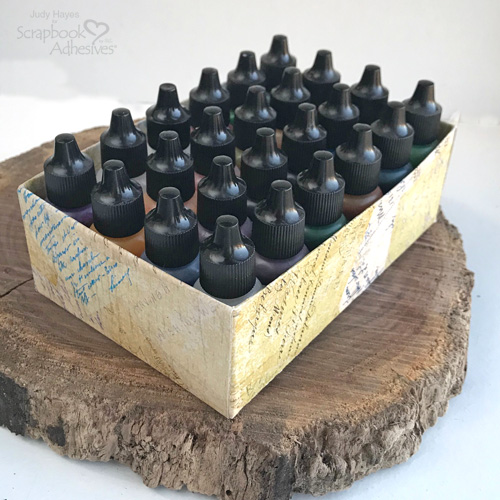
Hello crafty friends! Judy here and I’m sharing a DIY crafty organization box to keep some re-inkers in order to place in one of my craft drawers. Made from scratch, I think this would be useful for you too!

DIY Crafty Organization Box Tutorial by Judy Hayes for Scrapbook Adhesives by 3L

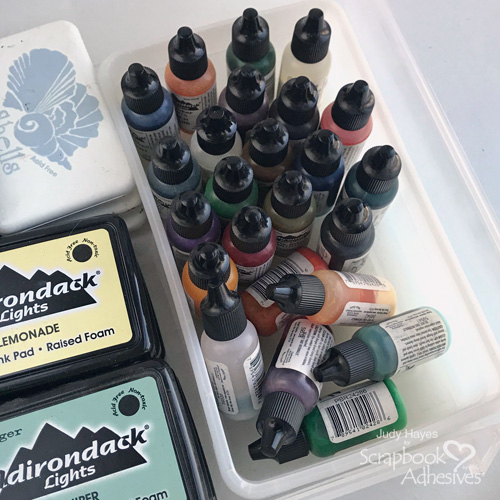
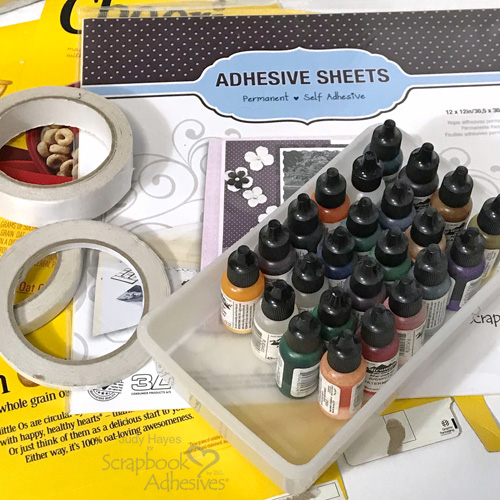
I had these bottles in a plastic box which were a little big and it took up more space than necessary. A crafter needs all the space possible in a craft room, right? Every time I opened the drawer some of the bottles fell over so it was time to make a custom box!

DIY Crafty Organization Box Tutorial by Judy Hayes for Scrapbook Adhesives by 3L

DIY Crafty Organization Box Steps

To make this box, I gathered my supplies of thin cereal box cardboard, lightweight patterned paper, Adhesive Sheets 12×12 inch and Premium Double-Sided Tape 1/2in, and Premium Double-Sided Tape 1in.

DIY Crafty Organization Box Tutorial by Judy Hayes for Scrapbook Adhesives by 3L

First, you need to determine the size of the box.

DIY Crafty Organization Box Tutorial by Judy Hayes for Scrapbook Adhesives by 3L

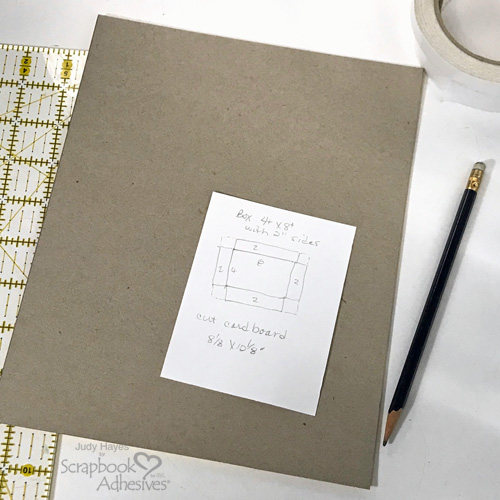
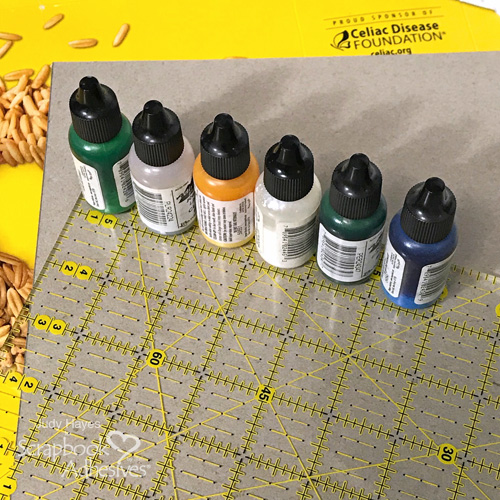
For my re-inkers, each bottle is about 1 inch wide. With 24 bottles, I decided to make the box about 4.125 x 6.125 inches with 2 inch sides. That allows a tiny bit of wiggle room. Cut a piece of cereal box to 8.125 x 10.125 inches. (2 + 4.125 + 2 = 8.125; 2 + 6.125 +2 = 10.125)

DIY Crafty Organization Box Tutorial by Judy Hayes for Scrapbook Adhesives by 3L

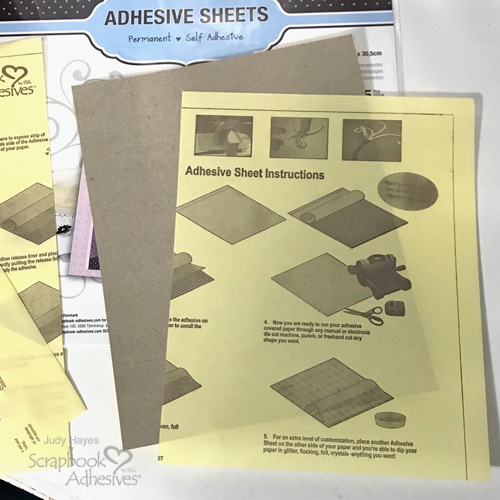
Next, cut a piece of Adhesive Sheets 12×12 inch to the same size. Apply it to the printed side of the cardboard. That’s the side to be covered with patterned paper.

DIY Crafty Organization Box Tutorial by Judy Hayes for Scrapbook Adhesives by 3L

Using Patterned Paper

The patterned paper is cut 1.25 inches bigger on both length and width, 8.375 x 11.375 inches. That allows enough to fold over the box edges.

Score the cardboard 2 inches from all edges.

DIY Crafty Organization Box Tutorial by Judy Hayes for Scrapbook Adhesives by 3L

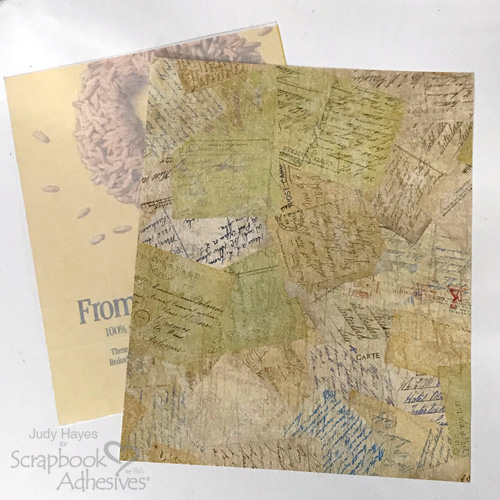
Remove liner from Adhesive Sheets on cardboard. Place adhesive side down centered on back of patterned paper. Lines can be drawn on back of patterned paper to help with placement.

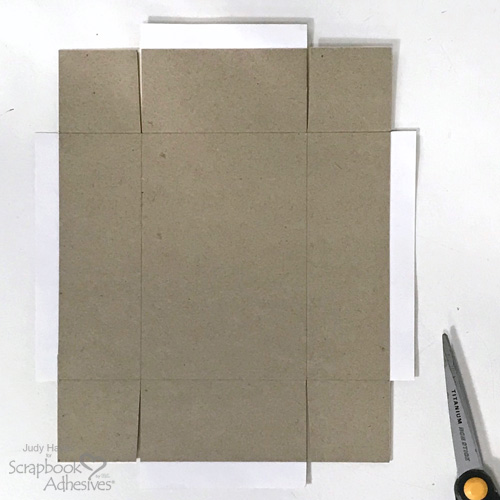
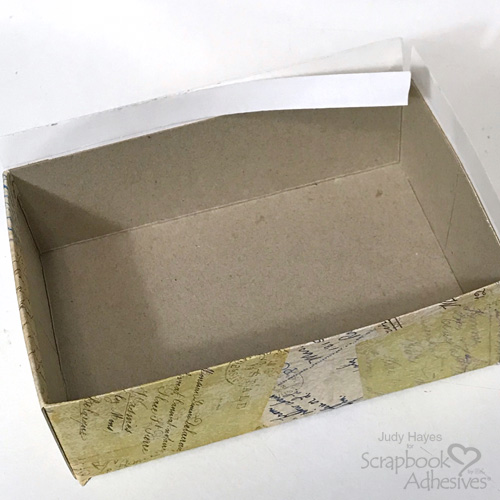
Cut through cardboard and paper on score lines on each end as shown in photo. Cut again at an slight angle to outside of each cut making a narrow wedge cut. Trim off patterned paper at corners. Leave patterned paper extend at each end and each side.

DIY Crafty Organization Box Tutorial by Judy Hayes for Scrapbook Adhesives by 3L

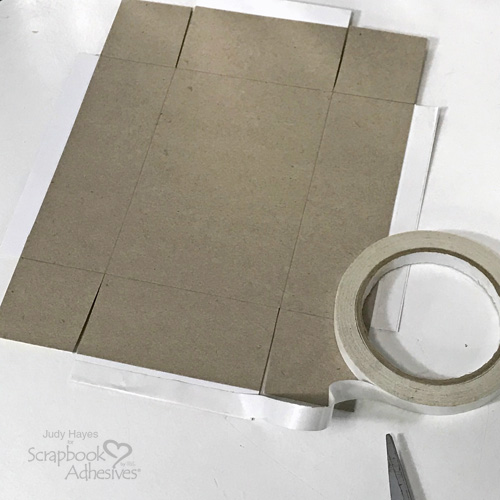
Apply Premium Double-Sided Tape 1/2in on back of patterned paper where it extends beyond cardboard.

DIY Crafty Organization Box Tutorial by Judy Hayes for Scrapbook Adhesives by 3L

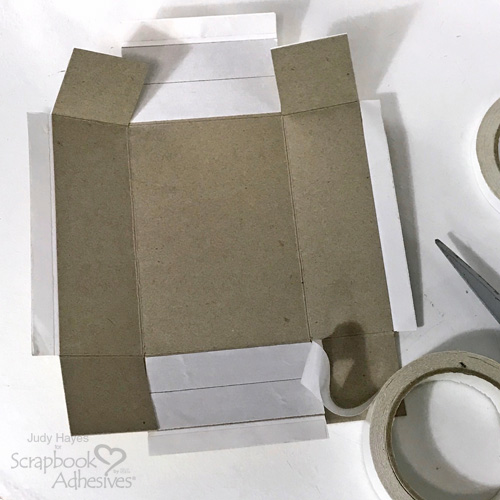
Fold on all score lines and crease well.

Assemble the Box

Apply Premium Double-Sided Tape 1in Permanent on cardboard ends. Rub to adhere tape well. This works for this size box since the flaps will meet and cover end of box.

DIY Crafty Organization Box Tutorial by Judy Hayes for Scrapbook Adhesives by 3L

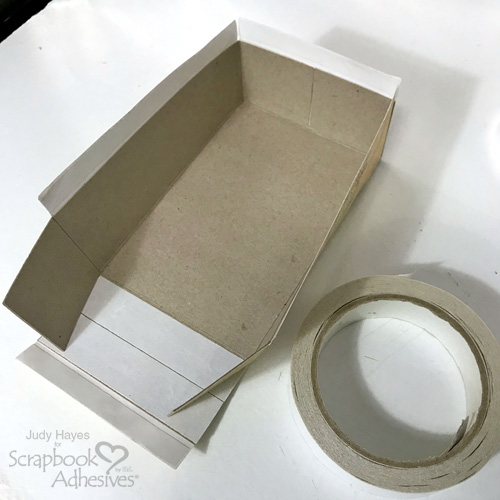
Remove liner from Premium Double-Sided Tape 1in Permanent on one end. Fold flaps inside and press box end up against flaps. Repeat at other end.

DIY Crafty Organization Box Tutorial by Judy Hayes for Scrapbook Adhesives by 3L

Remove liner from Premium Double-Sided Tape 1/2in from one patterned paper edge. Fold over box edge to inside and press well. Repeat for all box edges.

DIY Crafty Organization Box Tutorial by Judy Hayes for Scrapbook Adhesives by 3L

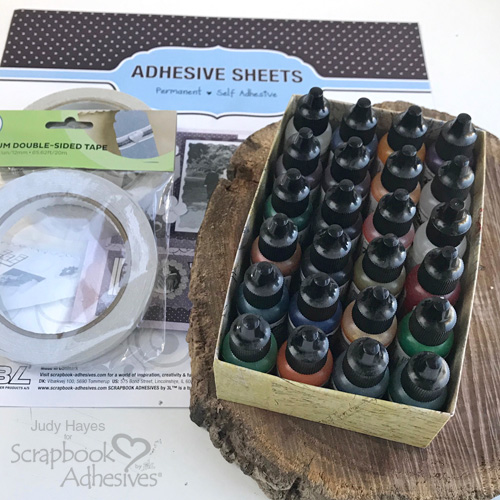
That finishes the box!

DIY Crafty Organization Box Tutorial by Judy Hayes for Scrapbook Adhesives by 3L

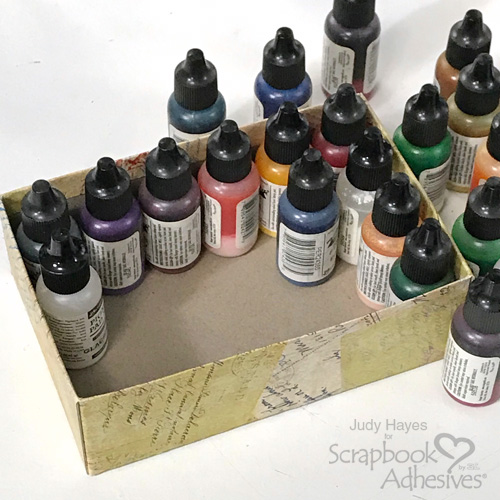
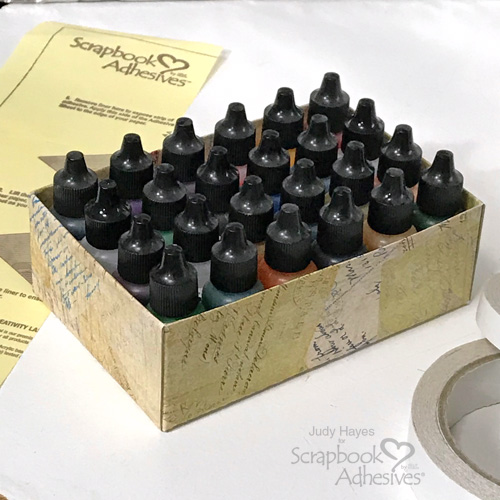
The re-inkers fit in it well! No more tipping over and there’s some extra space in the drawer where this box goes.

DIY Crafty Organization Box Tutorial by Judy Hayes for Scrapbook Adhesives by 3L

I often make boxes like this DIY Crafty Organization Box for my craft storage. I’ve used plastic boxes or baskets in the past. They often take more space than is needed. I like making custom sizes to fit my space.

I hope you’ve found some inspiration here today! Thanks for Visiting!
Judy Hayes

Creative Time: 30 Minutes
Skill Level: Beginner

Materials Needed
Scrapbook Adhesives by 3L®

HomeHobby™ by 3L

Other
The Paper Studio Lightweight Patterned Paper, cardboard (cereal box), Score tool, Scissors

DIY Crafty Organization Box Tutorial by Judy Hayes for Scrapbook Adhesives by 3L

Save It!

DIY Crafty Organization Box Tutorial by Judy Hayes for Scrapbook Adhesives by 3L Pinterest

Visit our Website and Blog!
Sign up for our Newsletter so you never miss a contest or giveaway!

instagram purple icon facebook icon purple pinterest purple icon twitter purple icon YouTube icon blog subscription purple icon

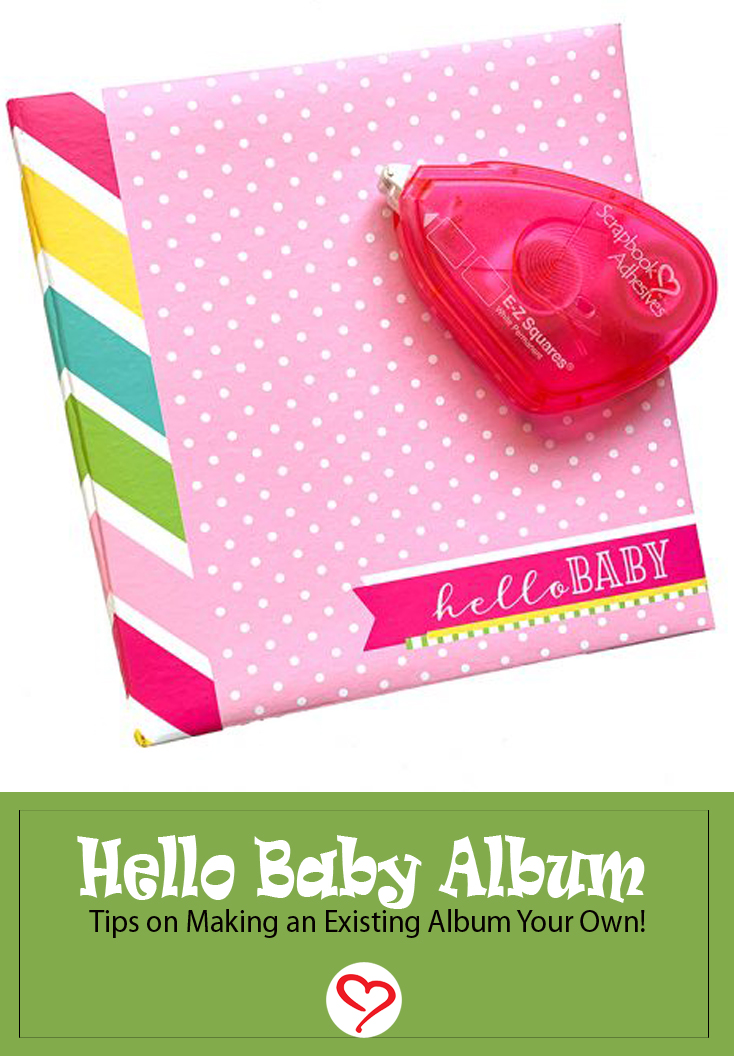
Hello Baby Album

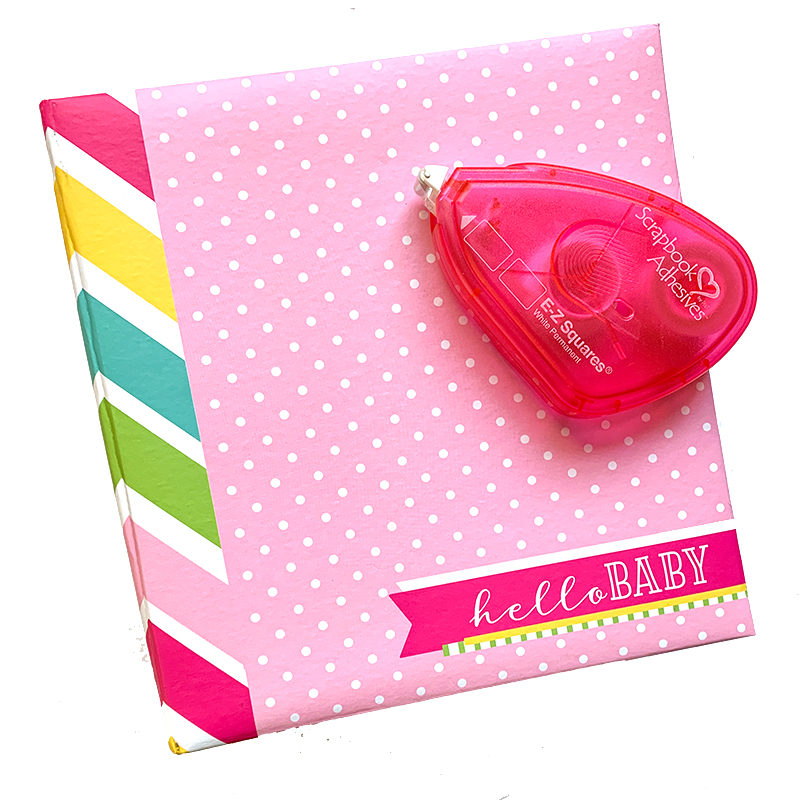
Whenever I see something that comes pre-assembled I automatically assume it’s going to be really easy to put together. And while that may be true at times, it doesn’t mean you can skimp on supplies while putting it together. Christine joining you today to show you how adding some solid adhesives to a pre-assembled Hello Baby Album can help it stand the test of time.

Hello Baby Album by Christine Meyer for Scrapbook Adhesives by 3L

Although this flip album is super unique and all ready to roll, it still needs pictures, stickers, and other elements added to it. Because it is an album that has no page protectors, I know it will be easy for things to be damaged and pulled up as it is looked at. This is where I decided to employ the strength and longevity of adhesives from Scrapbook Adhesives by 3L

Hello Baby Album Details

Hello Baby Album by Christine Meyer for Scrapbook Adhesives by 3L

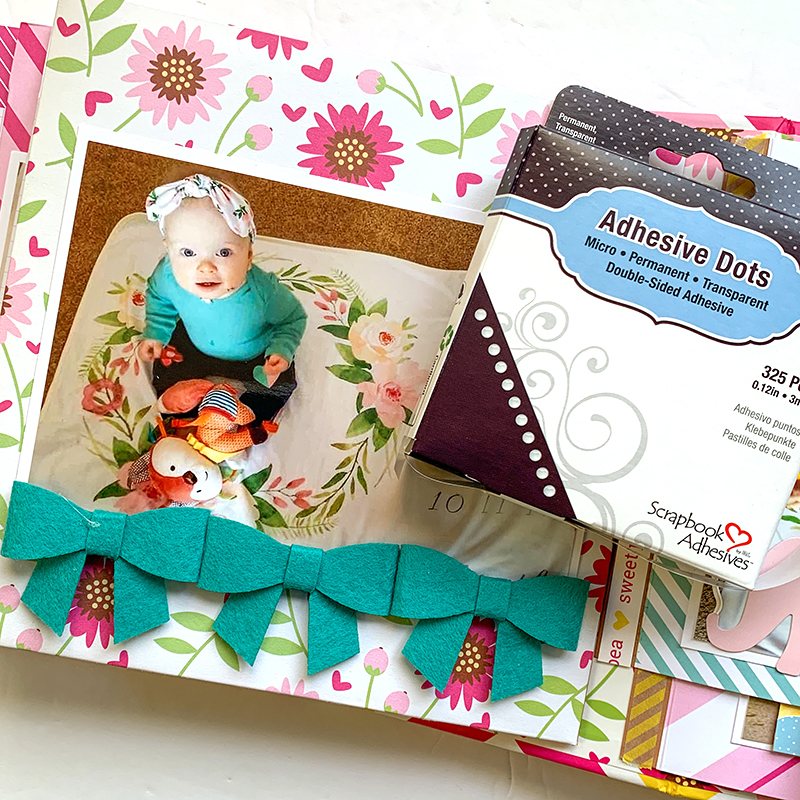
Adhesive Dots are so strong and the perfect choice for anything of weight or dimension. Although these bows already had adhesive on them, I added the Adhesive Dots to ensure that they would hold tight.

Hello Baby Album by Christine Meyer for Scrapbook Adhesives by 3L

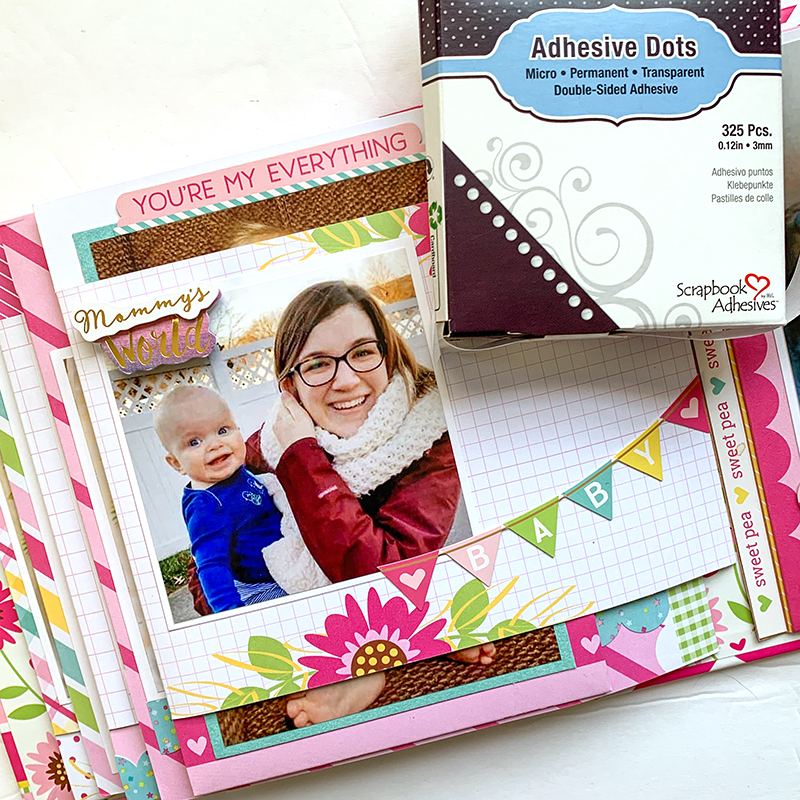
I also used the Adhesive Dots on the 3D Sticker in the corner here and underneath the Baby Sticker Banner. Although the banner didn’t need the hold that Adhesive Dots provide, I knew they needed extra hold and the size was right for the Micro Dots that I already had out.

Hello Baby Album by Christine Meyer for Scrapbook Adhesives by 3L

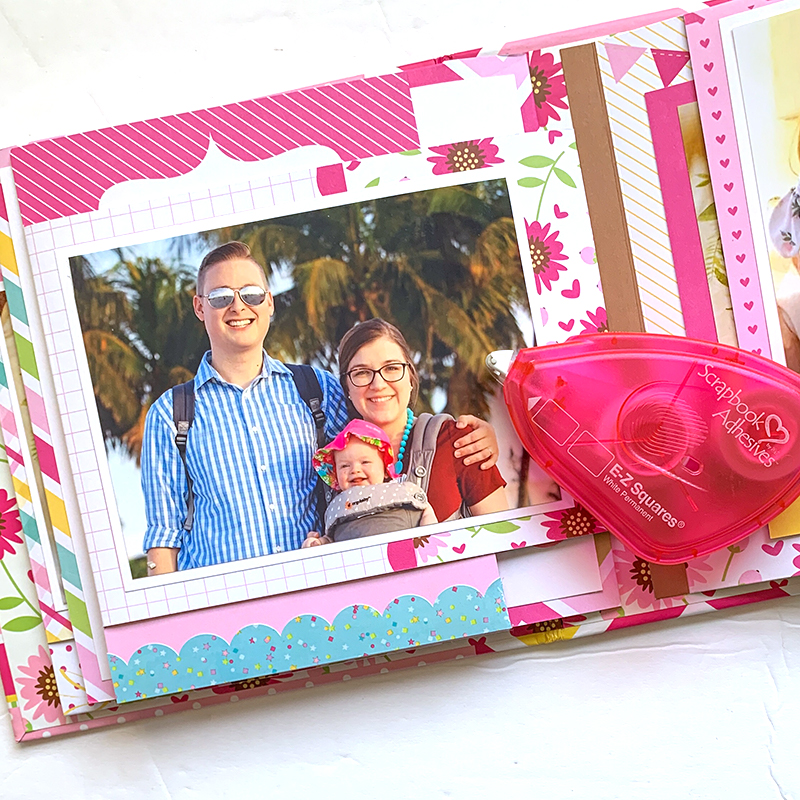
I used the E-Z Squares Refillable Dispenser to attach all of my photos. It’s perfect for a quick roll in each corner and then will hold tight.

Hello Baby Album by Christine Meyer for Scrapbook Adhesives by 3L

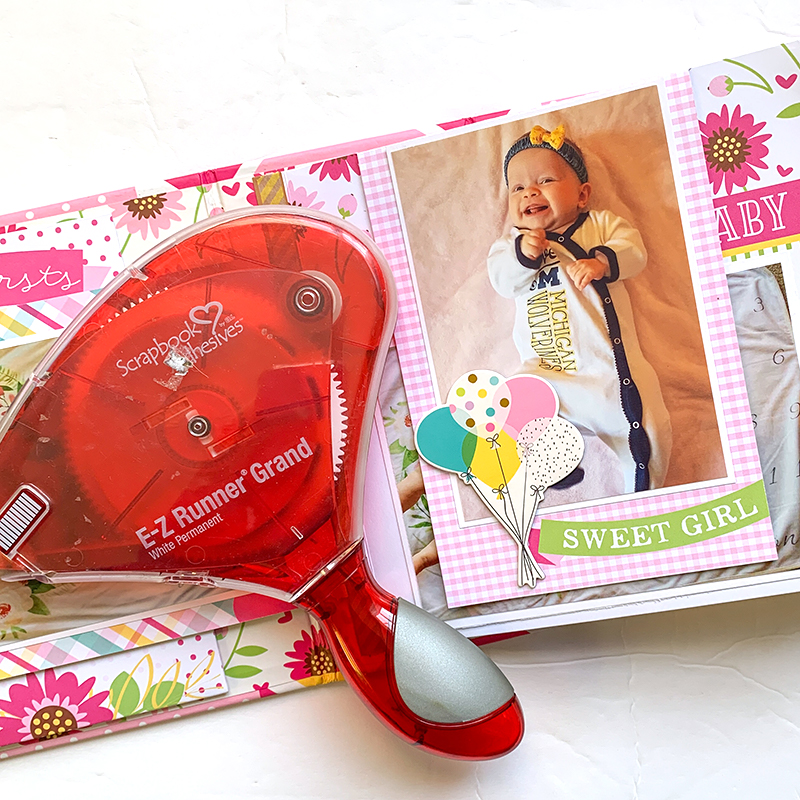
Finally, I used my E-Z Runner Grand to secure pieces like the chipboard balloons pictured here. It is so strong and works for a variety of things besides just adding paper to paper ;).

With the holidays here, I know many of us will be putting together Mini Albums and other crafts for presents. Be sure to use your Scrapbook Adhesives by 3L to ensure they will hold together and last a lifetime!

Thanks for stopping by today!
Christine Meyer

Creative Time: 60 minutes
Skill Level: Intermediate

Materials Needed
Scrapbook Adhesives by 3L®
E-Z Runner Grand White Permanent Dispenser
Adhesive Dots Micro
E-Z Squares Refillable Dispenser

Other
Album: Paper House Productions; Stickers: Simple Stories and Paper House Productions

Save It!

Hello Baby Album by Christine Meyer for Scrapbook Adhesives by 3L Pinterest

Visit our Website and Blog!
Sign up for our Newsletter so you never miss a contest or giveaway!

instagram purple icon facebook icon purple pinterest purple icon twitter purple icon YouTube icon blog subscription purple icon

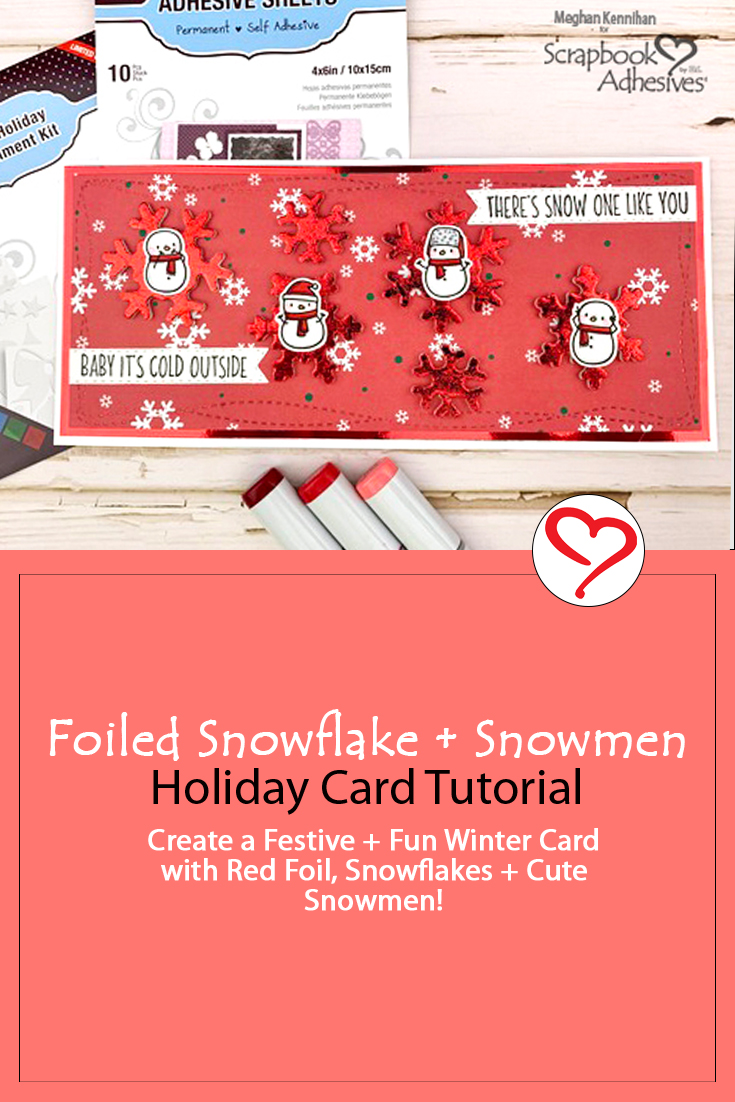
Foiled Snowflake + Snowmen Holiday Card

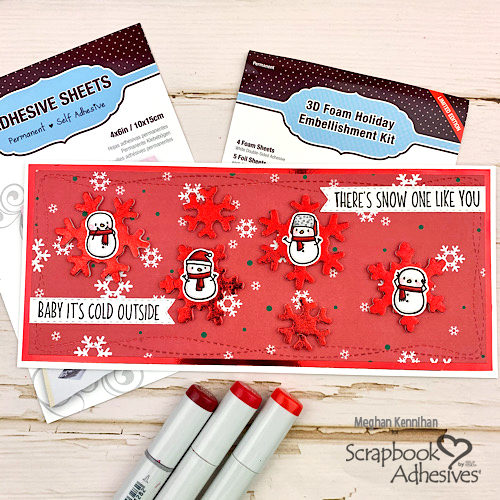
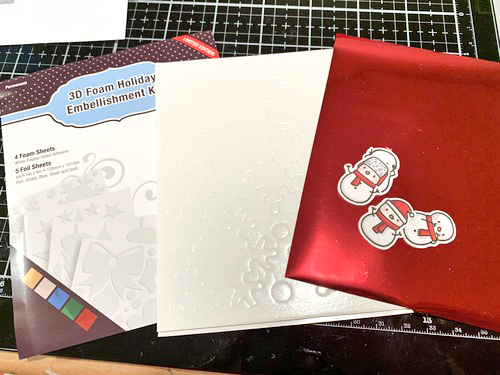
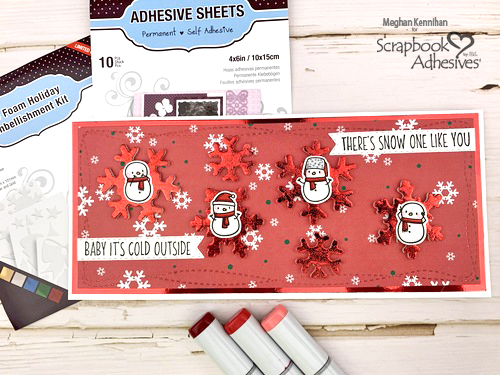
Hi Crafty Friends, Meghan Kinnehan here again featuring a festive Foiled Snowflake Holiday Card! I am in LOVE with the 3D Foam Holiday Embellishment Kit and its foil selection inside! Today, I created a fun slimline snowman card with a unique twist on the snowflakes by making them red.

Foiled Snowflake + Snowmen Holiday Card by Meghan Kennihan for Scrapbook Adhesives by 3L

Foiled Snowflake Steps

Step 1: Pick out the foam shape and foil color from the 3D Foam Holiday Embellishment Kit that you want to use. For this card, I chose the snowflakes and red foil.

Foiled Snowflake + Snowmen Holiday Card by Meghan Kennihan for Scrapbook Adhesives by 3L

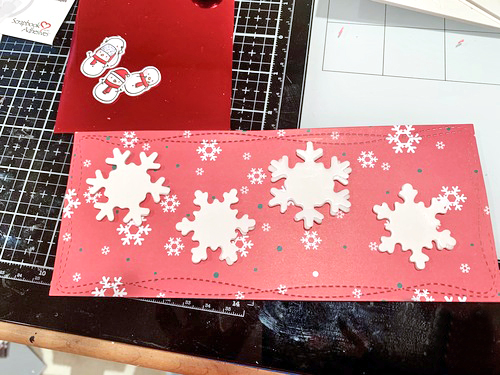
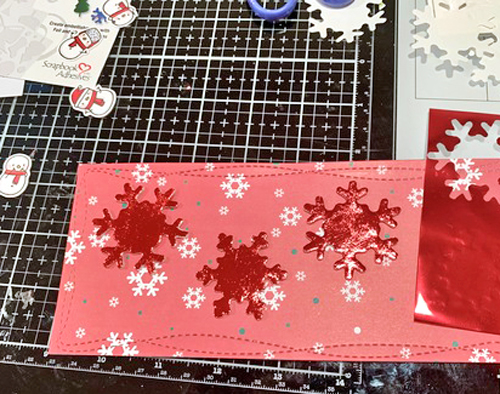
Step 2: Arrange your foam pieces on your card base, peeling off
just the bottom adhesive to adhere to your card.

Foiled Snowflake + Snowmen Holiday Card by Meghan Kennihan for Scrapbook Adhesives by 3L

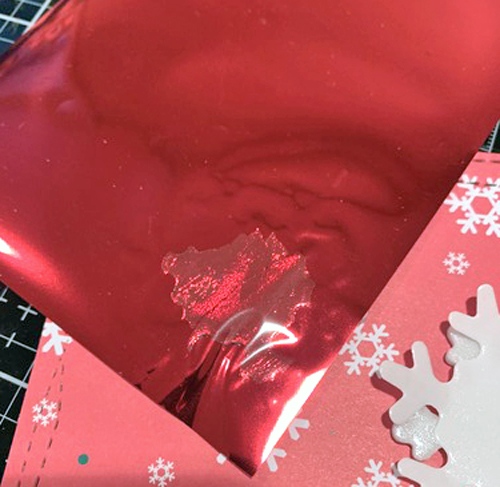
Step 3: Peel off the top layer of the foam snowflake to expose the adhesive and lay your foil on the top, color side UP. Rub the foil to transfer the color on the adhesive with your fingers.

Foiled Snowflake + Snowmen Holiday Card by Meghan Kennihan for Scrapbook Adhesives by 3L

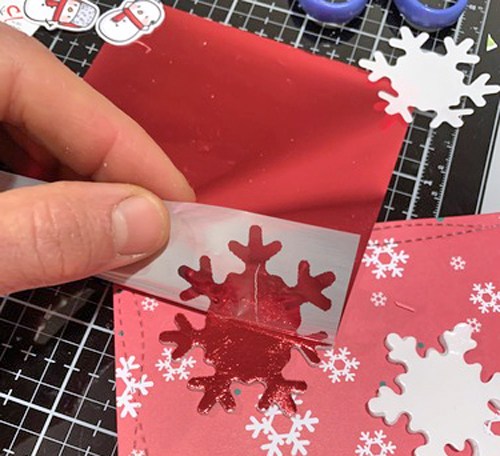
Step 4: Peel off the foil slowly making sure all the adhesive is covered in foil. If you missed a spot on your foiled snowflake, simply put the foil back over that spot and rub a little more.

Foiled Snowflake + Snowmen Holiday Card by Meghan Kennihan for Scrapbook Adhesives by 3L

Step 5: Repeat until you foiled all the snowflake embellishments.

Foiled Snowflake + Snowmen Holiday Card by Meghan Kennihan for Scrapbook Adhesives by 3L

Sentiment + Snowmen

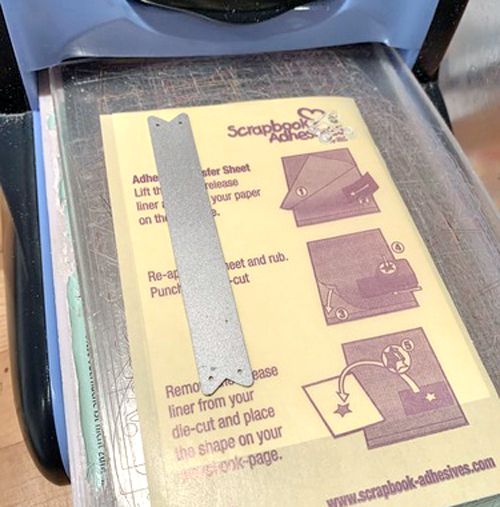
Step 6: For the sentiment stripes, I used the Adhesive Sheets 4 x 6-inch. Peel the yellow top liner back and place your paper on the adhesive. Next, put the yellow liner back over and rub it down.

Step 7: Pick your craft die and run it through your die-cutting machine.

Foiled Snowflake + Snowmen Holiday Card by Meghan Kennihan for Scrapbook Adhesives by 3L

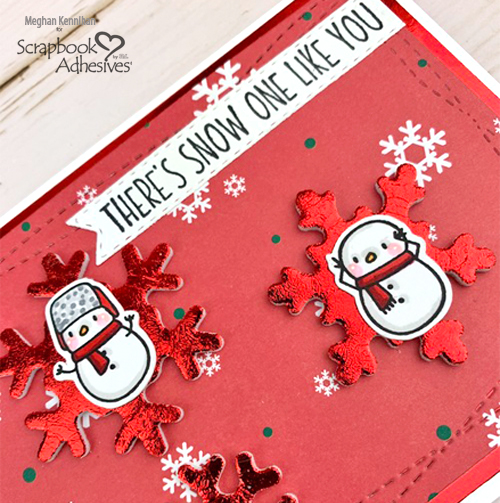
Step 8: Peel both liners off and adhere the die cut piece to your card. Now you have a Foiled Snowflake + Snowmen Holiday Slimline Card!

Foiled Snowflake + Snowmen Holiday Card by Meghan Kennihan for Scrapbook Adhesives by 3L

I hope this Foiled Snowflake + Snowmen Holiday Card inspires you to use other colors in the rainbow for a festive look! Thanks for stopping in!

Until next time,
Meghan

Creative Time: 35 minutes
Skill Level: Intermediate

Materials Needed:
Scrapbook Adhesives by 3L®
3D Holiday Foam Embellishment Kit
Adhesive Sheets 4 x 6-inch
E-Z Dots® Permanent Refillable Dispenser

Other
Stamps: Mama Elephant (Snowman Agenda Stamp Set) and Kat Scrappiness (Merry Critters Stamp Set); Craft Dies: Kat Scrappiness (Wavy Wonky Slimline Die)

Save It to Pinterest!

Foiled Snowflake + Snowmen Holiday Card by Meghan Kennihan for Scrapbook Adhesives by 3L Pinterest

Visit our Website and Blog!
Sign up for our Newsletter so you never miss a contest or giveaway!

instagram purple icon facebook icon purple pinterest purple icon twitter purple icon YouTube icon blog subscription purple icon

Fabric Christmas Tree Tags

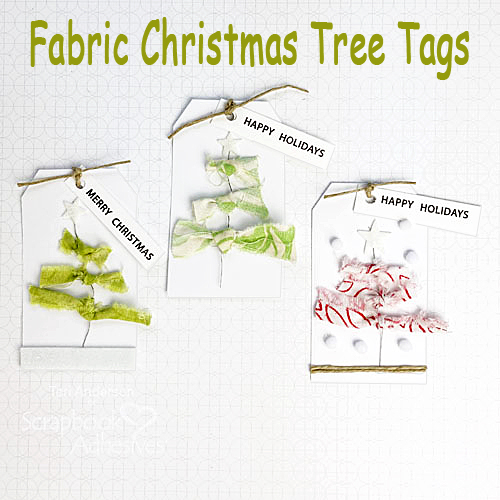
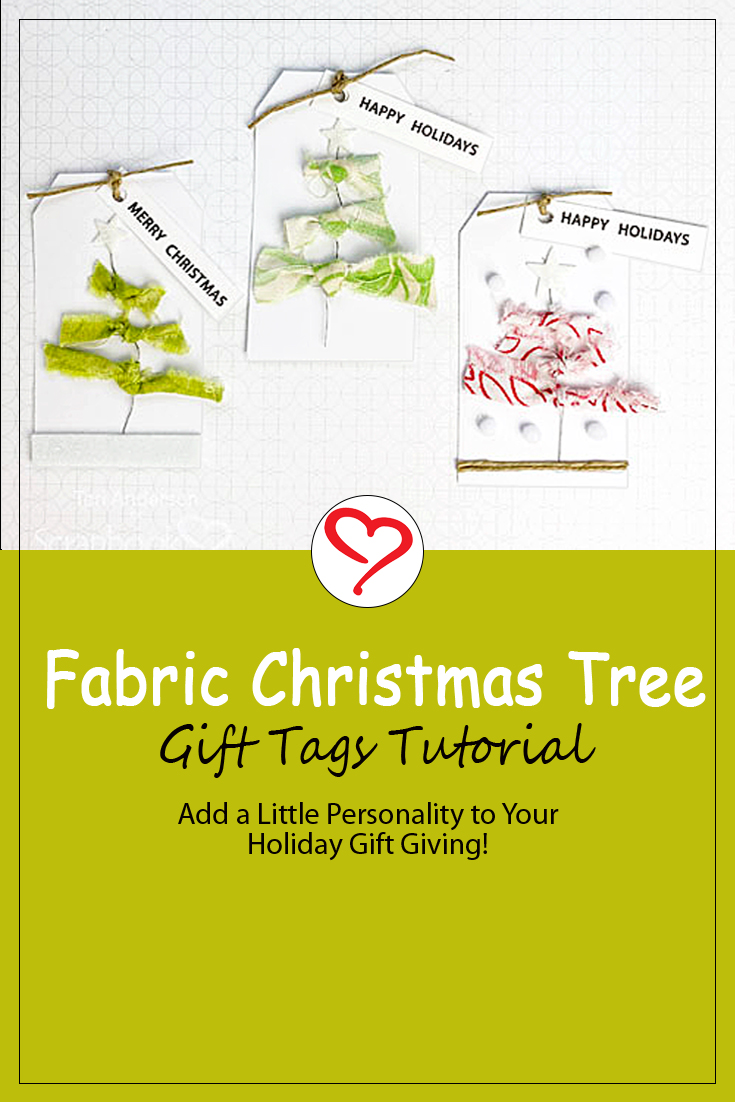
Hi, everyone! Looking for a fun way to spruce up your holiday gifts? Teri here, and I’ve got a fun way to make Christmas tags with fabric scraps!

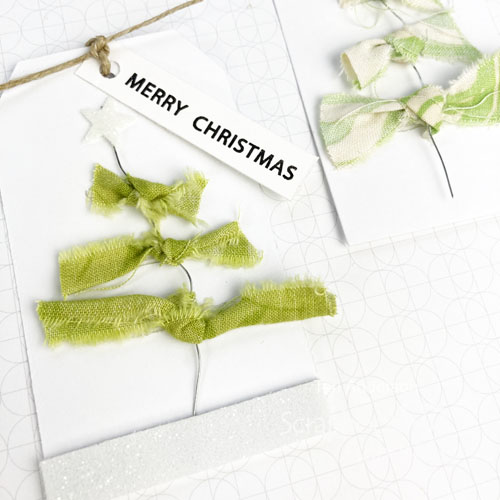
Fabric Christmas Tree Tags by Teri Anderson for Scrapbook Adhesives by 3L with text

The Christmas trees on these tags are so easy to make. All you need are fabric scraps, some wire and a few basic crafting supplies!

Making a Fabric Christmas Tree

Fabric Christmas Tree Tags by Teri Anderson for Scrapbook Adhesives by 3L

Start by cutting several tags from cardstock. I used a die to cut my tags but it’s easy to make your own tag without one. Cut a rectangle from cardstock and then snip off the top corners at an angle. Add a hole, and you’ll have a tag! Set your tags aside.

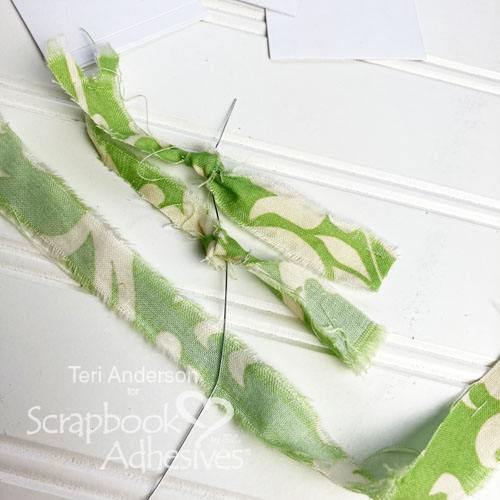
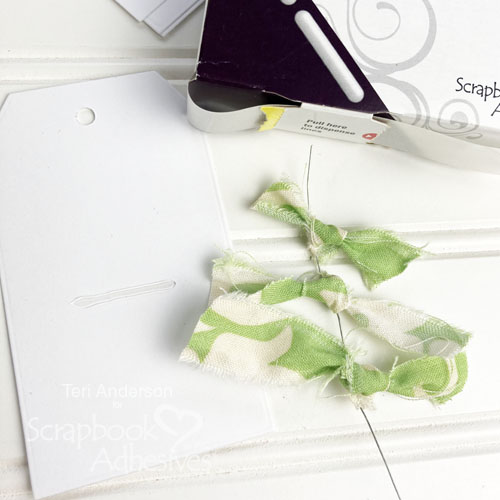
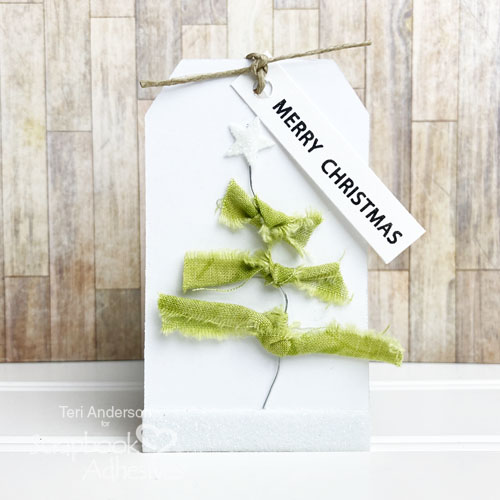
Take a piece of wire and tie and knot three skinny strips of fabric onto it. Trim the wire and fabric so you have something that resembles a primitive Christmas tree.

Fabric Christmas Tree Tags by Teri Anderson for Scrapbook Adhesives by 3L

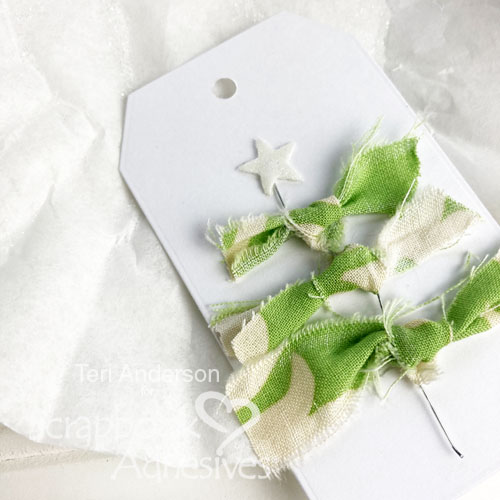
Place an Adhesive Line onto your tag. Set your tree onto it. You’ll want the line to fall right below the middle fabric strip. Then add two more lines under the fabric strip!

Fabric Christmas Tree Tags by Teri Anderson for Scrapbook Adhesives by 3L

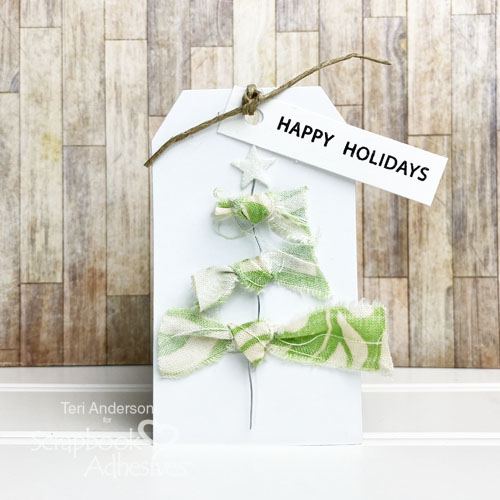
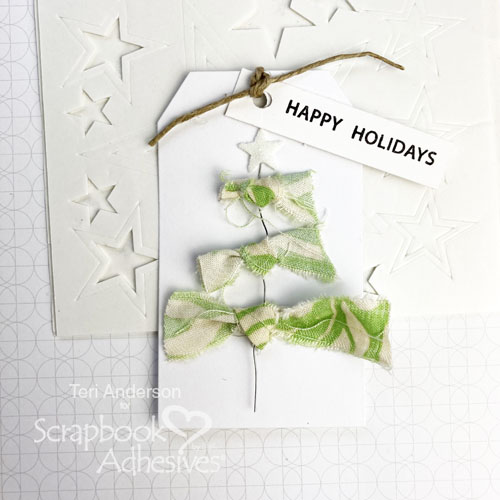
Add a 3D Foam Star to the top of your tree. Cover it with flock or glitter. Complete your tag by stamping (or handwriting) a sentiment on a strip of cardstock and tying it onto your tag with jute.

Fabric Christmas Tree Tags by Teri Anderson for Scrapbook Adhesives by 3L

A Snowy Fabric Christmas Tree Tag

Kick your tag’s design up a notch by adding some snow to it.

Fabric Christmas Tree Tags by Teri Anderson for Scrapbook Adhesives by 3L

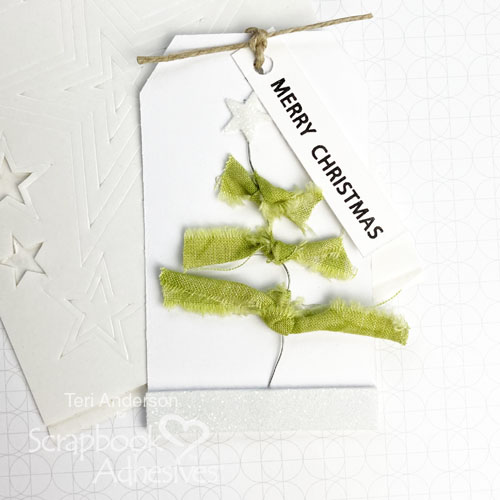
Simply place a strip of Crafty Foam Tape at the bottom of the tag and cover it with glitter or flock. You could even use foil!

Fabric Christmas Tree Tags by Teri Anderson for Scrapbook Adhesives by 3L

Changing Up the Design with Colors and Notions

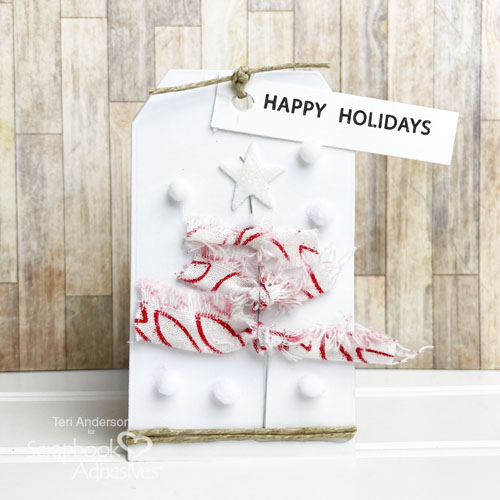
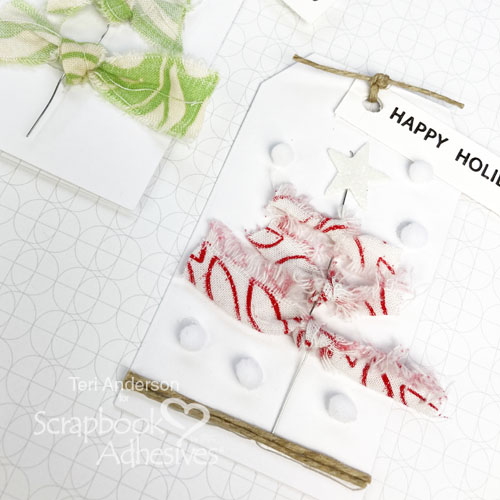
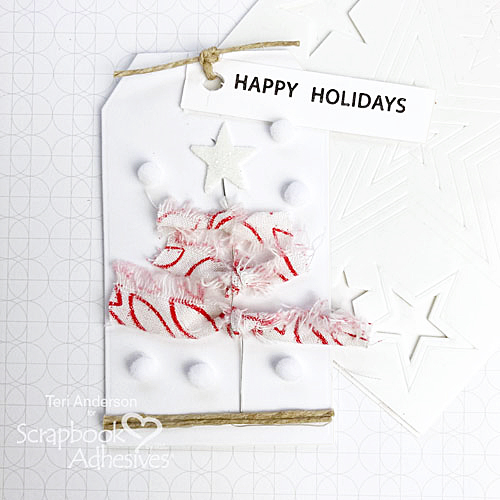
Don’t feel like you have to be traditional with your Christmas trees either! Try using fabric scraps that are in colors other than green! Red and white fabric was used here!

Fabric Christmas Tree Tags by Teri Anderson for Scrapbook Adhesives by 3L

Another way to change the design is to use pompoms to mimic the look of snow. Don’t have any pompoms? Use buttons! Jute is also a nice way to create “ground” for the tree.

Fabric Christmas Tree Tags by Teri Anderson for Scrapbook Adhesives by 3L

There’s no limit to what you can do when creating these Fabric Christmas Tree Tags! I encourage you to just have fun with it and play!

Happy creating!
Teri Anderson

Creative Time: 45 Minutes
Skill Level: Beginner

Materials Needed
Scrapbook Adhesives by 3L®

Other
White Cardstock: Neenah Paper; Dies: Taylored Expressions (Tag Stacklets 2); Stamps: Lawn Fawn (Offset Sayings: Christmas Stamp Set); Black Ink Pad: Ranger Ink; Glitter: Ranger Ink; Jute, PomPoms: Darice; Fabric Scraps; Wire

Save It to Pinterest!

Fabric Christmas Tree Tags by Teri Anderson for Scrapbook Adhesives by 3L Pinterest

Visit our Website and Blog!
Sign up for our Newsletter so you never miss a contest or giveaway!

instagram purple icon facebook icon purple pinterest purple icon twitter purple icon YouTube icon blog subscription purple icon

Simple Dimensional Border Layout

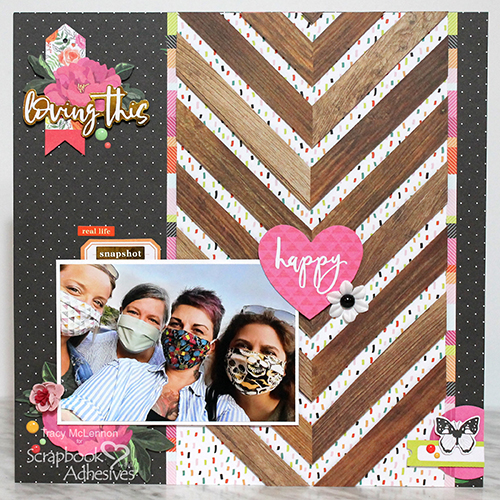
Hello crafty friends! Tracy here, and today I have a pretty little layout to share featuring a Simple Dimensional Border. Here are all of the details.

Simple Dimensional Border Layout by Tracy McLennon for Scrapbook Adhesives by 3L

Dimensional Border in the Making

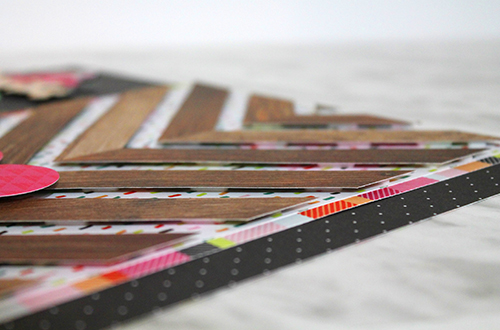
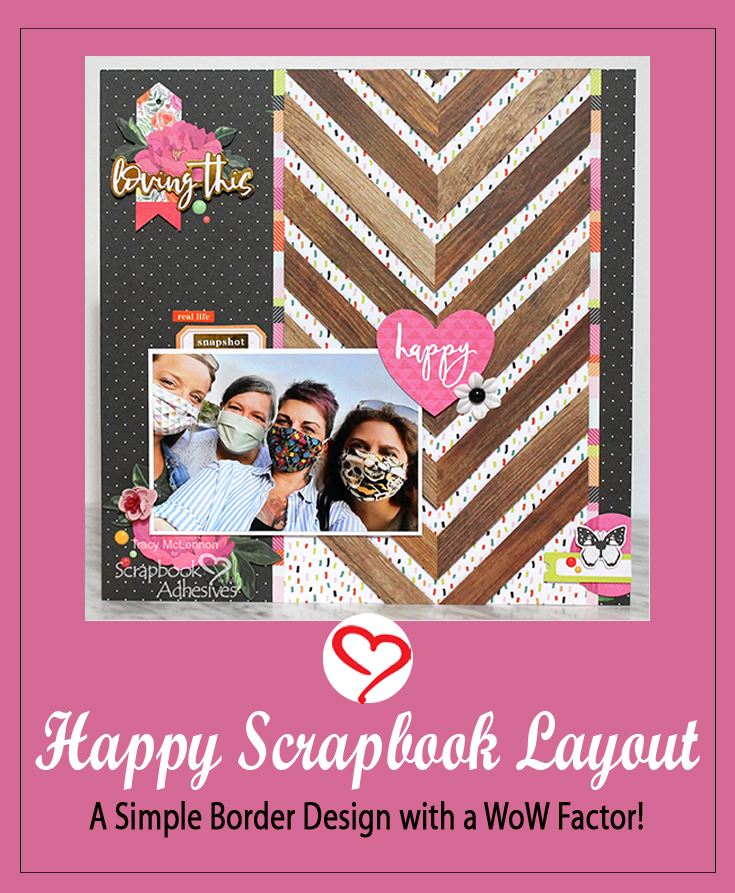
Cut the wood patterned paper and the confetti patterned paper to 6.5×12. Take the wood pattern and cut the wood sections apart using scissors keeping them in order. Adhere the separate wood pieces to the confetti pattern using 3D Foam Squares White Mix. Space the pieces out leaving a good bit of the confetti pattern showing between each wood piece. Continue down to the bottom of the strip to create this Simple Dimensional Border.

Simple Dimensional Border Layout by Tracy McLennon for Scrapbook Adhesives by 3L

Mat the Simple Dimensional Border with the striped patterned paper. Then adhere to the black polka dot patterned paper using the E-Z Runner® Permanent Strips Refillable Dispenser.

Loving This Cluster

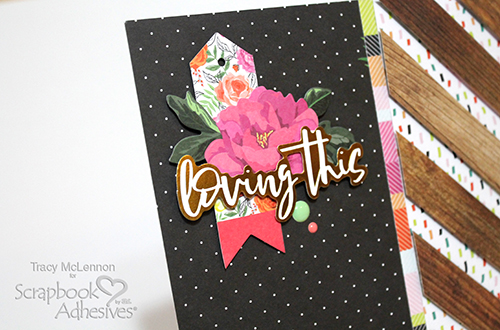
I created a cluster of ephemera in the top left hand corner of the layout using a combination of 3D Foam Squares White Mix and Thin 3D Foam Squares Black Mix. This allows you to get SO much dimension between layers, without adding too much thickness to your projects.

Simple Dimensional Border Layout by Tracy McLennon for Scrapbook Adhesives by 3L

The Little Details

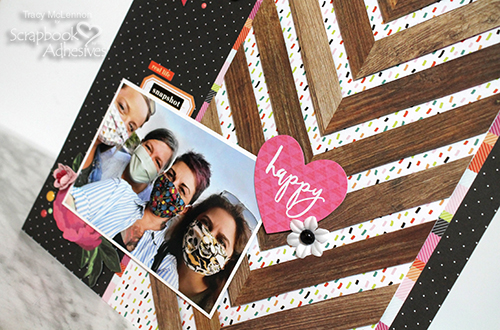
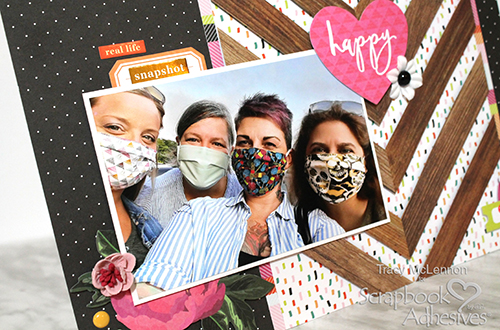
Mat the 4×6 photo in white cardstock using the E-Z Runner® Permanent Strips Refillable Dispenser. Then adhere to the layout using Crafty Foam Tape White, using 1 layer over the Simple Dimensional Border and 2 layers on the background. Add the ephemera flower and tab to the left of the matted photo using Thin 3D Foam Squares Black Mix. Then add the “Happy” heart using 3D Foam Squares White Mix.

Simple Dimensional Border Layout by Tracy McLennon for Scrapbook Adhesives by 3L

My final touch is to add the 3D flowers using Adhesive Dots Medium and a few more enamel dots. This layout featuring the Simple Dimensional Border is complete.

Simple Dimensional Border Layout by Tracy McLennon for Scrapbook Adhesives by 3L

Thanks so much for stopping by!
Tracy McLennon

Creative Time: 45 minutes
Skill Level: Beginner

Materials Needed
Scrapbook Adhesives by 3L®

E-Z Runner® Permanent Strips Refillable Dispenser
3D Foam Squares White Mix
Thin 3D Foam Squares Black Mix
Crafty Foam Tape White
Adhesive Dots Medium

Other
Patterned Papers, Stickers, Flower + Elements: Pink Paislee (5th & Monaco Collection; Black and White Cardstock; Enamel Dots

Save It to Pinterest!

Simple Dimensional Border Layout by Tracy McLennon for Scrapbook Adhesives by 3L Pinterest

Visit our Website and Blog!
Sign up for our Newsletter so you never miss a contest or giveaway!

instagram purple icon facebook icon purple pinterest purple icon twitter purple icon YouTube icon blog subscription purple icon

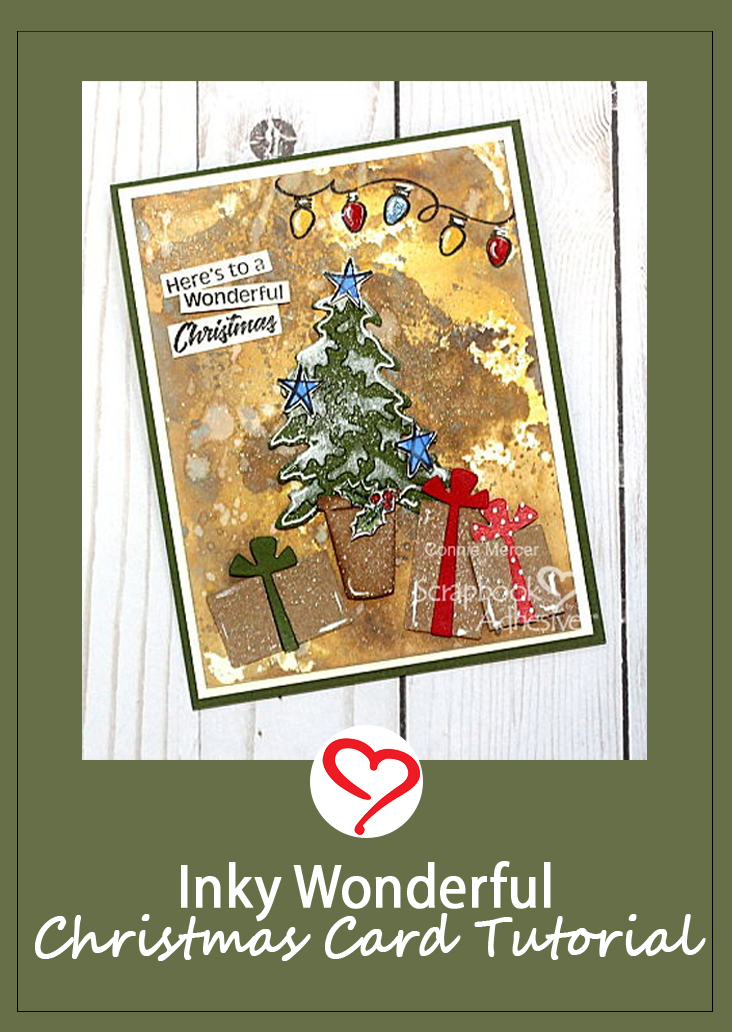
Inky Wonderful Christmas Card

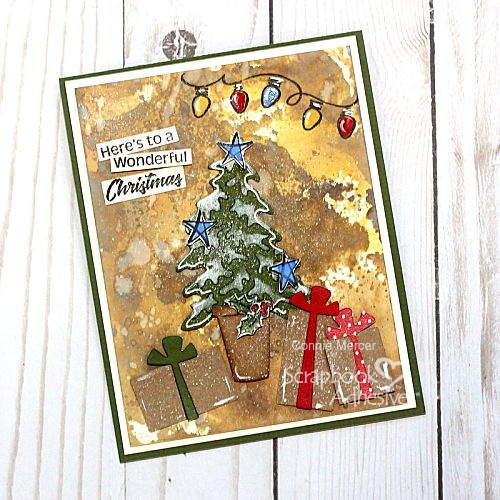
Hi, Connie here with a Christmas card using a wonderful inky background to highlight the holiday die cut shapes on the card front. Scrapbook Adhesives by 3L works so well securing all of the small parts. They have you covered – no part is too small for adhesive.

Inky Wonderful Christmas Card Tutorial by Connie Mercer for Scrapbook Adhesives by 3L

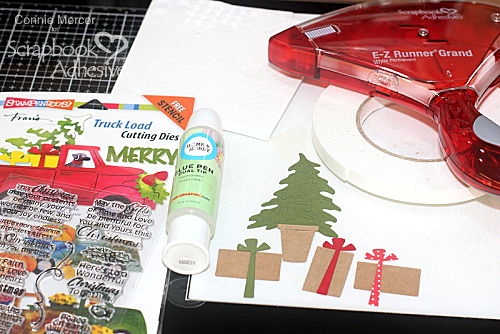
Inky Wonderful Christmas Card Supplies

Inky Wonderful Christmas Card Tutorial by Connie Mercer for Scrapbook Adhesives by 3L

First decide on patterned papers, cardstock, and card design. Then die-cut the shapes you will need to complete the card.

Inky Fun Background

Inky Wonderful Christmas Card Tutorial by Connie Mercer for Scrapbook Adhesives by 3L

On a card panel, start creating a background for the Christmas Tree scene. I used a combination of Distress Oxide inks to color a warm golden tone. It’s such a fun technique to add a mixed media backdrop. Don’t forget to splatter a little water!

Creating the Scene

Inky Wonderful Christmas Card Tutorial by Connie Mercer for Scrapbook Adhesives by 3L
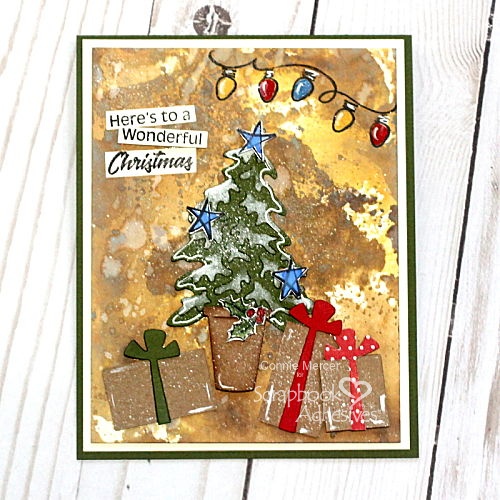
  1. Using the tree stencil in the craft die set, lay it over the coordinating shape, and add snow in just the right places.
  2. For the gift boxes, add the gift bows with the Dual Tip Glue Pen.
  3. I used 3D Foam Circles White Mix to add dimension to the gifts.
  4. Stamp the sentiment on white cardstock and cut into strips. Use 3D Foam Strips to adhere “wonderful” to overlap and popped up.

The Card Panels

Inky Wonderful Christmas Card Tutorial by Connie Mercer for Scrapbook Adhesives by 3L

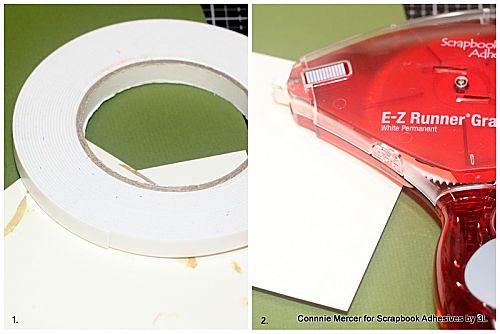
When matting the inky card front, I used Crafty Foam Tape 108′ and adhered it to an off white cardstock panel.

Next, I used E-Z Runner Grand Permanent White Dispenser to attach the layered card panel to a folded card base. Now my Inky Wonderful Christmas Card is ready to be mailed!

Inky Wonderful Christmas Card Tutorial by Connie Mercer for Scrapbook Adhesives by 3L

Thanks for stopping by~
Connie Mercer

Creative Time: 60 minutes
Skill Level: Intermediate

Materials Needed
Scrapbook Adhesives by 3L®
E-Z Runner Grand Permanent Strips
Crafty Foam Tape 108′
3D Foam Circles White Mix
3D Foam Strips

HomeHobby™ by 3L
Dual Tip Glue Pen

Other
Inks: Ranger Ink (Distress Oxide Inks + Archival Black Ink), Craft Dies: Stampendous! (Truck Load Cutting Dies), Stamps: Stampendous! (Christmas Stamps), Darkroom Door Stamps (Stars), Acrylic Paint (White, Yellow, Red, and Blue)

Pin It!!

Inky Wonderful Christmas Card Tutorial by Connie Mercer for Scrapbook Adhesives by 3L Pinterest

Visit our Website and Blog!
Sign up for our Newsletter so you never miss a contest or giveaway!
instagram purple icon facebook icon purple pinterest purple icon twitter purple icon YouTube icon blog subscription purple icon

Merry Christmas Wreath Card

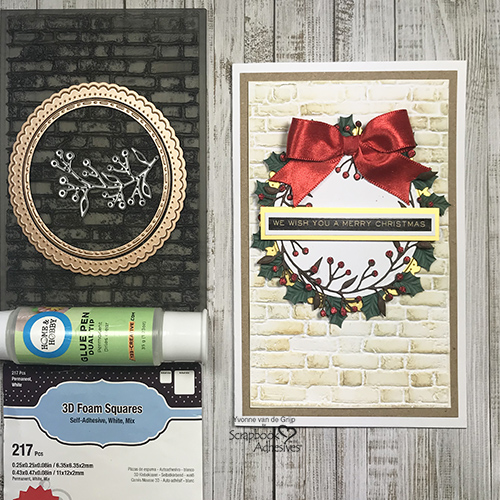
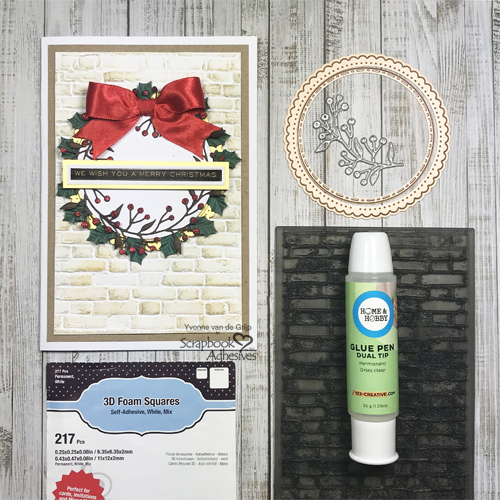
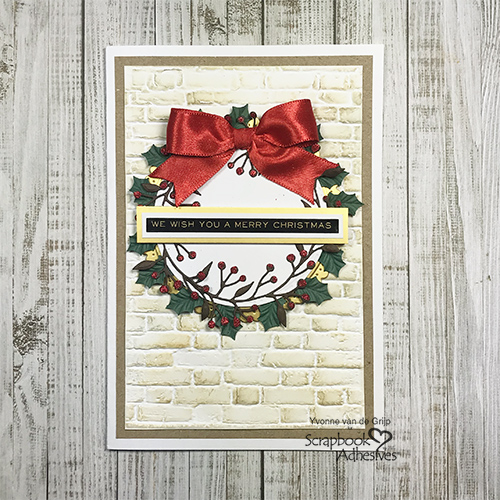
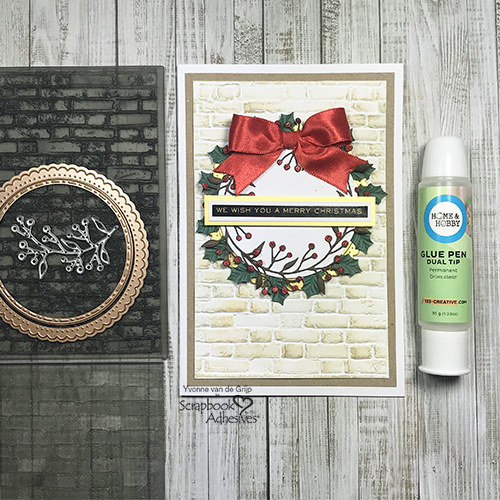
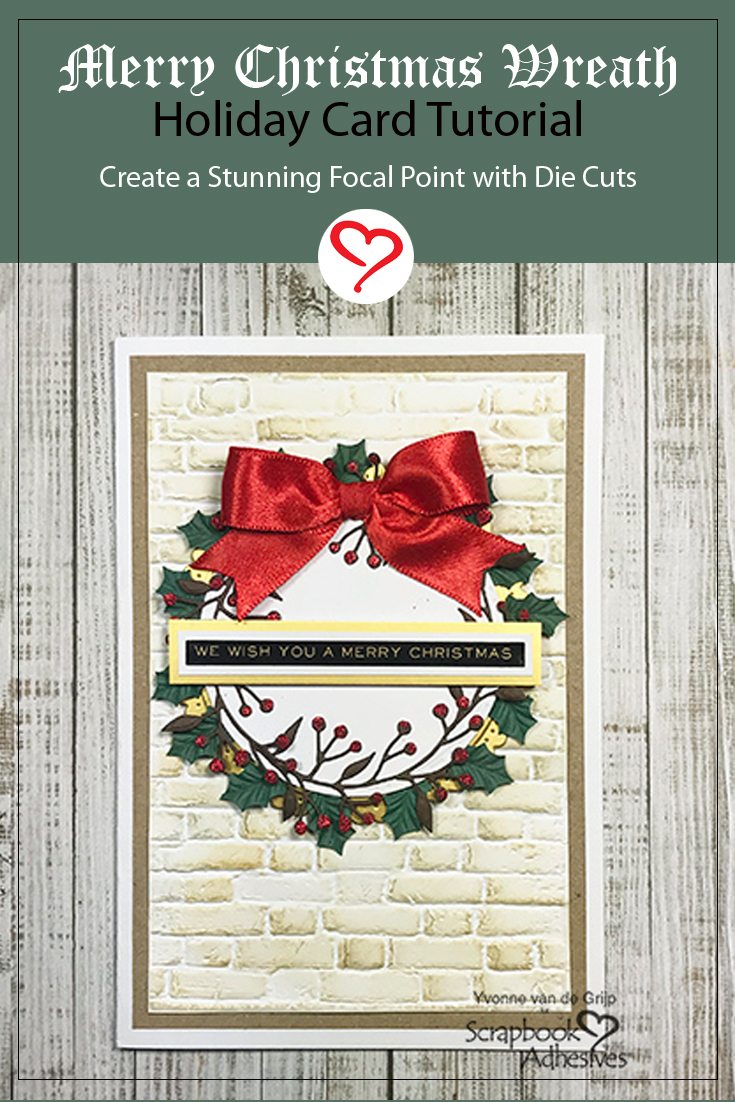
Hi everyone, Yvonne here with some Christmas inspiration. With Christmas coming up next month I started making my Christmas cards. I know this Merry Christmas Wreath Card may look complicated but with Scrapbook Adhesives by 3L products, it’s much easier to create than you might think. Let me show you how in my photo tutorial.

Merry Christmas Wreath Card by Yvonne van de Grijp for Scrapbook Adhesives by 3L

Christmas Wreath Panel Steps

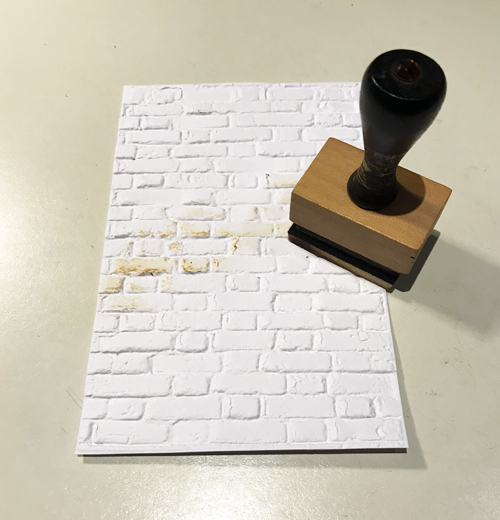
The top card panel for this card was embossed with a 3D brick embossing folder. Place a piece of white cardstock between the embossing folder and run the embossing sandwich through your die-cutting and embossing machine. Then trim the edges to the desired size by using a paper trimmer.

To highlight the embossed design, I used an ink blending tool to softly dab and brush a combination of brown and grey inks.

Merry Christmas Wreath Card by Yvonne van de Grijp for Scrapbook Adhesives by 3L

Card Panel Embellishing Details

Adhere the embossed panel onto a slightly larger brown card panel and then attach the layered panel to a white card base using the E-Z Runner® Permanent Strips Refillable Dispenser.

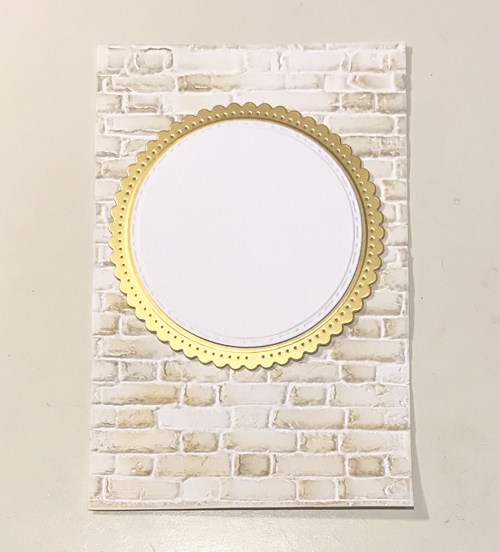
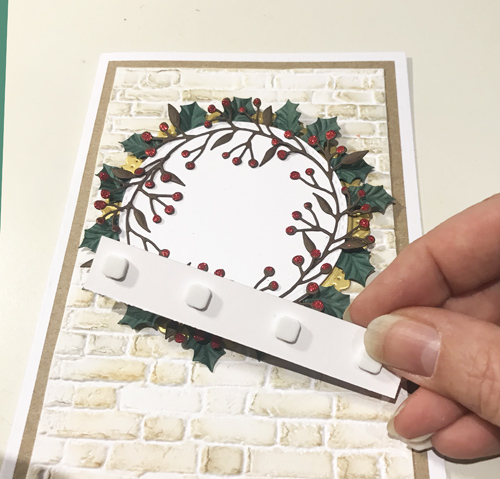
Next die-cut and emboss a scalloped circle from gold cardstock and a slightly smaller white circle from white cardstock. Layer the two die cut shapes with 3D Foam Squares White Mix. Then adhere them to the card base with more foam squares.

Merry Christmas Wreath Card by Yvonne van de Grijp for Scrapbook Adhesives by 3L

Making the Christmas Wreath

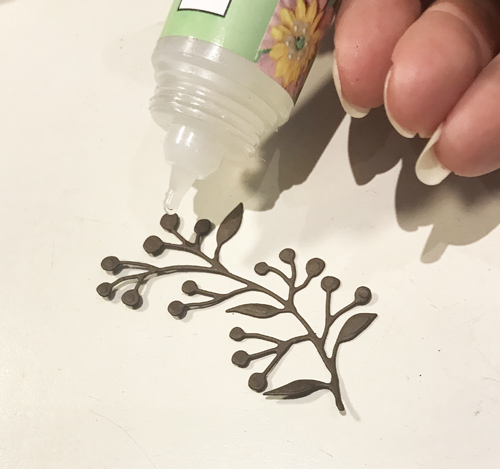
Let’s make the Christmas wreath! First, die-cut several berry branches from brown cardstock. Then add small drops of glue using the Dual Tip Glue Pen onto the little berries shapes.

Merry Christmas Wreath Card by Yvonne van de Grijp for Scrapbook Adhesives by 3L

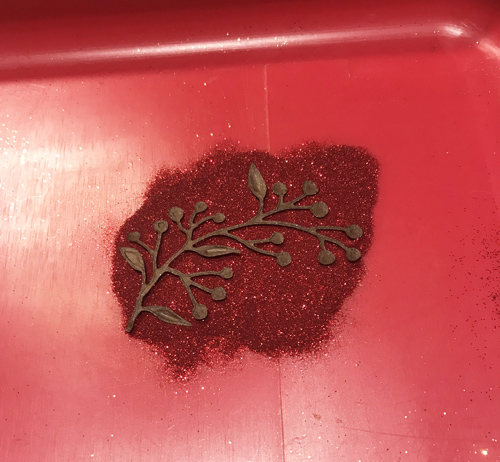
Gently press down the berries into red glitter and tap off any excess.

Merry Christmas Wreath Card by Yvonne van de Grijp for Scrapbook Adhesives by 3L

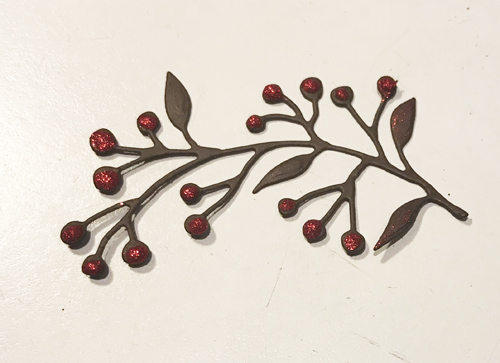
Set aside to dry. Repeat this step with the other berry branches.

Merry Christmas Wreath Card by Yvonne van de Grijp for Scrapbook Adhesives by 3L

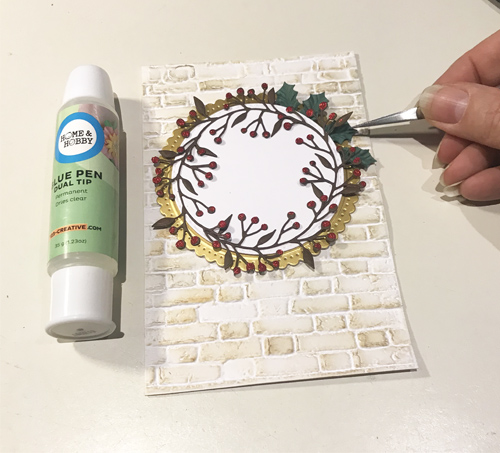
When the glittered berries dry, adhere the branches around the edge of the white circle shape on the card base.

Adhere mulberry holly leaves between the white and golden die-cut circles using the Dual Tip Glue Pen to give color and layer to the wreath.

Merry Christmas Wreath Card by Yvonne van de Grijp for Scrapbook Adhesives by 3L

Designer’s Tip: Use tweezers for the precise placement of the leaves.

The Finishing Touches

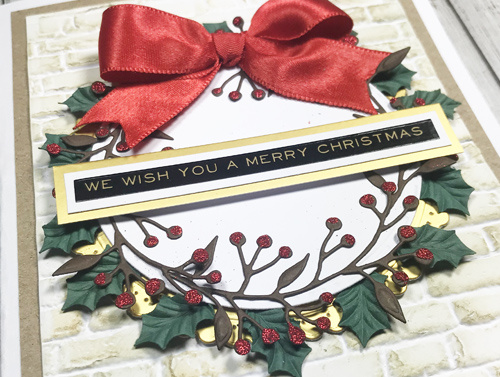
For the sentiment, I used a sentiment sticker which I double matted with white and gold cardstock using the E-Z Runner® Permanent Strips Refillable Dispenser. Lastly, I adhered it to the Christmas wreath using 3D Foam Squares White Mix in the middle of the wreath.

Merry Christmas Wreath Card by Yvonne van de Grijp for Scrapbook Adhesives by 3L

For the final touch, I made a red satin bow and adhered it to the top of the Christmas wreath using Adhesive Dots Large.

Merry Christmas Wreath Card by Yvonne van de Grijp for Scrapbook Adhesives by 3L

Voila…your Christmas Wreath card is ready. I bet it was easier than you thought!

Wishing you happy (Christmas) crafting,
Yvonne van de Grijp

Merry Christmas Wreath Card by Yvonne van de Grijp for Scrapbook Adhesives by 3L

Creative Time: 40 minutes
Skill Level: Intermediate

Materials Needed
Scrapbook Adhesives by 3L®

E-Z Runner® Permanent Strips Refillable Dispenser
3D Foam Squares White Mix
Adhesive Dots Large

HomeHobby™ by 3L
Dual Tip Glue Pen

Other
Embossing Folder: Sizzix/Tim Holtz (Bricked 3D Texture Fades Embossing Folder; Etched Dies and Die-cutting Machine: Spellbinders® Paper Arts (Fancy Edged Circles and Platinum 6 Machine); Sizzix (Thinlits Holiday Greens Mini); Inks and Ink Blending Tool: Ranger Ink (Distress Oxide Inks in Brushed Corduroy and Weathered Wood); Red Glitter; Sticker: Tim Holtz (Holiday Talk); White, Kraft and Gold Cardstock; Satin Bow; Mulberry Leaves; Paper Trimmer; Tweezers

Save It!

Merry Christmas Wreath Card by Yvonne van de Grijp for Scrapbook Adhesives by 3L

Visit our Website and Blog!
Sign up for our Newsletter so you never miss a contest or giveaway!
instagram purple icon facebook icon purple pinterest purple icon twitter purple icon YouTube icon blog subscription purple icon

Poster Calendar Holiday Layout

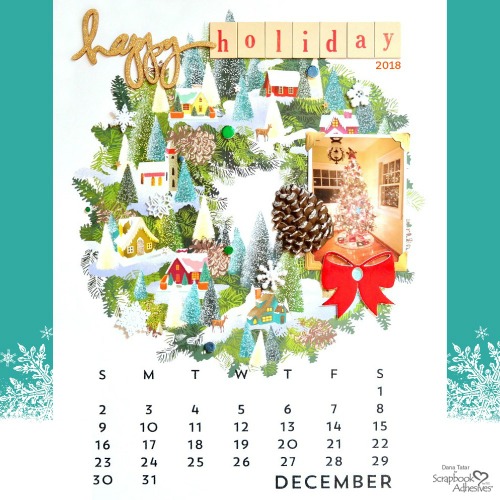
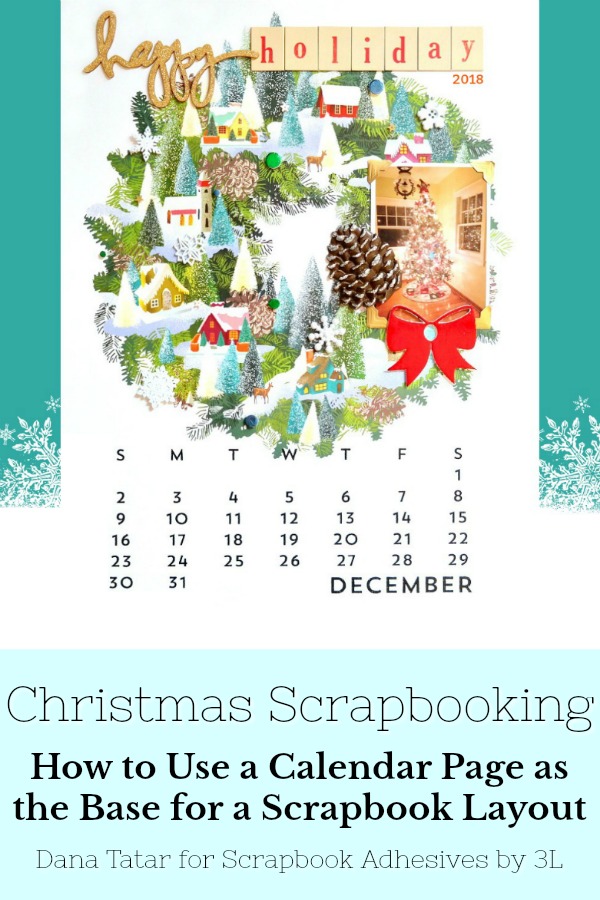
Hi friends! Dana here today sharing a holiday scrapbook layout. I switched up my usual layout size from 12×12 to 11×14 by using a gorgeous Linnea poster calendar as the base. The expanded size was fun to embellish with some of my favorite adhesive techniques.

Poster Calendar Holiday Layout by Dana Tatar for Scrapbook Adhesives by 3L

All the pretty trees on this calendar poster had me thinking of my own decorated Christmas tree. The 2018 holiday season was extra special because it was the first year we celebrated the holiday in our new home.

Adhesive Techniques for Holiday Crafting

Poster Calendar Holiday Layout by Dana Tatar for Scrapbook Adhesives by 3L

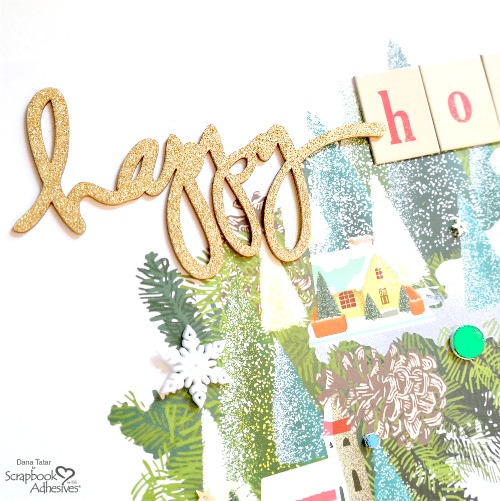
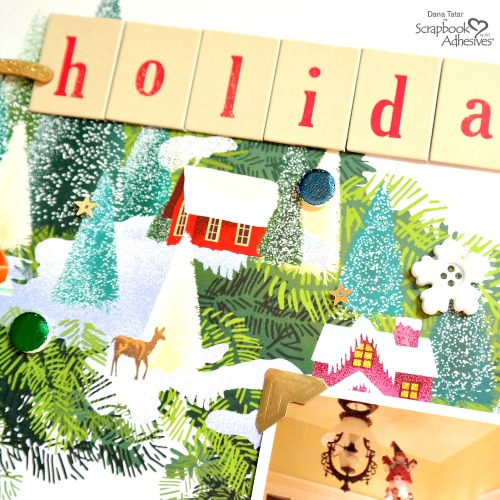
Chipboard is a great way to add texture and dimension to a project. My go-to adhesive for chipboard, especially script or intricate designs with lots of curves, is the E-Z Runner Petite Permanent Dots Dispenser. A quick swipe of this runner over chipboard applies a layer of adhesive dots. Don’t let the size of these dots deter you from using them on large chipboard pieces. The adhesive dots are small but extremely strong!

Poster Calendar Holiday Layout by Dana Tatar for Scrapbook Adhesives by 3L

I used Adhesive Dots Medium to secure the chipboard letter tiles across the top of the poster calendar. The 3D Foam Holiday Embellishment Kit with Foil is themed for Winter and includes pre-cut 3D Foam shapes of trees, stars, snowflakes, and other Christmas designs, with 5 sheets of Metallic Transfer Foil. I used several different sizes of 3D foam circles and the metallic transfer foil in several colors to add shimmery dots around the poster. I added mini gold star sequins to the background using Adhesive Dots Micro.

Finishing Touches

Poster Calendar Holiday Layout by Dana Tatar for Scrapbook Adhesives by 3L

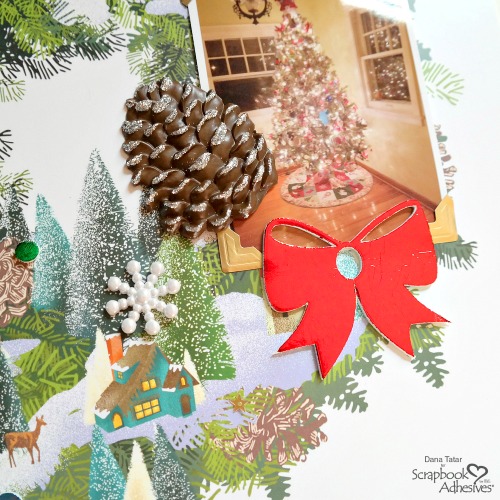
The gorgeous dimensional bow shown above is a 3D foam design from the Holiday Embellishment Kit that I covered with red metallic transfer foil. I used Crafty Foam Tape to attach the pinecone, a more heavy embellishment, and my photo to the poster. Creative Photo Corners in Gold were the perfect finishing touch to add a bit of sparkle.

Thanks for stopping by today! I hope I have inspired you to save old calendar pages to use in your crafting.
~Dana Tatar

Creative Time: 30 minutes
Skill Level: Beginner

Materials needed:
Scrapbook Adhesives by 3L®

Adhesive Dots Micro
Adhesive Dots Medium
Creative Photo Corners Gold
3D Foam Holiday Embellishment Kit with Foil
Crafty Foam Tape White
E-Z Runner Petite Permanent Dots Dispenser

Other
Calendar Poster: Linnea Designs; Chipboard Word: Heidi Swapp; Chipboard Letter Tiles: The Girls’ Paperie; Star Sequins: Clique International; Pinecone; Snowflake Buttons

Pin It!

Poster Calendar Holiday Layout by Dana Tatar for Scrapbook Adhesives by 3L Pinterest

Visit our Website and Blog!
Sign up for our Newsletter so you never miss a contest or giveaway!
instagram purple icon facebook icon purple pinterest purple icon twitter purple icon YouTube icon blog subscription purple icon

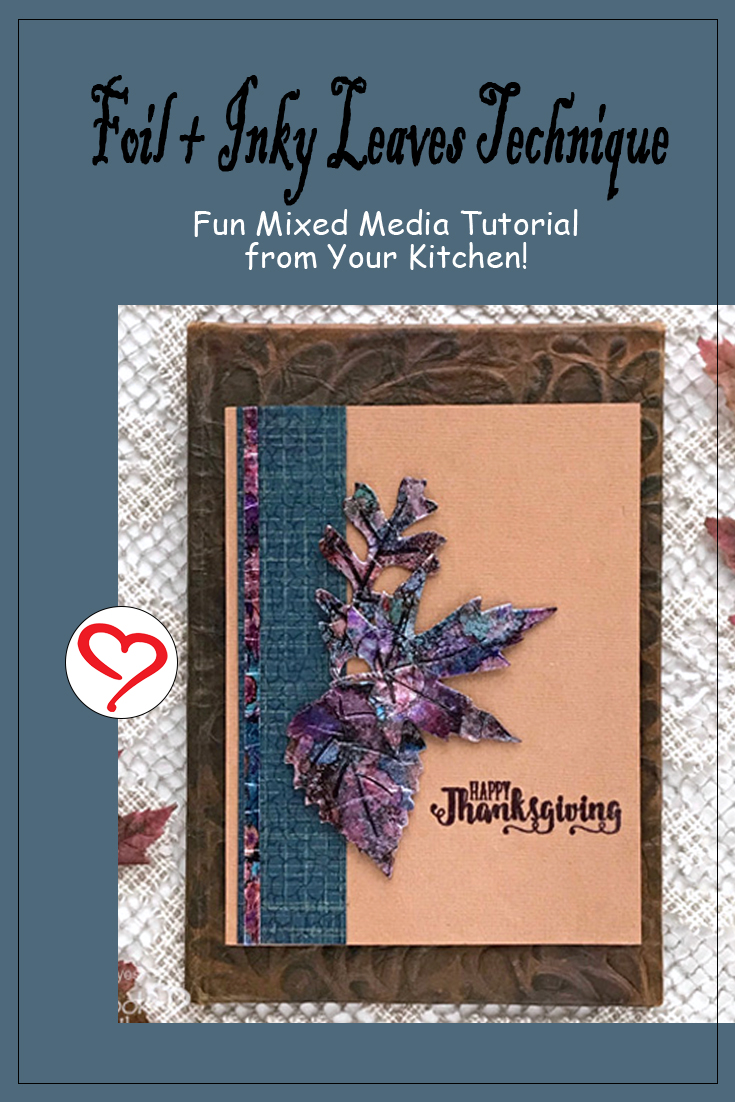
Foil + Inky Leaves Card Technique

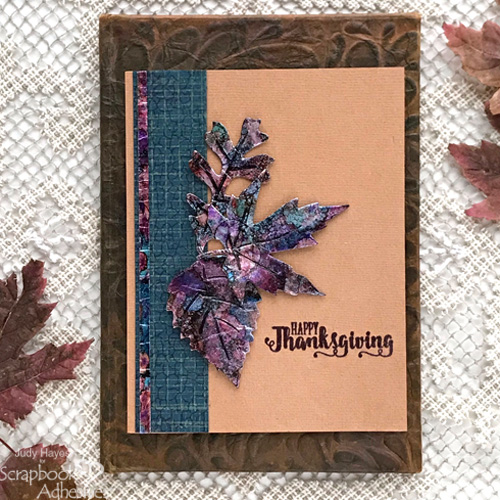
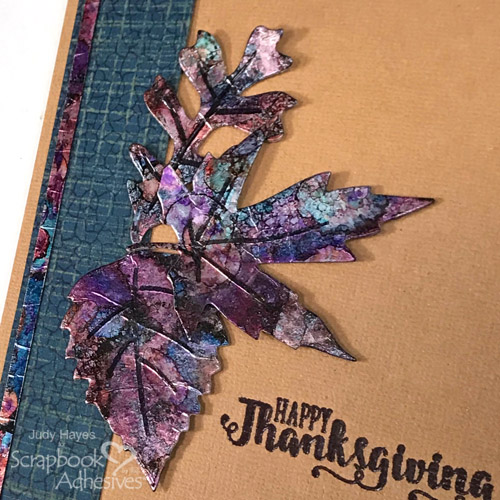
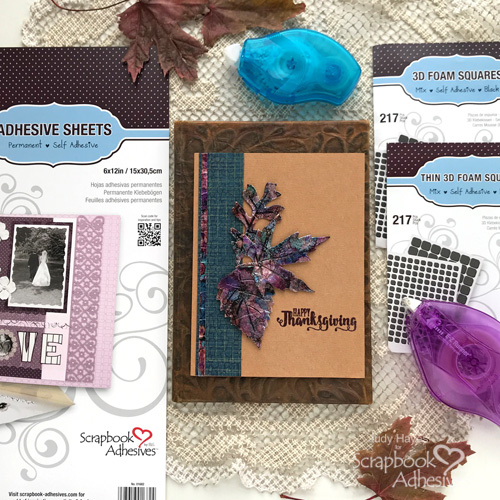
Hello crafty friends! Judy here today. As I put together this Thanksgiving card, the wind was whipping leaves everywhere. Brown crispy leaves not nearly so pretty as the foil + inky leaves on this card!

The foiled leaves are made with aluminum foil from my kitchen! Can you believe it? Let me show you how.

Foil + Inky Leaves Technique

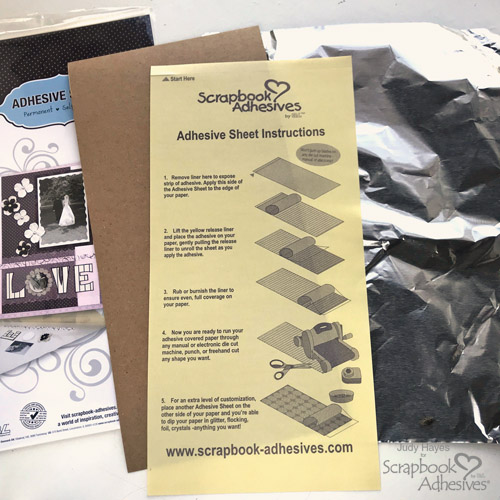
Attach Adhesive Sheets 6×12 inch to the back of a 6 x 12-inch Kraft cardstock. I chose Kraft because I have a lot of it. Black cardstock is also a good choice.

Foil + Inky Leaves Card Technique by Judy Hayes for Scrapbook Adhesives by 3L

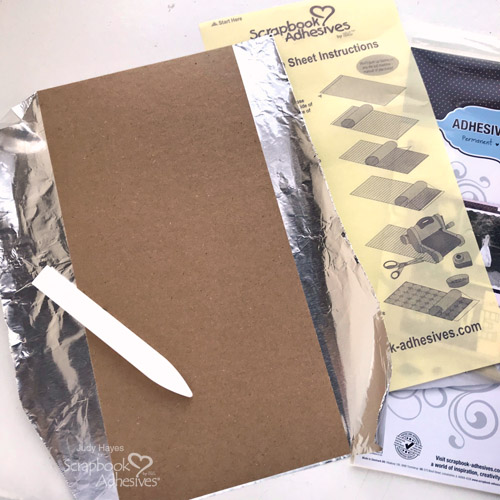
Remove the liner and place the adhesive side down on aluminum foil. I find it easier to keep foil smooth this way.

Foil + Inky Leaves Card Technique by Judy Hayes for Scrapbook Adhesives by 3L

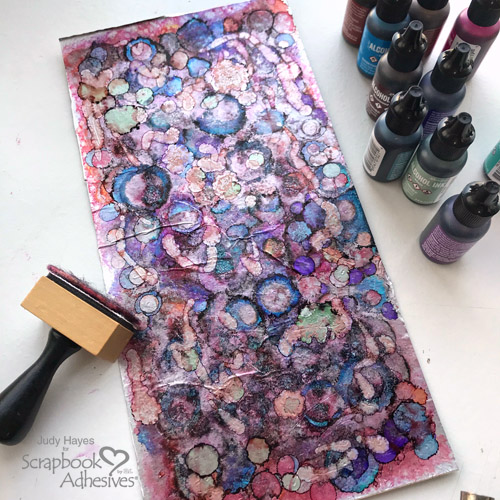
Next, add various colors of alcohol inks and blend them with a felt blending tool. Mist rubbing alcohol over the inks for a mottled pattern. Repeat these steps until you get your desired color.

Foil + Inky Leaves Card Technique by Judy Hayes for Scrapbook Adhesives by 3L

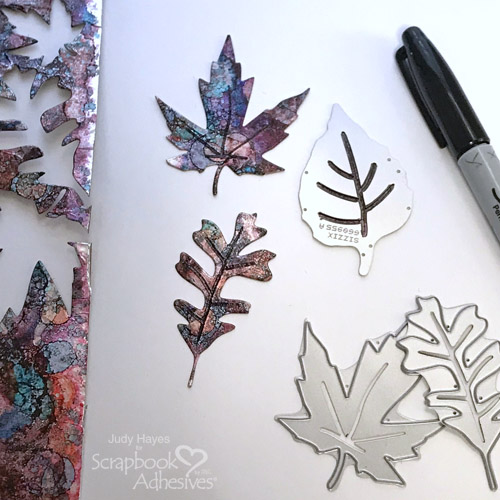
Use a die-cut machine and leaf dies to die cut three different leaf shapes with the foiled paper. With the shape still in the die, trace the vein lines with a black permanent marker using the die as a stencil.

Foil + Inky Leaves Card Technique by Judy Hayes for Scrapbook Adhesives by 3L

Card Panel Details

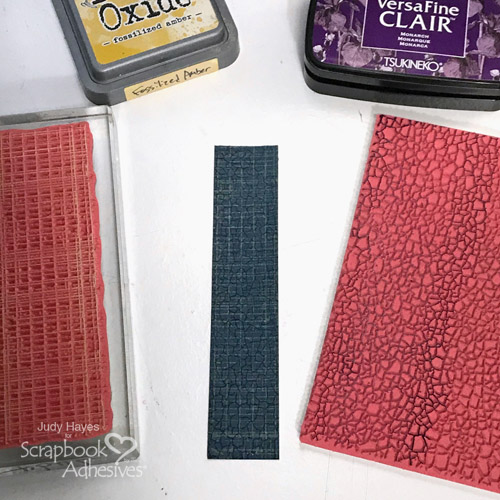
Ink grid design stamp with Fossilized Amber Oxide ink. Stamp on the 1.125 x 5.5-inch piece blue calypso cardstock strip. Re-ink stamp and stamp again to continue pattern over the entire piece. Apply Monarch ink to craze stamp. Stamp over grid pattern.

Foil + Inky Leaves Card Technique by Judy Hayes for Scrapbook Adhesives by 3L

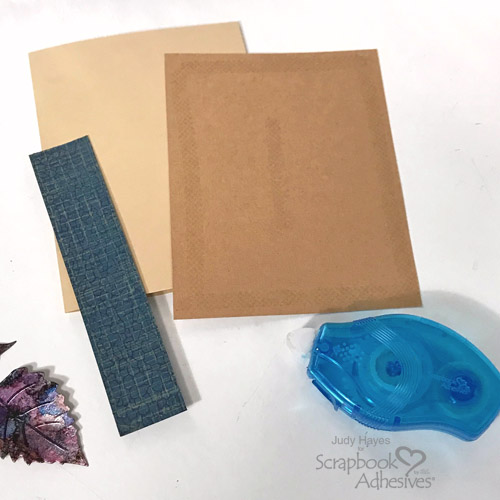
Form into a 4.25 x 5.5-inch card base with a buff-color cardstock. For a card panel, cut a light brown paper to 4.25 x 5.5 inches. My light brown paper was not heavy enough to make the card but I wanted to use this color. Use E-Z Runner® Petite Permanent Dots Refillable Dispenser to secure the light brown paper to the card front.

Foil + Inky Leaves Card Technique by Judy Hayes for Scrapbook Adhesives by 3L

Card Front Embellishing

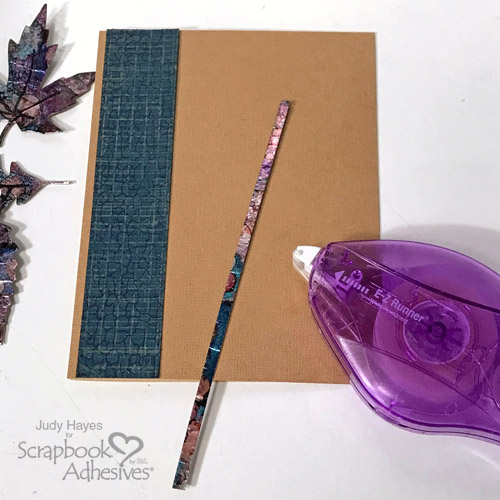
Attach the stamped strip near the left edge using E-Z Runner® Petite Permanent Dots Refillable Dispenser. Cut about a narrow strip of 0.125-inch wide x 5.5-inches long from the alcohol inked foil paper.

Use E-Z Runner® Micro Refillable Dispenser to apply adhesive to the back of the strip. Adhere to the card panel near the edge of the stamped blue calypso border.

Foil + Inky Leaves Card Technique by Judy Hayes for Scrapbook Adhesives by 3L

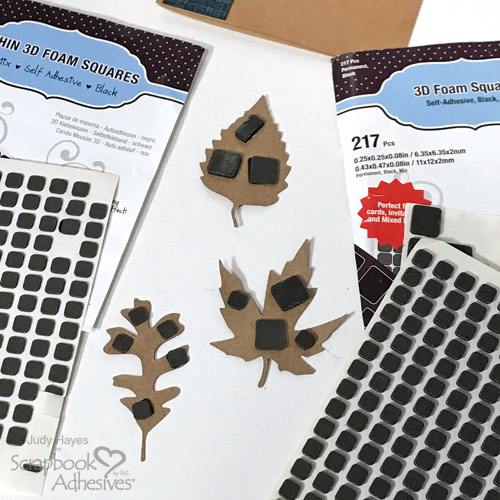
Place Adhesive Squares on the back of leaves. I used 3D Foam Squares Black Mix on the maple and solid leaf (not sure what kind it is!) and Thin 3D Foam Squares Black Mix on the oak leaf. Arrange and attach the leaves to the card.

Foil + Inky Leaves Card Technique by Judy Hayes for Scrapbook Adhesives by 3L

Stamp the sentiment with Monarch ink and heat emboss with clear embossing powder.

Foil + Inky Leaves Card Technique by Judy Hayes for Scrapbook Adhesives by 3L

Thanks for Visiting!
Judy Hayes

Foil + Inky Leaves Card Technique by Judy Hayes for Scrapbook Adhesives by 3L

Creative Time: 40 Minutes
Skill Level: Intermediate

Materials Needed
Scrapbook Adhesives by 3L®

Other
Craft Dies: Sizzix/Tim Holtz (Fall Foliage); Stamps: Stampers Anonymous/Tim Holtz (Craze & Planks, Mixed Media) and Taylored Expressions (Bushel of Blessings Stamp Set); Ink: Ranger Ink ( Distress Oxide Ink in Fossilized Amber) and Tsukineko (Versafine Clair in Monarch); Embossing Powder: Ranger Ink; Alcohol Inks: Ranger Ink (Boysenberry, Glacier, Laguna, Monsoon, Moss, Rosewood, Sienna, and Alloy Mined); Cardstock: Bazzill Basics Paper (Blue Calypso); Kraft, Buff and Tan Cardstock; Aluminum Foil; Black Permanent Marker

Save It!

Foil + Inky Leaves Card Technique by Judy Hayes for Scrapbook Adhesives by 3L Pinterest

Visit our Website and Blog!
Sign up for our Newsletter so you never miss a contest or giveaway!
instagram purple icon facebook icon purple pinterest purple icon twitter purple icon YouTube icon blog subscription purple icon