You are in our US store • Switch to Europe store

Butterflies, Dragonflies, and Glitter Card Tutorial

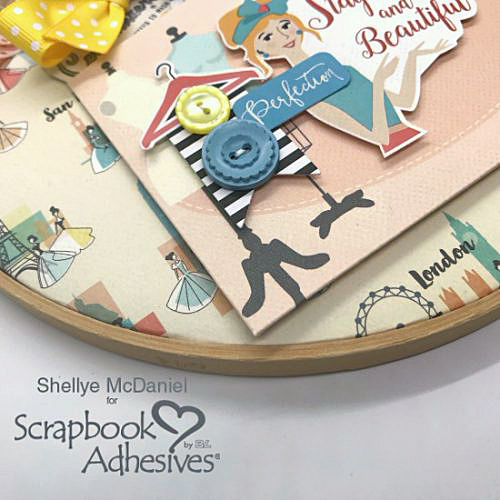
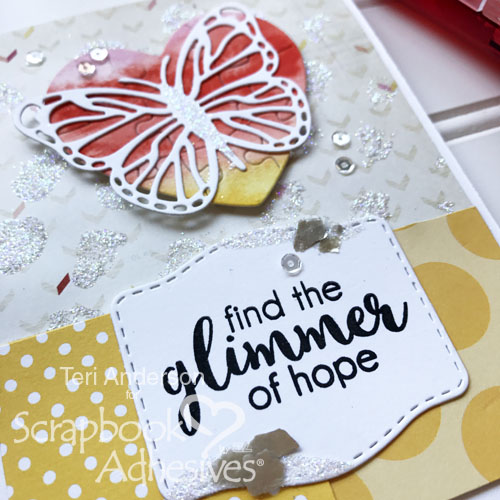
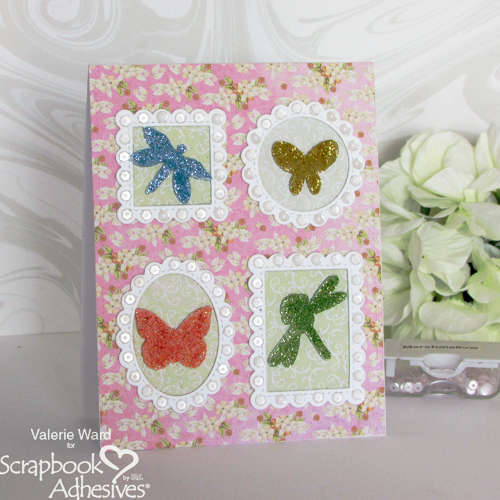
Hello! Valerie here today, and today I’m featuring a pretty summertime card featuring glitter and several Scrapbook Adhesive products. The focal point is on 3D Foam Butterflies and Adhesive Dots Micro for this all occasion card.

Butterflies, Dragonflies, Glitter Card tutorial by Valerie Ward

The Card Tutorial

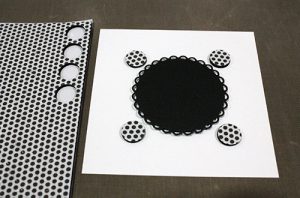
Create Four Mini Frames

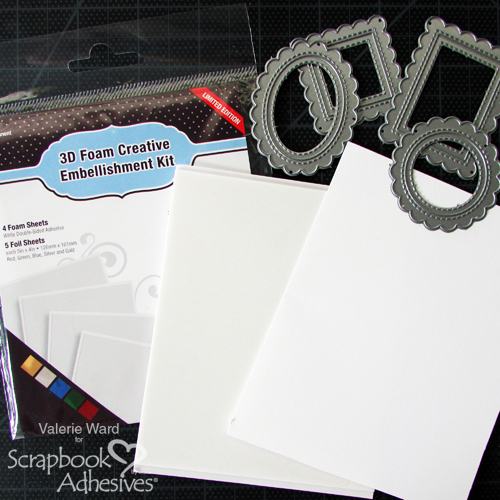
For this step, you’ll need your white cardstock, the 3D Foam Creative Embellishment Kit, scalloped mini frame dies, and a die cutting machine.

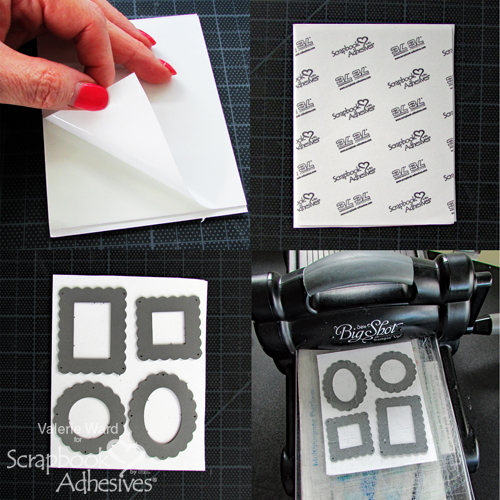
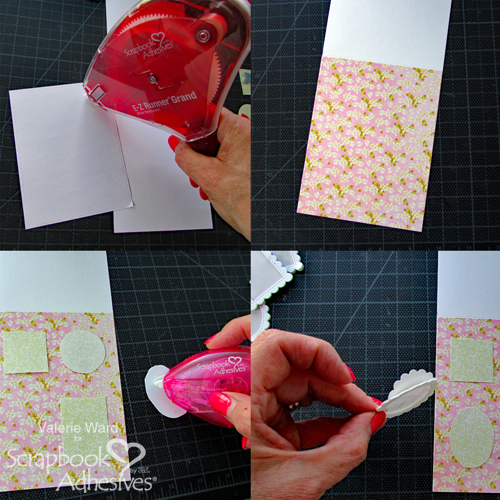
In the first step I created white frames. First, I peeled off the backing of one of the 3D Foam Creative sheets from the 3D Foam Creative Embellishment Kit and adhered a piece of white cardstock over the entire piece; I kept the backing on the other side. Next, turn it over to the white side that has the white cardstock on it, and place your 4 mini frame dies on it. Then run it through your die cutting machine. Set them aside for now.

Break out the Glitter!

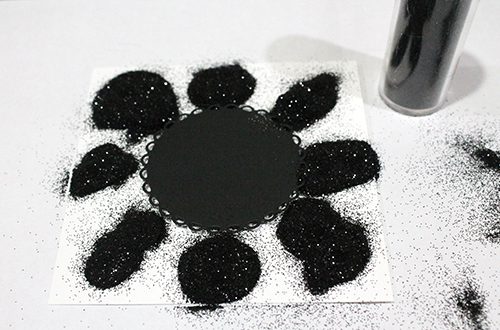
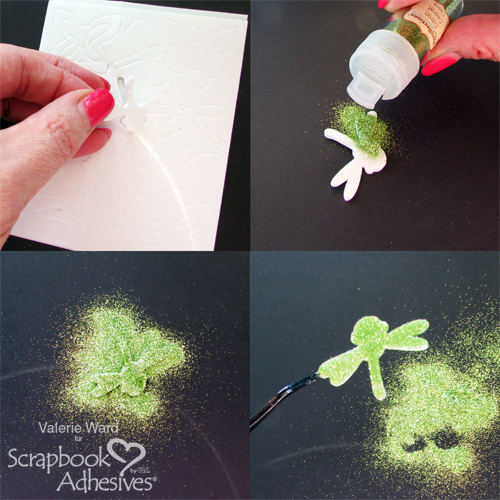
Here is where we create the glittery butterflies and dragonflies! Select your favorite shapes from the 3D Foam Butterflies kit, and get 4 colors of glitter.

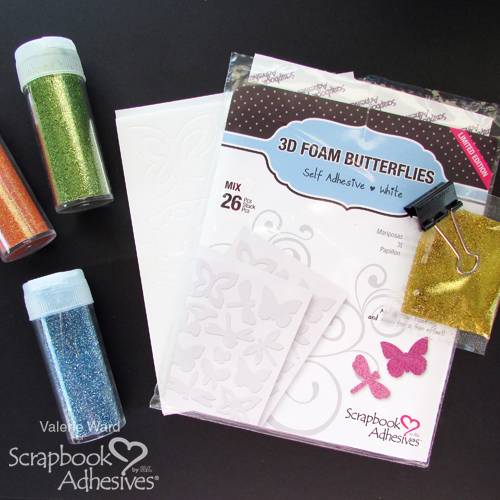
I’m using the dragonfly. First I removed it from the sheet, laid it sticky-side UP on a surface, and poured the glitter on. I picked it up with tweezers, poured off the excess glitter and set it aside. Repeat with the different bugs (lol – bugs) and different colors of glitter for each one (if you want 4 different colors, that is).

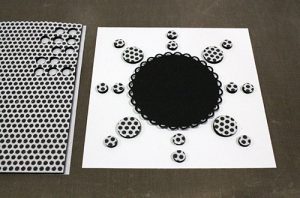
Embellish the Card Base and 4 Frames

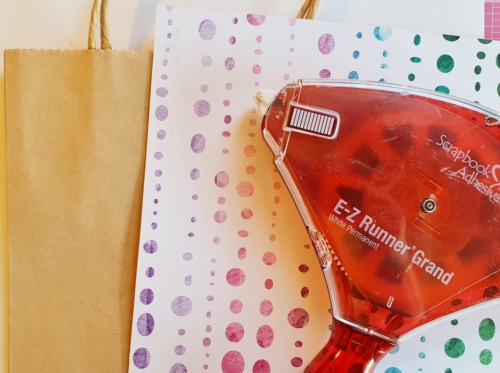
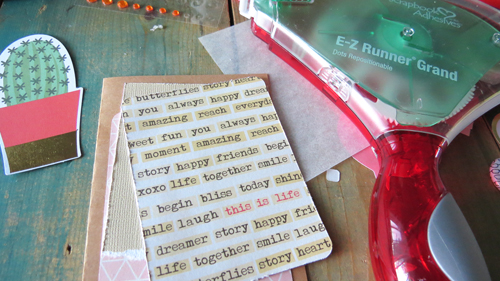
Using the patterned paper, flip it back-side-up, and apply adhesive from your E-Z Runner® Grand Refillable Dispenser. Line it up on your card base and apply.

You’ve already die cut your 4 mini frames, so for this step I hand cut 4 backgrounds for the frames from coordinating patterned paper. I lined them up where I wanted them to go, then applied adhesive from my E-Z Squares® Refillable Dispenser to the backs of each one and attached them to the card.

Next get the 4 die cut frames, and peel off the backing from them. Apply them to the card over the backgrounds for each one.


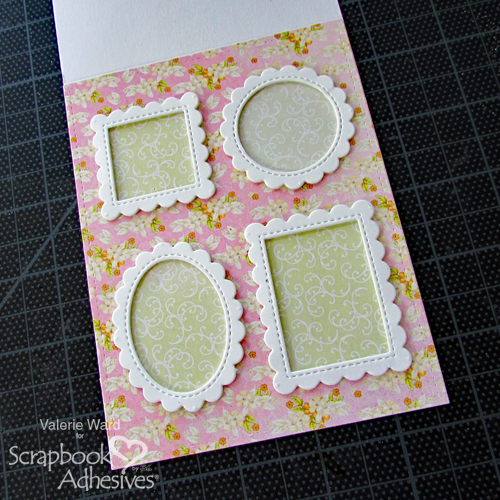
It’s really starting to come together now!

Add the Pretty Bugs

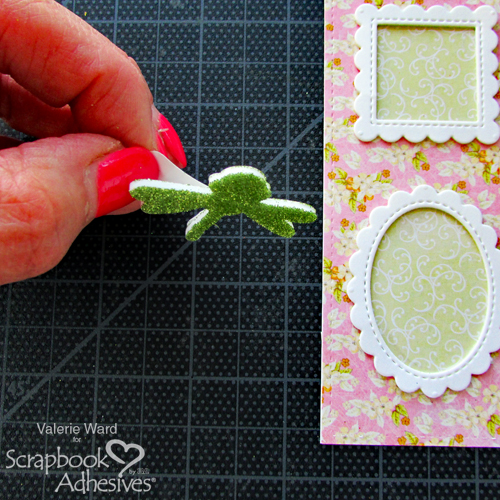
Now go get those 4 pretty bugs and decide which frames to place them in. Remove the backings, and adhere them inside the frames.

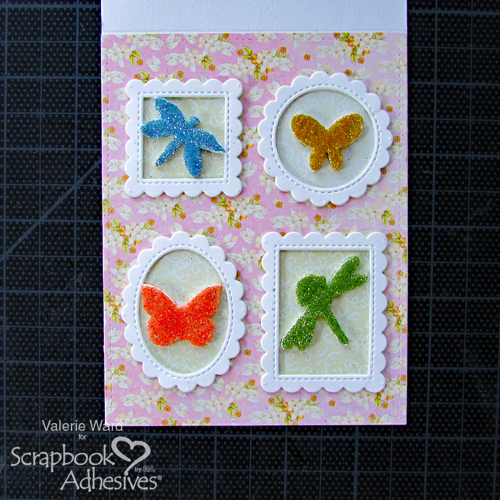
Embellish the Frames

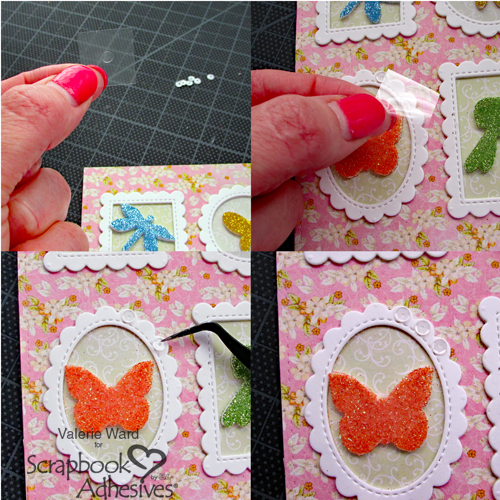
Next I decided this card needed something more to jazz up the frames. I pulled out some mini sequins and my box of Adhesive Dots Micro. These sticky dots are amazing! They are very strong and easy to use.

Adhesive Dots Micro and Sequins -a perfect match!

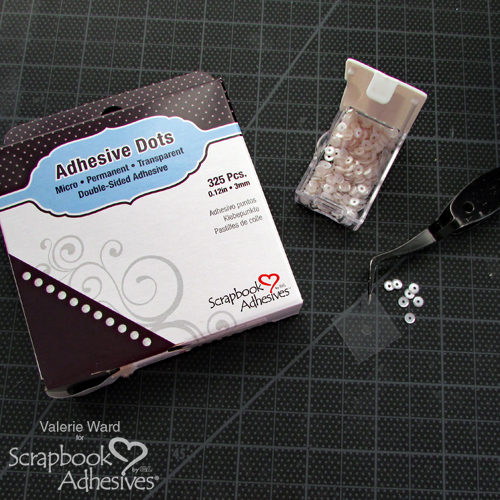
Adhesive Dots dispense from the box on a clear liner.  Just pull one square out of the box, lay the sticky dot where you want it applied, press it on the spot, and pull off the liner. No touch application! Then you can put your sequin on top of the Adhesive Dot, and it sticks right down. I suggest using tweezers with the sequins.

No-touch application for Adhesive Dots!

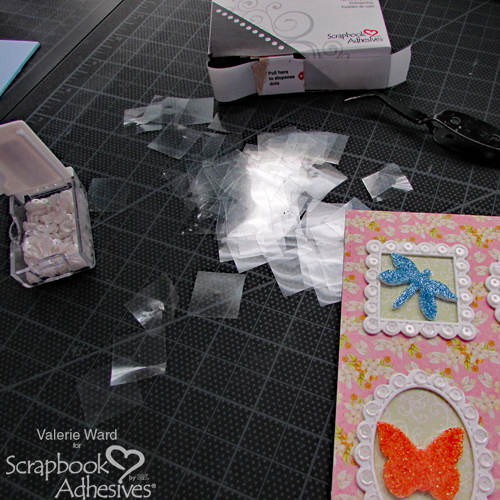
This step took MAYBE 5 minutes, tops. I couldn’t resist taking a shot of the pile of the Adhesive Dots clear liners. 😉

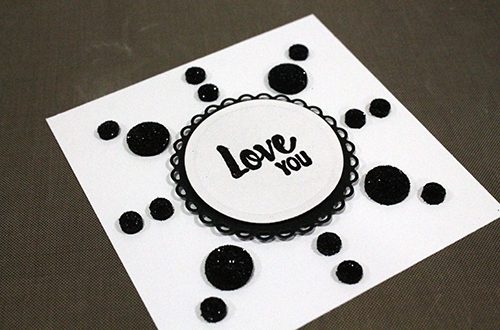
The card is finished! I was so happy with this final result. All the sparkle is so pretty, and the texture with the sequins was the perfect final touch.

Butterflies, Dragonflies, Glitter Card tutorial by Valerie Ward

Here are the Scrapbook Adhesive products I used. There is a list at the end of the post with links to each product.

Scrapbook Adhesives by 3L

A little close-up:

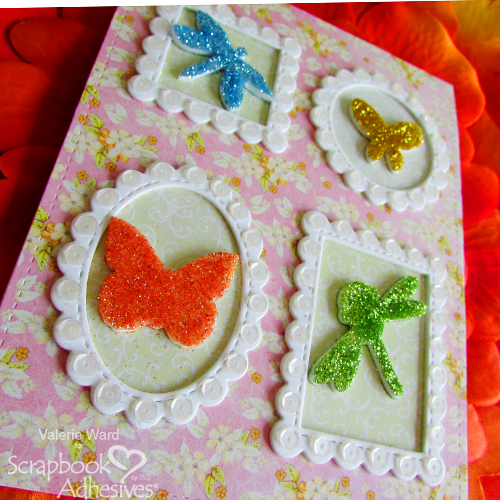
Thank you so much for joining me today! Have a wonderful day, and Happy Crafting!
Valerie

  • Creative Time: 60 Minutes
  • Skill Level: Intermediate

Scrapbook Adhesives by 3L® Supplies:
E-Z Runner® Grand Refillable Dispenser
E-Z Squares® Refillable Dispenser
3D Foam Butterflies
3D Foam Creative Embellishment Kit
Adhesive Dots Micro

Other Supplies: white cardstock, 2 patterned papers, scalloped mini frame dies, glitter, mini sequins, tweezer to pick up sequins, die cut machine

Snowy Scene Tags + Giveaway for Christmas in July

When you visit Favecrafts you’ll find the step-by-step instructions for Christine Emberson’s Snowy Scene Tags featuring Creative Photo Corners. They’re so cute and so very easy to make! They’ll make your gifts will look great under the tree, or around a wine bottle, or on a gift bag, so go ahead and take a look.

Snowy Scene Tags + Giveaway for Christmas in July with Favecrafts;  tags by Christine Emberson
Favecrafts.com

Get the Snowy Scene Gift Tag Tutorial

Visit our Website and Blog!
Sign up for our Newsletter so you never miss a contest or giveaway!

instagram purple icon facebook icon purple pinterest purple icon twitter purple icon YouTube icon blog subscription purple icon

Big, Bold and Bright with E-Z Runner Grand

Hi everyone, Christine here today with a big, bold and bright gift bag.  This is a large bag so without hesitation, I reached for my E-Z Runner Grand® Refillable Dispenser – perfect for this job!

Big Bold Bright Gift Bag Tutorial by Christine Emberson for Scrapbook Adhesives by 3L

A Bright Bag Tutorial

I selected my gift bag, bright patterned papers, kraft card and my trusty E-Z Runner Grand® Refillable Dispenser.  This is a large dispenser but only weighs 6 oz and that grip handle is perfect to hold and maneuver.

I affixed kraft card behind all patterned paper panels.

For the quote panel, I used 3D Foam Squares White Regular affixed to the reverse side, cannot resist that extra dimension.

Along with my patterned paper panels, I added die cut flowers with 3D Foam Circles White –  a perfect size for these.  They come in a mixed pack of two sizes, also available in black, so that suits all your embellishments.

Finish the bag with gold leaves die cuts and gold pearls to the flower centers.

Big Bold Bright Gift Bag Tutorial by Christine Emberson for Scrapbook Adhesives by 3L

Fill this up with goodies and make someone’s day bright and cheerful.

Big Bold Bright Gift Bag Tutorial by Christine Emberson for Scrapbook Adhesives by 3L

Thanks for stopping by.  Make your next creative project a grand one!

Christine

Creative Time: 30 Minutes
Skill Level: Beginner

Scrapbook Adhesives by 3L® Products used:
3D Foam Circles White
3D Foam Squares White Regular
E-Z Runner Grand® Refillable Dispenser
Others:
Dies: Spellbinders Paper Arts (Blooming Rose)White Card; Canvas Print Card; Silver Foil Card; Kraft, Gold Foil; Patterned Paper – Paper House Productions – Color Washed; Gold Enamel Pearls


Embroidery Hoop Mail Pocket Tutorial

Greetings!  Shellye McDaniel here today to share a fun new idea on sending snail mail with an Embroidery Hoop Mail Pocket!


Let’s Get This Hoop Started!

To begin, you will need a  9″ bamboo embroidery hoop and some of your favorite double-sided scrapbook paper.  From Scrapbook Adhesives you will use: Extreme Double-Sided Tape 1/8 inch, Dual Tip Glue Pen, Adhesive Dots Large and 3D Foam Circles White Mix.


The first step is to add a panel of paper to the back of the hoop.


You will need to separate the hoops. Trace the outer edge of the inner hoop onto patterned paper and cut out.


Use the Dual Tip Glue Pen to add glue around the rim of the hoop.  Next, attach the circle of patterned paper.


To construct the pocket, trace the outside edge of the larger hoop onto patterned paper.  You will only need a half-circle, so keep that in mind when tracing.  Cut the paper and leave approximately 1/4″ margin.  Next, make cuts from the margin’s edge to the trace mark to create pleats (as shown above).

For the pocket, you will want a high tack adhesive: Extreme Double-Sided Tape 1/4 inch. Apply the adhesive around the outer edge.

Now that the pocket has been added, reattach the outer hoop and secure in place with the tension knob.

Let’s Decorate!

4 X 6 Journal Cards make perfect mini pockets!


First, you will need to score the two sides and bottom of the card 1/4″ from the edge.


Next, fold along the score lines and apply a strip of Extreme Double-Sided Tape 1/4 inch to the folds.  Attach to the center of the larger pocket.

I am not a “flat sticker” kind of girl, so I almost always use 3D Foam Circles or Squares to give them dimension!

For the button application, I used the Adhesive Dots Large or whatever size you need depending on the button size.

When decorating the vintage button cards, I also used 3D Foam Adhesive and Adhesive Dots:

Larger tags and mini envelopes were stuffed into the larger pocket.  Add ribbons, bows and other ephemera pieces that your snail mail recipient will love!

Thank you for joining me today!

Creative Time: over an hour
Skill Level: Intermediate

Materials Needed:
Scrapbook Adhesives by 3L® Products:
Adhesive Dots Large 
3D Foam Circles White Mix

HomeHobby by 3L®:
Extreme Double-Sided Tape 1/8 inch
Dual Tip Glue Pen

Patterned Paper & Stickers: Carta Bella Paper

Ribbon: May Arts Ribbon

Make Your Cards Sparkle and Shine with 3D Foam Stars

Wear Your Adhesive on the Outside with 3D Foam Stars are a fun way to add sparkle and shine to handmade cards! Hello, Linsey here today sharing some card inspiration featuring limited edition 3D Foam Stars.

Make Your Cards Sparkle and Shine with 3D Foam Stars by Linsey Rickett for Scrapbook Adhesives by 3L

Sparkle and Shine with 3D Foam Stars

After finding inspiring star CAS design cards on Pinterest, I created one of my own using 3D Foam Stars and ribbon. The ribbons were cut to size and adhered to the white cardstock panel with E-Z Runner® Permanent Strips Refillable Dispenser.

Make Your Cards Sparkle and Shine with 3D Foam Stars by Linsey Rickett for Scrapbook Adhesives by 3L

3D Foam Stars can be embellished in many different ways. Place two nesting medium size 3D Stars together onto the card panel at the end of each ribbon. To keep its shape, make sure to have the top liner on until you’re ready to embellish.

Remove the outer line of the star and apply with silver foil from the 3D Foam Holiday Embellishment Kit. Make sure the color side is facing you. Gently rub to transfer the foil to the star. It’s that simple…no tools! Next, color in rainbow colors using alcohol markers.

Now for the sparkle, remove the inner liner of the star and sprinkle glitter and press down to secure before tapping off the excess. Repeat these steps for embellishing the rest of the stars.

Stamp the sentiment in black ink and then heat emboss with clear embossing powder.

Make Your Cards Sparkle and Shine with 3D Foam Stars by Linsey Rickett for Scrapbook Adhesives by 3L

This is just one example of how you can make quick and easy cards with a superstar Wow! factor, using 3D Foam Stars. How would you add them to your cards? Your imagination is the limit!

Make Your Cards Sparkle and Shine with 3D Foam Stars by Linsey Rickett for Scrapbook Adhesives by 3L

Thanks so much for stopping by! I hope you’ve been inspired to create something fabulous with 3D Foam Stars! Share your beautiful cards and projects using Scrapbook Adhesives by 3L® products on Instagram with hashtag #scrapbookadhesivesby3l.

Happy crafting!
Linsey

Creative Time: 20 minutes
Skill Level: Beginners Level

Materials Needed:
Scrapbook Adhesives by 3L®:
3D Foam Stars
E-Z Runner® Permanent Strips Refillable Dispenser
3D Foam Holiday Embellishment Kit

Layered Cheer Up Card Ideas

Hi, Shannon here sharing a set of cards today to cheer up a few friends. I have a lot of friends right now, all around me, and you may also, who need a little pick me up. I used E-Z Runner® Grand Repositionable Dots Refill3D Foam Squares White MixE-Z Runner® Grand Refillable Dispenser and Dual Tip Glue Pen to create this cute set of cards.

My hope is that this card set inspires you to create some handmade love for your friends or family!

Layered Cheer Up Card Ideas by Shannon Morgan for Scrapbook Adhesives by 3L

Bring Cheer in Card Making

This set was fun to create, I used twine and other things to add some colorful punches. I used the E-Z Runner® Grand Repositionable Dots Refill to get my placement just right on these cards, putting a lot of care into the details here and there to each one. Using the repositionable adhesive gives the opportunity to place things and re-adjust them if needed before adhering them permanently.

I used the repositionable adhesives for the “sentiment” on the card above. This is the first card in the set. For the sentiment to stick out but not overpower the card,  I wanted the heart to be “just so.” It took a few times but made it work!


A card set often contains multiple cards, this is perfect when you need a card readily available. I again, wanted that “yay!” sticking out “just so” and the repositionable adhesive came in handy for just that.

The final card was a little less layered. However, it required attention to the details that were on it. Placing some gemstones on the potted cactus die cut adds some visual interest. I also wanted to make sure that some of that cute patterned paper sticking out before attaching the sentiment to the card front.

Each card needs an envelope to help complete the card set. Did you know that using bags is a great alternative to a traditional envelope? It is! A few accents that coordinated to each card were the finishing touches.

Thank you for letting me share with you!

Creative Time: less than one hour
Skill level: Beginner

Materials Needed:
Scrapbook Adhesives by 3L®:
E-Z Runner® Grand Repositionable Dots Refill
3D Foam Squares White Mix
E-Z Runner® Grand Refillable Dispenser
Dual Tip Glue Pen

Other:
Kraft paper, Cardstock, Patterned papers, Die cuts, Tags, Sequins, Washi tape, Spray mist, and Twine

Believe in Yourself Card with Adhesive Dots

Today, I’m sharing Believe in Yourself Card that features Adhesive Dots 3D for the bigger flower centers and Adhesive Dots Medium on the smaller flowers.  These make quick flower centers!  I’ve used a mix of 3D Foam Circles White Mix and Thin 3D Foam Squares White Mix to give the flowers varied height.  Plus the verse panel is elevated a little with Thin 3D Foam Squares White Mix.  E-Z Dots® Permanent Refillable Dispenser makes it easy to fasten the patterned paper to the card front.

Create the Believe Card Basics

Create a 4.5 x 6 inches card base. Then fasten patterned paper to the front using E-Z Dots® Permanent Refillable Dispenser.

Stamp verse and add green mat using E-Z Dots® Permanent Refillable Dispenser. Then pop it up slightly with Thin 3D Foam Squares White Mix to fasten to the card front.

Flower Embellishment Details

Color flowers with inks and shape before assembling with Adhesive Dots Medium. The larger flowers have Adhesive Dots 3D for centers, and the two smaller flowers have 2 Adhesive Dots Medium layered over each other.

Pour embossing powder over each center, lightly press and tap off excess. Fasten some of the flowers with Thin 3D Foam Squares White Mix and others with 3D Foam Circles White Mix to give varied heights. Fasten leaves are with Thin 3D Foam Squares White Mix.

Last, add a bow of seam binding and fasten in place with Adhesive Dots Medium.

Thank you for visiting and Happy Crafting!
Judy Hayes

Materials Needed:
Scrapbook Adhesives by 3L®:
Adhesive Dots 3D
Adhesive Dots Medium
3D Foam Circles White Mix
E-Z Dots® Permanent Refillable Dispenser
Thin 3D Foam Squares White Mix

Other:
Carta Bella Paper – Spring Market; Imagine Crafts/Tsukineko Versafine Clair Shady Lane; Penny Black “just believe” stamp set; Spellbinders Cinch & Go Flower Two; Ranger Distress Powder: Antique Linen; Ranger Distress Oxide Inks: Tattered Rose, Abandoned Coral, Bundled Sage; Off White Cardstock; White Seam Binding

DIY Glittered Patterned Paper

Hi, everyone! Do you love patterned paper? Teri here to show you a card that features an easy way to embellish patterned paper with glitter, glue and a stencil! You are going to love trying out this fun DIY technique!

DIY Glittered Patterned Paper by Teri Anderson for Scrapbook Adhesives by 3L

Making Your Own DIY Glittered Patterned Paper

Adding glitter to patterned paper is easy with the Dual Tip Glue Pen and a stencil.

I recommend using a subtle, soft-colored patterned paper for this technique so that the glitter will really stand out.

Start by cutting the paper down to fit on your card or scrapbook page.

Set the stencil onto your paper panel and then apply glue in the open spaces. If you are having trouble completely filling the openings with glue, use your finger (or a pallet knife) to spread it out.

Remove the stencil and dump glitter all over the glue. Remove the excess glitter. Let the glue dry on its own. In a rush to put the paper to use? Use a heat gun to speed up the drying process.

Making the Card

To complete my card, I adhered the glittered paper to it. And then I added a few more pieces of glitter-free paper toward the bottom of it.

I placed a die-cut butterfly onto a heart. To give the butterfly a little sparkle, I applied some glue with my Dual Tip Glue Pen on the center of it and sprinkled a little glitter on top. I wanted the heart and butterfly to pop off the card so I adhered them to it with Thin 3D Foam Squares.

The card needed a sentiment so I stamped some words onto a die-cut label. I wanted it to have a little bit of glitz as well so I applied some glue to the edges with the Dual Tip Glue Pen. Next, sprinkle some glitter and mica flakes onto the glue.

Complete the card by adding a few small sequins. The Adhesive Dots Micro are perfect to use with sequins! They are just the right size for them.

Are you inspired to play? I’d love to see how you embellish patterned paper with glitter! Please share your projects with me by commenting on this post and sharing a link.

Creative Time: 1 hour/Beginner Level

Materials Needed:
Scrapbook Adhesives by 3L®:
E-Z Runner® Grand Refillable Dispenser
Thin 3D Foam Squares White Mix
Adhesive Dots Micro

HomeHobby by 3L®:
Dual Tip Glue Pen

Other:
Beautiful Dragonflies stamp set and Jam Jar Labels, Puzzle Heart and Classy Butterflies Crafting Dies from Technique Tuesday; Pearlized Mica Fragments from Stampendous!; Large Polka Dots Stencil from My Favorite Things; Various Patterned Papers; White Cardstock; Black Ink Pad; Watercolor Paper; Orange, Yellow and Pink Watercolors; Sequins; Glitter

Glitter Card Using 3D Foam Circles

Welcome back my crafty friends! Today I have a super cute sparkly card to share created with some of my go-to favourite adhesives. Let’s Wear Our Adhesive on the Outside!

I would describe my card making style as bold, less is more kind of crafting. I like my cards to have a defined focus and this card is a good example of that. Here are all of the details:

Start the creation by gathering your main supplies and cutting the basic cardstock layers. I used circle dies to cut the circle and scalloped circle.

Who doesn’t love sparkle??
I started by adding a little sparkle to the Black Creative Photo Corners. Using my Dual Tip Glue Pen I added adhesive to the middle embossed portion of each Creative Photo Corner.

Add black glitter and VOILA! Super cute sparkle.

The next step is to create the symmetrical design on the white cardstock layer. Use that black circle as a guide for now, but don’t adhere it down yet. I started with the large 3D Foam Circles, then came back and added the smaller 3D Foam Circles.

Once again, add the glitter and SPARKLE!

Once glittered I was able to add my cardstock circles, this time using regular 3D Foam Squares. I stamped and embossed my simple sentiment using black embossing powder.

Add the white cardstock layer to the black cardstock card base using those glittered Creative Photo Corners.

Thanks so much for stopping by!
Tracy

  • Creative Time: 40 Minutes
  • Skill Level: Beginner

Materials Needed:
Scrapbook Adhesives by 3L®:
3D Foam Squares Black Regular Size
E-Z Runner® Permanent Fine Adhesive Dispenser
Creative Photo Corners Black
3D Foam Circles Black Mix

HomeHobby by 3L®:
Dual Tip Glue Pen

Other Products Used:
Cardstock (Black and White), Heartfelt Creations Circle Dies, Crackerbox & Suzy Stamps Sentiment, Ranger Embossing Pad and Black Embossing Powder

DIY Planner Pocket with Repositionable Adhesive Dots

Have you ever looked at your planner and knew you needed to add something?  I was looking for a way to add a pocket that closes as I needed a place to store my more important receipts and notes that I knew they wouldn’t slip out of. Mine comes with plenty of open pockets, but I wanted to make one of my own that would close. Today I am going to show you how to use Adhesives Dots that are Repositionable and the E-Z Runner® Grand to make a DIY Planner Pocket!

DIY Planner Pocket using Scrapbook Adhesives by 3L

Planner Pocket Process Video

The directions for how to make this are very simple and just require a few products!

  1. Planner
  2. Adhesive Dots Large Repositionable
  3. E-Z Runner® Grand Ultra Strong Refill
  4. 12 X 12 Cardstock
  5. Whatever you want to decorate (in my case 3D Foam Squares, Patterned Papers, Stickers, and Washi Tape

Now let’s dive into the video and see how it all came together!

Planner Pocket Close-ups

As you saw the Adhesive Dots being Repositionable are really a key part to the success of this Planner Pocket. I used them to both secure it to my planner cover as well as to close the pocket up. If they happen to get worn out, I can simply pull my box back out and replace them!

Now I am all ready to roll – thanks to a few simple supplies!  But let’s not forget that this doesn’t have to be just for a planner!  Additionally, you could make this for a Scrapbook Layout too and enclose something like a report card on it.  You could also size it down and add it to a card as a fun and interactive element!  Thanks so much for joining me today!

-Christine

Creative Time: 20 minutes
Skill Level: Beginner

Materials Needed:
Scrapbook Adhesives by 3L®:

E-Z Runner® Grand Refillable Dispenser
3D Foam Squares White Mix
Adhesive Dots Large Repositionable
E-Z Runner® Grand Ultra Strong

Additional Supplies: Planner, Stickers, Washi Tape, Patterned Paper – Paper House Productions; Cardstock – Doodlebug Design