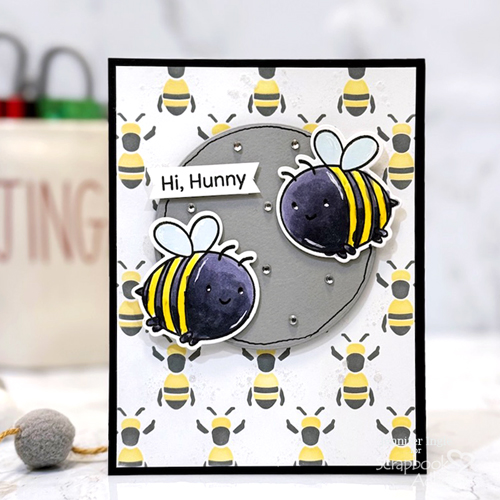
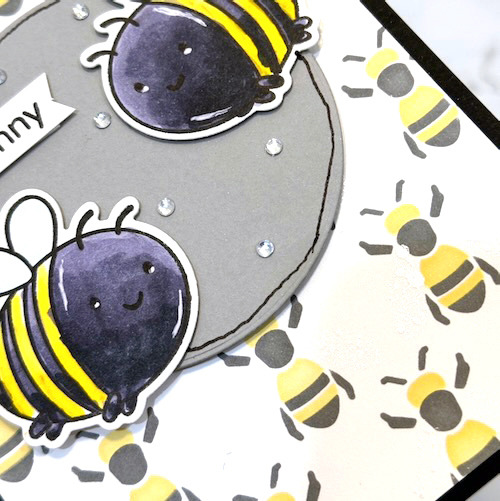
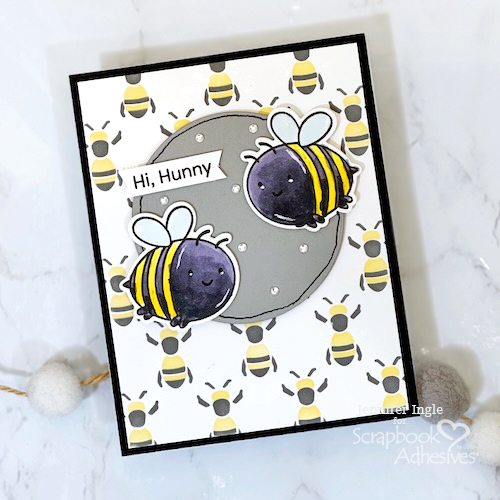
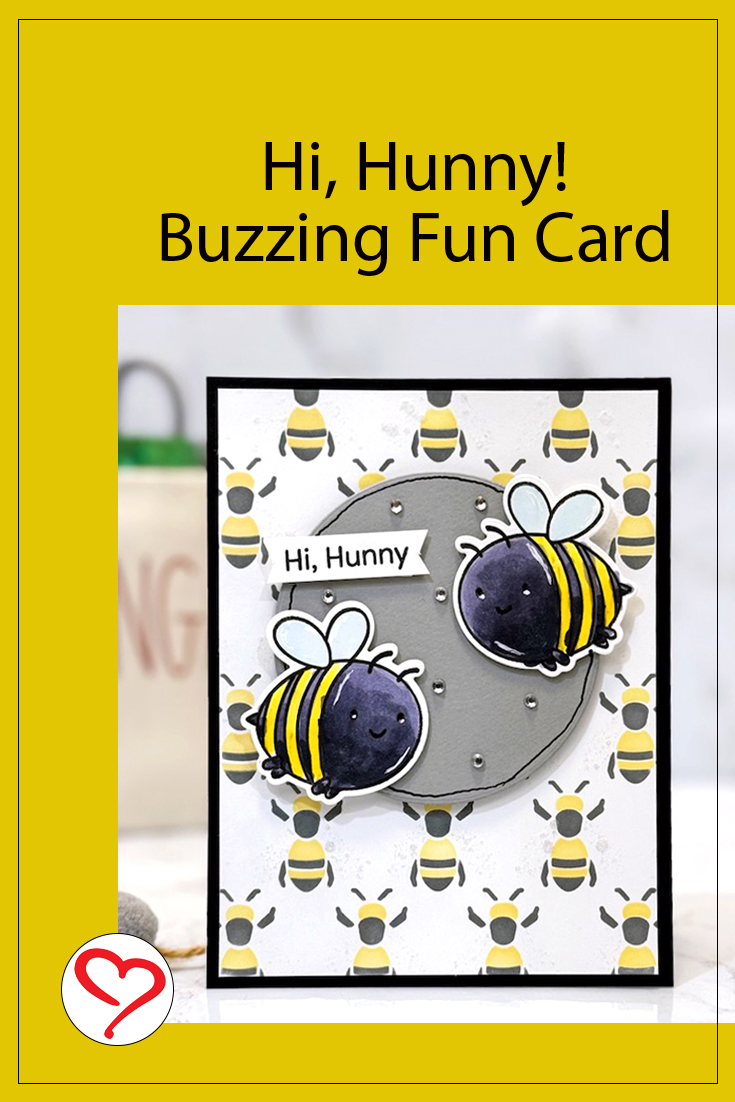
Hi, this is Jingle here today with a creative Buzzing By Card that showcases how to create an interesting background on a fun-themed design.
There seems to be a trend of using bees in all kinds of crafting and decor lately, and I am here for it! They truly are quite adorable and the puns, oh, the puns! I don’t know about you, but I am always up for a good pun.
Card Panel Background
For this card, not only are these adorable chubby bees the focal point, I made a bee background using layering stencils. For a bit more interest, I sprayed a layer of shimmer spritz through the wings stencil. It provides such a pretty, shimmery look to the background!
The rest was simple! I centered a die-cut circle with Crafty Foam Tape White 108ft. Next, use the Thin 3D Foam Squares Black Mix to adhere the bees and the sentiment strip to the card. This adds just a bit of dimension! Lastly, the Crafty Foam Tape Black 108ft was the perfect choice for adhering the completed panel to a black card base. It gives just a bit of lift and a whole lot of fun!
I hope this has inspired you to buzz around with some bee-themed supplies along with your favorite foam tapes!
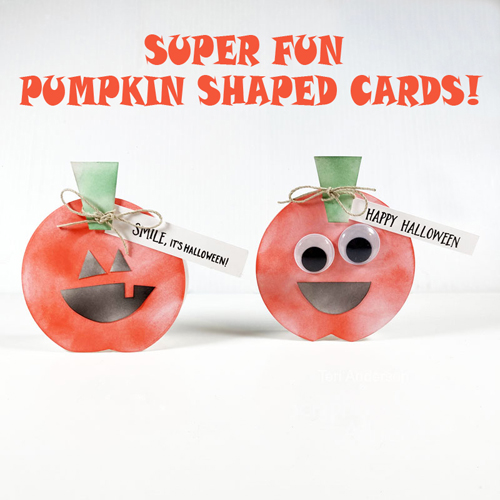
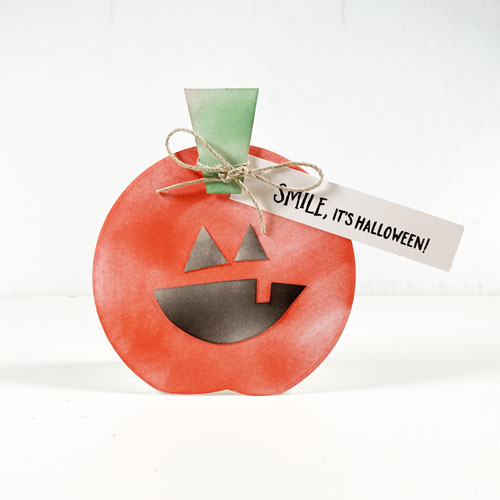
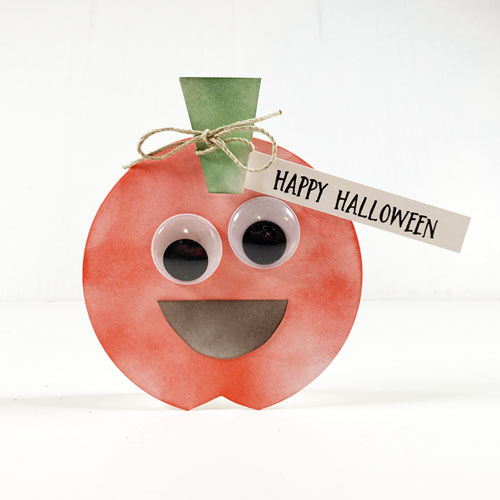
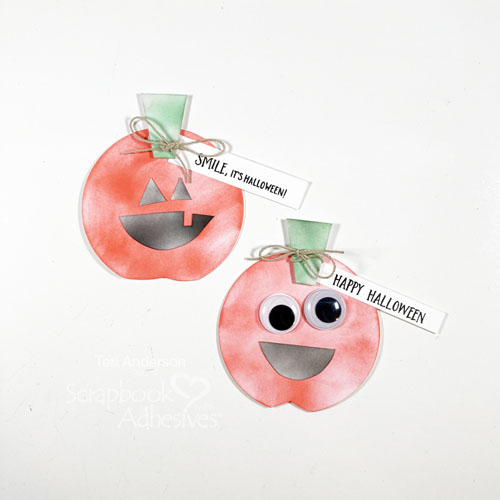
Hi, everyone! Getting ready for Halloween? Teri here to show you to make some super cute and easy shaped pumpkin cards!
Pumpkin Shaped Card Base
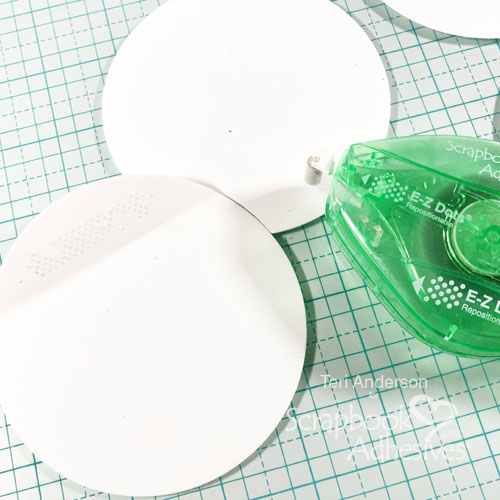
Start by cutting two large circles from white cardstock. Take one of the circles and fold it a little way down from the top. Place temporary adhesive above the fold line.
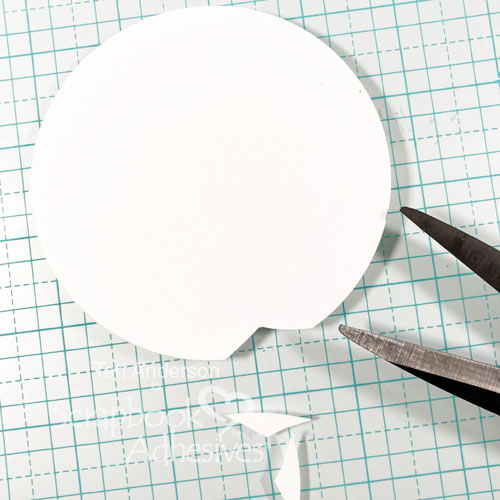
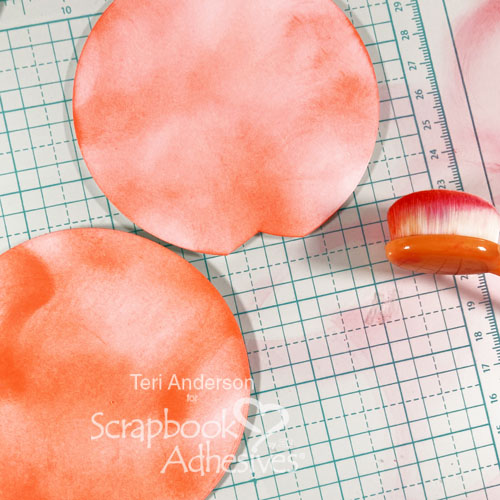
Set the two circles on top of each other. Use your scissors to cut a little off the bottom of the card. Remove the back circle. Rub off the temporary adhesive with your finger. Take the top circle and blend orange ink onto it. Once you do this, turn your circles into your card base by placing permanent adhesive above the score line on the second circle and mounting it to the orange circle.
Embellish the Front
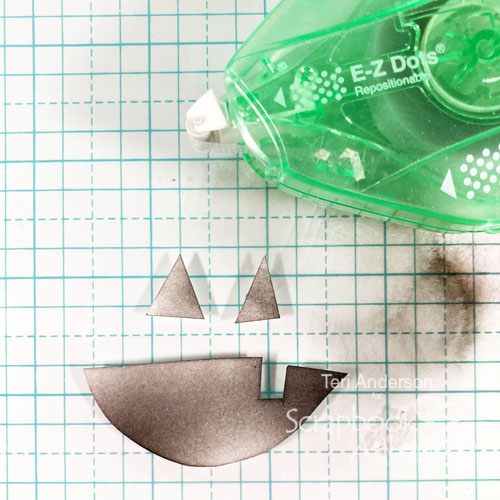
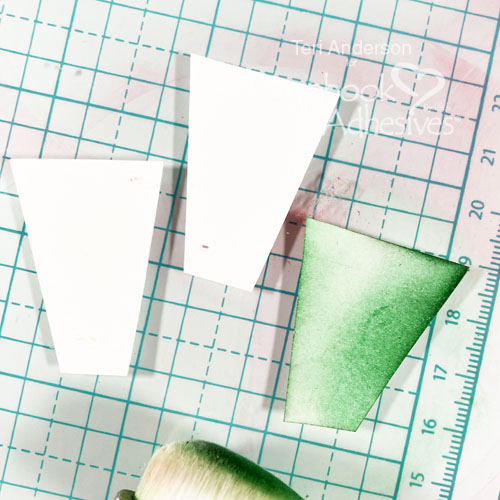
Cut a mouth, triangle eyes, and a stem from cardstock. They don’t have to be perfect. In fact, the more imperfect they are, the more whimsical your final card will be.
Blend black ink onto the pumpkin’s eyes and mouth. If the small pieces shift, use a little temporary adhesive underneath them such as the E-Z Dots® Repositionable Refillable Dispenser. After you’re done inking, just rub the adhesive off – so easy and no damage to your surface. Lastly, blend green ink onto your stem.
Detailing the Pumpkin Shaped Card
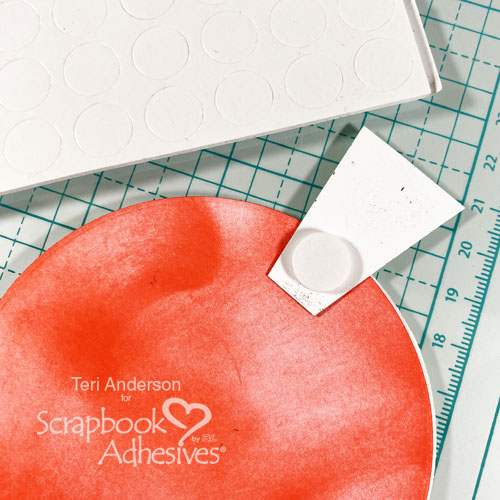
Adhere the face elements onto your pumpkin. Use a small circle from the 3D Foam Circle White Mix (or even a 3D Foam Squares White Regular) to place the stem at the top of your card. Be sure to let part of the stem hang off the card.
Stamp a sentiment on a strip of white cardstock. Adhere it to your card. Tie jute around the stem, using an Adhesive Dots Micro to hold the bow in place.
Change It Up a Little
You can create all kinds of shaped pumpkin cards with different sentiments. You can also use wiggle eyes instead of ones made from cardstock.
I hope my tutorial inspired you today. So let’s make some Pumpkin Shaped Cards!
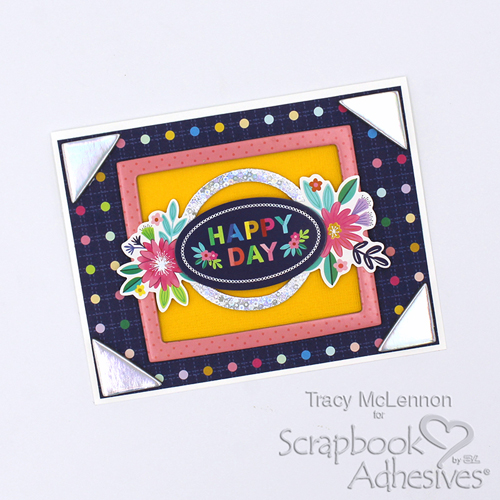
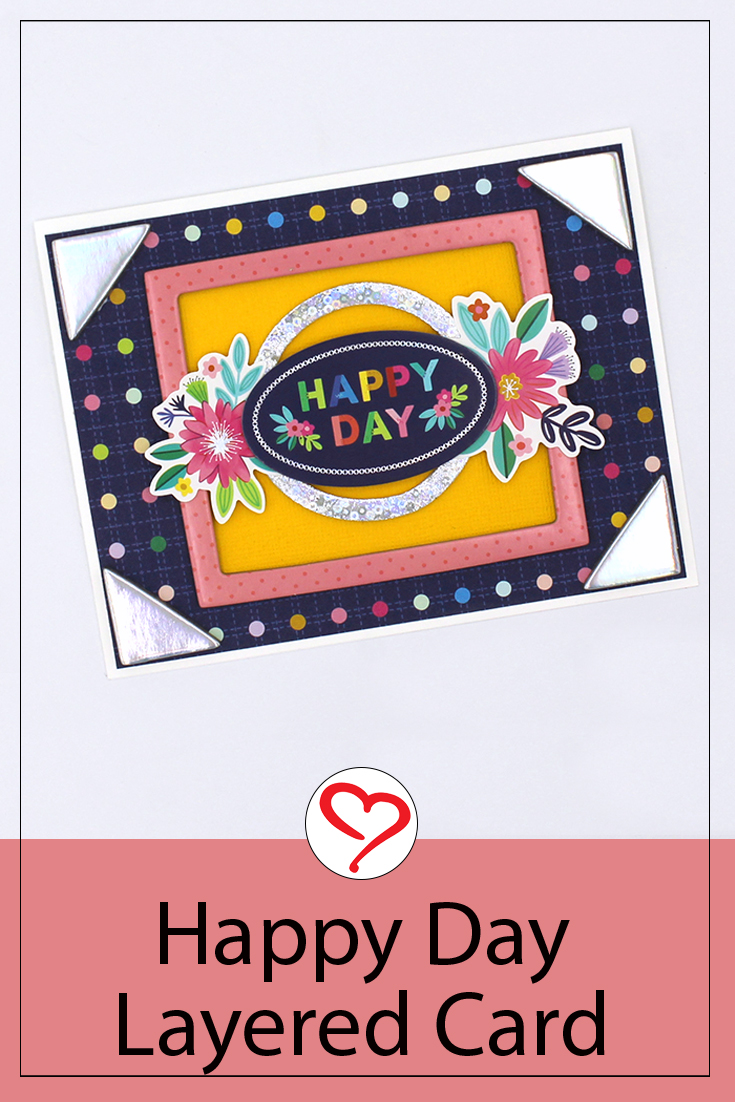
Hello, crafty cardmaking friends! Tracy here, and today I have a simple Happy Day Layered Card to share. Here are all of the crafty details.
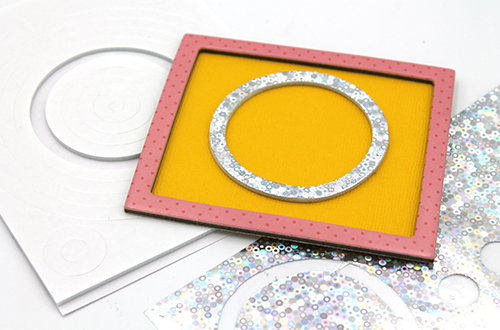
Happy Day Focal Point Design
First I chose the pink chipboard frame from the collection and added yellow cardstock behind it. This is the base of the Happy Day Layered Card. Then I found that one of the 3D Foam Circle Frames White fits inside the chipboard frame. To make it sparkle, I decided to foil it with the silver foil from the Metallic Transfer Foil Sheets Celebrate pack. Simply remove the top liner of the 3D Foam Circle Frames White, place the silver foil (color side facing you) over the exposed adhesive and gently rub to transfer the color.
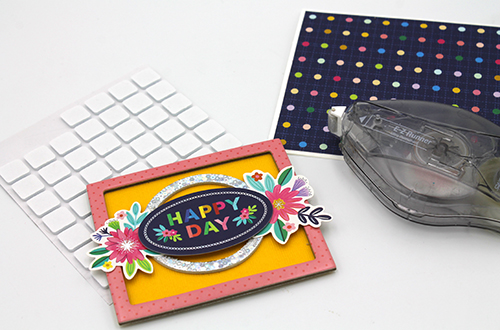
Card Layers
Cut a piece of patterned paper to cover the white cardstock card base. Adhere it together using the E-Z Runner® Ultra Strong Refillable Dispenser. Place cardstock stickers on either side of the chipboard frame. Next, I chose the card sentiment sticker and added that to the Happy Day Layered Card front using 3D Foam Squares White Regular Size.
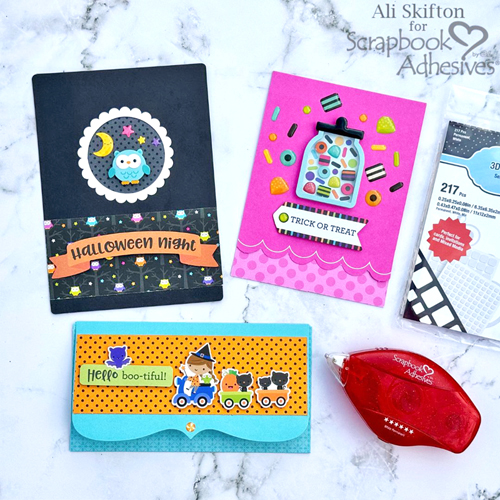
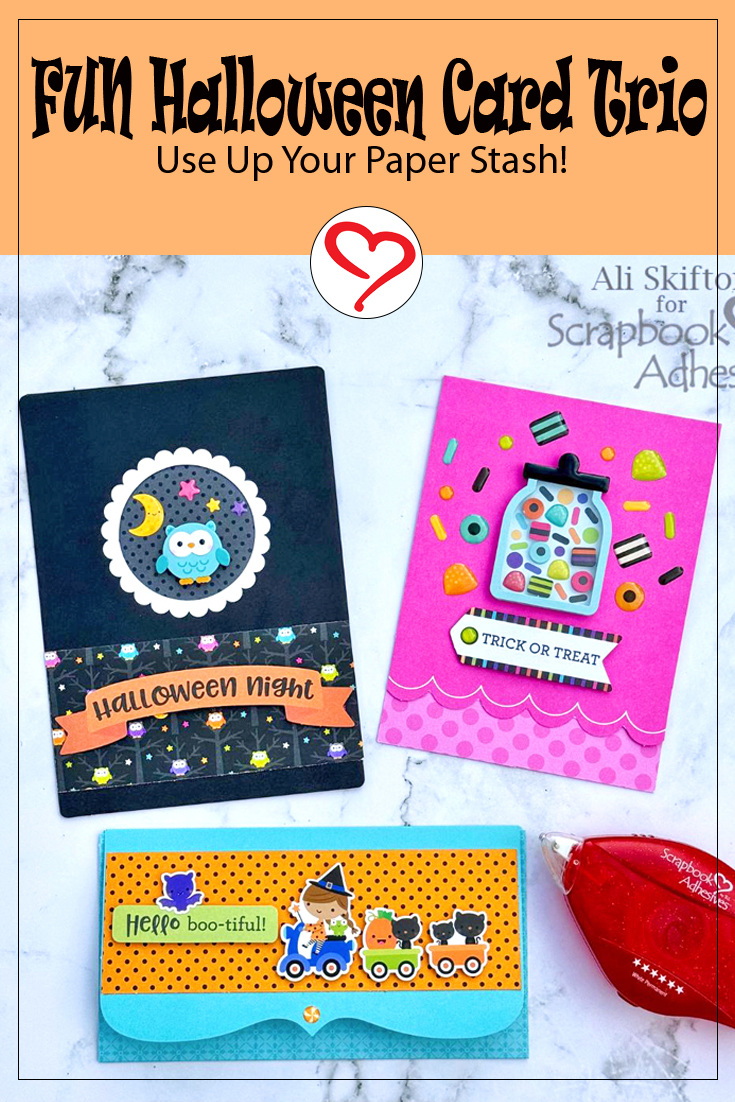
Hi, Ali here today! It’s time to start creating these FUN Halloween Card Trio. If you have a pile of Halloween-themed patterned papers and elements, come along and craft with me! I love using E-Z Runner® Permanent Strips Dispenser when I am working on smaller projects.
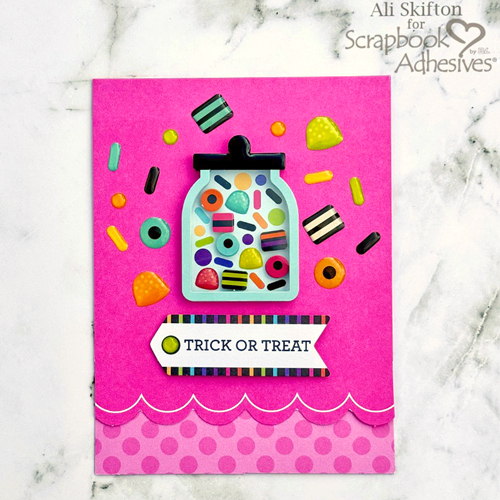
Fun Halloween Card Trio – Trick or Treat
I used an older Halloween collection from Doodlebug Design to create a trio of cards. Using dimensional stickers, I wanted my sentiment to be just as dimensional. My solution was popping it up with the 3D Foam Squares White Mix. So easy and so fast!
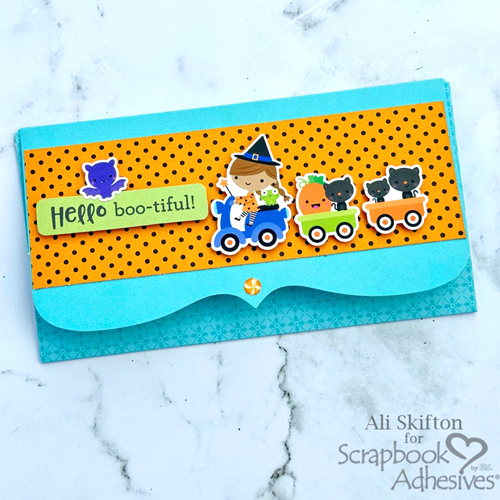
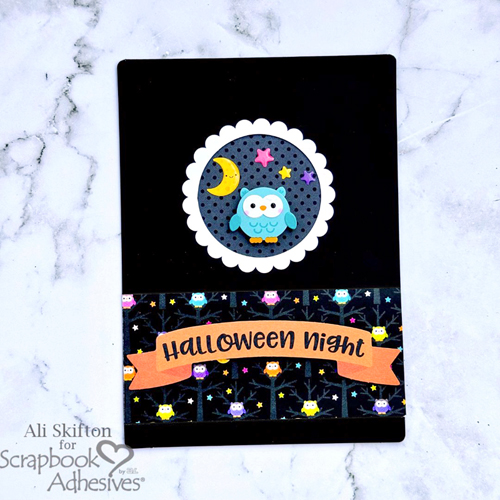
Fun Halloween Card Trio – Hello Boo-tiful + Halloween Night
For these cards, I loved using those 3D Foam Strips behind word phrases. It reassures me that they will not collapse when they go through the mail. How adorable are these cards?
Don’t be scared, you still have time to run out and buy adhesive to make these Halloween cards! Oh, and don’t forget to pick up a few good treats to snack on while you work 😉
Thanks for visiting! Ali Skifton (FunAdventuresWithAli)
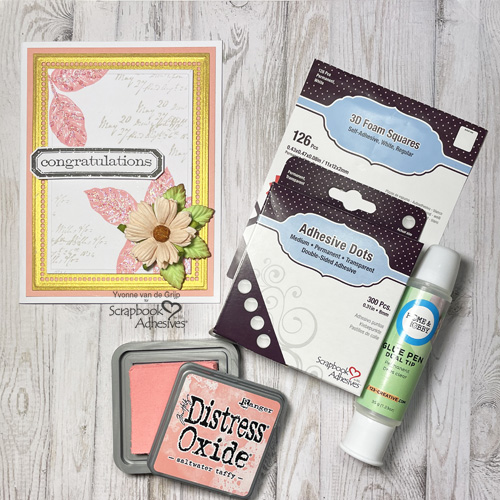
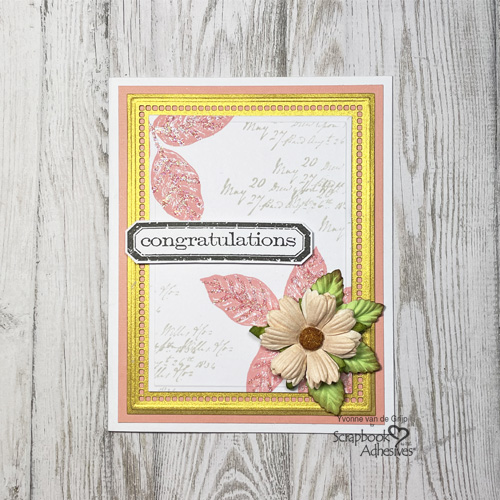
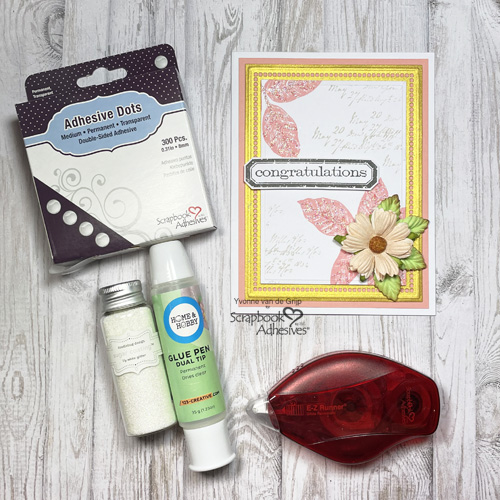
Hi everyone, Yvonne here with a tutorial on how to make this lovely Romantic Congratulations Card. This elegant card is fairly easy to create and I love how I custom created my accent with a simple step. Shall we get started?
Top Card Panel
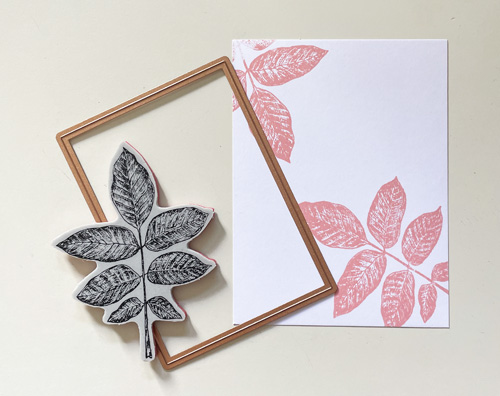
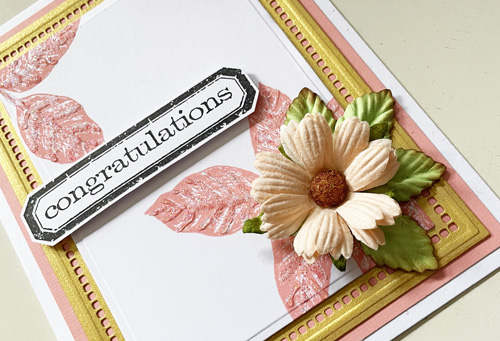
To create the top card panel for the Romantic Congratulations Card start by stamping some leaves onto white cardstock using a salmon ink pad. Next die-cut and emboss to a rectangle card panel.
Then use the Dual Tip Glue Pen to draw lines on the leaves. Next, sprinkle glitter upon it and let it dry. It’s that simple to give your stamp image a little extra touch!
Card Base
I first die-cut and embossed two nested dies from gold cardstock to create the Romantic Congratulations Card’s card base. Designer’s Tip: use washi tape to secure the dies to avoid shifting when die-cutting.
Stamp a sentiment onto white cardstock using a black ink pad. Then cut out the sentiment with scissors, and adhere to the card using 3D Foam Squares White Regular Size. Next, secure a flower and some leaves onto the card with Adhesive Dots Medium.
I randomly stamped some text onto the card using a soft grey ink pad for a finishing touch. And voilá, your Romantic Congratulations Card is ready. I hope you enjoyed this tutorial and wish you happy crafting!
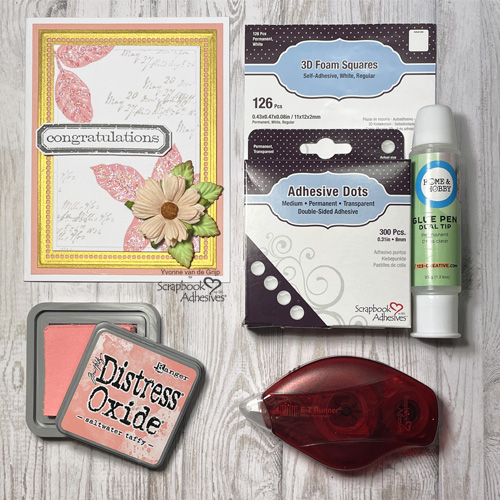
Craft Dies and Die-Cutting & Embossing Machine: Spellbinders® Paper Arts (Hemstitch Rectangles by Becca Feeken, A2 Matting Basics B, and Platinum 6 Machine); Stamps: Stampers Anonymous (Tim Holtz® Collection: French Garden, Sketchy Leaves, and Simple Sayings); Inks: Ranger Ink (Archival Inks™ in Jet Black, Distress® Oxide® Ink in Pumice Stone and Saltwater Taffy); Glitter: Doodlebug Design (Sugar Coating™ in Lily White Glitter); Acrylic Stamp Block; White, Brush Gold and Salmon Cardstock; Washi Tape; Mulberry Flowers and Leaves; Paper Trimmer; Tweezers; Scissors
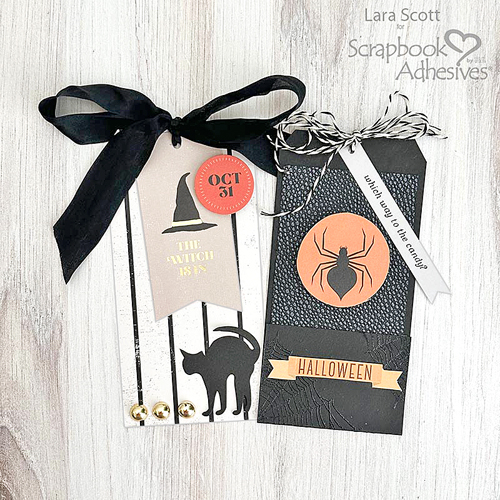
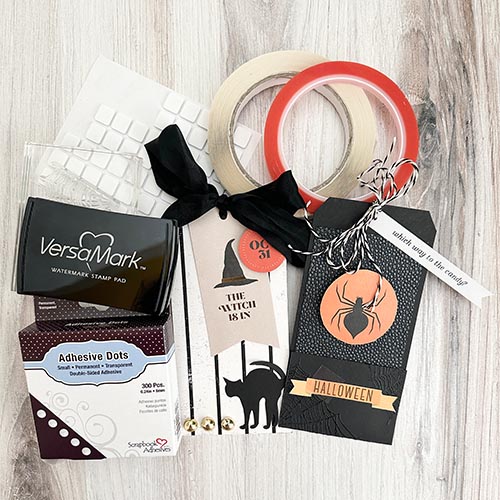
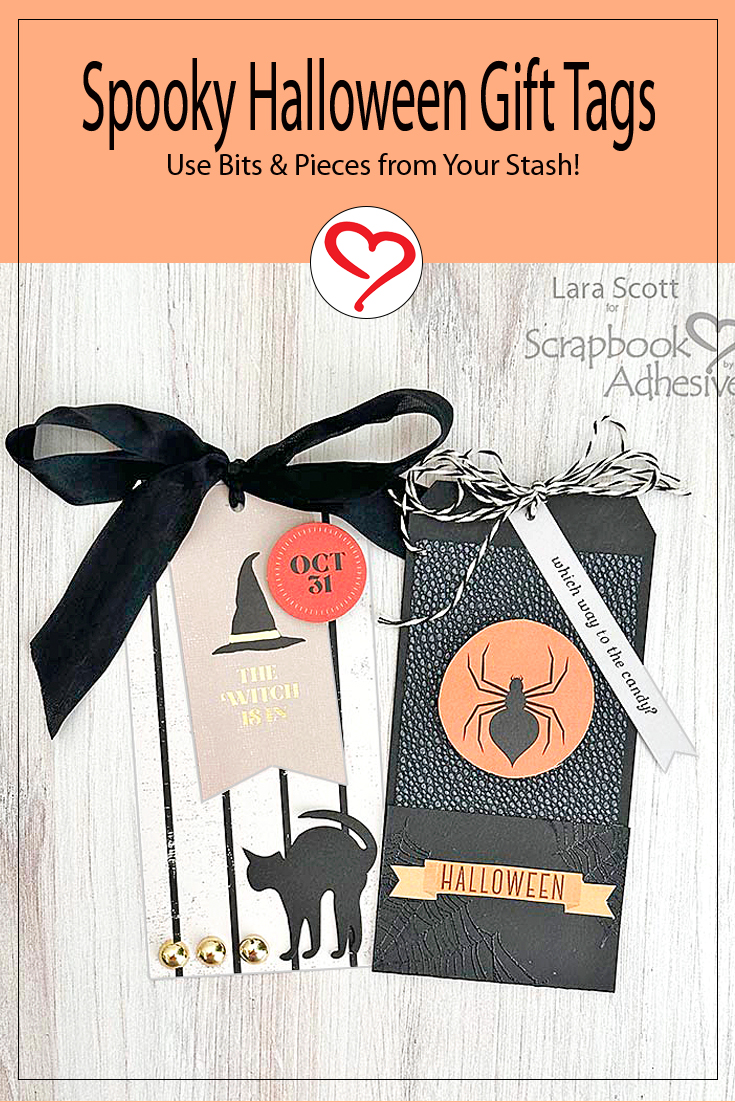
Hello, Lara here today! Fall is pretty much the only season I miss. Texas doesn’t have fall – just less hot. With fall in mind, I love to create Halloween tags! They’re great additions on gifts, tables as place cards, or an accent on a scrapbook page or mini album. Put them on sweet treats for all the Trick or Treaters.
These 3 x 6.5″ Spooky Halloween gift tags (well maybe not so spooky) are quick and easy to create. Using my Halloween stash, I created a couple of tags with random pieces of ephemera collected and what I had designed. Watch for a few more sets…it’s addicting! LOL!
Gather Up Supplies for the Halloween Gift Tags
Here are the products I used to create the tags.
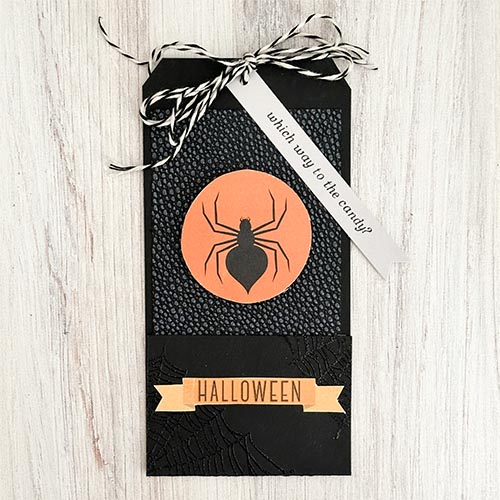
Black Spider Tag
For this tag, I used black cardstock which I cut about 2.25″ longer and scored to make a pocket. I stamped the spider web stamp with clear Versamark ink and heat embossed it with clear embossing powder. The black texture paper and the Halloween Banner were adhered with Crafty Power Tape Polybag 81ft, while the pocket was created using Extreme Double-Sided Tape 1/4in. To give the spider circle dimension I used the 3D Foam Squares White Regular stacked to add even more height. Add an extra tag and some butcher’s twine and you have Spooky Tag #1
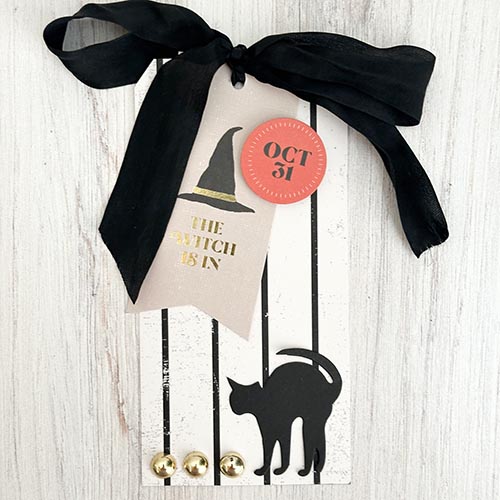
Witch and Cat Tag
This spooky tag was created with black and white striped patterned paper. I used the 3D Foam Squares White Regular on October 31 to adhere it to the smaller witch tag. The gold half beads from Buttons Galore and the cat die cut were all attached with Adhesive Dots Small. I added some silky-ish black ribbon and you had the second spooky Halloween Gift Tag.
Other: Papers: Heidi Swapp; Ephemera: Ali Edwards; Ephemera: Lara Scott: Spider circle and Halloween Banner; Stamp: Heidi Swapp (Hallows 22 ); Ink: Tsukineko (Versamark); Embossing Powder: Clear Embossing Powder; Black Cardstock; Black Ribbon; Black and White Butchers Twine
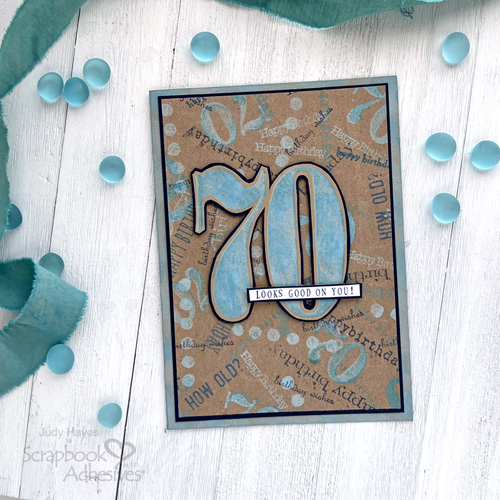
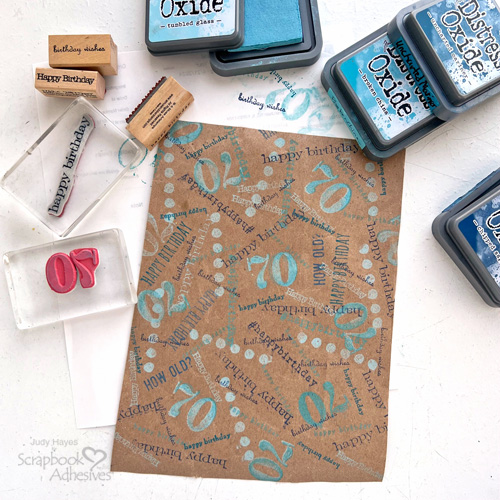
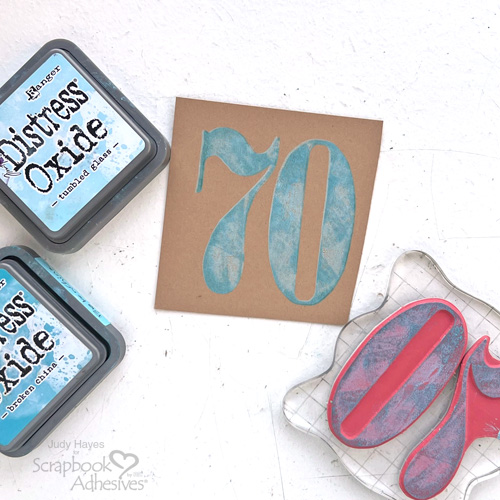
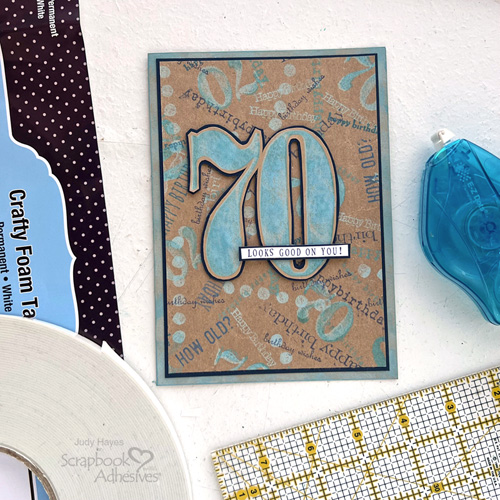
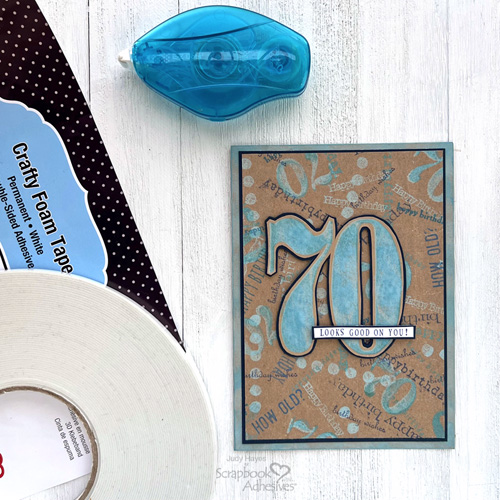
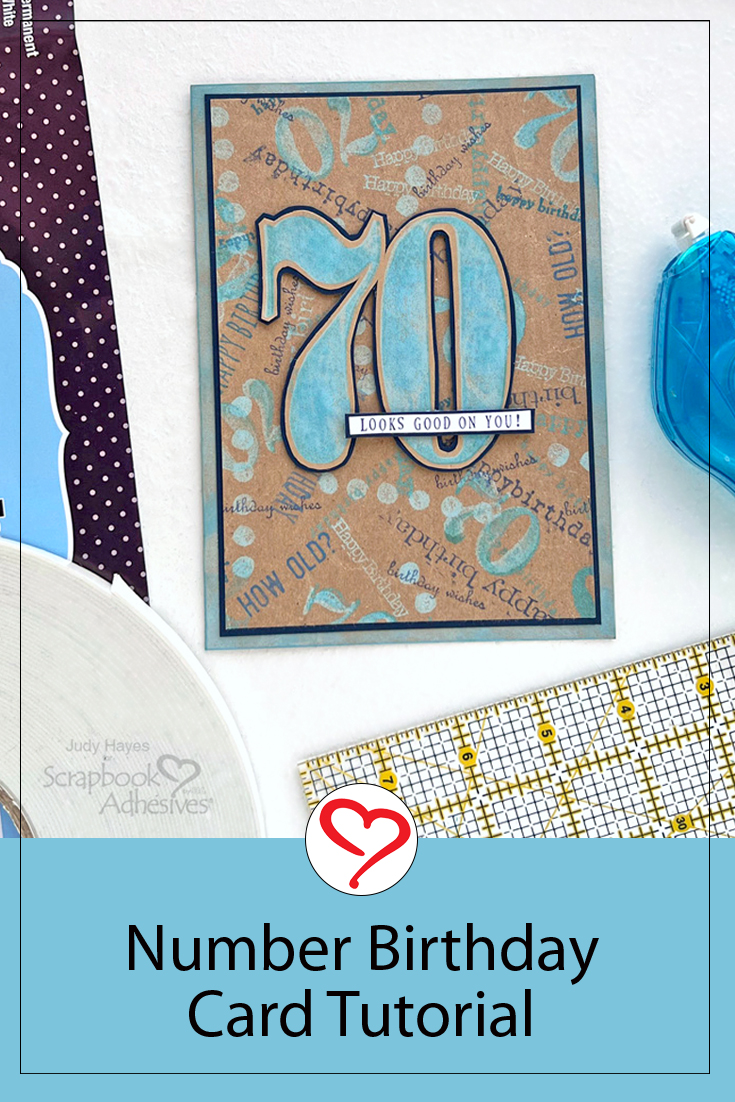
Hi, Judy here today! The idea for this Number Birthday card came about when I was recently invited to a 70th birthday party. I stamped some recycled Kraft packing paper to make gift wrap. With the leftover paper, I made this card. Any number or greeting can be used to fit any birthday age.
Number Birthday Card Panel Background
Find a piece of Kraft packing paper and iron it. (Paper from a grocery bag or Kraft cardstock can be used instead.) Start by stamping the numbers randomly over the paper with Distress Oxide Tumbled Glass ink. Next lightly ink number stamp with Distress Oxide Broken China ink and stamp over previously stamped numbers.
Next, gather assorted birthday stamps. Use Distress Oxide inks Chipped Sapphire, Broken China, Tumbled Glass, and Uncharted Mariner to stamp birthday greetings randomly. Stamp dots with Tumbled Glass ink. Mist lightly with water to activate the Distress Oxide inks. Then cut the background to 4.5 x 6.5 inches.
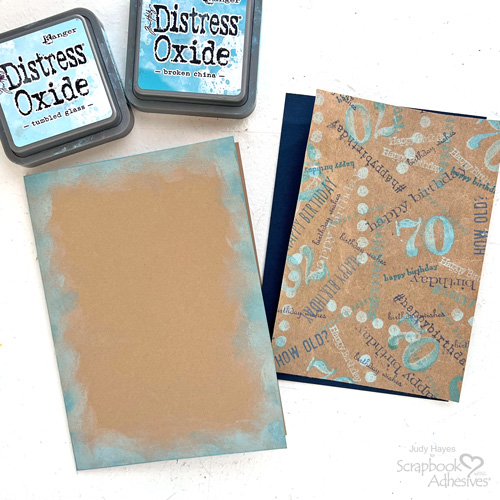
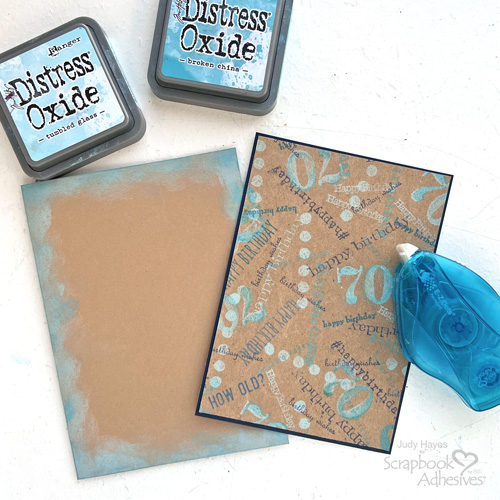
Card Base Assembly
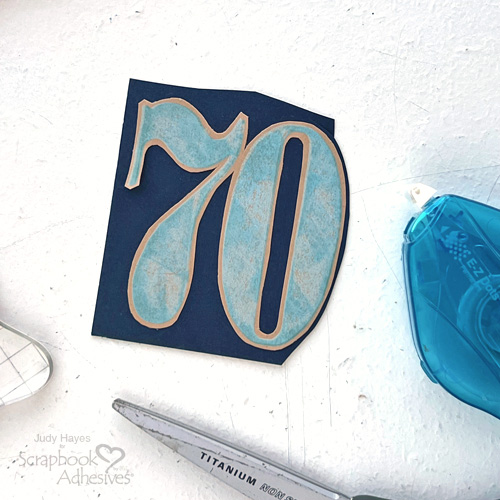
Cut Kraft cardstock 10 x 5 inches and navy cardstock 4.625 x 6.625 inches. Fold Kraft cardstock to form a 5 x 7-inch card.
Apply Distress Oxide Tumbled Glass ink with a finger or applicator tool around the edges of the card front. Next, add random light applications of Broken China ink over that.
Cut a scrap of Kraft cardstock large enough for the number. Ink number stamp with Tumbled Glass ink and stamp onto Kraft cardstock. Lightly apply Distress Oxide Broken China ink to stamp and stamp over the first image. Mist lightly with water. Allow it to dry for a couple of minutes or use a heat gun to dry it.
Fussy Cut Number and Mat
Fussy cut around number leaving a narrow border. To cut inside of zero, use a craft knife to make a slit or hole and then use small scissors to cut out the center.
Cut a piece of navy cardstock large enough for the numbers. Use E-Z Dots® Permanent Refillable Dispenser to apply adhesive to the back of the numbers and secure them on the navy cardstock. Fussy cut around the number leaving a narrow border of navy.
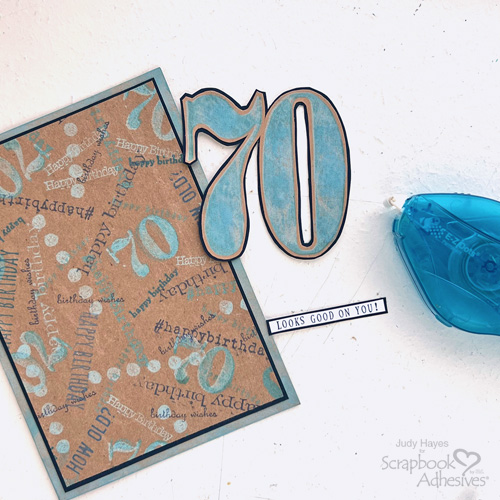
Greeting
Use alphabet letter stamps to form words and stamp the greeting with Distress Oxide Chipped Sapphire ink on white cardstock, cover with clear embossing powder, remove excess and heat emboss. Trim to narrow strip. (Or use a computer and printer to print verse).
Apply adhesive with E-Z Dots® Permanent Refillable Dispenser to the back of the greeting strip and fasten on scrap on navy cardstock. Trim around the strip with scissors leaving a narrow border.
Final Assembly
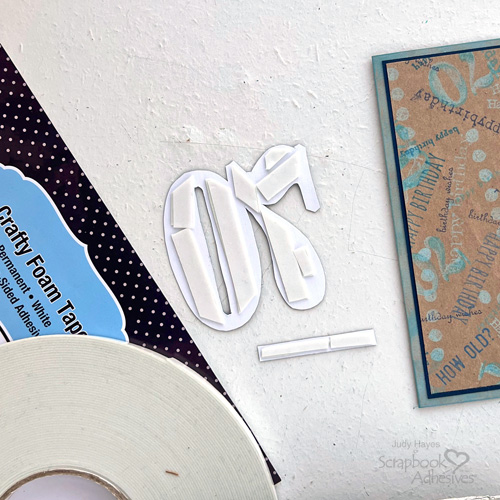
Put pieces of Crafty Foam Tape 108ft on the back of the number. Cut narrow pieces to put on the back of the greeting.
Remove liners from the foam tape on the number and place it on the card front. Then peel off liners from the greeting and fasten across the number. Designer Tip:Crafty Foam Tape 108ft adds dimension yet is thin enough to layer and not add bulk to a card.
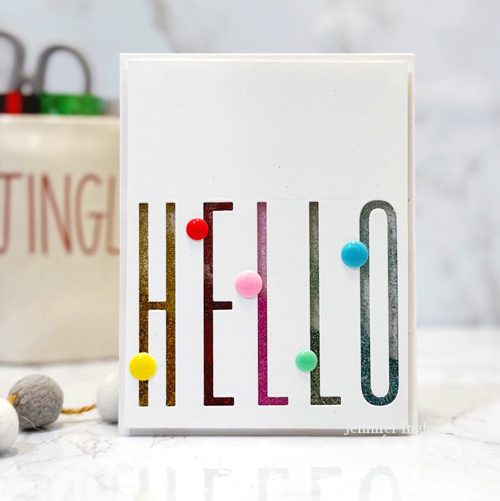
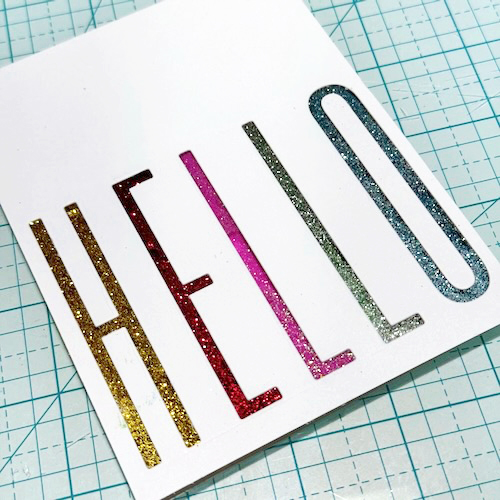
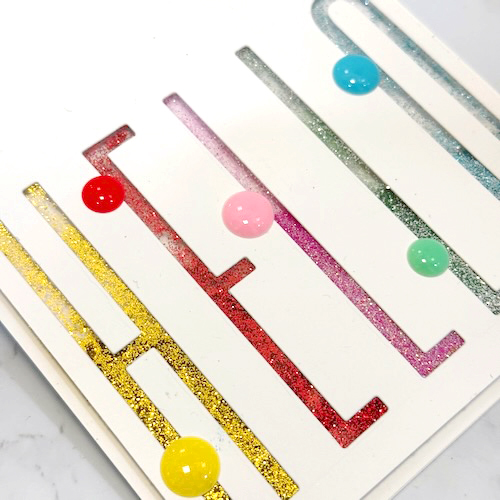
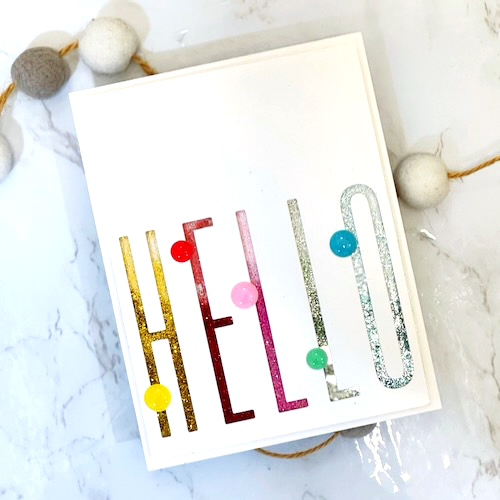
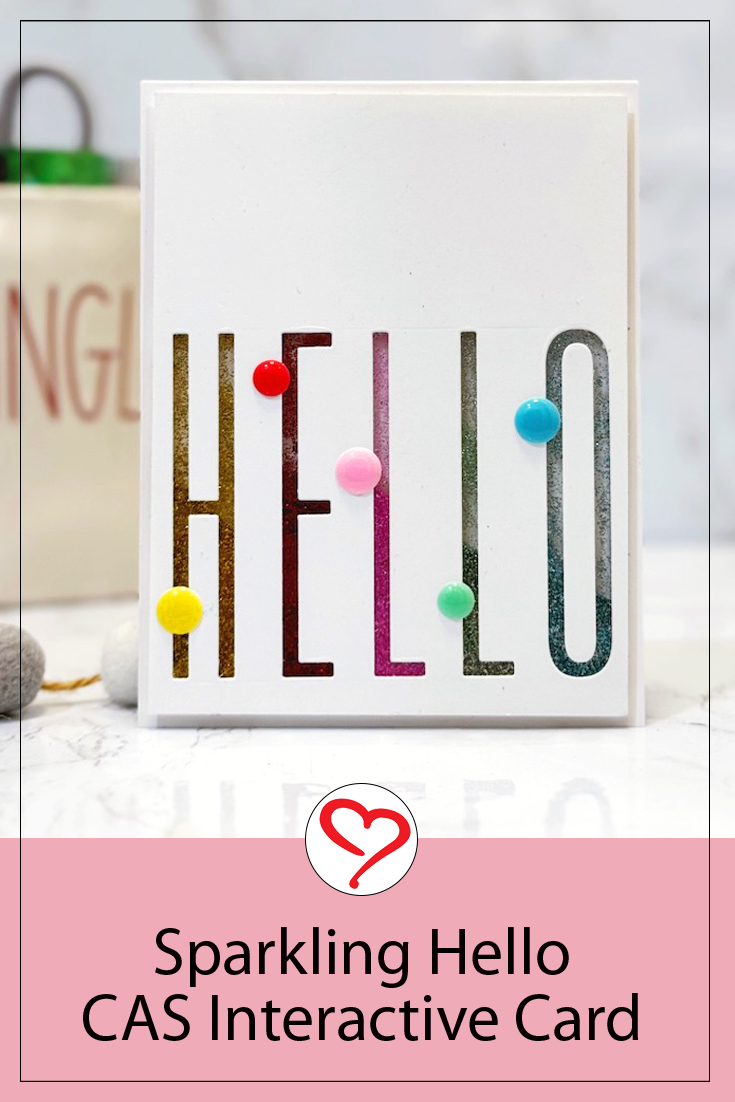
Hi, Jingle here today with a super fun CAS card that sparkles and shines! We all need a little more glitter in our lives, don’t we? Well, let’s get to this sweet Sparkling Hello!
Clean and Simple (CAS) design does not have to be boring! For this card, we explore how to create a multi-colored shaker with loads of glitter on a super clean design.
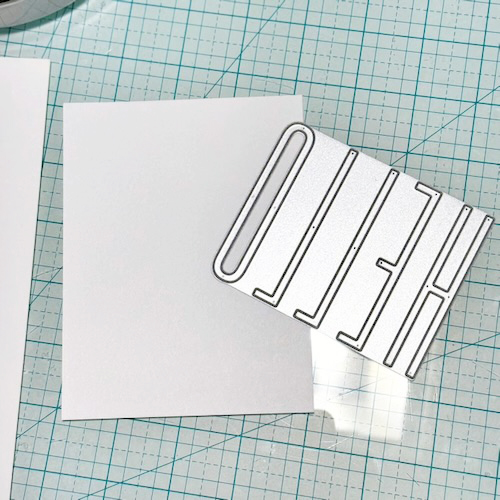
Sparkling Hello Card Panel
To begin, die-cut the Hello from a simple white panel of cardstock. This die is from MFT stamps and has all of your letters together, making it easy to keep it aligned. It also has plenty of room for our adhesives, allowing us to create individual compartments for each letter’s shaker filler.
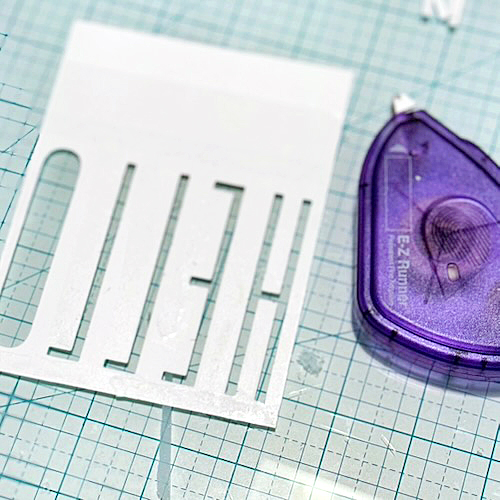
Create a Shaker Feature
Next, you want to adhere a sheet of clear film for the shaker cover. I like to use the E-Z Runner® Permanent Fine Adhesive Dispenser (aka Vellum Runner) for this, as it has a strong hold for the plastic sheet and you don’t risk any visibility because it is clear.
To create the individual compartments for the shaker filler, I reached for the 3D Foam Strips. These are narrow and long, making it so simple to create these perfect spots for the glitter! I added two pieces of Crafty Foam Tape White 54ft to the top portion of the panel to make it simple to add to my card base later.
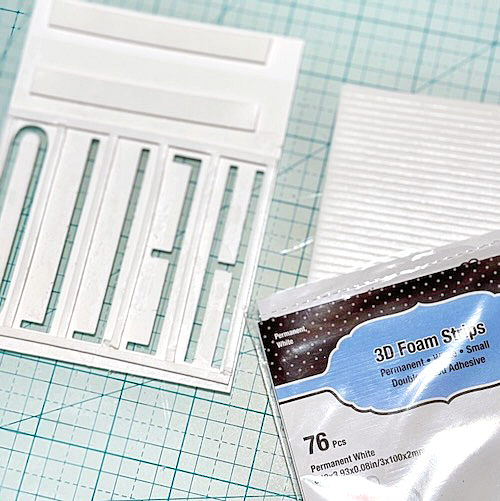
Glitter All The Things
And now we get to the fun bit! GLITTER! Choose the glitter colors you would like to use and then, carefully pour a good amount into each compartment. I use a small, soft paintbrush to push any that may have tried to get on the strips back into the spaces.
Once you have the glitter in place, gently remove the backing of each adhesive strip and adhere another white panel to the back of the design, sealing in the glitter. You can then adhere the shaker to a card base using the E-Z Runner® Grand Permanent Dots Refillable Dispenser.
Finally, add a finishing touch with some coordinating enamel dots from Doodlebug Designs.
And there you have it, folks! A super sparkly clean and simple design that is bound to bring a smile to your recipient’s face!
Thanks so much for stopping by today and Happy creating! Jennifer Ingle (aka Jingle)
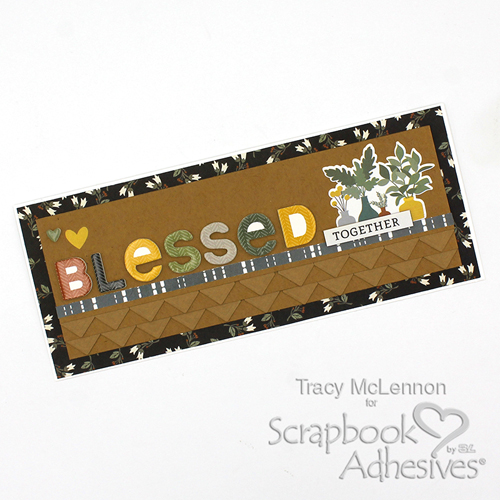
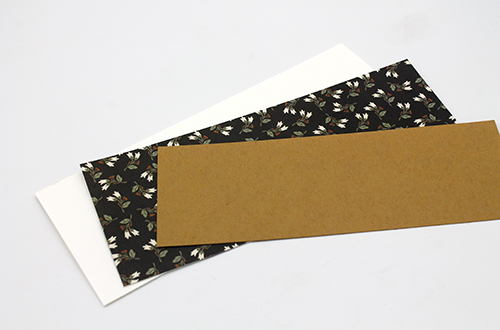
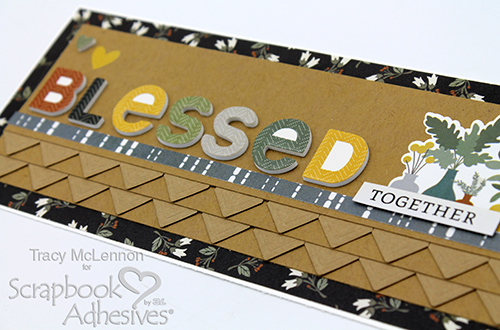
Hello crafty friends! Tracy here and today I have a fun yet simple little tutorial to share on how to create this photo corner border. This layered border adds dimension without too much thickness to your project. Here are all of the crafty details.
Photo Corner Border Layers and Design
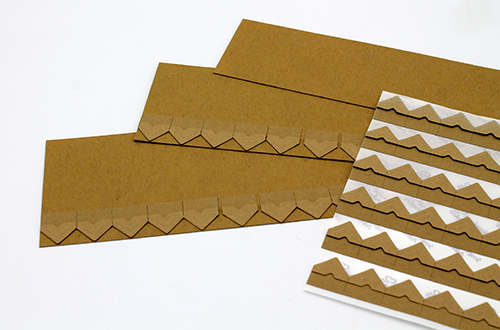
Firstly, cut your layers to create this photo corner border slimline card. The card base is a piece of 7 x 8.5-inch white cardstock folded in half. The next layer is a piece of patterned paper cut to 3.25 x 8.25 inches. Then a layer of kraft cardstock was cut to 2.75 x 7.75 inches.
Cut additional layers of kraft cardstock that are 2.25 x 7.75 inches and 1.75 x 7.75 inches. Add Creative Photo Corners Kraft along the bottom edge of both larger pieces of kraft cardstock. Leaving the top smallest layer of kraft cardstock blank for now.
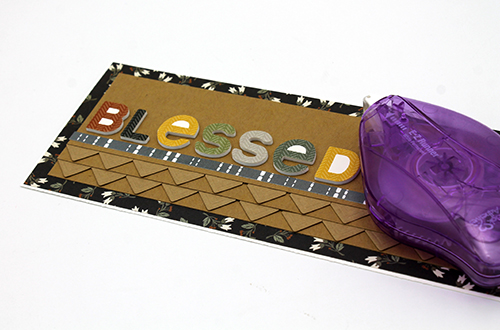
Add a nice little narrow strip of the blue patterned paper to that top layer of the photo corner border card using the E-Z Runner® Micro Refillable Dispenser. Adhere all the card layers so far together also using the E-Z Runner® Micro Refillable Dispenser. Add the foam sticker sentiment above the border strip.
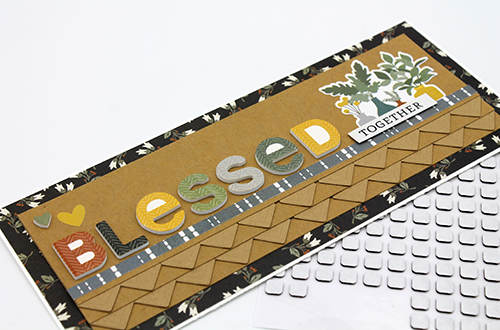
Add a few more simple embellishments to the card. Stickers directly to the background and the “together” sentiment using Thin 3D Foam Squares Black Mix for a subtle dimension. The thin foam squares have a height of 1/32″ (half of 1/16″ which is the height of our regular foam squares).
I hope you enjoyed the Photo Corner Border ideas. Give it a try on your next card creation. Thanks so much for stopping by! Tracy
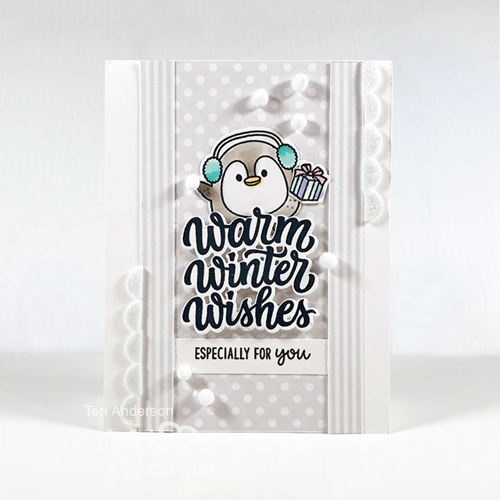
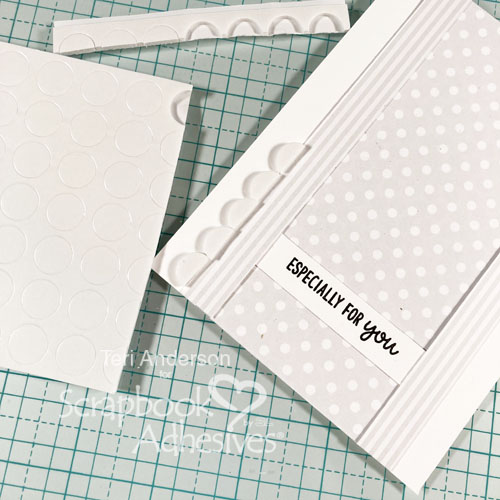
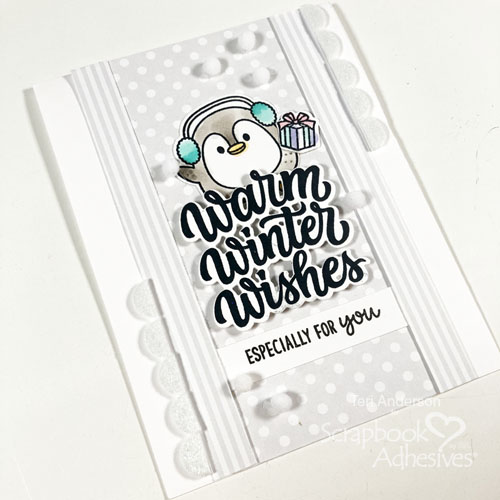
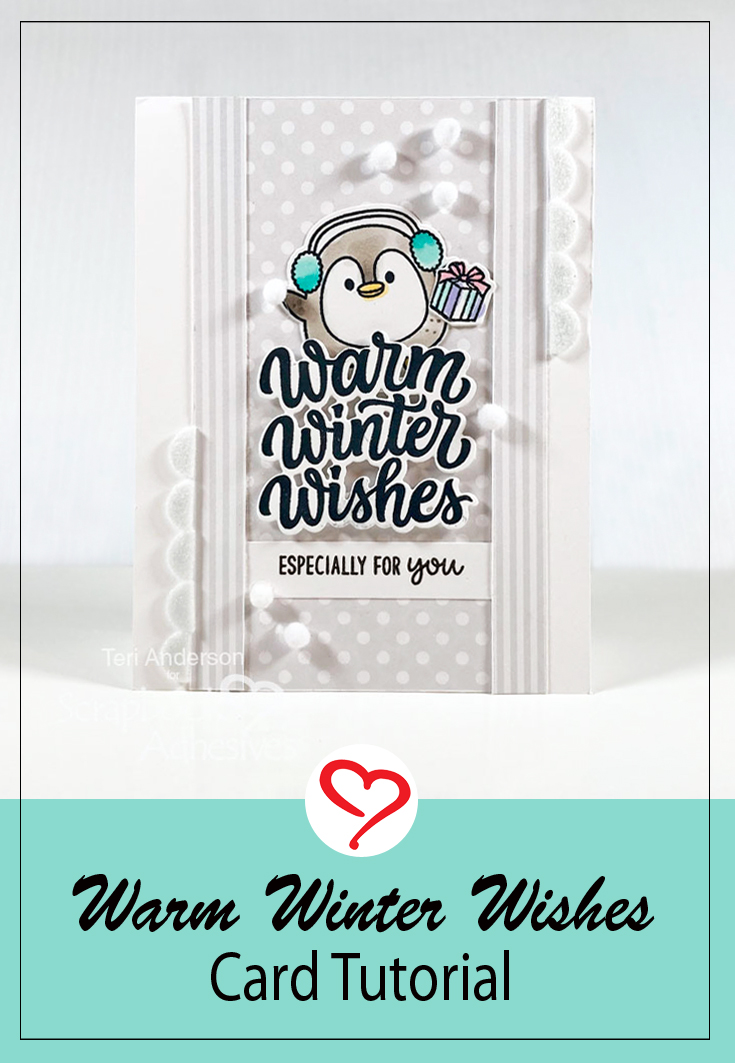
Hi, everyone! It’s never too early to get a jump start on your holiday cardmaking! Teri here to get your creative juices flowing for making some super cards for the season like this Warm Winter Wishes Penguin Card … a few months ahead!
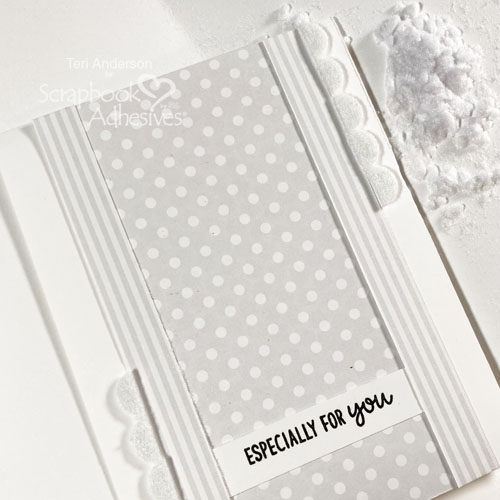
Warm Winter Wishes Card Base and Sentiments
Start by cutting some strips of patterned paper to go on a card. You’ll also want to stamp a large sentiment and a small one on a smaller strip of paper. Use your sentiments as a guide for lining up and adhering the strips of patterned paper onto a card. Be sure to adhere to that small sentiment strip on your card as well.
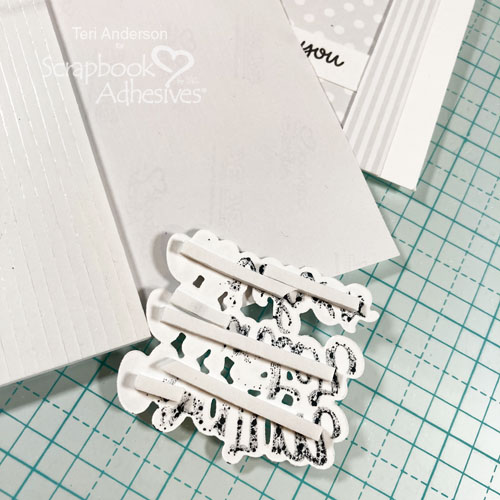
Add a Border and Snowballs
Take several 3D Foam Circles and cut them in half. Line them up along the sides of your card to make scalloped borders. Cover them with flock. (Not a flock fan? Try using our Metallic Transfer Foil Sheets in Nature to give them a sparkly finish!)
Take 3D Foam Strips and cut them up to fit on the back of your large sentiment. Be generous and use a lot of foam. This will keep your sentiment from getting crushed in the mail when you send out your card. (You can also use Crafty Foam Tape 54ft. for this. Just cut it up to fit the sentiment.) Adhere your sentiment to your card.
Stamp, color, and die-cut a couple of small Christmas or Winter images. Make sure they fit nicely over your large stamped sentiment. Adhere them to your card.
Complete the card by adding some snowballs to it. So, I used pompoms to mimic the look of snowballs. Just simply adhered them with Adhesive Dots Micro.
I hope you are inspired by today’s tutorial to get to work on your holiday cards!
Other: Cardstock: Neenah; Stamps and Dies: Sunny Studio (Roly Poly Penguins Stamp Set and Dies, Snowmen in Sweaters Stamp Set and Dies, Inside Greetings Stamp Set); Patterned Paper: Sunny Studio (Polka Dot Parade and Subtle Grey Tones 6×6 Paper Packs); Flock: Stampendous; Pompoms: Darice; Ink: Ranger Ink; Markers: Copic