You are in our US store • Switch to Europe store

October Memories Halloween Layout

Hello crafty friends! Tracy here, and today I have a spooky little October Memories Halloween layout to share. With a little dimension, I’ll walk you through the details.

October Memories Halloween Layout by Tracy McLennon for Scrapbook Adhesives by 3L

Let’s Get Started

This layout features the Simple Vintage October 31st collection, so I decided to go vintage with the photo used. This is ME in 1984, in a clown costume my mother lovingly made for me. The perfect subject for this dimensional Halloween layout.

First I cut the cardstock and patterned paper layers for the background. Black cardstock- 12×12, web patterned paper 11×11 on the outside and 1″ thick. The other 2 patterned papers are both 8×8.

October Memories Halloween Layout by Tracy McLennon for Scrapbook Adhesives by 3L

Adhere the background layers of the layout using the E-Z Runner® Grand Refillable Dispenser.

October Memories Halloween Layout by Tracy McLennon for Scrapbook Adhesives by 3L

Mat the 3.5×5 photo in white cardstock and adhere together using Creative Photo Corners Black. These will give the perfect vintage feel for this dimensional Halloween layout.

October Memories Halloween Layout by Tracy McLennon for Scrapbook Adhesives by 3L

Cut 2 more layers of patterned paper and adhere them to the layout using E-Z Runner® Grand Refillable Dispenser. Next, add the matted photo to the middle of the layout using Crafty Foam Tape 108′ Black.

October Memories Halloween Layout by Tracy McLennon for Scrapbook Adhesives by 3L

Begin adding all of the cute embellishments around the dimensional Halloween layout using a combination of E-Z Runner® Grand Refillable Dispenser and Thin 3D Foam Squares Black Mix.

October Memories Halloween Layout by Tracy McLennon for Scrapbook Adhesives by 3L

Once the final embellishments are added around the layout. Add a burlap string bow to the tag above the matted photo.

October Memories Halloween Layout by Tracy McLennon for Scrapbook Adhesives by 3L

Thanks so much for stopping by!
Tracy

Creative Time: 60 minutes
Skill Level: Intermediate

Materials Needed:
Scrapbook Adhesives by 3L®

Crafty Foam Tape 108′ Black 
Creative Photo Corners Black
Thin 3D Foam Squares Black Mix
E-Z Runner® Grand Refillable Dispenser

Save to Pinterest!

October Memories Halloween Layout by Tracy McLennon for Scrapbook Adhesives by 3L Pinterest

Visit our Website and Blog!
Sign up for our Newsletter so you never miss a contest or giveaway!

instagram purple icon facebook icon purple pinterest purple icon twitter purple icon YouTube icon blog subscription purple icon

Upcycled Christmas Gift Tags

Hi, friends! The holiday season is just two months away! A fun way to get ready for the big day is to make some upcycled Christmas Gift Tags to make a great presentation! Teri here and I’ll show you how to make these today with a unique twist…use past holiday cards!

Upcycled Christmas Gift Tags by 
Teri Anderson for Scrapbook Adhesives by 3L

Prep Work

Start by die-cutting a few tag shapes from old holiday cards. You’ll also want to cut some from white cardstock for variety.

Upcycled Christmas Gift Tags by 
Teri Anderson for Scrapbook Adhesives by 3L

Take a few of them and cut the word, Merry.

Upcycled Christmas Gift Tags by 
Teri Anderson for Scrapbook Adhesives by 3L

Lift Up the Fronts

Flip your white shapes over and use 3D Foam Strips to cover the back of them. Cut the strips up as you go to fit the open space.

Upcycled Christmas Gift Tags by 
Teri Anderson for Scrapbook Adhesives by 3L

Embellishing

Mount the foamed fronts onto your tags cut from old holiday cards. Add a 3D Foam Star to one of the R letters and remove the top liner. Apply a piece of gold foil from the Metallic Transfer Foil Sheets in Nature color side facing you on top. Gently rub the foil to transfer the color to the 3D Foam Star with your finger.

Upcycled Christmas Gift Tags by 
Teri Anderson for Scrapbook Adhesives by 3L

Take an E-Z Runner® Petite Permanent Dots Refillable Dispenser and randomly apply the dots to the edges. Add foil to them using the foiling method.

Upcycled Christmas Gift Tags by 
Teri Anderson for Scrapbook Adhesives by 3L
Upcycled Christmas Gift Tags by 
Teri Anderson for Scrapbook Adhesives by 3L

Finish by threading jute through the holes and double-knot them. Then stamp sentiments on strips of cardstock and add them on top.

Change It Up with the Recycled Fronts

Change the look by placing a tag cut from a past holiday card on top instead.

Upcycled Christmas Gift Tags by 
Teri Anderson for Scrapbook Adhesives by 3L

Embellish them the same way as your first batch.

Upcycled Christmas Gift Tags by 
Teri Anderson for Scrapbook Adhesives by 3L

Remember, none of these tags created with these techniques will look alike since you’re working with a variety of past holiday cards. It makes the results so fun!

Upcycled Christmas Gift Tags by 
Teri Anderson for Scrapbook Adhesives by 3L

Ready to give these tips a try? I’d to hear from you if you do!

Happy Creating!

Teri Anderson

Creative Time: 45 minutes
Skill Level: Intermediate

Materials Needed:
Scrapbook Adhesives by 3L®

3D Foam Stars

E-Z Runner® Petite Permanent Dots Refillable Dispenser

3D Foam Strips Large White

3D Foam Strips

Metallic Transfer Foil Sheets Nature Colors

Other: Cardstock: Neenah; Stamps and Dies: Concord and 9th (All the Merrys Stamp Set and Dies); Ink: Ranger Ink (Black); Jute: Darice; Old Christmas Cards

Save to Pinterest!

Upcycled Christmas Gift Tags by 
Teri Anderson for Scrapbook Adhesives by 3L Pinterest

Visit our Website and Blog!
Sign up for our Newsletter so you never miss a contest or giveaway!

instagram purple icon facebook icon purple pinterest purple icon twitter purple icon YouTube icon blog subscription purple icon

Uplifted Love You Card

Hi everyone, Yvonne here with a gorgeous Uplifted Love You Card. 3D Foam Strips is a great adhesive to lift up detailed effects to your card!

Uplifted Love You Card by Yvonne van de Grijp for Scrapbook Adhesives by 3L

With the help of a technique called Wear Your Adhesive on the Outside, I created the fuzzy squares on the card. I would love to show you how I made my card. Shall we get crafty?

Top Card Panel

Start by trimming a piece of white cardstock to a rectangular size. Then use blue and green ink along with an ink blending tool to create a background color on your Uplifted Love You Card. Sprinkle some water upon it and dab using a paper towel to add a little effect to the card panel.

Wear Your Adhesive on the Outside with Mounting Squares

To create the fuzzy little squares on the Uplifted Love You Card I used a technique called Wear Your Adhsive on the Outside. Adhere Mounting Squares 500 White Initially Repositionable all over the inked card panel.

Uplifted Love You Card by Yvonne van de Grijp for Scrapbook Adhesives by 3L

Now carefully remove the liners. Then sprinkle holographic flakes over the squares and rub to adhere securely. Tap off any excess flakes.

Card Base

Adhere the inked card panel onto a green card panel. Use the E-Z Runner® Grand Refillable Dispenser to adhere the panel quickly and easily…of course, it’s stainless. Then place it on a white card base.

Embellish the Love You Sentiment

Die-cut the sentiment. Add a glitter effect on the Uplifted Love You Card. Simply apply glue from the Dual Tip Glue Pen on the die-cut letters with the fine tip side. Then sprinkle some silver micro glitter upon them. Let dry thoroughly.

Uplifted Love You Card by Yvonne van de Grijp for Scrapbook Adhesives by 3L

Sentiment Placement Tip

To adhere the letters exactly as the die-template, put the letters back into the negative die-cut and use some washi tape to temporarily keep the letters in place.

Uplifted Love You Card by Yvonne van de Grijp for Scrapbook Adhesives by 3L

Then turn over and adhere 3D Foam Strips to the back of the letters.

Uplifted Love You Card by Yvonne van de Grijp for Scrapbook Adhesives by 3L

Now remove the liners and adhere to the top card panel. Then remove the washi tape and your sentiment is perfectly lined on your card. I used 3D Foam Strips to add that lovely uplifting effect. 

Uplifted Love You Card by Yvonne van de Grijp for Scrapbook Adhesives by 3L

Voilá your Uplifted Love Card is ready! I hope you enjoyed this tutorial and wish you happy crafting.

Yvonne van de Grijp

Uplifted Love You Card by Yvonne van de Grijp for Scrapbook Adhesives by 3L

Creative Time: 90 minutes (including drying time)

Skill Level: Intermediate

Materials needed:

Scrapbook Adhesives by 3L®

E-Z Runner® Grand Refillable Dispenser

Mounting Squares 500 White Initially Repositionable

3D Foam Strips

HomeHobby™ by 3L:

Dual Tip Glue Pen

Other

Etched Dies and Die-Cutting and Embossing Machine (Spellbinders Paper Arts®: Platinum 6 Machine; My Favorite Things: Love You);  Cardstock (White, Green,); Inkpads (Rangerink: Distress Oxide ink: Salvaged Patina, Tumbled Glass); Ink Blending Tool;  Flakes (Stampendous®: Fran-tage Shaved Ice); Glitter (Micro Glitter Silver); Washi Tape;  Scissors; Craft Knife; Paper Trimmer

Save to Pinterest!

Uplifted Love You Card by Yvonne van de Grijp for Scrapbook Adhesives by 3L Pinterest

Visit our Website and Blog!
Sign up for our Newsletter so you never miss a contest or giveaway!

instagram purple icon facebook icon purple pinterest purple icon twitter purple icon YouTube icon blog subscription purple icon

Visit our Website and Blog!
Sign up for our Newsletter so you never miss a contest or giveaway!

instagram purple icon facebook icon purple pinterest purple icon twitter purple icon YouTube icon blog subscription purple icon

Relax Mixed Media Card

Hi, Connie here with a fun play-on-words card called Relax. The inspiration for the card is the sentiment. I’m using stamps, stencils, and the E-Z Runner® Grand Dots Repositionable Dispenser. The repositionable adhesive really came in handy getting the deer images in alignment.

Relax Mixed Media Card by Connie Mercer for Scrapbook Adhesives by 3L

First thing, a small amount of prep work. To create a background I used stamps, stencils, and Distress Oxide ink. Keep in mind it is hard to mess up mixed media, just keep adding stamps and stencils, use different inks, paint, etc. to get the look you want. You will recognize the “look”, I promise!

Position and Stamp the Relax Card Panel

Relax Mixed Media Card by Connie Mercer for Scrapbook Adhesives by 3L
  • 1. Stamp the deer on white cardstock and arrange it to sit on the podium.
    2. Using a brick wall stencil apply in random spots to create interest to build the card background. Also, add in stamps and stencils for added interest. This is the fun part!!
    3. Use the E-Z Runner® Grand Dots Repositionable Dispenser to secure the podium image, so the deer can be embossed. I wanted the feet of the deer to be as close to the podium as possible. Using the repositionable tape is just a safety precaution to ensure the images are in the right place.
    4. Add the podium and sentiment strips using 3D Foam Squares White Mix and 3D Foam Strips to the card front.
Relax Mixed Media Card by Connie Mercer for Scrapbook Adhesives by 3L

Assemble the Card

Back the card front and card mat, using Crafty Foam Tape 108′ Black and Crafty Foam Tape 108′ White, to adhere them to the white cardstock base. Add twine to the top, of the card, and speckle with acrylic paint or ink.

Relax Mixed Media Card by Connie Mercer for Scrapbook Adhesives by 3L

Thanks for stopping by!
Connie Mercer

Creative Time: 60 minutes
Skill Level: Intermediate

Materials Needed:
Scrapbook Adhesives by 3L®

E-Z Runner® Grand Dots Repositionable Dispenser
Crafty Foam Tape 108′ Black and Crafty Foam Tape 108′ White
3D Foam Strips
3D Foam Squares White Mix

Other: Brushes: Hero Arts; Ink: Hero Arts and Ranger Ink; Embossing Powder: WOW!; Stamps: KatzelKraft; Stencil: Darkroom Door

Save to Pinterest!

Relax Mixed Media Card by Connie Mercer for Scrapbook Adhesives by 3L Pinterest

Visit our Website and Blog!
Sign up for our Newsletter so you never miss a contest or giveaway!

instagram purple icon facebook icon purple pinterest purple icon twitter purple icon YouTube icon blog subscription purple icon

Floating Strips Birthday Card

Hi, Jamie here today with a floating strips birthday card that’s easy to make with the right adhesives.

Floating Strips Birthday Card by Jamie Martin for Scrapbook Adhesives by 3L

Preparing the Card Base

Emboss the bottom of a white cardstock panel and place a strip of gold paper where the embossing ends using 1/8″ tape. Mount this to a top folding pink card using the E-Z Runner® Permanent Strips Refillable Dispenser

Floating Strips Birthday Card by Jamie Martin for Scrapbook Adhesives by 3L

Making the Floating Strips Panel

Die-cut an oval from acetate and place alternating strips of decorative paper and gold paper, securing it with Extreme Double-Sided Tape 1/4in. and Extreme Double-Sided Tape 1/8in. Place 3D Foam Strips on the back of the acetate behind the paper strips.

Floating Strips Birthday Card by Jamie Martin for Scrapbook Adhesives by 3L

Decorating the Floating Strips Panel

Die-cut flowers and leaves from white cardstock and place them on the left side of the oval using Micro dots. The pink center of the flower is popped up using 3D Foam Squares Micro Black. Attach a pink cord and a bow to the stem of the flowers using Adhesive Dots Micro. Die-cut Wishing from black and gold cardstock. Layer the gold on the black with the black edge showing and pop this up diagonally on the oval using 3D Foam Strips. Die-cut a banner from white cardstock and stamp it with the sentiment using pink ink. Add pink twine and a white and gold ribbon to the stem of the flowers.

Floating Strips Birthday Card by Jamie Martin for Scrapbook Adhesives by 3L

Thanks for Visiting!
Jamie Martin

Creative Time: 45 mins
Skill Level: Intermediate

Materials Needed:
Scrapbook Adhesives by 3L®

E-Z Runner® Permanent Strips Refillable Dispenser
3D Foam Squares Micro Black
3D Foam Strips
Adhesive Dots Micro

HomeHobby™ by 3L

Extreme Double-Sided Tape 1/4in.
Extreme Double-Sided Tape 1/8in.

Other:
Thin Metal Cutting Dies, Stamps and Embossing Folder: Spellbinders Paper Arts

Click Preferred Retailers List

Save to Pinterest!

Floating Strips Birthday Card by Jamie Martin for Scrapbook Adhesives by 3L Pinterest

Visit our Website and Blog!
Sign up for our Newsletter so you never miss a contest or giveaway!

instagram purple icon facebook icon purple pinterest purple icon twitter purple icon YouTube icon blog subscription purple icon

Visit our Website and Blog!
Sign up for our Newsletter so you never miss a contest or giveaway!

instagram purple icon facebook icon purple pinterest purple icon twitter purple icon YouTube icon blog subscription purple icon

BOO! Halloween Card

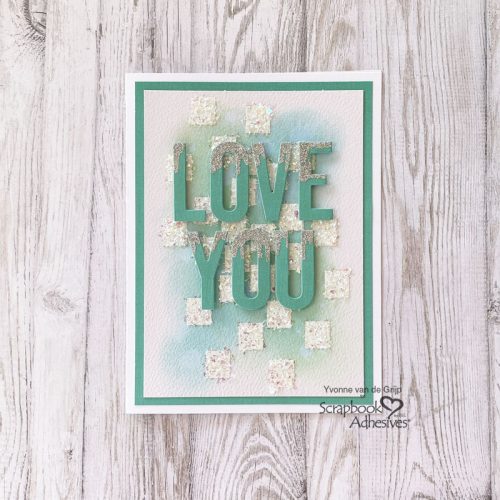
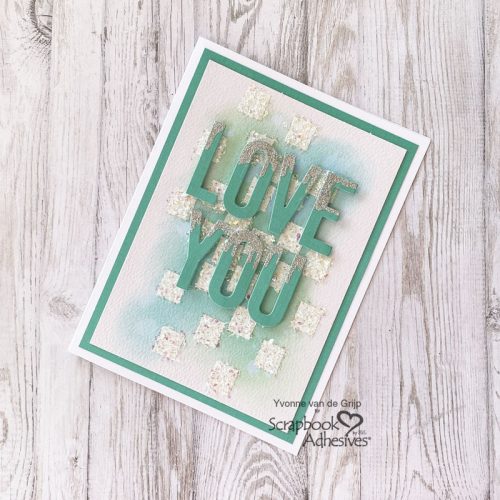
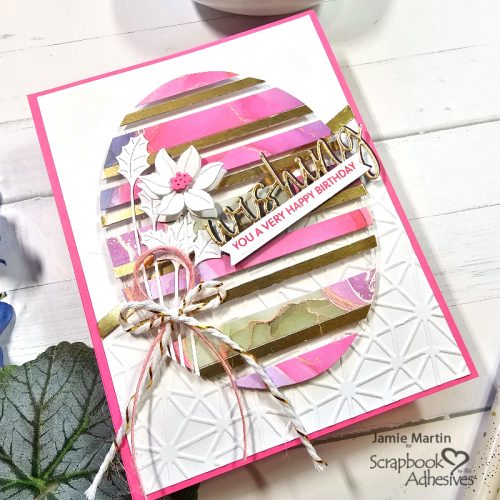
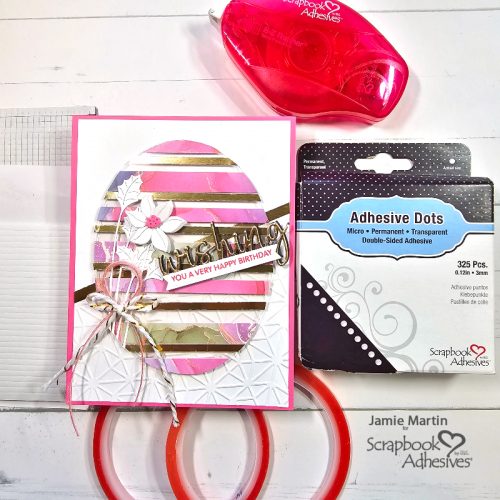
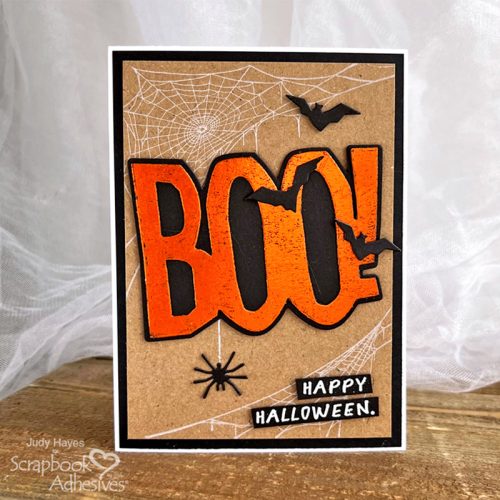
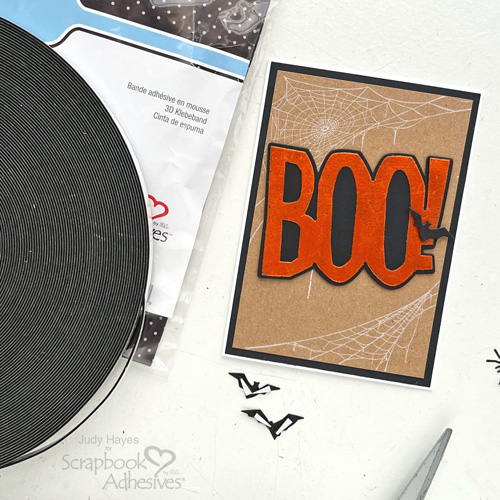
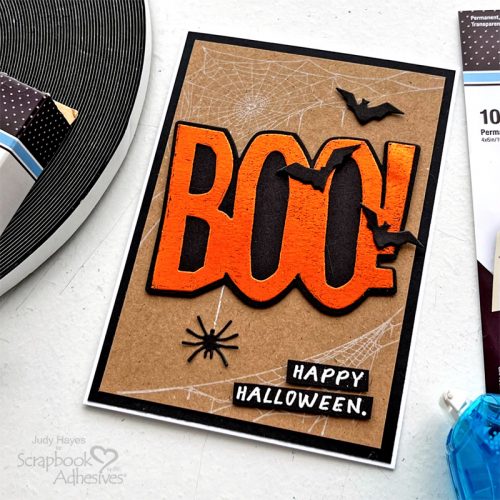
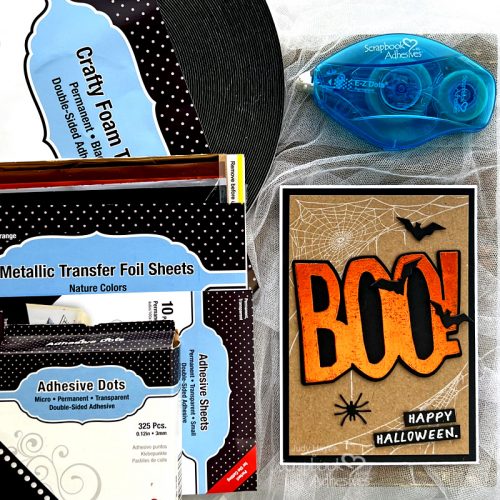
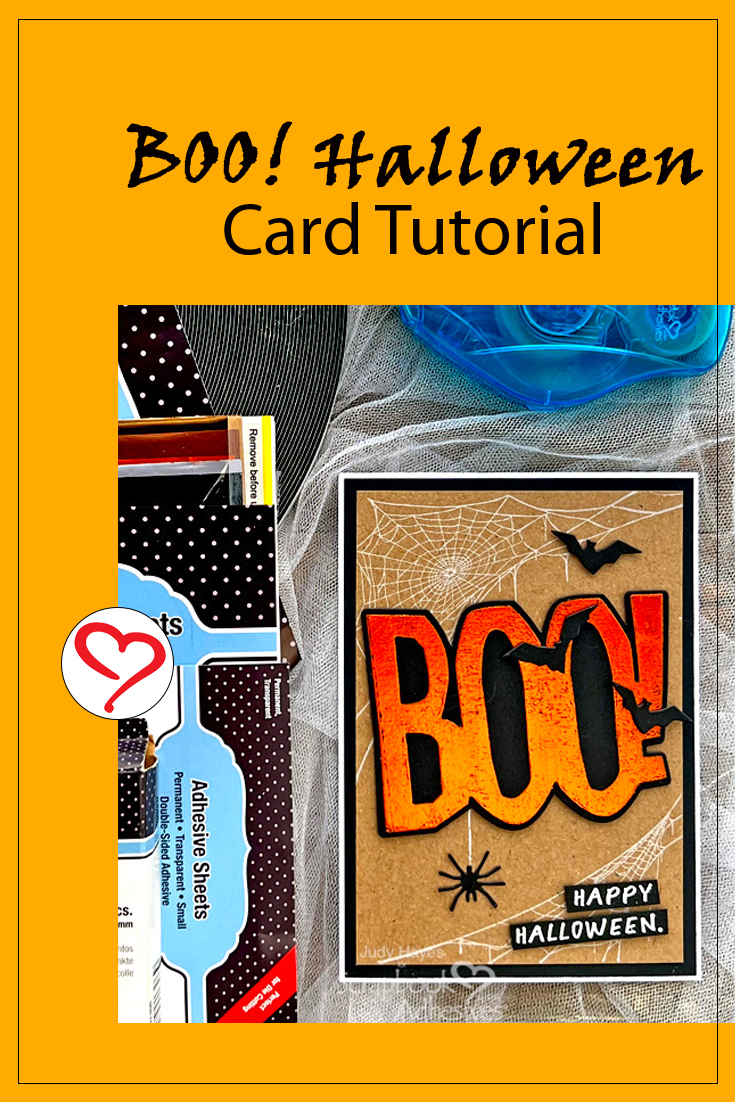
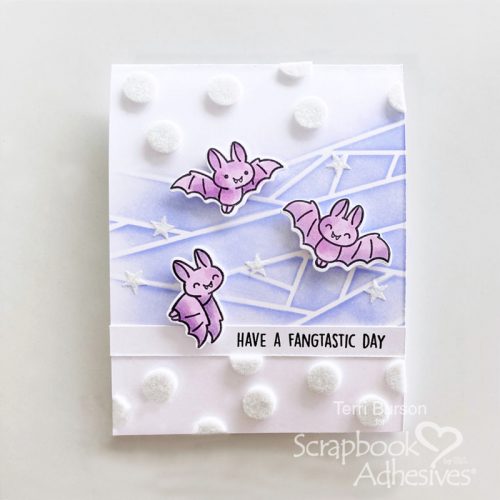
Hi, Judy here today! Fall has arrived and Halloween will soon be here. With that in mind, I put together this BOO! Happy Halloween card. I really like how “BOO!” looks with metallic foil on it from Metallic Transfer Foil Sheets Nature Colors! It’s popped up slightly on a stamped background with three die-cut bats, a spider, and a stamped greeting. A fun card to make!

BOO! Halloween Card by Judy Hayes for Scrapbook Adhesives by 3L

BOO! Card Part Assembly

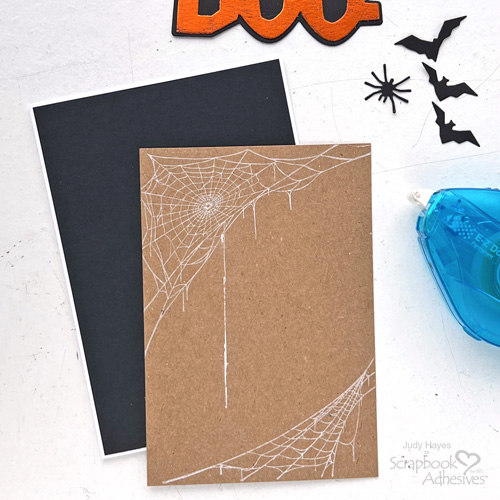
For the card base, cut 8.5 x 6-inch white cardstock and fold it in half to form a 4.25 x 6-inch card. Create the mat to anchor the card front by cutting a piece of 4.125 x 5.875-inch black cardstock. Use E-Z Dots® Permanent Refillable Dispenser to apply adhesive to the back of the black cardstock and attach to the card front.

Die Cut BOO!

BOO! Halloween Card by Judy Hayes for Scrapbook Adhesives by 3L

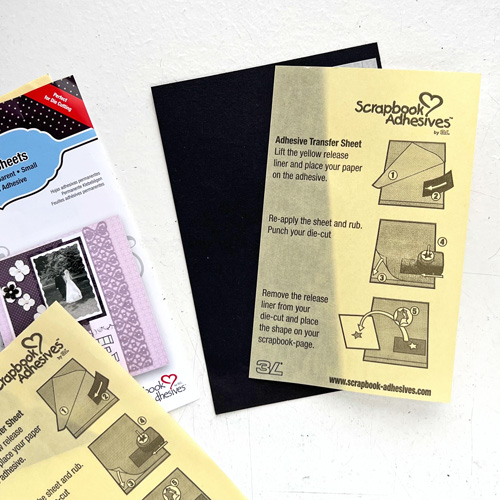
Apply Adhesives Sheets 4 x 6in. to a piece of black cardstock and rub well. Make sure that the adhesive side will be positioned in front of the word BOO! Designer’s Tip: Use the rounded end of a bone folder to burnish the adhesive sheet to the cardstock.

BOO! Halloween Card by Judy Hayes for Scrapbook Adhesives by 3L

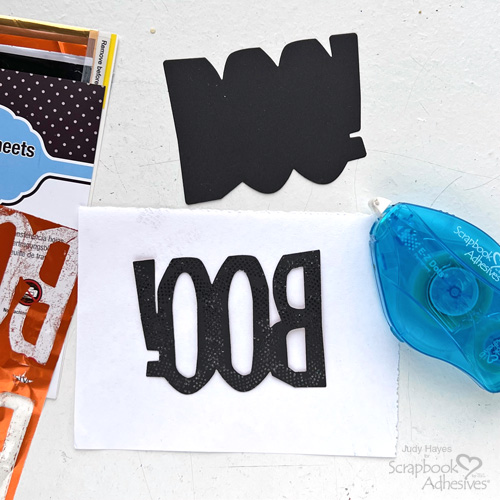
Place the cardstock on the die-cutting plate with the adhesive side up and lay BOO! die on it. Die-cut with your machine.

BOO! Halloween Card by Judy Hayes for Scrapbook Adhesives by 3L

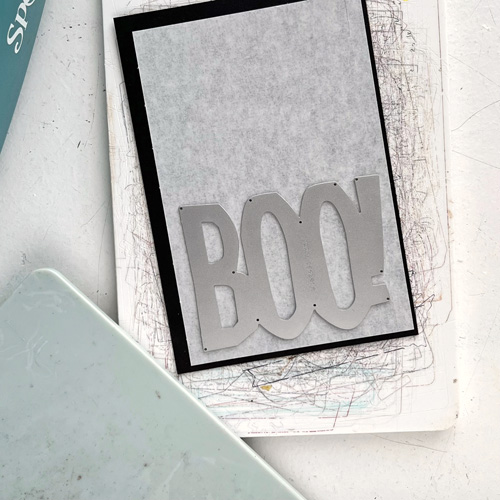
Then die-cut the outline shape for BOO! from black cardstock as well as one spider, one large bat, and 2 small bats.

BOO! Halloween Card by Judy Hayes for Scrapbook Adhesives by 3L

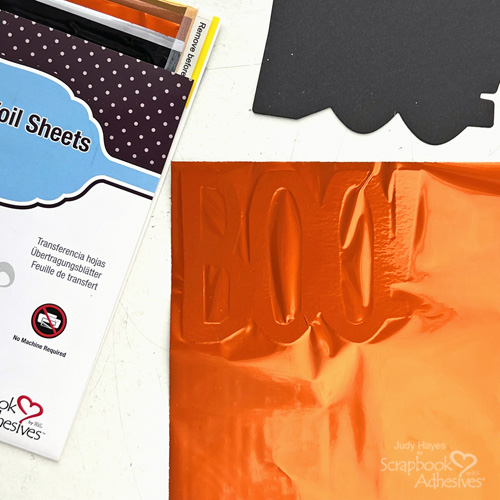
Carefully peel the liner back slightly on the BOO! piece, and place the orange foil (color side facing you) from the Metallic Transfer Foil Sheets Nature Colors over the exposed adhesive. Then remove the liner completely, press the foil into the word, and gently rub to transfer the color. Peel the foil away. If there are any missed areas, reapply the foil.

BOO! Halloween Card by Judy Hayes for Scrapbook Adhesives by 3L

On the backside of the foiled BOO!, apply E-Z Dots® Permanent Refillable Dispenser and attach it to the black outline piece.

Stamp the Background

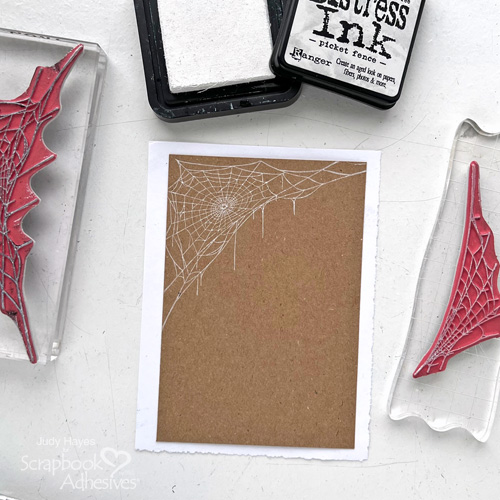
Cut a 3.875 x 5.625-inch rectangle from a piece of Kraft cardstock. Apply Distress Picket Fence ink to the large spider web and stamp at the top of the Kraft cardstock. Next, ink a small web with the Distress Picket Fence and stamp at the bottom.

BOO! Halloween Card by Judy Hayes for Scrapbook Adhesives by 3L

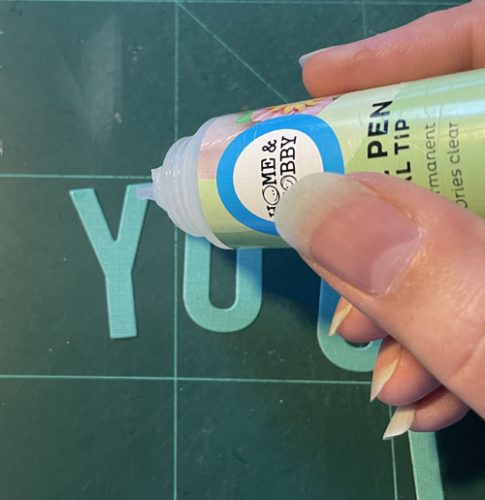
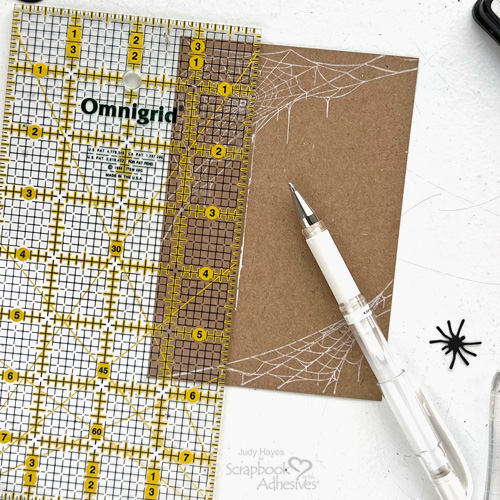
Use a white pen and ruler to extend the line from the web toward the bottom. Designer’s Tip: Place the matted BOO! piece on the stamped background to help determine how long to make a line.

BOO! Halloween Card by Judy Hayes for Scrapbook Adhesives by 3L

Apply adhesive to the back of the stamped Kraft piece with E-Z Dots® Permanent Refillable Dispenser and fasten on the card front.

Attach BOO! and Bats

BOO! Halloween Card by Judy Hayes for Scrapbook Adhesives by 3L

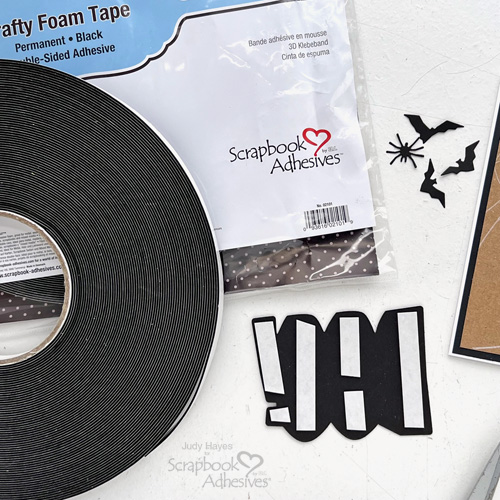
Cut pieces of Crafty Foam Tape Black 108ft. to fit on the back of the foiled BOO! piece, peel the liners off, and place on the card front.

BOO! Halloween Card by Judy Hayes for Scrapbook Adhesives by 3L

Cut pieces of Crafty Foam Tape Black 108ft. to place on the back of bats. Peel liners and place one small bat and large bat on BOO!. Place another small bat above the BOO!.

Designer’s Tip: I like using Crafty Foam Tape Black 108ft. because it’s thin and can be cut to fit as needed.
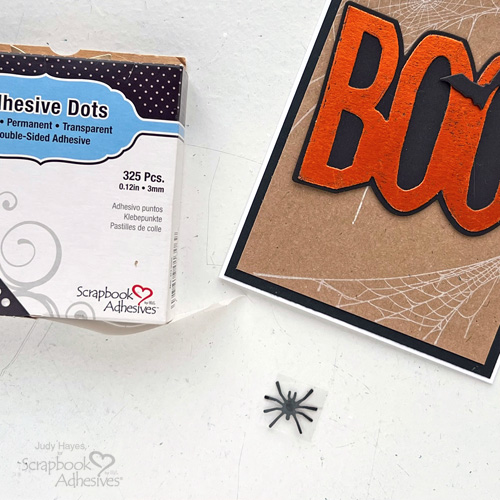
Attach the Spider

BOO! Halloween Card by Judy Hayes for Scrapbook Adhesives by 3L

Place Adhesive Dots Micro on the back of the spider, peel the liner, and attach it at the bottom of the drawn line (the line can be drawn longer as needed).
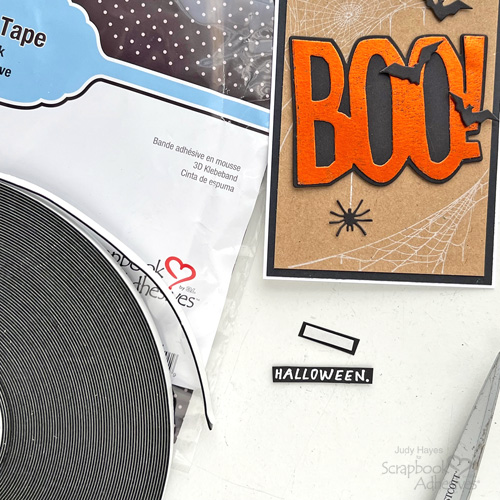
Add Greeting

Stamp greeting on black cardstock with embossing ink and heat emboss with white embossing powder. Trim around each word.

BOO! Halloween Card by Judy Hayes for Scrapbook Adhesives by 3L

Cut Crafty Foam Tape Black 108ft. into strips to fit Happy Halloween words and fasten on the back of each one. Peel liners and attach the greeting to the card at a slight angle matching the angle of the BOO!.

BOO! Halloween Card by Judy Hayes for Scrapbook Adhesives by 3L

Enjoy!

Thanks for Visiting!
Judy Hayes

Creative Time: 25 mins
Skill Level: Intermediate

Materials Needed:
Scrapbook Adhesives by 3L®

Adhesives Sheets 4 x 6in.

Metallic Transfer Foil Sheets Nature Colors

E-Z Dots® Permanent Refillable Dispenser

Crafty Foam Tape Black 108ft.

Adhesive Dots Micro

Other: Stamp: Stampers Anonymous (Tim Holtz Unraveled); Ink: Ranger Ink (Distress Picket Fence, Distress Embossing Ink); Embossing Powder: Ranger Ink (White Embossing Powder); Craft Dies: Sizzix (Tim Holtz Big Frights); Black, Kraft + White Cardstock; White Uni-Ball Signo Pen

Click Preferred Retailers List

Save to Pinterest!

BOO! Halloween Card by Judy Hayes for Scrapbook Adhesives by 3L Pinterest

Quilt Card Creations

Inspired by quilt designs, I created a couple of quilt card projects since I do not know how to sew! LOL! With the help of Adhesive Sheets 12 x 12in., it was so easy to piece together these intricate designs. Let me show you how.

Quilt Card Creations by Margie Higuchi for Scrapbook Adhesives by 3L

Mini Slimline Hexi Quilt Card Prep

Apply Adhesive Sheets 12 x 12in. on the back of the following cardstock color: light orange, dark orange, light green, cream, and white. Nest the outline and Hexi insert dies together and die-cut all the cardstock. Die-cut the outline die with a piece of cream cardstock to use as the base of the card front panel. Peel the liner off the frame and adhere it on top of the base.

Quilt Card Creations by Margie Higuchi for Scrapbook Adhesives by 3L

View a quick video below on how to apply.

Design Your Quilt Pattern

Determine your quilt design. Peel off liners from the pieces and adhere them into place. Designer’s Tip: After placement, use the blunt end of a bone folder to press in place or a die-cutting machine and roll through to add pressure to secure.

Quilt Card Creations by Margie Higuchi for Scrapbook Adhesives by 3L

Create Layers

Embossing a piece of 3 x 6-inch dark orange panel with the embossing folder.

Quilt Card Creations by Margie Higuchi for Scrapbook Adhesives by 3L

Stamp sentiment on a piece of 4 x 7/8-inch vellum strip. Assemble the layers and adhere them on a 3 x 6-inch side-fold mini slimline card base with the E-Z Runner® Grand Ultra Strong Refillable Dispenser.

Quilt Card Creations by Margie Higuchi for Scrapbook Adhesives by 3L

Die-cut two small flowers from cream cardstock, stack the two, and adhere them with Adhesive Dots Mini. Center a white pearl.

Quilt Card Creations by Margie Higuchi for Scrapbook Adhesives by 3L

Flower Mini Quilt Card

Apply Adhesive Sheets 12 x 12in. on the back of the light green and dark orange cardstock. Nest the outline and quilt insert dies together and die-cut both cardstock pieces. Remove the bigger pieces in the light green frame but leave the smaller triangle in the frame. Keep the arrow shapes and the center square from the dark orange frame.

Quilt Card Creations by Margie Higuchi for Scrapbook Adhesives by 3L

The Designing Details

Die-cut the outline die with a piece of patterned paper to use as the base of the card front panel. Peel off the liner on the back of the light green cardstock frame and place it on top of the panel. Remove the liners and add the bigger pieces of light orange into the frame. Refer to the image below on placement.

Designer’s Tip: After placement, use the blunt end of a bone folder to press in place or a die-cutting machine and roll through to add pressure to secure.

Quilt Card Creations by Margie Higuchi for Scrapbook Adhesives by 3L

Die-cut a decorative square from a piece of dark orange panel. Assemble the layers and adhere on a 4.25 x 5.5-inch side-fold white cardstock card base with the E-Z Runner® Grand Ultra Strong Refillable Dispenser.

Quilt Card Creations by Margie Higuchi for Scrapbook Adhesives by 3L

To finish, die-cut two small flowers from cream cardstock, stack the two, and adhere them with Adhesive Dots Mini. Center a white pearl. It’s ready to be sent for any occasion!

I hope you enjoyed these Quilt Cards and that they might inspire you to create some to spread some love!

Thanks for Visiting!
Margie Higuchi

Creative Time: 45 mins
Skill Level: Intermediate

Materials Needed:
Scrapbook Adhesives by 3L®

E-Z Runner® Grand Ultra Strong Refillable Dispenser

Adhesive Dots Mini

Adhesive Sheets 12 x 12in.

Other: Spellbinders Paper Arts (S5-542 French Braid and Hexagon Panels Etched Dies, S5-46 Log Cabin and Flower Mini Quilts Etched Dies, S5-538 Postage Edge Squares Etched Dies, STP-156 Quilty Hugs Sentiments Clear Stamp Set, E3D-046 Orange Peel Quilt 3D Embossing Folder and S3-420 Petite Floral Potpourri Etched Dies); Hero Arts (INTENS-ified Black Ink); PhotoPlay Paper Co. (Grow Paper, Spring in My Garden Collection); Light Orange, Dark Orange, Light Green, Cream and White Cardstock; Vellum Paper; Self-Adhesive White Pearl; Bone Folder

Click Preferred Retailers List

Save to Pinterest!

Quilt Card Creations by Margie Higuchi for Scrapbook Adhesives by 3L Pinterest

Visit our Website and Blog!
Sign up for our Newsletter so you never miss a contest or giveaway!

instagram purple icon facebook icon purple pinterest purple icon twitter purple icon YouTube icon blog subscription purple icon

Fangtastic Day Bats Card

Hi, everyone! Do you love adding texture to your handmade Halloween cards? Teri here to show you how to create this Fangtastic Day Bats Card that mixes flock with 3D Foam Circles White Mix and E-Z Runner® Stars to create a fun textured look!

Fangtastic Day Bats Card by Teri Anderson for Scrapbook Adhesives by 3L

Create the Card Base and Add Stars, Circles and Flock

Begin by creating a card base from cardstock. Apply ink directly onto the card. For a more unique look, apply the ink to it through a stencil. Set your card aside. Stamp, color and die-cut some bats to place on your card. Apply 3D Foam to the backs of the bats. I really like using the 3D Foam Strips for this step because it’s thin and long. You can easily cut it down so your bats are well covered with foam!

Fangtastic Day Bats Card by Teri Anderson for Scrapbook Adhesives by 3L

Apply stars onto your inked background. Place flock on top of them. Use your fingers to burnish the flock down by pushing and rubbing it firmly onto the stars.

Fangtastic Day Bats Card by Teri Anderson for Scrapbook Adhesives by 3L

Stamp a sentiment on a strip of cardstock. Place it on your card. Temporarily set your bats on your card so you know where it will look best.

Fangtastic Day Bats Card by Teri Anderson for Scrapbook Adhesives by 3L

Take several 3D Foam Circles White Mix and add them to the top and bottom of your card. Consider cutting of the circles in half for a cool look. Once again, apply flock to them. Tap off any excess flock! To make sure your flock is fully adhered to your circles, rub a little bit of wax paper over the circles.

Fangtastic Day Bats Card by Teri Anderson for Scrapbook Adhesives by 3L

Finish the Card and Use It to Send a Note or a Gift Card

Complete your card by mounting the bats onto it.

Fangtastic Day Bats Card by Teri Anderson for Scrapbook Adhesives by 3L

Use this card to send a message! You can also use it to send a gift card by adhering a Keepsake Envelope inside it to hold it!

Fangtastic Day Bats Card by Teri Anderson for Scrapbook Adhesives by 3L

Thank you for stopping by today! I’d love to see your Halloween-inspired creations. Leave a link for me in the comments so I can stop by and leave a little love for you!

Have a Fangtastic Day and Happy Creating!

Teri Anderson

Creative Time: 45 minutes
Skill Level: Intermediate

Materials Needed:
Scrapbook Adhesives by 3L®

3D Foam Circles White Mix

E-Z Runner® Petite Permanent Dots Refillable Dispenser

E-Z Runner® Stars Refillable Dispenser

3D Foam Strips

Other: Cardstock: Neenah; Stencil: Pretty Pink Posh (Mummy Wrap); Stamps and Dies: Lawn Fawn (Fang-tastic Friends Stamp Set and Dies); Ink: Ranger Ink (Black, Purple); Flock: Stampendous; Markers: Copic

Save to Pinterest!

Fangtastic Day Bats Card by Teri Anderson for Scrapbook Adhesives by 3L Pinterest

Visit our Website and Blog!
Sign up for our Newsletter so you never miss a contest or giveaway!

instagram purple icon facebook icon purple pinterest purple icon twitter purple icon YouTube icon blog subscription purple icon

Layered Border Birthday Greeting Card

Hello crafty friends! Tracy here, and today I have a fun little project to share. Here are all of the details on how I created this Layered Border Birthday Greeting Card.

Layered Border Birthday Greeting Card by Tracy McLennon for Scrapbook Adhesives by 3L

Card Base Layers for Layered Border Birthday Card

Start by cutting the card base layers for this card. The card base is pink cardstock, vellum layer (4×5.25), gold cardstock (3.75×5) and white cardstock (3.5×4.75).

Layered Border Birthday Greeting Card by Tracy McLennon for Scrapbook Adhesives by 3L

Add 3D Foam Circles White Mix to the top and bottom edges of the white cardstock layer. Using pink ultra-fine glitter, cover the 3D Foam Circles White Mix and brush off the excess glitter.

Layered Border Birthday Greeting Card by Tracy McLennon for Scrapbook Adhesives by 3L

Cut a piece of pink cardstock the is 3.5″ wide that fits in between your glitter covered 3D Foam Circles White Mix. Adhere Creative Photo Corners Gold to the top and bottom of this pink cardstock layer.

Layered Border Birthday Greeting Card by Tracy McLennon for Scrapbook Adhesives by 3L

Adhere all of the layers so far together using the E-Z Runner® Ultra Strong Refillable Dispenser. The E-Z Runner® Ultra Strong Refillable Dispenser is perfect for all of the different paper textures I used for this Layered Border Greeting Card.

Layered Border Birthday Greeting Card by Tracy McLennon for Scrapbook Adhesives by 3L

Cut a piece of white cardstock that is 3.5″ wide and long enough to cover the black background of the Creative Photo Corners Gold borders. Add rows of 3D Foam Circles White Mix to the top and bottom with more pink glitter. Then add this layer to the Layered Border Greeting Card front, again using the E-Z Runner® Ultra Strong Refillable Dispenser.

Layered Border Birthday Greeting Card by Tracy McLennon for Scrapbook Adhesives by 3L

The final touch is to add the gold puffy sticker sentiment to the top white cardstock layer.

Layered Border Birthday Greeting Card by Tracy McLennon for Scrapbook Adhesives by 3L

Thanks so much for stopping by!
Tracy

Creative Time: 45 minutes

Skill Level: Intermediate

Materials needed:

Scrapbook Adhesives by 3L®
3D Foam Circles White Mix
E-Z Runner® Ultra Strong Refillable Dispenser
Creative Photo Corners Gold

Other: Cardstock (White, Pink); Ultra-Fine Glitter; Gold Puffy Stickers; Vellum; Gold Cardstock

Save to Pinterest!

Layered Border Birthday Greeting Card by Tracy McLennon for Scrapbook Adhesives by 3L Pinterest

Visit our Website and Blog!
Sign up for our Newsletter so you never miss a contest or giveaway!

instagram purple icon facebook icon purple pinterest purple icon twitter purple icon YouTube icon blog subscription purple icon

Visit our Website and Blog!
Sign up for our Newsletter so you never miss a contest or giveaway!

instagram purple icon facebook icon purple pinterest purple icon twitter purple icon YouTube icon blog subscription purple icon

Just For You Mixed Media Card

Hi, Connie here with a mixed media card, Just For You Card. Grab your Adhesive Sheets 4×6 and Metallic Transfer Foil and let’s get started creating this fun card.

Just For You Mixed Media Card by Connie Mercer for Scrapbook Adhesives by 3L

As always with mixed media there is some prep work. We need a card background to put those crazy birds on.

Creating a card background

Just For You Mixed Media Card by Connie Mercer for Scrapbook Adhesives by 3L
  • 1. Gather inks. I use Distress Oxide and water them down. Then I dab the card front in the colors, one at a time. Let dry and repeat for more color.
    2. I chose the Nature set, for my Metallic Transfer Foil, to enhance the card front.
    3. The Adhesive Sheets 4×6 are perfect for applying the Metallic Transfer Foil to the card front. Form the Adhesive Sheet into a ball. Then pull the cling sheet back and dab the sticky adhesive to random areas on the card.
    4. Lay the Metallic Transfer Foil over the sticky adhesive and pull up. Repeat the process to get the look you want.
    Now you are ready for stamps and stencils.

Create and assemble the card

Just For You Mixed Media Card by Connie Mercer for Scrapbook Adhesives by 3L
  • 1. Add stencils and stamps to create interest. I use Distress Oxide, Hero Hues/Black and Archival inks. The focal images are stamped and trimmed out ready for the card front.
    2. To distress the crazy birds and card edges use wax by Hero Arts.
    3. Use Crafty Foam Tape 108’/ Black and Crafty Foam Tape 108’/ White to adhere the layers of cardstock together on the white card base.
    4. Stamp the sentiment and trim out. Adhere the sentiment to the card front using 3D Foam Strips/Black.
    Pop the crazy birds on with 3D Foam Squares Black Mix.
Just For You Mixed Media Card by Connie Mercer for Scrapbook Adhesives by 3L

Thanks for stopping by!
Connie Mercer

Creative Time: 60 minutes
Skill Level: Intermediate

Materials Needed:
Scrapbook Adhesives by 3L®

3D Foam Squares Black Mix
3D Foam Strips Black Small
Adhesive Sheets 4×6
Crafty Foam Tape 108′ Black and Crafty Foam Tape 108′ White
Metallic Transfer Foil/Nature

Other: Brushes: Hero Arts; Inks: Hero Arts and Ranger. Stamps: KatzelKraft and Studio Light; Stencil: Carabelle Studio

Click Preferred Retailers List

Save to Pinterest!

Just For You Mixed Media Card by Connie Mercer for Scrapbook Adhesives by 3L Pinterest

Visit our Website and Blog!
Sign up for our Newsletter so you never miss a contest or giveaway!

instagram purple icon facebook icon purple pinterest purple icon twitter purple icon YouTube icon blog subscription purple icon