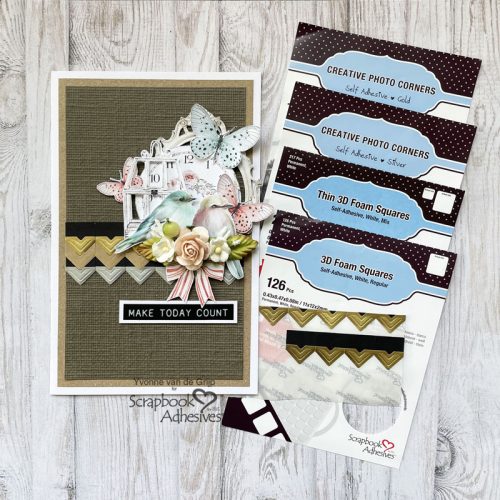
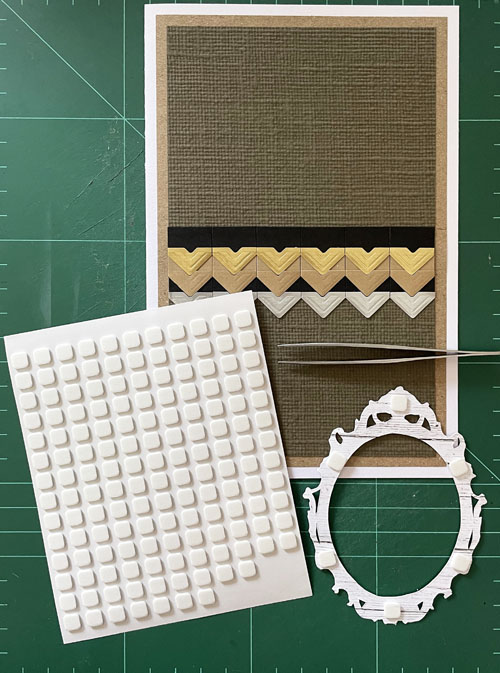
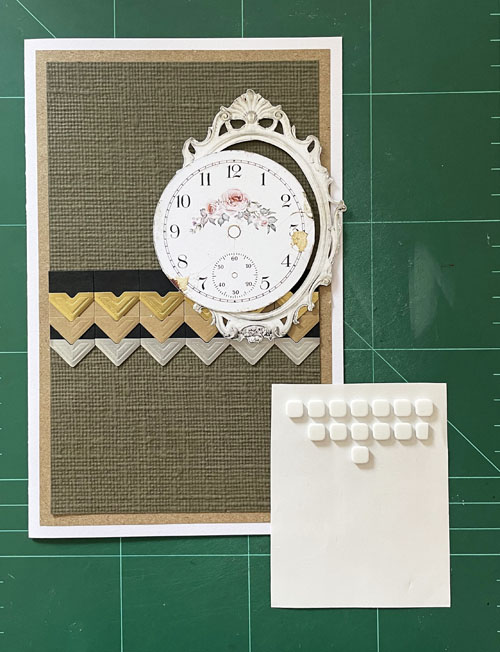
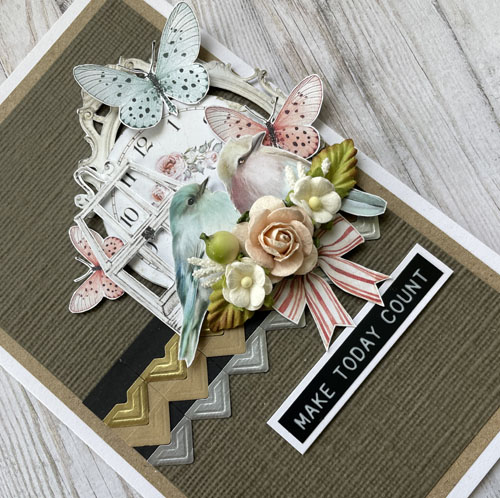
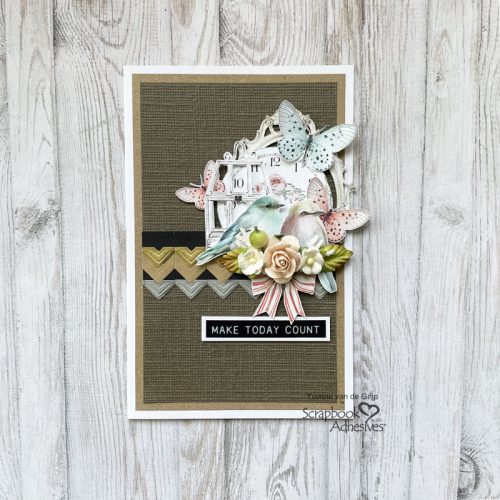
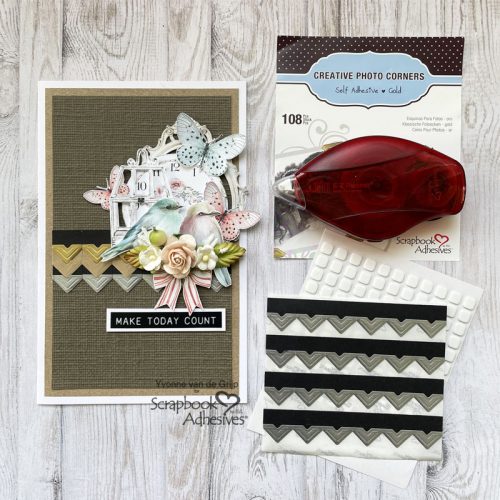
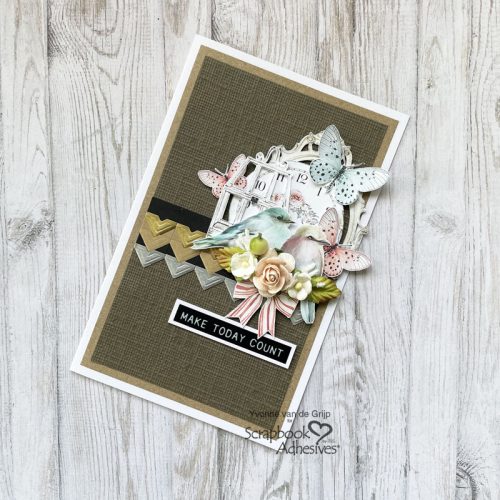
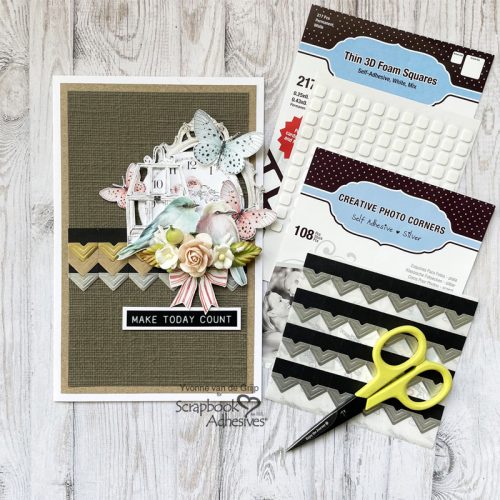
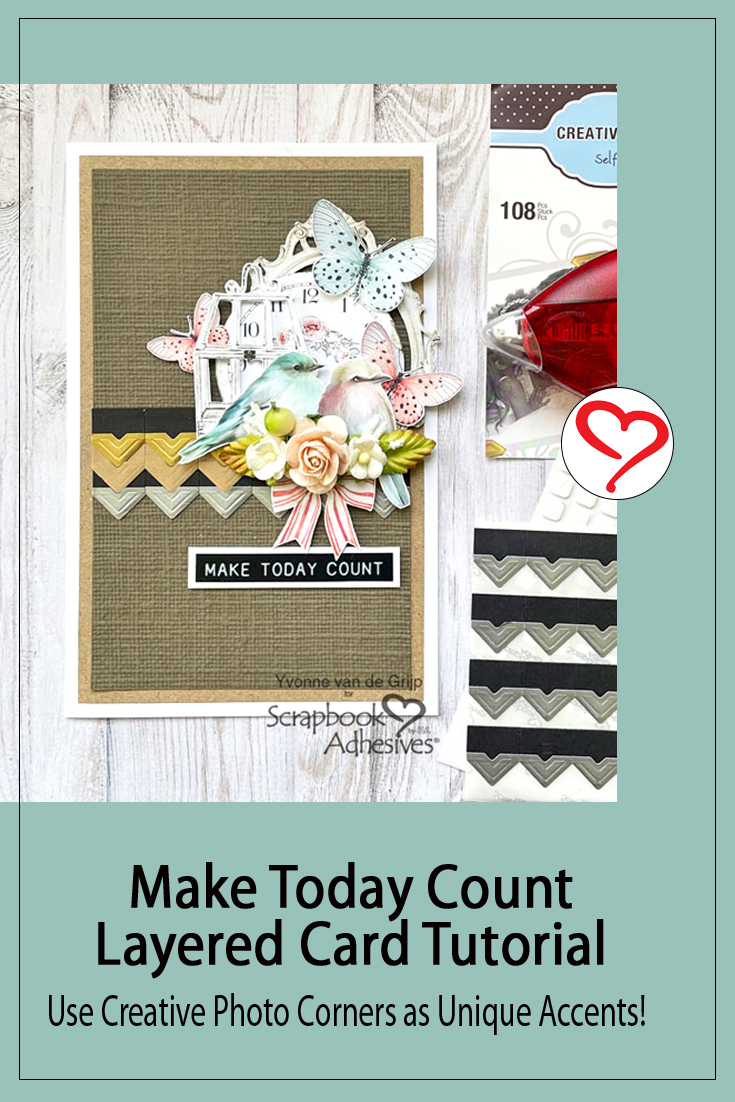
Hi everyone, Yvonne here with a wonderfully layered and textured card to inspire you! By layering multiple elements you can create a gorgeous look like this Make Today Count Layered Card. Note the unique accent created with Creative Photo Corners, this is a card that will astonish the recipient. Join me in making this card.
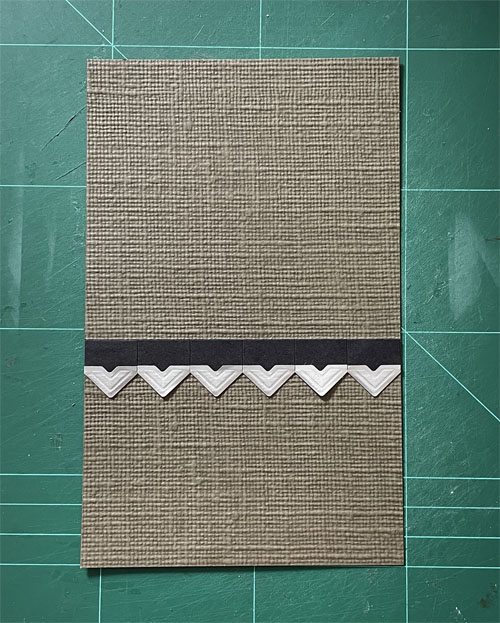
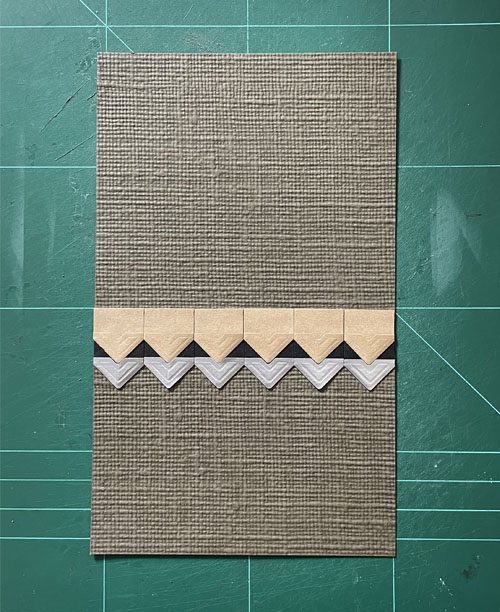
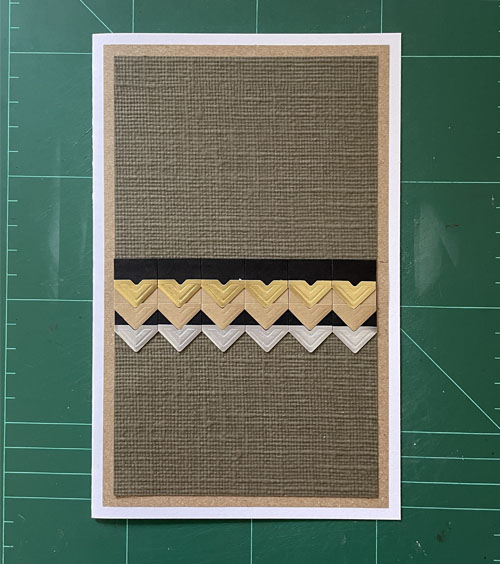
To make the card base of the Layered 3D Card simply adhere the top card panel onto a kraft card panel and then onto a white card base. Adhere the layers using the E-Z Runner® Permanent Strips Refillable Dispenser.
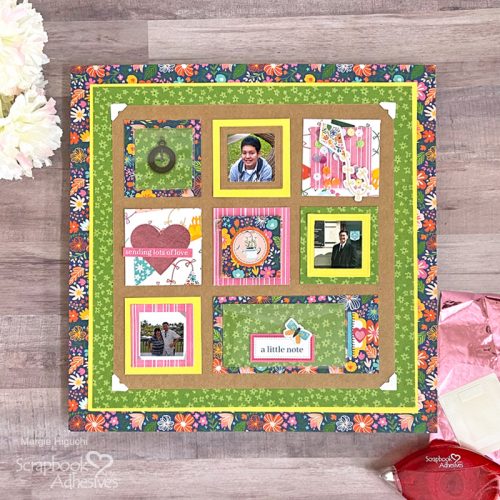
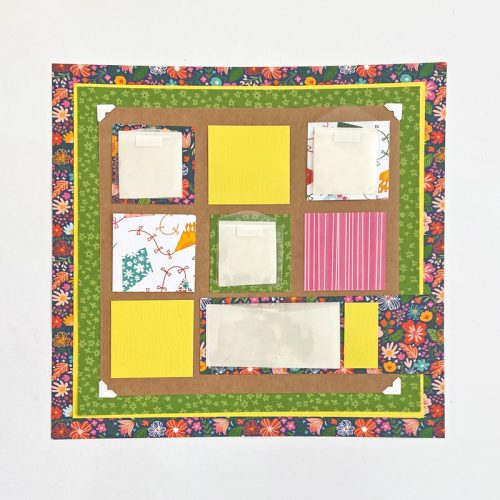
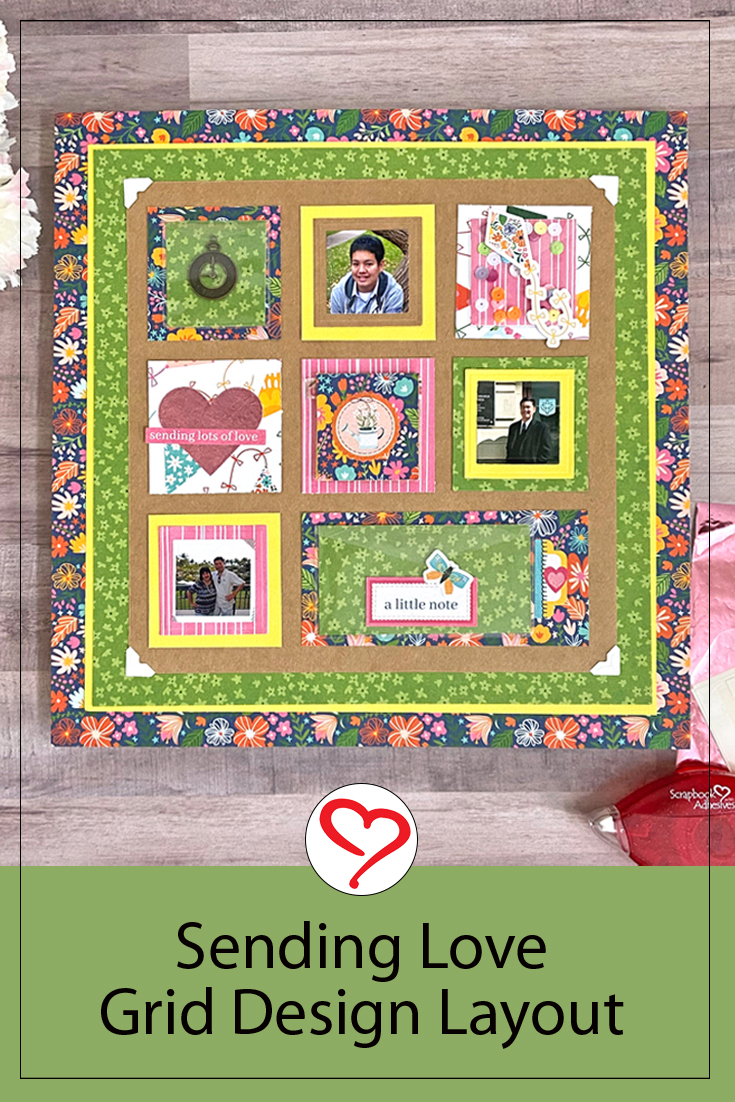
Happy (i)National Scrapbook Weekend, I am kicking off iNSD with a good grid design on a scrapbook page! Today, I am showcasing this Sending Love Grid Layout featuring the smallest clear envelope from the Keepsake Envelopes pack.
If you are looking for the Scrapbook and Cards Today Noteworthy Adhesive Giveaway, read all the way to the end on how to enter so you can re-create your own grid design! The contest ends Wednesday, May 10th, 2023 at Midnight Eastern.
Love Grid Layers
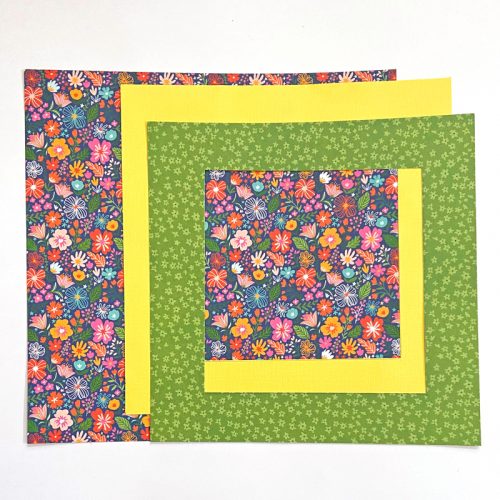
To create the background, I used 12 x 12-inch floral patterned paper. The second layer is a piece of 11 x 11-inch square yellow cardstock and the third layer is a piece of 10.5 x 10.5-inch square green patterned paper.
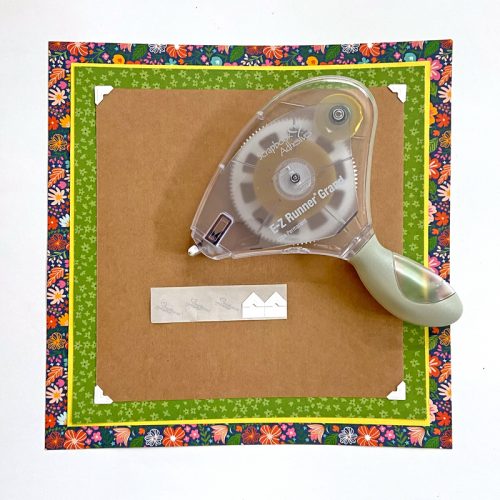
Designer Tip: cut the middle of the yellow and green patterned papers. This not only alleviates the bulk but they can be used as frames on the layout. Perfect in tying all the elements together.
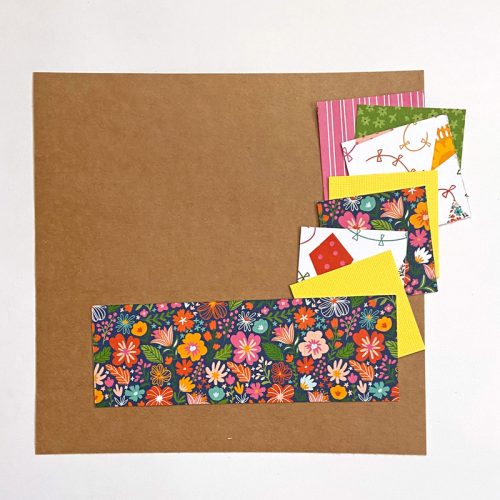
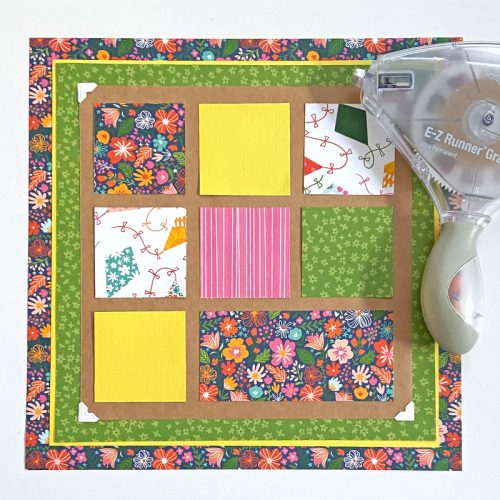
For the top layer and foundation for the layout, trim a piece of 10 x 10-inch square Kraft cardstock. Next, cut a combination of 2.5 x 2.5-inch squares from the leftover patterned papers and cardstock pieces – maybe add in another sheet of patterned paper to make a total of seven square mats.
Cut the bottom right corner mat to 5.5 x 2.5 inches. It will outline the rectangular Keepsake Envelope and hold a note/journaling. This was cut after I figured out my page design…didn’t want to waste the piece if I mismeasured! LOL!
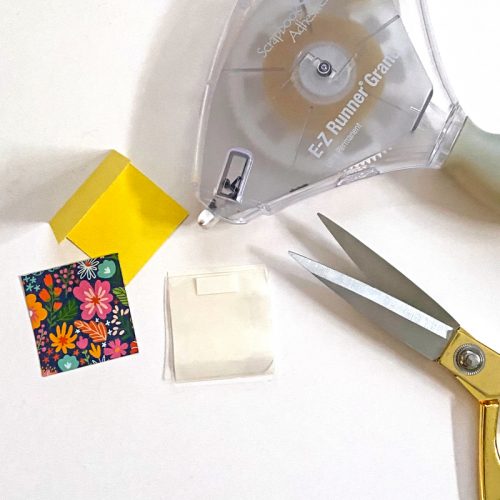
Now the fun part – designing! There are four 2 x 2-inch Keepsake Envelopes in the Keepsake Envelopes Mix pack so why not use most of it?! That was my inspiration for creating this page. Layout out the squares and determine where to place the envelopes. BTW, I cut the liner off from the smaller envelope as they come in two on one sheet so ignore the wonky cut. LOL!
Add in photos and a charm with an Adhesive Dot Large. Make a shaker (upper right corner) by adding sequins, closing the flap, and sealing with a sticker. I’ve added the largest 3D Foam Heart from a pack of 3D Foam Hearts and a heart from the E-Z Runner® Hearts. Both were embellished with the pink foil from the Metallic Transfer Foil Sheets in Pastel. Simply place the foil color side UP and rub to transfer the color to the hearts. Peel off to reveal a shiny embellishment!
How to Use Keepsake Envelope Video
Are you unfamiliar with the Keepsake Envelope application? We have a quick video on that! See below – it’s really simple!
Make a Pocket
Since the others are straightforward on how to use them, I decided to alter one of them into a clear pocket. Cut a piece of 2 x 5-inch yellow cardstock and fold it in half to make a top fold 2 x 2.5-inch gift card. Adhere a piece of 2 x 2-inch floral patterned paper on the front of the card.
Next, cut off the flap of a 2 x 2-inch Keepsake Envelope, peel off the adhesive liner, and add a strip of washi tape across the top to cover it. Center on the center square of the layout and slip the card in. You can embellish the inside of the card with stickers or write a little something. Done!
Maybe this tutorial inspires you to create a grid scrapbook layout! I hope you enjoyed my Sending Love Grid scrapbook page. Tag us and show off your grid design!
Other: Patterned Papers + Stickers: PhotoPlay Paper Co. (Oh, What a Beautiful Day Collection); Metal Charm; Washi Tape; Kraft and Yellow Cardstock; Crease Tool; Scissors; Paper Trimmer
Save to Pinterest!
Scrapbook and Cards Today Magazine Noteworthy Adhesive Giveaway
Enter to Win a Wonderful Array of Adhesives for your Paper Crafting Project! But HURRY! The contest ends Wednesday, May 10th, 2023 at Midnight Eastern. Simply Click SCT Noteworthy Adhesive Giveaway! Good Luck!
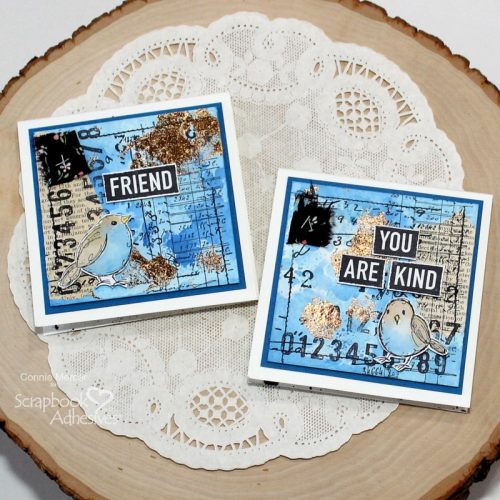
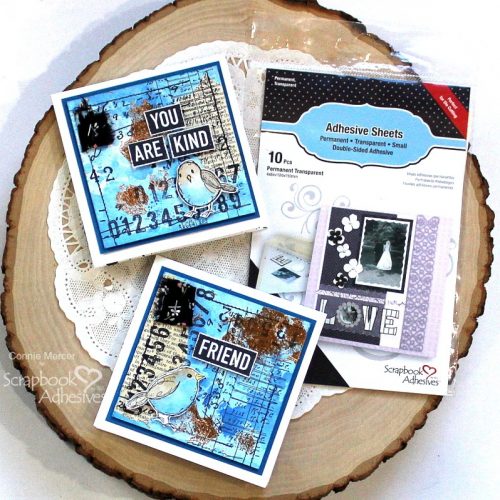
Hi, Connie here to share a couple of Memo Pads that are fun to create and Scrapbook Adhesives by 3L makes it easy! I love EASY!!! I’m using Adhesive Sheets 4×6 and Metallic Foil Transfer Sheets Nature Color to create a distressed look. Let me show you. Super fun one 🙂
These make really cute gifts and the perfect assembly line craft. You can make several at one time. That is what I did here.
Create the Cover Panel
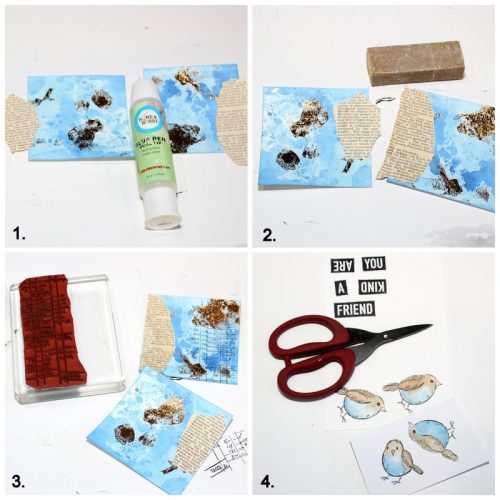
1. I’ve used the Wear Your Adhesive on the Outside technique on the background with adhesive sheets and foils. See those steps in my More Than Enough Card. Next, adhere the ephemera with the Dual Tip Glue Pen to the fronts. It measures 3 1/4″ x 3 1/4″. 2. Sand the edges to remove excess ephemera hanging over the edges. 3. Use stamps or stencils to create a mixed media style memo cover. 4. Stamp focal birds image and sentiments. Then cut them out.
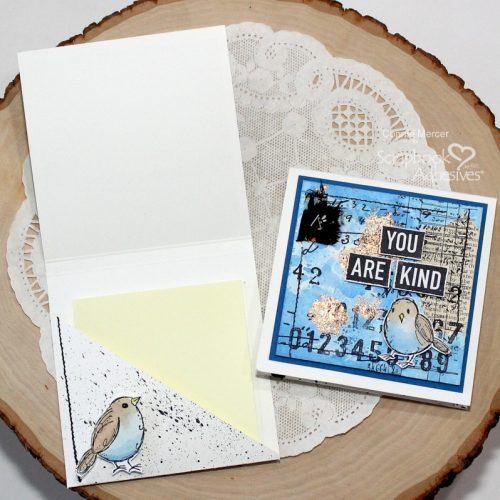
Make the Folder
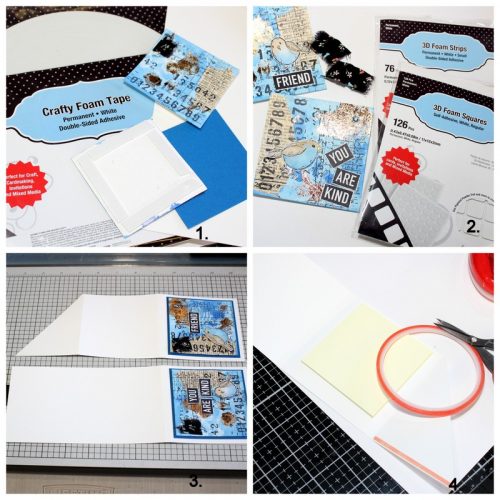
1. Adhere memo pad fronts to cardstock blue mat 3 1/2″x 3 1/2″ using Crafty Foam Tape 108′. 2. Using 3D Foam Squares White mix to adhere birds. Use 3D Foam Strips to add words. 3. Adhere memo fronts to white cardstock 3 3/4″ x 11 with the E-Z Runner Grand Refillable Dispenser and score above the blue mat line. This gives you three sections. Cut the top section at an angle creating a pocket for the memo pad. 4. Fold the angle cut up and adhere with Extreme Double-Sided Tape 1/4″ to secure the pocket.
Add stitching and bird to the inside of the pocket. I used stamps to achieve that look.
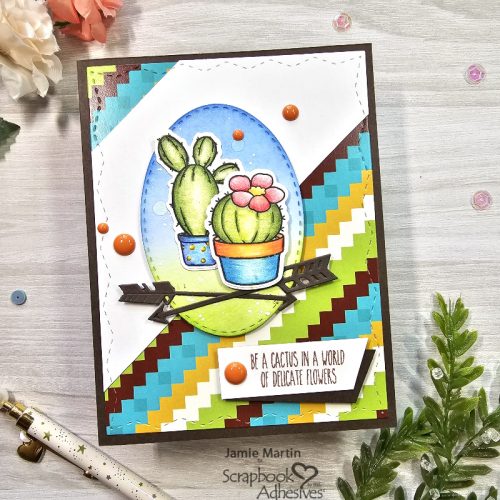
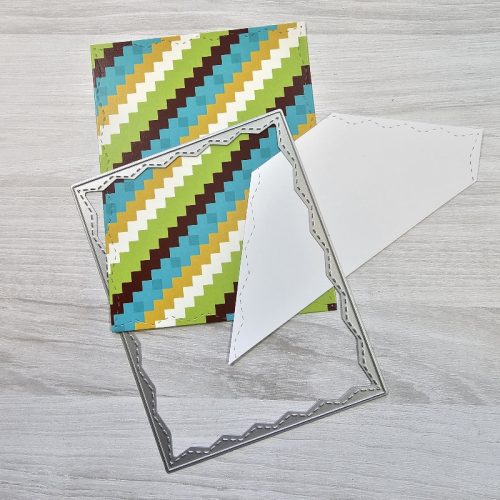
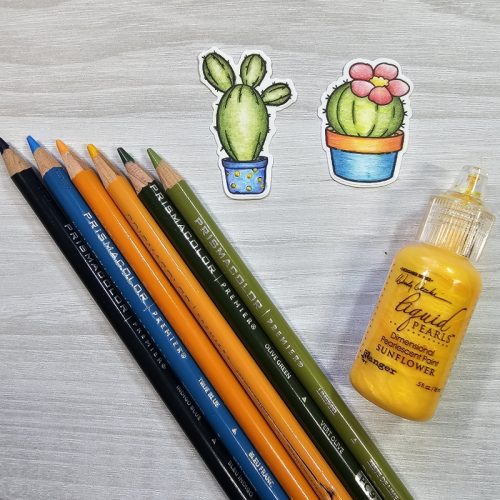
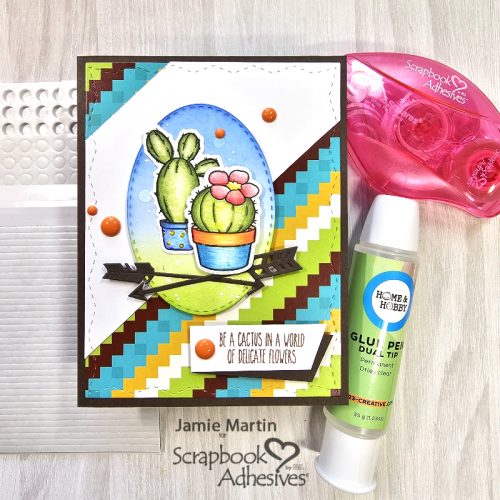
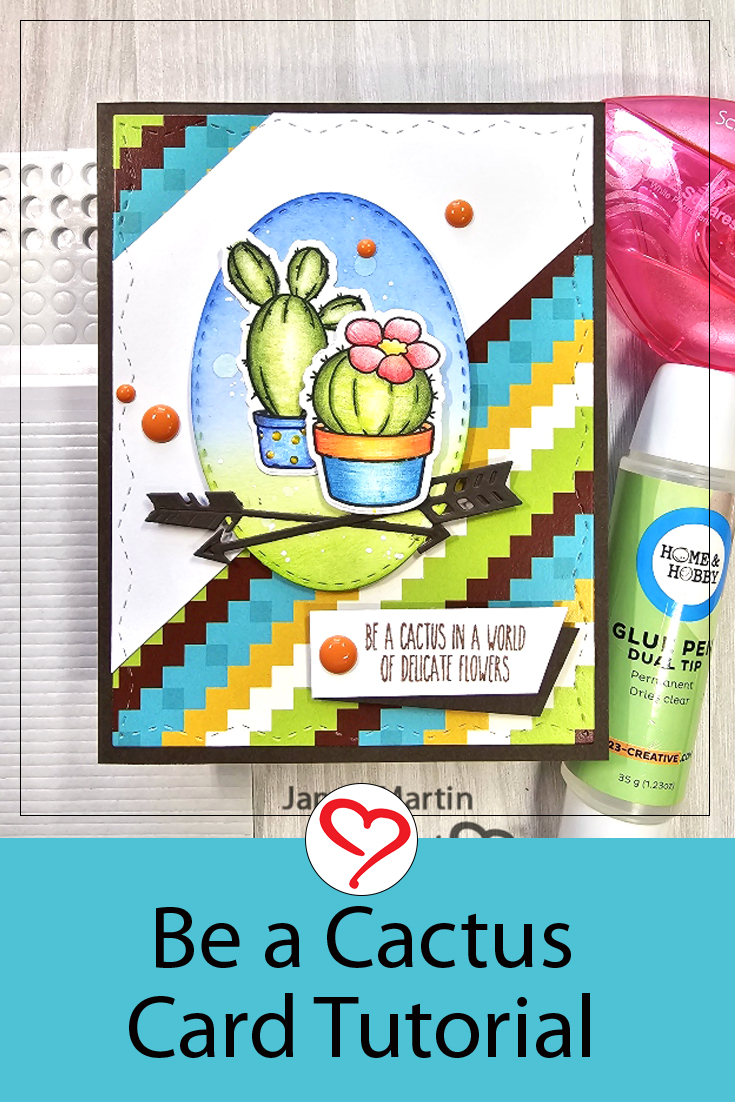
Hi, Jamie here today! I have a hip friendship, and encouragement Be a Cactus Card. Inspired by the southwestern vibe, this card was fun to make.
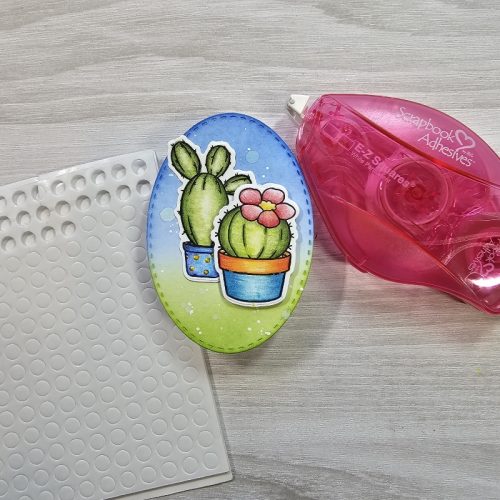
Cactus Card Background
Die-cut white cardstock and decorative paper using the largest rectangle die from the set. Using a paper trimmer, cut just a bit of the top left corner off and about half of the bottom right corner off. Using the E-Z Squares® Refillable Dispenser, adhere the cut white cardstock panel to the decorative paper panel and set it aside.
Making The Focal Elements
Stamp the cactus images on white cardstock, and colored pencil them before die-cutting. Apply Sunflower Liquid Pearls to the dots on the tall cactus vase. I squirted the Liquid Pearls on my glass mat and dipped a small stylus to dot them on the vase.
Die-cut white cardstock using the second to the smallest oval and apply green and blue inks using blender brushes.
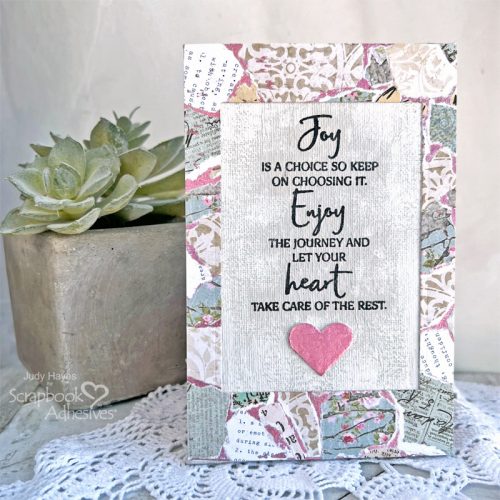
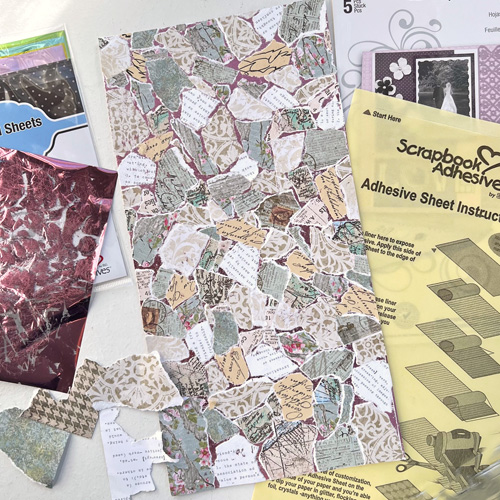
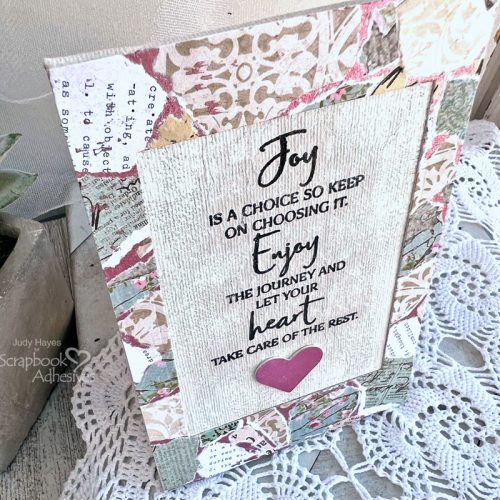
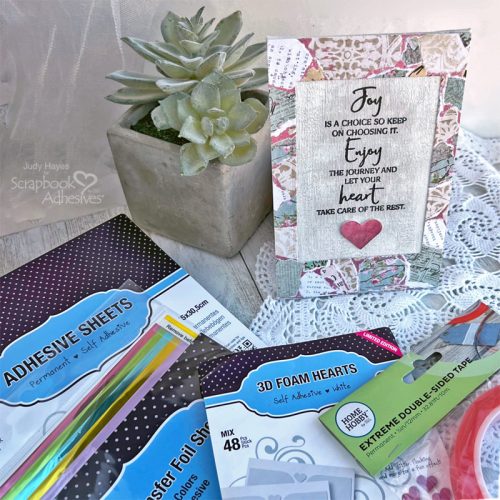
Hi, Judy here today! I put together a home decor piece, Joy Collage Frame Canvas, using a canvas board. It’s created with paper scraps, Adhesive Sheets 6 x 12 in., Metallic Transfer Foil Sheets Pastel Colors, a 3D Foam Heart, and a stamped verse. The collage technique is easy and can be adapted to other projects.
Make Collage Frame Sheet
Cut a piece of white cardstock 6 x 12 inches. This will make a collaged sheet large enough for several projects. Apply Adhesive Sheets 6 x 12 in. to cardstock and rub well to transfer adhesive. Partially peel back the liner at one end and place assorted torn pieces of patterned paper on the adhesive. Allow small space between papers. Continue to peel back the liner and fasten the paper over the entire cardstock. Cut any extending pieces even with the edge.
Place a piece of pink foil from the Metallic Transfer Foil Sheets Pastel Colors over the collaged paper (color side facing you). Press/rub firmly to transfer foil to spaces between papers. Lift the foil away and repeat until all spaces are covered with the foil.
Prep the Canvas
Stamp the verse with black ink on a piece of 3.5 x 5.5-inch white tissue paper slightly above the center (allow space for the heart). Next, cover it with clear embossing powder and heat emboss. Pencil mark the center at the top and bottom. Set aside.
Paint the canvas front and sides with Distress Pumice Stone Paint. Allow it to dry slightly. Apply a second coat. While wet, place the verse over it and press it into the paint with your fingers or a dry brush. Add more paint over the tissue as needed. When dried slightly, carefully rub any paint off the verse with a slightly damp paper towel. Dry brush with white gesso around the verse towards the edges of the canvas. Let dry completely.
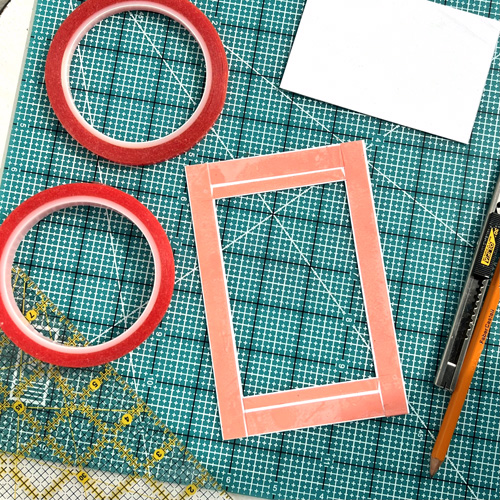
Cut Frame
Cut a piece of 4 x 6 inches from the collaged sheet. On the back side, pencil draw lines about 0.5 inches from each long side and 0.75 inches from top and bottom. The rectangle drawn will be about 3 x 4.5 inches, large enough for an opening to fit around the verse and heart. Cut out a rectangle with a craft knife or scissors to open the frame.
Designer’s Tip: I prefer to use a craft knife with a ruler to cut the opening so I can use the cut piece for another project.
Place medium size heart from 3D Foam Hearts below verse on canvas and press firmly in place. Remove the liner and cover with pink foil from Metallic Transfer Foil Pastel Colors, press firmly to transfer foil, and peel away.
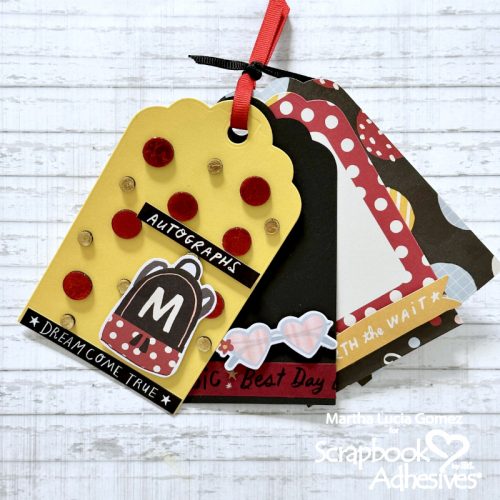
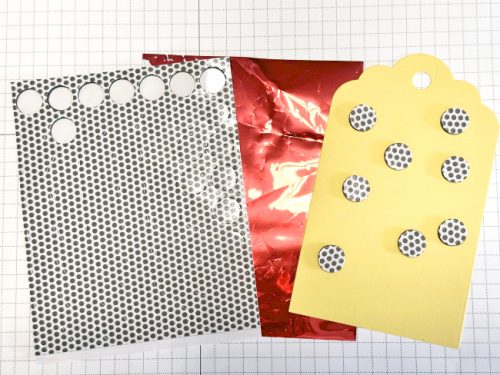
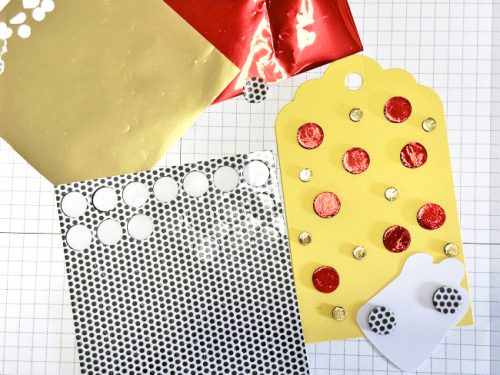
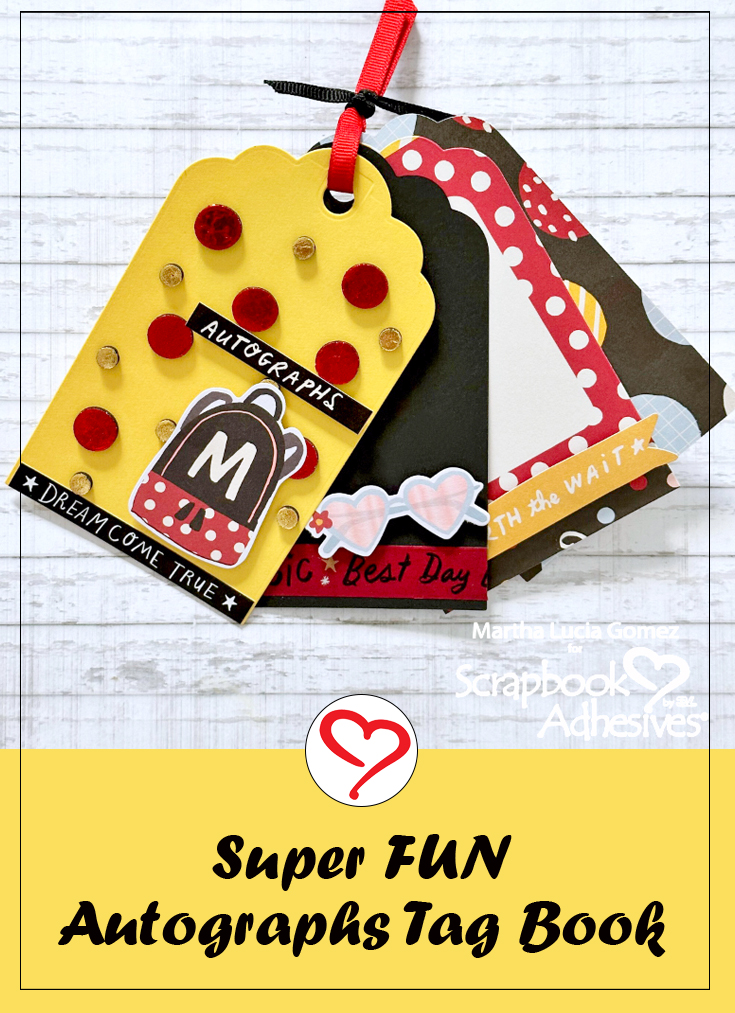
To make this fabulous autographs tag book, die-cut as many tags as you want as pages. Note that you can use different shapes and mix cardstock with heavy-weight patterned paper.
To decorate the cardstock pages, I use the Wear Your Adhesive on the Outside technique. Randomly place 3D Foam Circles Black Mix on the tags. Remove one top liner from a foam circle and place a piece of red foil from the Metallic Transfer Foil Sheets Variety. Make sure the color is facing you and rub to transfer the color to the circle. Repeat the foiling step for the rest of the circles.
Foiling Accent on Cover
For a fun accent, I placed a mix of regular and small sizes of the 3D Foam Circles Black Mix on the autographs tag book cover. With a combination of red and gold foil sheets from the Metallic Transfer Foil Sheets Variety, repeat the foiling steps mentioned above. Missed a spot? No problem, simply reapply the foil. Done!
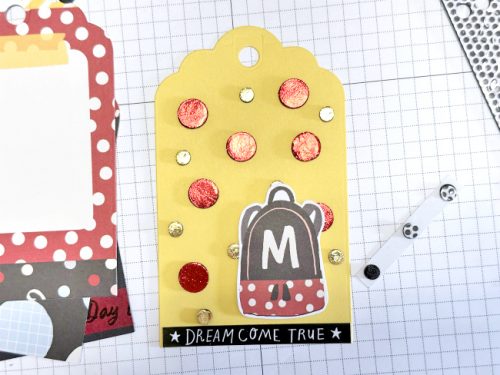
Autographs Tag Book Assembly
Let’s assemble and embellish the tag book. Use ephemera to personalize each page. All the small special details are adhered with 3D Foam Circles Black Mix for interest and dimension. Bind the tag book with a ribbon.
Thank you so much for stopping by and checking out my Autographs Tag Book. See you soon with more inspiration! Martha Lucia Gomez
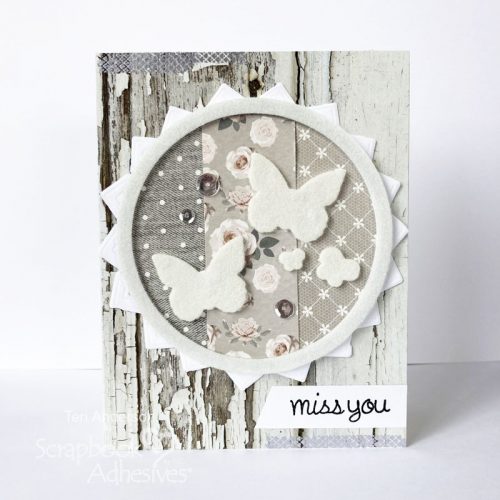
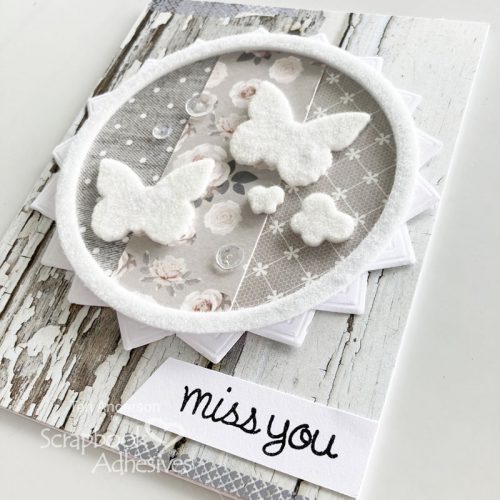
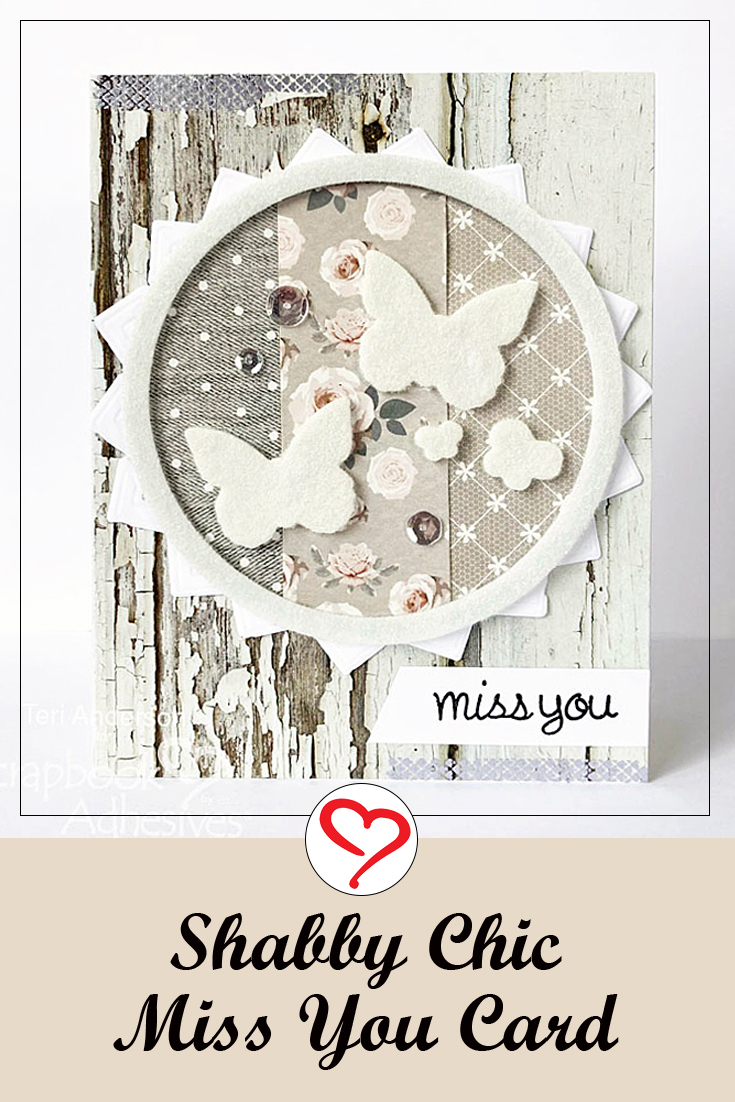
Hi, everyone! Teri here to show you how to make a Shabby Chic Miss You Card. What a sweet way to let a favorite person know you miss them! Let’s get started.
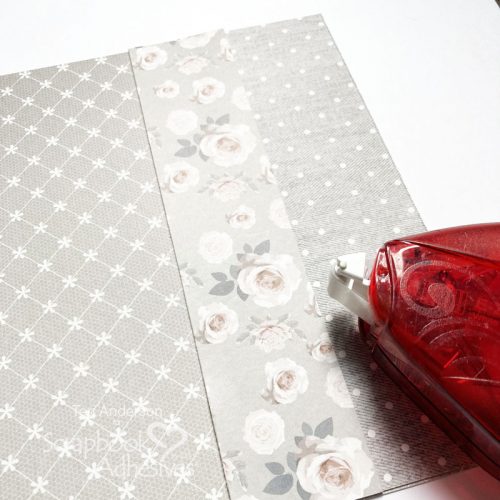
Shabby Chic Miss You Circle Frame Focal
Start by adhering a few strips of patterned paper on a larger piece of patterned paper. Since I wanted a shabby look so I kept a soft color palette and used papers with a rustic theme.
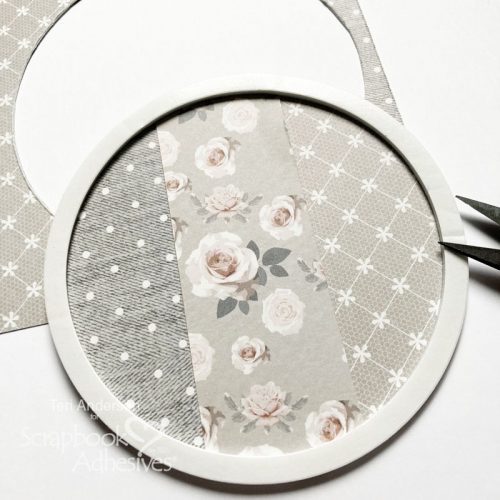
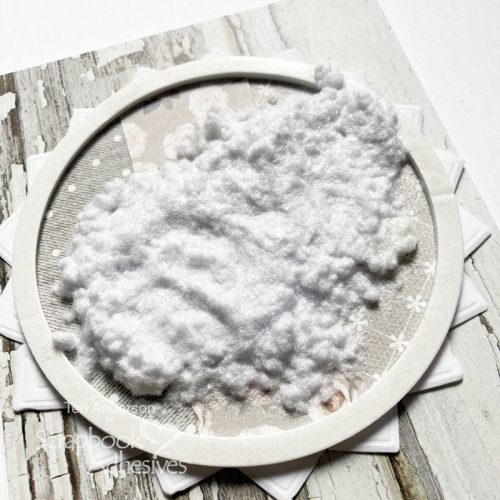
Set a large 3D Foam Circle Frame onto your paper panel. Use your scissors to cut around the circle.
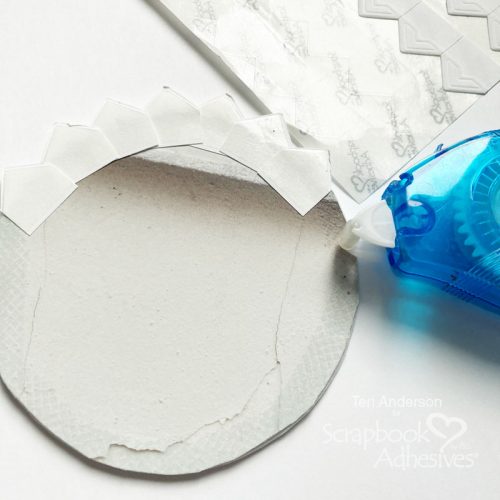
Flip the circle over. Apply adhesive along the edges and add some photo corners around it. Just let the tip of the corners be seen it gives the circle pointed edges.
Decorate the Card
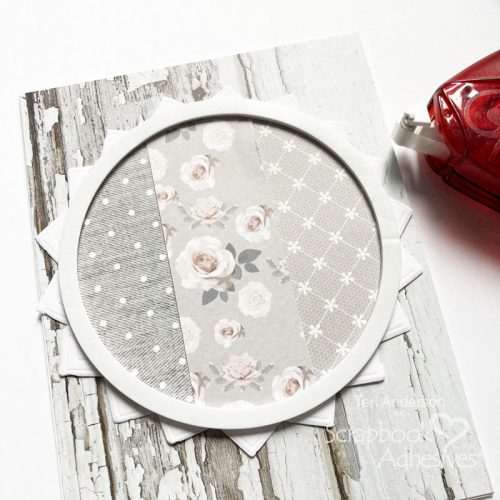
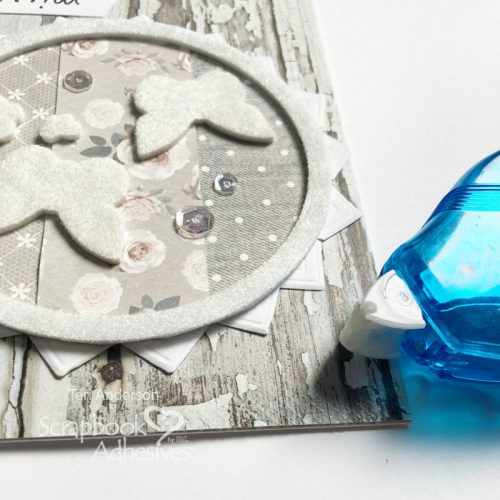
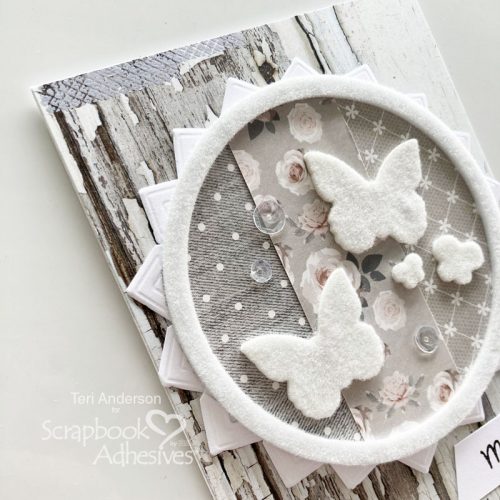
Adhere the circle onto a card covered with a wood-themed patterned paper. Add some 3D Foam Butterflies to the middle of the circle. Apply flock to the butterflies and the circle. I find it’s easier when covering a large number of foam shapes with flock (or glitter) to work in one section at a time. For this card, I started by adding the flock to the butterflies. Then I put the flock onto the circle.
Add a few sequins to the card. Stamp a sentiment on a strip of cardstock and place it below the circle.
Give the card a little glitz by adding some Dots onto the edges and applying foil on top. Keeping with the soft color scheme of the card, I used silver Metallic Transfer Foil. You could create a more dramatic look by using a bolder color, like gold or copper!
I hope you are inspired to create a card by today’s post! Consider making a shabby chic-inspired card or try one of the techniques I’ve shared!
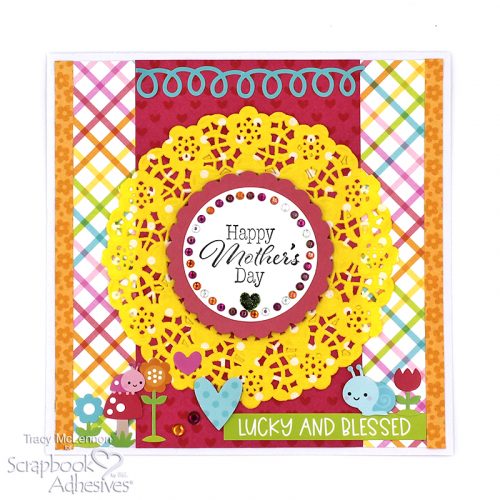
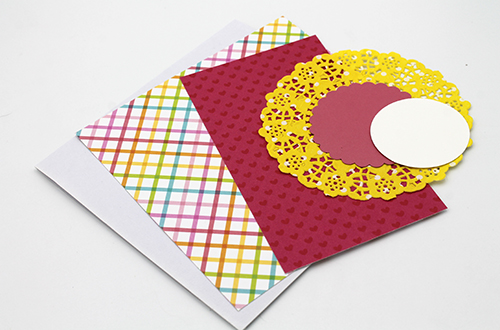
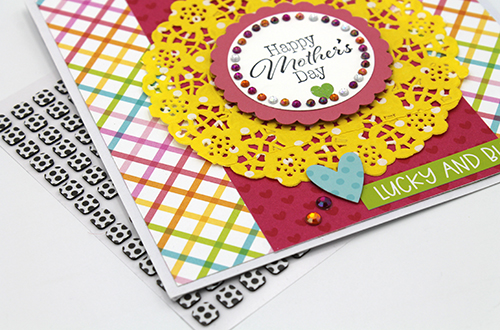
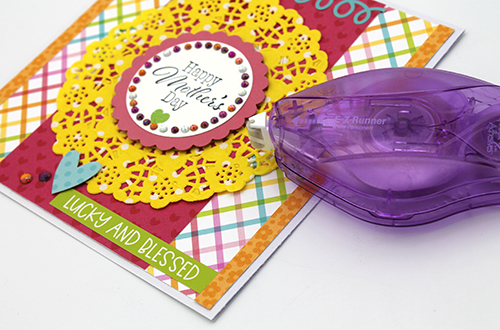
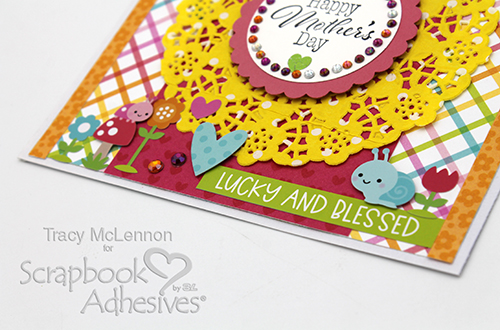
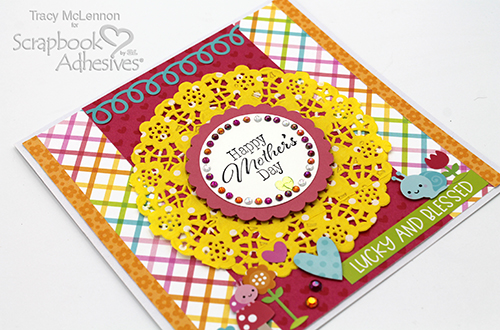
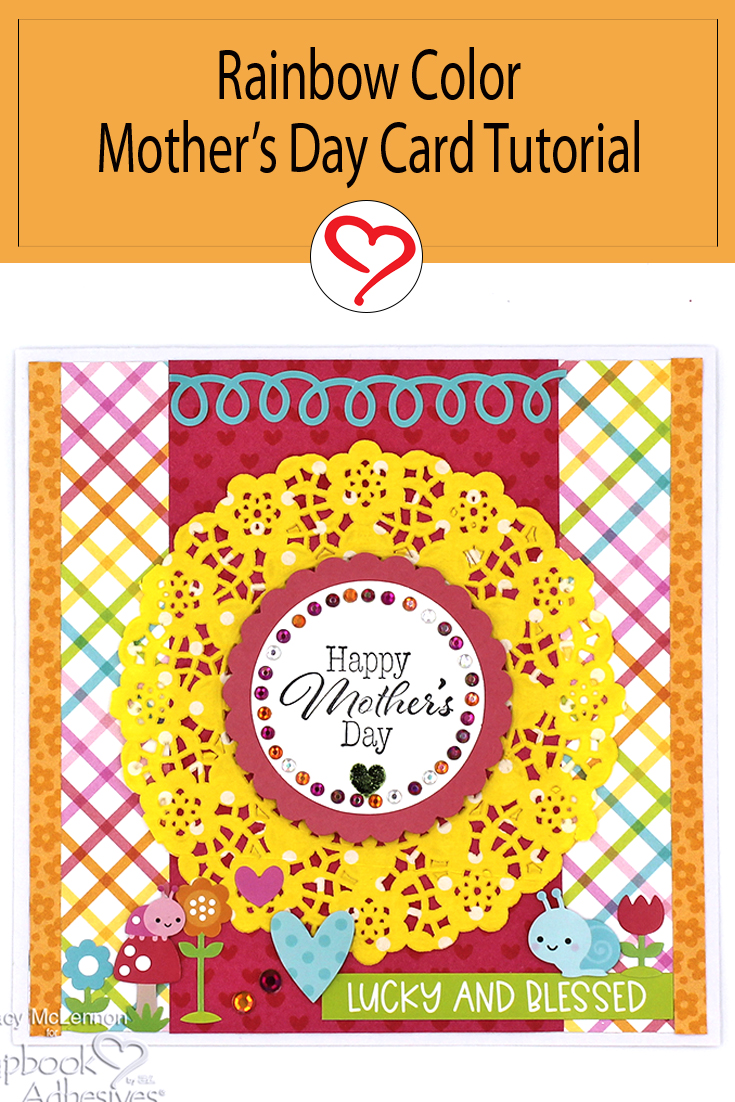
Hello crafty friends! Tracy here, and today I am sharing this fun Rainbow Color Mother’s Day Card. Follow along with a few easy steps to see how I created this cheerful card.
The Rainbow Color Mother’s Day Card Foundation
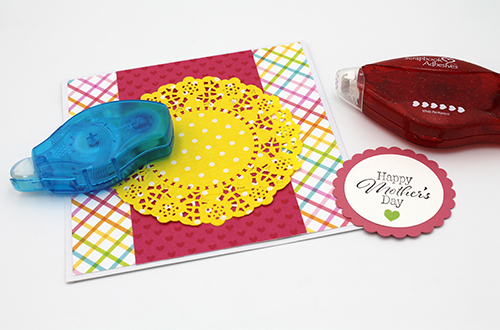
The first step in creating this Mother’s Day Card is to cut a 6 x 6-inch white cardstock card base. Next, trim a piece of rainbow plaid paper to 5.75 x 5.75 inches, and a strip of the heart patterned paper to anchor the middle. I loved the pretty Doodlebug doily so I’ll use the yellow one. Lastly, punch a scalloped red cardstock circle and a white cardstock circle for the sentiment.
For a little extra sparkle, I added gems around the sentiment. Begin adding embellishments around the card, popping up a few using Thin 3D Foam Squares Black Mix.
As I created I decided to add 2 narrow strips of the orange patterned paper up the sides of the card front using the E-Z Runner® Micro Refillable Dispenser. Then I added more sticker embellishments along the bottom border of the card. These are the final touches to this Rainbow Color Mother’s Day Card.
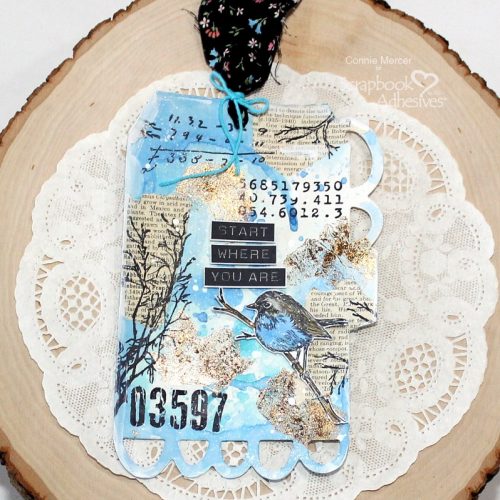
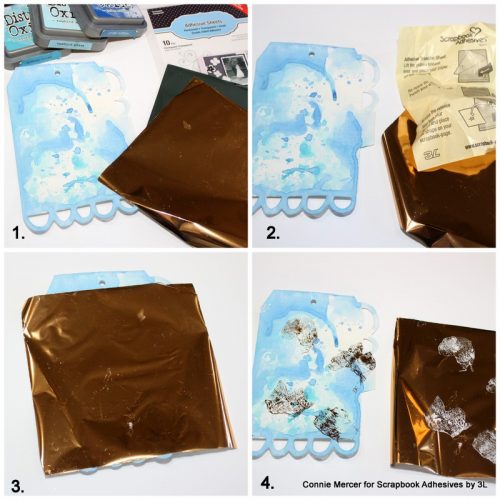
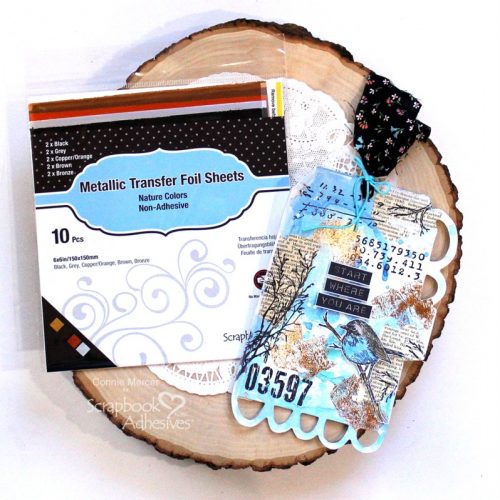
1. Distress tag using Distress Oxide ink. Designer’s Tip: Water it down and run the tag through the ink mixture. 2. Crumble up the Adhesive Sheets 4×6 into a ball and add in random spots on the tag. 3. Lay the Metallic Transfer Foil Sheets over the sticky spots (color side facing UP) and pull them up. 4. Repeat the process until you achieve a distressed look. The tag is ready to be stamped and stencils added.
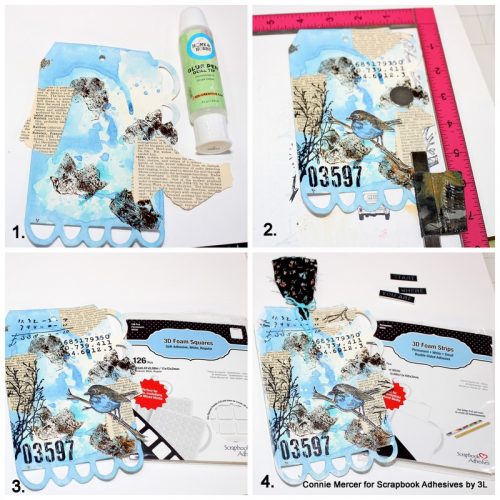
Build Layers
1. Add ephemera using the Dual Tip Glue Pen. Works so great!! 2. Add stamps and stencils using a stamping platform. Re-stamp if needed. 3. Stamp the bird and cut it out. Adhere to tag front using 3D Foam Squares White Mix. 4. Stamp the sentiment and cut it out. Add to tag front with 3D Foam Strips.
Speckle with white acrylic paint and add a material strip to complete the Start Where You Are Tag.
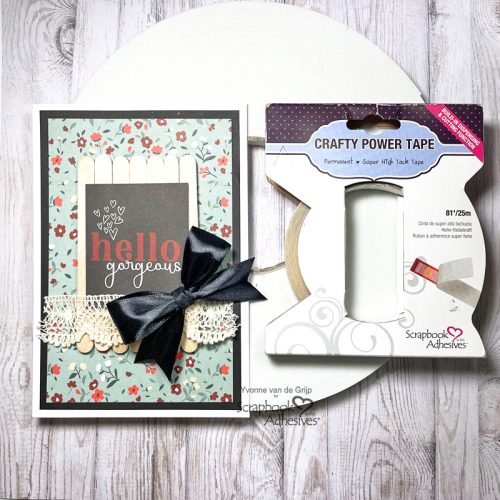
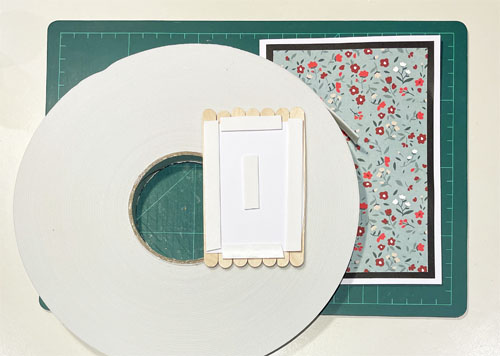
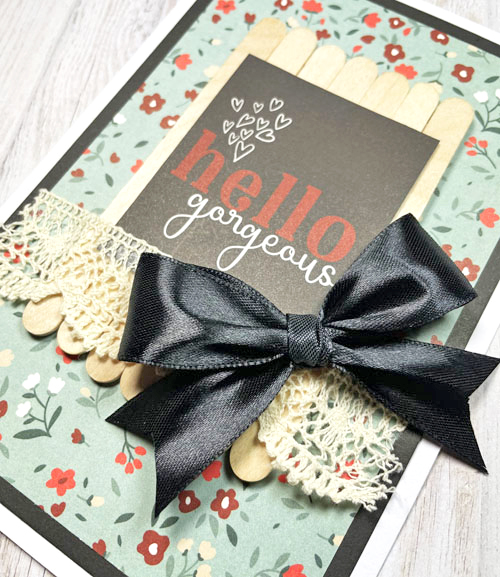
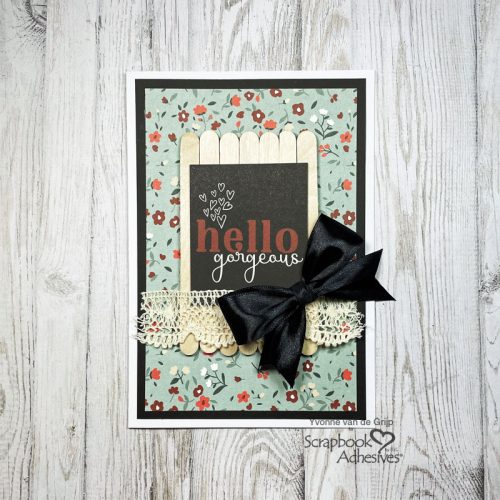
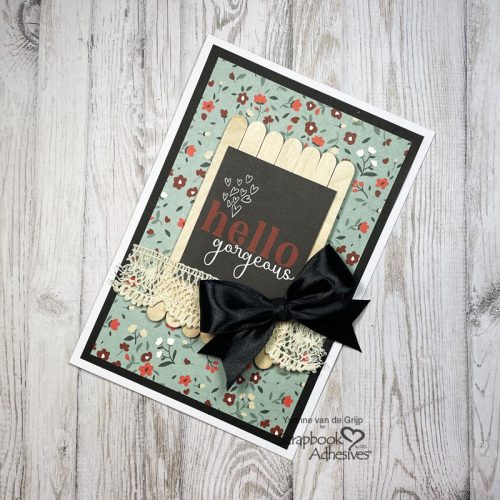
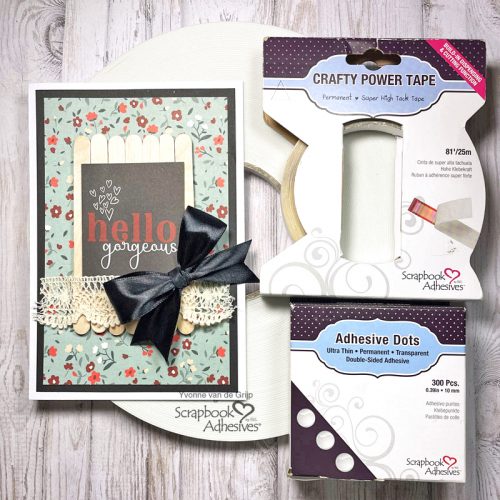
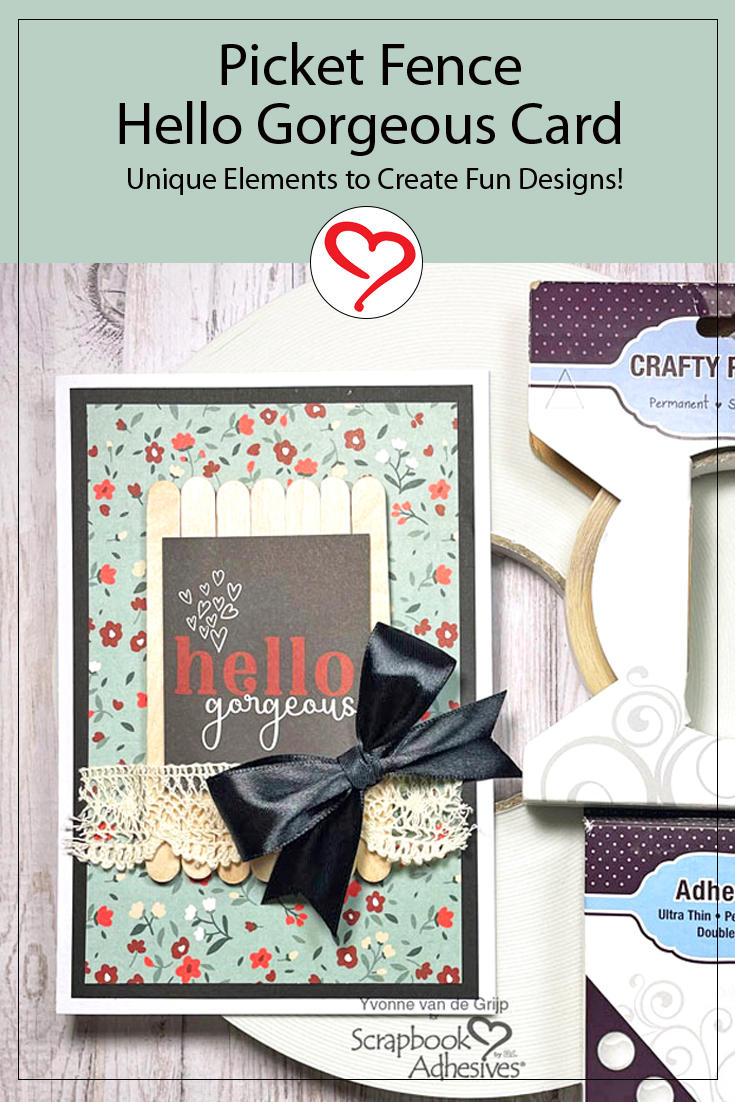
Hi everyone, Yvonne here with a quick and easy-to-make card. I added a fun element to this Picket Fence Hello Gorgeous Card. Do you see what it is? It will certainly bring brighten someone’s day! Let me show you how to create this Picket Fence Card Let’s get started!
Create a Layered Card Base
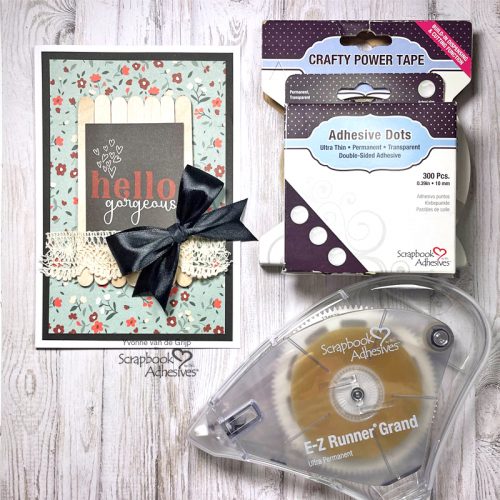
Before starting on the picket fence element, let’s get the foundation together. Layer a piece of patterned paper and a black card panel together before adhering them to a white card base. with the E-Z Runner® Grand Ultra Strong Refillable Dispenser.
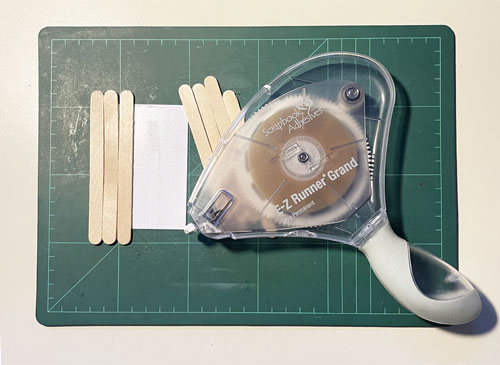
Making the Picket Fence
Start by adhering the wooden craft sticks (aka popsicle sticks) onto a piece of scrap white cardstock.
Start by adhering Crafty Foam Tape 108ft to the back of the Picket Fence element to the layered card base. Remove the liner and adhere the wooden fence to the card base.