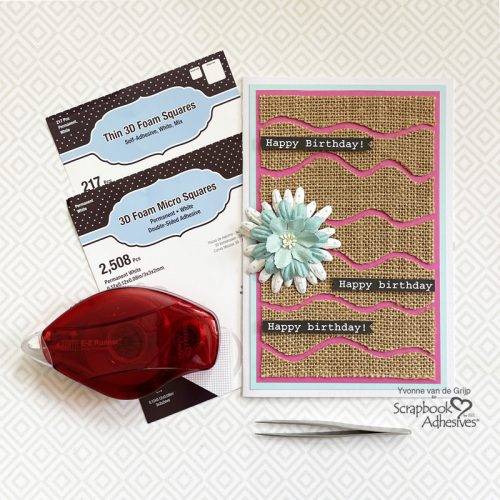
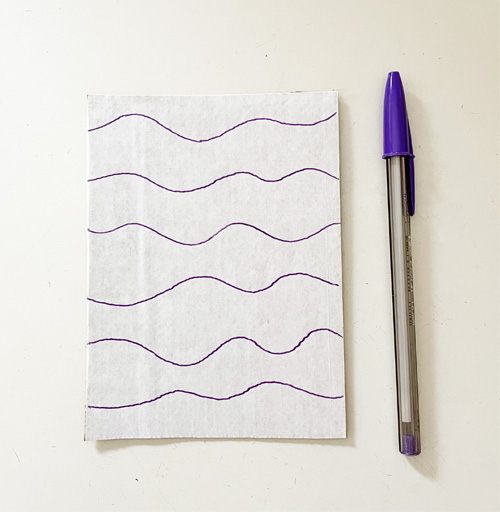
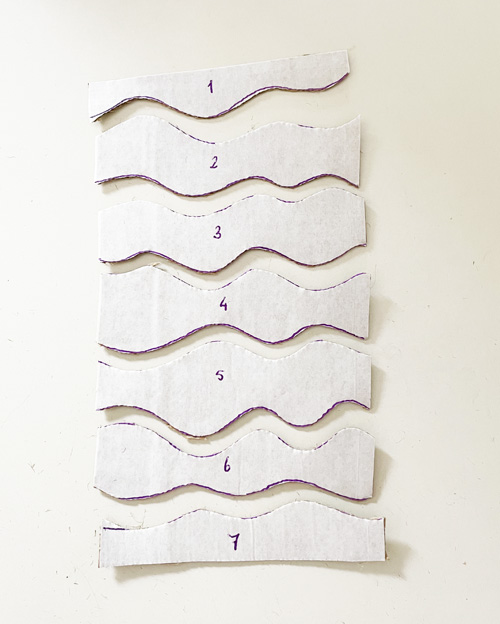
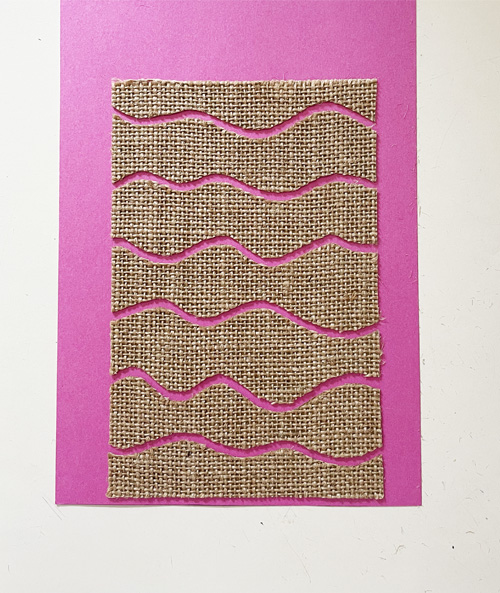
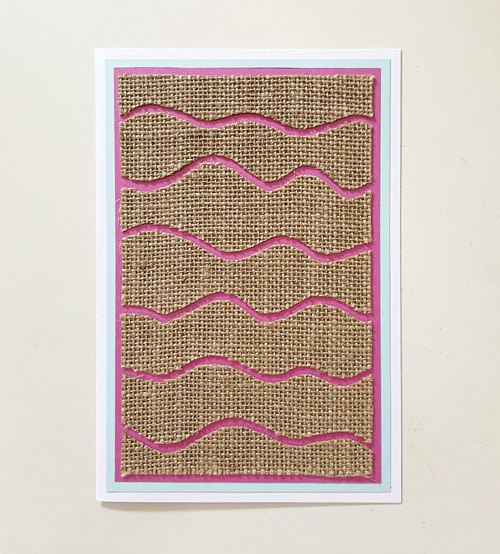
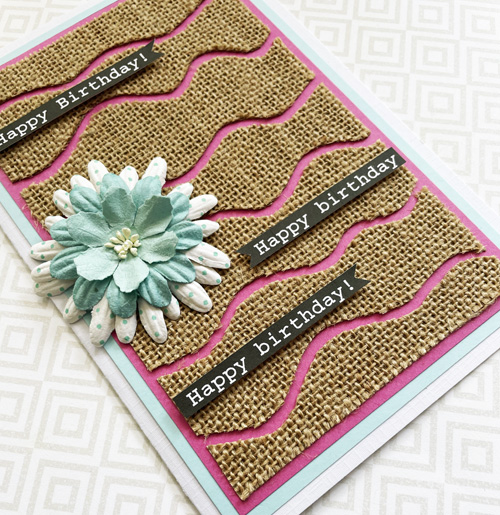
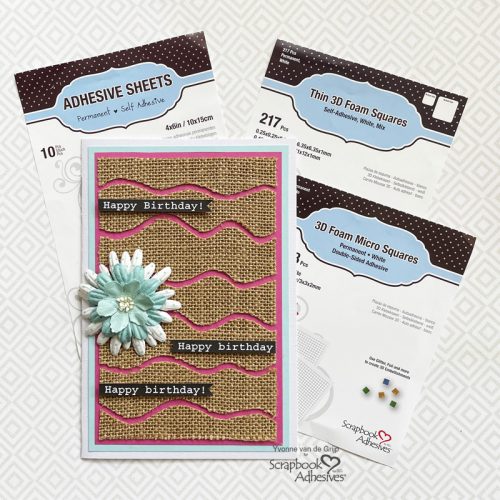
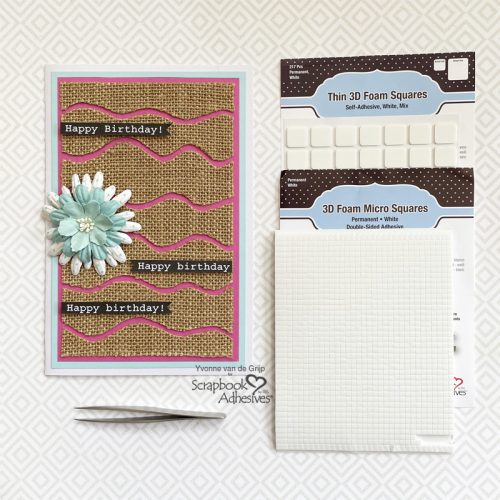
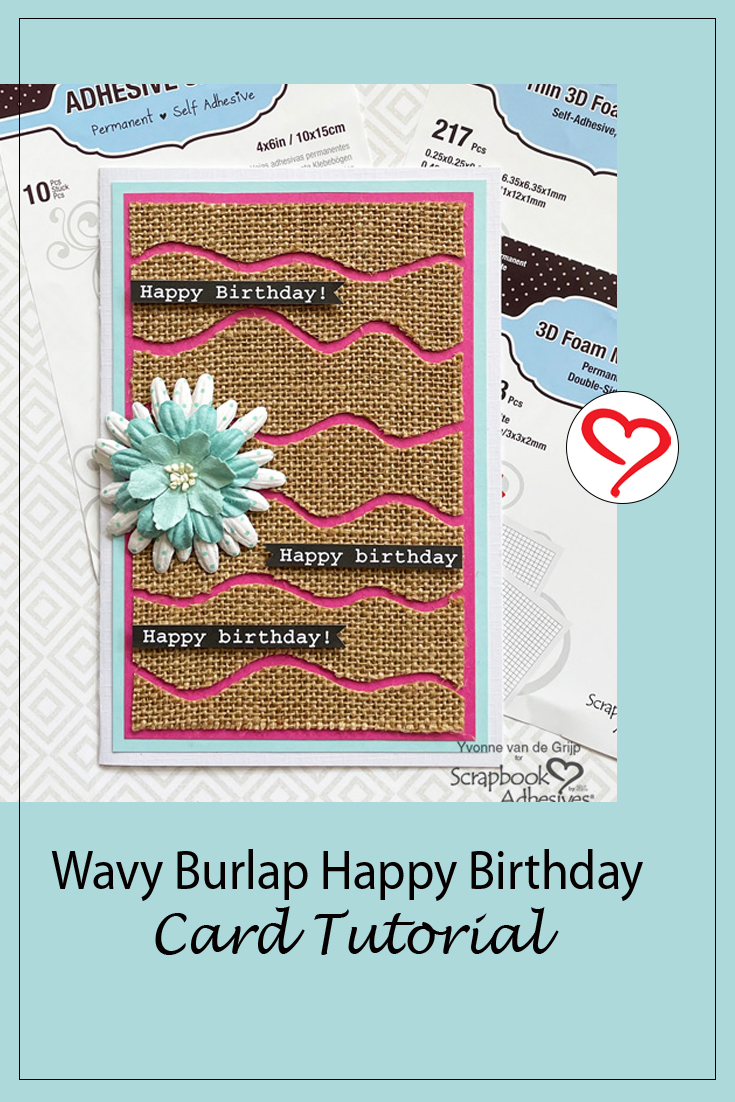
Hi everyone, Yvonne here with a fun Wavy Burlap Birthday Card. Adhesive sheets are a great way to turn your burlap cardstock into stickers.
And with the help of the brand new 3D Foam Squares Micro White adhere any small item to your card without the need for scissors. And the card is very easy to make so also suitable for beginner cardmakers! Let me show you how I made my card.
To embellish the burlap birthday card I used some printed sentiments. For adhering I used the brandnew 3D Foam Squares Micro White. These tiny pieces 3D Foam are perfect for invisible detailed adhering without needing any scissors..isn’t that easy!
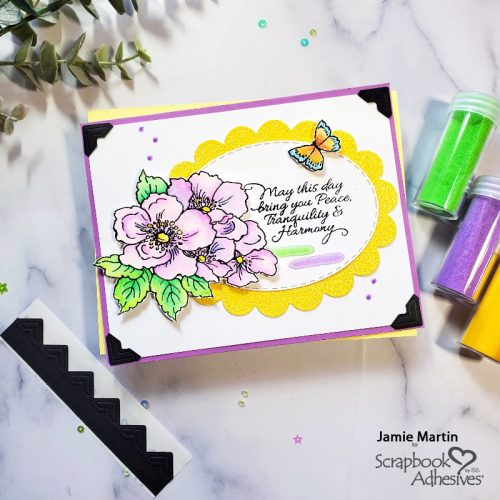
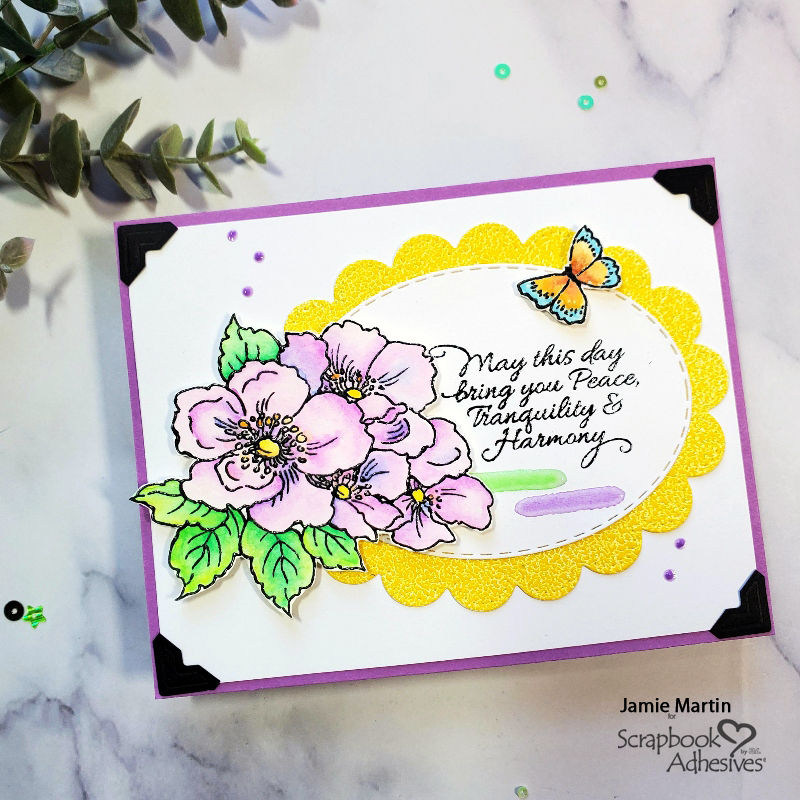
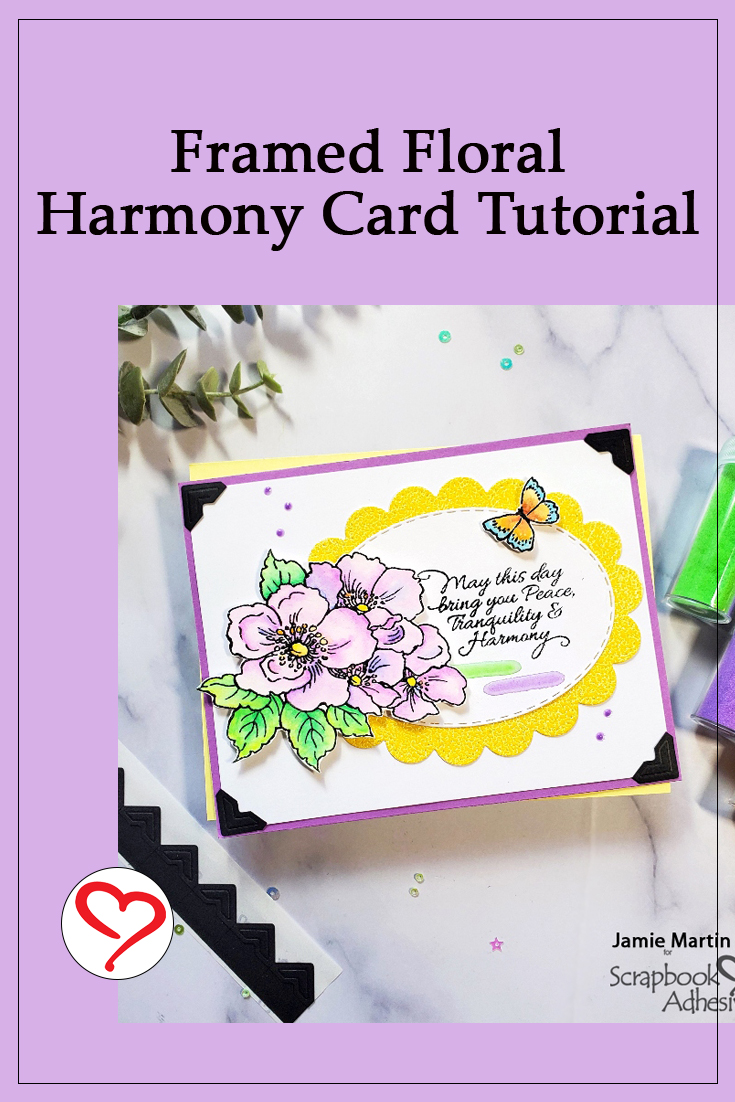
Hello, friends! Jamie here and today, I have a Framed Floral Harmony Card. Making your cards a little extra special is easy with Creative Photo Corners, Adhesive Lines, and Adhesives Sheets 4 x 6in. I used these items to add interest and color to my card that can be used for most occasions with the sweet sentiment.
Framed Floral Piece
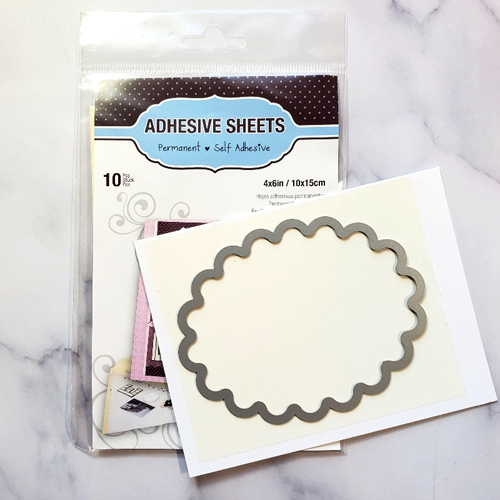
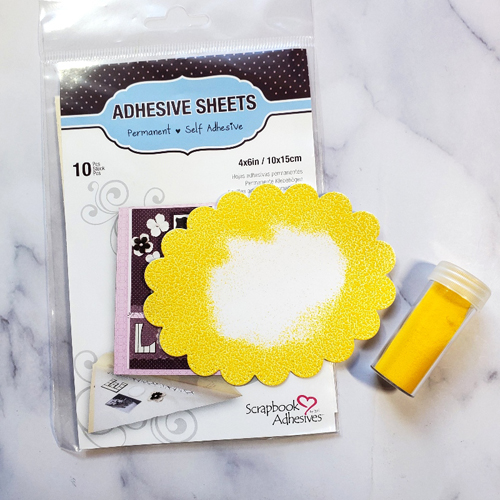
Trim an Adhesives Sheets 4 x 6in. slightly larger than the Nested Oval Scallop Die, remove the liner and place it on white cardstock. Then die-cut the piece with the die.
Wear Your Adhesive on the Outside
This fun concept makes the adhesive an embellishment piece with embossing powder! Simply remove the liner from the other side of the oval scallop shape to expose the adhesive and sprinkle the edges with yellow embossing powder. Then melt the powder with a heating tool. Set aside.
Framed Floral Sentiment
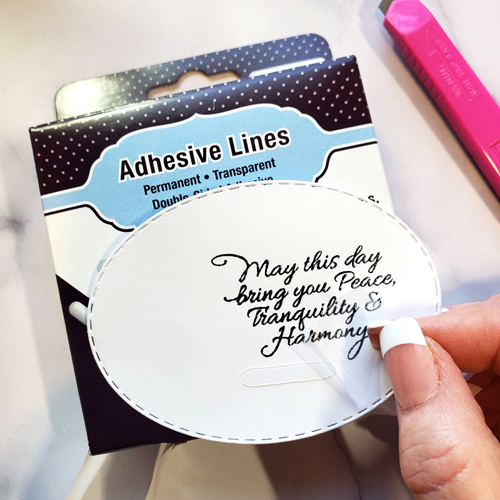
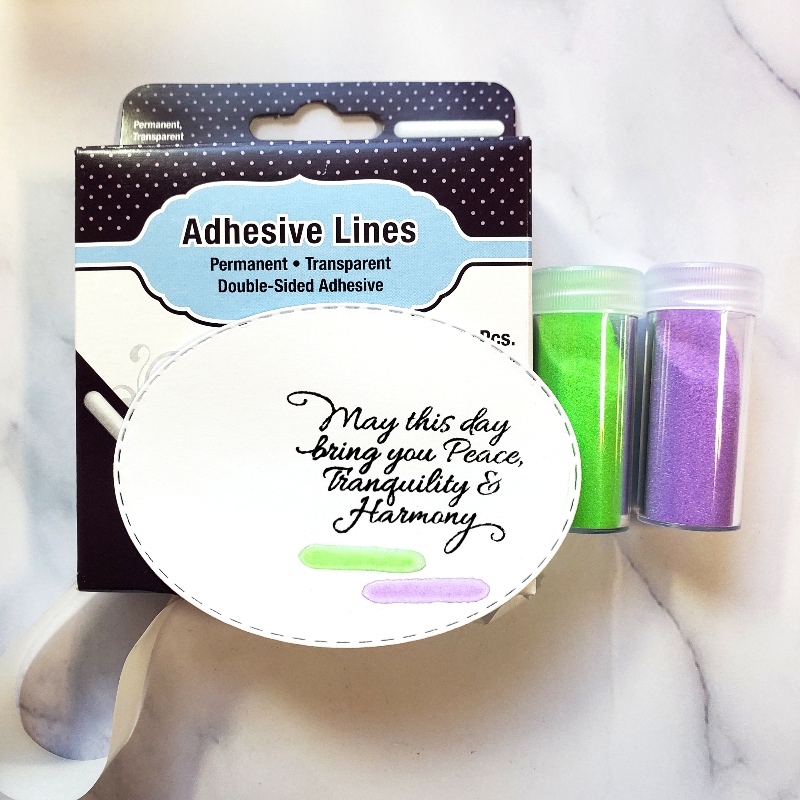
Die-cut white cardstock using a Nested Oval Stitch Die. Then stamp with the sentiment with black ink and emboss with clear embossing powder.
Adding Colors
Another Wear Your Adhesive on the Outside concept is using Adhesive Lines and embossing powder! Place one Adhesive Line below the sentiment and emboss with green embossing powder. Next, place a second Adhesive Line below the first and emboss it with purple embossing powder. I love that they are heat resistant and hold their shape!
Framed Floral Card Front
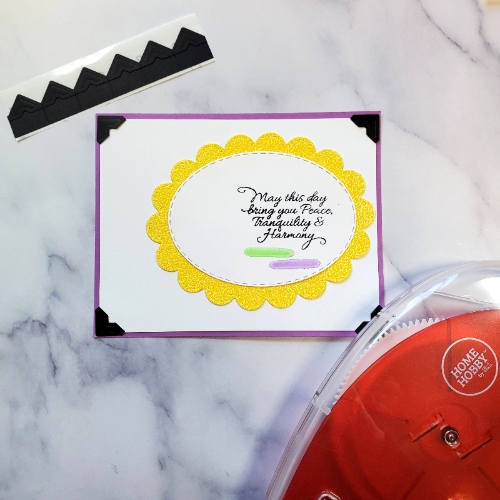
Place the oval sentiment in the center of the scallop oval which has exposed adhesive from the Adhesive Sheet. Using the EZ Runner Grand Refillable Dispenser, adhere it to a white cardstock panel. Next, add Creative Photo Corners in Black to each corner and attach the piece to a purple card base.
Other Embellishments
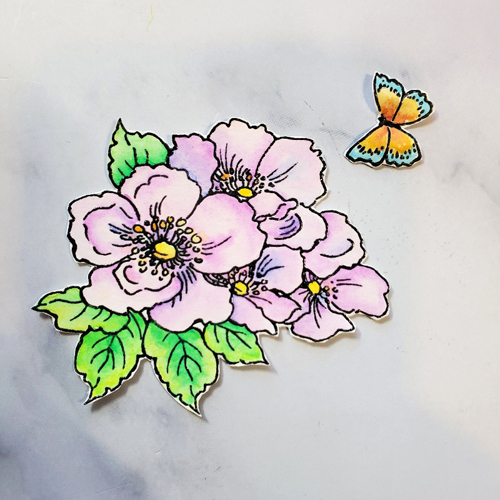
Stamp the flowers and the butterfly on watercolor paper with black ink, emboss with clear embossing powder, and watercolor. Once the images have dried, cut them out.
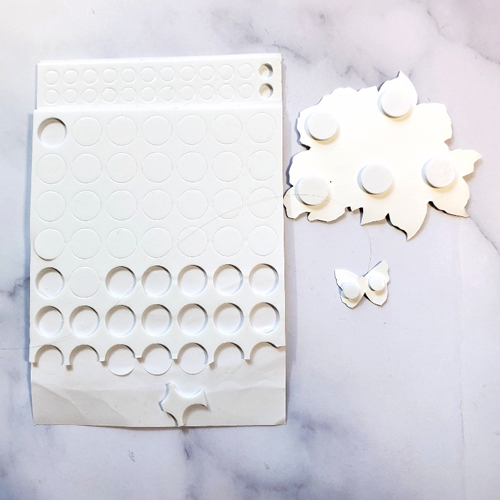
Place 3D Foam Circles in White on the back of the flowers and butterfly. Pop them up as shown in the photo below. Randomly add Violet Liquid Pearl above the flowers and below the scallop.
I hope you enjoyed my Framed Floral Harmony Card. Make one and comfort someone who needs it!
Other Stamps and Embossing Powder: Stampendous (Tranquil Rose Perfectly Clear Stamp Set, and Floral Garden Embossing Powder Kit); Craft Dies: Rubbernecker (Nested Oval Scallop with Pierce); Ink: Tsukineko (VersaFine Ink in Onyx Black); Liquid Enamel: Ranger Ink (Liquid Pearls in Violet); PrintWorks Specialty Paper White and Purple Cardstock
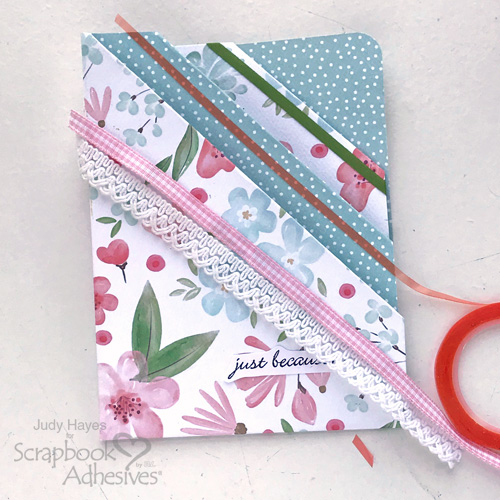
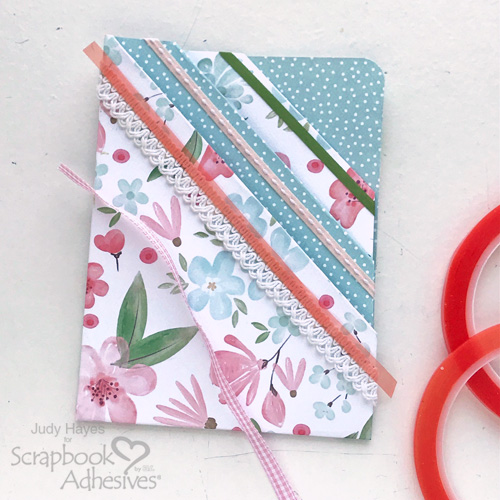
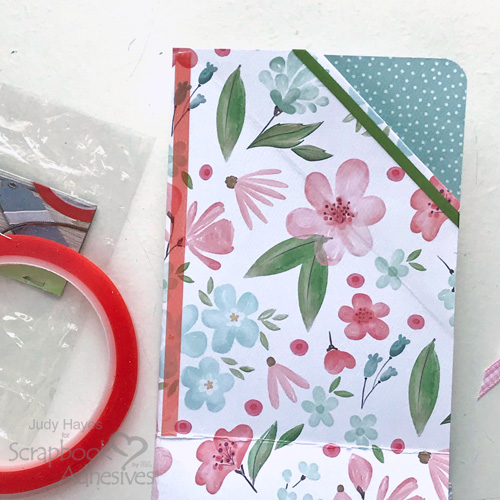
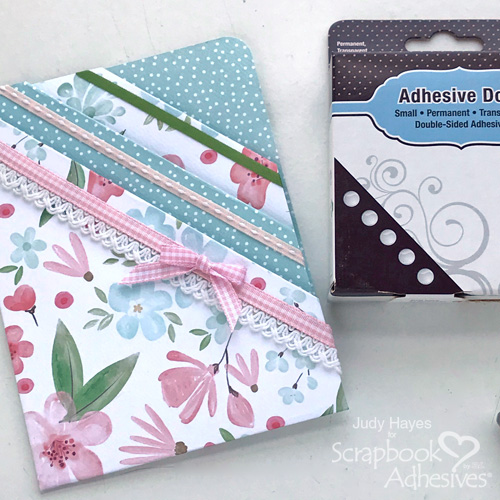
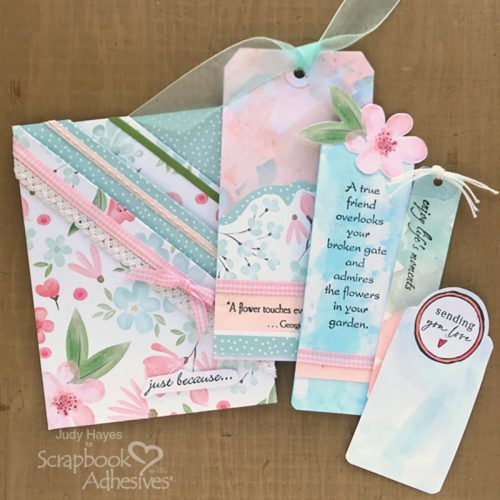
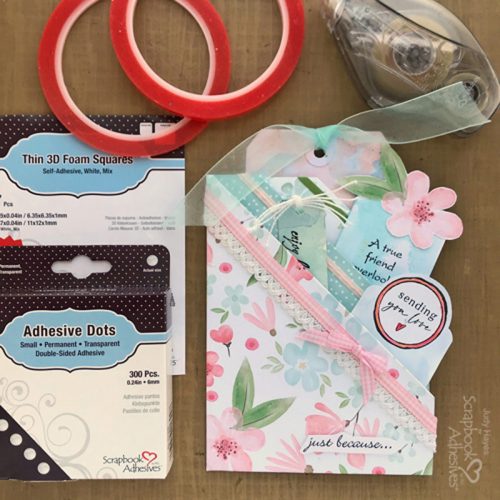
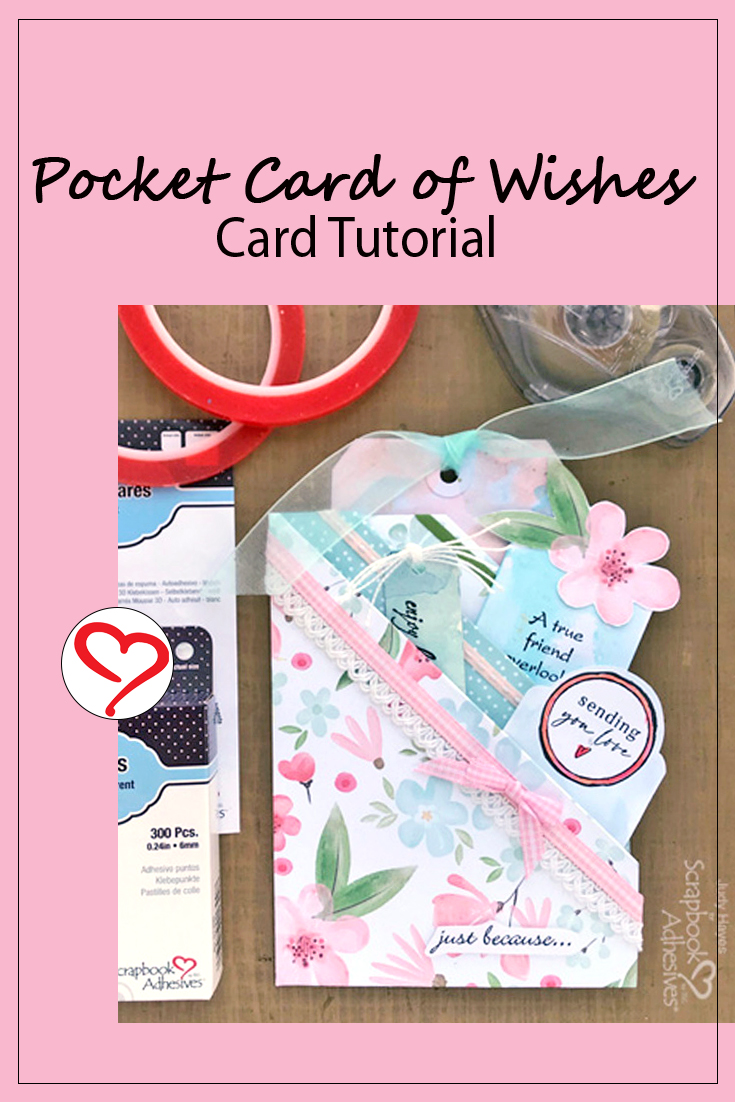
Hello crafty friends! Today, I’m sharing a pretty Pocket of Wishes Card! Credit goes to Kat Kirby, a mixed media artist, for the pocket directions to which I added my own twist on it. I used many pieces from my scrap papers including stamped pieces, the bookmark, watercolor swatch strip, and verse for the pocket front. The inserts are a good project for using bits and pieces.
Make Pocket Card Base
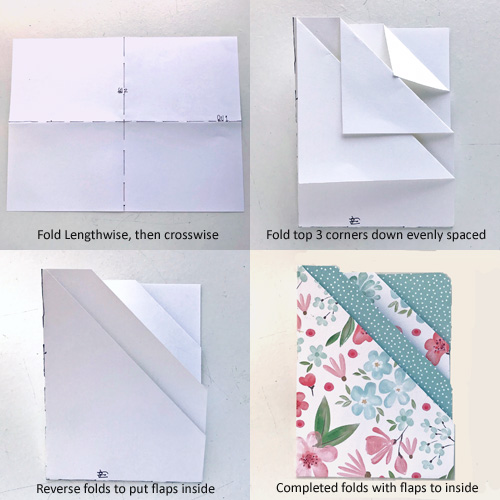
The pocket is created from one sheet of patterned paper cut to 9 x 12 inches.
To make a pocket card base, first, fold the paper lengthwise. Then fold it crosswise so it is 4.5 x 6 inches. Use a bone folder to crease folds well.
The next step is to make the pockets. The first pocket is made by folding the top right corner at an angle so the edge aligns with the side fold. Crease well. Continue to make folds on the next two corners with approximate even spacing across the top, and crease well.
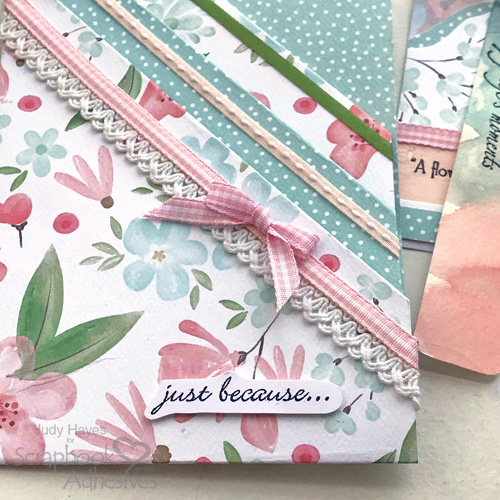
Choose ribbons and lace to decorated the pocket card. Apply Extreme Double-Sided Tape 1/8in along the edge of upper pocket. Remove the liner and place ribbon on adhesive. Press in place. Wrap ends to inside and fasten with Extreme Double-Sided Tape 1/8in.
Repeat to fasten the narrow ribbon along the edge of the second pocket. Apply Extreme Double-Sided Tape 1/4in along the front pocket edge for the lace. Remove the liner and secure the lace to it. Wrap ends around edges and attach.
Add a piece of Extreme Double-Sided Tape 1/4in over lace. Press firmly in place. Remove liner and place ribbon over lace. Wrap ends to inside and fasten.
Finishing the Pocket Card
Next to close the pocket side edge, apply Extreme Double-Sided Tape 1/4in inside the folded pocket along the left edge. This will close the edge between the second and third pockets. Remove liner and refold pocket card. Press firmly with bone folder to secure it.
Make a small ribbon bow. Attach it over ribbon on front pocket using Adhesive Dots Small. Stamp verse “just because” on white cardstock and trim around it.
Fasten Thin 3D Foam Squares White Mix to back of verse. Cut the large squares in half or use small ones. Fasten verse to front of pocket card.
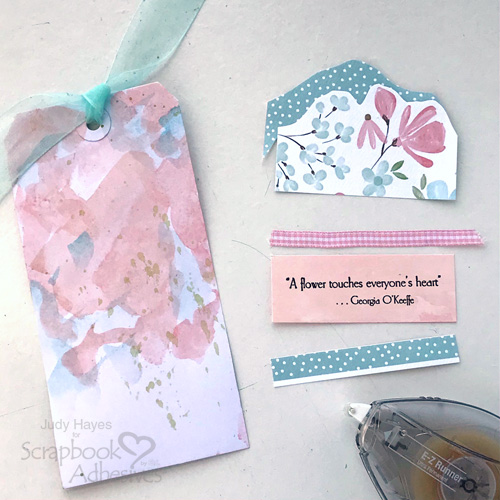
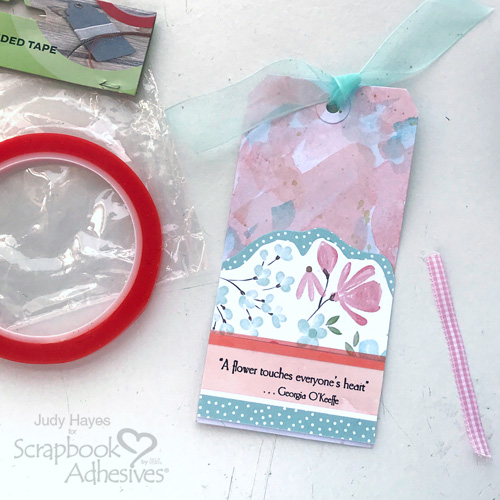
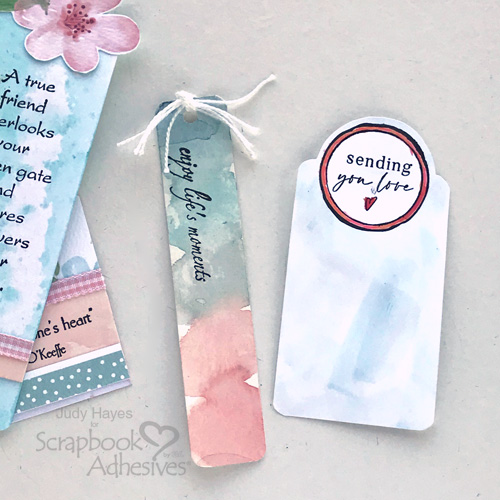
Decorate a Tag
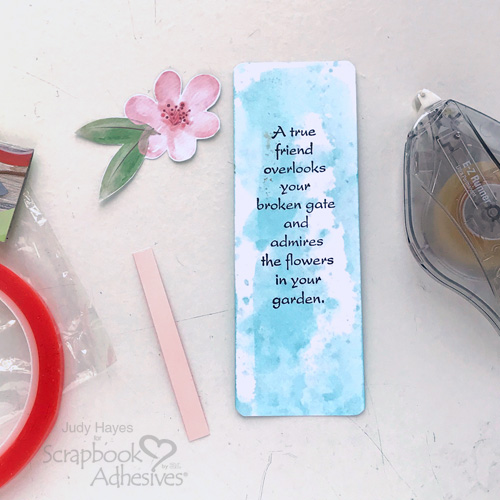
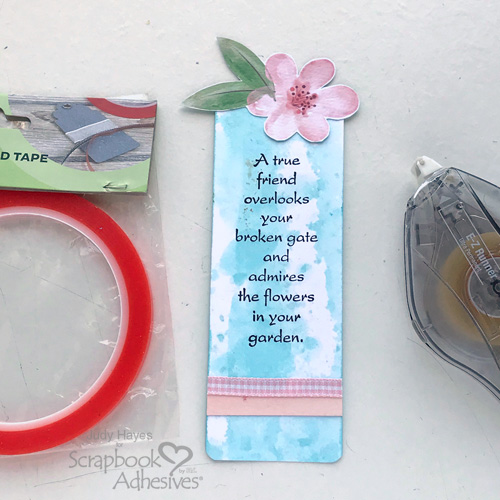
Watercolor #8 white tag for background color. After it dries, tie a sheer ribbon to it. Cut a piece of patterned paper to fit across bottom of tag and a contrasting border piece. With a scrap of watercolor paper, paint with watercolors and allow it to dry. Stamp a verse. Next, cut a narrow strip of contrast dot paper.
Cut a strip of watercolor paper 2 x 5.5-inches. Use a corner rounder to round all corners. Apply a wash of watercolor to the front and back. Allow to dry or dry with a heat tool. Stamp a verse with black ink,
Fussy cut a flower from a patterned paper and adhere at top of bookmark using E-Z Runner® Ultra Strong Refillable Dispenser. Cut a narrow strip of peach paper (I used the same paper as on the tag) and a piece of ribbon.
Stamp circle verse at top of a piece of 2 x 4-inch white cardstock and cut a curve following the top half of the circle verse. Add color to the verse with watercolors or markers and then add a wash of watercolor around the verse.
Watercolor a 1 x 5-inch swatch strip and round the corners. Stamp verse with black ink. Punch a hole and tie it with pearl cotton.
All that’s left is to tuck the tag, bookmark, and other inserts in the pocket card and it’s ready to give to someone special! I hope you enjoyed the Pocket Card of Wishes project and that you give it a try.
Other Carta Bella Paper Company “Flower Garden”; Dare 2B Artsy “Thinking of You” Stamp Set; Hampton Art SC1000 Stamp Set; Ranger Dina Wakley Media White Tags #8; Prima The Classics Watercolors; Tsukineko Versafine Onyx Black Ink; Verse Stamps: Watercolor Paper; Ribbon, Pearl Cotton. Lace
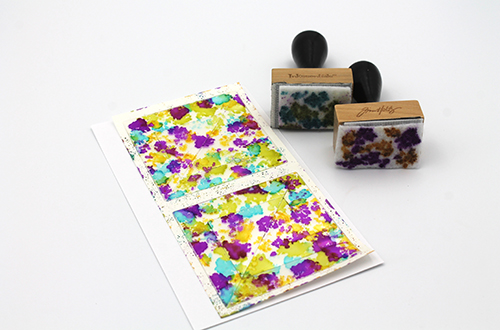
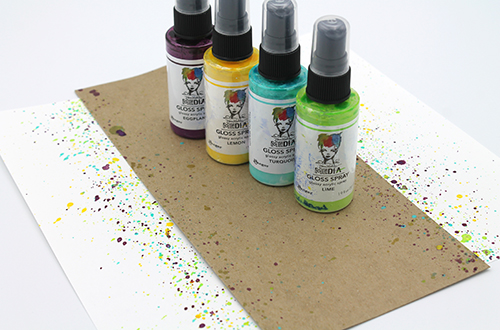
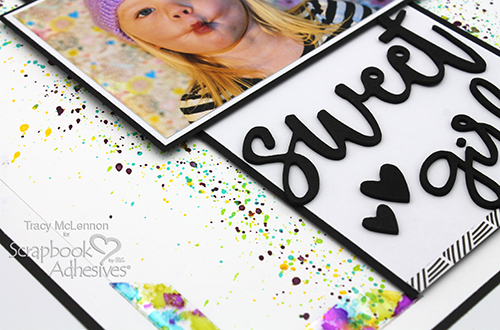
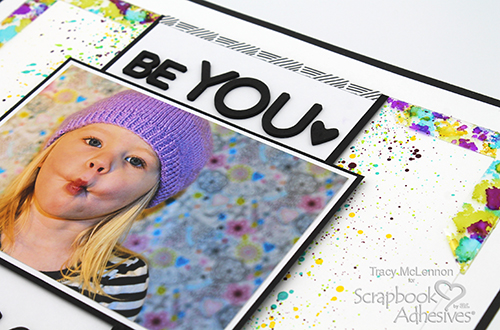
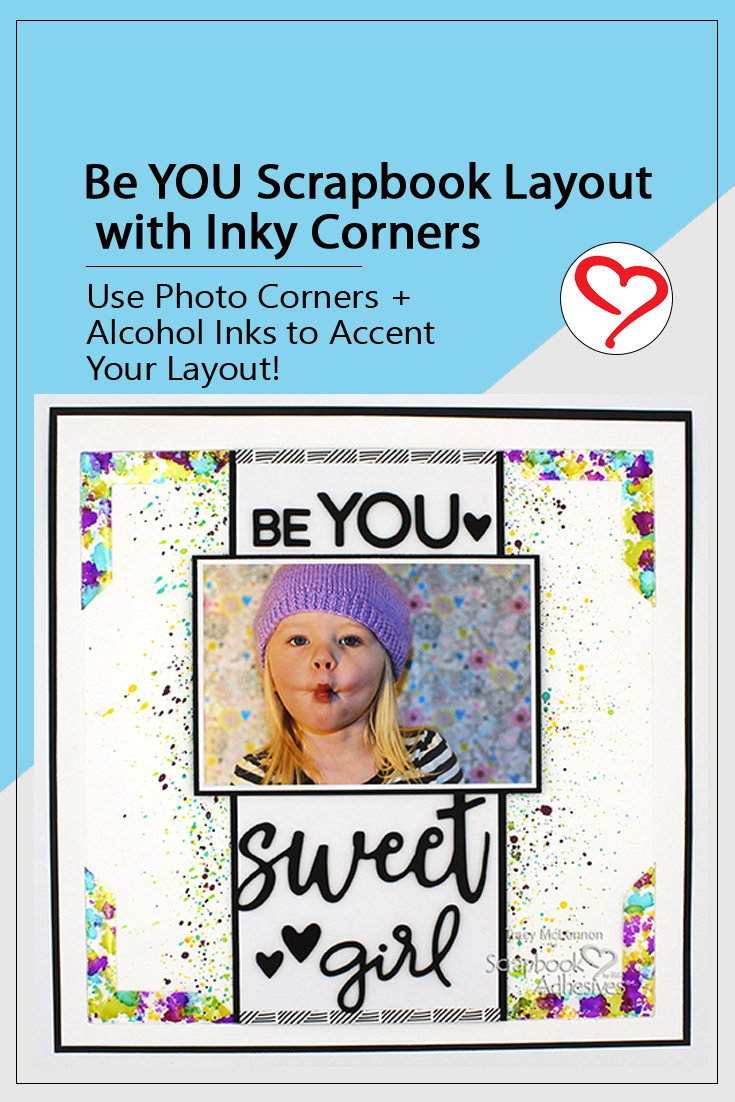
Hello scrappy friends! Today I have a fun way to bring color into your scrapbook layout. Curious? A little hint: inky corners! Using Mounting Corners Maxi View 3in and alcohol inks is all you need to jazz up your page. Here are all of the colorful details.
I chose misters that coordinated with the alcohol inks that I used for the corners. Cut the white cardstock down to 10.5×10.5, and I put a piece of chipboard down as a mask, just to reduce drying time. Splatter the misters up and down the edges of the mask. Let dry completely.
Scrapbook Layout Design
Black cardstock is the full background. Cut another piece of white cardstock that is 11.5×11.5 and adhere to the black cardstock using the E-Z Runner® Grand Refillable Dispenser. Add the splattered white cardstock to the background using the alcohol inked Mounting Corners Maxi View 3in.
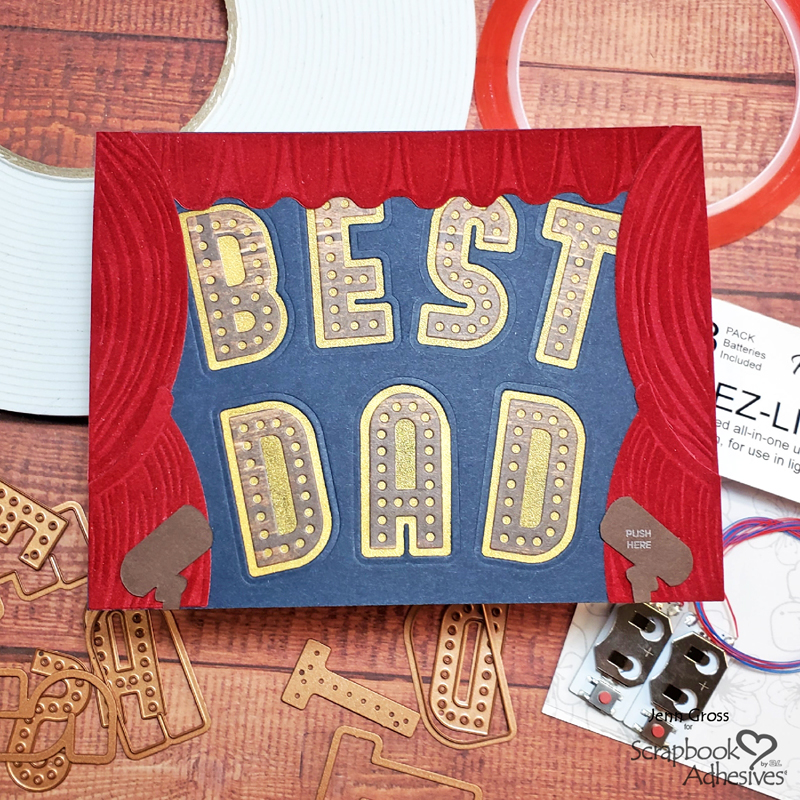
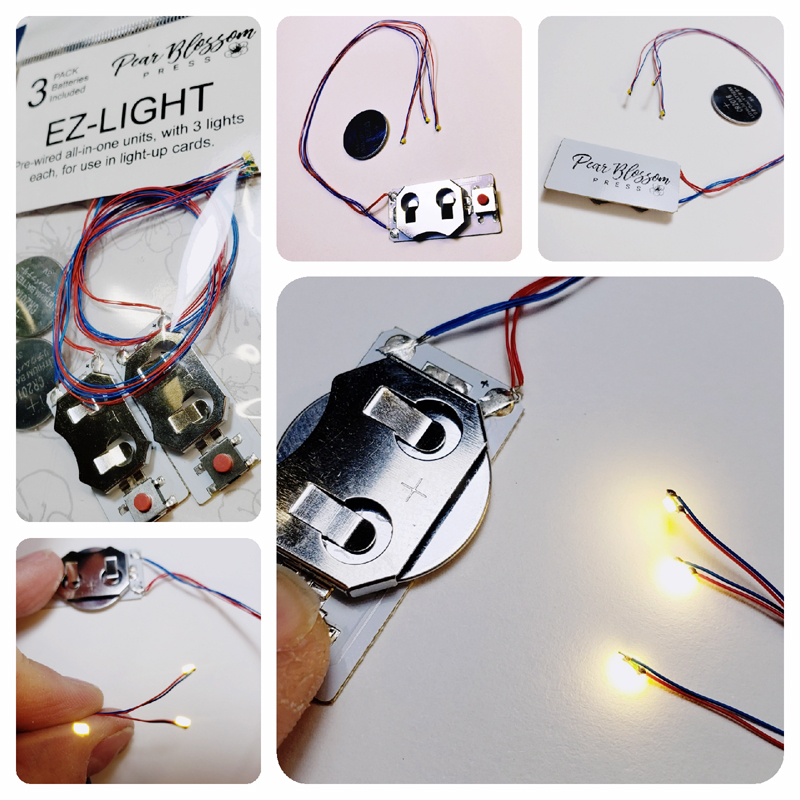
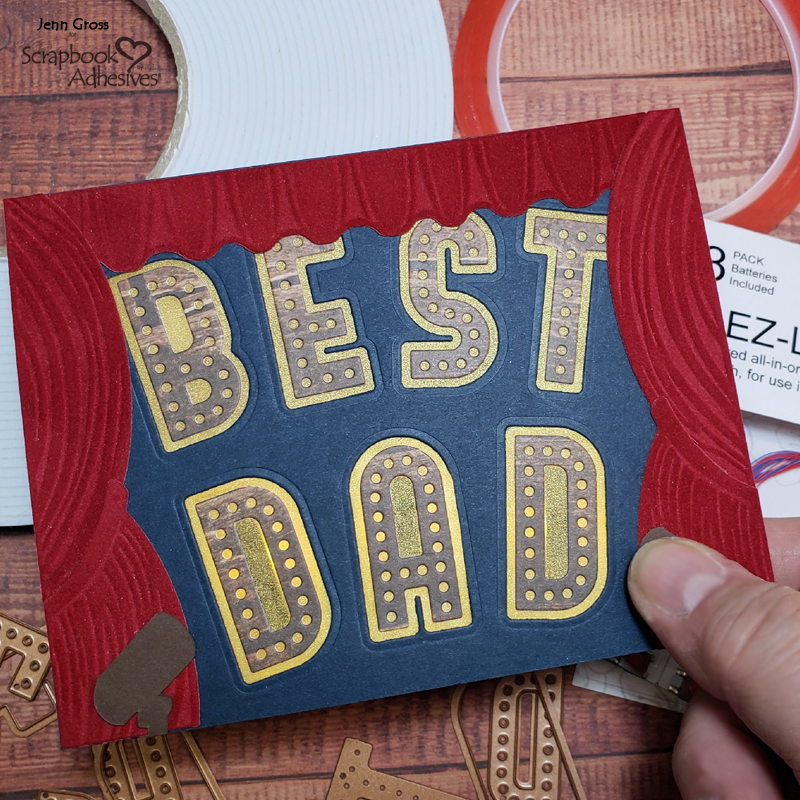
Hello, my crafty friend! With Father’s day at the end of the month, I thought I would get a head start on a card for my dad. My Best Dad Show interactive card was inspired by the Deco Bold Alpha Dies that looked like marquee words and I knew I wanted to light them up!
Best Dad Card Panel
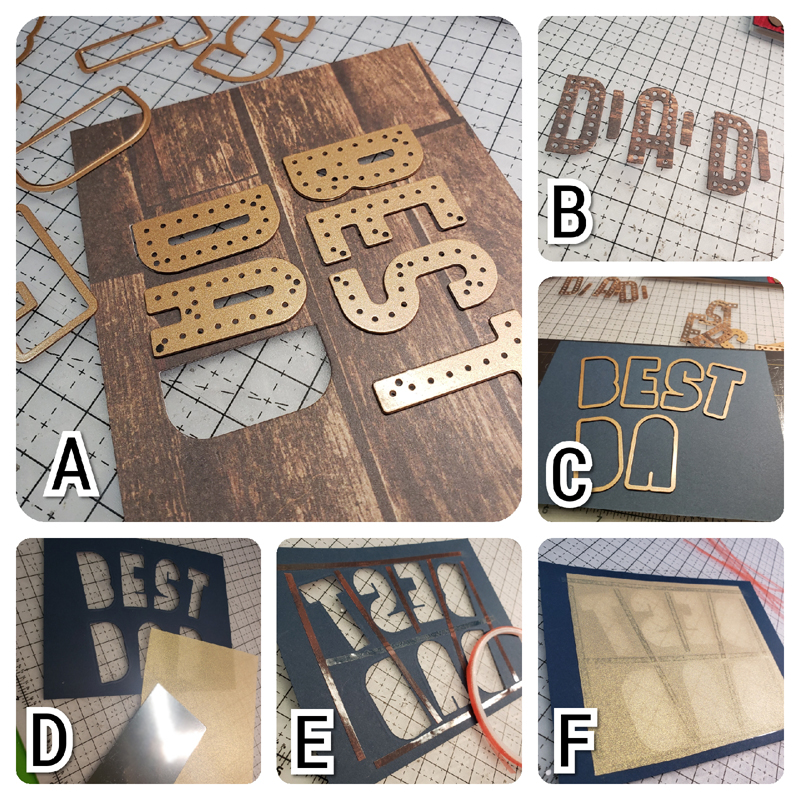
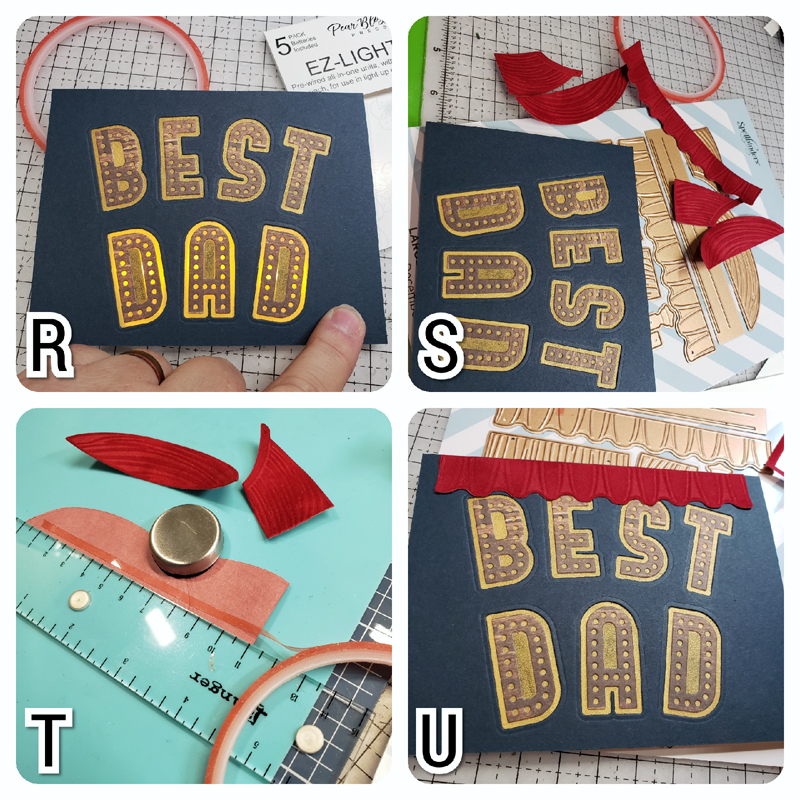
A and B – Die cut the letters to spell “Best Dad” from a piece of woodgrain printed cardstock. Save the middle pieces from the Ds and A to use later.
C and D – Use the outline alpha dies to position the words on a piece of 4 1/4 x 5 1/2-inch navy cardstock and die-cut to make the letter windows. Cut a piece of 4 x 4 1/2-inch gold vellum to cover the entire backside of the letter windows. Next, cut a piece of 1 3/4 x 3 1/2-inch silver mirror cardstock.
E and F – Frame out the backside of the windows with Extreme Double-Sided Tape 1/8″ and attach the piece of gold vellum.
G – Turn the navy card panel to the front and start adhering the letters DAD to the center of the gold vellum-covered windows.
H, I, and J – Take the middle pieces for the Ds and A, and color them with a black sharpie marker. Adhere Extreme Double-sided Tape 1/8″ to the back. Turn over the navy card panel and place the middle pieces of DAD as shown
K and L – Turn the navy card panel over and attach the remaining letters.
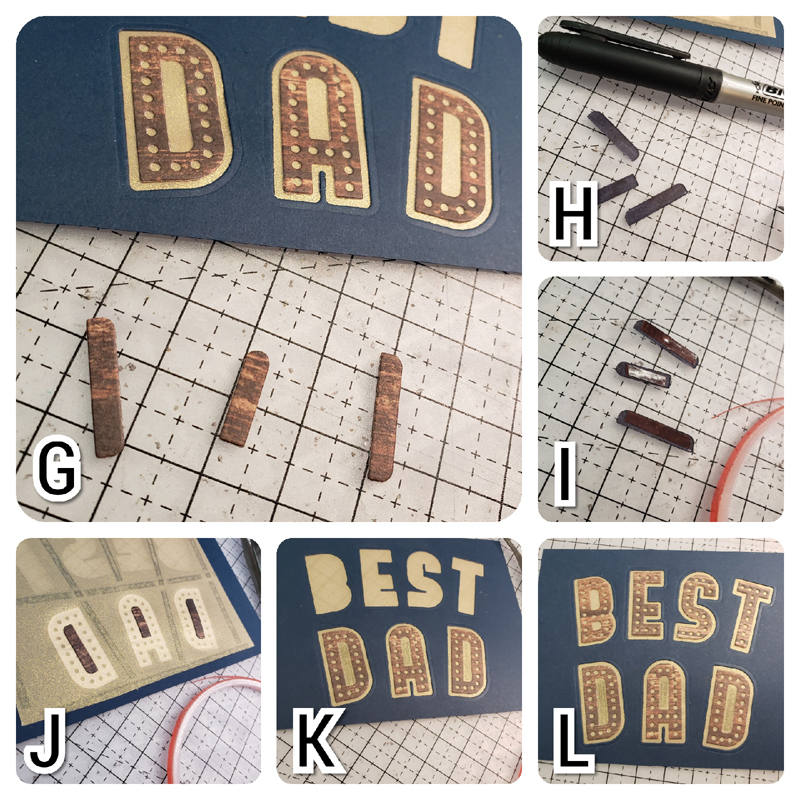
Stage Lights
Next, we are going to attach a set of EZ-Lights by Pear Blossom Press. It has a battery pack with three tiny lights in a set. Insert a battery and press the red button to light up. Perfect for an interactive card creation like my Best Dad Show card!
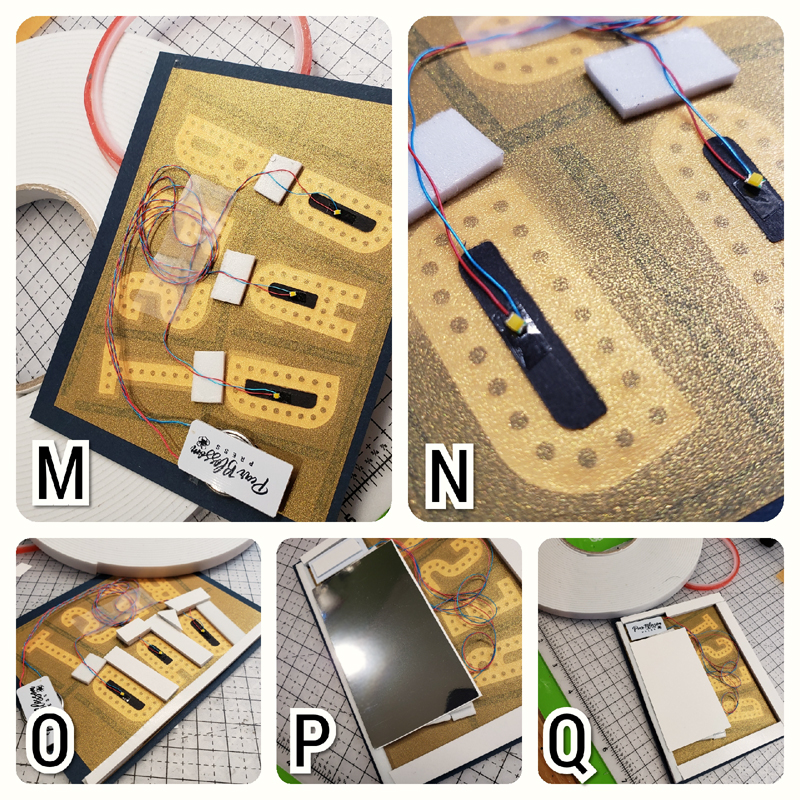
M – DAD will be lighting up so flip the card panel to the back. Cut three small pieces of Crafty Foam Tape White in 54ft and place each piece over each letter of DAD. Remove the liners.
N – Position each light face up in the middle of each letter (where the black pieces are) so they shine away from the letters. Arrange the light wires to adhere over the foam pieces to secure. Wrap the wires flat over the word BEST, secure with tape, and place the battery pack on the left side of the word DAD.
O – Double up on the Crafty Foam Tape White in 54ft as the battery pack is a little thick (about double the foam tape). Do this by cutting the foam tape the length of the card panel bottom and then cut in half the long side to create two thinner strips of foam tape. Stack the two pieces together and adhere to the card panel bottom. Next, frame out each letter of DAD with Crafty Foam Tape White in 54ft in double thickness (using the previous steps).
P and Q – Finish framing the sides of the card with a double thickness of Crafty Foam Tape White in 54ft. Remove the liner around the word DAD, adhere the silver mirror cardstock (shiny side down) to seal the letters with the lights inside. It will add additional reflection creating a brighter and more diffused light for the letters
Curtain Time
R – Turn over the card panel and test the light switch. Remove the remaining liner around the back of the card panel and add Extreme Double-sided Tape 1/8″ to the silver mirror cardstock. Attach the card panel to an A2-sized card base.
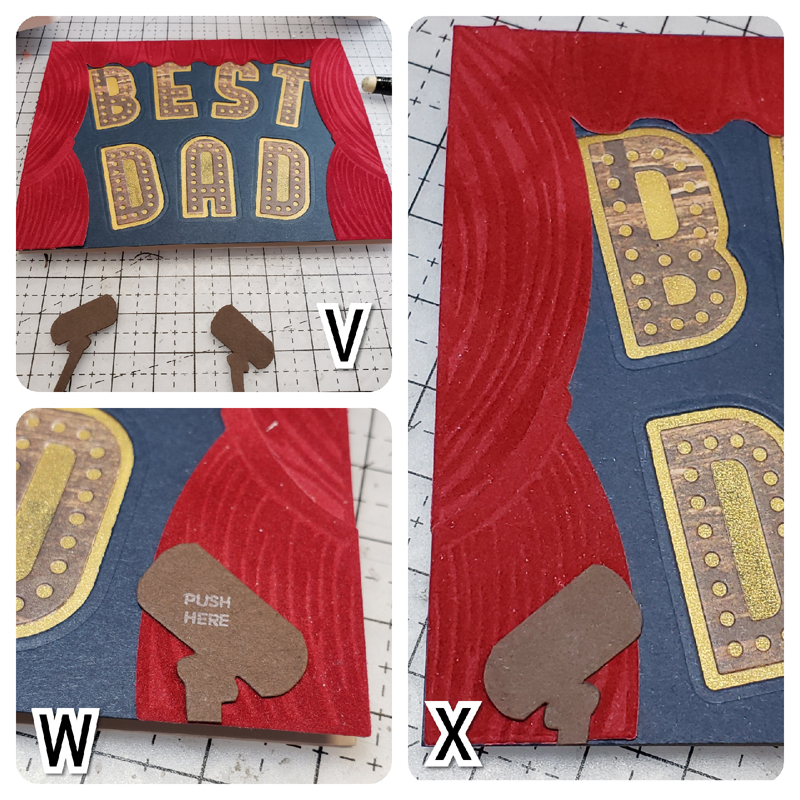
S – Die-cut the curtain die to cut the top and two side curtains piece from a red flocked specialty paper.
V – Adhere the side curtains. Hand draw two theater can lights and cut from brown cardstock.
W – Stamp/write Push Here on the right can light and position it over the battery pack button. Adhere in place and trim off the excess light post.
X – Add the left can light and cut off the excess light post.
Now you have a competed light up Best Dad card!
Thank you for stopping by todays’ blog. I hope you enjoyed learning how to create my Best Dad Show Interactive Card. Let me know in the comments how you would use these lights!
Other: Craft Dies: Spellbinders Paper Arts (Deco Bold Alpha, and Look Behind the Curtain); Lights: Pear Blossom Press (EZ Lights Pre-wired All in One Lights); Woodgrain Printed Cardstock, Navy Cardstock, Yellow Gold Vellum, Silver Mirror Cardstock, and Red Flocked Specialty Paper
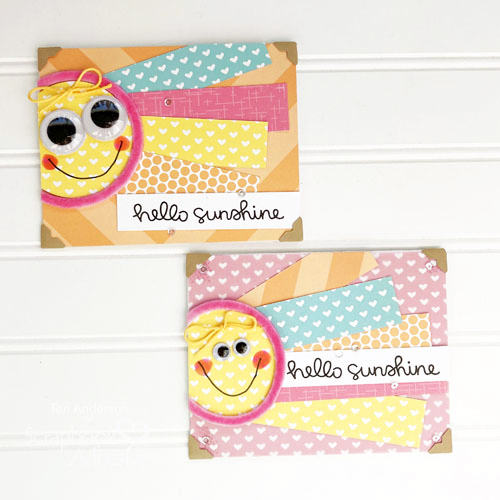
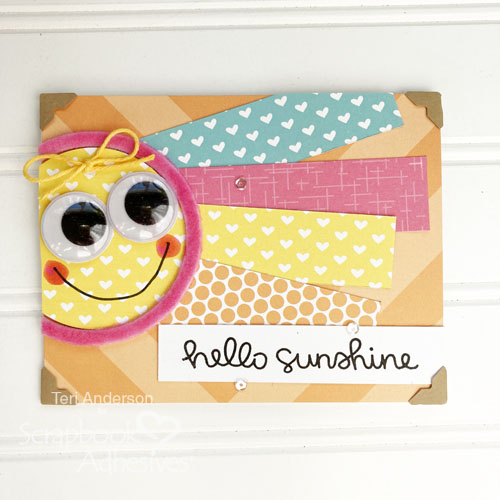
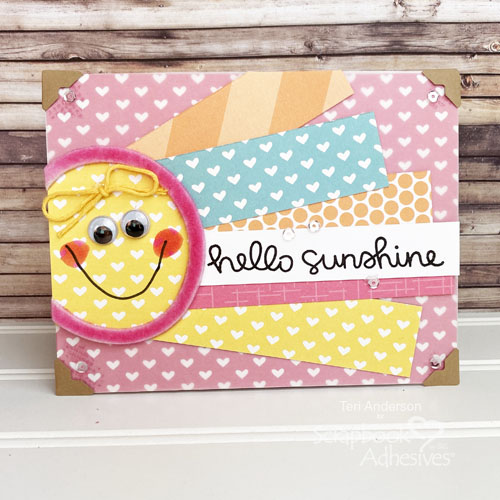
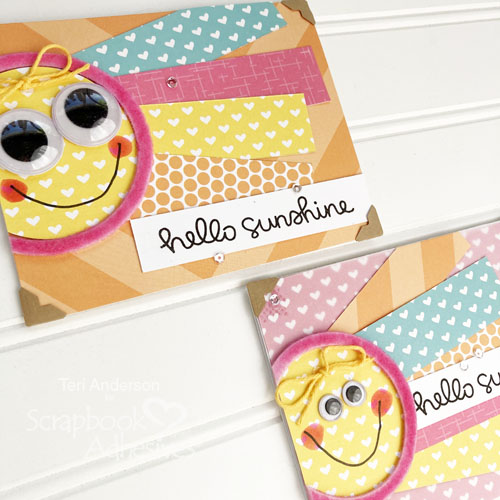
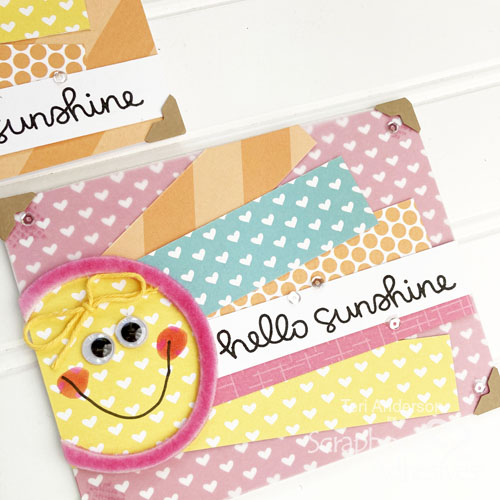
Hi, everyone! Things are heating up outside so why not make a few cards inspired by none other than the Sun! Teri here with a tutorial on how to make some Sunny Cards to send to all your favorite folks! Let’s get started 🙂
Sunny Cards with Sun and Ray Designs
Start by cutting panel of patterned paper to fit on the front of a card. You’ll also want to cut several strips of patterned paper, which you’ll adhere to the paper panel.
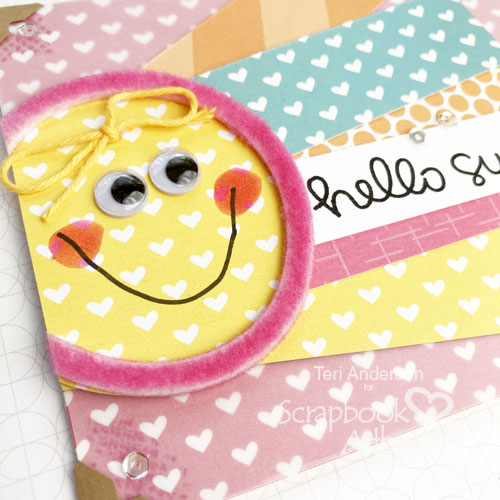
Cut a circle from yellow patterned paper and mount it to the paper panel. Trim any excess paper hanging off the edge of your paper panel.
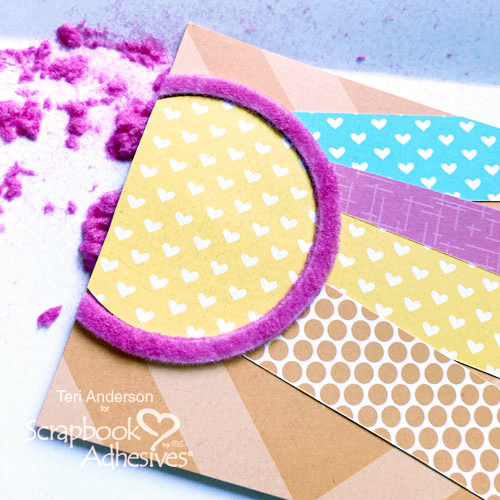
Place a 3D Foam Circle Frame onto the panel, over the circle. Use your scissors to cut away the excess. Apply flock to the circle. Use your fingers to really mash the flock onto the circle so that no sticky parts are left exposed.
Sunny Card Details
Add two wiggle eyes. Draw a mouth with a pen. Use a pink marker to draw circles for cheeks. Chalk would work as well! Add a bow made with twine or embroidery floss
Complete the card by stamping a sentiment on cardstock and adding it to paper panel. You’ll also want to add a few sequins and a couple photo corners. Affix the panel to a card.
Tip on Using Busy Patterned Papers Combos
Want to use a piece of paper on your card’s background that clashes with your patterned paper strips? Here’s an easy fix for that! Cut a panel of vellum and mount into onto the background paper. The vellum is kinda, sorta… magical! It will soften the color of the background paper!
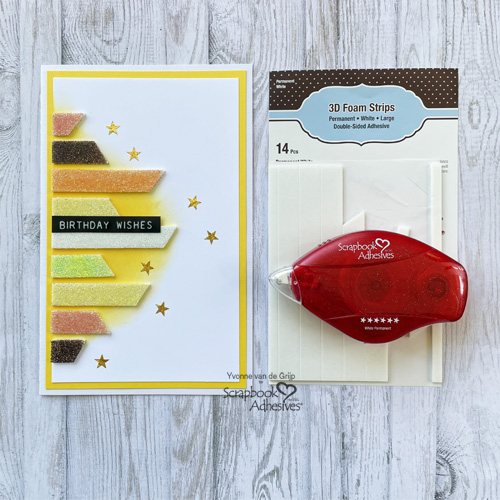
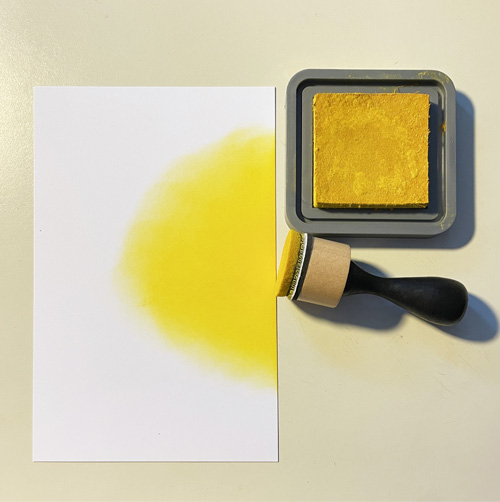
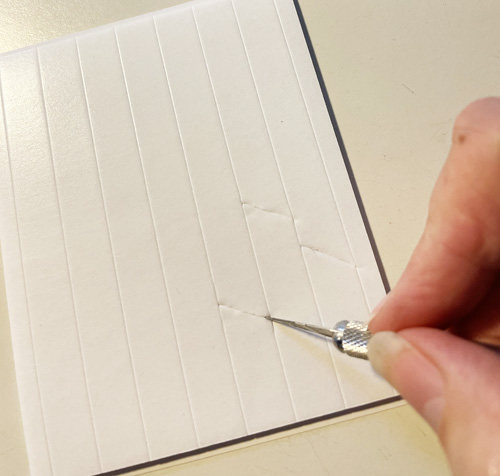
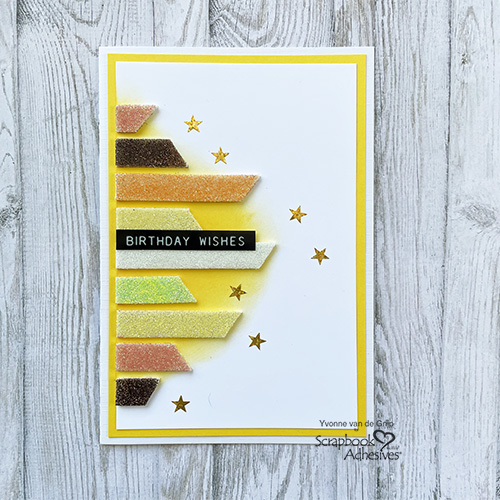
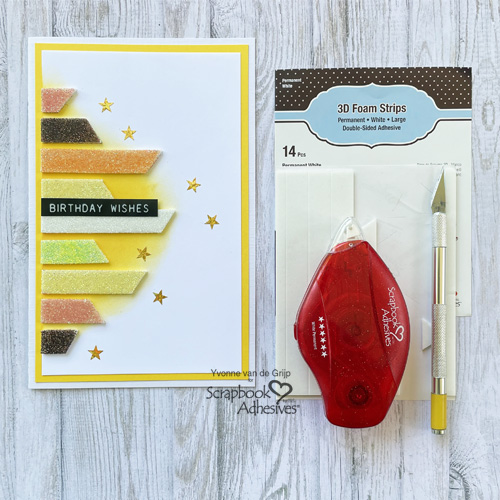
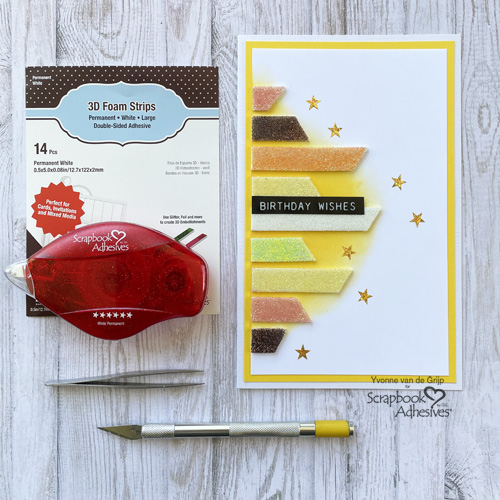
Hi everyone, Yvonne here a super easy to create a birthday card. Make glittered accents with the brand new 3D Foam Strips Large White and create your own Glittered Birthday Wishes card. This project is so simple to create that it’s also suitable for beginning card makers.
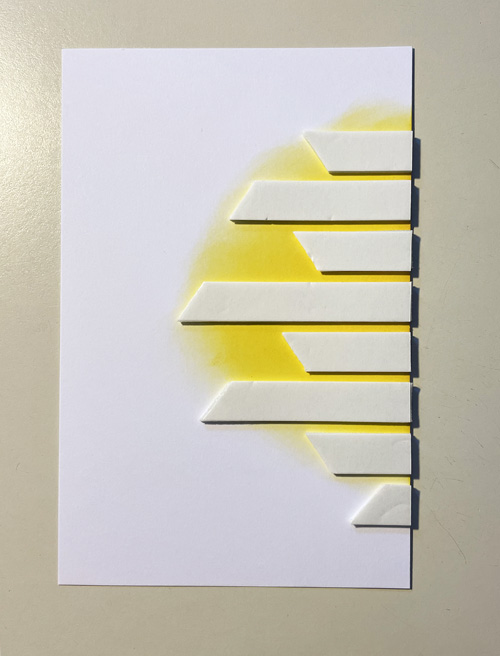
First trim a piece of white cardstock to a rectangular size. Then use yellow ink and an ink blending tool to create a yellow circle on the card panel.
Prep the Glittered Stripes
To make the glittered stripes I used 3D Foam Strips Large White. The strips are pre-cut so the only thing you need to do is cut the strips into pieces using a craft knife.
Then adhere the strips onto the colored cardpanel.
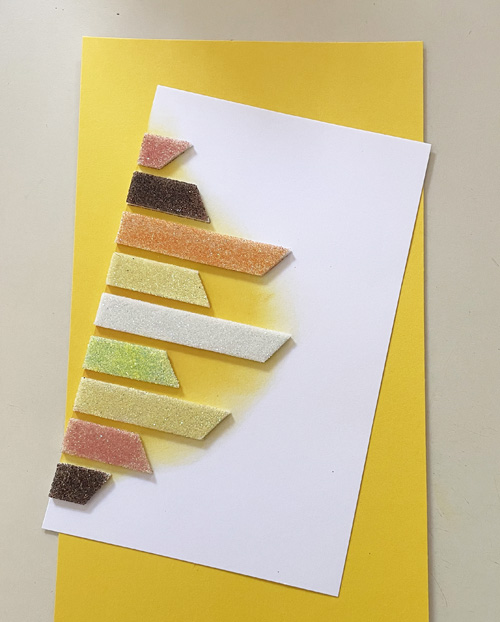
Next remove the liner of one 3D Foam Strips Large White and sprinkle glitter upon. Gently rub the glitter over the adhesive strip to secure the glitter. Then tap off any excess glitter. Repeat using different colors of glitter for the other strips.
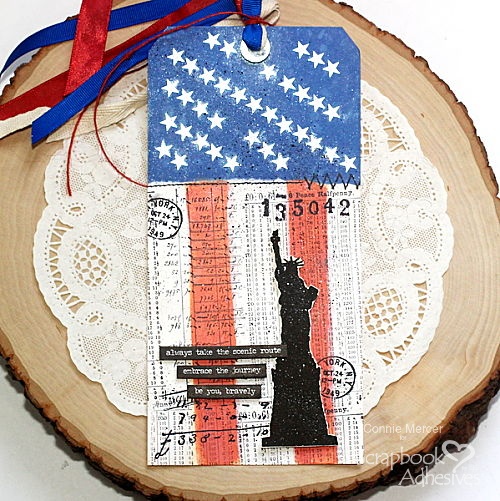
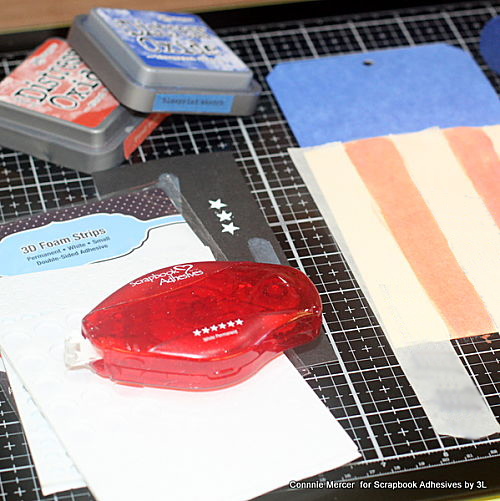
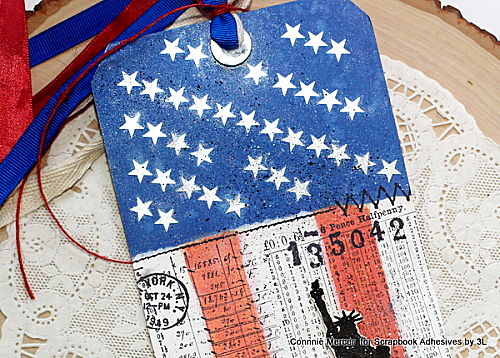
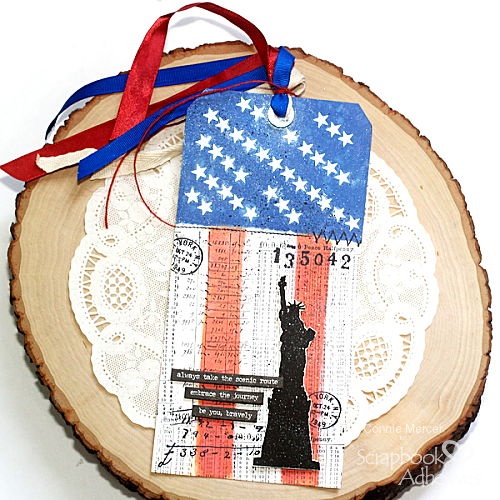
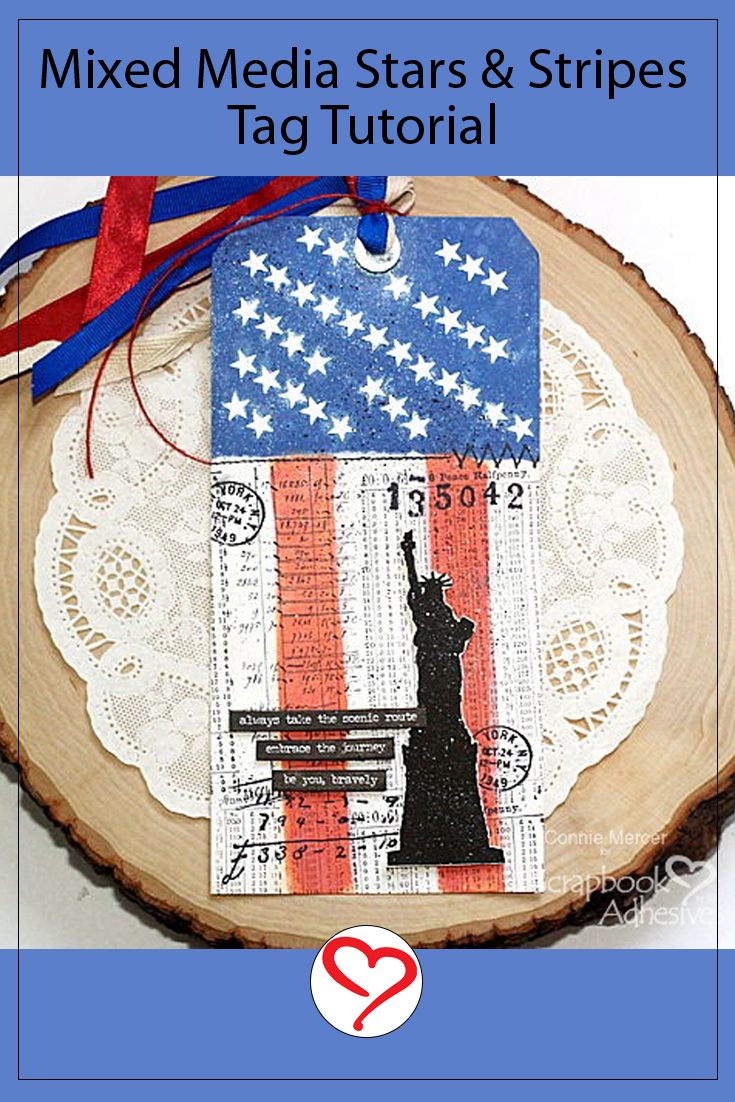
Hi, Connie here with a Mixed Media Stars & Stripes Tag using the new E-Z Runner Stars Refillable Dispenser to add stars on the tag. Could not have been easier!! Such a clever product by Scrapbook Adhesives by 3L. I hear they have hearts too!!! Check out the steps for this project below and follow along. Enjoy!
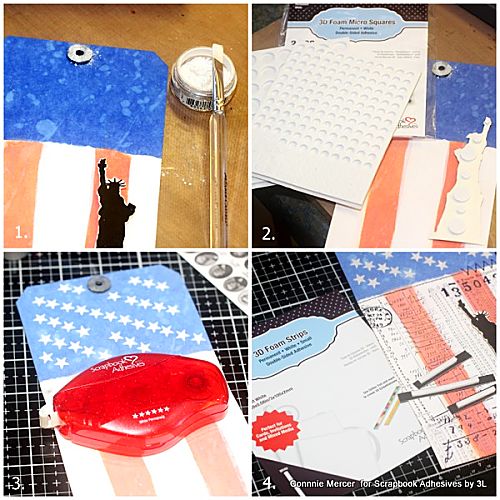
Mixed Media Stars & Stripes Tag Steps
I did a little background preparations to start the tag. Using Distress Oxide ink or the medium of your choice, I painted a flag design. Mask off a grid and just add color. Stamp out a focal image which was a Lady Liberty silhouette and trim out.
Assembly Details
1. Add the small reinforcement from the 3D Foam Circle Frames Black and brush on Perfect Pearls in off-white. 2. Add 3D Foam Circles White Mix and the 3D Foam Squares Micro White to the Lady Liberty silhouette shape. Tip: I used the Micro Squares for the very tip of the torch. – perfect size to keep the tip secured. 3. Now the fun part! Roll on those stars. Yes, it is that easy. I rolled at an angle for interest. The E-Z Runner Stars Refillable Dispenser skipped a few times but no worries, this is mixed media at its finest!! Next, brush on Perfect Pearls and dust off the excess. 4. Stamp some mixed media-themed stamps to the tag background for interest. The 3D Foam Strips (my new favorite product) were used to adhere to the word strips. Add twine and ribbons to finish the Mixed Media Stars & Stripes Tag.
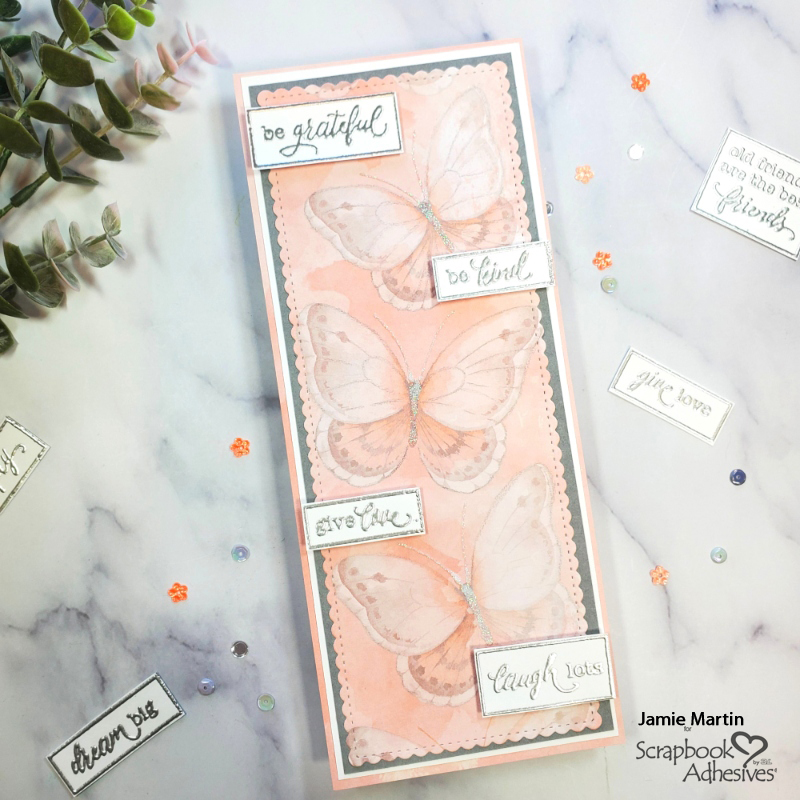
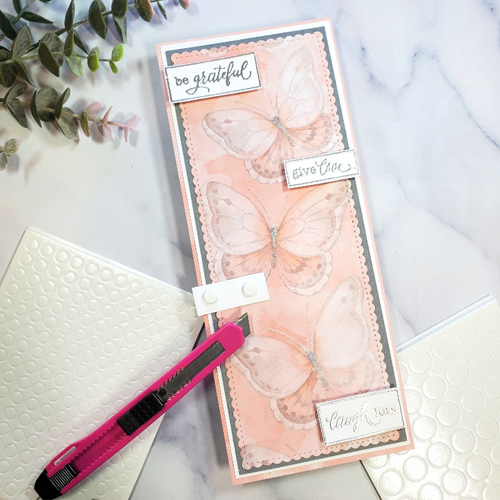
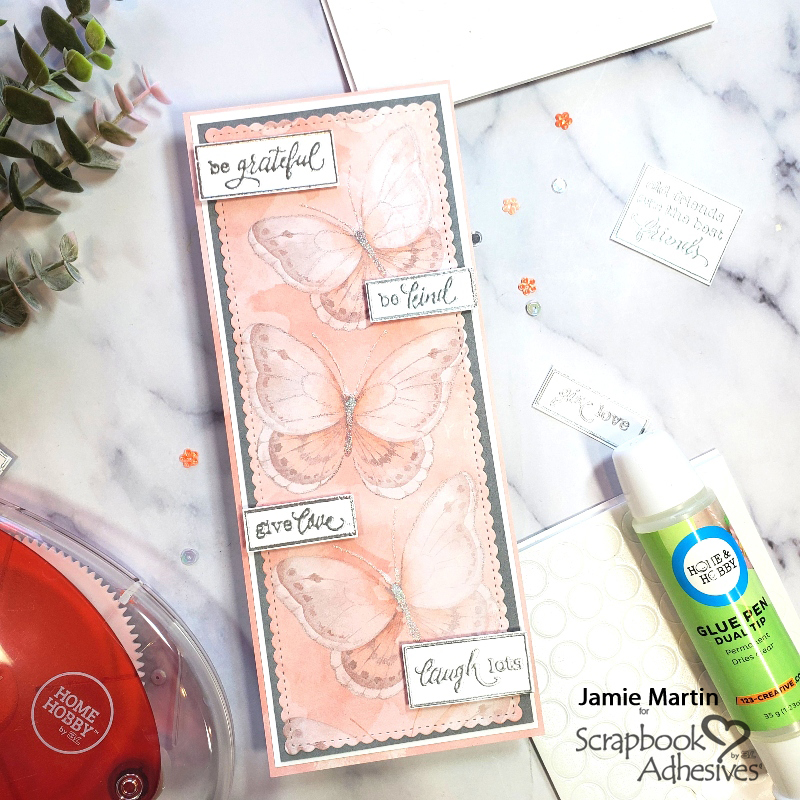
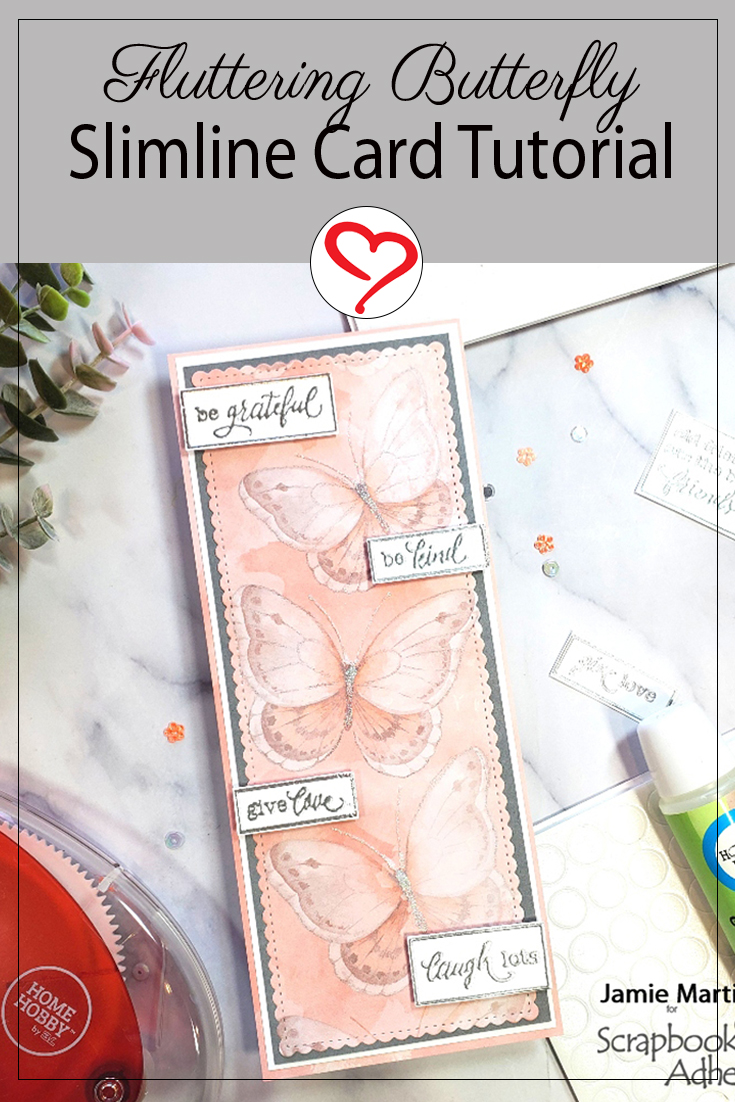
Hi, Jamie here with you today with a quick & easy card – perfect for the paper crafter and/or paper hoarder. Also, for those who like to make pretty cards but don’t want to color them. I fall into the paper hoarder category and have quite a bit of 12″ x 12″ decorative paper.
Usually, I use the small patterns on cards but never used the large patterns until now! Come see how I created this lovely Fluttering Butterfly Slimline Card.
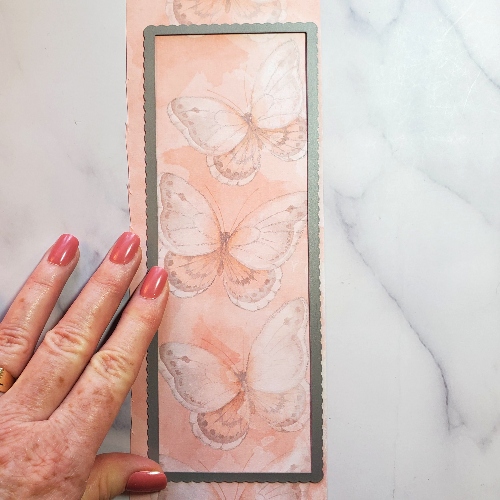
Fluttering Butterfly Card Panel
Pick out some pretty decorative paper with big images and die-cut it using a slimline die.
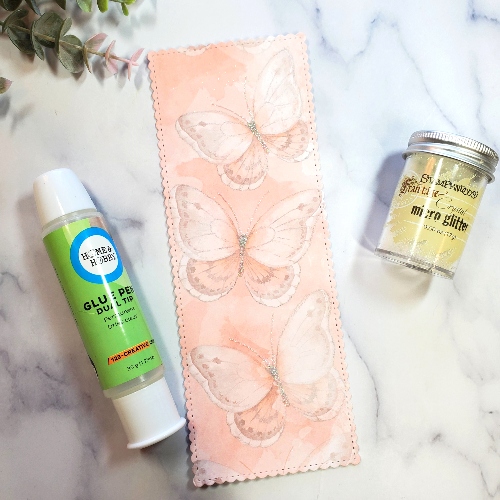
Embellishing the Card Panel
Use the Dual Tip Glue Pen to apply glue onto the body and antennas of the fluttering butterfly designs, then sprinkle Crystal Micro Glitter over the wet glue and let it dry.
Fluttering Butterfly Card Base
While this is drying, cut gray cardstock slightly larger than your slimline panel and use the E-Z Runner® Grand Refillable Dispenser to adhere it to a slightly larger white cardstock panel then glue it to a peach slimline card.
Adding More Details
Stamp Slim Cling Boxed Words on white cardstock with VersaMark Ink and emboss with Sterling Silver Embossing Powder.
There you have it a lovely Fluttering Butterfly Slimline Card to send to someone special. Find some pretty patterned paper in your stash and create one!
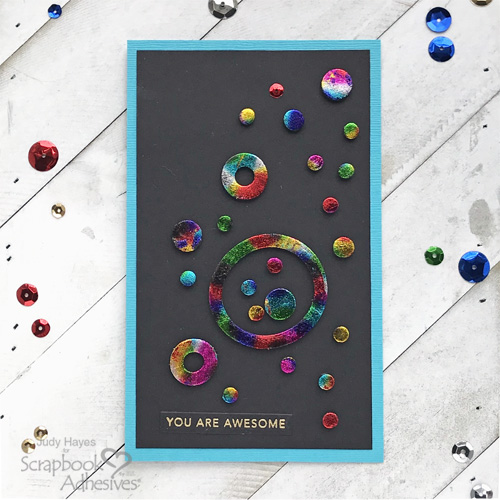
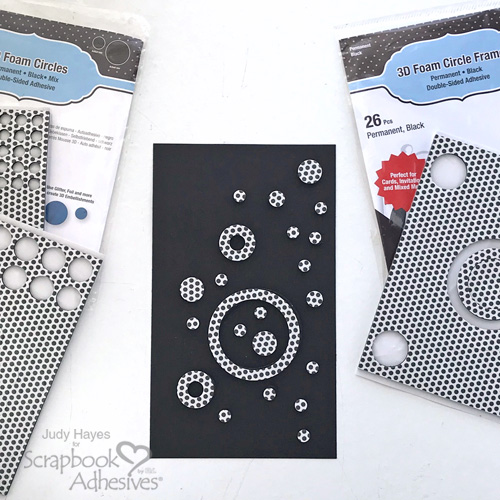
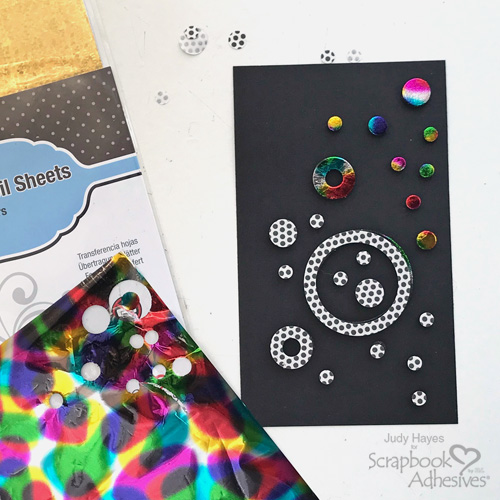
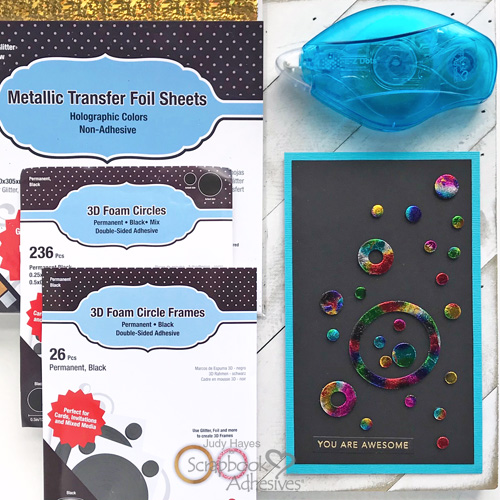
Continue to remove liners and apply foil to cover all circles and circle frames.
Reapply foil to any missed spots.
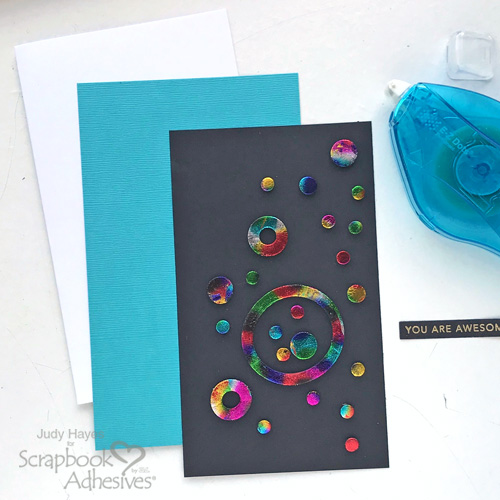
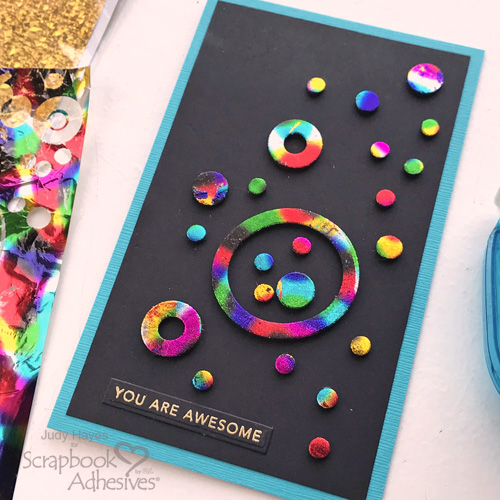
Assemble the Card
Form a 4 x 6.5 inch card base from white cardstock.
Cut turquoise mat to 4 x 6.5 inches. Use E-Z Dots® Permanent Refillable Dispenser to apply adhesive to it and fasten to the card front.
Also use E-Z Dots® Permanent Refillable Dispenser to fasten holographic circles piece over turquoise mat. Applying adhesive to card front rather than back of holographic circles piece may be easier.