You are in our US store • Switch to Europe store

Grid Father’s Day Card

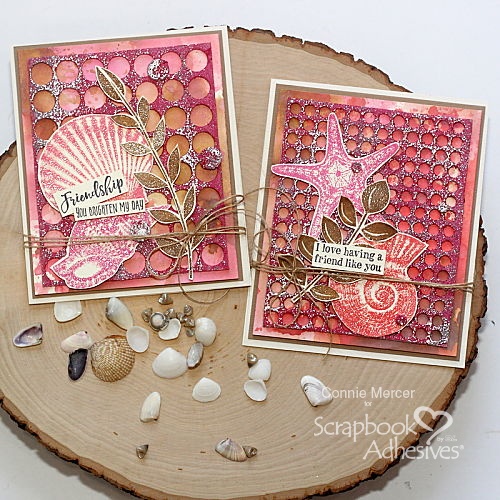
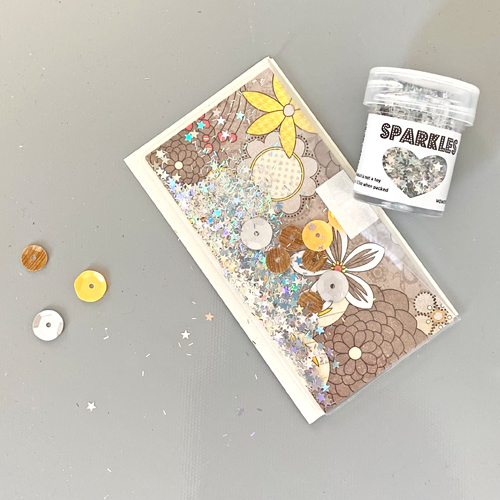
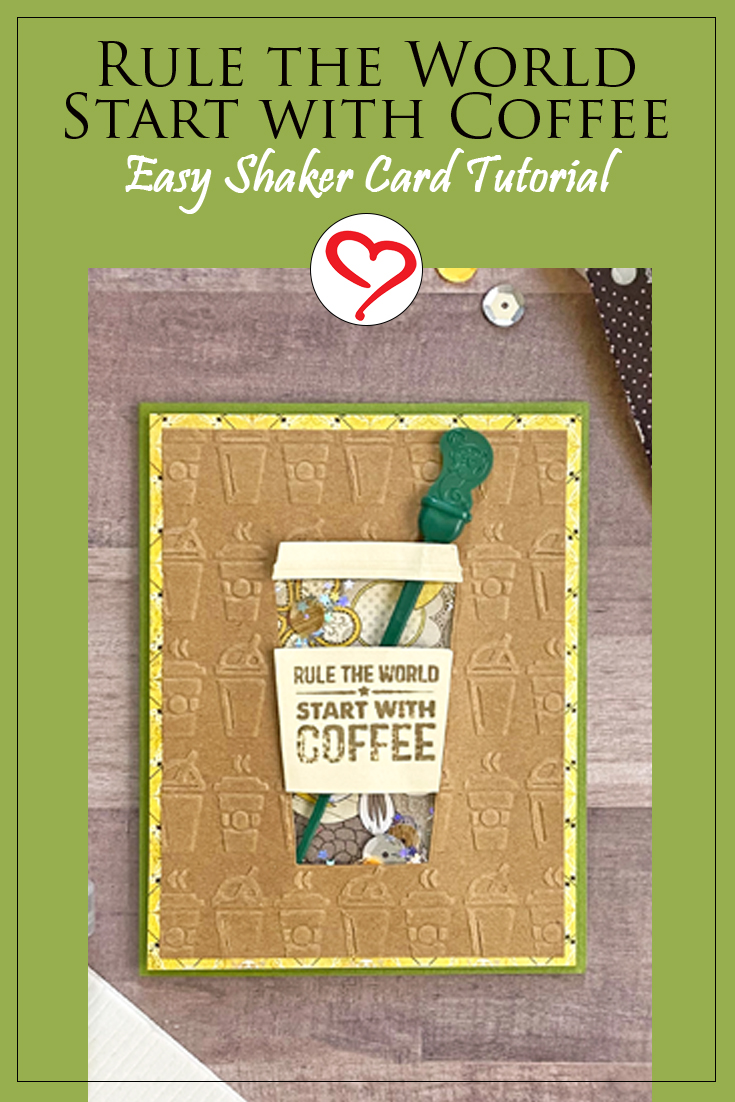
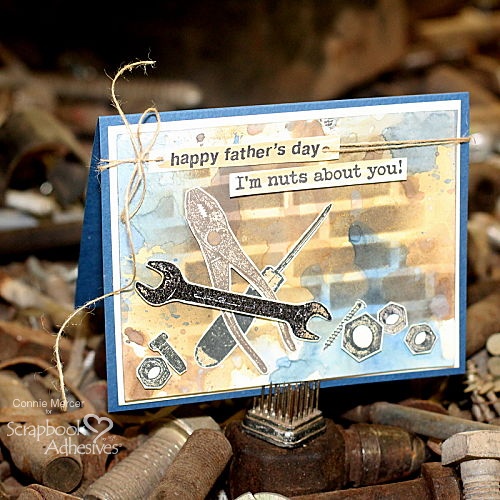
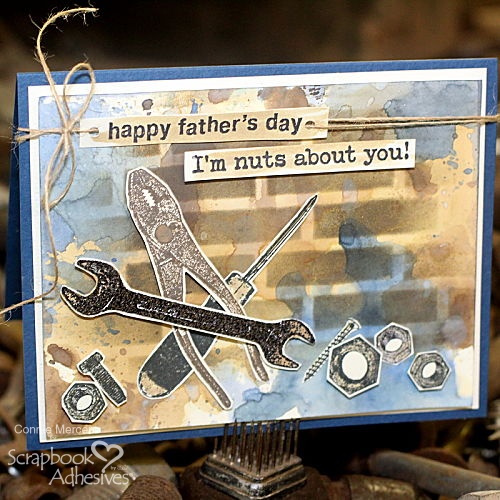
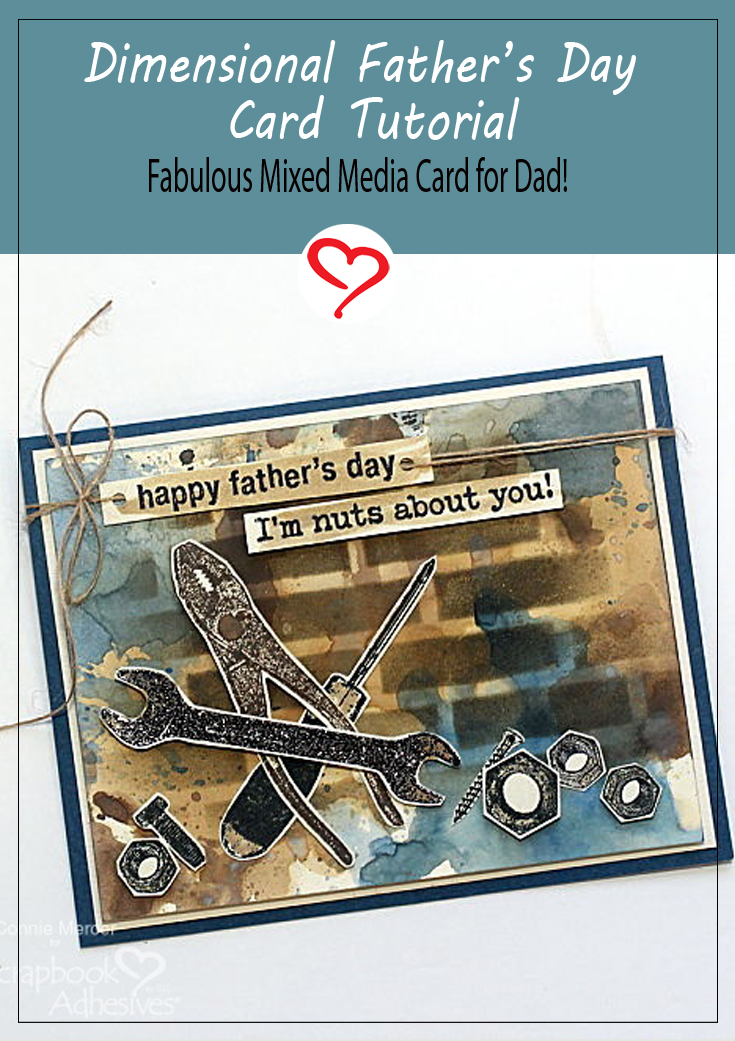
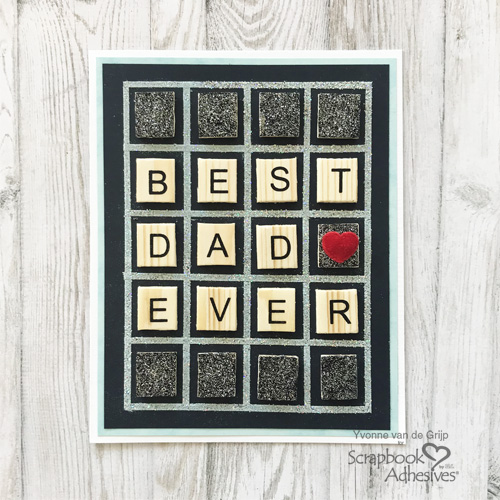
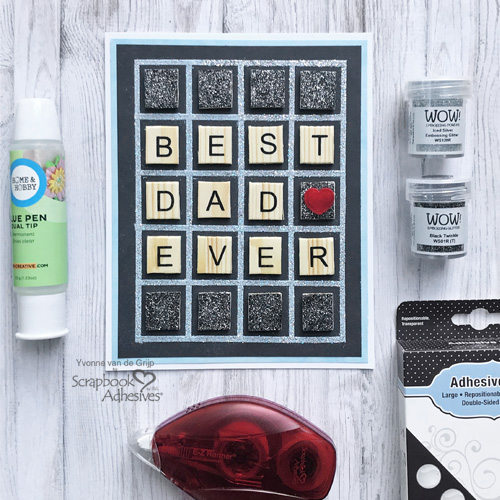
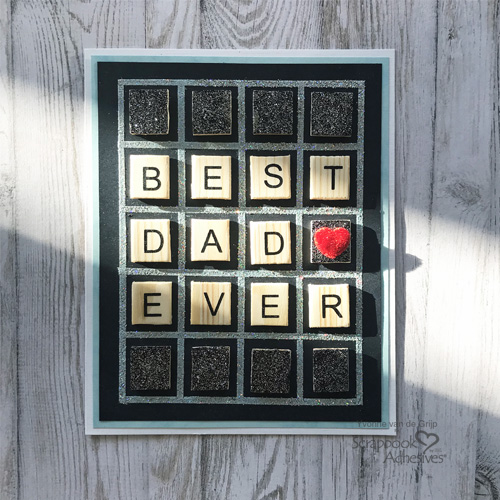
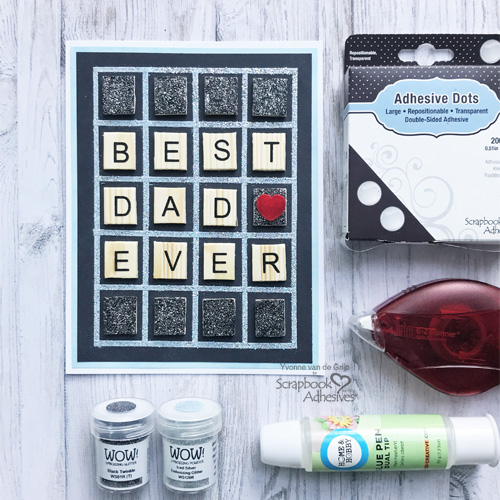
Hi everyone, Yvonne here with a Father’s day card idea. Use a grid design with game pieces for a unique masculine look! Then make your dad shine by adding glittery embossing powder using Wear Your Adhesive on the Outside concept! I’ll show you how in my tutorial.

Grid Father's Day Card By Yvonne van de Grijp for Scrapbook Adhesives by 3L

Positioning the Grid Design

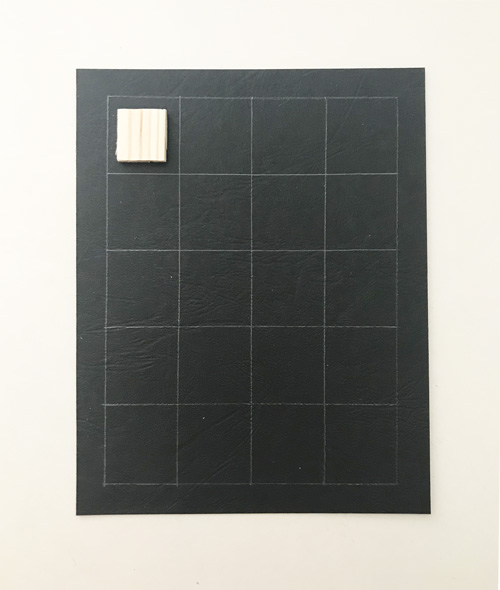
Using some wooden scrabble game letters to spell out “Best Dad Ever” and use the blank ones to fill in the rest of the grid design. The blank ones are really unpopular letters (like Q) turned blank side up. LOL!

Grid Father's Day Card By Yvonne van de Grijp for Scrapbook Adhesives by 3L

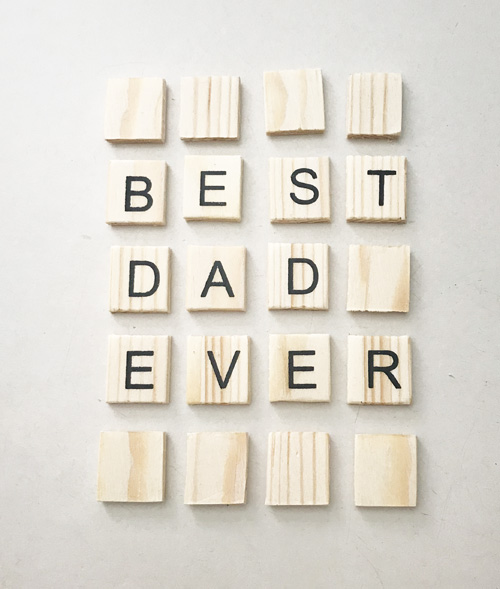
On a piece of the black cardstock card panel, draw a grid using a pencil and a ruler. Note the grid size is about ¼-inch larger than the size of the wooden letter tiles.

Grid Father's Day Card By Yvonne van de Grijp for Scrapbook Adhesives by 3L

The Grid Card Base & Layer

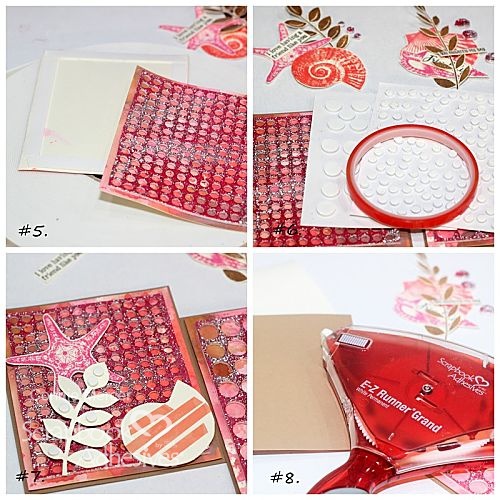
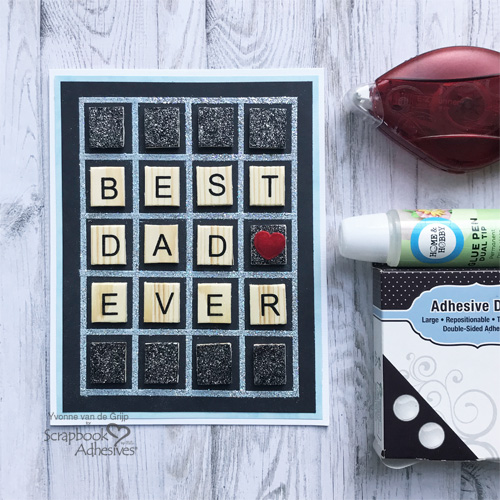
After finishing the grid card panel, I created another layer to mat the grid. A soft blue cardstock was my choice which I adhered with the E-Z Runner® Permanent Strips Refillable Dispenser. Then you can then determine the size of the card base you are going to make. Use the same adhesive to attach the layered card panel to the white card base.

Wear Your Adhesive on the Outside Concept

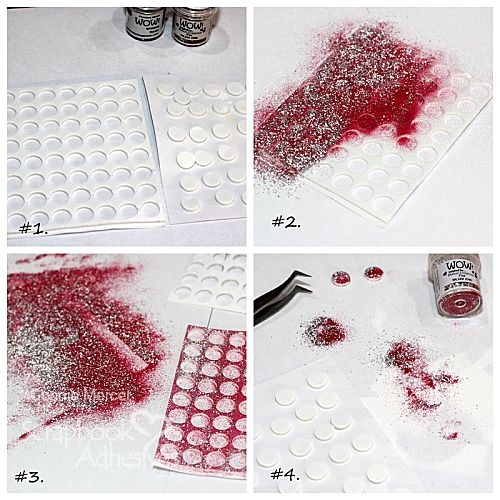
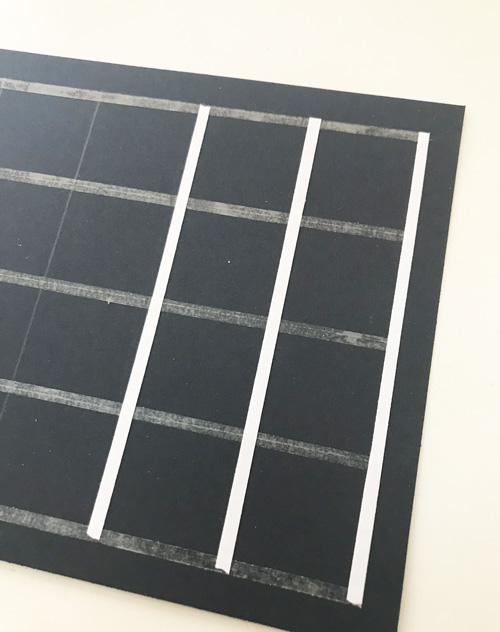
We will be using Premium Double-Sided Tape 1/8in onto all of the grid lines. Start with the vertical lines first. Make sure to rub the tape for extra secure hold. Then remove the liners. Make sure your desk is clean so nothing will stick to the tape.

Grid Father's Day Card By Yvonne van de Grijp for Scrapbook Adhesives by 3L

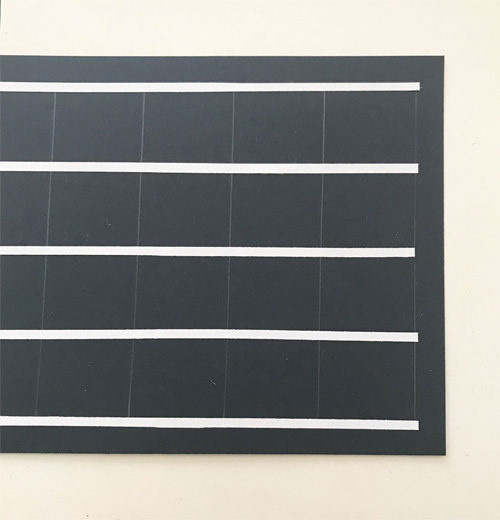
Now make the horizontal lines with the Premium Double-Sided Tape 1/8in and repeat the same steps.

Now you have a sticky grid ready to glitter!

Grid Father's Day Card By Yvonne van de Grijp for Scrapbook Adhesives by 3L

Cover the Iced Silver Embossing Glitter over the grid. Press in to secure and then tap off any excess. Repeat to cover any missed areas.

Grid Father's Day Card By Yvonne van de Grijp for Scrapbook Adhesives by 3L

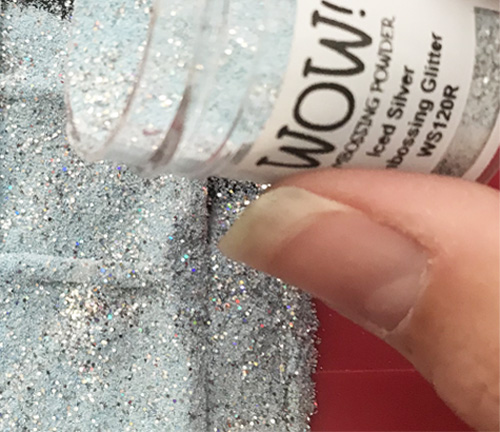
Melt the embossing powder with a heating tool. This technique is known as Wear Your Adhesive on the Outside.

Embellish the Tiles

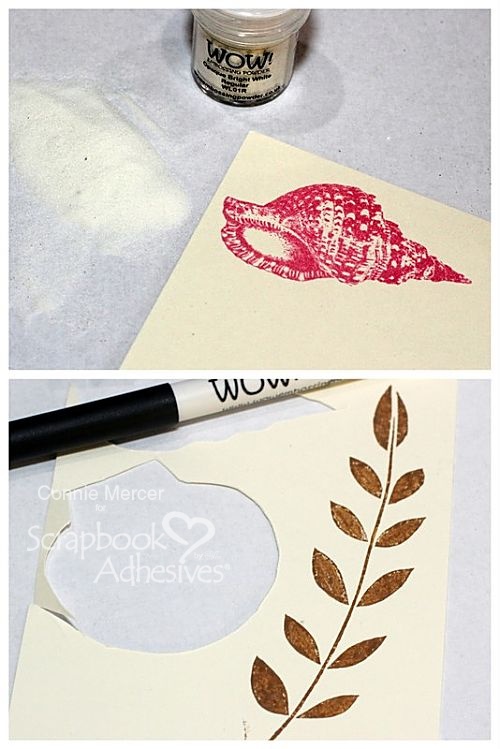
Cover the blank titles with a thin layer of the Dual Tip Glue Pen with my finger. I used a drop to spread over the surface.

Sprinkle dark glitter embossing powder on top of the title and melt using a heating tool. Designer’s Tip: to protect my fingers from the heat, I used tweezers to hold the tile.

Adhere the Tiles

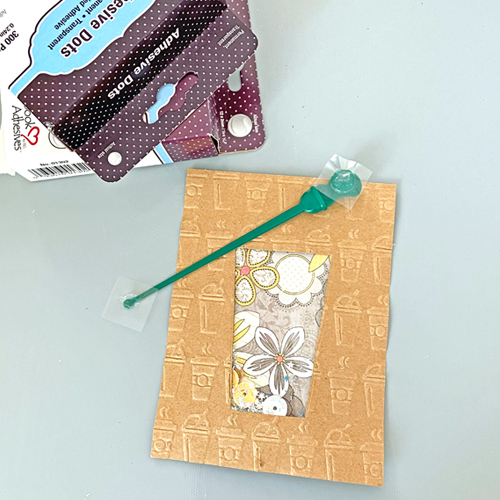
Add an Adhesive Dot Large Repositionable into each square of the grid. I love these dots because I can easily take the tile off if it’s crooked. It gives me peace of mind until I change my mind! LOL!

Grid Father's Day Card By Yvonne van de Grijp for Scrapbook Adhesives by 3L

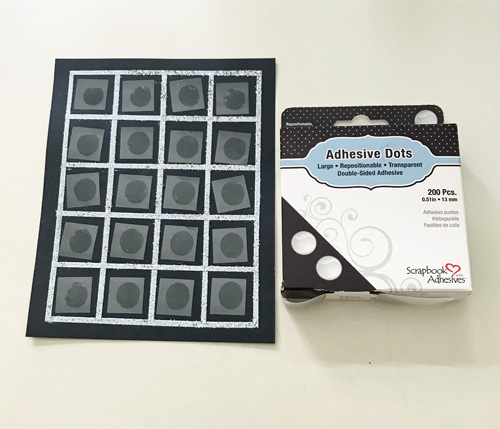
Remove the liners and adhere the tiles to the card panel. Finish off the card by adhering a red velvet heart onto a tile using an Adhesive Dot Large Repositionable.

Grid Father's Day Card By Yvonne van de Grijp for Scrapbook Adhesives by 3L

And voila, your Grid Father’s Day Card is ready to make any dad smile!

I hope you enjoyed this tutorial and wish you happy crafting!
Yvonne van de Grijp

Grid Father's Day Card By Yvonne van de Grijp for Scrapbook Adhesives by 3L

Creative Time: 40 minutes
Skill Level: Intermediate

Materials needed:
Scrapbook Adhesives by 3L®
E-Z Runner® Permanent Strips Refillable Dispenser
Adhesive Dots Large Repositionable

HomeHobby™ by 3L
Premium Double-Sided Tape 1/8in
Dual Tip Glue Pen

WOW! Embossing Powder
Iced Silver Embossing Glitter
Black Twinkle Embossing Glitter

Other
Black, Soft Blue, and White Cardstock; Wooden Scrabble Tile Game Pieces; Red Velvet Heart; Ruler; Pencil; Paper Trimmer; Tweezers

Save it to Pinterest!

Grid Father's Day Card By Yvonne van de Grijp for Scrapbook Adhesives by 3L Pinterest

Visit our Website and Blog!
Sign up for our Newsletter so you never miss a contest or giveaway!

instagram purple icon facebook icon purple pinterest purple icon twitter purple icon YouTube icon blog subscription purple icon

Embossed Background Sea Shell Card

Hi, Connie here with a really fun and cool project to create an embossed background for a mixed media style card. Using the leftover sheet from the 3D Foam Circles White Mix, WOW! Embossing Powder and stamps, I show how to make these wonderful cards.

Embossed Background Sea Shell Card by Connie Mercer for Scrapbook Adhesives by 3L

Embossed Background Steps

Embossed Background Sea Shell Card by Connie Mercer for Scrapbook Adhesives by 3L
  1. There were still some 3D Foam Circles White Mix on the sheets so I remove them by placing them on an empty liner sheet and set aside.
  2. Remove the top liner of the leftover sheet and cover the entire surface with the WOW! embossing powder.
  3. Shake off excess and emboss with a heat embossing tool.
  4. Next, emboss three 3D Foam Circles in the regular size using the same embossing powder.

Embellishing Details

Stamp sea shell and leaf images with colored inks. Then emboss with WOW! Embossing Powder in clear. I also used their embossing pen to touch up my stamped images that did not stamp clean. Set aside. Let’s work on the card layers.

Embossed Background Sea Shell Card by Connie Mercer for Scrapbook Adhesives by 3L

Using various Distress Oxide ink colors that would match the embossed background, I created a mixed media card panel. When I achieved my desired look, peel off the back liner of the embossing background, and adhere to the inked card panel.

Embossed Background Sea Shell Card by Connie Mercer for Scrapbook Adhesives by 3L

Designer’s Tip: use the leftover sheets as a dimensional adhesive. No one will know and no need to throw it away. Use every little bit – a no waste product! LOL!

Thanks for stopping by and I hope you enjoyed this project. I sure enjoyed creating the cards!!
Connie Mercer

Creative Time: 45 minutes
Skill Level: Intermediate

Materials Needed:
Scrapbook Adhesives by 3L®

3D Foam Circles White Mix
E-Z Runner Grand Refillable Dispenser
Crafty Foam Tape 108′

Home Hobby by 3L®
Extreme Double-Sided Tape 1/4″

WOW! Embossing Powder
Fizz Embossing Powder
Bright White Embossing Powder
Embossing Pen

Other
Stamps: Darkroom Door; Ink: Ranger Ink (Distress Oxide); Twine

Embossed Background Sea Shell Card by Connie Mercer for Scrapbook Adhesives by 3L

Save It to Pinterest!

Visit our Website and Blog!
Sign up for our Newsletter so you never miss a contest or giveaway!

instagram purple icon facebook icon purple pinterest purple icon twitter purple icon YouTube icon blog subscription purple icon

DIY Bouncy Glitter Ball

Hi friends! Dana here today sharing a fun kids craft tutorial for DIY bouncy glitter balls. It’s only two weeks into summer vacation and I have heard the phrase ‘I’m bored’ more times than I care to count. This simple project uses two basic craft staples and one common household item.

DIY Bouncy Glitter Ball by Dana Tatar for Scrapbook Adhesives by 3L Blog

In less than 15 minutes my kids had several bouncy balls that produced hours of fun! The WOW! Sparkles Premium Glitter that I mixed into the ball shown above catches the light is a fantastic way.

DIY Glitter Bouncy Ball Tutorial

DIY Bouncy Glitter Ball by Dana Tatar for Scrapbook Adhesives by 3L Blog

Dissolve 1 tablespoon of Borax into 3/4 cup of warm water.

DIY Bouncy Glitter Ball by Dana Tatar for Scrapbook Adhesives by 3L Blog

Squeeze 1 tablespoon of Dual Tip Glue Pen Clear Glue into a small container. Sprinkle a small amount of WOW! Sparkles Premium Glitter onto the glue. Stir to combine.

DIY Bouncy Glitter Ball by Dana Tatar for Scrapbook Adhesives by 3L Blog

Pour the glitter glue mixture into the Borax solution. Press and squeeze the glitter glue together with your fingers until the mixture is no longer sticky.

DIY Bouncy Glitter Ball by Dana Tatar for Scrapbook Adhesives by 3L Blog

Remove the glitter glob from the Borax solution and roll into a ball shape.

Bouncy Ball Storage

The bouncy balls will eventually dry out if left exposed to air. My kids were happy to zip their balls into a plastic bag. I wanted something a little cuter to hold my bouncy balls so I upcycled a small glass jar.

DIY Bouncy Glitter Ball by Dana Tatar for Scrapbook Adhesives by 3L Blog

1. Apply embossing ink onto a stamp and press onto patterned paper (or cardstock). Sprinkle on WOW! Mermaid Tails Embossing Glitter. Tap off the excess powder and apply heat to set.

2. Use a 6×12 Inch Adhesive Sheet to create a sticker. Punch a circle from the adhesive sheet. Remove the yellow backing paper and align the paper onto the adhesive. Remove the back liner and adhere to the project.

These bouncy balls will flatten over time. Warm the ball in your hand and roll to reshape to continue the fun. Thanks for stopping by today!
~Dana Tatar

Creative Time: 15 minutes
Skill Level: Beginner

Materials Needed:
Scrapbook Adhesives by 3L®

Adhesive Sheets 6×12 Inch

HomeHobby™ by 3L
Dual Tip Glue Pen

Wow! Embossing Powder
Atlantica Sparkles Premium Glitter
Bridal Sparkles Premium Glitter
Mermaid Tail Embossing Glitter

Other
Borax; Patterned Paper; Stamp: Studio Calico; Embossing Ink: Clearsnap

Save to Pinterest Now!

DIY Bouncy Glitter Ball by Dana Tatar for Scrapbook Adhesives by 3L Blog Pinterest

Visit our Website and Blog!
Sign up for our Newsletter so you never miss a contest or giveaway!

instagram purple icon facebook icon purple pinterest purple icon twitter purple icon YouTube icon blog subscription purple icon

Mixed Media Canvas for Dad

Hello everyone! Judy here today. I’m thinking ahead to Father’s Day with a mixed media canvas for Dad. I’ve been watching many craft and art videos during this stay at home time. Sure enjoying those!

One of those videos gave me a spark of inspiration for the color scheme for this canvas. This is one time that I picked out a collection of supplies including dies, papers, and canvas with embossing powder. Then began to create! Very happy with how it turned out!

Mixed Media Canvas for Dad

Start with a 4 x 6-inch canvas, I was lucky to find the canvas at a dollar store. The size is perfect for this project!

Cover the canvas with patterned paper (you can see visible at the top right corner) and a map collage paper layered over it. Use another piece of pattern paper that fits across the bottom for the floor. Adhere the papers with the Dual Tip Glue Pen.

Stamp on the corners and across the floor. Ink the edges to hide the white canvas.

The Fireplace Feature

Kraft and black papers were used to make the fireplace pieces. Apply Adhesive Sheets 4×6 inch to the back of all pieces for the small die cuts which makes for easy assembly.

The Kraft pieces were inked with Distress inks. The fireplace was attached with Crafty Foam Tape White to pop it up. The star strip was added to finish the fireplace.

Mixed Media Dad

Dad is a photo paper figure with a touch of color from markers. The figure was secured with two layers of 3D Foam Squares Black Mix behind the head. In the middle (over the fireplace) and the feet, a combination of 3D Foam Squares Black Mix and Thin 3D Foam Squares Black Mix were used to allow for the extra thickness of the fireplace and the rug.

Working on the Title

Letters for “DAD” were die-cut from 3D Foam Creative Sheets Small in Black and a piece of black cardstock. Set the letters aside to work on another layer that will be added.

Next, I applied Adhesive Sheets 4×6 inch to the back of a piece of black cardstock and adhere to another piece of black cardstock. Then apply another Adhesive Sheets 4×6 inch on the back before die-cutting the letters DAD again.

Layer all the matching letters together by placing the layered cardstock piece on top of the foamed letter. The layers accomplish a couple of things: keeps the foam from stretching as the font is narrow, and to add more depth.

Heat emboss the letters with two layers of embossing powder. Then lightly rub black ink over the surface.

Now, I attached the letters to the canvas with E-Z Runner® Ultra Strong Refillable Dispenser. Use the same adhesive to hold the star in place. “Love you” strips are secured with Thin 3D Foam Squares Black Mix.

Other Details

Stamp the words (except “ME”) with Tiny Text and heat embossed. “ME” are die-cut letters from black cardstock with Adhesive Sheets 4×6 inch. Ink all with Distress inks and popped up with 3D Foam Squares Black Mix.

At the bottom of the canvas, a tiny “rug” cut from a piece of natural canvas with fringes. Color the material with Distress inks.

This was certainly a fun project for me to put together! I hope you enjoyed it! And perhaps found some inspiration for your own project!

Thanks for Visiting!
Judy Hayes

Creative Time: 90 minutes
Skill Level: Advanced

Materials Needed
Scrapbook Adhesives by 3L®

HomeHobby™ by 3L
Dual Tip Glue Pen

Other:
Inks: Ranger Ink (Distress Ink in Tumbled Glass, Antique Linen, Iced Spruce, and Black Soot, and Archival Ink in Black Soot and Ground Espresso); Craft Die: Sizzix (Fireside, Alphanumeric Label and Alphanumeric Classic Upper); Stamps: Stampers Anonymous (Ledger Script, Tiny Text, and Mini Glitch); Papers: Tim Holtz (Paper Dolls, Etcetera Patterned Paper, Travel Collage Paper, and Stars); Powder: WOW! Embossing Powder (Sprinkle Powder in Angel Eyes); 4 x 6-inch Canvas; White, Kraft and Black Cardstock; Natural Canvas Fabric

Save it for Pinterest!

Visit our Website and Blog!
Sign up for our Newsletter so you never miss a contest or giveaway!

instagram purple icon facebook icon purple pinterest purple icon twitter purple icon YouTube icon blog subscription purple icon

Monthly Recap Scrapbook Layout

Have you ever created a Monthly Recap Scrapbook Layout? I started doing it this year with the help of the Best Year Ever Collection from Simple Stories. It’s a great way to use up pictures that may not make it to their own layout, but are still a part of life that you want to remember. Some months I have tons of pictures and others I have less. Being home all month in April and making lots of memories, made for a lot of April pictures. With lots of pictures and journaling to add, I need just the right adhesives to make this project work. Let’s take a look at what I used for my April layout.

Monthly Recap Scrapbook Layout by Christine Meyer for Scrapbook Adhesives by 3L

Monthly Recap Scrapbook Layout Adhesives

As we discuss regularly here, having the right adhesives for the job makes a project go so much smoother. For my Monthly Recap Scrapbook Layout, I used the E-Z Runner Grand, 3D Foam Squares, and Adhesive Sheets.

Monthly Recap Scrapbook Layout by Christine Meyer for Scrapbook Adhesives by 3L

Whenever I fussy cut something, as I did with April, it’s nice to have Adhesive Sheets. With all the curves and skinny lines, I don’t want to go back after doing all the cutting and have to try and get adhesive in all the right spots. Adhesive Sheets provide just enough coverage and hold fabulously.

Monthly Recap Scrapbook Layout by Christine Meyer for Scrapbook Adhesives by 3L

I can’t imagine doing a scrapbook page without my 3D Foam Adhesives. Today the 3D Foam Squares are helping give height to my butterflies and clouds.

Monthly Recap Scrapbook Layout by Christine Meyer for Scrapbook Adhesives by 3L

Everywhere else the E-Z Runner Grand was the workhorse. It was just thin enough to work for my journaling strips and yellow strips!

You can check out the details for my April Monthly Recap Scrapbook Layout below. For previous monthly recap layouts, head over on my YouTube Channel!

Thanks for stopping by today!
Christine Meyer

Creative Time: 60 Minutes
Skill Level: Beginner

Materials Needed:
Scrapbook Adhesives by 3L®

E-Z Runner® Grand Permanent Strips Refillable Dispenser
3D Foam Squares White Mix
Adhesive Sheets 6 x 12 in.

Other
Patterned Paper, Stickers, Ephemera, and Enamel Dots: Simple Stories

Love This? Save it to Pinterest!

Monthly Recap Scrapbook Layout by Christine Meyer for Scrapbook Adhesives by 3L

Visit our Website and Blog!
Sign up for our Newsletter so you never miss a contest or giveaway!

instagram purple icon facebook icon purple pinterest purple icon twitter purple icon YouTube icon blog subscription purple icon

Rainbow Cards Tutorial

Hi, friends! Want to make someone smile? Teri here, and I’ll show you how to put together a couple of quick rainbow cards to pop in the mail and make the ones you love smile! Let’s get started!

Rainbow Cards Tutorial by Teri Anderson for Scrapbook Adhesives by 3L

Create a Rainbow with Pop and Dimension

Rainbow Cards Tutorial by Teri Anderson for Scrapbook Adhesives by 3L

Start by die-cutting a rainbow and some clouds from white cardstock. Don’t have a rainbow die? You can make rainbow bands by using nested circle dies together.

Rainbow Cards Tutorial by Teri Anderson for Scrapbook Adhesives by 3L

Take your rainbow bands and apply color to them with markers. Flip your rainbow over and add a few strips of tape to them to hold them together.

Make your rainbow pop by adding some small strips of Crafty Foam Tape to it.

Rainbow Cards Tutorial by Teri Anderson for Scrapbook Adhesives by 3L

Stencil a pattern onto a piece of cardstock (or use it plain), and adhere your rainbow to it. Add your clouds and a stamped sentiment.

Rainbow Cards Tutorial by Teri Anderson for Scrapbook Adhesives by 3L

Give your rainbow an extra happy feel by adding some 3D Foam Hearts to it, as well as around it. Coat the hearts with flock or glitter!

Rainbow Cards Tutorial by Teri Anderson for Scrapbook Adhesives by 3L

Rainbow Card with Less Pop

Worried about sending a card through the mail with a lot of bulk? You can easily make a rainbow card without any Crafty Foam Tape or 3D Foam Hearts.

Rainbow Cards Tutorial by Teri Anderson for Scrapbook Adhesives by 3L

Change your design by adhering everything to your card with a “flat” adhesive, like Dots or Strips. Also, look for ways to add to the overall design. Stamped birds or butterflies in the background are a great way to do that!

Rainbow Cards Tutorial by Teri Anderson for Scrapbook Adhesives by 3L

You can also add sequins to your clouds with Adhesive Dots. Sequins are a great embellishment for cards because they are mostly flat and don’t add much bulk to cards!

Rainbow Cards Tutorial by Teri Anderson for Scrapbook Adhesives by 3L

I hope you enjoyed today’s tutorial and are inspired to make rainbow cards of your own!

Happy creating!
Teri Anderson

Creative Time: 45 Minutes
Skill Level: Intermediate

Materials Needed
Scrapbook Adhesives by 3L®

HomeHobby™ by 3L

Other
White Cardstock: Neenah Paper; Dies: Paper Smooches (Rainbow), Simon Says Stamp! (Clouds); Stamps: My Favorite Things (From the Heart Stamp Set), Paper Smooches (Luminous Spring); Stencil: My Favorite Things; Sequins: Pretty Pink Posh; Blue Ink Pad: My Favorite Things; Black Ink Pad: Ranger Ink; Flock: Stampendous!; Markers: Copic

Save it on Pinterest!

Rainbow Cards Tutorial by Teri Anderson for Scrapbook Adhesives by 3L Pinterest

Visit our Website and Blog!
Sign up for our Newsletter so you never miss a contest or giveaway!

instagram purple icon facebook icon purple pinterest purple icon twitter purple icon YouTube icon blog subscription purple icon

Rule the World Shaker Card with Coffee Lovers

Congratulations to our winners, LeeAnn, Kathy and June!! Check your emails!

Welcome! It’s time for the Spring/Summer Coffee Lovers Blog Hop with this adorable coffee-themed project! As a SUPER SPONSOR, we’ve provided great prizes too! Grab a cuppa and join the hop with your own beverage-themed artwork!

What is Coffee Lovers? It is a coffee-loving (or tea or cocoa) community of card makers open to everyone. Their blog offers inspirational coffee-related posts and bi-annual coffee blog hops that YOU can join. You get a chance to win the giveaways as a blogger! So read until the very end!

Margie shows you how she creates an easy and fun shaker card with Scrapbook Adhesives by 3L® products. Follow along and learn a few ideas. Let’s Rule the World with this shaker card!

Rule the World Shaker Card by Margie Higuchi for Scrapbook Adhesives by 3L

Rule the World Shaker Card by Margie Higuchi

Hi, coffee-loving friends! Margie here today sharing a coffee-themed shaker card with texture and an unexpected element too. Using the Keepsake Envelopes, I share how to make an easy and fast way to create a shaker feature. Let me show you how, along with other ideas!

Shaker Card Basics and Texture

I cut three layers for this green A2-sized (4.25 x 5.5-inch) card base. The yellow patterned paper was cut at 4 x 5.25-inches, the Kraft paper was cut at 3.75 x 5.00-inches and the flower patterned paper was cut at 2 x 4-inches to slid inside the Keepsake Envelope (on the right side of image).

Rule the World Shaker Card by Margie Higuchi for Scrapbook Adhesives by 3L

To make texture on the Kraft cardstock panel, I used a coffee-themed embossing folder and rolled it through the die-cutting machine. LOVE how it turned out!! Designer’s Note: lightly water mist the Kraft panel before embossing for a crisp embossed design.

Rule the World Shaker Card by Margie Higuchi for Scrapbook Adhesives by 3L

Making a Window

Die-cut a coffee cup window shape in the embossed Kraft panel. Set aside.

Rule the World Shaker Card by Margie Higuchi for Scrapbook Adhesives by 3L

Since I had my die-cutting machine out, I die-cut the lid and the sleeve out of ivory cardstock. Then I stamped the sentiment on the sleeve with brown ink. Set aside.

Rule the World Shaker Card by Margie Higuchi for Scrapbook Adhesives by 3L

Shaking It Up a Bit

Slip the 2 x 4-inch flower patterned paper into the rectangle Keepsake Envelope. Add sequins and shaped glitter in front of the paper. Take the small liner in front off, fold the flap over on top to seal. Keep the back liner on – you will need it to add to the Kraft window panel.

Rule the World Shaker Card by Margie Higuchi for Scrapbook Adhesives by 3L

Apply E-Z Runner® Grand Ultra Strong adhesive on the edges of the Kraft window panel. Using the back liner of the Keepsake Envelope as a handle, place the envelope over the window and use the liner to press the envelope into the adhesive to secure.

Rule the World Shaker Card by Margie Higuchi for Scrapbook Adhesives by 3L

Adding a Twist

To add some fun, I had an unused coffee cup stopper that I grabbed from my coffee shop. I used a combination of Adhesive Dots 3D for the top (because it had a stopper and was thick) and Adhesive Dots Small for the bottom tip. I tuck the bottom into the window and then secured the top.

Rule the World Shaker Card by Margie Higuchi for Scrapbook Adhesives by 3L

Then I added 3D Foam Strip on the top edge of my window to lift the coffee lid over the coffee stopper. I stacked two strips. Repeat for the sleeve.

Rule the World Shaker Card by Margie Higuchi for Scrapbook Adhesives by 3L

Assembly the Card

Take off the bottom liner of the Keepsake Envelope and apply E-Z Runner® Grand Ultra Strong adhesive on the Kraft window panel. Adhere to the yellow patterned card panel.

Rule the World Shaker Card by Margie Higuchi for Scrapbook Adhesives by 3L

Lift the layered panel with Crafty Foam Tape White and secure onto the green card base. You’re done!

Rule the World Shaker Card by Margie Higuchi for Scrapbook Adhesives by 3L

I hope that my Rule the World Shaker Card inspired you to try this easy method for a shaker element.

Rule the World Shaker Card by Margie Higuchi for Scrapbook Adhesives by 3L

Keep reading for the Coffee Lover’s giveaway details!

Thanks for stopping in!
Margie Higuchi

Materials Needed:
Scrapbook Adhesives by 3L®
Keepsake Envelopes Mix
E-Z Runner® Grand Refillable Dispenser
E-Z Runner® Grand Ultra Strong Refill
3D Foam Strips
Adhesive Dots Small
Adhesive Dots 3D
Crafty Foam Tape White

Other
Patterned Papers: Authentique Paper (Blissful Collection); Stamps and Dies: My Favorite Things Stamps (Perk Up Stamps and Coffee Cup Dies); Ink: Ranger Ink (Fray Burlap Distress Ink); Embossing Folder: Sizzix (On the Go Texture Fades by Tim Holtz); Green Card Base; Kraft and Ivory Cardstock; Coffee Cup Stopper; Shaped Glitter: WOW! Embossing Powder; Sequins

Save It to Pinterest!

Rule the World Shaker Card by Margie Higuchi for Scrapbook Adhesives by 3L Pinterest

Click the button below to participate, and/or see more inspiration

If you can’t find the comment section at the bottom of this post, click on this button and scroll down to the bottom of the post and leave a comment.

Visit our Website and Blog!
Sign up for our Newsletter so you never miss a contest or giveaway!

instagram purple icon facebook icon purple pinterest purple icon twitter purple icon YouTube icon blog subscription purple icon

Make a Wish Birthday Card

Hello crafty friends and welcome back! Tracy here, and today I am sharing this sweet and simple Dimensional Card to brighten up someone special’s day. Let’s bring back the love of Snail Mail during this time that we cannot be together, get crafting and send some cards.

Make a Wish Birthday Card by Tracy McLennon for Scrapbook Adhesives by 3L

Make a Wish Layers

Firstly I started by cutting, and die cutting my dimensional card layers. This collection from Simple Stories is just the cutest, and prefectly sweet to create birthday cards with. I then gathered the die cuts that I wanted to feature on the dimensional card. The finished card base is a 4×6 front, 6×8 in white cardstock and folded in half.

Make a Wish Birthday Card by Tracy McLennon for Scrapbook Adhesives by 3L

Second step is to adhere the yellow pattern to the white cardstock die cut piece, and adhere the lavender cardstock to the plaid patterned paper using the E-Z Dots® Permanent Refillable Dispenser.

Make a Wish Birthday Card by Tracy McLennon for Scrapbook Adhesives by 3L

Dimensional Layers

To create a dimensional card I start by using Crafty Foam Tape White between the larger layers. You can also adhere these layers to the card base using the E-Z Dots® Permanent Refillable Dispenser.

Make a Wish Birthday Card by Tracy McLennon for Scrapbook Adhesives by 3L

Embellishments can be added to the card front using a mixture of Thin 3D Foam Squares White Mix and 3D Foam Squares White Regular Size. Using the 2 thicknesses of foam squares gives even more dimension to this dimensional card.

Make a Wish Birthday Card by Tracy McLennon for Scrapbook Adhesives by 3L

Finally I added a few enamel dots to the card for s little sparkle and shine.

Make a Wish Birthday Card by Tracy McLennon for Scrapbook Adhesives by 3L

Make a Wish and celebrate everything good in these times.

Make a Wish Birthday Card by Tracy McLennon for Scrapbook Adhesives by 3L

I hope you enjoyed the Make a Wish birthday card! Thanks so much for stopping by!
Tracy McLennon

Creative Time: 30 Minutes
Skill Level: Beginner

Materials Needed
Scrapbook Adhesives by 3L®

Crafty Foam Tape White
3D Foam Squares White Regular Size
Thin 3D Foam Squares White Mix
E-Z Dots® Permanent Refillable Dispenser

Other:
Thin Metal Die: Heartfelt Creations (Ornate Die); Patterned Papers, Enamel Dots, and Die Cuts: Simple Stories (Magical Birthday Collection); Lavender and White Cardstock

Save it to Pinterest!

Make a Wish Birthday Card by Tracy McLennon for Scrapbook Adhesives by 3L Pinterest

Visit our Website and Blog!
Sign up for our Newsletter so you never miss a contest or giveaway!

instagram purple icon facebook icon purple pinterest purple icon twitter purple icon YouTube icon blog subscription purple icon

Recognize and Nominate Your Front Line Hero!

We’re excited to be a part of a campaign with Scrapbook & Cards Today Magazine called Nominate a Front Line Hero!

Recognize and Nominate Your Frontline Hero with Scrapbook & Cards Today Magazine and Scrapbook Adhesives by 3L & Others

During these unprecedented times, our Front Line Heros are making a difference every day to keep our families safe and we want to share their story. Their tireless work and bravery deserve to be celebrated, so together, let’s put them in the spotlight!

Share a story about a deserving Hero who you know on the Scrapbook & Cards Today Blog (not on this post).

Together with many other papercraft partners below, there are not one but THREE fun & incredible boxes full of crafting items for three deserving Front Line Heros! These boxes are sure to bring a smile to each of our winners!

Recognize and Nominate Your Frontline Hero with Scrapbook & Cards Today Magazine and Scrapbook Adhesives by 3L & Others

Click the Button Below to Visit Scrapbook & Cards Today Blog
for Entry Details!

Visit our Website and Blog!
Sign up for our Newsletter so you never miss a contest or giveaway!

instagram purple icon facebook icon purple pinterest purple icon twitter purple icon YouTube icon blog subscription purple icon

Dimensional Father’s Day Card

Hi, Connie here with a dimensional Father’s Day card. June will be here before we know it, so let’s create a mixed media-inspired card for our dads! Creating a Father’s Day card with 3D Foam products will make this card POP!

Dimensional Father's Day Card by Connie Mercer for Scrapbook Adhesives by 3L

Dimensional Father’s Day Card Steps

Dimensional Father's Day Card by Connie Mercer for Scrapbook Adhesives by 3L
  1. First, gather the supplies such as the E-Z Runner Grand Refillable Dispenser, 3D Foam Circles White Mix, 3D Foam Squares White Small Size, 3D Foam Strips, stamps, ink, embossing powder, stencil, and heavy mixed media cardstock.
  2. Create a background using inks by watering it down and use it as watercolors. Layer colors and heat dry after each color until the desired look is achieved.
  3. Stamp tool images with ink and one image with VersaMark. Emboss the VersaMark image with embossing powder. Trim all images out.
  4. Add 3D Foam Circles White Mix and 3D Foam Squares White Small Size to the tool embellishments and set aside.
  5. Add in a small area of the inked card panel, the brick wall stencil.
  6. Adhere the card panel to a beige card panel with 3D Foam Squares White Small Size.
  7. Using the E-Z Runner Grand Refillable Dispenser to adhere the layered card panel to a folded blue card base.
  8. Add a combination of 3D Foam Circles White Mix and 3D Foam Strips to the tool embellishments. Then adhere to the card front.
Dimensional Father's Day Card by Connie Mercer for Scrapbook Adhesives by 3L

I hope this Dimensional Father’s Day card inspires you to try a little mixed media! Thanks for stopping by~
Connie Mercer

Dimensional Father's Day Card by Connie Mercer for Scrapbook Adhesives by 3L

Creative Time: 30 minutes
Skill Level: Beginner

Materials Needed:
Scrapbook Adhesives by 3L®

3D Foam Squares White Small Size
3D Foam Circles White Mix
E-Z Runner Grand Refillable Dispenser
3D Foam Strips

Other
Inks: Ranger Ink (Distress Oxide Ink and Archival Ink); Stencil and Stamps: Darkroom Door (Brick Wall Stencil and Tool Shed Stamps); WOW! Embossing Powder; Twine

Save To Pinterest!

Dimensional Father's Day Card by Connie Mercer for Scrapbook Adhesives by 3L

Visit our Website and Blog!
Sign up for our Newsletter so you never miss a contest or giveaway!

instagram purple icon facebook icon purple pinterest purple icon twitter purple icon YouTube icon blog subscription purple icon