You are in our US store • Switch to Europe store

Blog Hop with LDRS Creative – Day 3

Welcome to Day 3 of our blog hop with LDRS Creative! See what products the two talented design teams have used and created for some amazing inspiration. If you missed Day 2, click Blog Hop with LDRS Creative – Day 2! There’s an opportunity to win a giveaway…so stay tuned at the end of the post for details!

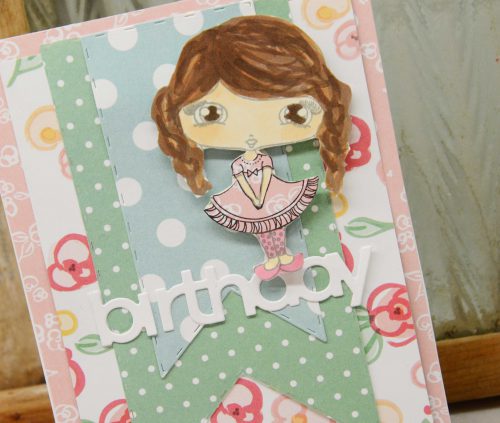
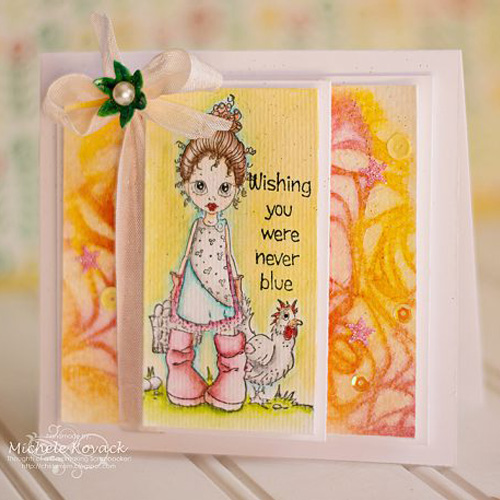
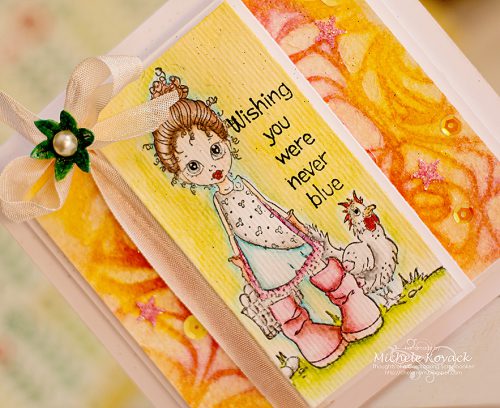
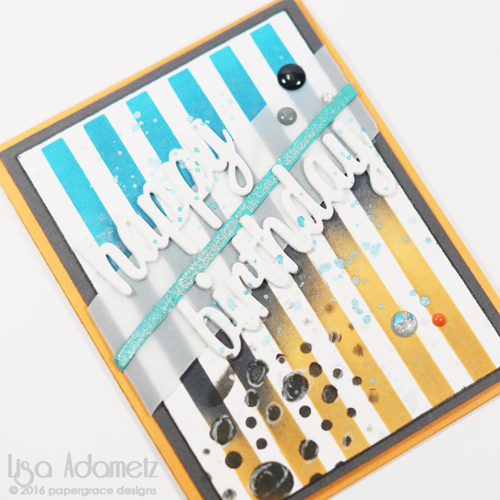
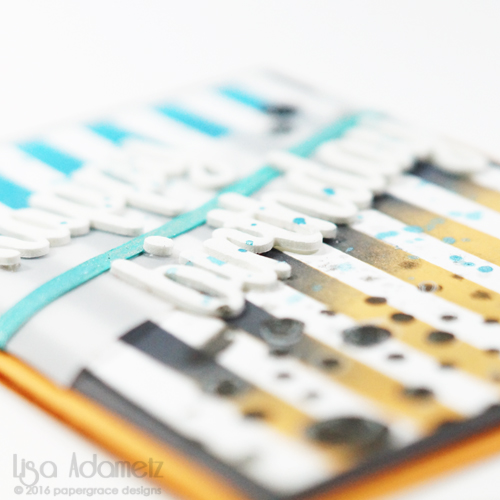
Hi everyone, Laurel here.  I was fortunate to receive the Basic Stitched Flags dies and the Emmy Lou set from CandiBean Stamps to work with.  I am always in need of kids birthday cards so they were perfect!

LDRS Birthday Card by Laurel Seabrook

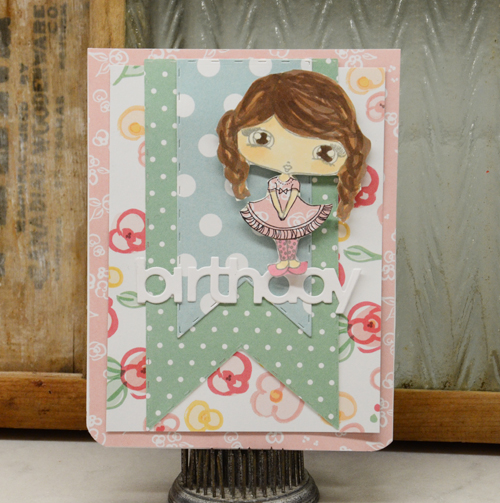
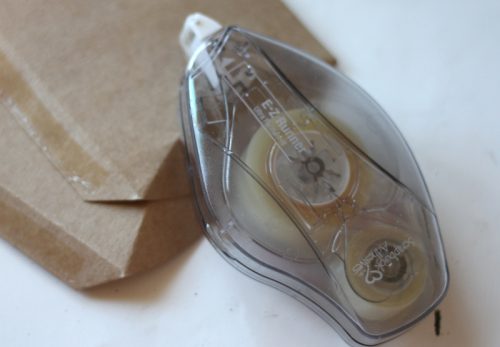
I used the die to add a couple of flag layers.  I adhered these to the base using the  E-Z Runner® Grand Dispenser.  I then paper pieced and colored the image before mounting her with the 3D Foam Squares White Small. Tip: for small areas such as her legs, I cut the foam squares in half 🙂

2016 05 16_3243

I hope you have been enjoying the projects this week and be sure to come back each day!

Products Used:
Scrapbook Adhesives by 3L®: E-Z Runner® Grand Refillable Dispenser (150′) and 3D Foam Squares small
LDRS Creative: Emmy Lou Stamp and Basic Stitched Flags Die
Other: Elle’s Studio (Paper);

Don’t forget to hop over for more wonderful projects from our friends over at LDRS Creative by clicking Blog Hop with LDRS Creative – Day 3.

Blog Hop Prize Details
Blog Hop with Scrapbook Adhesives by 3L and Little Darlings Rubber Stamps

Enter to win by leaving a comment through the Rafflecopter App. A winner will be randomly picked. International entries are welcome.

a Rafflecopter giveaway

Blog Hop with LDRS Creative – Day 2

Welcome to Day 2 of our blog hop with LDRS Creative! We are excited to share wonderful inspiration created with both company’s products. See what the two talented design teams have done. If you missed Day 1, click Blog Hop with LDRS Creative – Day 1! Don’t forget an opportunity to win a giveaway…details at the end of the post 🙂

Margie Higuchi here and I am excited to be participating in the Scrapbook Adhesives by 3L® and LDRS Creative Blog Hop!! Using both companies’ products, I created an embossed get well card…

Wishing You Speedy Recovery Card by Margie Higuchi

First I embossed the Gilded Embossing Folders to give my pink shimmery card base some dimension. Set aside.

MargieHiguchi SpeedyRecoveryCd May1716 Step1

I stamped a sentiment from the Wishing You Stamp Set with black ink on white cardstock. Using the second largest oval from the Gilded Oval Labels Set, I placed over the stamped sentiment and die cut. From the same die set, I cut the largest oval from green patterned paper.

MargieHiguchi SpeedyRecoveryCd May1716 Step2
MargieHiguchi SpeedyRecoveryCd May1716 Step3

With Adhesive Sheets 12 x 12″, I applied adhesive on the back of leftover Lace Ribbons and sentiment die cut by burnishing the back with a bone folder.

MargieHiguchi SpeedyRecoveryCd May1716 Step4

I adhered the two pieces of ribbon on each side of the card base. Next I placed several 3D Foam Squares – Black, Reg on the back of the largest oval die cut. Then centered the smaller oval die cut on top.

MargieHiguchi SpeedyRecoveryCd May1716 Step5
MargieHiguchi SpeedyRecoveryCd May1716 Step6

Then I adhered the die cut between the pieces of Lace Ribbons. To finish, I placed Adhesive Dots Small on each side of the large oval die cut, sprinkled pink glitter on top and gently rubbed/pressed into the Adhesive Dots for accents.

Another look at the finished card….

Speedy Recovery Card by Margie Higuchi

MargieHiguchi 500WM SpeedyRecoveryCd CloseUp1 May1716

Supplies:
Scrapbook Adhesives by 3L®: Adhesive Sheets 12 x 12″, 3D Foam Squares Black, Reg. and Adhesive Dots Small

LDRS Creative: Gilded Oval Labels Set, Gilded Embossing Folders and Wishing You Stamp Set
Patterned Paper: Prima Marketing
Card Base and White Cardstock: Core’dinations ColorCore Cardstock®
Pink Micro Glitter: Stampendous®
Black Ink: Imagine Crafts®/Tsukineko®
Tool: MISTI; Spellbinders® Platinum™ Die Cutting and Embossing Machine

Don’t forget to hop over to our friends over at LDRS Creative by clicking Blog Hop with LDRS Creative – Day 2.

Blog Hop Prize Details
Blog Hop with Scrapbook Adhesives by 3L and Little Darlings Rubber Stamps

Enter to win by leaving a comment through the Rafflecopter App. A winner will be randomly picked. International entries are welcome.

a Rafflecopter giveaway

Blog Hop with LDRS Creative – Day 1

Welcome to Day 1 of our blog hop with LDRS Creative! We are excited to showcase fabulous inspiration created with both company’s products. Join us each day this week through Friday to see what both talented design teams have done plus an opportunity to win a giveaway…details at the end of the post!

Michele here with day 1 of the Scrapbook Adhesives By 3L® and LDRS Creative blog hop! I had so much fun creating a card to spread a little joy!  I used this adorable stamp from LDRS called, Eggstra Special.  I colored her in with water colored pencils. I stamped the sentiment directly on the image using LDRS’s Wishing You stamp.  I used Crafty Foam Tape to mount the image on another piece of card stock to add some depth.

Never Blue Card by Michele Kovack

The background was a bit of an experiment involving a stencil and Tim Holtz crayons. 😉 I used stars and glitter to add a bit of sparkle.  I adhered the back panel to the card using E-Z Squares® Refillable Dispenser.  To add the sequins I used an Adhesive Dots Mini.  I love the Minis because there is no messy glue and so much easier to adhere tiny items, like sequins!

little darlingstwo

Thank you for joining us today!

Supplies:
Scrapbook Adhesives by 3L®: Adhesive Dots Mini, Crafty Foam Tape and E-Z Squares® Refillable Dispenser

LDRS Creative: Eggstra Special Stamp and Wishing You Stamp
Stencil, Crayons, Watercolor Pencils, Sequins, Ribbon, Pearl

Don’t forget to hop over to our friends over at LDRS Creative by clicking Blog Hop with LDRS Creative – Day 1.

Blog Hop Prize Details
Blog Hop with Scrapbook Adhesives by 3L and Little Darlings Rubber Stamps

Enter to win by leaving a comment through the Rafflecopter App. A winner will be randomly picked. International entries are welcome.

a Rafflecopter giveaway

Dad Pillow Box

Hello – AJ here with a little treat for your pops!

AJOtto-DadStarbucks-1

I thought it would be fun to create a little gift pouch for Father’s Day using a few fun dies and my go to adhesive for boxes/bags/and pouches- E-Z Runner® Ultra Refillable.

AJOtto-DadStarbucks-2
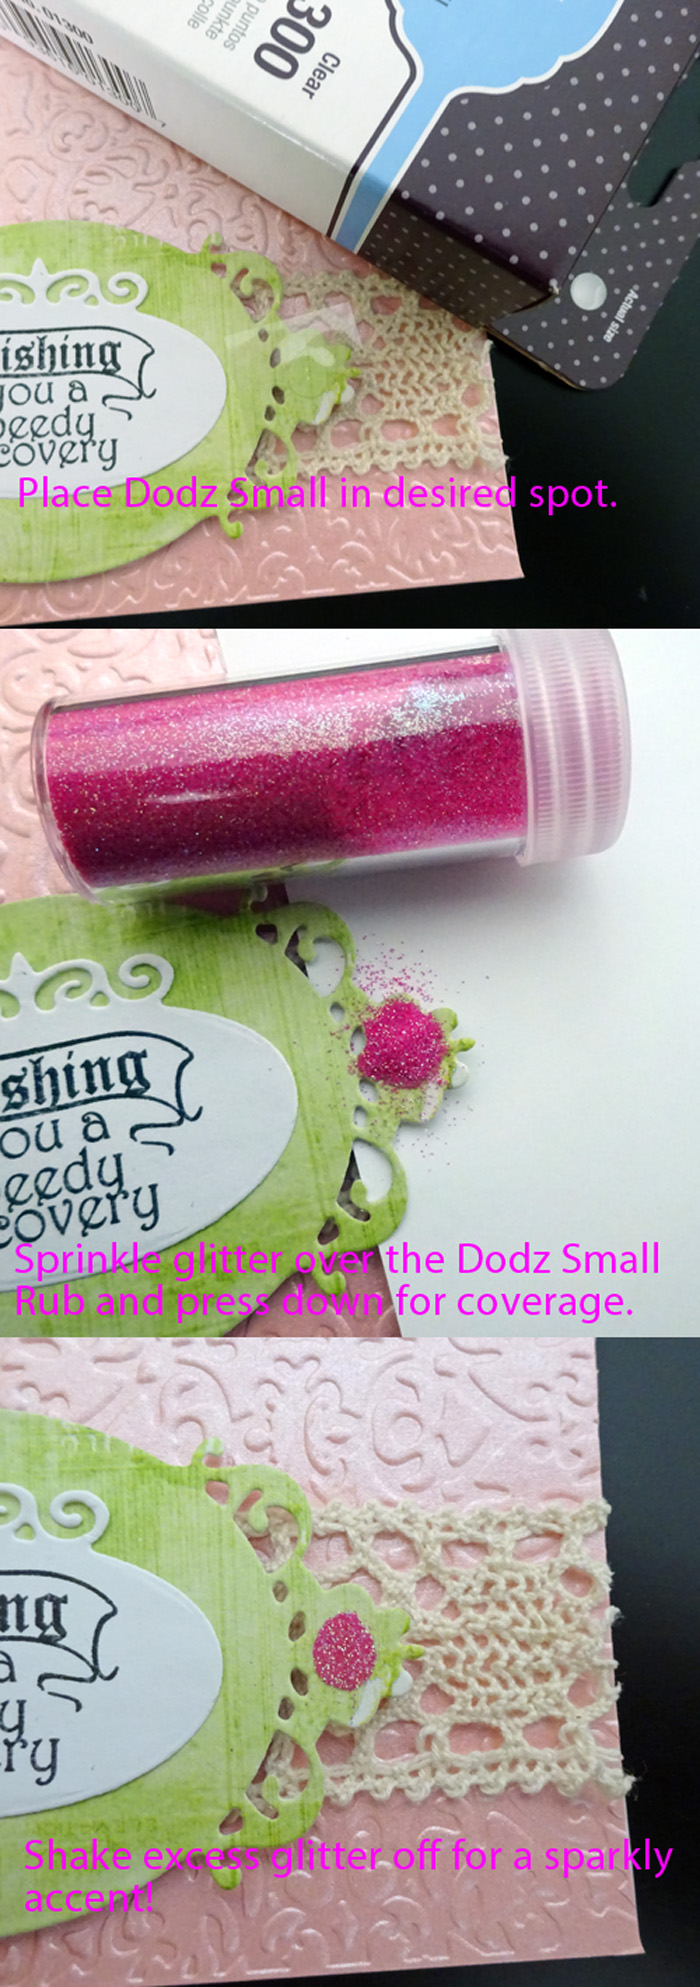
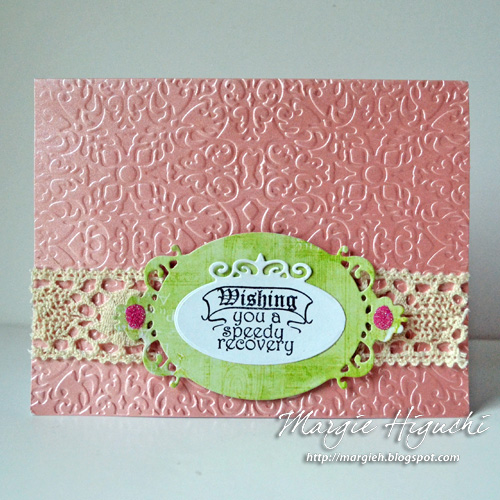
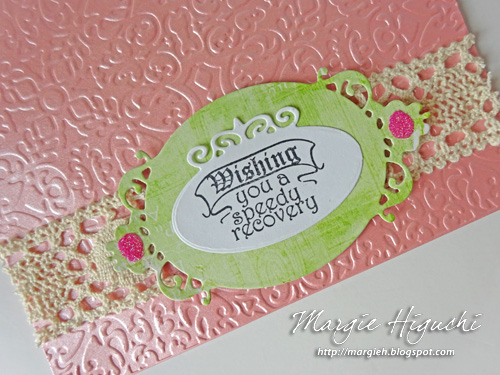
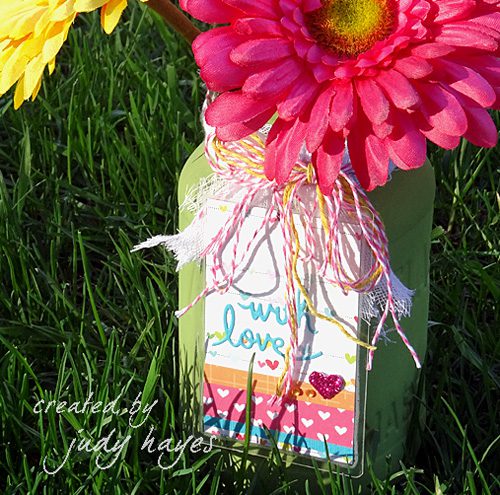
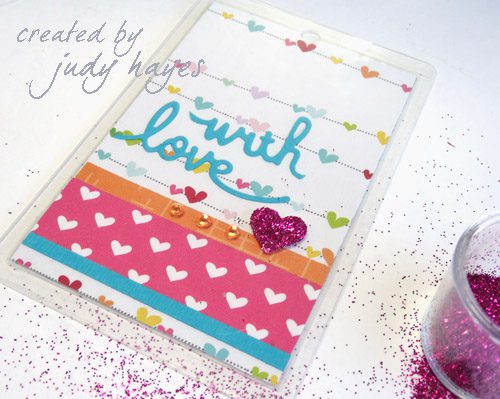
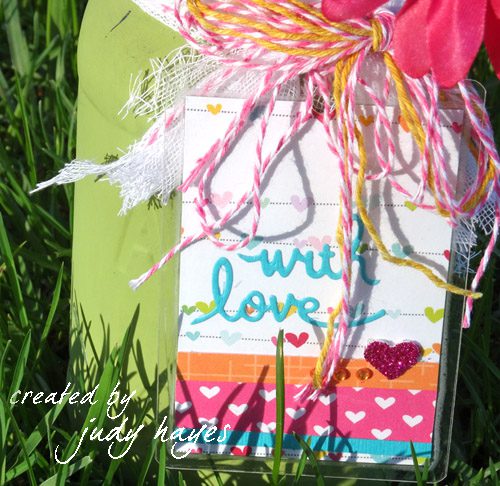
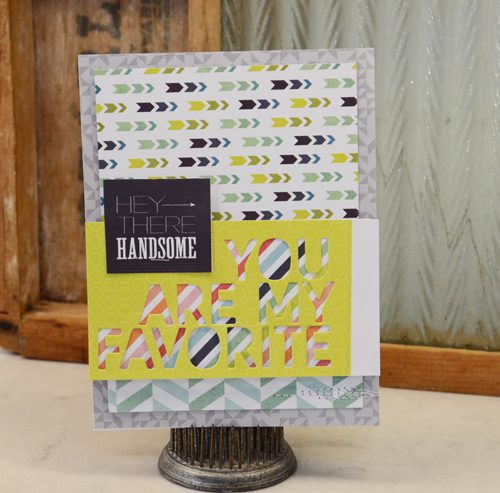
This is the super hero or adhesive runners, with clear adhesive and super hero strength fit for a box that needs to stay closed!  The sides are all I use this on for my pillow box, but you can also use it on the ends as well if not tying a cute little  Twine piece around.
AJOtto-DadStarbucks-3
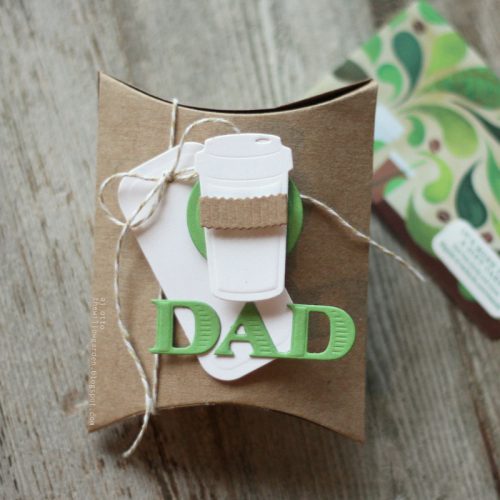
To hold my tag in place, I secured the oval with a mini Dodz before adhering the coffee cup together with 3D Foam Squares.  I finished this off by gluing the DAD with the new Dual Tip Glue Pen.

Hope this inspires you to whip up something special for the cool guy in your life!

enjoy!  AJ

Scrapbook Adhesives by 3L® Products used:  E-Z Runner® Ultra Refillable; 3D Foam Squares, Black Small; Dodz Adhesive Dots Mini; Dual Tip Glue Pen

other: Dies- Spellbinders, cardstock

Save

Save

Friendship Card

0516LYcdmyperson2

Hello there! Latisha with you today, sharing a card that is perfect for a friend.  The die cut and sentiment can be easily changed to fit the receiver. I am trying to be better at sending cards in the mail.  I need to work on being better at it.  This card will go into my “to-send” basket.  Do you have a container where you keep your cards to give away?


Instructions:

  1. Cut/fold pattern paper to create a card base.
  2. Die cut pattern paper, adhere to the card base using Scrapbook Adhesives by 3L® Crafty Foam tape (white).
  3. Trim down pattern paper, die cut it to fit the square and adhere to the front panel using Scrapbook Adhesives by 3L® 3D Foam Squares (white, regular)
  4. Die cut pattern paper using a circle die, adhere to the card front using Scrapbook Adhesives by 3L® Crafy Foam Tape (white).
  5. Adhere sentiment die cut using Crafty Foam Tape.
  6. Put together the die cut bow using Home and Hobby Extreme Double Sided Tape.
  7. Adhere the bow to the card using Scrapbook Adhesives by 3L® Dodz™ Small.
  8. Adhere stars using Scrapbook Adhesives by 3L® EZ Dots Permanent Refillable.
  9. Add twine.


0516LYcdmyperson


Materials Used:

Scrapbook Adhesives by 3L® 3D Foam Squares – White, Regular

Scrapbook Adhesives by 3L® Crafty Foam Tape (white)

Scrapbook Adhesive by 3L® Dodz™ Mini

Scrapbook Adhesives by 3L® EZ Dots Permanent Refillable

Scrapbook Adhesives by 3L® Extreme Double Sided Tape

Patterned Paper & Die Cuts: Fancy Pants Designs

Dies: Lawn Fawn

Twine

Masculine Happy Birthday Card

Hi crafty friends! It’s Lisa here on the blog today and I’m sharing a masculine birthday card today that I made. I have a few friends that share a birthday today, but I made this one for an extra special one. I hope you all like it. Making cards for men (or boys) can be difficult (at least to me), but I found that keeping it simple, graphic, and the colors less feminine that seemed to work for me.

Masculine Happy Birthday

I used a stencil and a few inks to create the main panel. Very simple to do. Each layer of ink was sponged on.

Masculine Birthday Card 2

After I pulled the stencil up I trimmed the panel of card-stock to the size I wanted.

To add interest I mixed water with Silver Pigment Powder and flicked it with a paintbrush onto the panel.

Masculine Birthday Card 3

I mounted this panel onto a piece of grey piece of cardstock using the E-Z Runner® Ultra Refillable Dispenser. After this was done I die-cut Happy Birthday from fun foam, a piece of vellum, and a very thin piece of card-stock. The vellum was wrapped on the diagonal and adhered to the back of the panel. The die-cuts were adhered using Adhesive Dots Mini and the Dual Tip Glue Pen.

Masculine Birthday Card 4

Using the E-Z Runner® Micro Refillable Dispenser I was able to adhere the tiny strip of paper to the vellum.

I mixed up some Blue Pigment Powder in the same way that I did the silver and flicked it all over the card. Using a stencil with circles, I mixed a black Gelato with water and pressed that through to create the pattern on the lower left hand corner. Some embellishments were added and the card was adhered to a beautiful orange base card using the E-Z Runner® Ultra Refillable Dispenser.

Here are a few more angles for you!

LisaAdametz-HappyBirthday-05112016-3

And one more!

LisaAdametz-HappyBirthday-05112016-2

I hope you enjoyed my card today! 🙂

SUPPLIES by Scrapbook Adhesives by 3L®:
E-Z Runner® Ultra Refillable Dispenser
E-Z Runner® Micro Refillable Dispenser
Adhesive Dots Mini
Dual Tip Glue Pen

Other products:

Pigment Powder
Dies: My Favorite Things Die-Namics
Stencils:My Favorite Things, Prima
Cardstock: My Favorite Things
Ink: Ranger, Faber-Castell
Embellishments: My Mind’s Eye

LisaAdametz-sig

Visit our Website and Blog!
Sign up for our Newsletter so you never miss a contest or giveaway!

instagram purple icon facebook icon purple pinterest purple icon twitter purple icon YouTube icon blog subscription purple icon

Floral Thanks Card

Good morning friends! Michele here with a water colored thank you card.  I colored this pretty flower with various water colors in shades of brown, red, and gold.  I was aiming for a more muted look.  Behind the flower I added some  Twine and  a vertical strip of  Lace Ribbon. stampendous brown

I really love wood colored washi tape.  The wood tone was a perfect backdrop to my flower.  I adhered the flower and twine using Dodz™ Medium to the faux wood panel.  The wood panel was attached to another piece of water color paper using Crafty Foam Tape in White, then attached to a pale pink card using the foam tape again.

stampendous browntwo
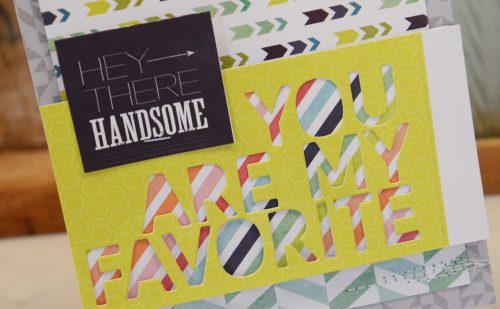
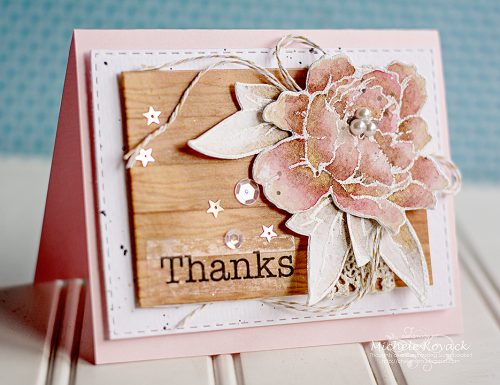
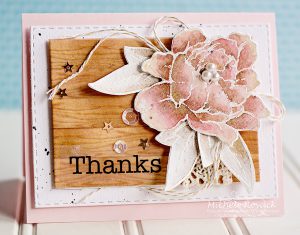
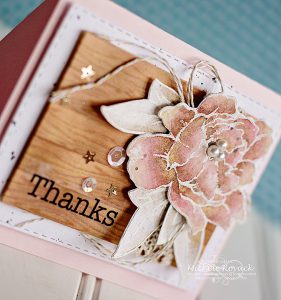
For my finishing touches I added a sticker sentiment and a scattering of sequins and pearls.  Those were applied using Dodz™ Mini.

stampendousbrownthree

Thank you so much for stopping by today!

Supplies: Crafty Foam Tape-white, Dodz™ Mini, Dodz™ Medium, washi tape, Lace Ribbon, Twine, sticker, card stock, water colors, pearls.

Decorated Notebook for Mother’s Day

Hi there,

it’s Stephanie here today and I want to show you a decorated Notebook for Mother’s Day with Sizzix dies and the fabulous E-Z Dots® Permanent – Refillable and 3D Foam Squares Mix – white.

Stephanie_Album_1

This year I wanted create not only a card for Mother’s Day, but a album or a notebook. I used a Chipboard Album with deviders and papers from Wycinanka and decorated it.

Here is my little tutorial for you.

Stephanie_Album_2

1 – I used a piece of watercolor paper and stamped with black acrylic paint and a stamp on it to create my background. I also splashed a bit with black paint.

2 – Then I prepared my motive, a butterfly. This is a Sizzix die with three pieces you can put together and I adhered them with a little 3D Foam Square (from the 3D Foam Squares Mix – white) under the corpuscles and with the E-Z Dots® Permanent – Refillable to put together the wings.

3 – Then I added a sticker with a bow in the middle.

4 – I cuted my paper and cuted the edges with a Crop a Dile.

5 – Then I adhered the butterfly onto the background.

6 – I prepared the album with a black background by using black acrylic paint and adhered the little card with the E-Z Dots® Permanent – Refillable.

And that’s it.

Stephanie_Album_3

Stephanie_Album_4

To all mothers a great Mother’s Day, enjoy the special attention and love!

Thanks for visiting me today!

I wish you a nice creative day!

Stephanie 🙂

Supplies from Scrapbook Adhesives by 3L®

3D Foam Squares Mix – white

With Love Tag and Jar and NSD Giveaway!

Happy Saturday! It’s Judy here today to share an easy Mother’s Day project. Actually, it could be used for other occasions as well. I’ve put together a fun tag to add to a mason jar filled with flowers.

With Love Tag and Jar

I’m using a recycled jar from spaghetti sauce. Any jar will work. I chose to paint it with spring green chalk paint. If there’s not enough time for that, simply use a clear mason jar maybe with some marbles or pebbles in it. Then add bright flowers!

judy-hayes-with-love-tag-3

I cut a strip of gauze to tie around the jar top. The pink bakers twine is perfect with my flowers but I wanted a touch of yellow, too. I applied yellow ink directly to the beige/white twine, misted it and rolled it in my hands to spread the ink.

judy-hayes-with-love-tag-2

You can put the twine in a small plastic bag if you don’t want inky hands! I used my heat gun to dry it. I wrapped several strands of pink and yellow twine around the gauze and tied a bow.

The Self-Laminating Pouches Cards Small from the HomeHobby Line are perfect for a tag. Using the 2¼ x 3½ʺ insert, I cut 2 pieces of patterned paper that were fastened back to back with E-Z Dots® Permanent Refillable adhesive. I wanted both sides of the tag to be the same. I added assorted strips of papers across bottom fastened with E-Z Dots® Permanent adhesive. To add adhesive to narrow strips of paper, place them on scrap paper, run E-Z Dots® Permanent adhesives over strip. Strip will have adhesive on it and excess adhesive will be on scrap paper.

judy-hayes-with-love-tag-4

I applied a piece of Adhesive Sheets 4 x 6″ to back of turquoise card stock. Then I die cut the words “with love” from it. Such an easy way to add adhesive to small die cut words! Simply peel adhesive backing and fasten to tag insert.

To put insert in Self-Laminating Pouches Cards Small, I placed pouch face down on work surface, added insert face down and then peeled backing from adhesive and pressed over back of insert. I firmly pressed the layers together especially along edges. So easy!
Next, I added a little Bling and a glitter heart! I placed a small 3D Foam Hearts on tag. I covered it with glitter, pressed it onto heart and then removed excess glitter. I added three rhinestones beside heart.

judy-hayes-with-love-tag-5

I punched a hole at top of tag. With another piece of  pink Twine, I tied it around the jar. It’s ready to brighten someone’s day!

judy-hayes-with-love-tag-6

Happy Mother’s Day!

Judy Hayes

Supplies:

It’s National Scrapbook Day!

Be sure to visit  Scrapbook and Cards Today Magazine for a day full of giveaways. We are scheduled for the 2:00 pm EST hour, visit and enter to win some of our newest products!

National Scrapbook Day prize

Save

Using Crafty Foam Tape on a Card

Hi everyone, Laurel here with a quick and easy card.  Life is so busy right now, quick and easy is all I have time for!

2016 05 05_3240 copy

I made this card for hubby and I am sure you know… he doesn’t really think about all the work that goes into a project, so I am ok with giving him a simple just because card.

I adhered the background panels with  E-Z Runner® Grand Dispenser.  After die cutting the sentiment,  I used the  E-Z Runner® Grand Dispenser to adhere a background paper behind it.

2016 05 05_3241

To mount the sentiment panel to the card I used the Crafty Foam Tape White (13′)

Like I said quick and easy 🙂

Thanks for stopping by and have a great day!

Products Used:

E-Z Runner® Grand Dispenser

Crafty Foam Tape White (13′)


Other Products:

Pattern Paper: Heidi Swapp

Die: Simon Says