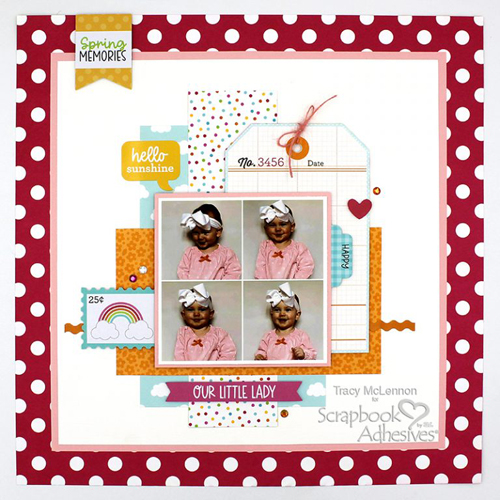
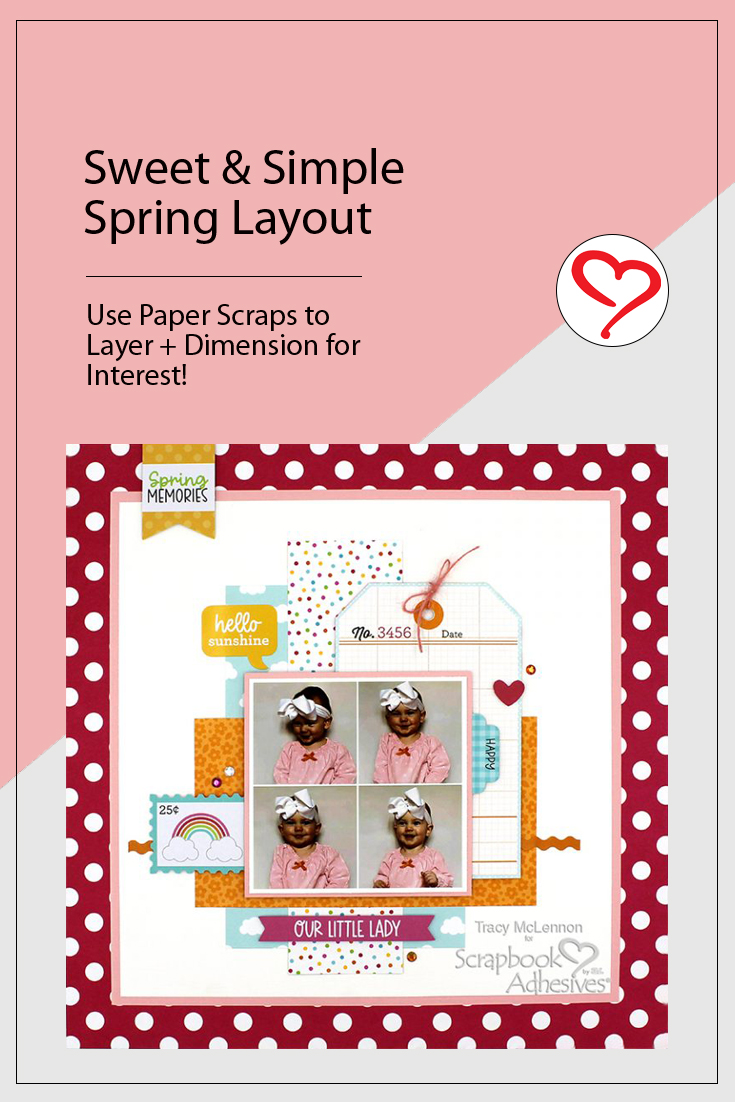
Hello crafty friends! Tracy here, and today I have a sweet and simple Spring Layout to share. Let’s celebrate warmer weather with a little crafting. Here are all of the details.
Let’s Get This Spring Layout Started!
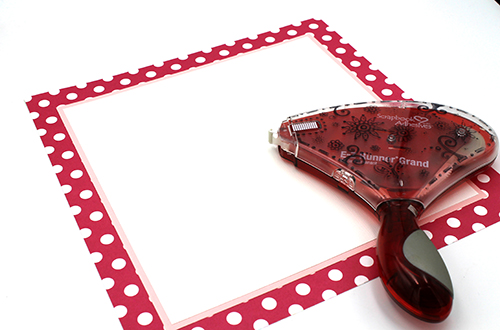
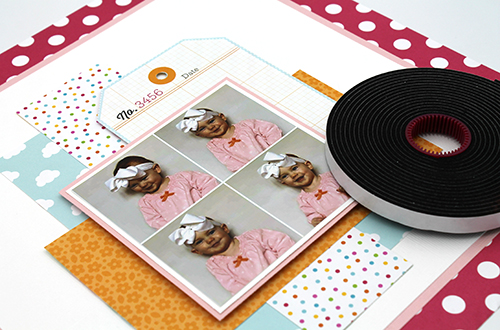
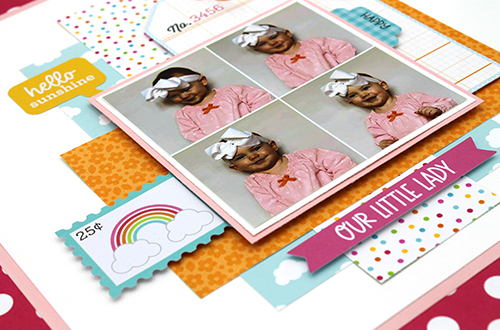
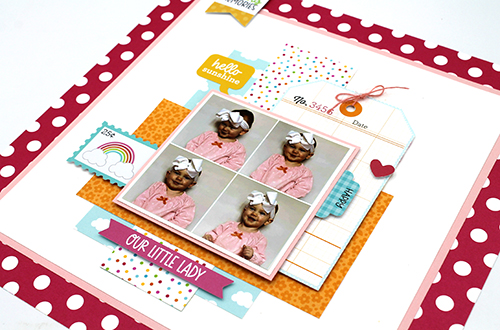
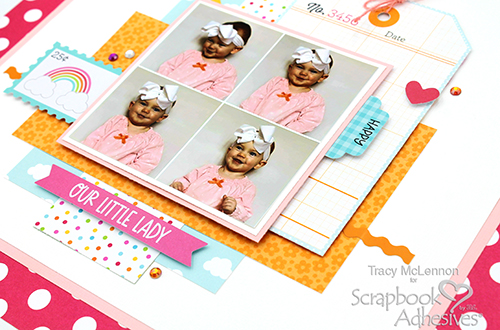
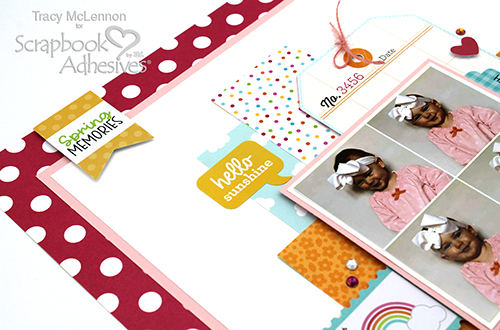
First I created a very simple layered background for this Spring Layout using patterned paper, white cardstock and light pink cardstock. Adhere these layers together using the E-Z Runner® Grand Refillable Dispenser.
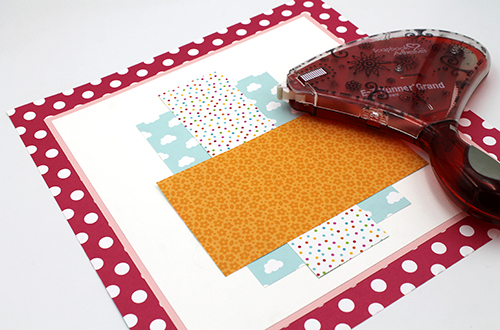
I adhered some leftover bits and pieces of coordinating patterned paper to collage onto the background and adhere using the E-Z Runner® Grand Refillable Dispenser.
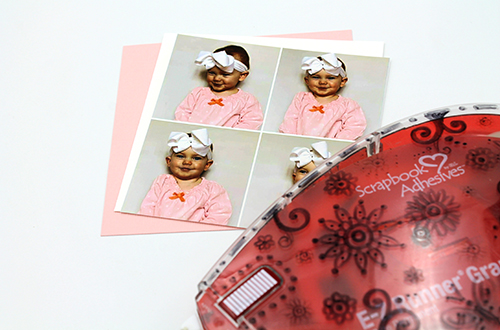
Add the large tag as well as the matted photo to the Spring Layout using Crafty Foam Tape Black for lots of dimension.
Next step is to add the ephemera and some sticker embellishments around the matted photo. I added lots of these using 3D Foam Squares White Mix for some fun dimension.
Add a few more sticker embellishments around the Spring Layout and the burlap string bow to the large tag.
The final touch was to add just a little sparkle and shine using gems around the layout in coordinating colors.
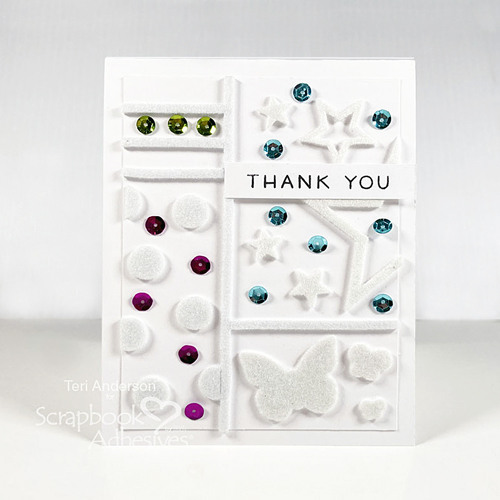
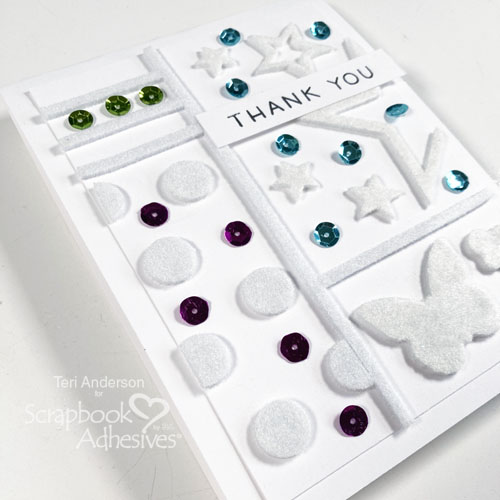
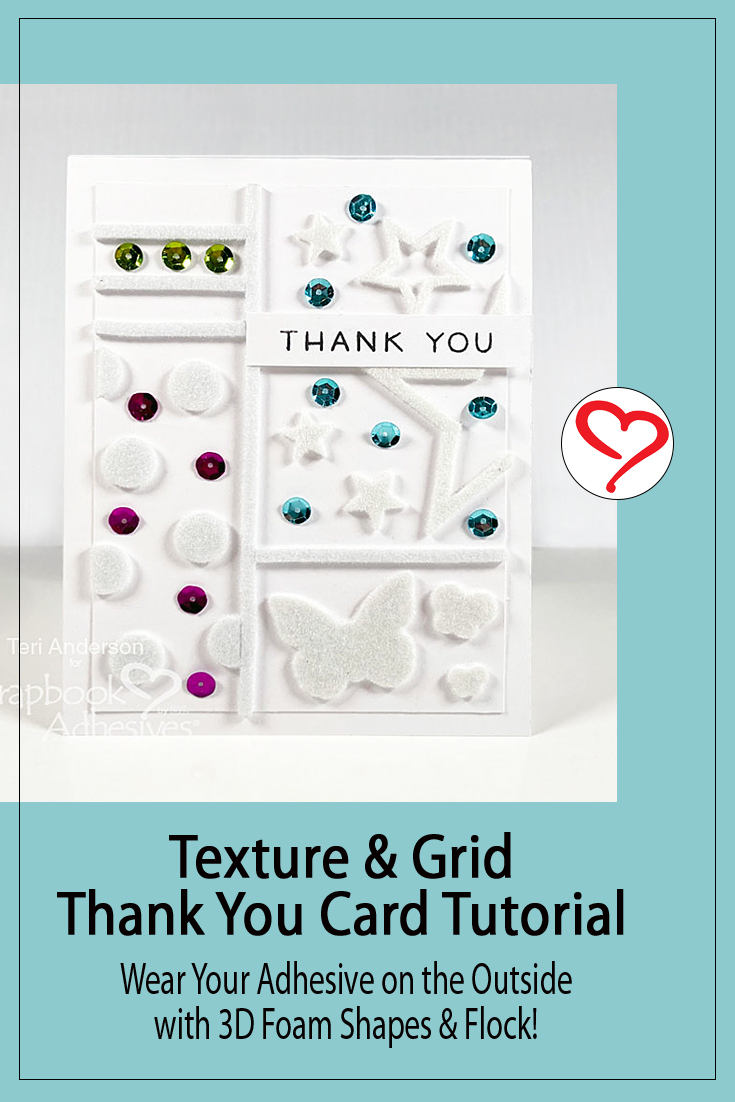
Hi, everyone! Do you love the look of flock? Teri, here to show you this fun Flocked Thank You Card featuring 3D Foam Shapes. They are the perfect way to add lots of flock to your handmade cards in a visually interesting way!
Flocked Thank You Card Front Design
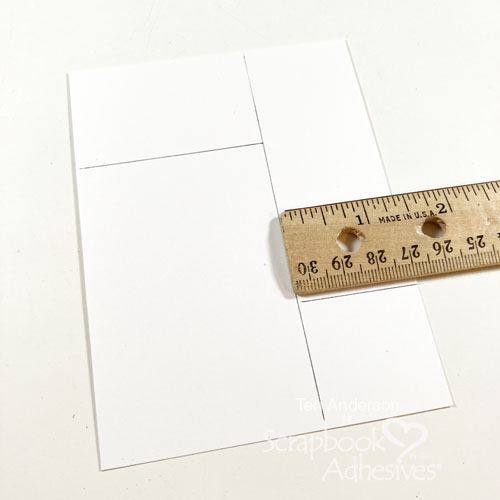
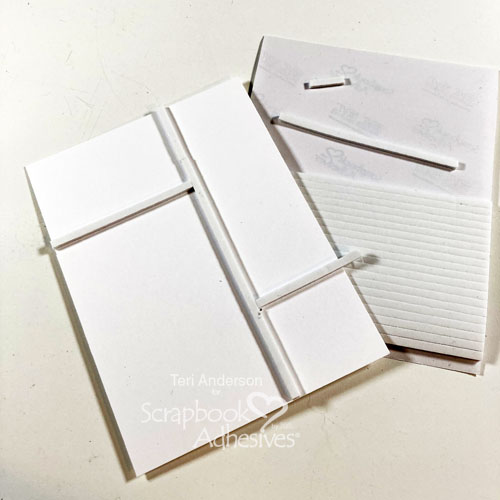
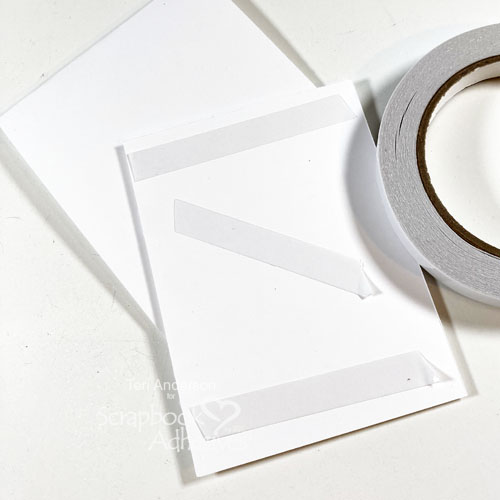
Start by cutting a panel of cardstock to fit on a card. Use a ruler and pencil to draw gridlines on your panel. You can make your grid sections as big or small as you want.
Place 3D Foam Strips on top of your pencil marks. Since you are covering up those marks, there is no need to erase them. Use your scissors to cut down your strips to make them fit.
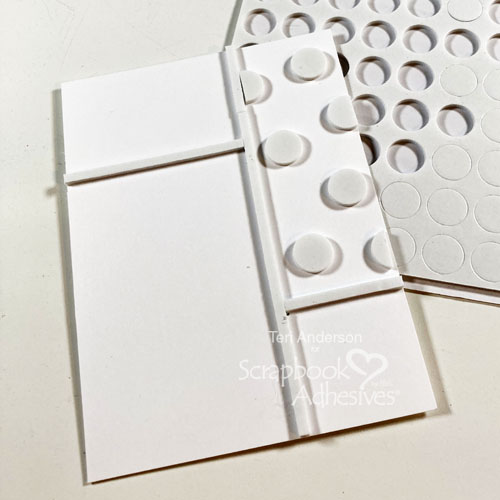
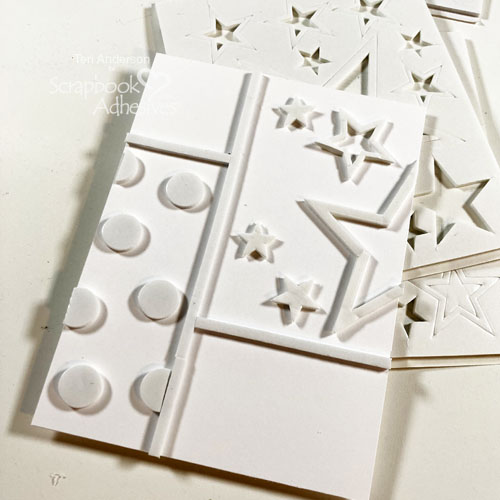
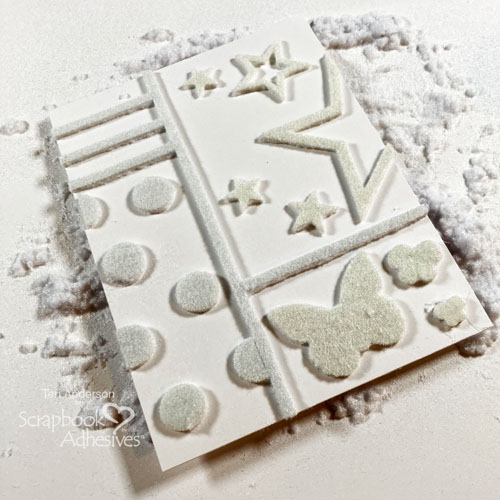
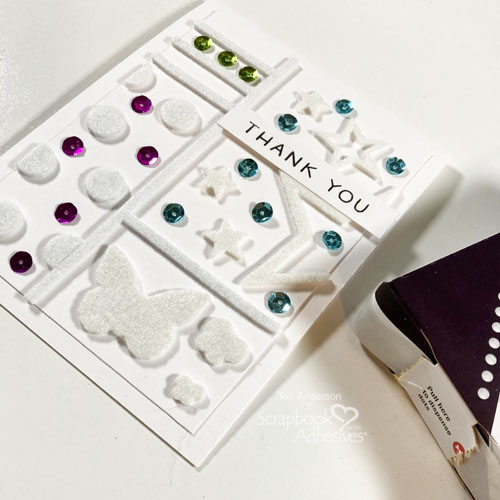
Remove the release paper from your foam shapes and apply flock to them. I only used one color of flock on my card. You may want to use two or three colors. Just be sure to apply the flock one color at a time on different sections of the panel.
Assemble the Card and Embellish It
Mount the panel onto a card with the Crafty Power Tape Polybag 81ft. Did you know we have tear tape? The 1/4″ tape is aligned along one of the edges of the liner for perfect placement and the liner gap makes it easier to remove the liner from the tape…clever!
Stamp a sentiment on a strip of cardstock and place it on your card. Embellish the card with a few sequins or gems. Adhesive Dots Micro are perfect to adhere small embellishments like these to cards!
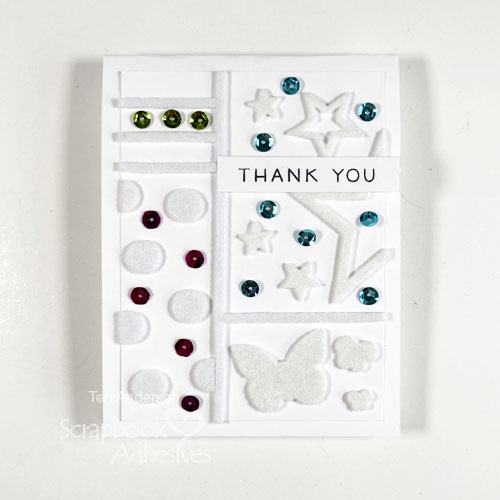
I hope have enjoyed today’s Flocked Thank You Card post, and are inspired to make some cards with flock on them!
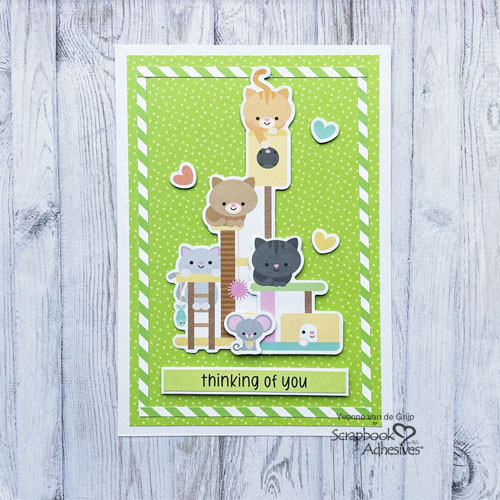
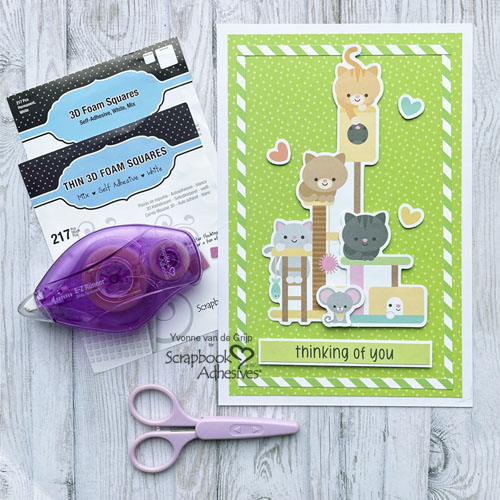
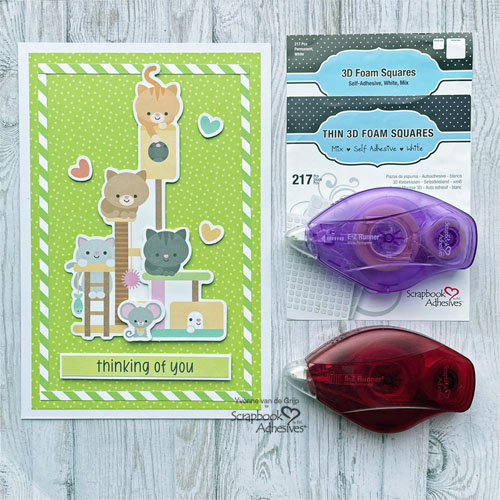
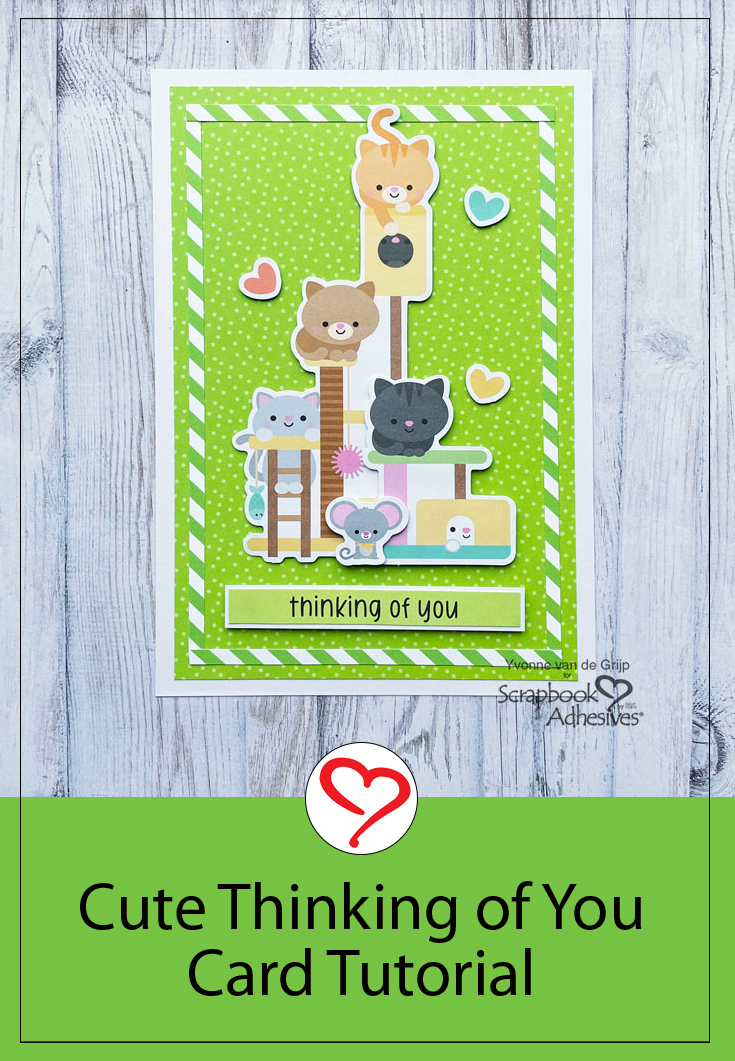
Hi everyone, Yvonne here with a super Cute Thinking of You Kitten Card. What better way of saying that you are thinking of someone with all these cute kittens staring at you?
The fun thing about this card that it is suitable for beginner cardmakers too. And for precise adhering I am letting you in on a very handy adhesive. Wanna join me?
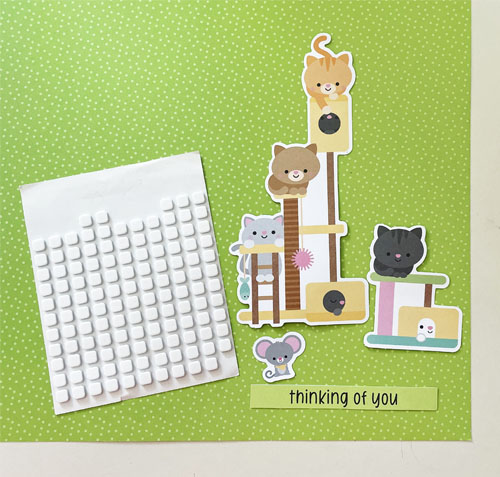
Kitten Card Panel
For this cite kitten card I worked with die-cut pieces. First I picked out the images I wanted to use and adhered them onto green patterned paper.
The largest image is adhered using Thin 3D Foam Squares White Mix. Then adhere the other images on top and on the side using Thin 3D Foam Squares White Mix as well as 3D Foam Squares White Mix to created a 3D scenery. Next I cut out a sentiment and adhered it, using the EZ RUNNER, onto a slightly larger banner I cut out from white cardstock. Then adhered the banner under the kitten scenery.
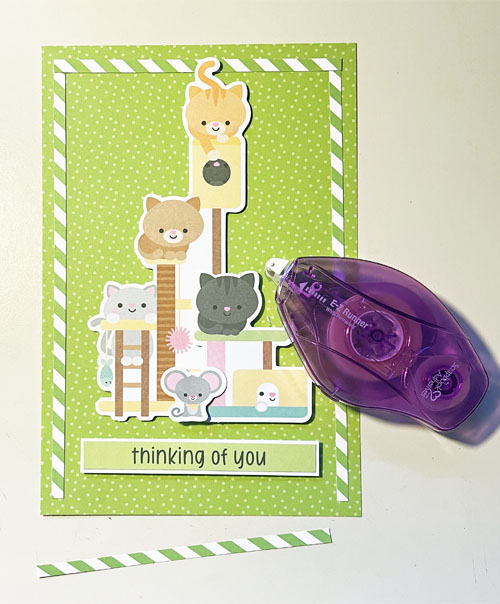
Making the Kitten Card Base
First, trim the patterned cardstock with the kittens to te the desired size. Then adhere onto a white card base using the E-Z Runner® Permanent Strips Refillable Dispenser. This is the base for your Cute Thinking of You Kitten Card. Next, we are adding some fun details.
Adding a Finishing Touch
Start by trimming some strips from striped patterned paper. The use the E-Z Runner® Micro Refillable Dispenser to adhere the strips onto the card as shown on the picture below.
The E-Z Runner® Micro Refillable Dispenser is perfect for adhering small strips with it’s only .08in wide strips. For a finishing touch I adhered some die-cut hearts, using Thin 3D Foam Squares White Mix for adhering. Voilá your Cute Thinking of You Kitten Card is ready to bring a smile to someones face.
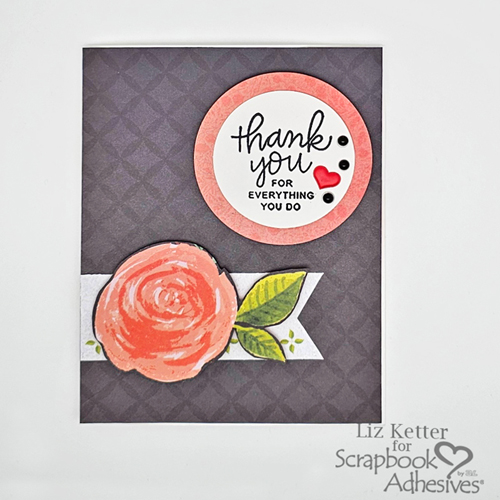
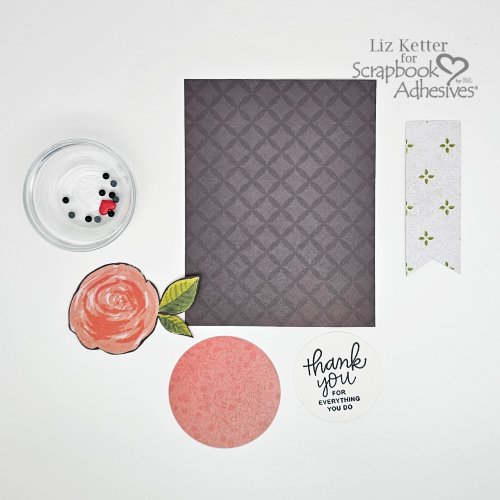
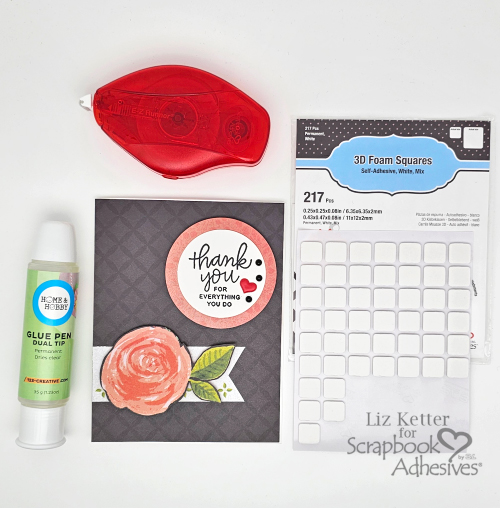
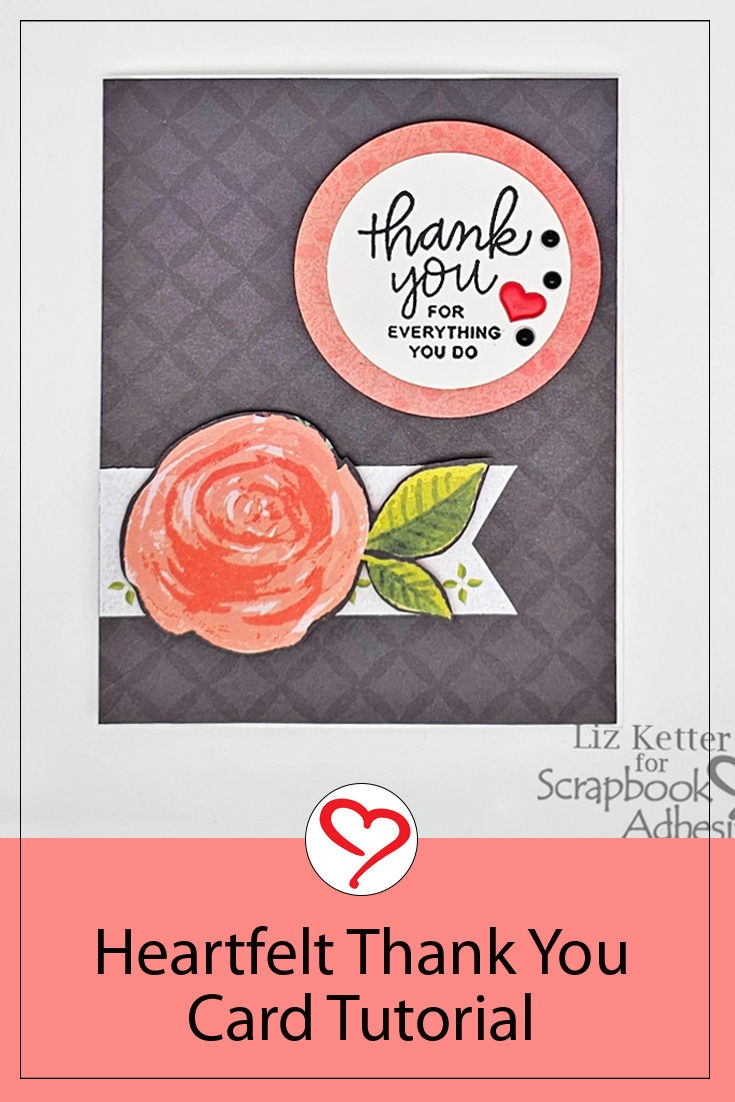
Hi, Liz here today with a simple yet Heartfelt Thank You Note. I love having pre-made thank you notes on hand ready to give someone as an acknowledgement for something that you are thankful for. In this world of fast high-tech and electronic communication, sending and receiving a physical thank you note to touch and read is nice.
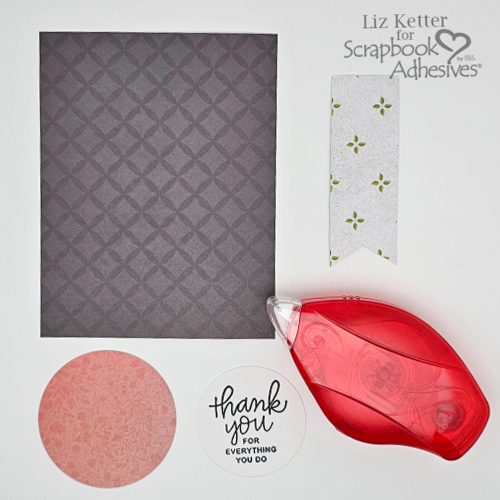
Heartfelt Thank You Card Panel and Elements
For the card panel, cut a dark patterned paper to the size of your card base. Stamp a sentiment that fits in a 2″ circle and punch out. Next, punch out a 2 1/2″ circle of colored patterned paper. Create a 1 1/4″ tall and 3 1/4″ long fishtail banner and find a large flower element, taller than your fishtail banner. Lastly, gather a small heart and some tiny black flat-back pearls or sequins. Now to start assembling!
Assemble the Card Panel and Elements
Using the E-Z Runner® Permanent Strips Refillable Dispenser, secure the card panel to your card base, and then the fishtail banner near the lower left corner of the panel. Lastly, mat the two circles with the sentiment circle on top.
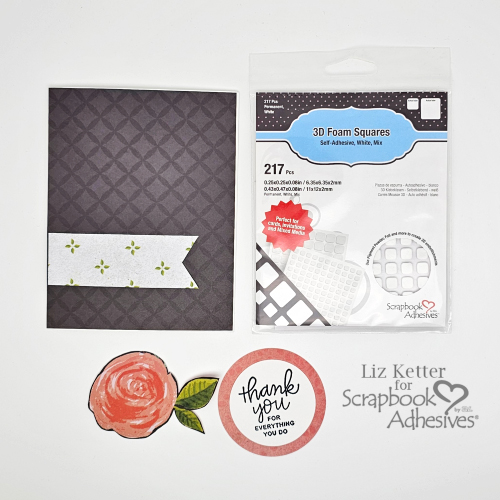
Lift the Elements
Let’s lift and give some dimension to some of the elements. Use several larger squares from the 3D Foam Squares White Mix under the flower but cut one in half some of the foam squares to fit under the two leaves. Remove the liners and place the flower element on top of the banner. On the back of the matted circle, add several large foam squares, and place the circle in the upper right corner.
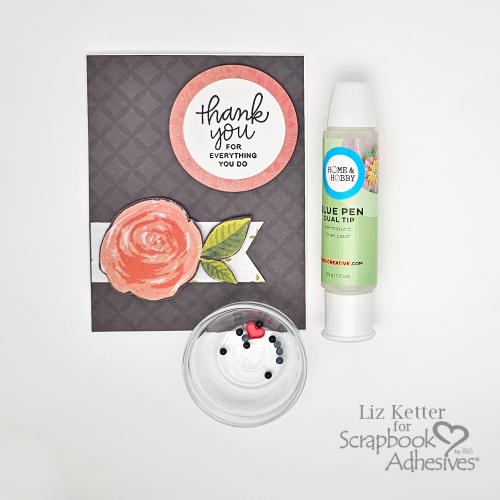
Secure Those Tiny Embellishments
I adhered tiny embellishments with the Dual Tip Glue Pen. First, the sweet red heart was placed on the matted sentiment circle. The black flat-back pearls were adhered around the heart embellishment to anchor the design.
Designer’s Tip: the liquid glue tends to move out of the pen quickly but my solution was to hold the glue pen horizontally. This way only a tiny drop came out of the glue pen and onto the intended area.
It was fast and easy to create but this simple Heartfelt Thank You Note takes advantage of the various adhesives to make it stand out…in a subtle way. I hope this has inspired you to create some cards today!
Other: Patterned Papers: KaiserCraft (True Love Collection), 2″ and 2 1/2″ Circle Punches, Thank You Sentiment Stamp, Tiny Red Heart: The Paper Studio; Flat Back Pearls
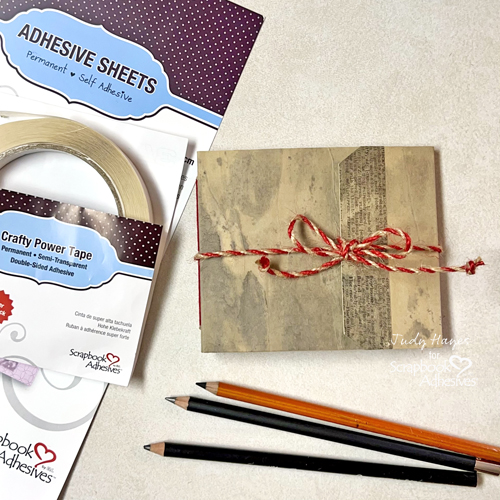
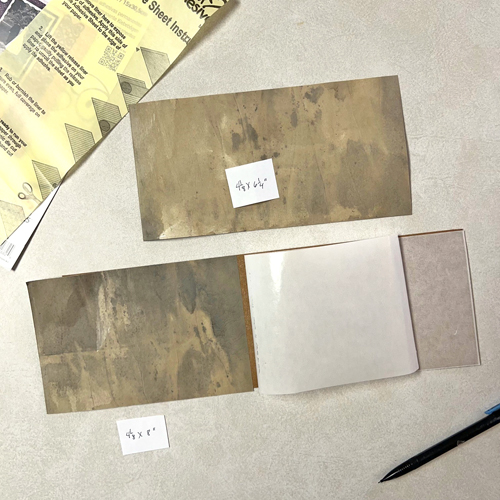
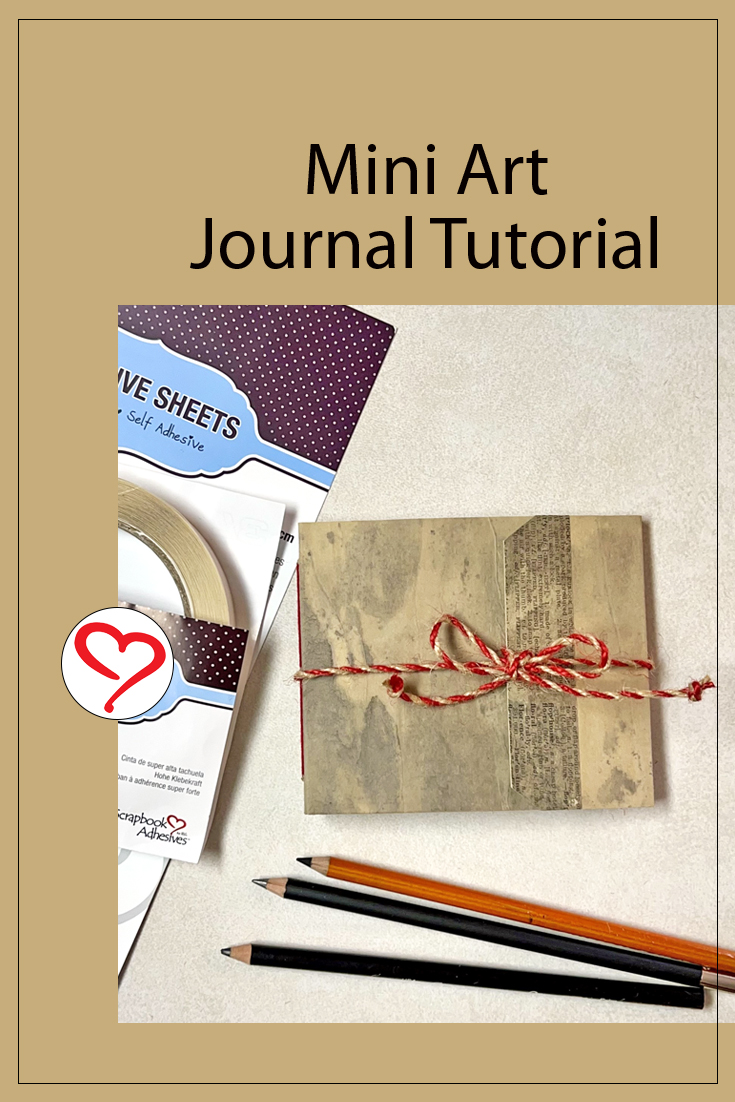
Hi, Judy here today! I love making journals, especially art journals. My project today, Mini Art Journal, was inspired by a journal made by Karen Elaine, on Instagram @KarenElaineCreative. My Mini Art Journal has a cover with paper dyed with coffee and pages of drawing paper. I plan to make these for small gifts with some using printer paper pages for a writing journal.
Mini Art Journal Papers
Cut the Kraft cardstock 4 x 12 inches. Make score lines at 4.75, 5, 9.75, and 10 inches, do not fold. From coffee-dyed paper, cut two pieces: 4.125 x 8.5 inches and 4.125 x 5.5 inches. Designer Tip: Cut these pieces a little wider than needed and then trim them. Next, cut six pieces of drawing paper to 3.875 x 9 inches
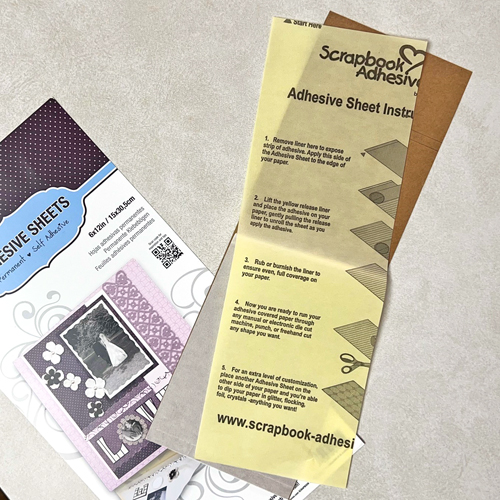
Apply Adhesive Sheets
Cut an Adhesive Sheet 6 x 12in. to 4 x 12 inches. Peel away the narrow strip of liner. Kiss that end of the Adhesive Sheet to the end of Kraft cardstock (make sure to align the edges), and press well. Carefully lift the Adhesive Sheet, gradually peel the remaining liner, and press in place to cover the entire back of the Kraft cardstock. Use a bone folder to rub the Adhesive Sheet well to transfer the adhesive to the cardstock.
View the How to Use Adhesive Sheet Video
Adding the Coffee-Dyed Paper
On the back side of the smallest coffee-dyed paper, draw a pencil line 1 inch from one end and leave it face down on the work surface. From the end of the Kraft cardstock with score lines farthest from the end, peel back the liner partially, align the end with a pencil line on coffee-dyed paper, and press to secure. Turn over the Kraft cardstock with coffee paper, remove the liner, and press the coffee paper in place. Trim away excess coffee-dyed paper along the long edges. Do not trim away at ends.
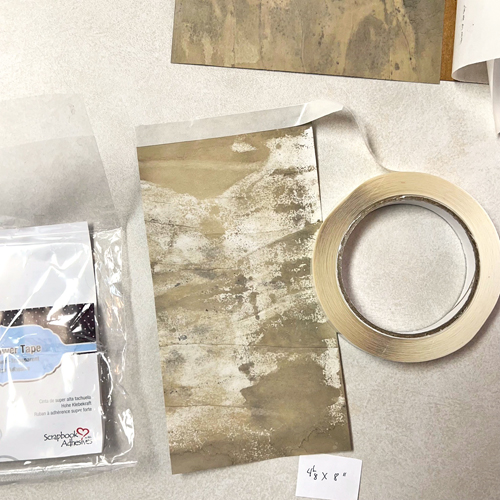
Apply Crafty Power Tape Polybag 81ft. along one end of the remaining coffee-dyed paper (the longer piece), press well, and remove the liner. Align that end about 0.25 inch over the previously applied coffee paper, press in place, and continue to press it over the remainder of the Kraft cardstock. At this point, the coffee-dyed paper will extend about 1 inch beyond the Kraft cardstock on both ends.
Apply Crafty Power Tape Polybag 81ft. along the back side of one extended end of the coffee-dyed paper. Next, apply a strip of Crafty Power Tape Polybag 81ft. at the end of the Kraft cardstock and another next to it. Peel all liners and fold the coffee-dyed paper over the end of Kraft cardstock. Repeat at the other end.
Fold the journal cover on all score lines so that the coffee-dyed paper is outside.
Use an Old Book Page
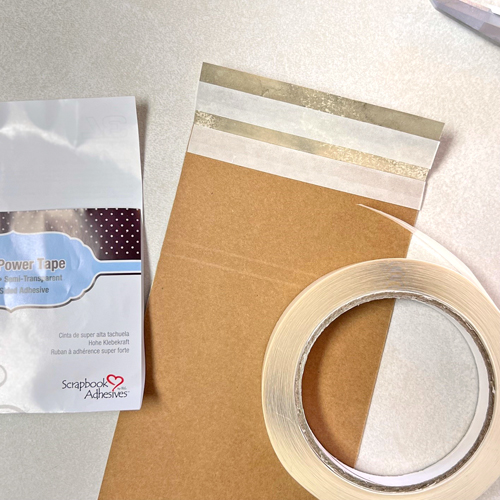
At the flap end of the Mini Art Journal cover that has score lines closest to the end, place three rows of Crafty Power Tape parallel with the end. Crafty Power Tape Polybag 81ft. is placed on one edge of the liner to make tape placement accurate, and make the liner easier to remove. Peel the liner off and apply the next strip to align each row with the other. Peel the last remaining liner for the next step.
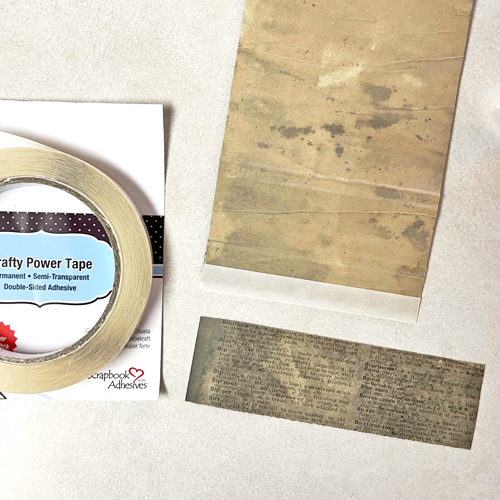
Cut a piece of old book page about 1.5 x 5 inches. Align the long edge of the old book page over the Crafty Power Tape and press in place. The old book page will extend on the sides and the front edge so use scissors to trim the excess.
Binding the Mini Art Journal Pages
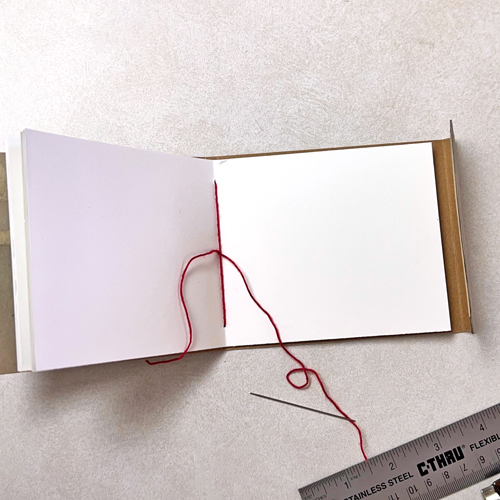
Cut off the corners of the flap at an angle. Designer’s Tip: use a tag as a guide. Mark a position for the hole centered across the flap and punch with a hole punch. Align all pieces of drawing paper, hold ends together, and fold in half. Use a bone folder to crease the fold well. Pages are sewn to the journal cover with pamphlet stitch (find detailed instructions online). Punch three holes with a needle tool on the inside crease, at the center about 0.5 inches from each edge. Place folded pages centered on the inside spine and mark the position of holes with a pencil. Punch holes in the center of the spine with a needle tool.
Thread a sewing needle with a light string or heavy thread. Designer’s Tip: I used a red string recycled from a sack of cat food. Hold pages in the journal cover with holes aligned, insert the needle with thread through the center hole to the outside leaving about 2 inch tail, and return through the top hole. Then insert needle in the bottom hole on the inside and come back through the center hole on the opposite side of the thread tail. Pull the thread snug and tie in a square knot. Trim the string ends to 0.5 inches.
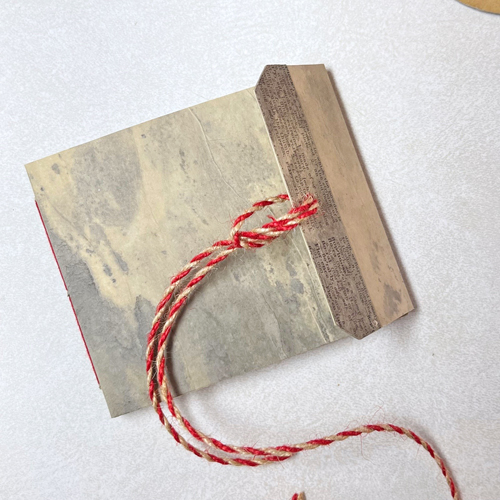
Create the Closure
Measure about 24 inches of twine. Fold so that one end is about 8 inches. Push the folded loop through the hole in the journal flap, thread the ends through the loop, and pull the twine tightly.
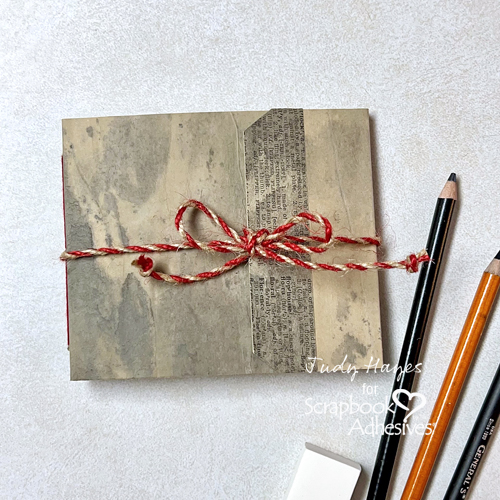
To close the Mini Art Journal, wrap long twine around the journal and tie a bow with short end of the twine. Trim off ends as desired. Option: knot each end of the twine.
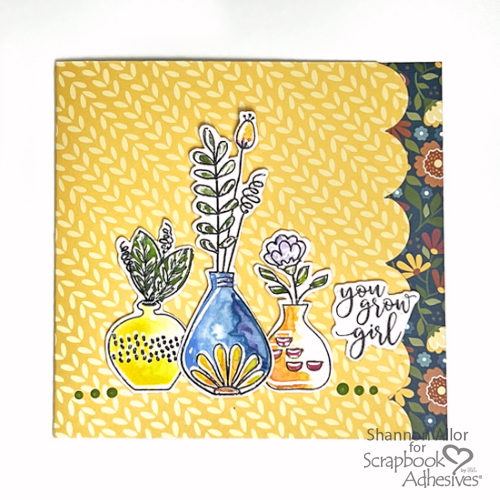
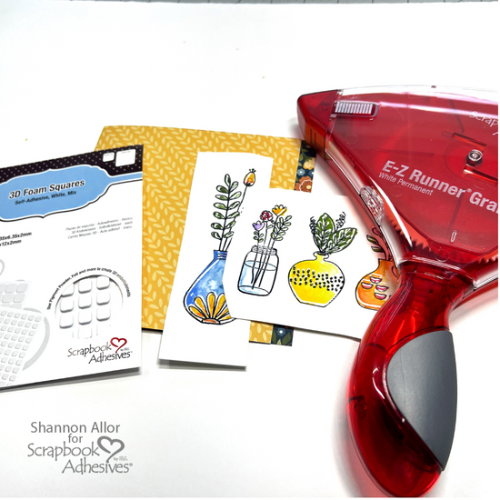
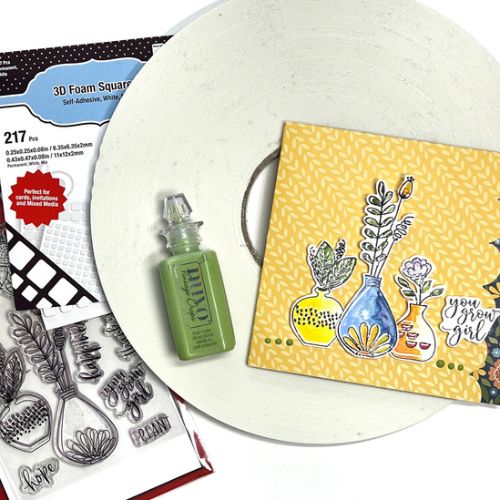
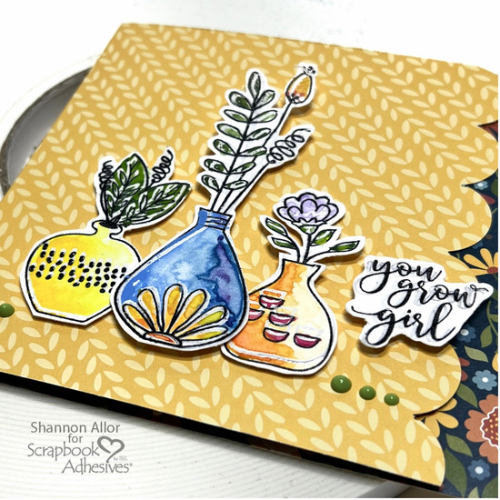
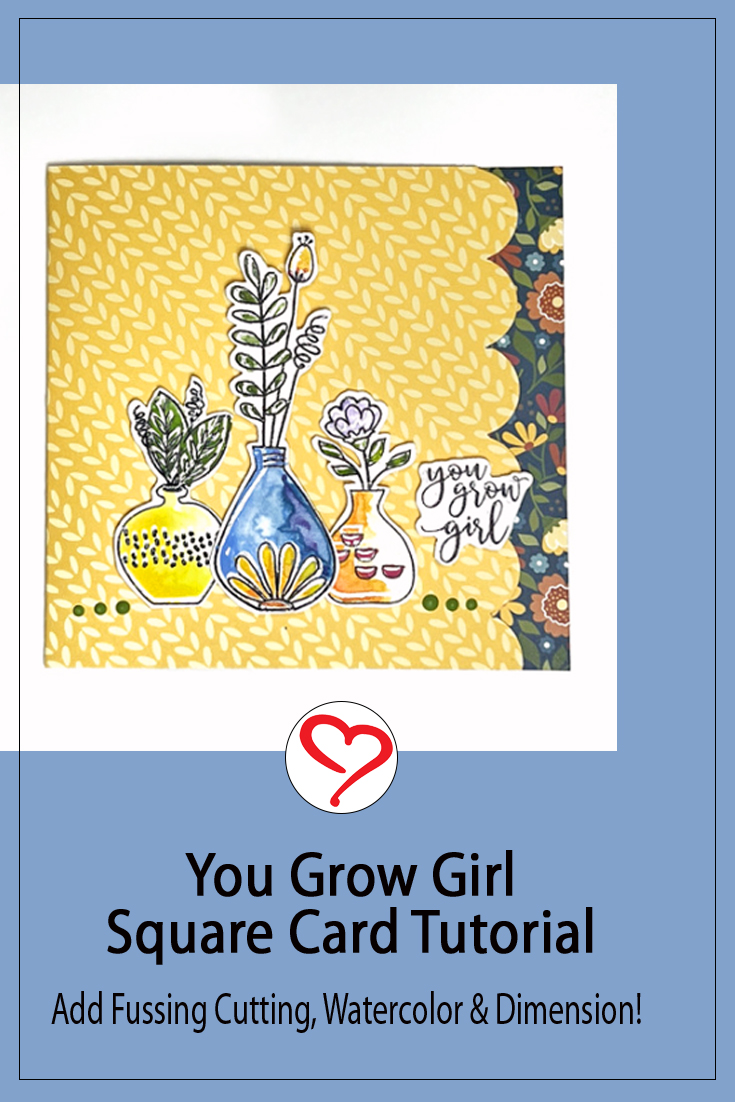
Hi, Shannon here today! I’m up on the blog today with this sweet and simple You Grow Girl Card! I love grabbing my favorite Crafty Foam Tape. You can layer it up if you need even more dimension!
Grow Girl Card Prep
I had this gorgeous Dare 2B Artzy collection on hand. It has double-sided patterned papers that were perfect to create this card! I used a 5×10-inch piece of paper and folded it in half. For a bit of interest, I used an edge punch on the front of the card. So fun to see the pattern on the inside of the card!
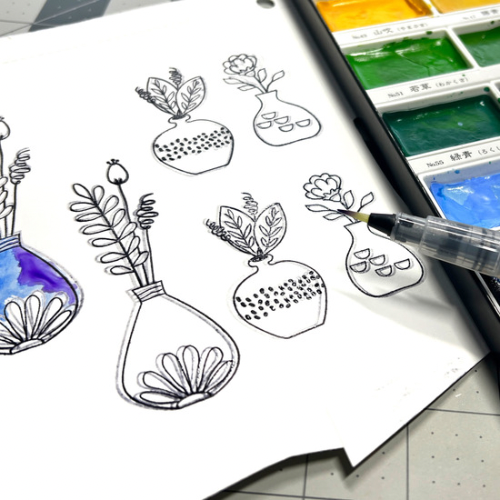
Stamping and Fussy Cutting Elements
Let me tell you about my little stamped images. I took my Dare 2B Artzy stamp set and stamped it onto Vicki Boutin Mixed Media paper using Ranger Permanent Black Ink. I then heat embossed over the image with clear embossing powder. Next, I grabbed a set of watercolors and painted the images. I think the color match turned out well! I love the slight shadow from the embossing powder.
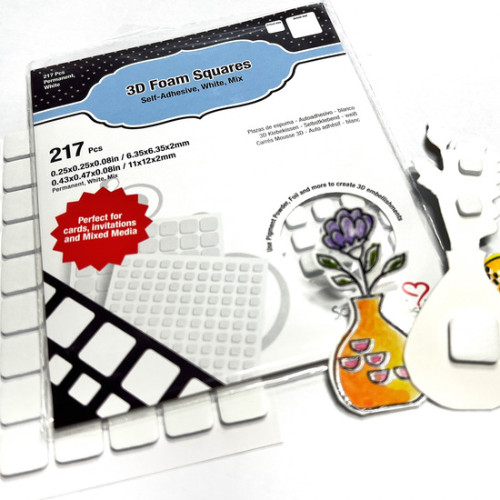
The 3D Foam Squares Mix White Mix is so easy to use! They have the perfect amount of stickiness and the backing is easy to remove. I popped up my elements on them and arranged them into a nice little cluster. I then added some Nuvo drops and this little card was done!
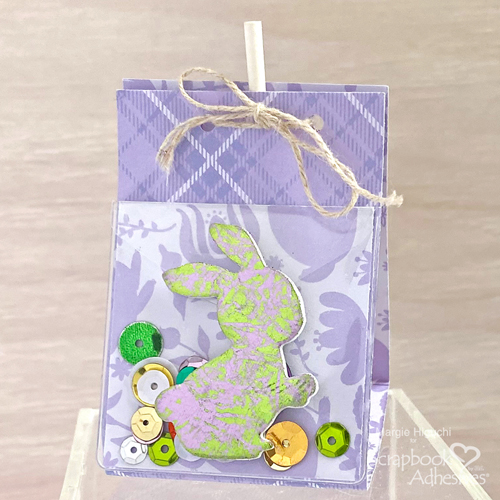
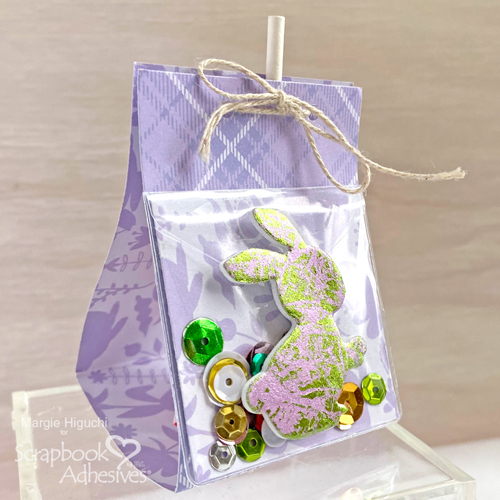
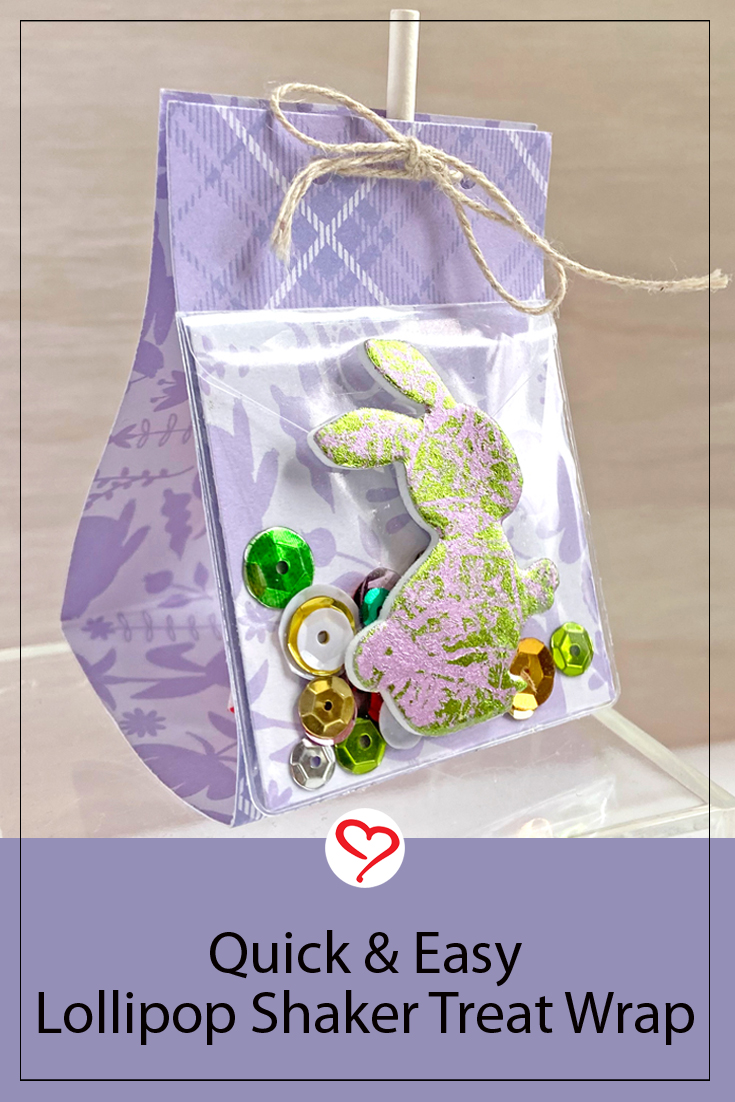
Hi everyone! Margie here today to share this really easy project. Depending on the papers and 3D Foam Shape, you can change it up for any occasion. I’m featuring the Easter Shaker Lollipop Wrap. This project is a make ‘n take at a retailer’s symposium last spring…which is why mine is an Easter-theme. LOL!
Lollipop Wrap Base
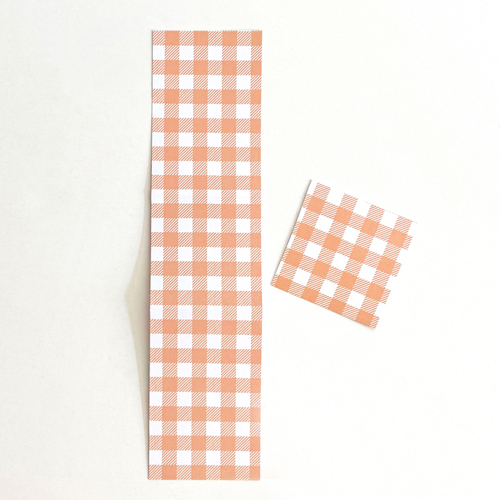
Cut a strip of 2 x 10-inch patterned paper and then cut a 2-inch square off one of the ends. The strip is the base of the wrap. On the long side (10-inch) up of the paper strip, score at 3-inch and 5-inch. Burnish the folds.
Shaker Feature
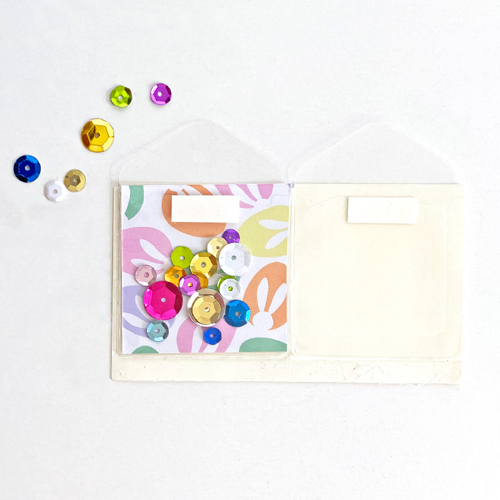
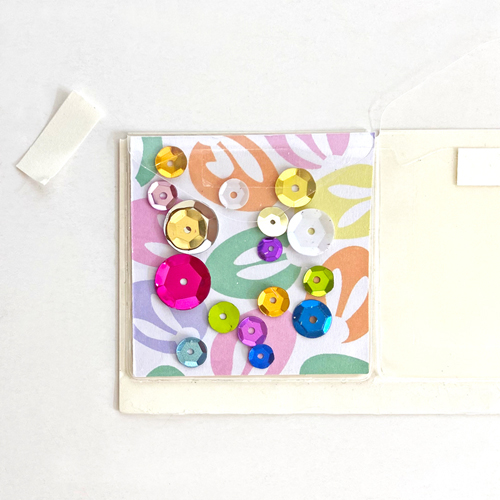
Add the 2-inch square paper into the smallest Keepsake Envelopes Mix. Then fill a pinch of sequins in the envelope but don’t overfill. Remove the white front liner and fold the flap down to close.
Remove the shaker envelope from its liner and place it in line with the bottom edge of the wrap. This will give the top area room for the twine closure.
Center a 3D Foam Easter Shape of your choice over the flap. Peel off the top liner and place your choice of Metallic Transfer Foil Sheets Pastel Colors. Make sure the foil color is facing you and put the foil down to rub with your fingertip to transfer the color. Remove the foil to reveal the results!
Assemble the Lollipop Wrap
Add an Adhesive Dots 3D to the bottom of the lollipop and place it in the center of the wrap. Using the candy stem, punch a hole on each side of it. Thread the twine and knot a bow.
I hope you are inspired by this project to make for other occasions. Share with me by linking your post under this post’s comments. I would love to see them!
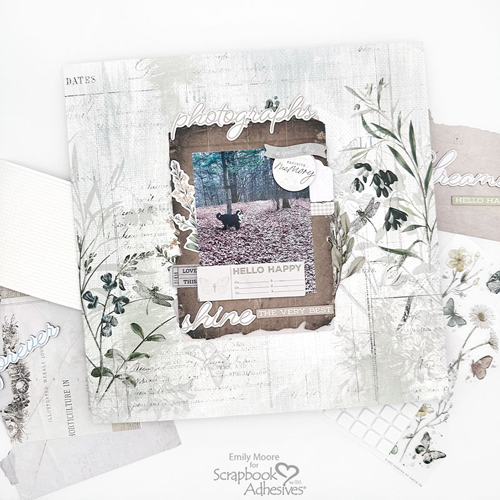
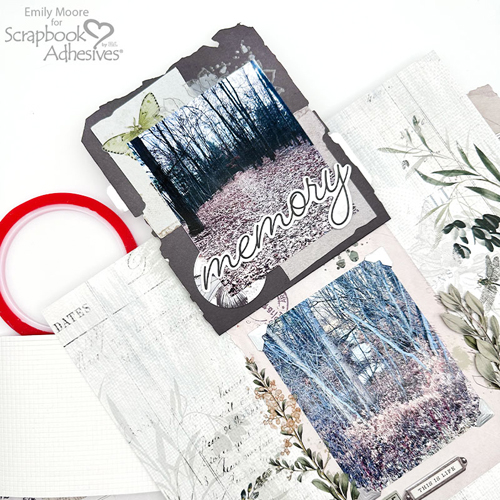
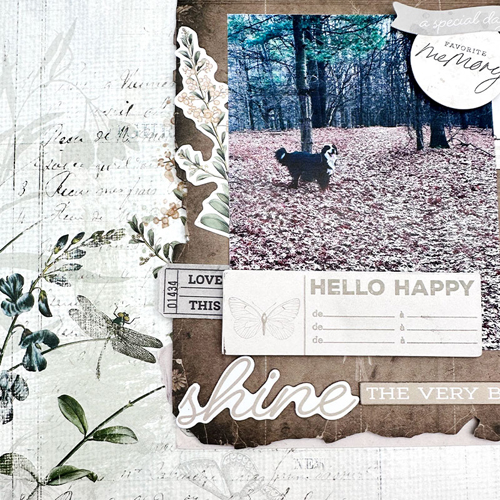
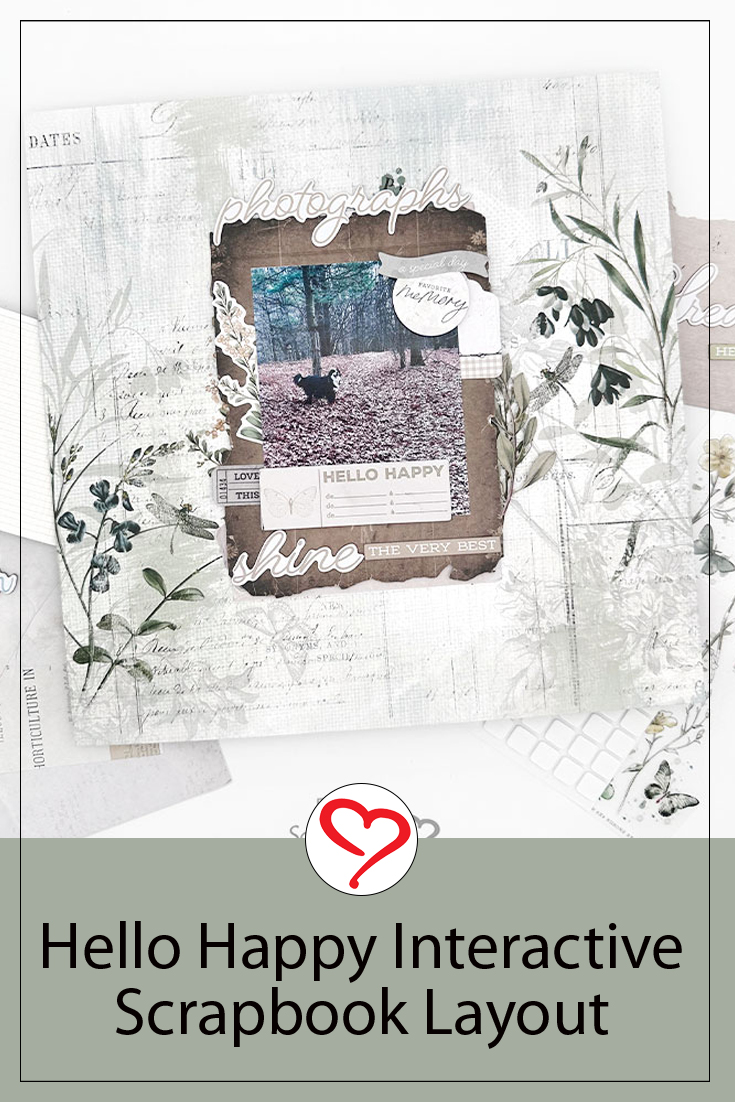
Hi, Emily here today! I’m excited to share a fun Hello Happy Interactive Scrapbook layout. Interactive because it contains some secret flaps, perfect for adding more photos or journaling notes! Let’s get into it!
Hello Happy Interactive Feature
I have many photos of my pup, George, but I wanted my focal picture to be large. My concern was I didn’t want to sacrifice my layout design or the natural border of the paper. So I decided to create a flap, using the Extreme Double-Sided Tape 1/4in. which is perfect for creating those secret folds. It’s nice and strong for permanent pieces like this.
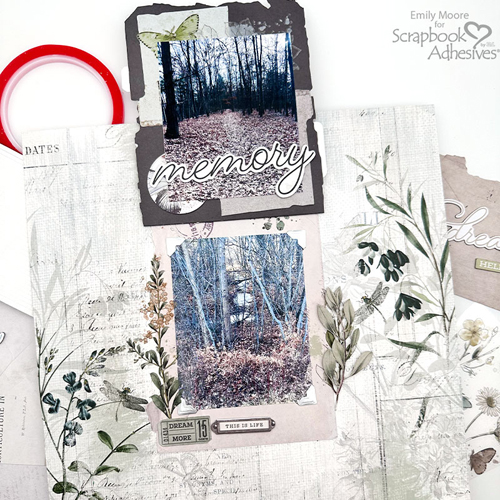
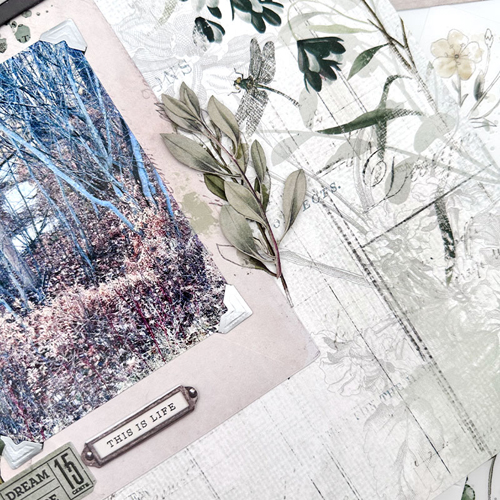
How to Create a Flap
A flap like this also adds more space if you want to include journaling but don’t necessarily want it on display. For the picture on the inside bottom half, I decided to use Creative Photo Corners Silver to add a special touch and extra details to the photo. I also had the leaf to the right and put that on some 3D Foam Squares Micro White to make it look like it was popping off the page. I didn’t want to add too much of a lift though, because we want the top flap to close and be flat, so I added Thin 3D Foam Squares to the details on this page & the top half.
3D Foam Squares White Mix were used for the top photo to add my embellishments since there was more space. I love the way this turned out! May need to make more layouts like this to capture many memories!
View the Process Video
If you want to see me create this Hello Happy Interactive Scrapbook Layout from start to finish, I have a full process video. Please view it here: https://youtu.be/FH5jIP-9wkA
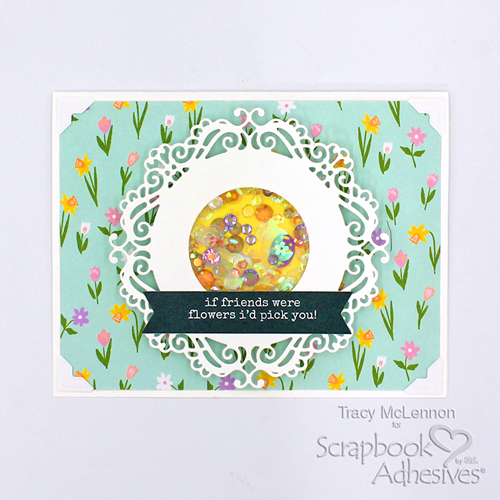
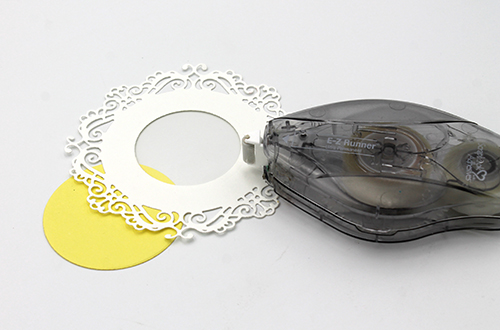
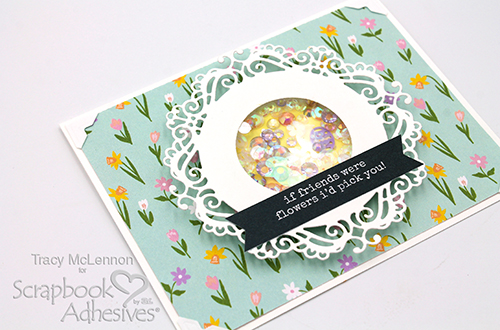
Hello crafty friends! Tracy here, and today I have a sweet little Spring Shaker Card to share. It’s so easy with the3D Foam Circle Frames White, nothing to cut because it’s already pre-cut for you…and in several sizes to choose from. Here are all the details.
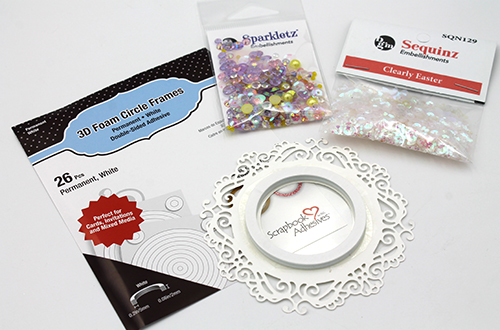
Gather your chosen shaker bits for your Easter Shaker Card. I chose a combo of these two Buttons Galore & More mixes. Stack two of the same size 3D Foam Circle Frames White (there are two sheets in a pack). Then add the shaker bits inside. Then peel off the liner from the circle frame and add the yellow cardstock shaker back to secure the bits inside.
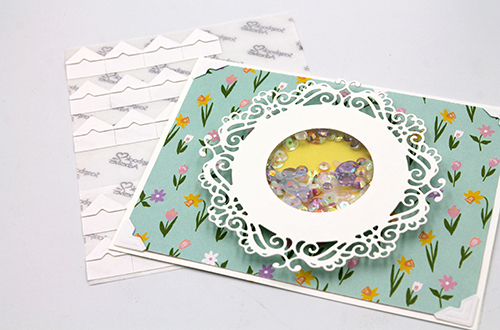
Assemble the Card Front
Cut a white cardstock card base and a piece of coordinating patterned paper for the card front. Adhere the patterned paper to the card base using a combo of E-Z Runner® Ultra Strong Refillable Dispenser and Creative Photo Corners White. This will ensure the heavier shaker card front will stay in place.
Other: Patterned Paper: Simple Stories; Craft Die: Heartfelt Creations; Shaker Bits: Buttons Galore & More (Sequinz in Clearly Easter, and Sparkletz in Happy Easter); White and Yellow Cardstock; Acetate
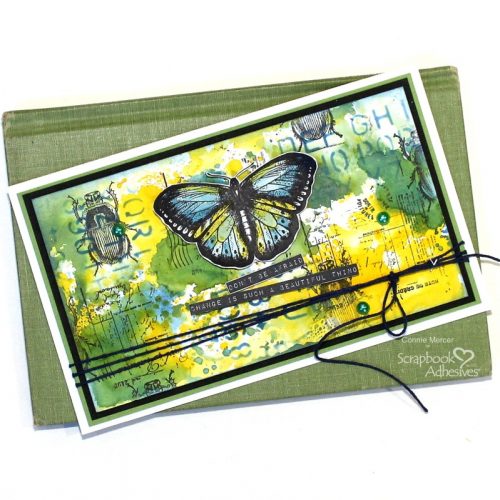
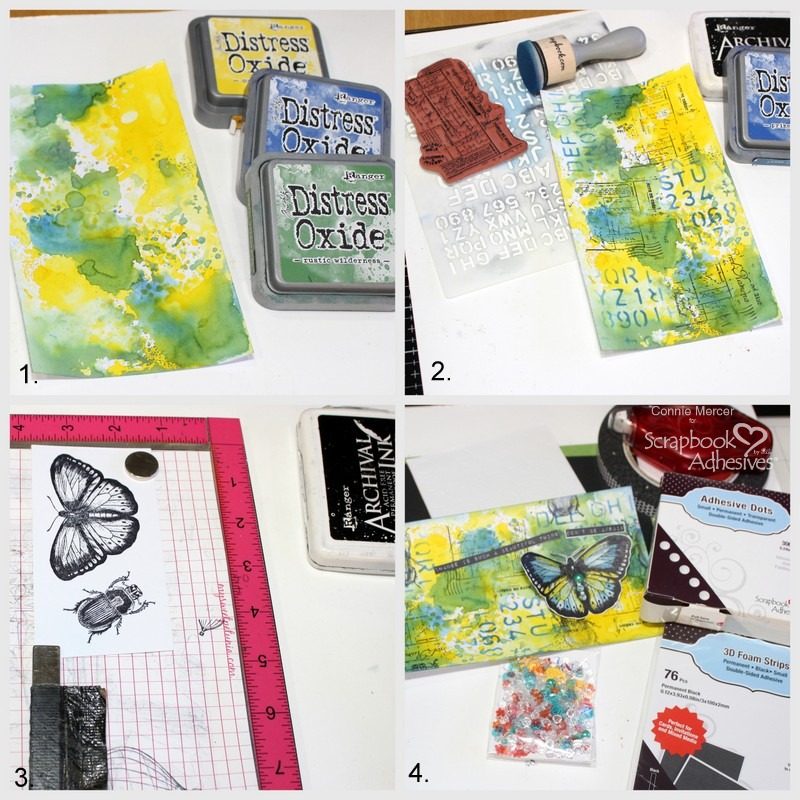
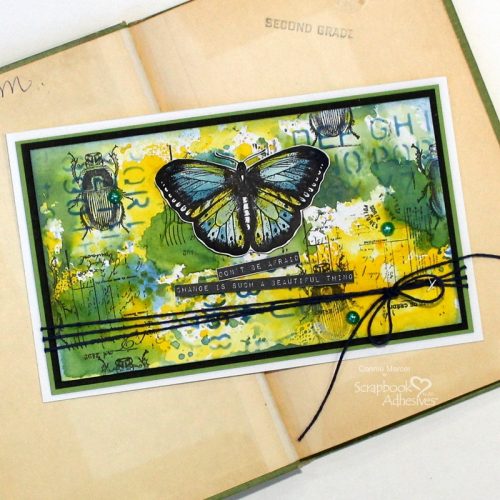
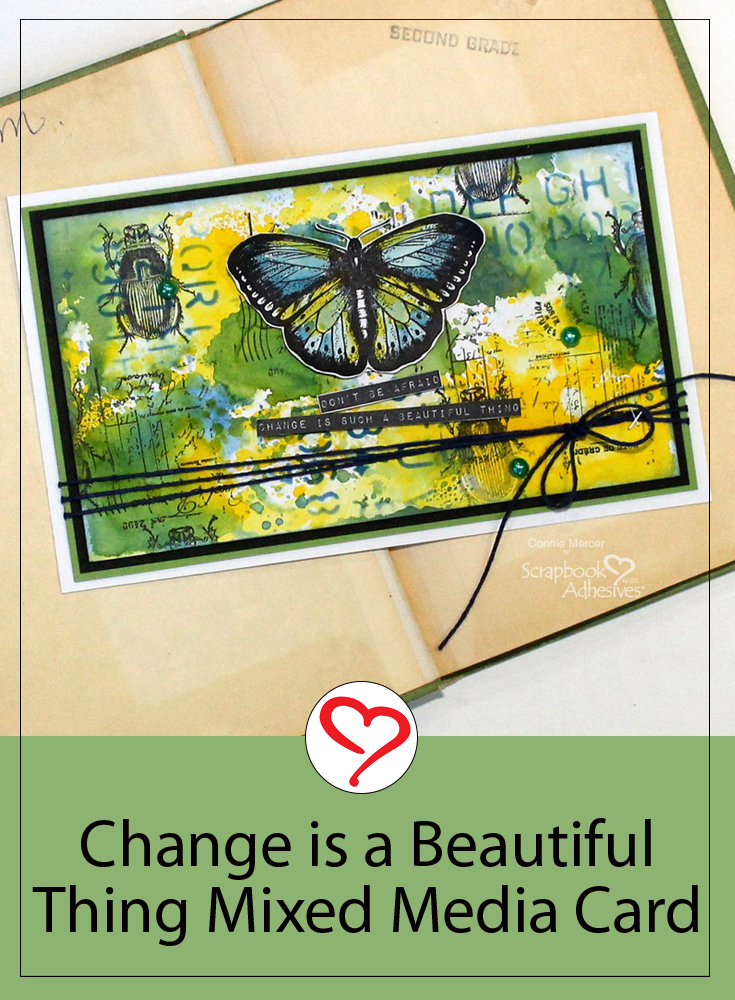
Hi, Connie here with a Change is a Beautiful Thing card and a little mixed media thrown in. Use the fabulous 3D Foam Adhesives to create dimension and interest in what we all love on our cards!
Change is a Beautiful Thing Card Prep
There is some prep work before we can start assembling the card. I have a little step out to help with that.
1. Use a combination of Distress Oxide inks to create a background mix to the card. 2. Stamping and using stencils provide a great look – use your favorites! 3. Pick a stamp image as the focal point. Color and trim out. 4. Add more stamps, if needed. I added the Beatle bug.