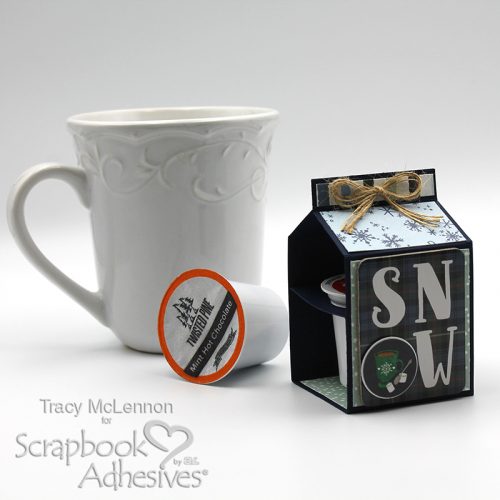
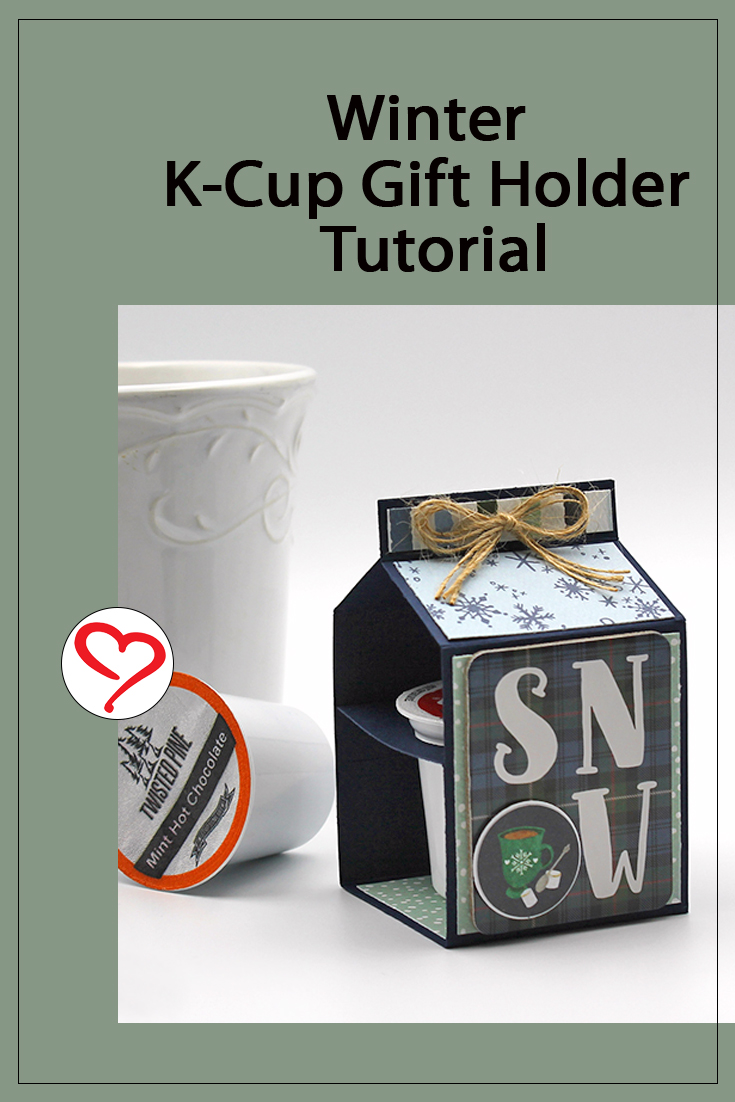
Hello friends! Tracy here, and today I have a fun little Winter K-Cup Gift Holder tutorial to share. This easy little project makes such a sweet little gift to warm someone’s heart this winter. Here are all of the details.
Quick and Easy Gift
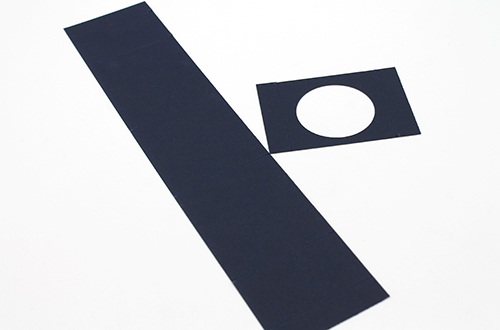
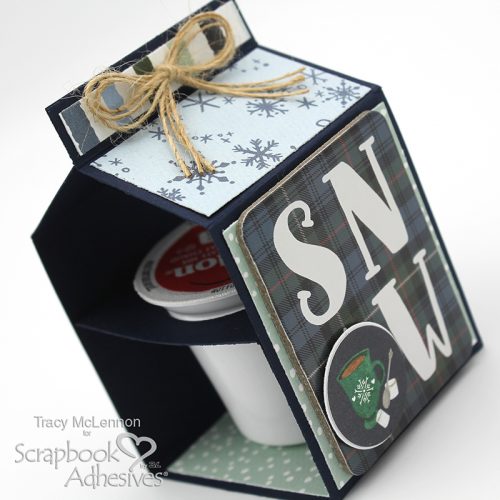
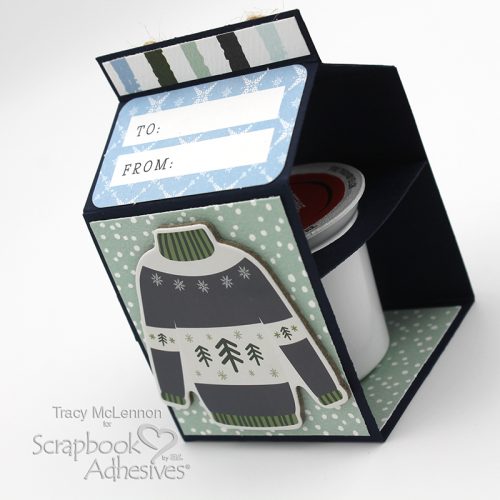
The first step in creating this Winter K-Cup Gift Holder is to choose your cardstock for the base. Cut the cardstock to 2.25″ x10.5″. Grab your scoring blade or scoreboard, and score at the following measurements: 0.5″, 1.75″, 4.25″, 6.5″, 9″, 10.25″.
Cut the middle piece that holds the K-Cup to 2.25″x3.25″. Score this piece at the following measurements: 0.5″, 2.75″. Using a 1.75″ circle punch, cut a hole in the middle section of this piece.
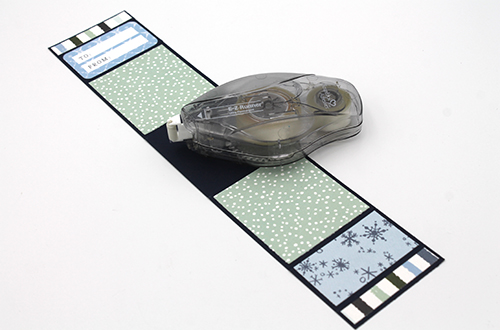
Choose the patterned paper you would like to cover the outside of the Winter K-Cup Gift Holder. Start adding to each section using the E-Z Runner® Ultra Strong Refillable Dispenser.
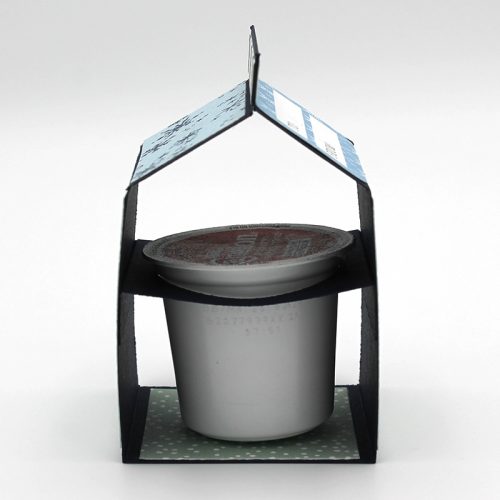
Start folding the base to create that milk carton shape. Pop a K-Cup in the middle piece to use as a guide as to where the middle section will be adhered, again using the E-Z Runner® Ultra Strong Refillable Dispenser.
Using an Adhesive Dots Micro, add a simple burlap string bow to the top of the Winter K-Cup Gift Holder. I also used Thin 3D Foam Squares White Mix to add the ephemera and chipboard sticker pieces to the outside of the carton.
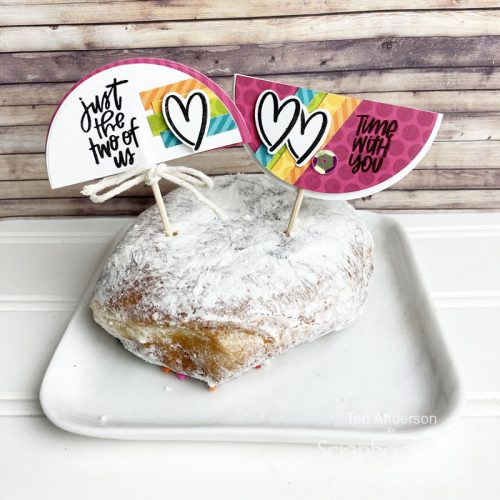
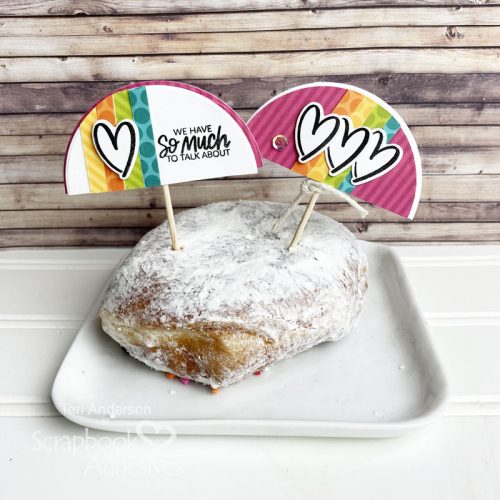
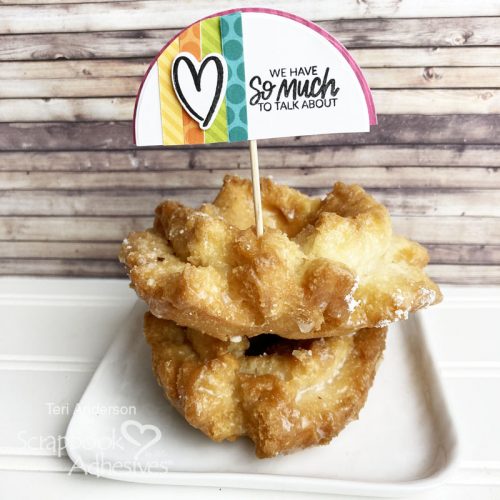
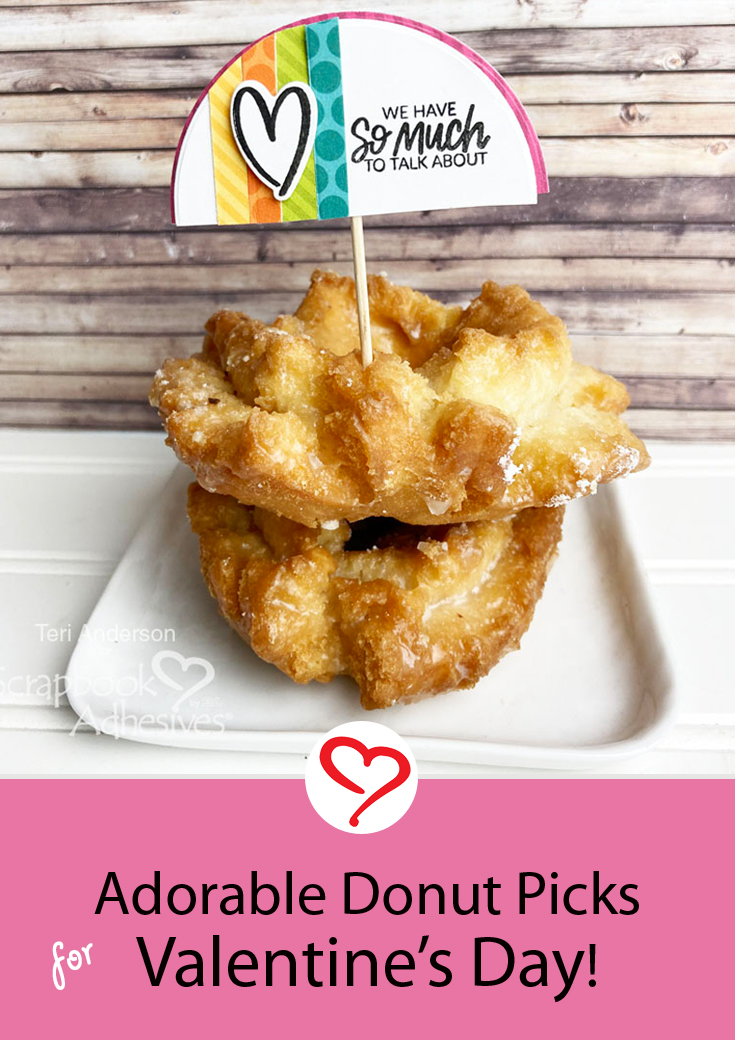
Hi, friends! Valentine’s Day will be here before you know it! Teri here with a sweet idea for you! Give your sweetie a donut or two with a couple of cute handmade picks in it!
These donuts picks are easy to make with a few die-cut shapes, stamps, toothpicks, and basic craft supplies.
Create and Embellish the Donut Picks
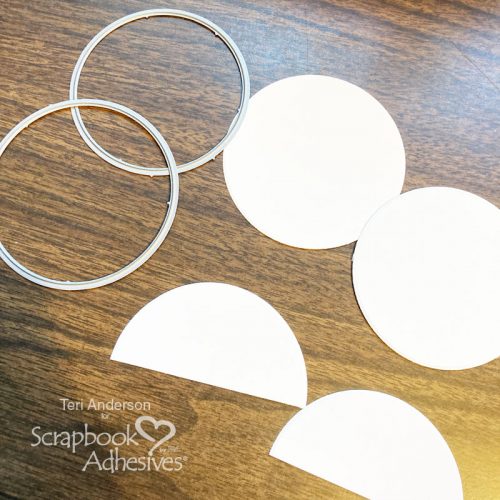
Start by cutting a couple of large circles and slightly smaller large circles from cardstock. Note: you’ll also want to cut a few from patterned paper.
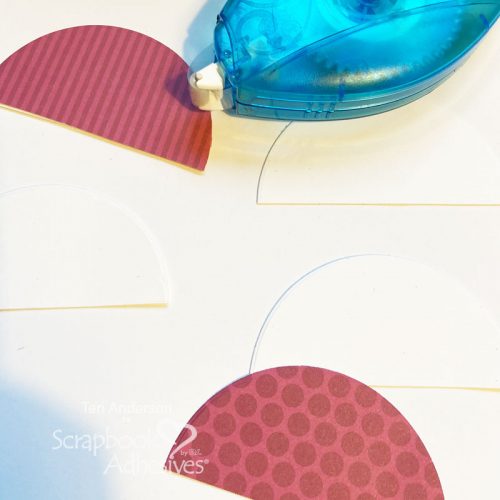
Cut the circles in half. Decorate some of the half circles of cardstock with half circles of patterned paper.
Decorate the smaller circles with stamping and die-cuts to make a sweet message for your Valentine!
Assemble the Picks
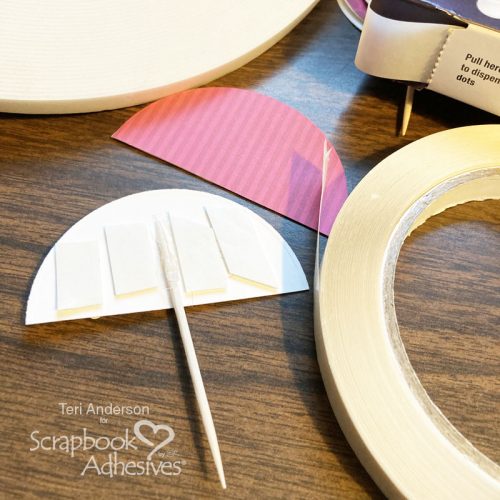
Take the smaller large circle. Flip it over. Adhere a toothpick onto it. I like to hold the toothpick down with Crafty Power Tape and then add a few Adhesive Dots on top. Surround the toothpick with pieces of foam tape.
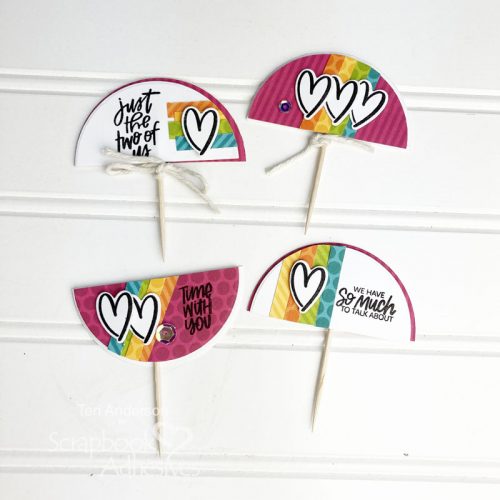
Adhere the larger half circle to the slightly smaller half circle, sandwiching the toothpick and foam pieces. Complete your donut picks by adding twine and embellishments to them. You can also use them without adding anything!
Use a couple of donut picks to decorate a donut!
You can even get by using just one pick on a small stack of donuts!
I hope today’s tutorial fuels your creative juices! Let me know if you decide to make a few donut picks of your own!
Other White Cardstock: Neenah Paper; Stamps and Dies: Pretty Pink Posh (Let’s Party Stamp Dies), Ellen Hutson (It’s a Date by Brandi Stamps and Dies); Patterned Paper: Sunny Studio Stamps (Dots & Stripes Jewel Tone Paper Pack); Ink Pad: Ranger Ink; Sequins: Pretty Pink Posh; Twine: The Twinery; Toothpicks
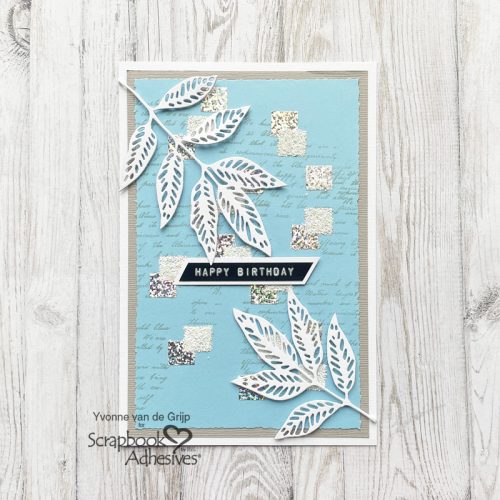
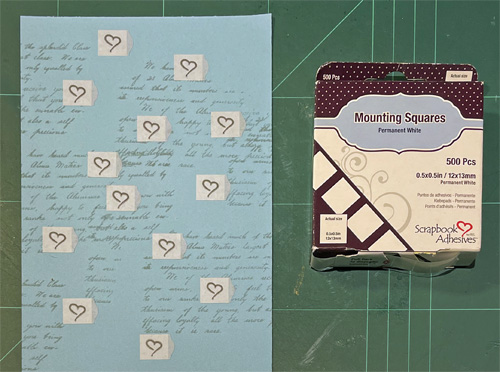
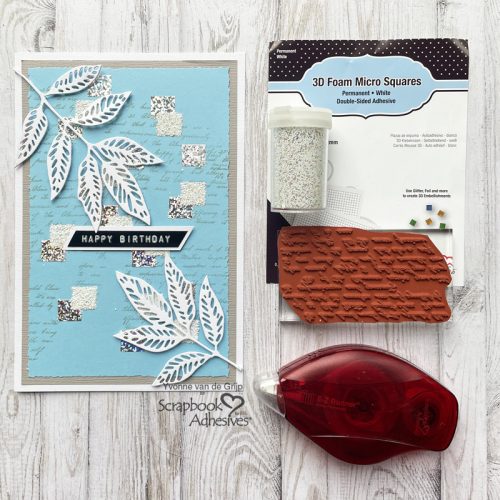
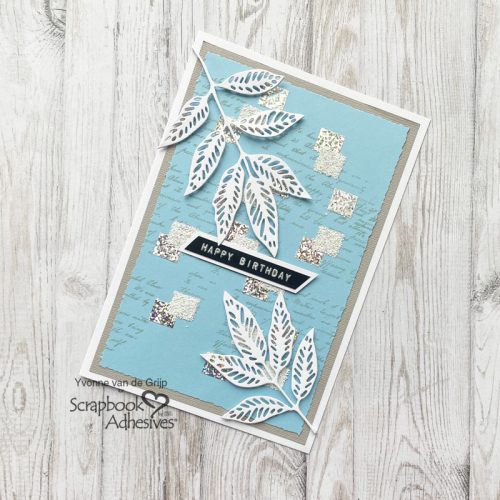
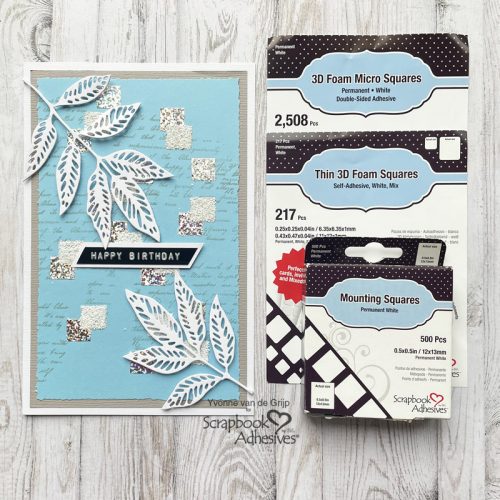
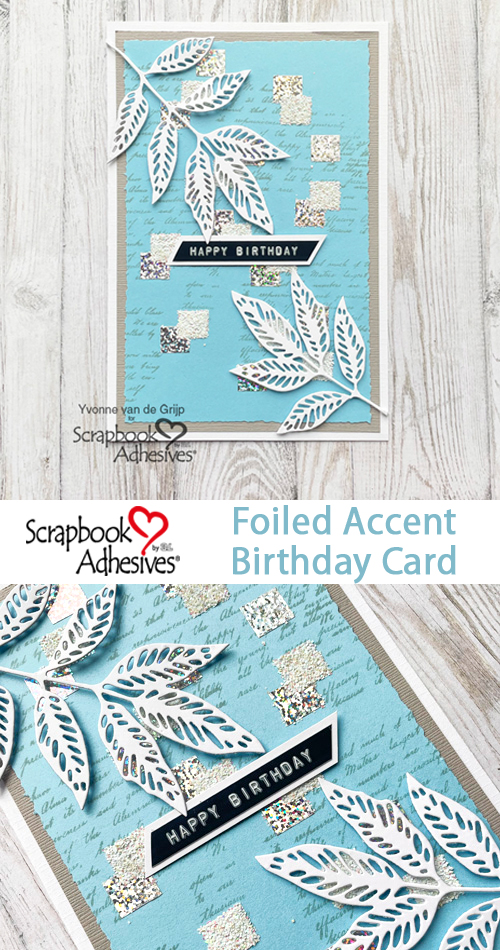
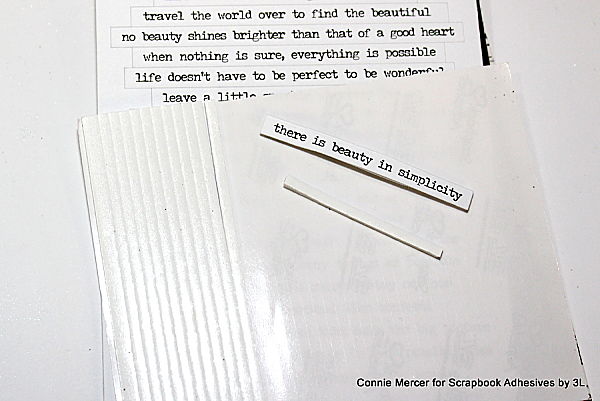
First, trim a piece of blue cardstock to a rectangular size. Then stamp upon some texts using a grey ink pad. Then adhere upon some Mounting Squares 500 White.
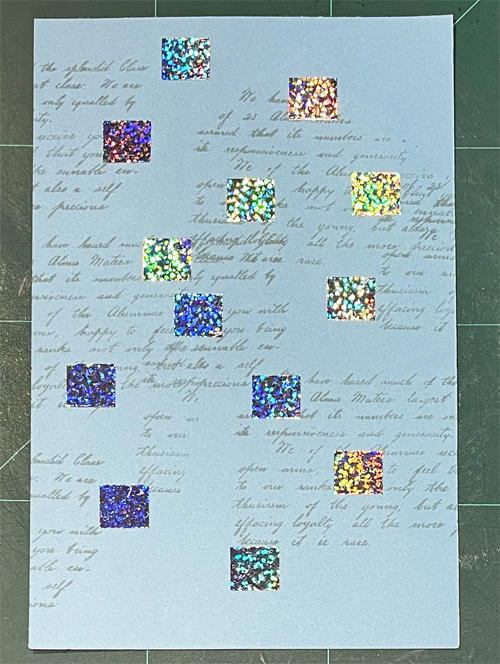
Next, take off the liner of the Mounting Squares and press Metallic Transfer Foil Sheets Holographic Colors (with the color side up) over the adhesive Square, and rub over with your fingers to transfer foil. Then peel off the foil and a holographic Square will appear.
Next again adhere several Mounting Squares 500 White onto the card panel and overlap some of the holographic squares. Now take off the liner of the Mounting Squares and sprinkle white glitter upon it and rub the glitter over the Mounting Squares 500 White with your finger. Then tap off any excess glitter. This technique making your adhesive shine is also known as Wear Your Adhesive on the Outside. Next, I decided to add a torn edge to the card panel using a Torn Edge Trimmer and adhered the panel onto the card base using the E-Z Runner® Permanent Strips Refillable Dispenser.
Embellishing the Birthday card
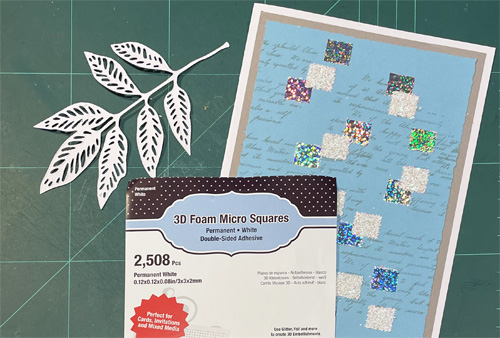
First die-cut some skeleton leaves from white cardstock. Then adhere the leaves onto the card base using 3D Foam Squares Micro White.
These extra small 3D Squares are great for detailed adhering without needing a craft knife since the squares are sized just 0.12×0.12in… so super easy!
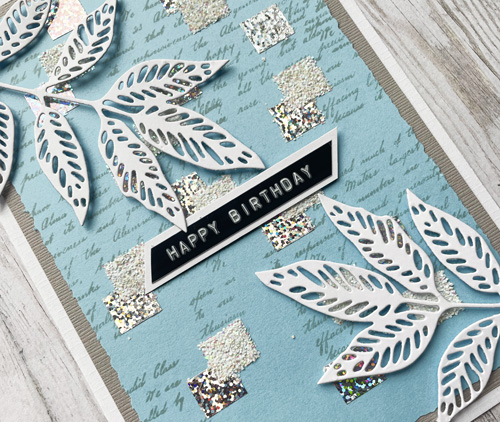
Finally, I adhered a sentiment onto the card using Thin 3D Foam Squares White Mix. And voilá your Birthday Card is ready. I hope you enjoyed this tutorial and wish you happy crafting!
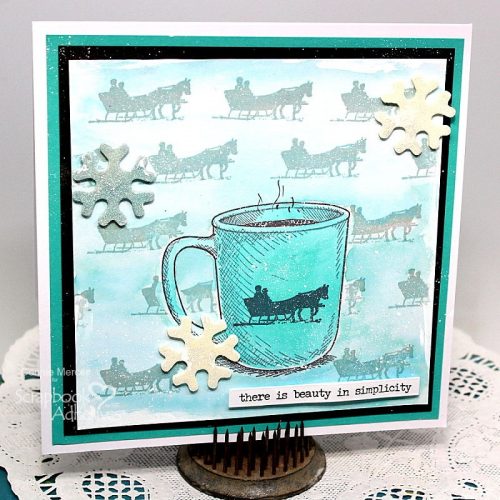
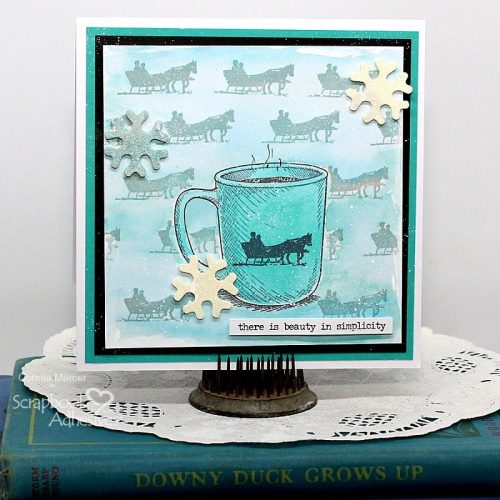
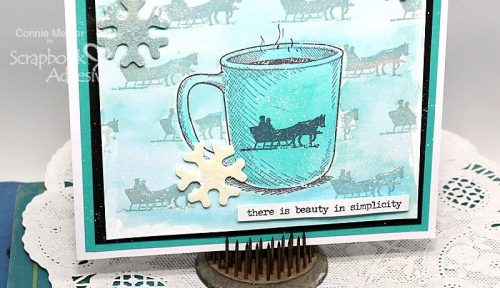
Hi, Connie here with a Mixed Media Snowflake Card using the 3D Foam Snowflakes as dimensional embellishments. They are fun and make for a pretty card. Scrapbook Adhesive by 3L® has 17 3D Foam Shapes to choose to create with.
Stamp & Mask the Mixed Media Snowflake Card Panel
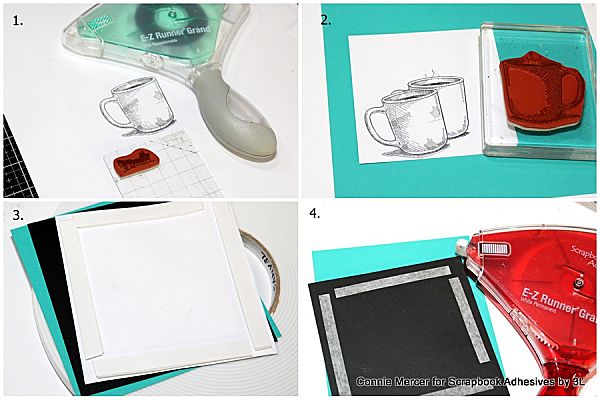
To build my card, start with a white background and stamp a coffee cup. Use the Archival Distress/Hickory Smoke to stamp the sleigh and then add Distress Oxides inks for the color. But first I needed to mask my cup.
1. To make the mask, stamp a second coffee cup on a scrap piece of cardstock and trim it out. 2. To create the background, apply E-Z Runner® Grand Repositionable Dots Refill on the back of the coffee cup mask, and place it over the coffee cup image on the card front. Now randomly stamp the sleigh on the cardstock with Archival Distressed/Hickory Smoke. A light color ink works best. 3. Use Crafty Foam Tape White 54ft to attach the card front to the black cardstock mat. 4. Next, use the E-Z Runner® Grand Refillable Dispenser to attach the card front to the card base.
Add Background Coloring
Color the card front background with Distress Oxide inks watered down. I used blue tones. On the coffee cup, a sleigh was stamped in the center with Distressed Archival/Black Soot.
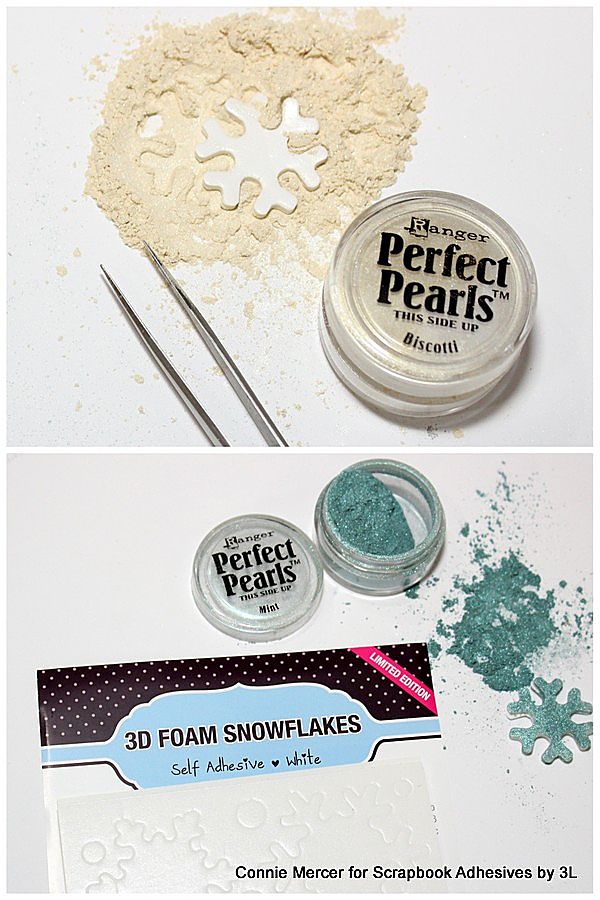
Wear Your Adhesive on the Outside with 3D Foam Snowflakes
To use these 3D Foam Snowflakes as embellishments vs. placing them between layers, we call it “Wear Your Adhesive on the Outside” and most do not need special tools. In this case, we are using pigment powder to add color and interest.
Simply remove the snowflake from the package, leaving the release sheet on its back, dip and press them into the powder until it is covered. Remove with tweezers, burnish the powder into the shapes and place them on the card front. That’s it!
The Finishing Touches
Lastly, use the 3D Foam Strips to the back of the word sticker add it to the card front. Speckle with white acrylic paint. Call it good and cute!
Thanks for stopping by and Happy New Year!!! Connie Mercer
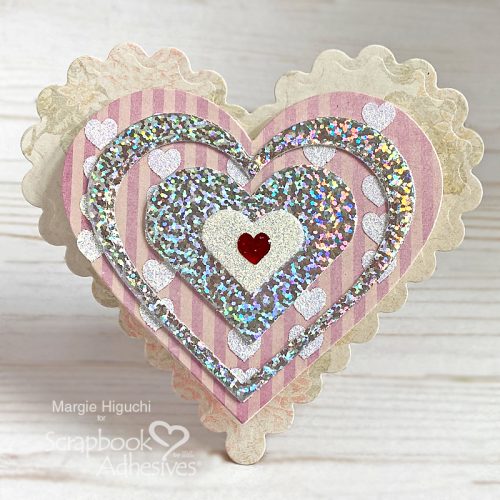
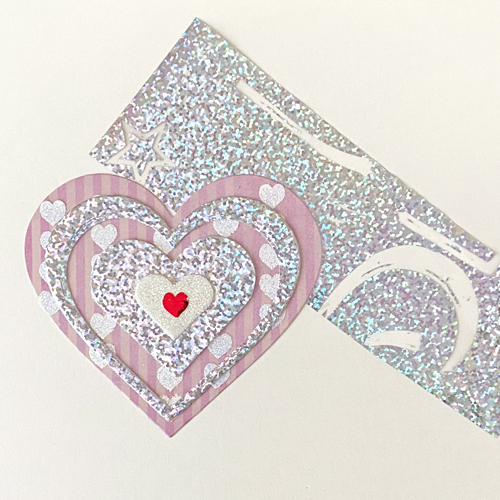
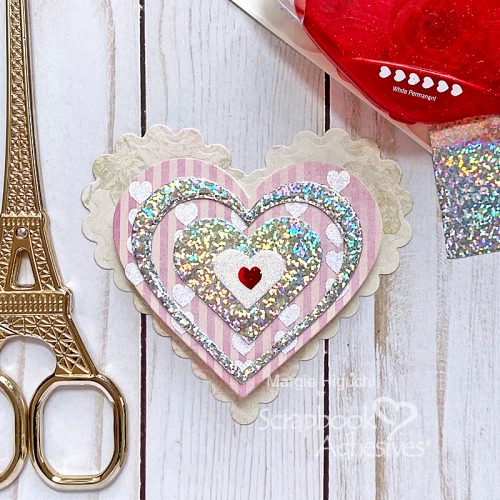
Happy 2022, everyone! I am thrilled to be posting the first project for the new year with this heartfelt 2022 greeting with this heart-shaped card.
Heart-Shaped Card Front
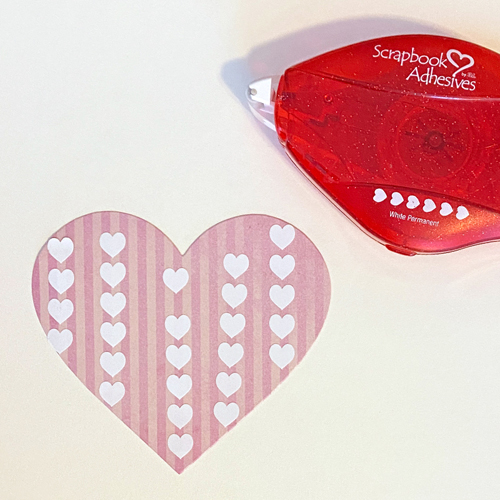
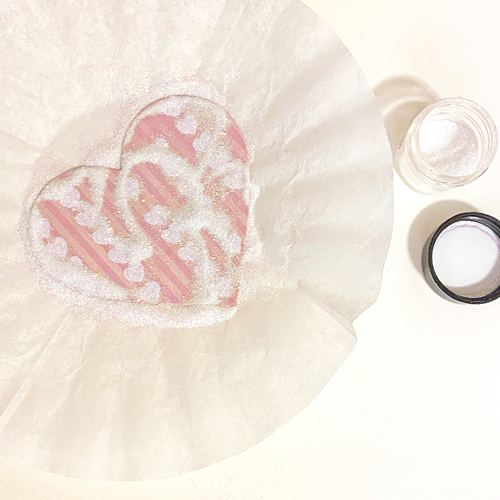
To create my heart-shaped card front, I die-cut a #-inch heart from a pattern paper. With the E-Z Runner® Hearts, I applied several vertical rows of hearts to fill the shape. My purpose is to create an interesting background from a plain striped pattern.
Sprinkle fine white glitter to cover the hearts, press into the hearts to secure and tap off excess. Note: a clean paint brush may help to get rid of those pesky lingering glitter.
This technique is called Wear Your Adhesive on the Outside. Use adhesives as an embellishing element instead of adhering between layers. You can also use our Metallic Transfer Foil sheets, pigment powder, flock and even embossing powder to melt into the shapes.
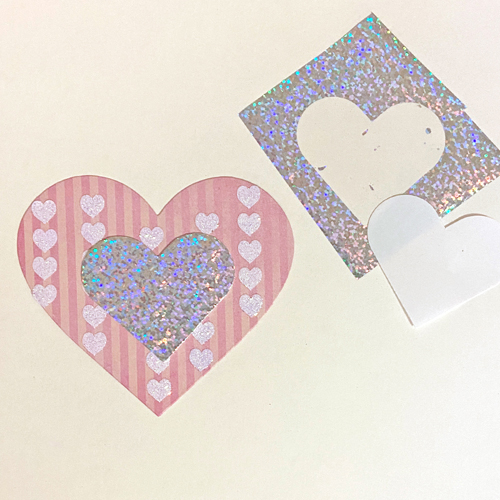
Layering Heart-Shaped Elements
Since this wasn’t enough, I layered the largest heart from the 3D Foam Hearts. Using the chunky silver glitter foil from the Metallic Transfer Foil Sheets in Holographic Colors set, I placed it over the foam heart color side UP and rub gently to transfer the color to the shape. Peel off and done! If there are missed areas, simply reapply the foil.
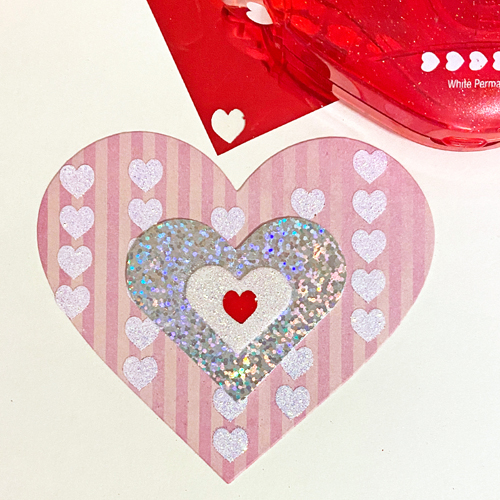
Yup, added more layers! LOL! I centered a medium size heart from the 3D Foam Hearts onto the larger foiled heart and used the same fine white glitter to tie in the background hearts. Next, I took a heart from the E-Z Runner® Hearts and adhered it to the center of the glittered heart. I foiled it with the red foil from the 3D Foam Creative Embellishment Kit with Foil. Don’t forget to foil color side UP!
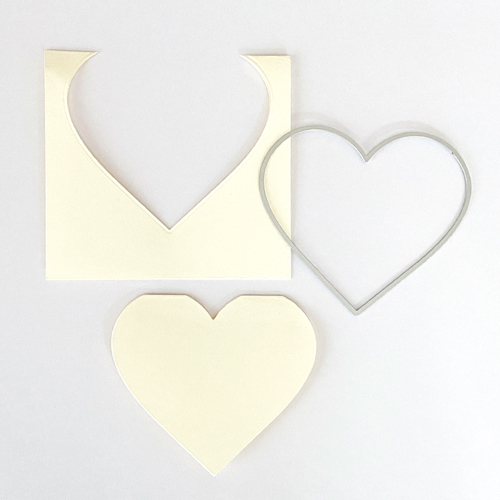
Add More Interest
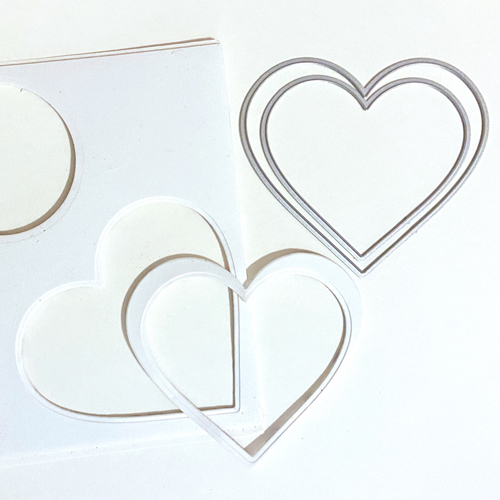
I couldn’t resist because I had this 3D Foam Creative Sheet left from the 3D Foam Creative Embellishment Kit with Foil that I had to use. LOL! Nesting two hearts together, I die-cut them from the foam sheet to make a heart-shaped frame. If you’re looking for a dimensional element, this is perfect to die-cut any shape you want to customize for your projects!
Place on the card front, remove the top liner, and apply foil in the same previous steps (color side up). LOVED how it turned out!
Create the Heart-Shaped Card Base
Let’s create the shaped card base. Fold a piece of cream cardstock and place the heart die just enough that the top is over the crease. This part act as a hinge for the shaped card. It won’t be a full heart shape but that’s OK. The card front will cover that part in the next step.
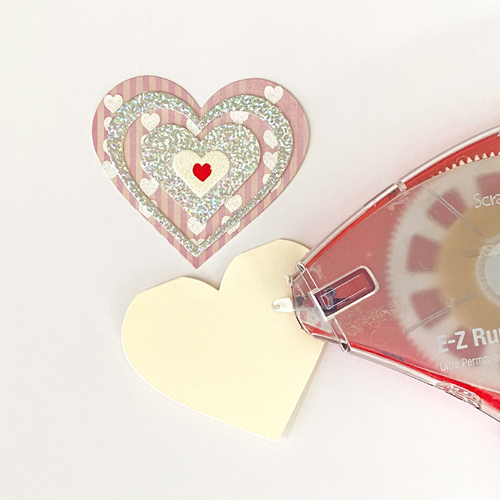
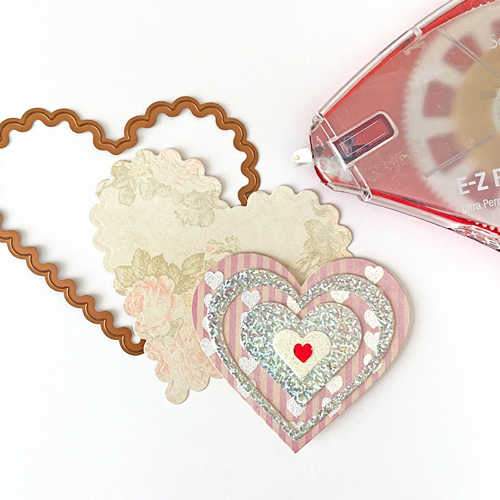
Apply E-Z Runner® Grand Ultra Strong over the cream card base and place the embellished card front on top. Make sure to match up the shape to look like one shape.
Lastly, die-cut a large scalloped heart with a piece of patterned paper and adhere the heart-shaped card in the center with the E-Z Runner® Grand Ultra Strong.
I hope my heart-shaped card inspires you to create this unique type of card creation for someone you like to send a heartfelt greeting to. Happy New Year, friends! Margie Higuchi
Other Patterned Papers: Kawaii Paper Goods/Memory Place (Floral Collection); Craft Dies: Hearts (Hero Arts) and Scalloped Hearts (Spellbinders® Paper Arts); Glitter: Sparkle ‘N Sprinkle; Cream Cardstock
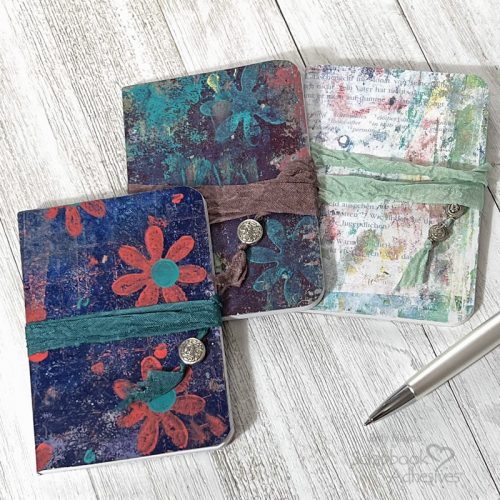
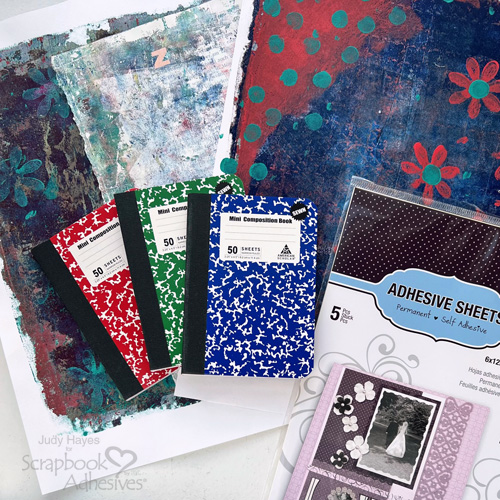
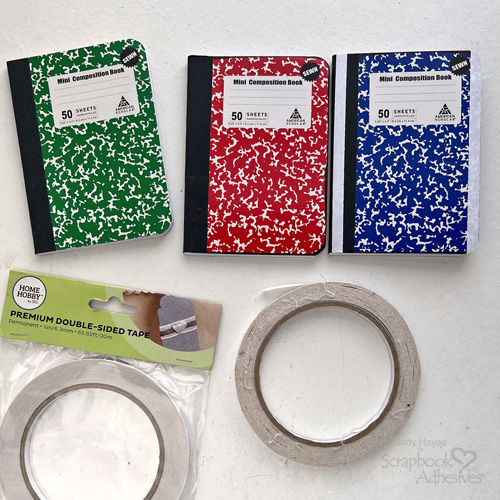
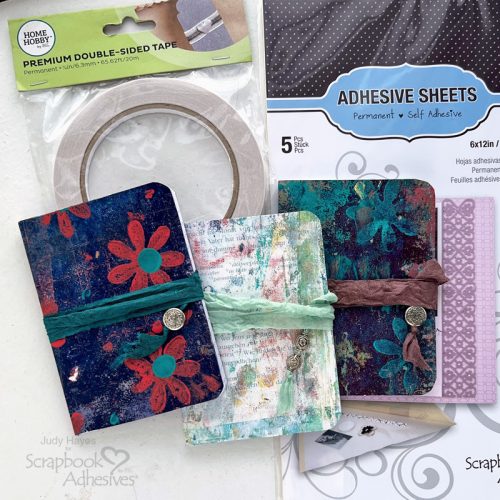
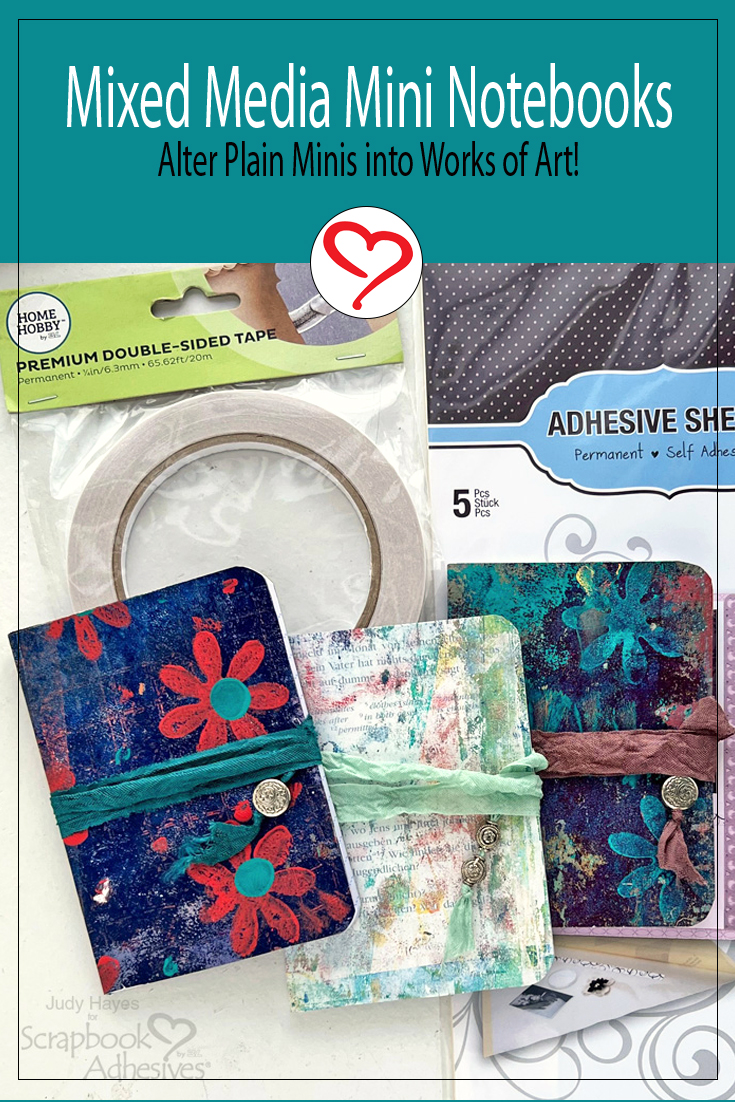
Hello crafty friends! Today, I’m sharing an easy way to cover mini composition notebooks for yourself or gifts. I like the size to fit in a purse or to have in the car to write down those things needed to buy or do that suddenly pop into one’s head when out shopping. They can usually be found in packs of 3 in dollar stores.
Apply Adhesive Sheets on Mini Notebooks
The best paper to use is text weight or slightly heavier. I chose some gel plate printed papers, the lightest one was printed on a page from an old book.
Cut paper slightly larger than needed to cover a notebook and apply Adhesive Sheets 6×12 inch to the back of it. Rub with hand or bone folder to secure adhesive well.
Cut with Paper
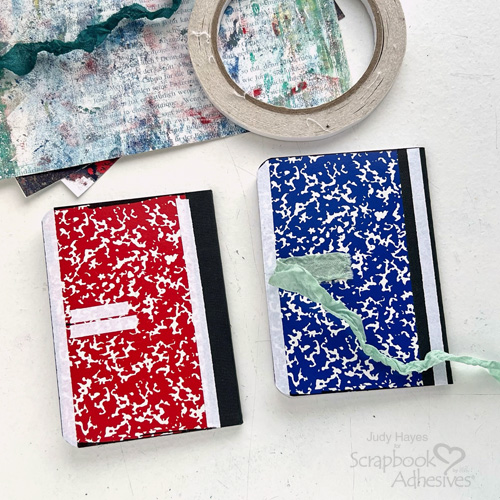
Measure spine of notebook and length from edge of front cover around the spine to the edge of back cover. Cut paper same width and slightly longer than length. The composition notebooks I used are 4.5 inches at the spine and about 7 inches in length to wrap around the cover. So cut the paper to 4.5 x 7.25 inches.
Marker on Edges
Optional: Use a permanent marker to cover notebook cover edges. This covers the cover color in case the paper doesn’t quite cover the edge.
Add Premium Double Sided Tape
Apply Premium Double-Sided Tape 1/4in to front and back opening edge of the notebook and along the spine. Use a bone folder to press tape securely onto the notebook. Trim tape at corners following the edge of the cover.
Photo shows red notebook with a black marker around edges and blue notebook with Premium Double-Sided Tape on it.
Attaching the Seam Binding
On the back cover of the notebook mark center at the outer edge. Place about a 1-inch strip of Premium Double-Sided Tape 1/4in on each side of mark perpendicular to cover edge. Peel liner from tape and place end of seam binding in place. Then add a strip of Premium Double-Sided Tape 1/4in across seam binding along the edge of cover and press firmly in place.
Apply Cover Paper
Peel liner from Premium Double-Sided Tape at the front edge of the notebook.
Peel and fold back about 1 inch of Adhesive Sheets liner on paper for the cover. With the paper edge aligned with the front edge of the notebook and long edges of paper aligned with the top and bottom edge, press paper onto the cover. Peel liners from Premium Double-Sided Tape at spine. Continue to peel the liner from the back of the paper and press the paper onto the cover. Remove liners from tape on the back cover and finish wrapping paper over the notebook cover. Use scissors to trim paper even with notebook edges at corners and edges as needed. Rub well with a bone folder to seal paper to the notebook.
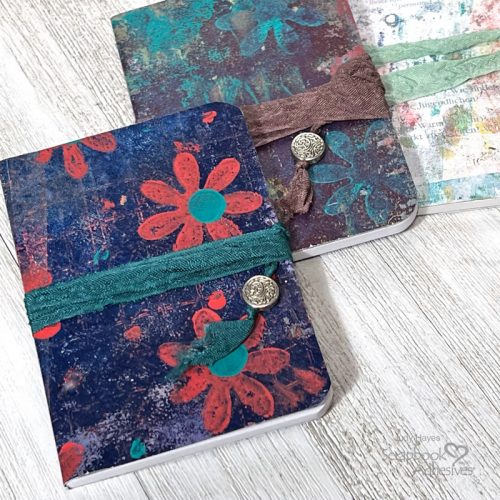
Add Bead
Thread bead on the end of seam binding. I use a denture flosser to pull a pointed end of seam binding through the bead.
Wrap seam binding around the notebook to determine the best placement for the bead. Tie a knot below bead at end of seam binding. Trim end as needed.
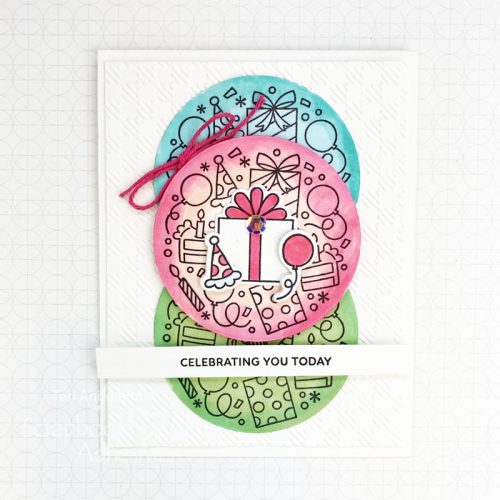
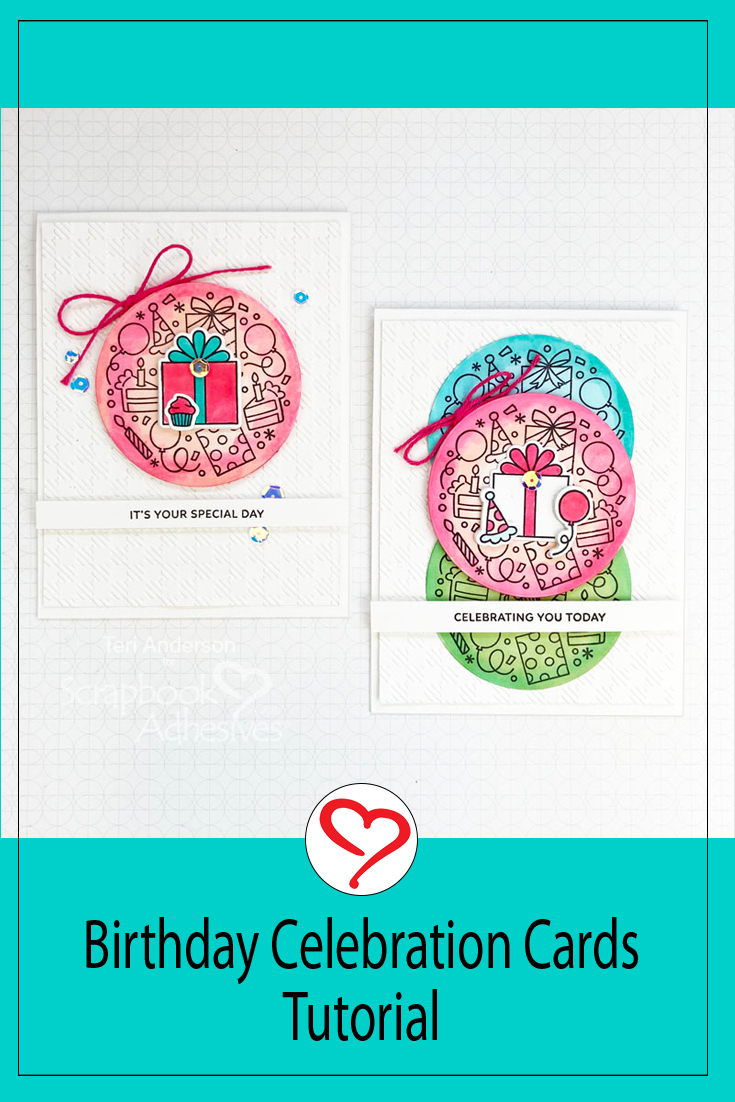
Hi, friends! Need a birthday card? Teri here to show you how to make some super cute birthday celebration cards to make ahead and send out when you need them!
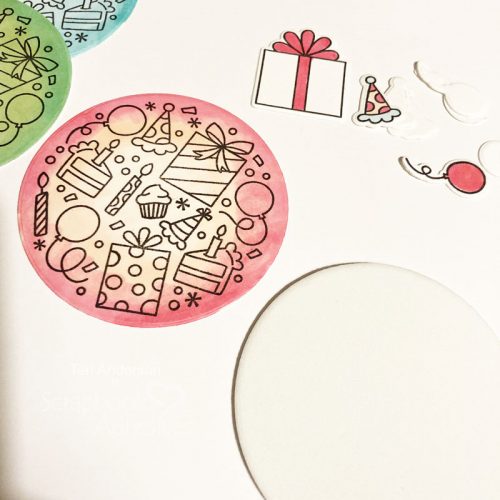
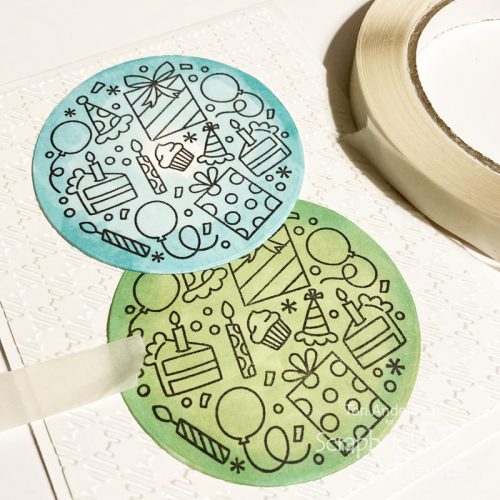
Birthday Celebration Cards Step Outs
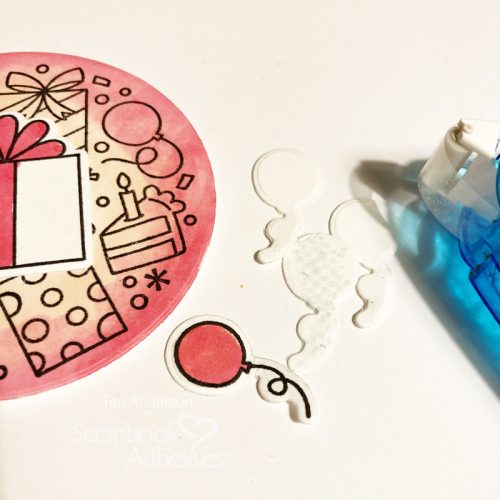
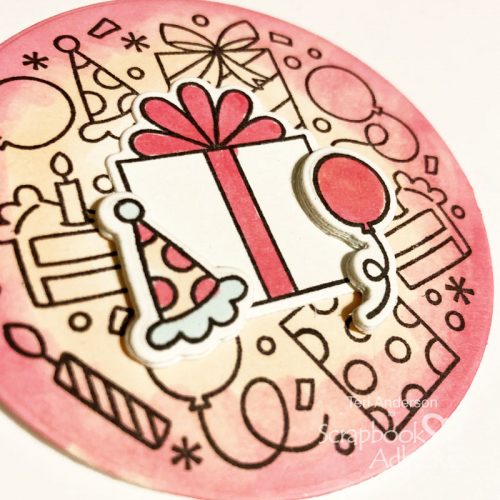
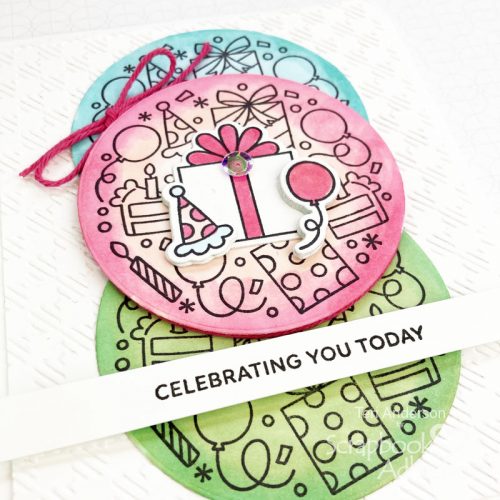
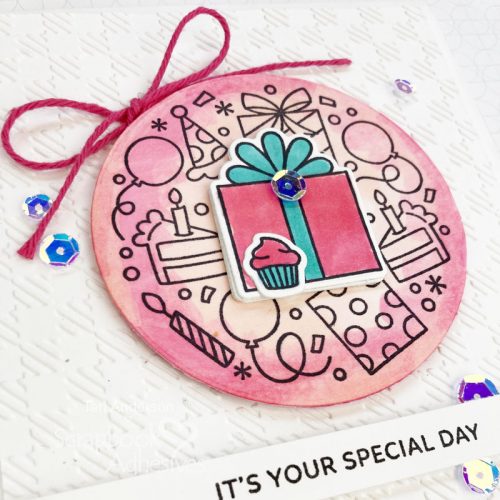
Start by stamping a birthday design on cardstock and adding color to it with markers or ink. Then die-cut it out with a circle die. Next, die-cut a second circle, a slightly smaller circle size die, from 3D Foam Creative Sheet Medium. By the way, if you don’t have a cute birthday circle stamp to use, try creating your own design by mixing together small birthday images or using patterned paper instead.
Stamp, color in, and die-cut a couple of birthday-themed images to place on your circle. Cut a few additional blank shapes to stack up and adhere to the back of your stamped images. This will give them a subtle dimension.
Mount the images onto your circle and then the foam circle behind it. Set it aside.
Stamp, color in, and die-cut two more large circles. Dry emboss a pattern on white cardstock. Mount it an A2 card and then add those two circles to it.
Place your first stamped circle in the middle and over the two other circles. Tie twine around the middle circle, adding a bow at the top side.
Stamp a sentiment on a strip of cardstock. Mount it to your card with foam strips. Complete your card by adding a sequin or gem to the circle.
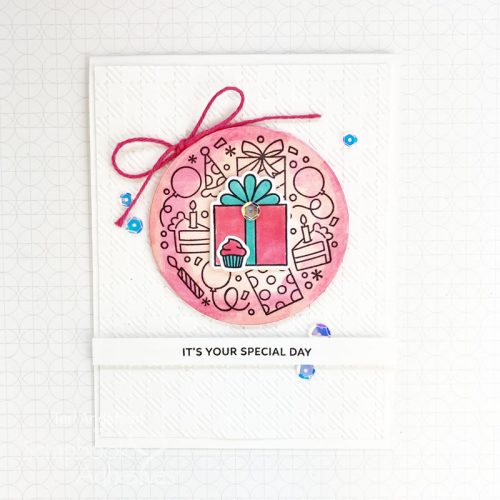
Change Up Your Card Design
Try making a similar birthday card by using only one big circle on it.
To “fill out” your card design, add some sequins or gems around the circle and sentiment strip. You could even use buttons if you wanted!
I hope you are inspired to make a few birthday cards of your own! Thanks for stopping by today!
Other White Cardstock: Neenah Paper; Stamps and Dies: Pretty Pink Posh (Let’s Party Stamp Set and Dies); Embossing Folder: Sunny Studio Stamps (Buffalo Plaid); Ink Pad: Ranger Ink; Markers: Copic; Sequins: Pretty Pink Posh; Twine: The Twinery
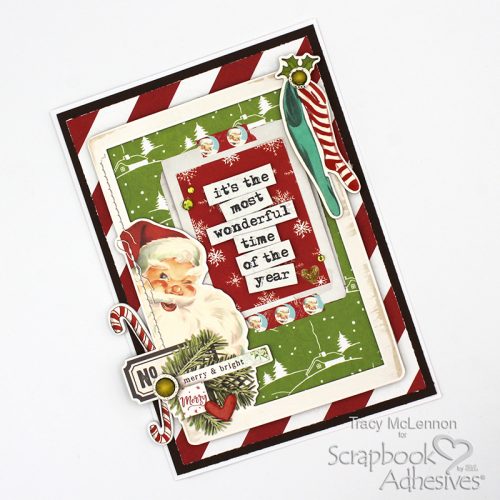
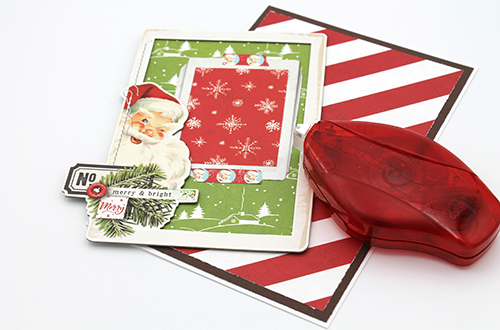
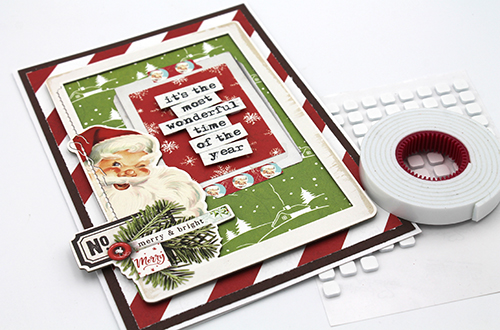
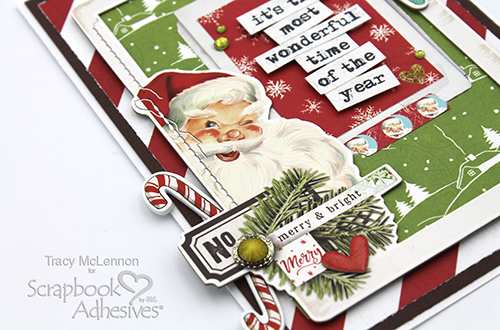
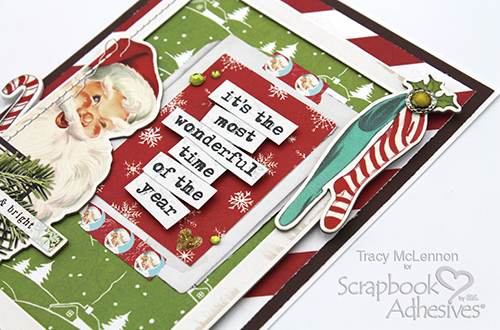
Hello crafty friends! Tracy here and today I have a fun and festive little Christmas card to share that is just SO easy to create but packed with dimension. Here are the details for this Wonderful Christmas Time Card.
Wonderful Christmas Time Layers
The dimensional Christmas card base is a 5×7 card. I cut the next 2 layers from brown cardstock and the striped patterned paper. Next cut a piece of green patterned paper to fit behind the chipboard frame. I adhered these pieces together using the E-Z Runner® Permanent Strips Refillable Dispenser.
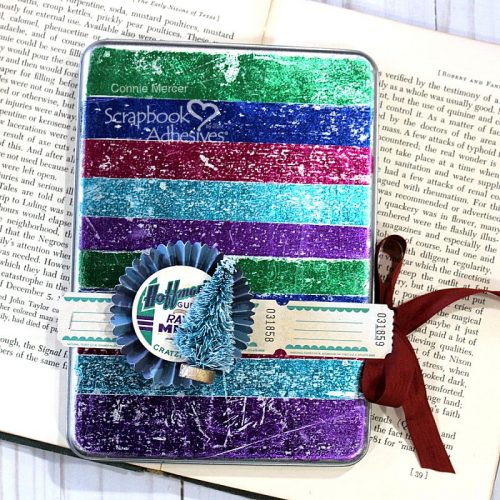
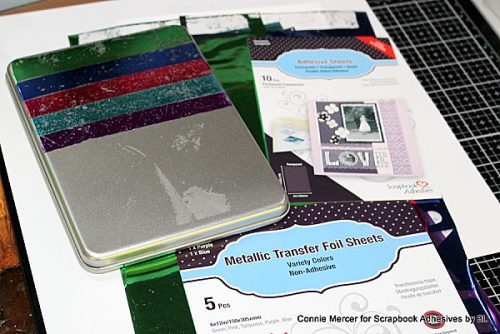
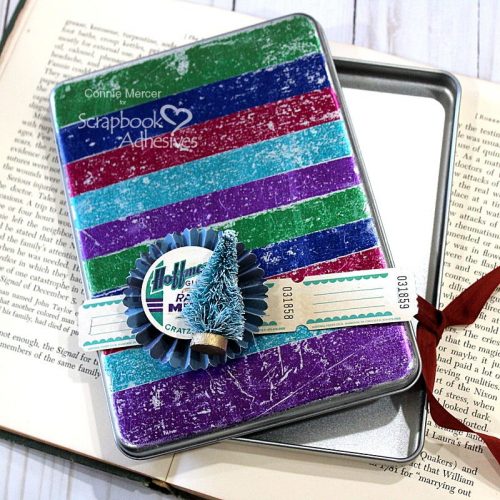
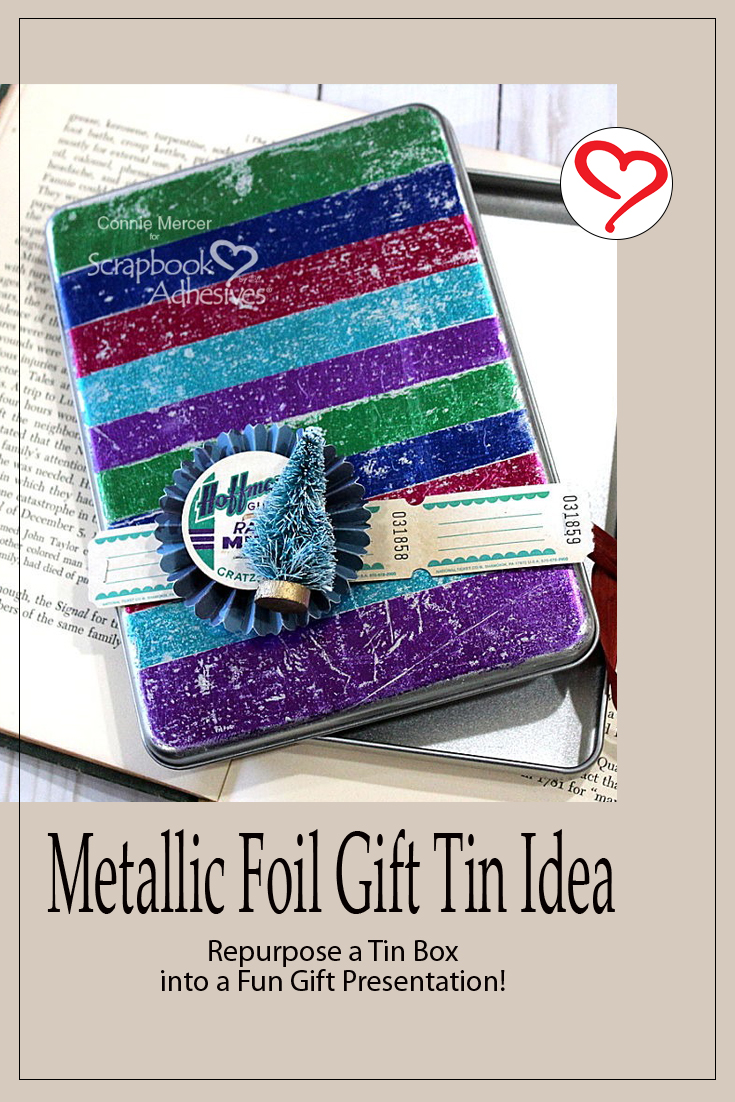
Hi, Connie here with a Metallic Foil Gift Tin project using one set from the Metallic Transfer Foil Sheets to cover a tin box. Using it with the Adhesive Sheets 4 x 6 in., makes this project easier to do! I had this tin in my craft stash so it was perfect for a makeover. Grab what you have and let’s get started.
Wear Your Adhesive on the Outside with the Gift Tin
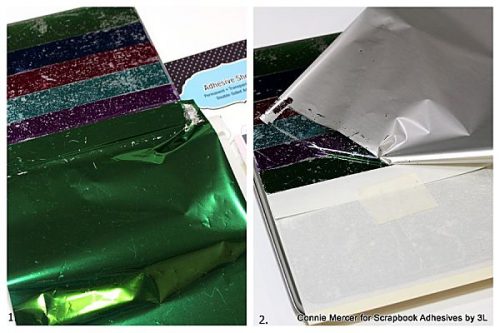
1. The first thing to do is cut your foil sheets in half. They will be easier to handle when laying on the adhesive sheets. Add the 4×6 adhesive sheet to the tin. Rub it on and then pull up. Take the release sheet and cover all but about an inch (so foil doesn’t stick until you are ready). 2. Add the foil over the adhesive and rub. Pull up and repeat until the front of the tin is covered. Tip: Keep folding the release sheet down so you are covering only an inch strip at a time. I really loved the distressed look when the foil was all on.
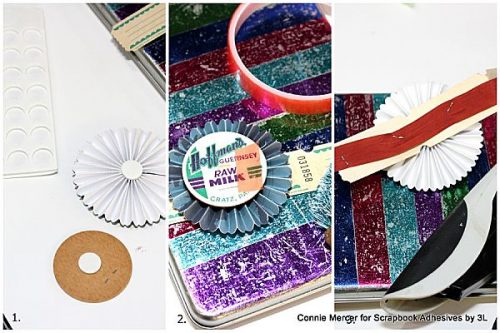
Creating a Embellishment Cluster
1. I took a rosette embellishment and added a vintage milk cap to the center using the 3D Foam White Circles Mix. 2. Then using the 3D Foam White Circles Mix adhered the rosette to a strip of vintage tags. Extreme Double-Sided 1/2″ Tape was used to secure the tiny tree to the milk cap. 3. The embellishment strip was stapled to ribbon and then tied around the tin. Tip: Making a ribbon tie around will keep the foil in place. Adhesive will pull up the foil if you ever decide to remove the embellishment.
Thanks for stopping by and have a wonderful Holiday!! Connie Mercer
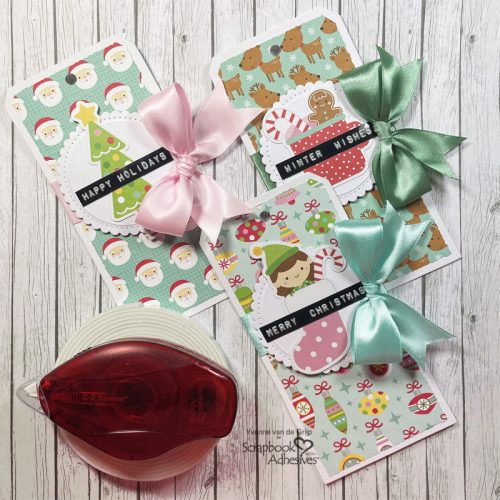
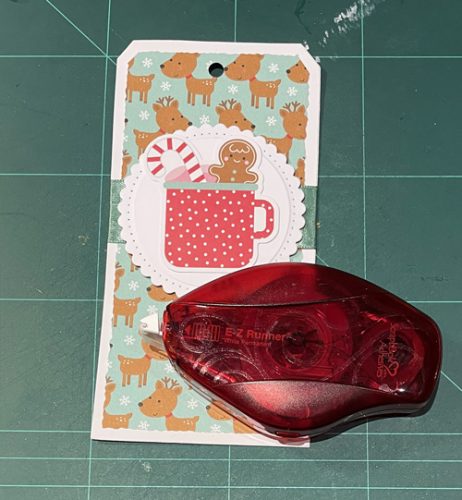
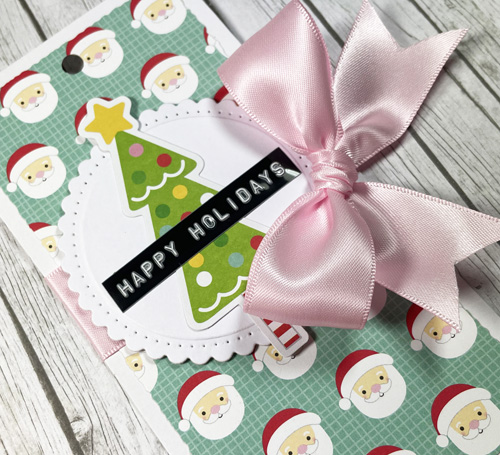
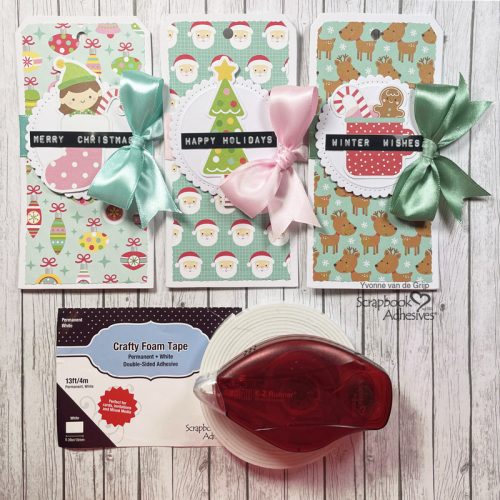
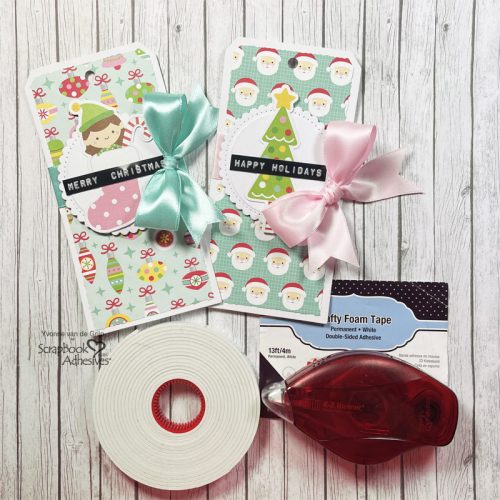
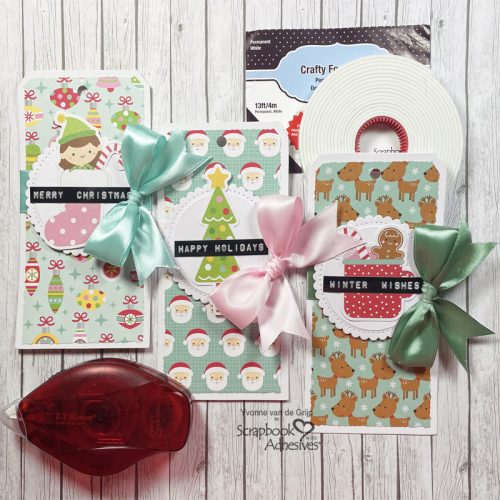
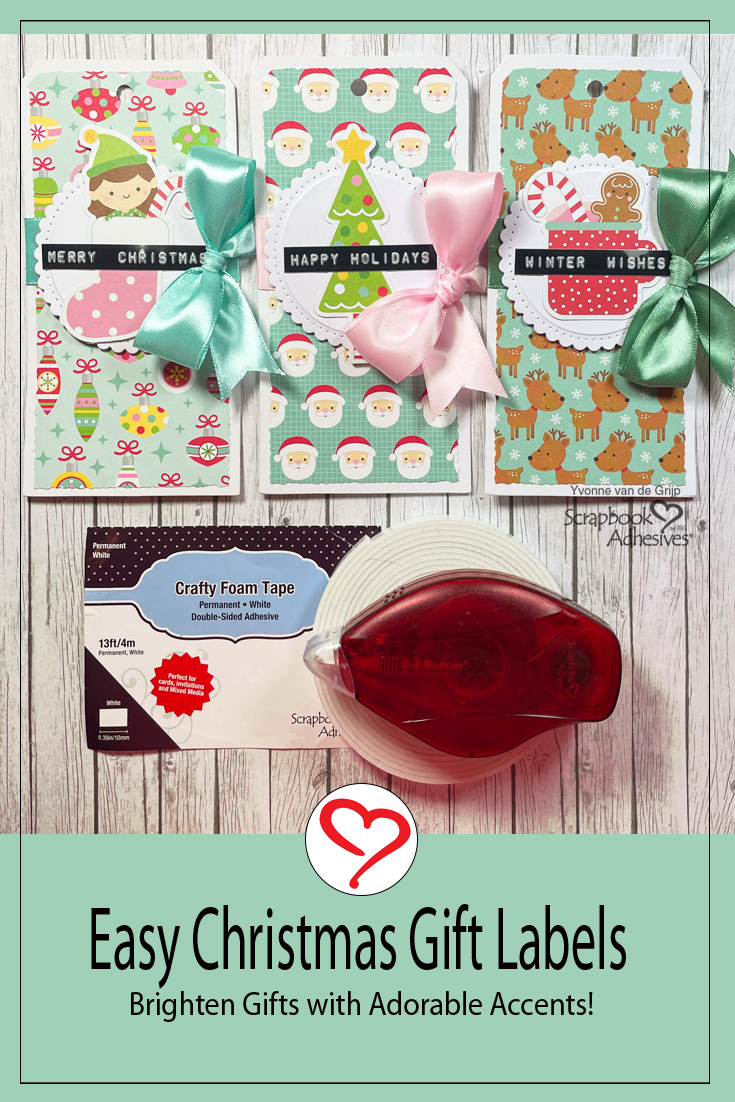
Hi everyone, Yvonne here with some last-minute, quick, and easy-to-make gift labels for your Christmas presents. Lol…I always calculate how many gift labels I need for Christmas, but somehow I always end up not having made enough gift labels.
So, I would like to share how I made my last-minute Easy Christmas gift labels for this Christmas. Using Scrapbook Adhesives by 3L® Adhesives made my labels really easy and very quick to make! Shall we get started?
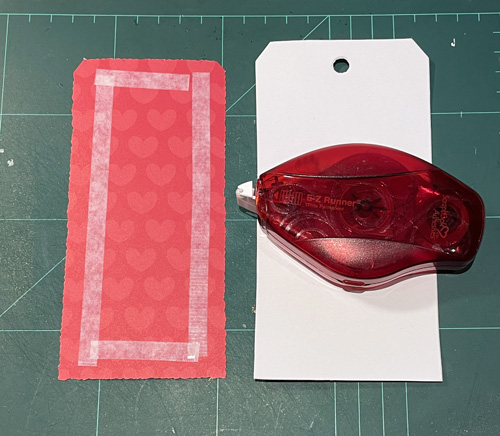
Making the Christmas Gift Label Base
For the base, I used a white cardstock tag. Now trim a piece of patterned cardstock to a size slightly smaller than the white tag. I used a Torn Edge Trimmer to create the torn edges, but you could also use some torn edge scissors. Then adhere the patterned label upon the white label using the E-Z Runner® Permanent Strips Refillable Dispenser.
And next punch a hole for fastening the label to a gift.
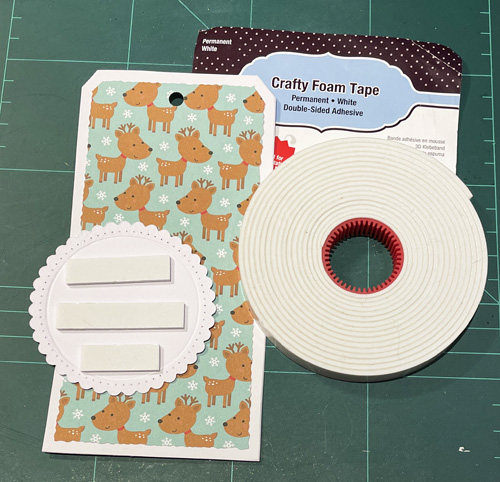
Adding Dimension to the Tag
First, fold a piece of satin ribbon around the tag and adhere the ends to the back of the label using the E-Z Runner® Permanent Strips Refillable Dispenser. Next die-cut and emboss a scalloped circle from white cardstock. Then adhere the circle onto the tag using Crafty Foam Tape White.