We’re in the 6th year of the Seasons Givings Blog Hop! This event features an opportunity to win a prize from each participating blog, paired with fabulous projects! Thanks to Design Team Member, Latisha Yoast, for bringing this blog hop each year. Grab a drink and a snack and let’s get comfortable starting the New Year with creative inspiration! Don’t forget to pin your favorite projects! ?
Today, Margie Higuchi shares a New Year shaker card that is sure to bring in 2018 with festive sparkle and shine!
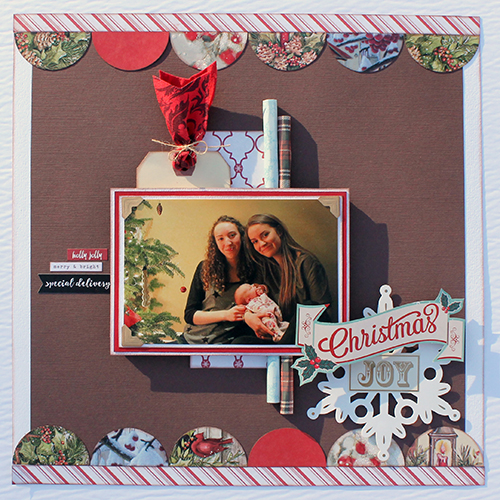
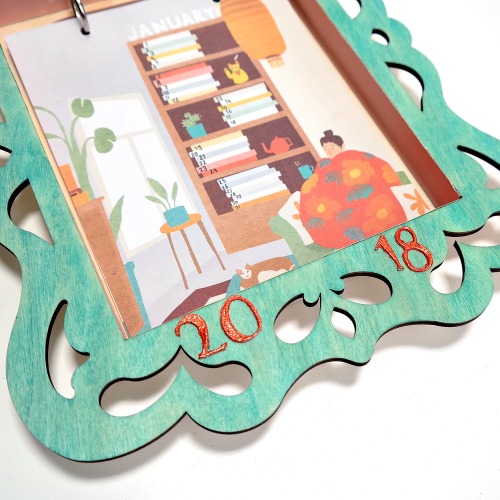
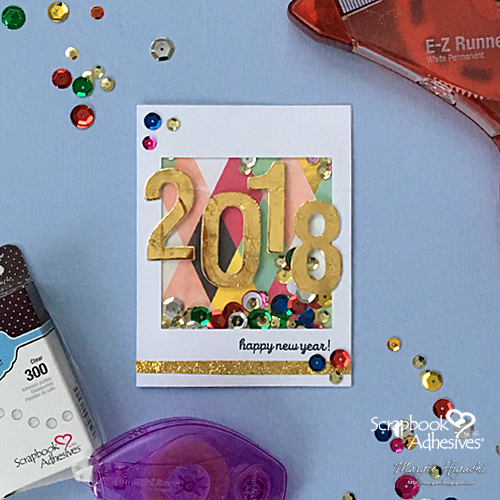
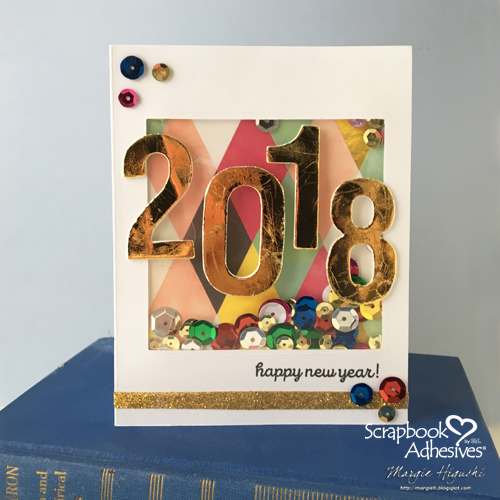
2018 Happy New Year Shaker Card
by Margie Higuchi
Happy New Year, friends! I wanted to bring in the new year with some sparkle so why not do it with a shaker feature?! It is so simple with Keepsake Envelopes so let’s get started.
Give 2018 a Shake!
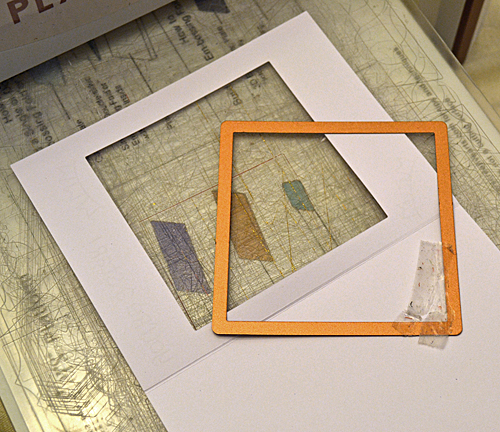
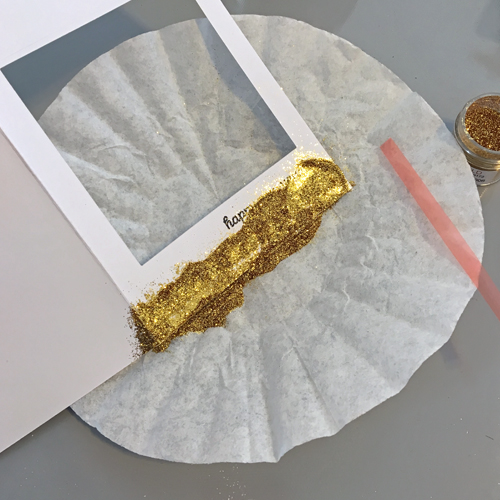
To make the card base, die-cut a square on an A2 (4.25 x 5.5 in) size card front to create a window. To add sparkle, place Extreme Double-Sided Tape 1/4 in. at the bottom of the card (make sure you have enough space for a sentiment – I used the stamp as a guide) and leave the liner on. Stamp sentiment in black ink.
Remove the liner from the Extreme Double-Sided Tape 1/4 in., pour gold glitter on top and push the glitter into the tape. Tap off excess and you have a beautiful glittery border! Set aside.
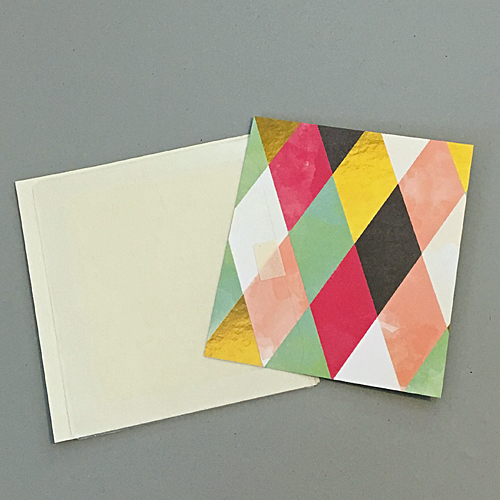
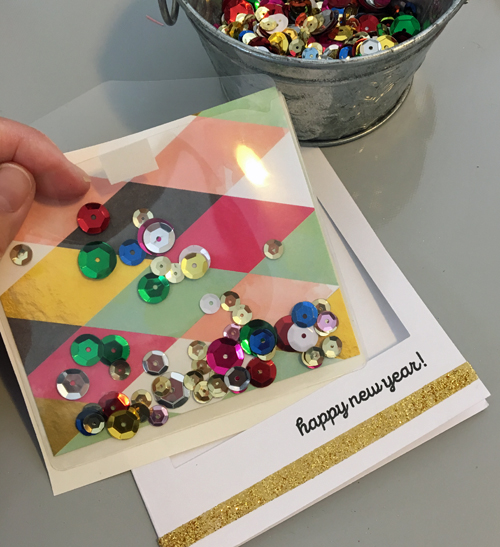
Let’s work on the shaker feature – it’s SO EASY! Cut patterned paper to fit inside a large Keepsake Envelope. Add sequins inside (and in front of patterned paper). Take the liner off from the front of the envelope and close the flap.
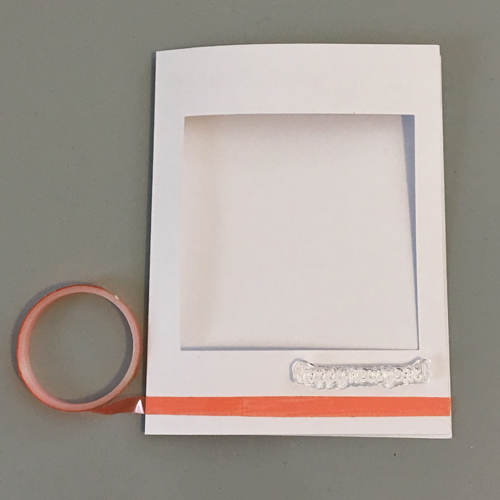
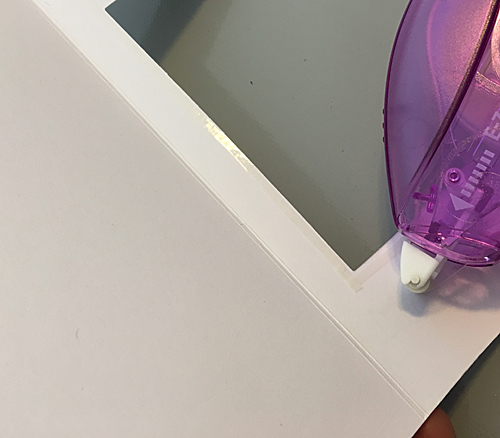
Now to attach the shaker to the card base by applying the E-Z Runner® Micro Refillable Dispenser close to the edge of the window as possible. Curl the ends of the shaker liner together to make a “handle” for easy placement over the window. DO NOT REMOVE THE LINER YET because you’ll use it to push the edges together for a secure hold.
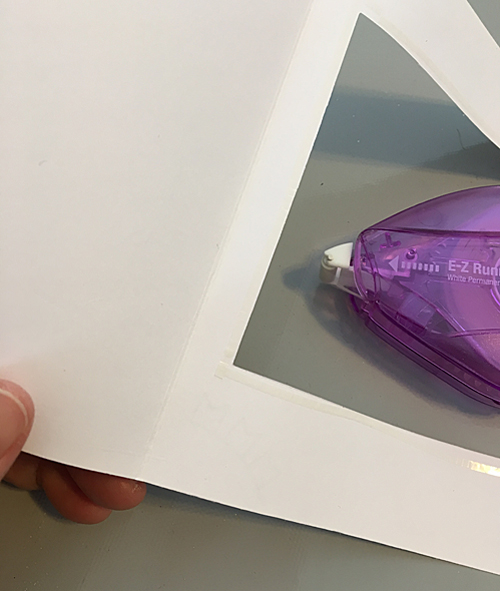
Not sure if you can see the white liner on the edge so I took two different images.
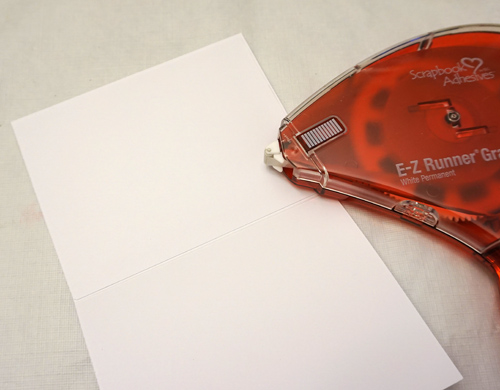
Next, we need to cover up the shaker from the inside of the card. So apply E-Z Runner® Grand Dispenser Permanent Strips on edges of the white cardstock piece that is trimmed 4.25 x 5.5 in. Remove liner of Keepsake Envelope and place white cardstock over to cover the entire side.
A Shiny New Year!
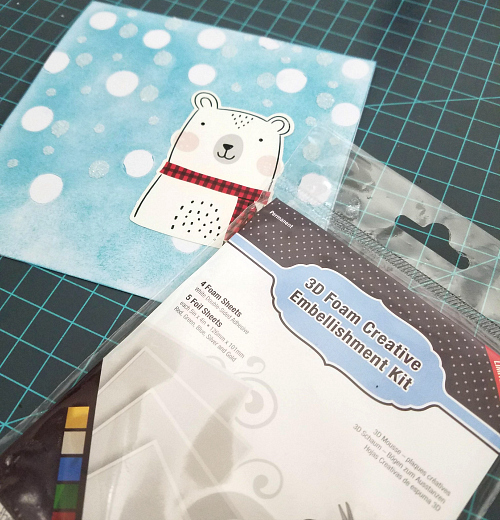
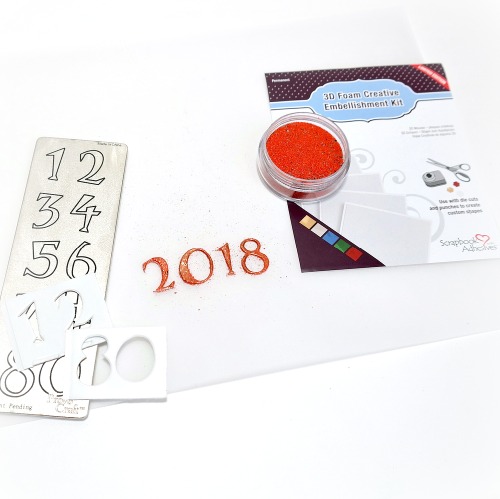
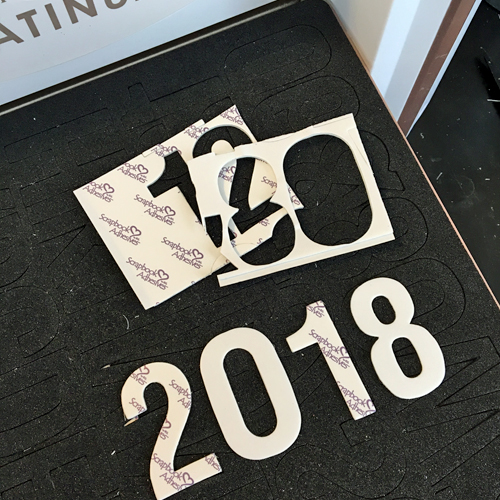
Let’s get creative with the card front and start with the 2018 dimensional die cuts. By trimming the 3D Foam Creative Sheet from the 3D Foam Creative Embellishment Kit, I can see where to place them on the steel rule dies.
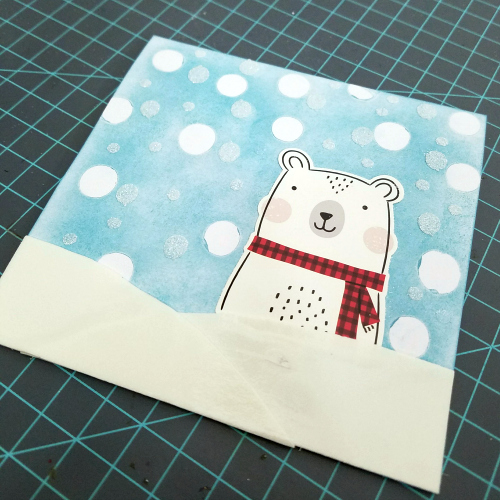
After die-cutting them, I peeled off the back liner and place them on top of the shaker window.
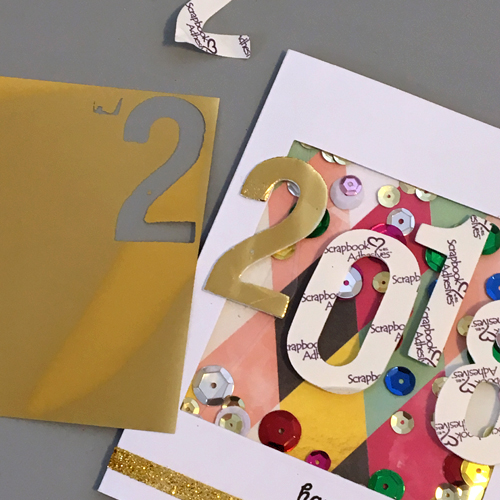
Next, take off the top liner of the first number only and place the gold foil over it (shiny side UP) and rub gently. As a result, you are transferring the foil onto your die-cut. Repeat with each number.
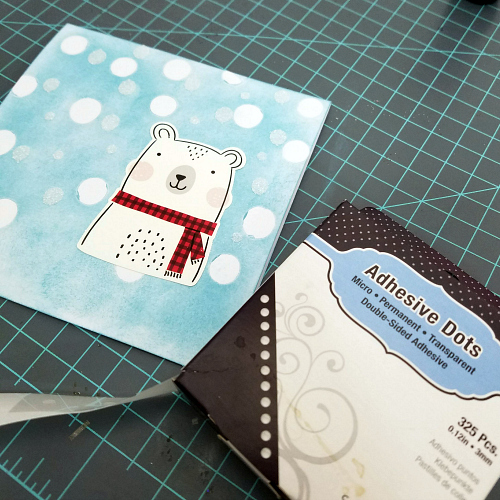
Finally, add sequins to the corners of the card base using a combination of Adhesive Dots Mini and Adhesive Dots Small. Here’s a second look…
Scrapbook Adhesives by 3L®:
Keepsake Envelopes Mix
E-Z Runner® Micro Refillable Dispenser
E-Z Runner® Grand Dispenser
3D Foam Creative Embellishment Kit
Adhesive Dots Mini
Adhesive Dots Small
HomeHobby by 3L®:
Extreme Double-Sided Tape 1/4 in.
Other:
Etched Dies and Steel Rule Die: Spellbinders® Paper Arts (Standard Squares and Type-O Contour™ Steel Rule Dies)
Stamps: Mama Elephant (Lunar Extras Set)
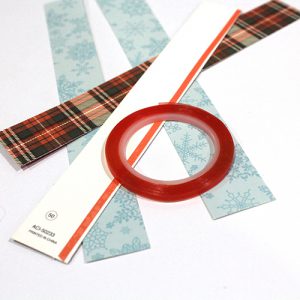
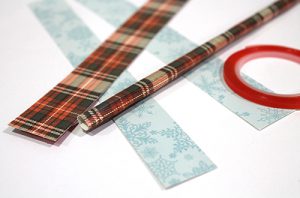
Patterned Paper: Bo Bunny Designs (You’re Invited Collection)
Ink: Tsukineko (Memento Ink – Black Tuxedo)
Tool: My Sweet Petunia (MISTI)
White Cardstock; Sequins
Giveaway Details
Enter to win through the Rafflecopter App. Comments are monitored and will take time to publish. International entries are welcome.
a Rafflecopter giveaway
If you cannot see the comment section (at the bottom of this post), please click: Seasons Givings Blog Hop and New Year’s Shaker Card, and scroll down to the bottom of the post.
Visit our Website and Blog!
Sign up for our Newsletter so you never miss a contest or giveaway!


Your next stop is: Reverse Confetti
Visit Season’s Givings Blog Hop Participants:
Lawn Fawn
Technique Tuesday
Scrapbook Adhesives by 3L (YOU ARE HERE!!)
Reverse Confetti
MFT Stamps
Neat & Tangled
Winnie & Walter
Hero Arts
CAS-ual Friday Stamps
My Sweet Petunia
Paper House Productions
Verve Stamps
Stamp Simply Ribbon Store
Catherine Pooler
Indigojade Art
A Jillian Vance Design
Kelly Creates
Latisha Yoast
Kimberly Crawford
Vera Yates
Nichol Spohr
Chari Moss
Audrey Tokach
Zsoka Marko
Teri Anderson
Wanda Guess
Amy Tsuruta
Lydia Fiedler
Laurie Willison
Jenn Shurkus
Debi Adams
Cindy Lawrence
Lori Craig
Lisa Henke
Dina Kowal
Laura Bassen
Jessica Frost-Ballas
Kelly Lunceford
Dana Joy
Tracey McNeely
Margie Higuchi
Laurel Beard
Janine Tinklenberg
Sean Fetterman
Christine Meyer
Heidi Blankenship
Debbie Seyer
Libby Hickson
Gracie Chavez
Julee Tilman
Karen Baker
Lee Murphy
Yvonne Van De Grijp
Leigh Penner
Marcie Sharp
Patti Gilliam
Barbara Anders
Bunny Vance
Kyra Sanders
Giovana Smith
Jillian Vance
Ceal Pritchett
Neva Cole