You are in our US store • Switch to Europe store

Glittered Make A Wish Card

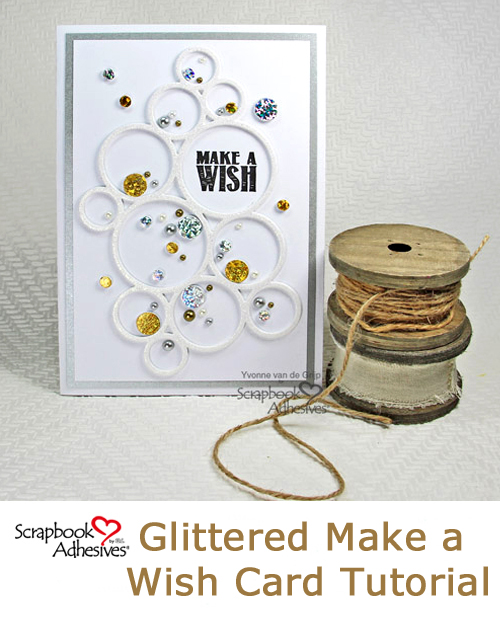
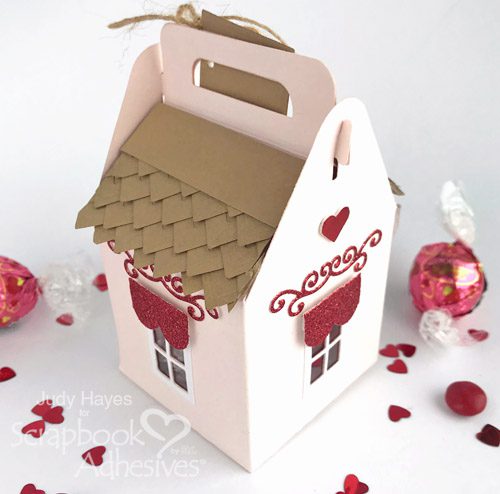
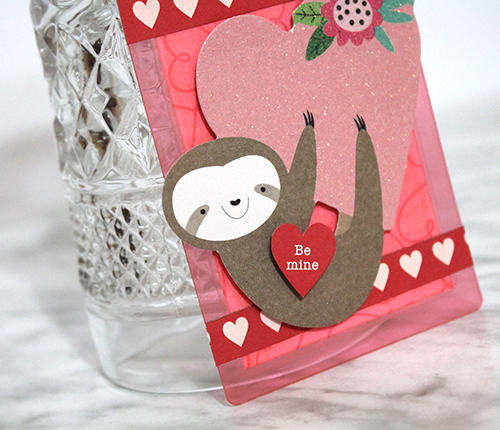
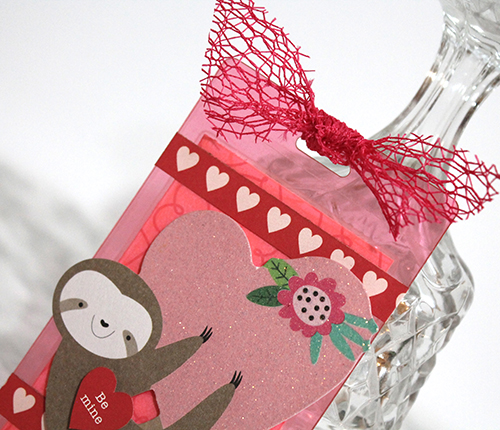
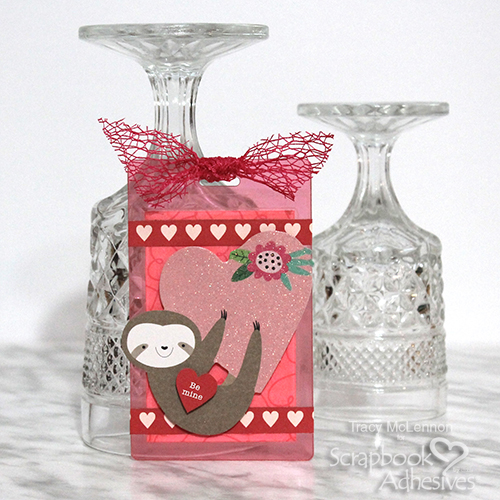
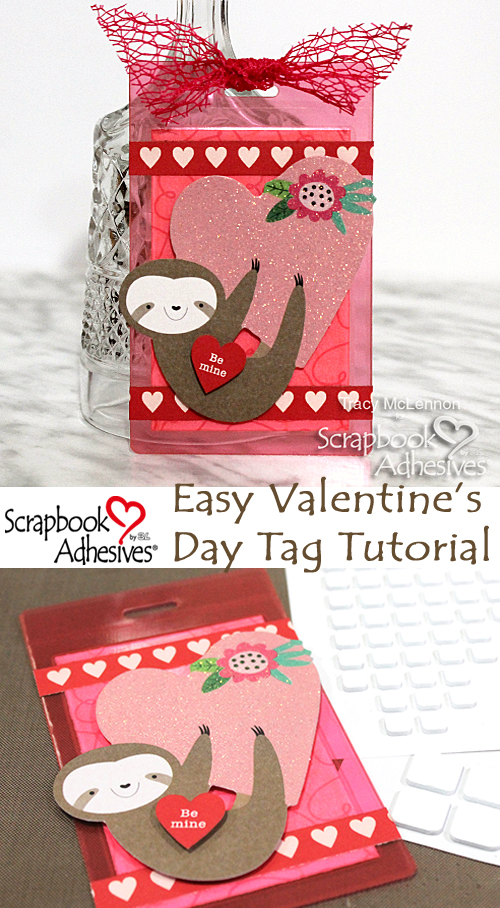
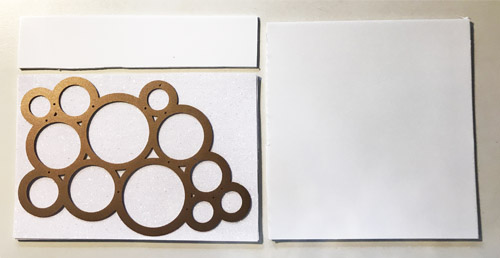
Hi everyone, Yvonne here with a festive card embellished with glittered 3D Foam Sheets. Have you seen the NEW 3D Foam Creative Sheets Medium White? They are perfect for those larger die cuts like the one I used on my card! With this 6 x 12-inch size, I am able to die-cut this fun bubble shape with ease! No more piecing together small sheets to cover the large design.

Glittered Card with 3D Foam Sheets by Yvonne van de Grijp for Scrapbook Adhesives by 3L

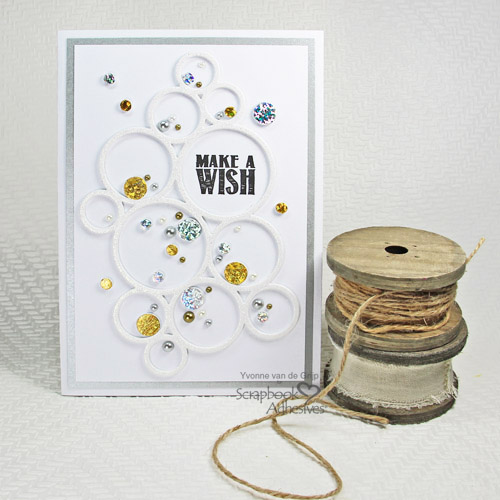
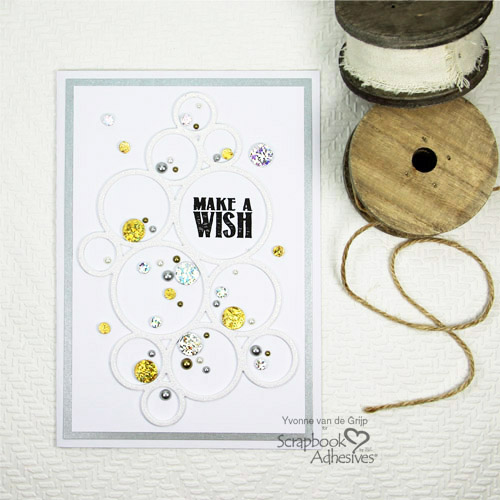
Make a Wish Glittered Card

Let’s start with layering a rectangle piece of white cardstock to a grey panel (slightly larger than the white top layer). Next, adhere it to a white card base using the E-Z Runner® Ultra Strong Refillable Dispenser for all the layers.

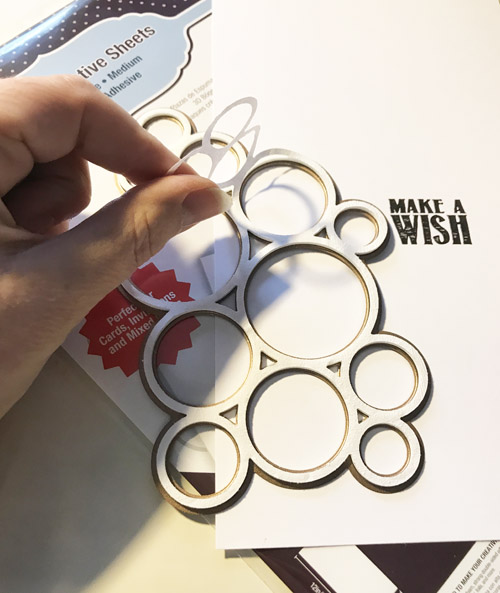
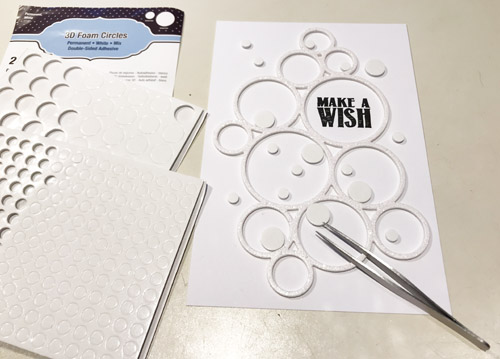
To make my focal point, I first scissor cut a piece of 3D Foam Creative Sheets Medium White to fit the size of my etched die. Simply use the die as my guide.

Glittered Card with 3D Foam Sheets by Yvonne van de Grijp for Scrapbook Adhesives by 3L

Remove the liner from the cut piece of 3D Foam Creative Sheets Medium White and apply a piece of white glitter paper on top. Make no air bubbles form in between the layers. Place the etched die onto the glittered 3D Foam Sheet with the cut blade facing down to the glitter) and run through your manual die-cutting machine.

Leaving the foam paper in the etched die, remove the excess. This will not only help place the die cut on the card front but give me better control in keeping its shape as the design is intricate.

Now to position the glittered die-cut onto the card. Remove the liner and gently rub over the back of the filled etched die and the die cut will adhere in perfect shape to the card front.

Glittered Card with 3D Foam Sheets by Yvonne van de Grijp for Scrapbook Adhesives by 3L

Embellishing the Card

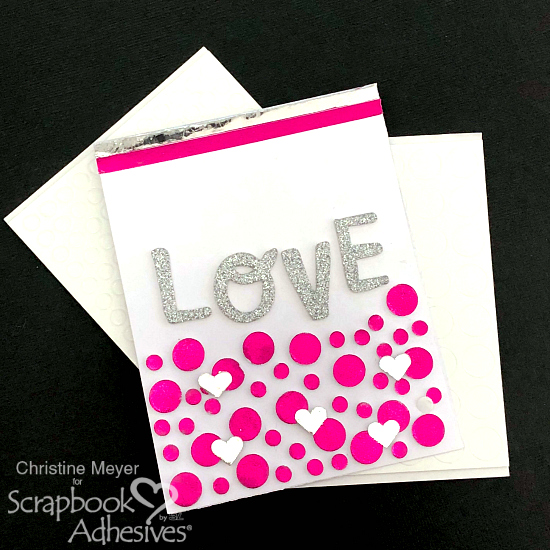
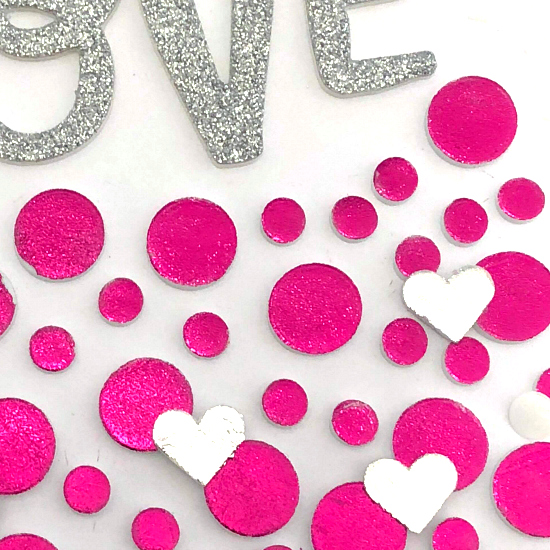
Stamp the sentiment in black ink. Randomly place 3D Foam Circles White in both regular and small sizes on the card front. Make sure to keep the top liner on.

Glittered Card with 3D Foam Sheets by Yvonne van de Grijp for Scrapbook Adhesives by 3L

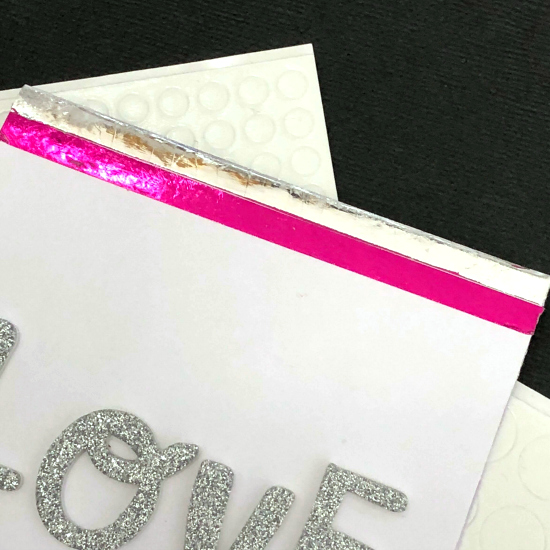
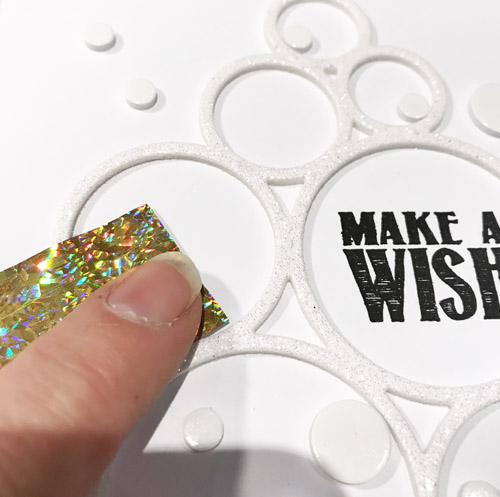
Cut small pieces of Silver and Gold Glitter Foil sheets from the NEW Metallic Transfer Foil Sheets Holographic Colors. It’s easy to handle that the larger 6 x 12-inch format. Remove the liner from 3D Foam Circles and place the pieces from Metallic Transfer Foil Sheets Holographic Colors with the color side UP. Rub softly to transfer the color to 3D Foam Circle. Just peel off to see the color = instant gratification! LOL!

Glittered Card with 3D Foam Sheets by Yvonne van de Grijp for Scrapbook Adhesives by 3L

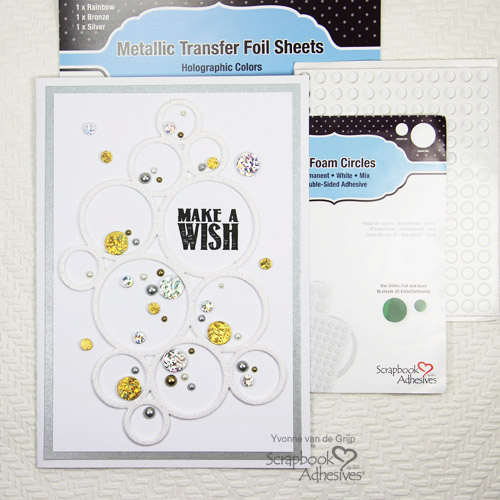
Repeat for all the 3D Foam Circles White Mix on to the card. For the final touch, add pearls to the card for a festive touch!

Glittered Card with 3D Foam Sheets by Yvonne van de Grijp for Scrapbook Adhesives by 3L

Glittered Card with 3D Foam Sheets by Yvonne van de Grijp for Scrapbook Adhesives by 3L

Creative Time: 40 minutes
Skill Level: Intermediate

Materials Needed
Scrapbook Adhesives by 3L®

E-Z Runner® Ultra Strong Refillable Dispenser
3D Foam Creative Sheets Medium White
Metallic Transfer Foil Sheets Holographic Colors
3D Foam Circles White Mix

Other
Etched Dies: Spellbinders® Paper Arts (Cascading Circles by Donna Salazar, Platinum 6 Die Cutting and Embossing Machine), Cardstock (White, Silver, White Glitter), Stamp (Lili of the Valley), Black Inkpad, Self-adhesive Pearls, Tweezers, Paper Trimmer, Scissors

Pin It!

Glittered Card with 3D Foam Sheets by Yvonne van de Grijp for Scrapbook Adhesives by 3L Pinterest

Ready, Set, Travel: Part One

Hello crafty friends! Tracy McLennon here, and today I have Part One of my traveler’s journal project to share. In March, my husband and I will be traveling to Spain. I wanted to share what I have done to prepare my travel journal for the journey.

I have been a journal lover in the past, both for writing and drawing. But this will be my first traveler’s journal, and I am very excited about that. For this journey, I chose to start with a journal (cover, notebook, and inserts).

Ready, Set, Travel: Part One by Tracy McLennon for Scrapbook Adhesives by 3L

Travel Journal Prep

I used the yellow Self-Laminating Tag for the tag that I added to the cover of my traveler’s journal. Inside the tag, I added yellow cardstock and red vellum to create the look of Spain’s flag. I then painted wood veneer letters black and added them to the tag using Adhesive Dots Micro. I didn’t use the loop to attach my tag to the book but instead used a silk ribbon.

Ready, Set, Travel: Part One by Tracy McLennon for Scrapbook Adhesives by 3L

In the back pocket of my insert is where I will keep my Creative Photo Corners Kraft, Creative Photo Corners Black and my Keepsake Envelopes Mix. This way I will be able to easily pull out what I need while I create on the run.

The Keepsake Envelopes Mix will be perfect for adding little bits and pieces of memorabilia.

Ready, Set, Travel: Part One by Tracy McLennon for Scrapbook Adhesives by 3L

Ready, Set, Travel: Part One by Tracy McLennon for Scrapbook Adhesives by 3L

The final piece to take with me as I travel is my E-Z Runner® Petite Permanent Dots Refillable Dispenser. It’s perfectly petite to add to my travel backpack.

Ready, Set, Travel: Part One by Tracy McLennon for Scrapbook Adhesives by 3L

Thanks so much for stopping by!
Tracy

Creative Time: 20 Minutes
Skill Level: Beginner

Materials Needed
Scrapbook Adhesives by 3L®

Creative Photo Corners Kraft
Creative Photo Corners Black
E-Z Runner® Petite Permanent Dots Refillable Dispenser
Adhesive Dots Micro
Keepsake Envelopes Mix

HomeHobby by 3L®
Self-Laminating Tags with Loops

Other
Travelers Journal: Momenta (Explorer Journal), Paint: Ranger Inks (Distress Paint in Black Soot), Wood Veneer Letters, Multi-Craft Letter Stickers, Silk Ribbon


Pin It!

Ready, Set, Travel: Part One by Tracy McLennon for Scrapbook Adhesives by 3L Pinterest

Decorated Memory Jar Tutorial

Hi everyone, Christine here today with a decorated Memory Jar.  These are so easy to create by repurposing an everyday jar and make wonderful gifts too.  You can pop little photos inside and notes that mean something to you and then fix a date to open it up and remind yourself of lovely events, sentiments and feelings.

Decorated Memory Jar Tutorial by Christine Emberson for Scrapbook Adhesives by 3L

Memory Jar Step Outs

Select a jar, any shape will do as long as you can insert little photos and notes.  It is possible to purchase printers to produce photos from your phone if you wish.

Decorated Memory Jar Tutorial by Christine Emberson for Scrapbook Adhesives by 3L

Calculate the size of the jar lid and select a pretty die cut to affix to the top. Using strips of Extreme Double Sided Tape 1/4 inch will hold this in place perfectly.

Decorated Memory Jar Tutorial by Christine Emberson for Scrapbook Adhesives by 3L

For the lid decoration, I’ve chosen die cut flowers and leaves that I’ve colored with distress inks  Affixing 3D Foam Squares Small on the reverse of each leaf gives wonderful extra dimension.

Decorated Memory Jar Tutorial by Christine Emberson for Scrapbook Adhesives by 3L

Stamens inside die cut flowers look extra realistic. To hold the stamens in place use Adhesive Dots 3D. Trim the stamens, pop them through the layered flowers and cover with the Adhesive Dot on the reverse.

Decorated Memory Jar Tutorial by Christine Emberson for Scrapbook Adhesives by 3L

I selected a kraft tag to tie around the jar and stamped a suitable sentiment.

Decorated Memory Jar Tutorial by Christine Emberson for Scrapbook Adhesives by 3L

The finished decorated memory jar.  This will sit on my kitchen windowsill where I will continue to place items inside throughout the year.

Decorated Memory Jar Tutorial by Christine Emberson for Scrapbook Adhesives by 3L

Decorated Memory Jar Tutorial by Christine Emberson for Scrapbook Adhesives by 3L

Thanks for stopping by and check out the brilliant adhesives on the website.

Creative Time: 30 Minutes
Skill Level: Intermediate

Materials Needed
Scrapbook Adhesives by 3L®

3D Foam Squares Small
Adhesive Dots 3D

HomeHobby by 3L®
Extreme Double Sided Tape – 1/4 inch.

Other
Craft Dies: Spellbinders® Paper Arts (Cinch and Go Flowers III, Fancy Edged Circles); Stamps: LDRS (Birthday Sentiments); White cardstock; Distress inks; Kraft Tag; Stamens


Pin It!

Decorated Memory Jar Tutorial by Christine Emberson for Scrapbook Adhesives by 3L Pinterest

Dear Syd Dimensional Scrapbook Layout

Happy February, Shellye McDaniel here with a sweet dimensional scrapbook layout featuring my girl, Sydnee. In the middle of the winter months, I thought it would be nice to change up to spring colors. It goes well with the picture, don’t you think?

Dear Syd Dimensional Scrapbook Layout by Shellye McDaniel for Scrapbook Adhesives by 3L


Start of a Dimensional Scrapbook Layout

I chose bright patterned papers from a favorite collection.  To reduce the busy-ness of the floral pattern paper base, I cut the pink wavy paper down 2 inches smaller than the base paper. From the start, dimension was added by attaching it to the center with Crafty Foam Tape Black.

Dear Syd Dimensional Scrapbook Layout by Shellye McDaniel for Scrapbook Adhesives by 3L

Next, I cut a strip of green dot paper to anchor the layout and added it to the bottom using the E-Z Runner® Grand Refillable Dispenser with the E-Z Runner® Grand Permanent Dots. It’s so easy to change out the E-Z Runner Grand Refills! Simply open, take out the refill inside and drop in the E-Z Runner® Grand Permanent Dots Refill! I’ll share the quick video below. To attach the scallop border sticker, I used 3D Foam Circles Black Mix.

View a quick video on How to Use and Refill the E-Z Runner Grand Dispenser.

Finally, I used the Adhesive Dots 3D to adhere to bulky embellishments such as the crochet flowers. They really do STICK! Did you know these Adhesive Dots have a unique patented single dot dispenser provides touch-free application? I’ll share a short video on this too 🙂

Dear Syd Dimensional Scrapbook Layout by Shellye McDaniel for Scrapbook Adhesives by 3L

See this short video on How to Use Adhesive Dots.

I love adding dimension to my page layouts and these adhesives are the best around!

Skill Level: Beginner
Time Required: 30 Minutes

Materials Needed
Scrapbook Adhesives by 3L®

Crafty Foam Tape Black
E-Z Runner® Grand Permanent Dots
3D Foam Circles Black Mix
Adhesive Dots 3D

Pin It!

Dear Syd Dimensional Scrapbook Layout by Shellye McDaniel for Scrapbook Adhesives by 3L Pinterest

Footprints in our Hearts Mosaic Card Tutorial

Today I have a square kraft card to share with you. What is so unique is I mimic the shape and size of the Mounting Squares. I was inspired when I saw DIY Mosaic Background by Dana Tatar – loved how it turned out. So here’s my take on a baby card I created for a baby shower I attended. What do you think?

Footprints in our Hearts Mosaic Card Tutorial by Margie Higuchi for Scrapbook Adhesives by 3L

Going a little Mosaic Crazy!

First I cut my patterned paper into 1/2 inch wide strips and then cut into 1/2 inch squares. This size worked well with the Mounting Squares 250 White. But we have other sizes of Mounting Squares that you can try too.

I applied a Mounting Square onto the back of each square and then added them onto a 5 x 5-inch square card panel.

Footprints in our Hearts Mosaic Card Tutorial by Margie Higuchi for Scrapbook Adhesives by 3L

After I cut a piece of 3 x 3.5-inch blue patterned paper card panel and the 2.5 x 3.0-inch sentiment panel. Ink all the edges with dark brown ink, using an ink applicator.

Footprints in our Hearts Mosaic Card Tutorial by Margie Higuchi for Scrapbook Adhesives by 3L

The mosaic card panel adhered with Mounting Squares 250 White was centered onto the card base.

For the blue card panel, I wrapped a piece of narrow white ribbon around it and tied with a simple bow, secured with an Adhesive Dot Small on the panel. Then I added Mounting Squares to the back (including the ribbon for extra security). Also, add the Creative Photo Corners Kraft to each corner before centering it onto the mosaic card panel (forgot to take a step-out picture of this ;)).

The sentiment panel adhered with 3D Foam Squares White Regular Size was placed on top of the layered card.

Footprints in our Hearts Mosaic Card Tutorial by Margie Higuchi for Scrapbook Adhesives by 3L

Footprints in our Hearts Mosaic Card Tutorial by Margie Higuchi for Scrapbook Adhesives by 3L

The finishing touch was adding the button on top of the bow with an Adhesive Dot Small and it’s ready to give!

Footprints in our Hearts Mosaic Card Tutorial by Margie Higuchi for Scrapbook Adhesives by 3L

Creative Time: 45 minutes
Skill Level: Beginner

Materials Needed
Scrapbook Adhesives by 3L®

Mounting Squares 250 White
3D Foam Squares White Regular Size
Adhesive Dots Small
Creative Photo Corners Kraft

Other
Patterned Paper: Prima Marketing Inc.; Ink and Applicator: Gathered Twigs Distress Ink (Ranger Ink); Narrow White Satin Ribbon; Wood Button

Pin It!

Footprints in our Hearts Mosaic Card Tutorial by Margie Higuchi for Scrapbook Adhesives by 3L Pinterest


More Mosaic Projects

We have more of these wonderful mosaic design projects, check out the posts below by clicking on the title or image. ENJOY!

Kid Scrapbook Layout with DIY Click N Stick Mosaic Squares Background
DIY Mosaic Background by Dana Tatar Heart Mosaic Card by Christine Emberson Mosaic 3D Foam Squares Background Card by Tracy McLennon
Love You Card - Angela Ploegman for Scrapbook Adhesives by 3L
Adhesives Ain’t Just for Adhering by Michele Kovack DIY Heart Mosaic Stamp Card by Angela Ploegman Love and Glitter Heart Card by Christine Emberson

Sweet Shoppe Valentine’s Treat Box Tutorial

Happy Valentine’s Day! I’m excited to share Sweet Shoppe Valentines Treat Box with you today!  I think it turned out so cute!  I used a holiday die set but embellished it for Valentine’s Day.

Sweet Shoppe Valentine's Treat Box by Judy Hayes for Scrapbook Adhesives by 3L

Creating a Sweet Shoppe Base

To make this treat box, cut 2 cottage treat box pieces from pink cardstock. Position inner window dies on treat box and die cut. I cut a window centered on each side and on the back and offset the one on the front to allow room for the door.

Apply Adhesive Sheets 4 x 6 inch to back of white cardstock. Cut one door and three window frames from it.

Sweet Shoppe Valentine's Treat Box by Judy Hayes for Scrapbook Adhesives by 3L

Remove adhesive liner and fasten window and door to treat box. Cut acetate slightly larger than windows. Attach it to the inside over windows using E-Z Runner® Micro Refillable Dispenser.

Sweet Shoppe Valentine's Treat Box by Judy Hayes for Scrapbook Adhesives by 3L

Apply Extreme Double-Sided Tape ¼ inch to tabs. Remove liners and adhere sides of treat box together.

Sweet Shoppe Valentine's Treat Box by Judy Hayes for Scrapbook Adhesives by 3L

Apply Extreme Double-Sided Tape ¼ inch to two opposite bottom flaps. Fold in flaps without adhesive first. Fold flaps with adhesive and secure by pressing from the bottom and inside the box. I set the treat box on my work surface after flaps were aligned and pressed from inside.

Sweet Shoppe Valentine's Treat Box by Judy Hayes for Scrapbook Adhesives by 3L

Adding All the Details

Cut three scallop pieces from red glitter cardstock and one from white cardstock. Cut two scallop strips into sections of two to make four sections of two scallops. Use small squares from 3D Foam Squares White Mix to fasten a scallop section over each side and back window.

Sweet Shoppe Valentine's Treat Box by Judy Hayes for Scrapbook Adhesives by 3L

For front window, use Thin 3D Foam Squares White Mix small squares to fasten it. (This is so it will fit under the awning). Attach white scallop piece behind glitter scallop with narrow reveal using E-Z Runner® Ultra Refillable Dispenser. Attach it across the front with small squares from 3D Foam Squares White Mix.

Apply Adhesive Sheets 4 x 6 inch to the back of small pieces of red glitter paper. Cut 3 swirly pieces from it. Remove adhesive backing and position one above each side and back window

Sweet Shoppe Valentine's Treat Box by Judy Hayes for Scrapbook Adhesives by 3L

Sweet Shoppe Roof of Photo Corners

Cut 2 pieces of 1¼ x 2½ʺ Kraft cardstock to fit the roof. Add Creative Photo Corners Kraft by starting with 3 centered across the bottom edge. Add four over them with points even with first three. Allow photo corners to extend beyond side edges and trim when finished. Attach the next row offset and above the first three. Cut photo corners in half to fill in at edges. Continue to add photo corners so there are 6 rows counting first two layers as row one.  Repeat for second roof section. Use large squares from 3D Foam Squares White Mix to secure the photo corner roof to the treat box.

Sweet Shoppe Valentine's Treat Box by Judy Hayes for Scrapbook Adhesives by 3L

Cut two strips of kraft cardstock to fit over the photo corners at the rooftop (about ¾ x 2½ʺ). Use E-Z Runner® Ultra Refillable Dispenser to apply adhesive and attach it over photo corners at top of treat box roof.

Sweet Shoppe Valentine's Treat Box by Judy Hayes for Scrapbook Adhesives by 3L

Adding the Final Touches

Remove the liner from one small 3D Foam Heart. Place red foil from 3D Foam Creative Embellishment Kit over the heart and rub to transfer Metallic Transfer Foil to heart. Remove foil sheet. Repeat for four small hearts.

Sweet Shoppe Valentine's Treat Box by Judy Hayes for Scrapbook Adhesives by 3L

Add one 3D Foam Heart to the door and one above each side window. (4th heart for tag)

Handwrite “Sweet Shoppe” on a tiny piece of Kraft cardstock with black fine point marker. Use E-Z Runner® Micro Refillable Dispenser to apply adhesive to back. Add to a white mat. Cut small squares of Thin 3D Foam Squares White Mix in half. Use to attach sign above the door on treat box.  Add a dot of black Enamel Accents for the doorknob.

Sweet Shoppe Valentine's Treat Box by Judy Hayes for Scrapbook Adhesives by 3L

Sweet Shoppe Finishing Touches

For the tag, cut white cardstock ⅞ x 1⅛ʺ and Kraft cardstock 1 x 1¼ʺ.  Stamp a verse with black ink on white piece. Adhere to Kraft piece using E-Z Runner® Micro Refillable Dispenser. Add heart to tag. Punch a hole at the top. Tie to Sweet Shoppe Valentine’s Treat Box with twine. I tied it to front handle only so the box can be opened without removing the tag.

Sweet Shoppe Valentine's Treat Box by Judy Hayes for Scrapbook Adhesives by 3L

Even the back side is cute with the treats show through the windows!

Sweet Shoppe Valentine's Treat Box Tutorial by Judy Hayes for Scrapbook Adhesives by 3L
Sweet Shoppe Valentine's Treat Box by Judy Hayes for Scrapbook Adhesives by 3L

Wishing you a sweet Valentine’s Day!
Judy Hayes

Creative Time: 60 Minutes
Skill Level: Intermediate

Materials Needed
Scrapbook Adhesives by 3L®

Adhesive Sheets 4 x 6 inch
Creative Photo Corners Kraft
E-Z Runner® Micro Refillable Dispenser
E-Z Runner® Ultra Refillable Dispenser
3D Foam Hearts
3D Foam Creative Embellishment Kit
Thin 3D Foam Squares White Mix
3D Foam Squares White Mix

HomeHobby by 3L®
Extreme Double-Sided Tape ¼ inch

Other
Bazzill Pale Rose Cardstock; Best Creations Ornament Gem Glitter Cardstock; Imagine Crafts Versafine Onyx Black; Ranger Enamel Accents Black Tie; Spellbinders Charming Cottage Die Set; Taylored Expressions Many Minis-Holiday Stamp Set; Black Fine Marker; Cardstock: Kraft, White; Clear Acetate; Twine

Save It to Pinterest!

Sweet Shoppe Valentine's Treat Box Tutorial by Judy Hayes for Scrapbook Adhesives by 3L

Visit our Website and Blog!
Sign up for our Newsletter so you never miss a contest or giveaway!

instagram purple icon facebook icon purple pinterest purple icon twitter purple icon YouTube icon blog subscription purple icon

Flying Fairy Card Tutorial

Hi, friends! Teri here with a handmade card featuring a sweet little fairy that flies. Creating a card like this is a snap with a cute stamped image, a brad and some Thin 3D Foam Squares from Scrapbook Adhesives by 3L®.

If interactive stamped cards are your thing, you are going to enjoy trying to make a card like this one. Let’s get to it.

Flying Fairy Card Tutorial by Teri Anderson for Scrapbook Adhesives by 3L

Creating the Foiled Background!

Start by cutting a 3 3/4″ x 5″ panel of cardstock. This will go on the front of your card. You’ll also need to create an A2 card by cutting a 5 1/2″ x 8 1/2″ panel of cardstock and folding it in half.

Sponge some color onto the smaller panel with a cosmetic sponge and ink pad. You can use any color of ink. I chose pink because I wanted my card to feel really feminine.

Flying Fairy Card Tutorial by Teri Anderson for Scrapbook Adhesives by 3L

Take an Adhesive Sheet 4 x 6″ and tear off one edge. Place it on the panel and rub the adhesive onto it. You can cover it completely or apply it sparingly.

Flying Fairy Card Tutorial by Teri Anderson for Scrapbook Adhesives by 3L

Set a piece of foil on top. Burnish the foil to the adhesive with either your hand or a bone folder.  You’ll end up with a pretty, sparkly panel.

Flying Fairy Card Tutorial by Teri Anderson for Scrapbook Adhesives by 3L

Adding the Flying Fairy!

Stamp and die-cut a fairy. Color the fairy in with markers or pencils. Don’t worry if you don’t have a fairy like mine. Select an image that suits your tastes.

Once you’ve colored in the fairy, flip it over and apply a Thin 3D Foam Square on the back of it. My fairy was a little big so I applied three to it. Be sure to leave the backing paper on the squares (or square). You’ll see why in a minute.

Flying Fairy Card Tutorial by Teri Anderson for Scrapbook Adhesives by 3L

Set the fairy onto your foiled panel of cardstock. Use a piercing tool to poke a hole through it, one foam square and the foiled panel. Stick a brad through the fairy, foam square, and foiled panel.

Flying Fairy Card Tutorial by Teri Anderson for Scrapbook Adhesives by 3L

Flying Fairy Card Tutorial by Teri Anderson for Scrapbook Adhesives by 3L

Because you’ve left the backing paper on your foam squares, your fairy will twist and spin and fly! It’s super fun!

Complete your card by adhering the panel to the card base. Stamp a sentiment on a strip of cardstock and mount it to the card with Thin 3D Foam Squares.

Flying Fairy Card Tutorial by Teri Anderson for Scrapbook Adhesives by 3L

Want your card to have even more glitz? Consider adding a few sequins or gems to it. Remember, it’s important to make sure they are out of the pathway of the fairy so she doesn’t run into them.

Creative Time: 45 Minutes
Skill Level: Beginner

Materials Needed
Scrapbook Adhesives by 3L®

E-Z Runner® Grand Refillable Dispenser
Thin 3D Foam Squares White Mix
3D Foam Creative Embellishment Kit
Adhesive Sheets 4×6 inch

Other
So Fairy Cute Stamps and Crafting Dies from Paper Smooches; Pink, Yellow, Flesh and Brown Markers from Copic; Brad; Pink and Black Ink Pads; Markers; White Cardstock

Pin It!

Flying Fairy Card Tutorial by Teri Anderson for Scrapbook Adhesives by 3L Pinterest


Easy Valentine’s Day Tag

Hey crafty friends! Tracy here, and today I have a quick and easy Valentine’s Day Tag to share. But a few things you may not know about me.

First is, February is one of my favourite months. Why? I love winter, and we often get the wildest winter weather in February. February is also my Birthday Month. In fact, TODAY is my birthday, and it happens to be a pretty big one.

And finally, it’s the month that celebrates Valentine’s Day. A day to spread a little LOVE is always a great day in my books. So why not add this Easy Valentine’s Day Tag to a gift for your someone special.

Easy Valentine's Day Tag by Tracy McLennon for Scrapbook Adhesives by 3L

Easy Valentine’s Day Tag Details

I started my creation with the pink tag from the Self-Laminating Tags with Loops. Then cut a piece of patterned paper that is 2.25 x 3.25-inch.

Easy Valentine's Day Tag by Tracy McLennon for Scrapbook Adhesives by 3L

Adhere that piece of patterned paper inside the Self-Laminating Tag.

Easy Valentine's Day Tag by Tracy McLennon for Scrapbook Adhesives by 3L

Using the E-Z Runner® Ultra Strong Refillable Dispenser I added strips of patterned paper on the outside of the tag.

Easy Valentine's Day Tag by Tracy McLennon for Scrapbook Adhesives by 3L

Then added some super cute die cut embellishments using my 3D Foam Squares White Mix.

Easy Valentine's Day Tag by Tracy McLennon for Scrapbook Adhesives by 3L

The finished product is a super cute, quick and easy dimensional tag.

Easy Valentine's Day Tag by Tracy McLennon for Scrapbook Adhesives by 3L

I added a simple pink mesh bow to the top. The tag opening at the top makes it super easy to tie to any sweet Valentine treat.

Easy Valentine's Day Tag by Tracy McLennon for Scrapbook Adhesives by 3L

Thanks so much for stopping by!
Tracy McLennon

Creative Time: 20 Minutes
Skill Level: Beginner

Materials Needed
Scrapbook Adhesives by 3L®
3D Foam Squares White Mix
E-Z Runner® Ultra Strong Refillable Dispenser

HomeHobby® by 3L
Self Laminating Tags with Loops

Other
Patterned Papers and Die Cuts: Pebbles Inc. (Love Me Collection); Pink Mesh Ribbon

Save It to Pinterest!

Visit our Website and Blog!
Sign up for our Newsletter so you never miss a contest or giveaway!

instagram purple icon facebook icon purple pinterest purple icon twitter purple icon YouTube icon blog subscription purple icon

Valentine’s Day Foiled Card

With Valentine’s Day fast approaching, we could all use some simple ideas for creating Valentines! Christine joining you today with a Valentine’s Day Foiled Card that I created from items in my stash – especially focusing on adhesives from Scrapbook Adhesives by 3L!

Valentine's Day Foiled Card by Christine Meyer for Scrapbook Adhesives by 3L

Would you believe almost all of this card is made up of 3D Foam Adhesives?  When you Wear Your Adhesives on the Outside, it’s easy to create without even needing patterned paper.

Foiled Card Close-Ups

Valentine's Day Foiled Card by Christine Meyer for Scrapbook Adhesives by 3L

To create the bottom of my Valentine’s Day Foiled Card, I simply created a collage of both sizes of the 3D Foam Circles. Once I was satisfied with how they looked I unveiled the adhesive and added the Magenta foil to them.  In addition to being gorgeous, our Metallic Transfer Foil Sheets are very user-friendly and come in a wider variety now!

I topped the hearts with a limited number of 3D Foam Hearts foiled with Silver Foil.  I did this just to add a quick accent embellishment to the circles.

Valentine's Day Foiled Card by Christine Meyer for Scrapbook Adhesives by 3L

For the top portion of my card, I used the Extreme Double Sided Tape 1/8″ unveiling one strip at a time to add foil. Although my sentiment is just a sticker from my stash,  you could pretty easily make this with our 3D Foam Creative Sheets (available in a variety of sizes now too) and some foil!

Foiled Card Process Video

As always, I have a quick video to share with you that walks you thru the entire process showing you just how easy and user friendly this technique can be!

Thanks so much for joining me today – be sure to check out all the new Foils we have available!
-Christine

Skill Level: Beginner
Time Required: 30 Minutes

Materials Needed
Scrapbook Adhesives by 3L®

Metallic Transfer Foil Sheets Holographic
Metallic Transfer Foil Sheets Variety
3D Foam Hearts
3D Foam Circles White Mix

HomeHobby® by 3L
Extreme Double-Sided Tape 1/8in

Pin It!

Valentine's Day Foiled Card by Christine Meyer for Scrapbook Adhesives by 3L Pinterest

Visit our Website and Blog!
Sign up for our Newsletter so you never miss a contest or giveaway!

instagram purple icon facebook icon purple pinterest purple icon twitter purple icon YouTube icon blog subscription purple icon

Crafty Adhesive Survival Kit

Hello friends, Terri here with a Crafty Adhesive Survival Kit.  It’s perfect for gift giving to your crafty friends at a crop or weekend craft retreat.  Let’s face it.  There’s always someone who runs out or doesn’t bring enough adhesive, or, (heaven forbid) forgets their adhesive altogether!  Be the one who comes to the rescue!  Stick around for a few minutes, as I’ve got a process video for you as well.

Crafty Adhesive Survival Kit by Terri Burson for Scrapbook Adhesives by 3L

Adhesive On the Inside

This crafty adhesive survival kit includes handmade envelopes stuffed with a variety of adhesives.  One of the key ingredients for this crafty adhesive survival kit is handmade envelopes.  Let me introduce you to the E-Z Runner® Petite.  This permanent dot mini dispenser is refillable and perfectly handy for planners and projects like this.  I love this dandy little adhesive runner!  The portability and size is just right for me to keep in my desk at work.  You know, for when I sneak in a little crafty time on break!

Crafty Adhesive Survival Kit by Terri Burson for Scrapbook Adhesives by 3L

Adhesive On The Outside

Another brand new item just released for 2019 is the 3D Foam Creative Sheets Medium White.  These 6 x 12 inch sheets are nice and thick at 2 mm and perfect for large word dies.  Today, however, I’m using these to create glittered accents on my wooden clips, as well as heat embossed hearts, die cut from these sheets.  “Wear Your Adhesive On The Outside!” (and the inside!)

Crafty Adhesive Survival Kit by Terri Burson for Scrapbook Adhesives by 3L

You’ll see exactly how to create these fun clips, burnishing the glitter and heat embossing the die cut hearts,  for your own crafty adhesive survival kit.  Check out my video!  I’ll also show you how to make those handmade envelopes with a tool board.

Crafty Survival Kit Video


Crafty Adhesive Survival Kit by Terri Burson for Scrapbook Adhesives by 3L

Thanks so much for popping in.  I hope you enjoyed today’s project.  If you’d like to know more about the products that I’ve used, you can hop on over to my blog at Waving My Wand.  There are also links in the video description.  See you next time…. Terri

Creative Time: 30 minutes
Skill Level: Beginner

Materials Needed
Scrapbook Adhesives by 3L®
E-Z Runner® Petite Permanent Dots Refillable
3D Foam Creative Sheets Medium White

Other
Patterned Papers: Echo Park Paper; Mixed Media Paper: Strathmore; Mini Doilies: Doodlebug Design; Craft Dies: ScrapbookCom (Nesting Hearts) and Lawn Fawn (Stitched Circles); Die-Cutting Machine: Spellbinders Paper Arts; Glitter: DecoArt (Glamour Dust); Embossing Powder: American Crafts; Tools: We R Memory Keepers and My Sweet Petunia; Brush Markers: Kelly Creates; Heating Tool: Ranger Inks

Pin It!

Crafty Adhesive Survival Kit by Terri Burson for Scrapbook Adhesives by 3L Pinterest