You are in our US store • Switch to Europe store

Holiday Treat Bag Tutorial

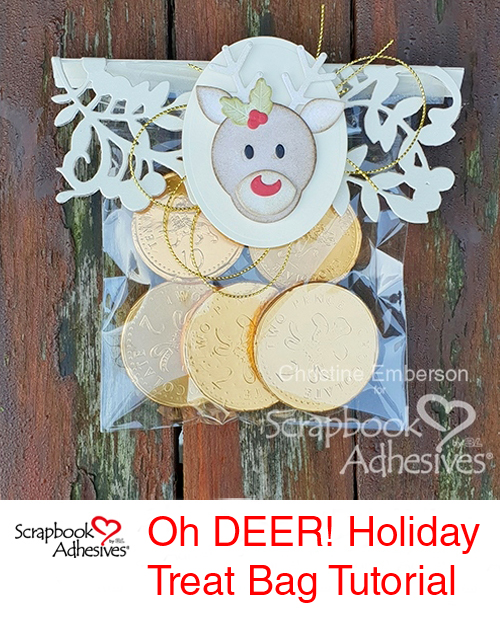
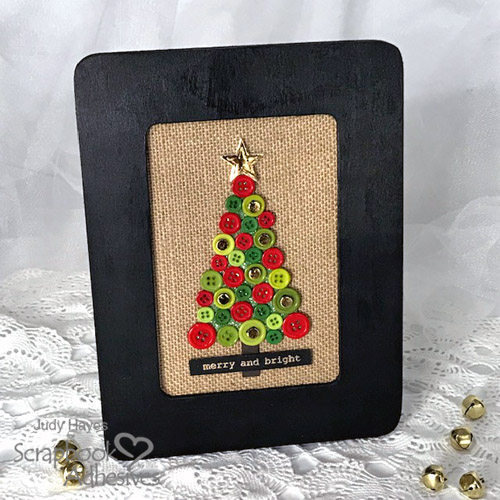
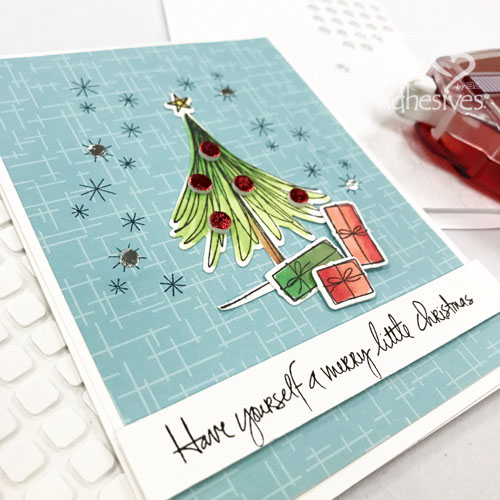
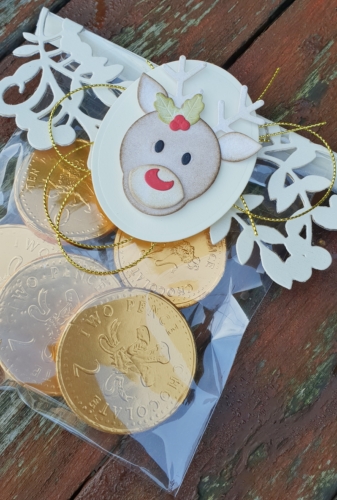
Hi everyone, Christine here today with a reindeer themed holiday treat bag. These are a perfect teacher and workplace gifts and also great for table favors. Set aside a little relaxing time to make these before the Christmas mayhem!

Holiday Treat Bag Tutorial by Christine Emberson for Scrapbook Adhesives by 3L

The “How-To” on a Holiday Treat Bag

Adhesive Sheets and die cutting are a match made in heaven! Whenever you want to achieve a drop shadow with foil card these sheets are your answer.

  1. Remove yellow backing paper.
  2. Align card onto the adhesive.
  3. Smooth the entire card to the adhesive.
  4. Run through your die cutting machine.
  5. Remove the back liner and adhere.


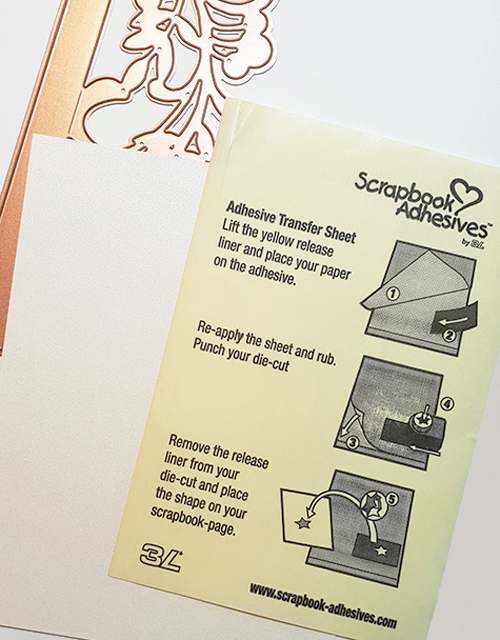
The “How-To” on Adhesive Sheets

See this short How to Use Adhesive Sheets for Die Cutting video below:

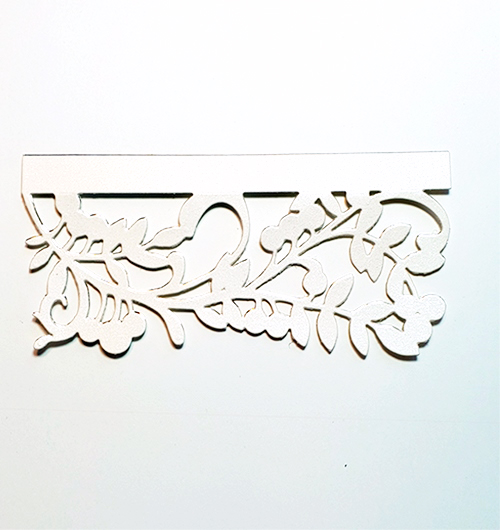
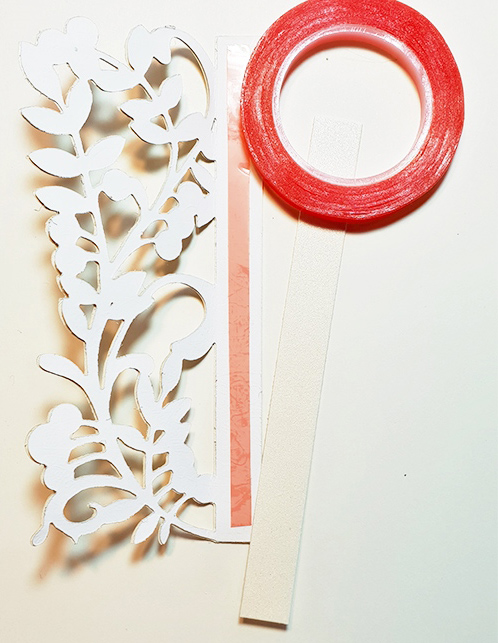
This die cut is going to create a topper for your gift bag.  To ensure it stays in place use Extreme Double Sided Tape – 1/4 inch.


For further decoration, I created a reindeer embellishment and used 3D Foam Squares White Regular Size on the reverse.


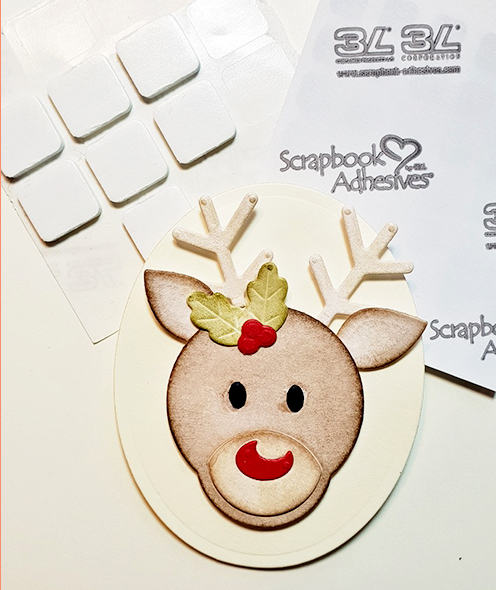
Again use the trusty 3D Foam Squares White Regular Size to hold in place loops of gold twine.

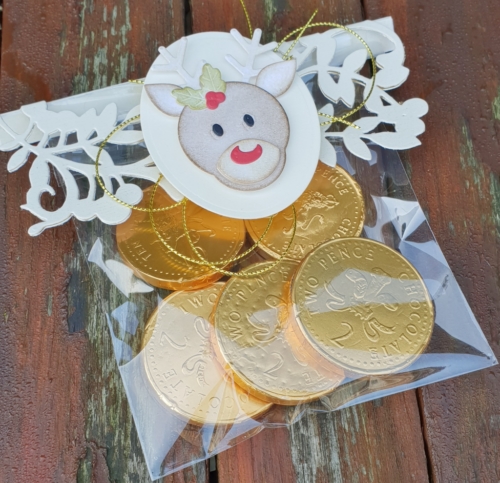
For healthier treats fill the bags with cosmetics or perhaps fill with reindeer food and leave out for Santa, those reindeer get very hungry!

Thanks for stopping by and wishing you a wonderful festive season!

Creative Time: 30 Minutes
Skill Level: Intermediate

Materials Needed
Scrapbook Adhesives by 3L®

Adhesive Sheets
3D Foam Squares White Regular Size
HomeHobby by 3L®
Extreme Double Sided Tape – 1/4 inch.

Others:
Craft Dies: Spellbinders® Paper Arts (Reindeer, Mistletoe Gatefold); Gold mirror cardstock; Ivory, red and black cardstock; Cellophane Bag; Candy/Treats

Pin It!

Holiday Treat Bag Tutorial by Christine Emberson for Scrapbook Adhesives by 3L Pinterest


Christmas Hinged Gift Box Tutorial

Holiday Greetings!  Shellye McDaniel is here today to share an easy DIY Hinged Gift Box.  These are perfect for jewelry, candy, cookies and more! Aren’t these cute?!

Christmas Hinged Gift Box Tutorial by Shellye McDaniel for Scrapbook Adhesives by 3L

First, I grabbed these supplies from Scrapbook Adhesives: Extreme Double-Sided Tape 1/2in, 3D Foam Squares White MixE-Z Runner® Grand Refillable Dispenser and E-Z Runner® Grand Permanent Dots Refill. I also used a 12X12 sheet of green and red cardstock and patterned paper with matching embellishments.

Christmas Hinged Gift Box Tutorial by Shellye McDaniel for Scrapbook Adhesives by 3L

Hinged Gift Box Basics

Cut the green cardstock in half to create two 6 x 12-inch pieces for two boxes. But we have to do one more step before scoring the lines. That is to cut an inch off the long side to create a 6 x 11-inch piece. Now we’re ready to proceed 🙂

Christmas Hinged Gift Box Tutorial by Shellye McDaniel for Scrapbook Adhesives by 3L

On the 6-inch side, score at 1-inch and 5-inch.

Christmas Hinged Gift Box Tutorial by Shellye McDaniel for Scrapbook Adhesives by 3L

On the 10-inch side, score at 1, 5, 6 and 10-inch.

Christmas Hinged Gift Box Tutorial by Shellye McDaniel for Scrapbook Adhesives by 3L

With the paper facing horizontally I then cut all of the horizontal lines UP TO the vertical score marks on each side to create tabs.

Christmas Hinged Gift Box Tutorial by Shellye McDaniel for Scrapbook Adhesives by 3L

Once I completed the cuts on both sides I then folded along all of the score lines:

Christmas Hinged Gift Box Tutorial by Shellye McDaniel for Scrapbook Adhesives by 3L

Next, I placed a small piece of the Extreme Double-Sided Tape 1/2in along all of the tabs.  This is the part where you will want to use a heavy-duty tape to reinforce the edges of your box.

Christmas Hinged Gift Box Tutorial by Shellye McDaniel for Scrapbook Adhesives by 3L

We have now created two 4 x 4 x 1-inch boxes!

Christmas Hinged Gift Box Tutorial by Shellye McDaniel for Scrapbook Adhesives by 3L

Finishing Touches

Finally, I used the E-Z Runner® Grand Permanent Dots and added squares of red cardstock to the tops of the boxes. I used the 3D Foam Squares to attach the squares of patterned paper to the red cardstock.  Embellishments were also added with the 3D Foam Adhesive Squares.

Christmas Hinged Gift Box Tutorial by Shellye McDaniel for Scrapbook Adhesives by 3L

Again, these are the perfect size for gifting your favorite large or small cookies, candies, trinkets and jewelry in 🙂

Thank you for joining me today and I hope that you have a very happy holiday season!

Creative Time: 30 Minutes
Skill Level: Beginner

Materials Needed
Scrapbook Adhesives by 3L®

3D Foam Squares White Mix
E-Z Runner® Grand Refillable Dispenser 
E-Z Runner® Grand Permanent Dots Refill

HomeHobby by 3L®
Extreme Double-Sided Tape 1/2in

Pin It!

Christmas Hinged Gift Box Tutorial by Shellye McDaniel for Scrapbook Adhesives by 3L Pinterest

Visit our Website and Blog!
Sign up for our Newsletter so you never miss a contest or giveaway!

instagram purple icon facebook icon purple pinterest purple icon twitter purple icon YouTube icon blog subscription purple icon

Foiled Trees in a Winter Wonderland

Foiled trees are a wonderful thing! They are even wonderful sparkling throughout my winter wonderland village canvas! Hello friends, Linsey here today sharing my latest project featuring 3D Foam Trees and Craft Foils! Foiled trees have never been easier or more fun! Come take a stroll through my winter wonderland village and see what I mean!

Foiled Trees in a Winter Wonderland by Linsey Rickett for Scrapbook Adhesives by 3L

Building A Scene

Allow a layer of white glitter paste to dry over the canvas base. Add a variety of chipboard pieces and stickers and arrange to create a winter village. Add perfect dimension with 3D Foam Circles White Mix, 3D Foam Squares White Mix, and Thin 3D Foam Squares White Mix. The variation allows you to overlap pieces slightly for a more realistic effect.

Foiled Trees in a Winter Wonderland by Linsey Rickett for Scrapbook Adhesives by 3L

The 3D Foam Trees have different sizes and shapes, so they are unique and that makes them very cool. Think of how fun it would be to add foils to the trees in other colors like gold, silver, red and blue for the holidays! The 3D Foam Holiday Embellishment Kit is perfect for this and a must-have for the holiday season! I just love foiled trees!!

Foiled Trees in a Winter Wonderland by Linsey Rickett for Scrapbook Adhesives by 3L

Imagine gazing into the village shop windows as the glorious green trees glisten along the snow-covered street. How charming, indeed! My little winter village simply wouldn’t be as magical without these fabulous foiled trees! Don’t you agree?

Pin It!

Foiled Trees in a Winter Wonderland by Linsey Rickett for Scrapbook Adhesives by 3L

My DIY Advent Journal Part 2

If you recall from a previous post, I was working on an Advent Journal (see it here: Creating an Advent Journal Cover Tutorial) this year instead of a December Daily. Today I am sharing a bit more this journal with you. Here is a bit how I created the pages shared, specifically the one pictured here.

My DIY Advent Journal Part 2 by Shannon Morgan for Scrapbook Adhesives by 3L


Adding Tabs and Paper Strips

My DIY Advent Journal Part 2 by Shannon Morgan for Scrapbook Adhesives by 3L

  1. Using my trusty, go-to E-Z Runner Grand Permanent Strips dispenser, I added adhesive to a strip of double-sided Christmas patterned paper.
  2. I had a flap that overlapped from a previous entry, I wanted to use it in a neat way, so I used it as a tip-in. A tip-in is adding a separate piece of paper into your journal. It will add extra space to the entry allowing you to journal or add other elements that wouldn’t normally fit.
  3. Then I added a tab to the tip-in. Again, I used the E-Z Grand Runner to do this, adhering it to either side of the paper.
  4. Journaling is now added, I used a white pen because I wanted to have some softness to the page.

What About That Envelope?

Wondering about that envelope I have in the middle of the page? I have step-out pictures on how it was placed. My envelope was created with an envelope tool, but you can use any envelope you may have around. Maybe you have a favorite envelope you’ve been waiting to use on the perfect project? Pssst?!? I’m telling you, use it now!

My DIY Advent Journal Part 2 by Shannon Morgan for Scrapbook Adhesives by 3L

I used Adhesive Dots Medium to affix the envelope to the page. Look at the picture above and see how I used 5 dots to do this. Adding the envelope to the page, I then began to add finishing touches here and there to complete the page.

Sharing The Entries

Here is a bit more of the details, I wanted to share as much as possible with you on these pages, the previous entries all kind of run into each other. It’s continuous as the Advent period goes on, I will document pages and have even more ready to share with you next time!

My DIY Advent Journal Part 2 by Shannon Morgan for Scrapbook Adhesives by 3L

Creative Time: 1 Hour
Skill level: Intermediate

Materials Needed
Scrapbook Adhesives by 3L®

E-Z Runner Grand Refillable Dispenser
Adhesive Dots Micro
Adhesive Dots Medium

Other:
Illustrated Faith Advent Collection, Alpha Stickers, Sequins

Pin It!

My DIY Advent Journal Part 2 by Shannon Morgan for Scrapbook Adhesives by 3L Pinterest

Merry and Bright Button Christmas Tree

Hello everyone! Are you all set for the holidays? There’s still time to make this Merry and Bright Button Christmas Tree framed home décor piece.  Perfect on a mantel, hall table or even on a holiday buffet setting!

A Merry and Bright Button Christmas Tree Frame

First, paint frame black.  Set aside to dry.

Cut burlap paper and cardboard to fit in frame opening by using the paper that was in my frame as a guide.  Attach the burlap paper to the cardboard using E-Z Runner® Ultra Refillable Dispenser to make the background.

The Button Christmas Tree

Using a piece of white 3D Foam Creative Sheets, cut it to 2¼ x 3½ʺ rectangle.  Mark the center on the 2¼ʺ side and draw lines from the center to the corners to create a triangle. Lastly, cut along lines to create your Christmas tree shape.

Trim off about ⅛ʺ from the point.  Partially peel back liner starting at the top.  Place buttons on 3D Foam allowing them to extend beyond edges.  Continue to peel the liner and place the buttons until the tree is covered.

Note: I removed the small green button shown at the top in this photo – it acted as a place holder.

Sprinkle with glitter and shake slightly to settle glitter into buttonholes and spaces between buttons.  Remove excess glitter by tapping off or with a small brush. Use lint roller or masking tape to pull off stray glitter, if needed.

The Finishing Details

Place burlap paper and cardboard in the painted frame. Align tree triangle on burlap and fasten by removing its liner from the back.  Press in place.

Cut a piece of 3D Foam Creative Sheets for the tree trunk.  Remove liner from one side and place it on a scrap of brown cardstock.  Trim cardstock slightly larger than 3D Foam piece.  Peel the backing and fasten at the base of the tree.

Stamp “merry and bright” on black cardstock.  Heat emboss with gold embossing powder.  Trim to size.  Place small 3D Foam Circles Black Mix on back at each end.  Fasten across the tree trunk.

Carefully remove a small star and its outline star together from a sheet from the 3D Foam Holiday Embellishment Kit.  Place at the top of the tree.

Take the top liner off of the star.  Place gold foil shiny side up on the star, rub to transfer the color, and peel the foil to reveal the foiling. Reapply if there are any missed areas.

Place small circles from 3D Foam Circles Black Mix on top of some of the buttons on the tree.  Remove top liner from the 3D Circles and cover with gold foil. Rub and remove foil.  Repeat to cover all of the circles.

Tada!  Merry and Bright Button Christmas Tree is done!

Have a Merry and Bright Holiday season!
Judy Hayes

Creative Time: 60 minutes
Skill Level: Intermediate

Materials Needed:
Scrapbook Adhesives by 3L®

3D Foam Creative Sheets
3D Foam Holiday Embellishment Kit
E-Z Runner® Ultra Refillable Dispenser
3D Foam Circles Black Mix

Other
Unfinished Wood Craft Frame, Art Glitter Ultra Fine Opaque Leaf, DecoArt Americana Satin Paint, DCWV Burlap Paper, Memory Box Typewriter Holiday Sentiments, Imagine Crafts/Tsukineko Versafine Onyx Black ink, Ranger Queens Gold Embossing Powder, Green, and Red Buttons, Black Cardstock, Brown Cardstock

Save It to Pinterest!

Visit our Website and Blog!
Sign up for our Newsletter so you never miss a contest or giveaway!

instagram purple icon facebook icon purple pinterest purple icon twitter purple icon YouTube icon blog subscription purple icon

12 Days of Holiday Giveaways!

Wow, do we have some good stuff for you this holiday season! We have 3, count ’em, 3 great giveaways happening with our partners Favecrafts, Scrapbook and Cards Today Magazine, and Creative Scrapbooker Magazine. See the details and find the links to enter below!

Favecrafts 12 Days of Christmas

At Favecrafts you’ll find this a-door-able Door Card by Beth Pingry, a complete tutorial and a chance to win a Keepsake Paper Crafting Giveaway and a Sleigh Full of Prizes of grand prize!

Visit this link for all the tutorial and giveaway entry!

The deadline to enter at Favecrafts is December 23rd, 2018 at 11:59:59 PM Eastern Time.

Door Card by Beth Pingry for Scrapbook Adhesives by 3L & Favecrafts

Door Card Tutorial and Giveaway

Keepsake Paper Crafting Giveaway at Favecrafts from Scrapbook Adhesives by 3L

Keepsake Paper Crafting Giveaway at Favecrafts

12 Days of Crhiatmas Sleigh of Prizes at Favecrafts

Christmas Sleigh of Prizes at Favecrafts


Scrapbook and Cards Today Magazine’s 12 Days of Holiday Giving

Our friends at Scrapbook and Cards Today Magazine‘s annual extravaganza is going on now – check out the awesome prize you could win!

Entry details are on the SCT Magazine Blog, just click here.

You have until midnight on December 22nd EST. All winners will be announced on December 23rd at noon EST by Scrapbook and Cards Today.

Scrapbook and Cards Today 12 Days of Holiday Giving

12 Days of Holiday Giving

12 Days of Holiday Giving from Scrapbook and Cards Today Magazine and Scrapbook Adhesives by 3L

12 Days of Holiday Giving from Scrapbook and Cards Today Magazine


Creative Scrapbooker Magazine’s 12 Days of Giving

And last but not least, Creative Scrapbooker Magazine is running their annual 12 Days of Giving!

Find their giveaway details at Creative Scrapbooker Magazine’s Blog (click now).

You have until Dec 23rd midnight to enter to win all 51 prizes from 12 Days. Winners will be announced on Dec 24th by Creative Scrapbooker Magazine.

Creative Scrapbooker 12 Days of Giving

Creative Scrapbooker Magazine’s 12 Days of Giving

12 days of Giving by Creative Scrapbooker & Scrapbook Adhesives by 3L

12 Days of Giving Prize for Creative Scrapbooker Magazine

Thank you for being a fan, we wish you a wonderful holiday season!

Connect and Stick with 3L!

Visit our Website and Bookmark our Blog!
Sign up for our Newsletter so you never miss a contest or giveaway!

instagram purple facebook purple pinterest purple twitter purple SAby3L YouTube icon blog purple

Foiled Christmas Tree Card

Looking for some last-minute Christmas card inspiration?  Teri here, and I’ve got a quick card to share with you today. It’s quick to put together, plus it’s easy to give a bit of glitz to this card with products from Scrapbook Adhesives by 3L.

Foiled Christmas Tree Card by Teri Anderson for Scrapbook Adhesives by 3L

To make a card like mine, the first thing you’ll want to do is create a card base. Fold a 4 1/4″ x 11″ piece of white cardstock in half. Add a 4″ x 5 1/2″ panel of patterned paper to the top. Choosing patterned paper for a project like this can sometimes be difficult. I recommend looking for a paper with a small pattern on it rather than a large pattern.

Making the Tree

Next, you want to stamp and die-cut a Christmas tree and a couple presents. Use stamps like I used or pick something similar. Color your images in with markers and adhere them to your card. Want the presents to really pop? Mount them to the card with Thin 3D Foam Squares.

Now, place five to eight 3D Foam Circles onto the tree. Remove the backing paper and burnish Metallic Transfer Foil (or the foil from the 3D Foam Creative Embellishment Kits) onto each circle. Use your fingers or a bone folder to do this.

Foiled Christmas Tree Card by Teri Anderson for Scrapbook Adhesives by 3L

You can either use one color of foil or use several. There is no limit to the possibilities when using foil.

Add Some Stars

Now, stamp some snowflakes, starbursts or stars around the tree with black ink. The more stars you add, the merrier. Randomly place Adhesive Dots onto some of them. I prefer the Adhesive Dots Micro because of their small size. You may prefer a larger size. That is fine!

Remove the backing sheet and burnish some foil onto the Adhesive Dots. Be sure to really push the foil with your fingers onto the dots as you burnish them to ensure each dot gets completely covered with foil.

Foiled Christmas Tree Card by Teri Anderson for Scrapbook Adhesives by 3L

Complete your card by cutting a strip of cardstock that goes entirely across your card. Stamp a sentiment onto it and then adhere it with Thin 3D Foam Squares.

Creative Time: 1 hour
Skill Level:
 Beginner

Materials Needed
Scrapbook Adhesives by 3L®
E-Z Runner Refillable Grand Dispenser
Adhesive Dots Micro
Thin 3D Foam Squares White Mix
3D Foam Circles White Mix
3D Foam Creative Embellishment Kit

Other:
Christmas Scribbles Stamp Set and Matching Dies by Julie Ebersole for Ellen Hutson; The Brights 6×6 Paper Pad by Avery Elle; Green, Red and Yellow Markers by Copic; Black Ink Pad; White Cardstock

Pin It!

Foiled Christmas Tree Card by Teri Anderson for Scrapbook Adhesives by 3L Pinterest

Visit our Website and Blog!
Sign up for our Newsletter so you never miss a contest or giveaway!

instagram purple icon facebook icon purple pinterest purple icon twitter purple icon YouTube icon blog subscription purple icon

Quick and Easy Christmas Place Cards

Welcome back, crafty friends! Are you ready for Christmas? Today I have some quick and easy Christmas place cards to share. I love everything about Christmas, and especially holiday crafting.

The holidays can get hectic, and if you haven’t pre-planned, there is probably not a lot of spare time to craft. Here are three quick and easy place card ideas that won’t take hours to create and will add holiday flair to your dinner table.

Quick and Easy Christmas Place Cards by Tracy McLennon for Scrapbook Adhesives by 3L

Pink and Sparkly Place Card

First up, the sparkly pink Christmas place card. For that unconventional tablescape.

This first place card consists of simple layers and a little bit of dimension. Use Adhesive Dots Medium Ultra Thin to add the snowflake die cut and the mini poinsettia. The glitter cardstock is added using 3D Foam Squares White Mix. The name plate is cut from white cardstock using a punch and added using 3D Foam Squares White Mix.

Quick and Easy Christmas Place Cards by Tracy McLennon for Scrapbook Adhesives by 3L

Sleek and Modern Place Card

The second place card gives more of a sleek modern Christmas vibe, for those that like a “less is more” table design.

This sleek place card starts with a black cardstock base. Add Extreme Double-Sided Tape ⅛ in to the sides, then using Gold Foil from the 3D Foam Creative Embellishment Kit add that sparkle and shine to the adhesive strips. Next, add the gold cardstock layer using 3D Foam Squares White Mix. The slender name plate is added using 3D Foam Squares White Mix, and add a couple of gold gems for good measure.

Quick and Easy Christmas Place Cards by Tracy McLennon for Scrapbook Adhesives by 3L

Classic Christmas Place Card

The final idea is a classic but simplest design for your place setting.  Do you have stamped and colored poinsettias die cuts in your stash?

Using the E-Z Runner® Grand Refillable Dispenser add the green cardstock to the white cardstock base. Add the red glitter patterned cardstock using 3D Foam Squares White Mix. The poinsettia is added using Adhesive Dots Medium Ultra Thin. Then simply add a small name plate using the E-Z Runner Grand Refillable Dispenser.

Quick and Easy Christmas Place Cards by Tracy McLennon for Scrapbook Adhesives by 3L

Happy Holidays friends! Thanks so much for stopping by!
Tracy

Creative Time:  5-10 Minutes each
Skill Level:  Beginner

Materials Needed
Scrapbook Adhesives by 3L®

3D Foam Creative Embellishment Kit
Extreme Double-Sided Tape ⅛ in
E-Z Runner Grand Refillable Dispenser
3D Foam Squares White Mix
Adhesive Dots Medium Ultra Thin

Other:
Cardstock (White, Green Black), Gold Metallic Cardstock, Red Glitter Patterned Cardstock, Heartfelt Creations- Poinsettia and Holly Clusters Cling Stamps and Die, Gold Gems, Pink Gems, Beads

Pin It!

Quick and Easy Christmas Place Cards by Tracy McLennon for Scrapbook Adhesives by 3L Pinterest

Christmas Joy Made Easy

Christmas joy made easy, okay maybe that’s a stretch. But capturing Christmas Joy was certainly made easier by the best adhesives around from Scrapbook Adhesives by 3L! Christine joining you today with a Christmas Scrapbook Layout and one especially fabulous tip!

Christmas Joy Made Easier by Christine Meyer for Scrapbook Adhesives by 3L

Christmas Joy Layout Close-ups

This Christmas layout has lots of little details but there’s a couple I want to really focus on!  First off, let’s talk about how amazing the E-Z Runner Grand Dot Permanent Refill is!  A recent tip from team member, Margie, led me to try this refill for my cut-file title.  I simply set the cut-file onto some scratch paper and rand my runner all over the backside of it.  It picked up the dots and made it ready to adhere.  Here’s a close-up look!

Christmas Joy Made Easier by Christine Meyer for Scrapbook Adhesives by 3L

I’ve used several adhesives on my cut-files before – the E-Z Runner with the Micro Refill, Adhesive Dots, and the Dual Tip Glue Pen.  While all of those worked well and got the job done, I think the Dots Refill is the easiest and quickest!  I’m not sure why I had never thought of it before – but it certainly will be a standard in my arsenal now!

Christmas Joy Made Easier by Christine Meyer for Scrapbook Adhesives by 3L

As I created this Christmas layout I cut out half-inch strips and laid them all across my cardstock.  I did not aim to keep them straight – I just wanted a lot of wonky lines!  I also didn’t know if I was going to cut out the tree and use it or use the negative space.  Both ideas worked in my brain, but I need to get a visual!  Because of that, and my uncertainty as to which direction I was going to go, I used the E-Z Runner Grand with the Dots Repositionable Refill to start.  I then went back and secured them with the Dots Permanent Refill later!

All of this will make a little more sense in my video!

Christmas Joy Made Easier Scrapbook Process Video

Thanks so much for joining me today!
-Christine

Creative Time: 1 Hour
Skill Level:  Intermediate

Materials Needed
Scrapbook Adhesives by 3L®
E-Z Runner® Grand Refillable Dispenser
E-Z Runner® Grand Permanent Dots Refill
E-Z Runner® Grand Repositionable Dots Refill
3D Foam Circles White Mix

Other Supplies: Flavors of the Month Kit from The ScrapRoom

Pin It!

Christmas Joy Made Easier by Christine Meyer for Scrapbook Adhesives by 3L Pinterest

Visit our Website and Blog!
Sign up for our Newsletter so you never miss a contest or giveaway!

instagram purple icon facebook icon purple pinterest purple icon twitter purple icon YouTube icon blog subscription purple icon

Snow Flurry Card

It’s a snow flurry kind of day here on the Scrapbook Adhesives by 3L blog.  Hello friends, Terri here, and todayI’m showing fun ways to add texture and sparkle to your wintry themed Christmas cards.

Snow Flurry Card by Terri Burson for Scrapbook Adhesives by 3L

Versatility of Products

I always look for versatile ways to use my products.  If a product can be used in multiple ways, it’s liable to find a permanent home in my craft space.  The 3D Foam Creative Embellishment Kit fits the bill. You can glitter it, emboss it, color it and even top it – as in snow!

Snow Flurry Card by Terri Burson for Scrapbook Adhesives by 3L

Snow All The Things

To begin, I grabbed some inexpensive iridescent bagged snow.   I trimmed my creative embellishment sheet into a slope shape, peeled the lining and pressed it into the snow.  Once this was applied to my card panel, I used scissors to trim the ragged edges.

Snow Flurry Card by Terri Burson for Scrapbook Adhesives by 3L

My Stampendous snowman needs a little frost, don’t you think?  I applied glue from my Dual Tip Glue Pen along the entire left edge, then sprinkled with crystal glitter.    It’s a great way to Wear Your Adhesive On The Outside!

Snow Flurry Card by Terri Burson for Scrapbook Adhesives by 3L

After heat embossing my sentiment, I adhered the scenic panel to my top fold white A2 sized card using my E-Z Runner® Grand Refillable Dispenser and E-Z Runner® Grand Ultra Strong Refill cartridge popped in.  I rely on this combination to securely adhere my watercolor panels.

Lastly, I added lots and lots of tiny snow dots to my distress ink blended background on watercolor paper.  A white gel pen is great for this.  Make sure your background is completely dry, or your white gel will turn the color of your background!

Snow Flurry Card by Terri Burson for Scrapbook Adhesives by 3L

Give these fun techniques a try and let the kids help with the snow!  If you’d like more information on the products that I used, stop by my blog at Waving My Wand.

See you next time,
Terri

Creative Time: 30 Minutes
Skill Level: Intermediate

Materials Needed:
Scrapbook Adhesives by 3L®

3D Foam Creative Embellishment Kit
E-Z Runner® Grand Refillable Dispenser 
E-Z Runner® Grand Ultra Strong Refill

HomeHobby by 3L®
Dual Tip Glue Pen

Other:
Stampendous stamps/dies, Spellbinders die cut machine, Neenah cardstock, Strathmore watercolor paper, glitter, decorative snow,  We R Memory Keepers trimmer, Sakura Gel pen, Brutus Monroe embossing powder, Scrapbookcom white pigment ink, Ranger Ink distress ink and blending tools, Marvy Uchida Brush Markers, water brush, Colorbox dye ink

Pin It!

Snow Flurry Card by Terri Burson for Scrapbook Adhesives by 3L Pinterest