You are in our US store • Switch to Europe store

Creating Polka Dots Background with Adhesive Dots Large Repositionable

Hi there, I want to show you how I created a polka dots background using Adhesive Dots Large Repositionable. A fun twist to using adhesives with spray paint for an interesting background!

Let’s get started with my little tutorial for you…

First, on a 20 x 20cm piece of watercolor paper, I applied the Adhesive Dots Large Repositionable randomly.

Then I sprayed paint in a dark color over the Adhesive Dots Large Repositionable until I had my desired look.

Let it dry.

When dried, I pulled off the Adhesive Dots Large Repositionable…such a fun background!

Then I adhered my pieces of scrapbook papers, photos and elements with the E-Z Squares® Refillable Dispenser. Gave the page final details by adding sticker and washi tape.

Thanks for visiting us today!

Have a great day!
Stephanie

Scrapbook Adhesives by 3L® Supplies:
Adhesive Dots Large Repositionable
E-Z Squares® Refillable Dispenser

Quick Treat Bags with Adhesive Sheets

Hello everyone! It’s Judy here today to share some very quick treat bags using Adhesive Sheets 4 x 6ʺ .  These are meant to be a last minute quick project for a spur of the moment gathering! Of course, they can be made ahead for such a purpose!

I was inspired to make these after a weekend at the lake with family.  My sister put together treat bags for everyone with candies and assorted goodies.  Everyone enjoyed them!

Simple is key for these bags!  The Kraft bags I used  are 4¾ x 7½ʺ and the Adhesive Sheets 4 x 6ʺ were the perfect width.

I applied Adhesive Sheets 4 x 6ʺ to back of 6 colors of cardstock. One was used for the die cut “For You” and the others were cut into strips. See HOW TO USE ADHESIVE SHEETS FOR DIE CUTTING AND MORE video below for a quick tutorial…

Various strips were fastened to each Kraft bag. (Tip: I put the bag with strips through my die cut machine with embossing sandwich to firmly secure.) I added white faux stitches with a pigment pen. The die-cut verse is fastened on top.  I added an extra strip of color cardstock across bag top.  The bag is stapled shut over a white tag.   These can be made with any combination of colors or even patterned papers.

For me, summer is all about outdoor activities with not much time for crafting.  So I have to make quick projects.

Happy crafting,
Judy

Scrapbook Adhesives by 3L®:
Adhesive Sheets 4 x 6ʺ
Other: Bright Colored cardstock; Kraft Treat Bags; Spellbinders Simply Said Phrase Set Two; White Cardstock; White Pigment Pen

Save

Hello there, Summer Layout with Layers + Dimension

Hello everyone, Jana here with a new layout with layers and dimension, using 3D Foam Squares – White Small and Crafty Foam Tape White. We have a little pool in our garden and my little one loves to jump in! I had so much fun watching him so I took some awesome photos. Here you can see one of them!

I started by cutting out a lot of scalloped borders from different patterned papers to create some “waves.” The idea came from the black scallops design and I ran with it 🙂

Watercolors and splatters in the background were added to give it more of the water look and its movement.

I used my E-Z Runner® Grand Dispenser to adhere the strips down. But i also added some stitching to them for accent.

Thin 3D Foam Squares were added for a subtle layer of dimension. I used my favorite Crafty Foam Tape under my photo and paper layers to pop it up.

3D Foam Squares were added to all the die cuts and elements –  just love all the dimension on this layout!

The final touch was some sequins! I used some Dodz Adhesive Dots Mini to get all the little sequins onto my project.

I TOTALLY LOVE how this turned out and had a lot of fun!

Thanks for stopping by today!

Scrapbook Adhesives by 3L® Supply:
E-Z Runner® Grand Dispenser
Dodz Adhesive Dots Mini
3D Foam Squares – White Small
Crafty Foam Tape White
Thin 3D Foam Squares

Other Supplies:
Authentique Paper; Simple Stories; Crate Paper; Pinkfresh Studio; October Afternoon

Paper Sparklers Featuring Premium Double-Sided Tape

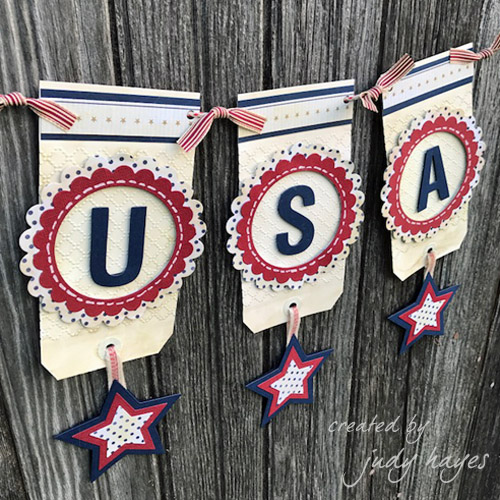
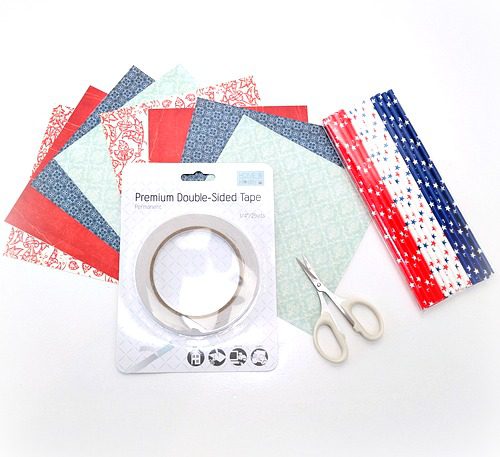
Hi friends! Dana Tatar here today sharing how to quickly put together paper sparklers with Premium Double-Sided Tape 1/4″. If you’re looking for a fun patriotic paper craft to help occupy a group of kids during your Independence Day celebration, this is a good one!

Paper Holiday Sparklers Tutorial by Dana Tatar for Scrapbook Adhesives by 3L

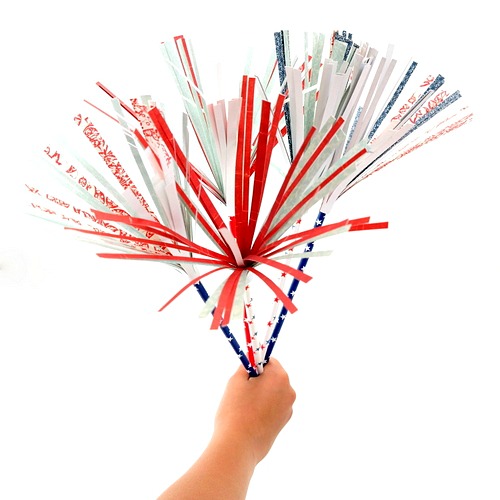
The supply list is short, the steps are easy to follow, and this project is great for kids of all ages. Maybe more importantly, exposed skin, long flowing hair, and clothing or other flammable fabrics are all safe with this paper version of the festive firework.

Making Paper Sparkers

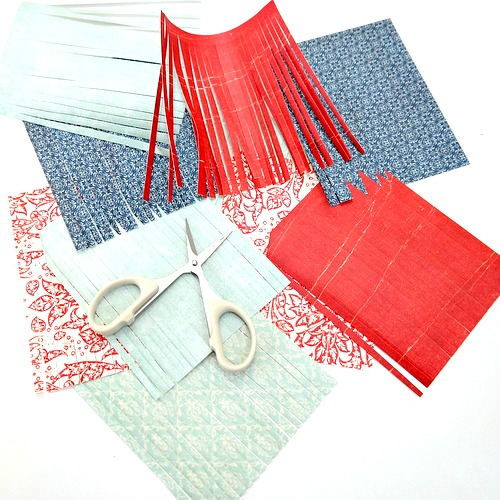
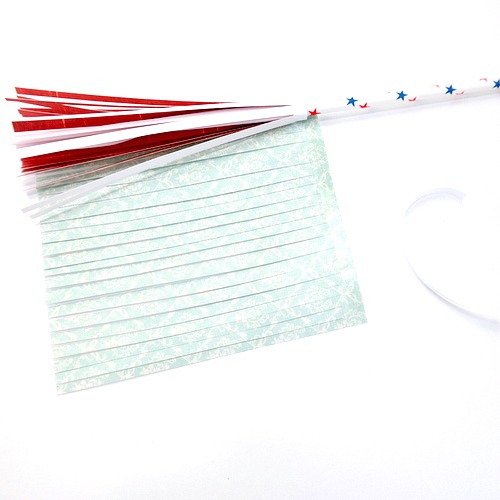
Step 1: Cut the red, white, and blue patterned papers to measure 4 x 5 inches. Use scissors to cut narrow strips into the paper pieces. Leave a 1/4 inch strip of paper along the top edge of each piece of paper uncut.

Note: Cardstock, vellum, gift wrap, or specialty glitter paper would also work great. Use what you have on hand.

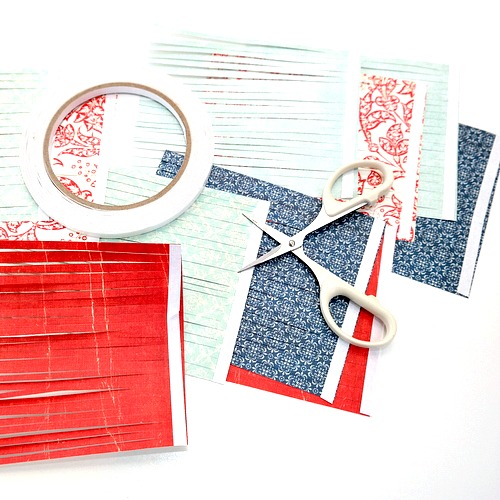
Step 2: Apply a strip of Premium Double-Sided Tape 1/4″ across the uncut portion of each piece of fringed paper.

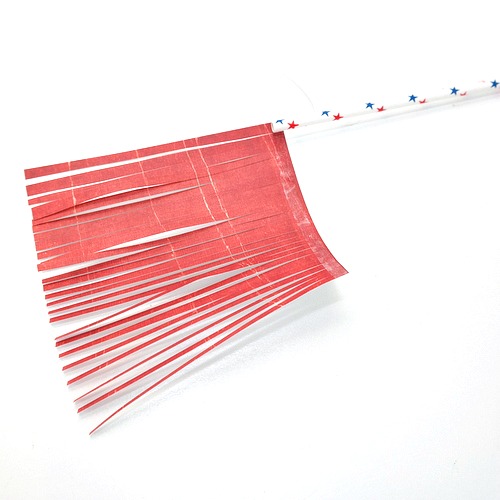
Step 3: Remove the paper liner from the strip of Premium Double-Sided Tape 1/4″. Place a straw on the tape at the edge of the patterned paper and roll, pressing firmly, until the paper is wrapped around the straw.

Step 4: Remove the paper liner from the strip of Premium Double-Sided Tape 1/4″ on a second, contrasting color, piece of patterned paper. Place the straw from the previous step on the tape at the edge of the patterned paper and roll, pressing firmly, until the paper is wrapped around the straw.

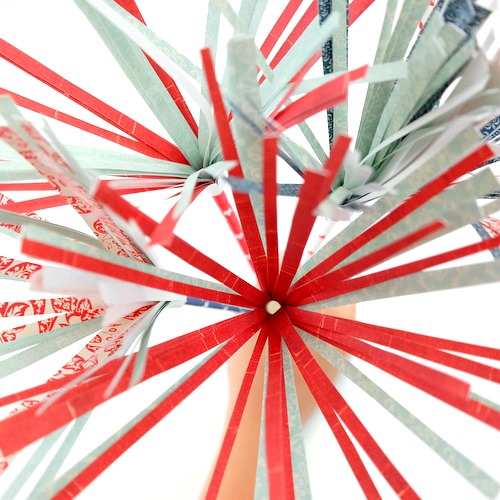
Repeat this process with the remaining paper and straws. My paper sparklers were thoroughly kid-tested. The permanent bond of the double-sided tape is strong and will hold up to rough handling. These festive paper sparklers also make great centerpieces!

Thanks for stopping by today!
Dana

Supplies:
HomeHobby by 3L Premium Double-Sided Tape 1/4″
Others:
Red, White, and Blue Patterned Paper (Pink Paislee); Festive Paper Straws; Scissors

Creating Mixed Media Artist Trading Cards (ATCs)

Hello everyone, Lea Biccelli here! I am very happy to share my creations with you as part of the Guest Designer Team for the next several months. For my first project, I made a mini set of mixed media Artist Trading Cards (ATCs).

Set of Mixed Media Artist Trading Cards by Lea Biccelli for Scrapbook Adhesives by 3L

I cut a total of four rectangles (2.5 x 3.5″): two from a strip of canvas already painted with the watercolor from a previous project, and two from plain white cardstock.

Adhere the canvas and white cardstock together using Premium Double-Sided Tape Permanent 1/4″ to make two strong base for the ATCs.

Next I applied a combination of Adhesive Dots Micro and Dodz Adhesive Dots Medium randomly on the cards.

After removing the protective film (liner), I poured over brown embossing powder, tapped off the excess and heat embossed. I loved how it turned out with its wonderful dimensional effect. Then I stamped and added some splashes of white acrylic paint. The background is ready!

Now the FUN part…to compose my design! Glue half of a circular chipboard with Dual Tip Glue Pen. Its applicator tips (a fine tip and a wider tip to cover larger surfaces) is so useful for what I wanted to accomplish. I also added a scrap piece of doily with Premium Double-Sided Tape Permanent 1/4″.

I used strips of patterned paper and small painted canvas scraps to create the center of the card. Then add a heart shaped embellishment on top. I used 3D Foam Squares – White Mix to attach the ensemble to the card.

For the finishing touches, I added words, sequins and white rope to frame the heart.

Set of Mixed Media Artist Trading Cards by Lea Biccelli for Scrapbook Adhesives by 3L

That’s all I have! Hope you like my little project … xoxo

Scrapbook Adhesives by 3L®:
3D Foam Squares – White Mix
Adhesive Dots Micro
Dodz Adhesive Dots Medium
Premium Double-Sided Tape Permanent 1/4″
Dual Tip Glue Pen

Organize Your Crafting Space with Adhesive Dots Large Repositionable

Need help to organize your craft space? Hi everyone, it’s Christine here today with an idea to help organize your crafting space with a little help from Adhesive Dots Large Repositionable.

It doesn’t take long to amass lots of craft items and we all look to different ideas for storage. Clip boxes are ideal but I often forget as to what was inside each box. I definitely need a combination of Adhesive Dots Large Repositionable and labeling!

Organize your craft supplies by Christine Emberson

Let’s Organize!

First I typed out the contents of each box on my computer and printed it out onto cardstock.  Then I die cut each label.

The labels are affixed with the Adhesive Dots Large Repositionable.  This means I can move and re-stick my labels whenever I need. But don’t be fooled, these labels stay in place firmly until you want to move them, and then re-stick without additional adhesive.

How about embellishing your labels with cute little flowers?  You can easily affix them with 3D Foam Squares White Small Size. Customize your craft space decor and stay organized – that’s the beauty of this idea 🙂

Now that all my boxes are labeled, it will definitely save me some time when crafting. Perhaps I should label my kids’ cupboards and they might put their stuff away! One can always wish! LOL!!

Thank you for stopping by today and don’t forget to check out the brilliant products on the website.Christine

Products used:
3D Foam Squares, White Small
Adhesive Dots Large Repositionable
Others:
Dies: Spellbinders Paper Arts (Labels Four)
Ivory and Blue Cardstock; Printer; Gemstone.

Save

Save

Save

Baby Love Card using 3D Foam Stars

Hey there everyone! Latrice here today with a baby girl themed card for you. Today I was set on creating a simple card with 3D Foam Stars, patterned paper and a die cut. It seems like lately everyone is having babies around me. This mommy is all done, but it’s so fun to make cards for all my expecting friends.

First off I gathered the adhesives I wanted to use. I chose the E-Z Runner® Permanent Fine Adhesive Dispenser, HomeHobby Dual Tip Glue Pen, 3D Foam Stars and the Thin 3D Foam Squares – Mix White. I then chose a couple pink glitters for fun.

To give those stars some shimmer and to WEAR YOUR ADHESIVES ON THE OUTSIDE, peel the liner from one side off and press glitter into that exposed side. I did a couple in each shade of pink.

Next I chose some paper and cut those pieces down to the desired thickness. I trimmed any excess off after adhering them down with my E-Z Runner® Permanent Fine Adhesive Dispenser and the Thin 3D Foam Squares – Mix White.

After getting all that paper down I then adhered the die cut using the HomeHobby Dual Tip Glue Pen and finished the card off with the stars and some twine.

This was a fun card to create. You just have to love glitter! Send in a matching envelope and your soon to be my my friend will love it.

Scrapbook Adhesives by 3L® Supplies:
E-Z Runner® Permanent Fine Adhesive Dispenser
3D Foam Stars
Thin 3D Foam Squares – Mix White
HomeHobby Dual Tip Glue Pen
Other:
Authentique Paper; Silhouette Cut Shapes; Glitter and Twine from SRM Stickers; American Crafts Cardstock

Latrice

Best Day Ever Scrapbook Layout featuring Adhesive Lines and 3D Foam Squares

Hi there crafty friends! Have you been doing some traveling this summer (or even spring) Maybe you even have some Disney pictures to capture!?! Christine joining you today with a Disney layout highlighting three of my favorite adhesives: Adhesive Lines, 3D Foam Squares, and E-Z Runner® Micro Refillable Dispenser! So let’s get started!

Disney Scrapbook Layout featuring Adhesive Lines, Foam Squares, and E-Z Runner by Scrapboook Adhesives by 3L

Throughout this layout I consistently used these three adhesives. The Adhesive Lines are amazing for attaching all those chipboard frames to the layout!

I like that these are an inch long and help speed up the process. And of course, you can’t go wrong with how strong they are!

Adding dimension in is always easier with 3D Foam Squares – White Mix. I primarily used the small ones because of the size of elements I was working with. Sometimes I needed even more height and in that case – I stacked two of the squares on each other.

Look at all that dimension!!! The E-Z Runner® Micro Refillable Dispenser also came into play as I used it to add my title onto the layout. I created a process video to walk you thru how I used all of these adhesives so visit my blog, CLICK: Magical Memories Day 5 Giveaway to check it out and giveaway details too!

Scrapbook Adhesives by 3L® Supplies:
Adhesive Lines
3D Foam Adhesive Squares – White Mix
E-Z Runner® Micro Refillable Dispenser
Other:
Patterned Paper, Stickers, Chipboard and Die Cuts: Simple Stories; Enamel Dots: Doodlebug Design

Save

Patriotic USA Tag Banner Tutorial

Hello everyone!  Today, I’m sharing a USA banner in honor of the 4th of July. I’ve used Crafty Foam Tape Black and 3D Foam Squares White Mix, 3D Foam Squares Black Mix to add dimension. Each pendant is a #8 manila tag turned so the hole is at the bottom where a star dangles.

Patriotic USA Tag Banner Tutorial by Judy Hays for Scrapbook Adhesives by 3L

Making the USA Tag Banner

To recreate this banner, first paint each tag white,  then emboss and distress with stain.

Next fasten strip of navy card stock and star paper across bottom of tag which will be top for banner using E-Z Runner® Ultra Refillable Dispenser.

Cut scalloped open circles from dot paper and red cardstock. Use same inner circle and different size scallop circles. Fasten together using E-Z Dots® Permanent Refillable Dispenser. Distress with stain. Apply 3D Foam Squares White Mix to back. Fasten to tags.

Cut U S A letters from navy cardstock. Apply pieces of Crafty Foam Tape Black to back of each letter. Fasten each letter to tag.

Cut 3 different sizes of stars: 6 of navy, 3 each of red and dot paper.  Fasten dot, red and navy stars together using E-Z Dots® Permanent Refillable Dispenser. Other navy star is for back. Apply 3D Foam Squares Black Mix to center of navy star for back (3D Foam Squares add dimension to star).  Add Adhesive Dots Mini to each point. Fasten to layered star leaving one point unfastened.

Insert trim into tag hole. Fold and fasten ends together with Extreme Double-Sided Tape ¼ʺ. Wrap a piece of Extreme Double-Sided Tape ¼ʺ over trim end so tape is on both sides. Insert trim between points of star and fasten together over trim.

Finally, punch holes on each side of tag top. Thread cord through holes. Tie short ribbons between pendants and at each end. The banner is ready to display!

Have a happy 4th of July!
Judy

Scrapbook Adhesives by 3L®:
Crafty Foam Tape Black
Adhesive Dots Mini
3D Foam Squares White Mix
3D Foam Squares Black Mix
E-Z Dots® Permanent Refillable Dispenser
E-Z Runner® Ultra Refillable Dispenser

HomeHobby by 3L®
Extreme Double-Sided Tape ¼ʺ

Other: Authentique Paper Seafarer Eleven; Photo Play Let Freedom Ring; Spellbinders Circles, Stars, Alphabet dies; Sizzix Texture Fades; Tim Holtz Trimmings;  Ranger Distress Stain; White Craft Paint; Stripe Ribbon, #8 Manila Tags; Cardstock: Navy, Red

Visit our Website and Blog!
Sign up for our Newsletter so you never miss a contest or giveaway!

instagram purple icon facebook icon purple pinterest purple icon twitter purple icon YouTube icon blog subscription purple icon

Simple Gift Card Holder with 3D Foam Squares + Extreme Double-Sided Tape

Hello friends, Latisha with you today. I am sharing these cute little gift card holders.  They were created with pattern paper, a die, Extreme Double Sided Tape and 3D Foam Squares. These also make perfect little envelopes for sweet notes, and what a great addition when giving someone flowers!

After the paper has been die-cut and scored, I applied Extreme Double-Sided Tape 1/8″ to the tabs. This adhesive will ensure that the envelope stays put – this tape is strong!


Next, I added 3D Foam Squares White Small to the backs of the die cuts. Just peel of the protector (liner) and place them on the front of the envelopes.


Here you go, a few “easy to make” gift card holders/little note envelopes! So cute and the perfect way to hide a note or to give a gift card.


Scrapbook Adhesives by 3L® Supplies:
3D Foam Squares White Small
Extreme Double Sided Tape 1/8″
Strong:
Patterned Papers and Die Cuts: Fancy Pants Designs
Etched Die: Lawn Fawn